VaughnT
Members
-
Joined
-
Last visited
Everything posted by VaughnT
-
What a great opportunity. Rather similar to how I met the guy that ended up getting me into blacksmithing. Never got any tools from him, but I spent many an hour forging in his shop. I'll look forward to hearing of your future adventures.
-
Since I'm forbidden from accessing the other thread, I thought I'd put up this dandy video for general consumption. I really enjoy hunting for videos of old smiths in far off Europe. Youtube is thick with them, but you have to hunt hard to find the good ones. Anyhow, here's a great video from a recent hunt on youtube. The guy's nail-forging station is simple and easily replicated. Forging the ox shoes looks like it would be a test, though!
-
Looks like a home-made anvil. While there are a lot of hornless anvils, I've never seen a mass-produced anvil that had such a thick, but unsupported heel. That's a mighty long cantilever for the heel, and I don't see any indication of a faceplate being welded on. More likely it was cut from a thick billet with a plasma cutter. Still a mighty fine anvil and one I'd be happy to have in the shop.
-
I'm in the planning stages of my next gas forge and have decided to go with the doghouse style because I have the material on hand. I found a design that i like, but there seems to be a disconnect in my brain and the arithmetic isn't working. Seems like there's some fancy trigonometry or such going on, or maybe I'm just not seeing what I should be seeing. I really like the ridge lines on the shell and would like to duplicate that look, but for the life of me I can't figure out how to lay it out. Assume that the inside chamber measures 9x11. You then have what appears to be 2" of insulation. That puts the outside walls at 13" apart at the base and 15" tall. But, how does that translate into a the length needed to form a faceted parabola like in the picture? Thoughts?

-
It'd be small potatoes to create a shield for the threads that still allowed access to the nut. Of course, everything would depend on what you plan on doing with the vise. Were it I, there'd be a stop block and rack of teeth attached to the fixed leg so it could be used to upset and form rivets.
-
Truly. But, the key feature is the speed of closure and the ability to keep your hands free to work the metal and tools.
-
If you use a threaded portion and nut on the back of the fixed jaw, you can adjust the opening of the jaws to fit specific sizes of stock. Right? The way you have it set up now, the vise opens all the way and then has to be closed all the way. With a threaded end, the cam and moving jaw stay in the same position relative to each other, but the amount of travel is reduced to just what is needed to clear the metal you're trying to hold. Does that make sense? Seems like it does to my mind.
-
Looking forward to seeing what you come up with, Dave.
-
Frosty, the heel end notch serves much like a pritchel hole and supports the work while you drive the hole through. The ends of the heel are sharpened to varying degrees to create a built-in fuller and hot-cut. Here's a good link to a thread Bogdan did some time ago. He's definitely handy with a hammer! http://www.bladesmithsforum.com/index.php?showtopic=25866 I've been wanting one of these anvils for a long time. Very neat design and would be great as a demonstration anvil or for making blades.
-
How common are good anvils in NZ? That PW looks to be in great condition, almost like new, so feel good about buying it regardless of the price. It's not like it's going to wear out any time soon, so you can always factor the cost over the number of years you'll have it.
-
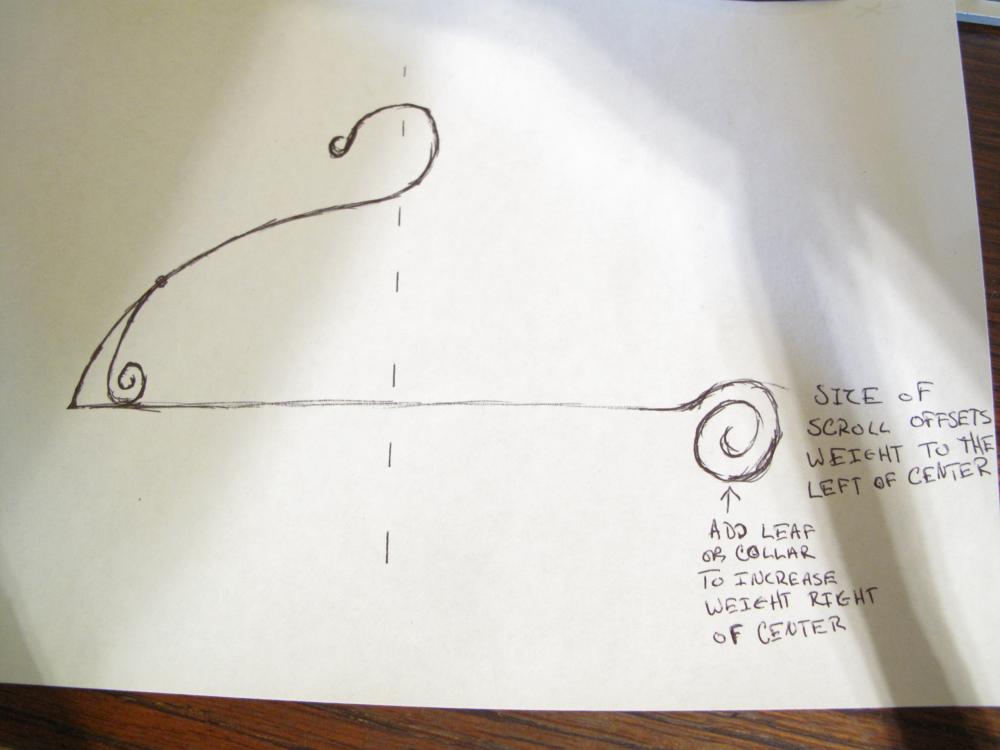
Because you're dealing with a cloth that spans the entire length of the hanger, you'll need that cloth to help design the hanger. The weight of the cloth will play a huge role in how the hanger hangs and where you need to place decorative counter-weights. I would make up a handful of small scrolls and leaves, then fasten them to the hanger with clothespins. That way you can move things around however needed when the cloth is in place. Take a few photos of the final solution just in case things get knocked around on the way back to the shop. Just remember to keep the design fluid and graceful.
-
The weight of the cloth is spread out over the entire length of the hanger, so some of it will be on both sides of the centerline. As such, incorporating a decorative scroll or some leaves to add metal/weight to the high end when it's hanger is on the bar will be more than enough to balance things out. The way you have it drawn, you're placing the hook well to the left of center, and I'm not sure I understand why this has to be a design feature. Regardless, I wouldn't simply scrunch up the metal to create a counterbalance on the high side. Looks ugly and amateurish. Scrolls, leaves, spikes and collars will add weight and look attractive.
-
Is there some reason you need to buy a brand new anvil? I had my Fisher anvil shipped from Massachusetts to South Carolina for only $200. While it's not a pristine anvil, it's pretty darn close and I certainly haven't been hampered by the rough edges. Total cost was still under $3/lb. If I had $1200 to spend on an anvil, I could have one inside of a week just by browsing eBay and arranging shipping through u-ship.com or someplace similar. As for the swage block, it would probably be easier to have one cut for you. Finding an old one that's in good shape and has the cut-outs that you want.... it can take awhile!
-
1045 in a 6x12 chunk would make a great anvil. If you know anyone on the local volunteer fire department, you might be able to get them to quench the hot metal with their fire hose! It takes a lot of gallons per minute to blast through the steam jacket and cool the steel. It's definitely worth it, though. If you can get more 1045 chunks, you could retail them as blade smith anvil, jeweler's anvils, etc. There's definitely a market for them.
-
I always like to thin my Boiled Linseed Oil substantially so it will soak into the wood more easily. As soft as pine is, the ambient humidity and lack of air flow will cause rot and bug issues even though it's stuck in the garage. It certainly doesn't hurt to give it a good painting with some BLO. Not only does it darken the wood and make it look "not new", but it helps to prevent bugs and rot from happening.
-
Beautiful!
-
On something that size, I'd use an arc welder and lay down a nice thick bed of hard-facing rod. Make sure you get the kind of rods that are impact resistant, not abrasion resistant. If you pre-heat the metal, you should get a very durable surface that's around a Rockwell 50-55. If you can get such a large chunk of iron for a decent price, you'll have a great post anvil. And later down the road, you can use it as the anvil for a power hammer. Definitely a wonderful find. I'm jealous!
-
The sword isn't the problem, your attitude is. The sword is simply a physical manifestation of the problem. You acknowledge that you're an entry-level smith, but you insist on trying to make master-level projects. Then you get upset when you can't achieve success at it. While it's a bit insulting to sword-makers that you'd think sword-making is so easy that someone with your tooling and experience could make one, the truth is that you let your ego overrule what reality was telling you. While a master smith could probably use your shop to make a sword, that's only because they're masters at the trade and know things from years of experience. You, on the other hand, were behind the eight ball from the word go. Until you recognize your own deficiencies, you can't get better at this trade or any other. As for your knife, since you asked, it shows that you are more than willing to accept excuses, take shortcuts and find contentment with sub-standard results. Even assuming that the blade is made from a quality alloy, there is absolutely zero excuse for the handle. Note my words posted before you put up the pic. "The knife you made looks like crap only because you refused to take the building step-by-step and do everything to perfection. Instead, like the sword, you tried to force things, rush things, and accept excuses for the shoddy workmanship that you knew you were putting into it." Of the 10,000 knives you've seen pictures of, knives made by craftsman that take pride in their work and follow through from one step to the next, not one demonstrates lines like you've put on your handle. You knew this, yet you continued on, assembling and glueing up the handle so you could claim a finished knife. Why? Why did you quit halfway through making the handle? Why did you continue when you saw that huge chink in the lines of the middle section? Why didn't you simply replace the handle wood with some new stock and start over? Why the rush? You had to know that the end product wasn't going to be as good as it could be. You had to know that all it would take was another tree limb and a few minutes with a rasp to come up with a new handle that had better lines. But you kept on with what you had. Why? What excuses did you accept to justify the results? Wore your rasp out? Ran out of sandpaper? Broke your last file fending off a badger? You see, something stopped you from throwing that handle away and starting over. That something is the real problem you need to address. You're 19 years old, have access to files, rasps and sand paper.... yet you rushed through the project and happily justified the results.
-
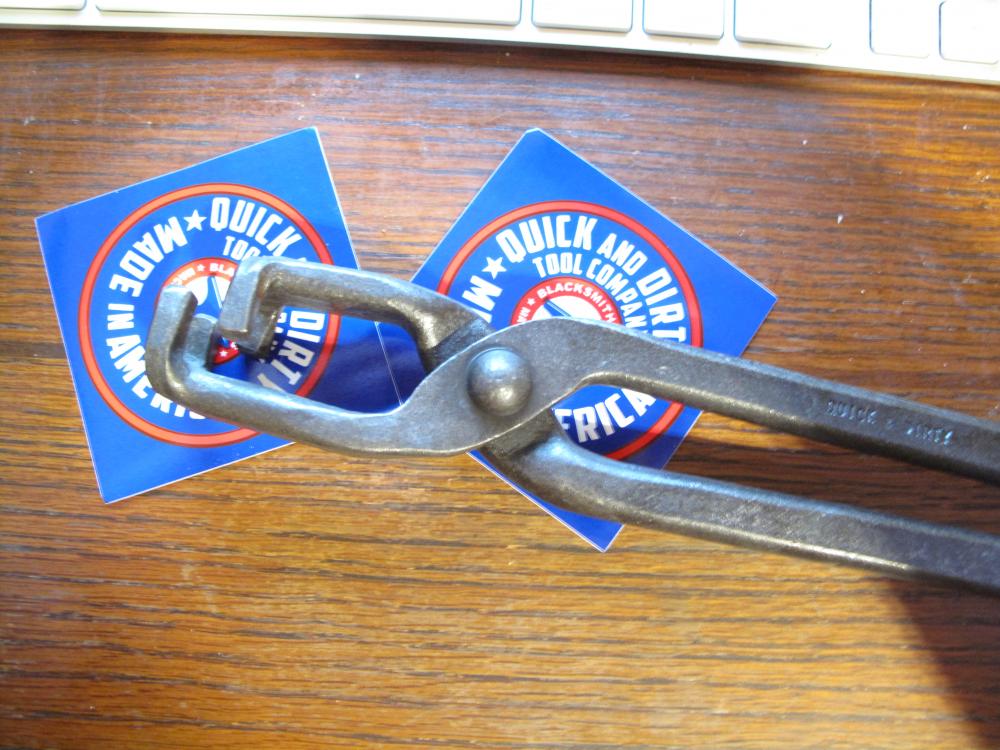
I prefer something that wraps all the way around the bar stock so the stuff doesn't flip out on me. I recently purchased some rather nice tongs from Quick-n-Dirty Tool Co. While they're listed as 1/2"x1", they hold any 1" stock I've put in them, all the way down to 1/8". So that's, what, four pairs of tongs in one. Definitely a very good set of tongs and I love how they wrap around the metal. For blades that have stick tangs, I find myself reaching for my 1/2" v-bit bolt tongs more often than not. The tang is usually narrow enough that it fits caddy-corner in the jaws of the tongs and holds quite well. I haven't found anything really "ideal" for holding on to a tang that isn't parallel-sided.
-
No, I didn't misunderstand anything. You said you were feeling down in the dumps and needed a boost. I asked you to better explain where the problem was because you seemed to be upset about achieving exactly what you set out to achieve. When you say things like, "But I'm starting to wonder if its just worth it to sell it off, make back some money, and leave this behind me. extra 200 would help for college." That means you're upset and frustrated and thinking about quitting. Okay. Why? Why are you feeling down in the dumps? You said, "I know I took on a big project that most smiths don't even attempt. And I know I worked a steel that most smiths wont even touch. And I know I'm still a newbie. and prideful, and ambitious" Not one bit of that is the recipe for success, yet you're down in the dumps because you didn't achieve a success. Therein lies the problem, hoss. You admit that you're a newbie, and that's okay. We all were at one point. Being ambitious certainly isn't a problem because that's what keeps you going, learning new things and bettering yourself. Being prideful, however, can be a real killer when you allow it to blind you to reality. Your original post verily reeks of hubris. You knew from the first minute that you weren't really qualified or geared up to make a sword, but weren't going to let that stand in your way. Then, when things don't work out and the sword doesn't materialize... you're upset and depressed. Am I missing something? My question to you is simple : why are you upset and thinking about quitting the trade when you achieved the only logical outcome? If you want to be successful, and find pleasure and satisfaction in smithing, you need to recognize your limitations and work within them. As you grow and learn, your limitations become fewer and you can do some really neat things. However, if you continue to accept shoddy workmanship, short cuts, over-reaching, etc, you'll continue to be disappointed and depressed with how things turn out. Step back and focus on the fundamentals. Make a hundred nails, trying your darndest to make each hammer blow perfect. Compare Nail 1 with Nail 100 and see how you've improved. Then make a hundred leaf key fobs. Again, focus on the fundamentals and make each strike as perfect as you can. Then sit back and compare Leaf 1 to Leaf 100. As you grow and learn, your projects will become larger and more complex. But remember what the wise man once said, "A man's got to know his limitations."
-
Sanding sealer is the way to go. You can make your own by thinning out varnish, say 4:1. The key is to block some of the tubes in the end grain so they can't suck up the stain. On pine, I find it's best to coat the entire wood in a thinned down sealer and then give it a light sanding. This prevents the stain from going on blotchy or really darkening the growth rings of the tree.
-
Don't forget to calculate how much room this tool-holder is going to take up. That's a small press and you don't have much throw to sacrifice. By the time you add up the thickness the anvil plate, and the tool, and the tool holder..... well, just how small a chunk of steel will you be able to fit between them?
-
-
I don't understand why you're upset. You did everything possible to set up a failure, and then you achieved a failure. Where's the problem? Now, if you wanted to successfully make a sword, you would have, or should have, set yourself up for success. You didn't do that. More importantly, you knew you weren't doing that. So where's the problem? It might sound rough to say it out loud, but there's the facts. You thought you could just buy any old chunk of steel, and knock out a passable sword using the very limited equipment and knowledge that you have. And you pretend to be surprised when life doesn't cooperate with your dreams. Bottom line is that you've got only the most rudimentary tooling and knowledge, but think you're qualified to make the highest level stuff. That's hubris, in my estimation, and often goes before the fall. "I'm a mediocre smith. I made a knife last year, it looks like crap but its pretty good..." Hmmm, why does your knife look like crap? If I was to infer from this comment, as well as your tale of sword-making woe, I'd say that you don't actually apply yourself to the task at hand. You freely admit that you're a mediocre smith, but you're already trying to make knives and swords? The knife you made looks like crap only because you refused to take the building step-by-step and do everything to perfection. Instead, like the sword, you tried to force things, rush things, and accept excuses for the shoddy workmanship that you knew you were putting into it. All throughout life you'll find that success only comes from hard work and applying yourself to the task at hand. You could have started smithing by making a bunch of hooks, scrolls, shelf brackets, and other such stuff. Each of those little project could be taken to the highest level, straining for a perfect finish, and learning with each one made. And each one leads you to more and more knowledge, skill and experience. After the hundredth hook, you probably would have found yourself selling a few here and there to offset your smithing hobby. Instead, you just right into the deep end of the pool and can't figure out why you're sitting on the bottom struggling for air.
-