VaughnT
Members
-
Joined
-
Last visited
Everything posted by VaughnT
-
Certainly worth the price, if it all comes as a set. It looks to me like someone used modern steel to create a set-up that looks like something from medieval times. I've been wanting to do something similar as a stand-alone nail making station. Is it usable? Absolutely. You need to remember that vikings were using similarly sized anvils, or granite boulders, for their anvils, and they were able to create some truly wonderful ironwork. If you apply yourself and have patience, there's absolutely no reason you couldn't duplicate the quality of olden times. If you're into making knives, such a set-up would be very good for forging out the blades. You really don't need much of an anvil as long as it's firmly tied to the earth and doesn't jump around with every hit of the hammer.
-
Definitely a gorgeous anvil! I'd use it as-is for the next year so you can learn what you need and where you need it. Horns are rather over-rated and a small bick can be chucked into a vise if you need to make a bend in something. The radiused side of the anvil will be more than enough for drawing stock out, and I prefer a selection of pipe sections for making bends because they're a uniform radii. If, in a year, you really find that a horn or hardy hole is a "must have", cypher out the best way to add one. Until then, no sense in making work for yourself.
-
Just because that thing has a blower attached to it doesn't mean you have to use that blower. Build a simple box bellows and plug it into the airway. A day's labor and a few "quid" for some lumber... and it's all together except for joining it to the forge. I certainly wouldn't get rid of such a nice forge. Very nice bit of kit, even if that shade of blue is a bit on the ugly side.
-
-
Remember, Seek, you can always shrink a handle that's too big, but you can't grow a handle that's too small. Start with a standard sledge-hammer handle, or hoe handles, something you can easily source at the hardware store, and sand/file/rasp until you find that comfort point that balances controllability and comfort. No varnish or polyurethane to coat them. No fancy carving that looks cool but causes hot spots and blisters. Simple, clean lines that speak to the spirit of the working man. Half the fun is in traveling the path and discovering new things.
-
I'm trying to think of a simple way you could build a ratchet and cog into the foot pedal so you simply step on the pedal and lock the vise closed. Seems like it should be relatively easy, but.... If you're only going to be working a small range of stock sizes, it might be that you can build in some automatic stops at given thicknesses. Maybe something like a toothed cooking trammel. Of course, it's late and I need to get some sleep, so I might not be thinking too clearly! I am thoroughly enjoying watching it all come together, though. Makes me kind of proud to have played even a small part in this adventure.
-
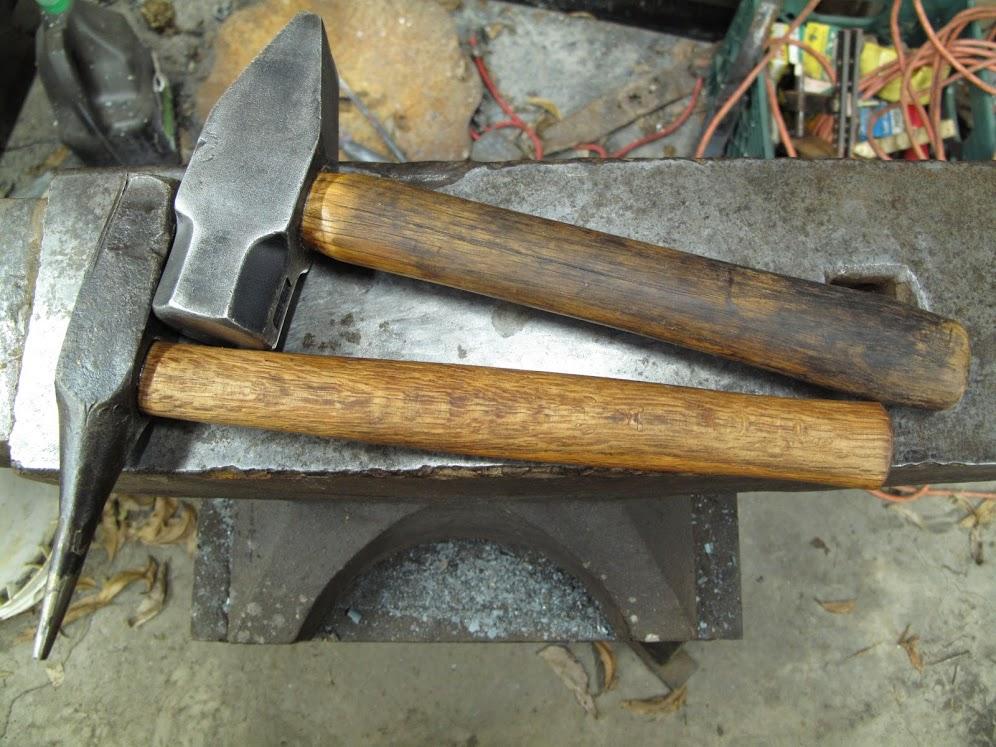
I prefer a sledge-hammer handle as opposed to the spindly little handles most folks call a hammer handle. While I don't mind the swell on most of them, I don't like how thin they get right under the head. Doesn't make much sense to have it thick where you grip it some times and then thin where you grip it other times. Or maybe I'm the only one that regularly chokes up on any hammer over 2.5lbs. Some folks like their handles to have a more square cross-section, but I've never had a problem with how store-bought sledge handles are shaped. I can get three shorter handles from a single sledge handle. All I do is take them to the wire wheel to remove the polyurethane finish, then paint them with really thinned down boiled linseed oil. In this photo, the handle on the punch is the OEM handle that used to be on the cross-peen. Far too small to help control a 3.5# hammer head, so I reached into my bucket of bits and bobs for a replacement. Night and day difference in how the hammer handles.
-
Looks like you've got some solid engineering there, Dave! My thinking is that the cam, when closed, should just barely pass TDC and kind of lock in place so you don't have to stand on the pedal while you're working at the vise. In the OP it looked like there was a short length of rod that would have propped against the stump and prevented the jaws from opening. If you have to stay standing on the pedal to keep the vise closed, you're rather limited in your ability to move around, grab another tool, etc. Sounds right, right? In your video, you've got the bearing hitting the screw by the time the jaws are fully closed, but how does it act when you try to grip some bar? Can you get enough weight/leverage on the jaws to securely hold some half-inch square for twisting? Can you adjust from 1/2" to 3/4" without throwing off the cam?
-
I listened to the entire thing even though I couldn't understand a word of it. Absolutely wonderful 30 minutes! I'll definitely be revisiting this link in the future.
-
Beautiful work, Ptree. It's got to be really neat to have an anvil like that!
-
I'd put a real hot fire under that griddle even after it's been sand-blasted. Better safe than sorry, and I'd want to burn out any nasties that might be down in the pores. Certainly wouldn't hurt to do a wash with muriatic acid (available at any home repair/masonry store) and then sand blast it again, and then put some serious heat under the thing. Of course, I'm a belt and suspenders kind of guy.
-
Ptree comes through in a big way! Big axles are hard to come by around here, but standard truck axles are a dime a dozen.....
-
A few of them in the pics seem to have spiderweb cracking and might not hold up long at all. With the freeze/thaw cycle of PA.... I'd wonder about any of them. Two layers of that fire brick, though, would make a dandy table for a coal forge. The clinker, scale and ash would quickly build up and fill the voids, helping to hold any cracked bricks together. I wouldn't worry about a "fire pot" with a brick table; I'd simply build up a moveable fence with more bricks so I could shape the fire how I liked. A 3" pipe nipple and end cap would serve to bring the air up through the two layers of brick....
-
For a few dollars, you can simply buy a quality bick from eBay. Yesteryear Forge makes some really nice ones. By the time you hunt around for a sizable chunk of steel, then burn some tonnage of fuel to hammer it into a round cone, then spend a few hours smoothing said cone down.... $60 + s/h doesn't look so bad. Personally, I'd be more inclined to spend the time hunting for pipe sections. I use all different sizes of pipe as mandrels to bend around because they give you precise, repeatable radii. You can't have enough pipe sizes, in my estimation!
-
I've been hunting for a nice barrel to act as a quench tub. Like anything else in the shop, looking good is half the battle, and a wood barrel just looks the part. Haven't found one, yet, though. Saw a fellow that had a half-barrel and it was oblong. Never seen anything like it before. Taking garlic oil pills is a great way to keep the mosquitoes at bay without spraying yourself down with something. I love the garlic too much to be dunking it in the quench tub.
-
You gents are fantastic. Lots of great info, and lots of different ways of accomplishing the same goal. Next time we meet, your first beer's on me!
-
Hard to say anything since we don't know what you don't like, or why, but I'll play.... Made from 1" square mild, cut about 1.5" long and hammered down a bit to shape it.

-
Let it rest for six months or so. You can ponder on it here and there, but don't dwell deep. There's no rush, so don't rush. Work on the totality of the image you want to present to the world. The web presence is critical, but letterhead, business cards, online photographs.... all these things come together in a synergistic fashion to create an impression of your work in the customer's mind. People buy the story more than they do the iron doodad, and they like to feel they're part of something neat. Learn how to take a good photo that displays your work in the best light. Work on how you want the business page to look, the general feel of things, and how the photos play with the sites background color and banner. Little details make a huge difference, and while you're working on how you present yourself to the world, you can ponder on the name and what you really want to say.
-
The biggest thing you need to worry about is how it comes across to the non-smith. Is it juvenile? Too mystical or ethnic? There's no rush, so take your time and think on it. You're fortunate to have a good family name that's easy to pronounce, spell and also works with the trade. Think long and hard on how you can use it to your benefit. Steer clear of botching the spelling. It's "works", not 'werx' or 'werks'! Bastardizing it doesn't make you tougher, stronger, more capable, sexier or richer. I make a point of never doing business with a company that does stuff like that simply because I find it too juvenile. It's like the barbwire tattoo around the bicep.
-
Incredible! I'd be giddy as a schoolgirl if I ran into a deal like that.
-
Without a doubt, it's got to be the 2x72 belt grinder. If you don't have one, you're really hamstringing yourself! Not a day goes by that I don't use it for something, and I'm always wondering how I ever did without it. There simply aren't words enough to describe how useful they are, even if you don't work with metal. I might sell off all of my tools and move into an apartment.... but that 2x72 is going with me when I do!
-
And, to be honest, if it was a good idea, you can bet that folks would have been doing it already since non-ferrous and dead-blow hammers have been around for ages.
-
I think it's a great idea for a bucking bar, but I'm not seeing any way to get it into place before you lose the heat. Riveting like that has always been a problem for me, so I usually resort to welding the back end and grinding/filing it smooth.
-
Bad videos are so easy to make! One thing I've noticed a lot of is.... ego. When I watch a video, I want to see a pro doing something. Watching an amateur hammer away on a chunk of railroad track, well, no. Yet, these folks have no shame and want the world to see them making a tomahawk out of a rail spike. Gary Huston is another one that makes good videos. He has problems with his camera switching focus on close-ups, but it's almost become his trademark and can be rather humorous. Definitely an accomplished smith and his voice-over work should be studied by anyone wanting to make a video. The British accent makes everything better.
-