VaughnT
Members
-
Joined
-
Last visited
Everything posted by VaughnT
-
Not crude in the least. Firstly, it's clear and legible, which is a win. Secondly, it looks like it was written by hand and that gives it far more style and elegance than what you'd get with something done on a laser or whatnot. The size, scale, line thickness, character spacing.... everything is spot on. It looks organic and original, fits the size and scale of the piece it's on, and I have no doubt feels great in the hand. That's a fantastic bit of work and you should be rightly proud -- especially since it's your first go. You hit it right out of the ballpark. Two thumbs up!
-
Very slick idea. Maybe instead of a magnet and the risk of magnetizing your tools, use some short sections of tubing to hold the chisels and loops to hold handled tools. Honestly, the only thing I'd do is to trim the end of the wood arm so it mimics the shape of the hinge. Purely aesthetic, but I think it would really tie the whole design together from a visual standpoint.
-
Exactly. It's easy to misread things or type something that sounds sensible in your head but doesn't come through to the reader the same way. So, everyone and their momma has ragged on the guy for endangering his child, in their estimation. Lord knows what they must think about transporting kids in automobiles - and, no, seat belts are the barest measure of "safety". What really chaps my hide is the dog piling as though everyone needs to say the same blessed thing. It's a picture of a kid having some fun with his dad. Congrats to both of them for spending time together. Or, we can continue the thread drift and possibly drive the guy away from the forum entirely. Kudos, HH, for being a good dad. Just remember, the next time you post a picture of your son helping you at the forge, make sure he's wearing a full aluminized suit like those guys at the steel mill.
-
Getting kids involved in your life is a good thing and I hope you keep it up. Better in the shop than stuck with their noses in their phones or the television! If you want something to really help, get yourself a copy of Paul Hasluck's "Bent Ironwork". While your kiddo is a bit small still, BI was written with widows and orphans in mind. It's a fun read and has a ton of valuable projects that folks can do because it's written around the idea of minimal tooling and repetitive curves. I love the book and consider it a genuine treasure in my library. For the pittance it costs, you really can't go wrong.
-
As a temporary solution to stop your anvil from bouncing around on the stump.... sure. As long as you understand this is just temporary. You want to be a blacksmith? Then forge yourself some nice hold-down spikes. Draw a long point on some 1/2" square bar, then fold it back on the main bar. Cut the whole thing free about 1" down from the bend, on the parent bar, creating an offset head that will hook down over the feet of the anvil. Chisel in some small teeth on the pointy part so it'll bite into the end grain of the wood better. Boom. You're done. Straps burn/melt easily. Chains look silly and get in the way. Part of being a blacksmith is forging your own kit, and the hold-down mechanism for your anvil is a great place to get started.
-
Had to go on another hunt a few months back. Got my arm scorched a bit from the caustic saliva on these beasts, but I was victorious in the end! Scrub and brush however you like, you're just not getting the stains out after they've been baked deep into the enamel for years and years!
-
Those jacks sell very easily, especially when you get them for free and can low-ball the price! I wish my recycling place had bins like that!
-
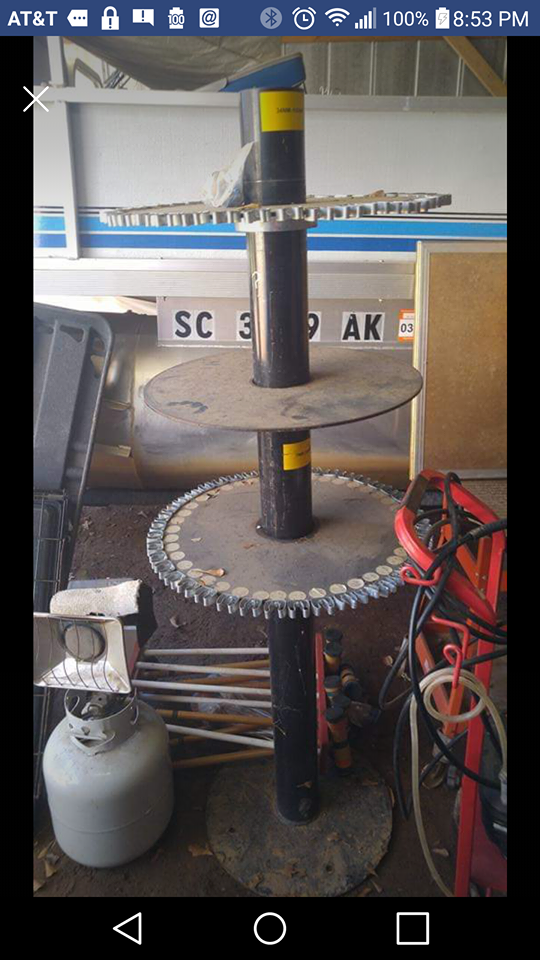
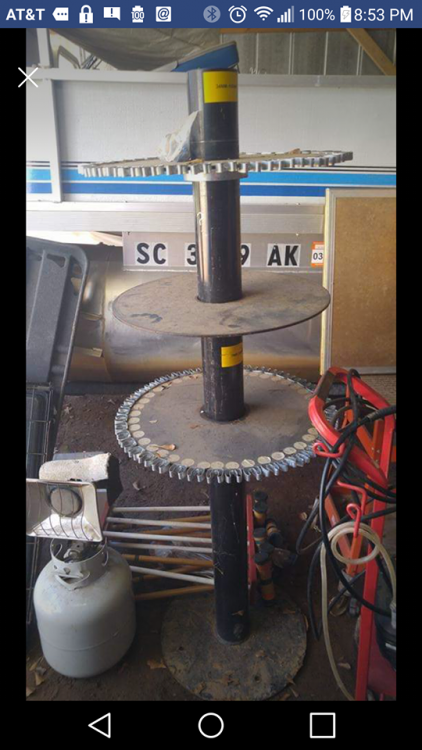
The foundation for my new tool table! 6'x2', with four levels. The upper three levels all rotate around the center column. I'll be removing most, if not all, of the spring clips since they don't really hold tools that well unless they're handled tools. Tried holding a 3/4" punch in the things, but it wanted to slip down all the time. The clips will hold hammers fine, but they also chew into the handles right under the head. Since I'll have to remove every other clip just to fit the hammer heads nicely, might as well remove the entire set and replace it with a proper ring for hammers and tongs. Just one of the levels gives me the same footage as my current table, quadrupling that will be very nice! I'm hunting down some heavyweight casters, too. In a month or three, I hope to have it fully kitted out. Then I'll have plenty of storage not just for hammers and tongs, but all the other little stuff that goes with the anvil!
-
A wrought iron anvil will ring like a bell and annoy you no end. Add silicone, liquid nails or similar, and you silence that ringing to a degree that's really amazing. It's a night and day difference. I used a just about a whole tube on my Wilkinson anvil and it worked like a treat. I wonder if there's a minimum that I could have used, but better too much than not enough! The clean up to get rid of all the stuff that squished out was a pain, but my Wilkinson became almost as quiet as my Fisher. That's a real boon!
-
Really gorgeous. I like the overkill design and nice big handle. That's not likely to get lost around the shop any time soon! I've used my BD1 about a hundred times since mentioning it here, and it's performed flawlessly. Seeing all these pretty painted models, though, has got me in the mood to upscale mine a bit!
-
I'm a huge believer in Fisher anvils and would buy that one in a heartbeat if I had the money. The price is certainly high, but the overall quality of the anvil is pretty dang good compared to most that you'll ever see on the market. I already have a 300# Fisher so that one would be redundant, but it has far better edges than my current anvil and would certainly see use. Do you need it as a hobbyist? No. Not even a little bit. Granted, it's one of those heirloom tools that you buy once and can rest easy knowing that your great grandchildren will still be using it. They don't wear out unless you're an idiot with it. They don't need any sort of maintenance other than a regular wipe down with an oily rag. And you can always sell it in a year or two for a large percentage of what you paid for it -- thus making your "all in" cost a lot lower than the $1500 you initially paid for it. That said, It'll be a beast to move around. Unless you have a dedicated place for it and won't ever need to move it out of the way, or transport it to the new house you buy in two years..... well, you might want to keep in mind just how heavy three hundred pounds is. For that money, I'd give serious consideration to a Holland Anvil. They're members here are are turning out a great product. Their lighter anvil might be right up your alley. Easier to move, just as practical, and brand spanking new.
-
To be honest, I'm just as likely to be interested in the pretzel rods as the Kastolite. Those really are some good rods!
-
Whoever it was that invented that cheap spray-on adhesive is a godsend! The hardest part, honestly, is finding a font you like. Most of the artsy designs you might want to use are available online through an image search for "line art" or similar. It might not be perfect, but there's a good chance it'll get the job done or be easy enough for you to modify slightly. The wire inlay is super easy, but it does come with its own issues. My trusty Canon G10 camera bit the dust just after Christmas and I haven't picked up a new one yet. It'll be awhile before I do, but rest assured that the inlay will be one of the first things I work on when the new G10 gets here.
-
No underestimating. I just think that if truckloads of european anvils were hitting the US shores, I would be seeing a lot more of them right here on the internet. Instead, all I see are LPA's. Some of those LPA's could have been sourced in the UK or Mainland Europe, but we'll never know that since they don't come with a provenance. Maybe they're going to interior decorators? I'm just not seeing French Pig anvils and other provably European anvil designs in any kind of numbers..... and I"m around the internet a lot.
-
Please post some pics of your next go at it. I've had a few people send me private messages, but I think people haven't wanted to clutter up this thread for some reason. As long as things stay on track, I'm more than happy to see how others are doing things. Maybe I'll learn a trick or two! Next up, I'll do a bit about inlaying copper wire.
-
IF they're coming to America, they disappear soon afterwards and aren't being dispersed throughout the smithing community. I think we'd have seen a lot more French Pig and other oddball anvils in the US if that was the case. Instead, we get the usual london-pattern that could have been made right here in the US for all we know. Nothing unique in the designs, and certainly nothing marketed as being from Europe.
-
Just because someone says they were used by their great, great, great, great grandfather doesn't actually mean they were. He might honestly believe it, but memories are fickle things and those tongs might be confused with another set. Or, the guy added a couple "great" to the equation. No intent to defraud, but honest mistakes happen all the time. Personally, the tongs aren't anything special and I wouldn't try to repair them unless you're well versed in working wrought iron. They aren't especially well designed tongs since the boss area around the rivet is so very thin. I have a pair of tongs very similar and they're great for holding little things and moving them around in the forge. I don't use them for much more than pick-up tongs, though they do fairly well when I'm forging small stuff. New tongs aren't so expensive, and yours have a nice story. Use them as pick-up tongs for light/thin stuff and enjoy having them around.
-
Honestly, I haven't been able to figure that part out. Not having one in hand to examine, I wonder if it's for increased visibility as you're working the part. With the jaws out from the stem, you can see where you're working from all four sides. Then again, GS Tongs has a very unique perspective on things. He might have done it just to do it and set his gear apart from the herd much like he did with his tool designs.
-
The guy from GS Tongs does one very similar and I always thought it was a pretty brilliant idea. Simple enough that anyone could do it, even if it meant riveting instead of welding. The lack of a "bottom" under the lower die really makes you smack your own noggin because you didn't think of it. One of those brilliant little ideas that makes a whole lot of sense. Why have a bottom plate when the anvil face is as good a bottom as anything you could whip together?!?! :O
-
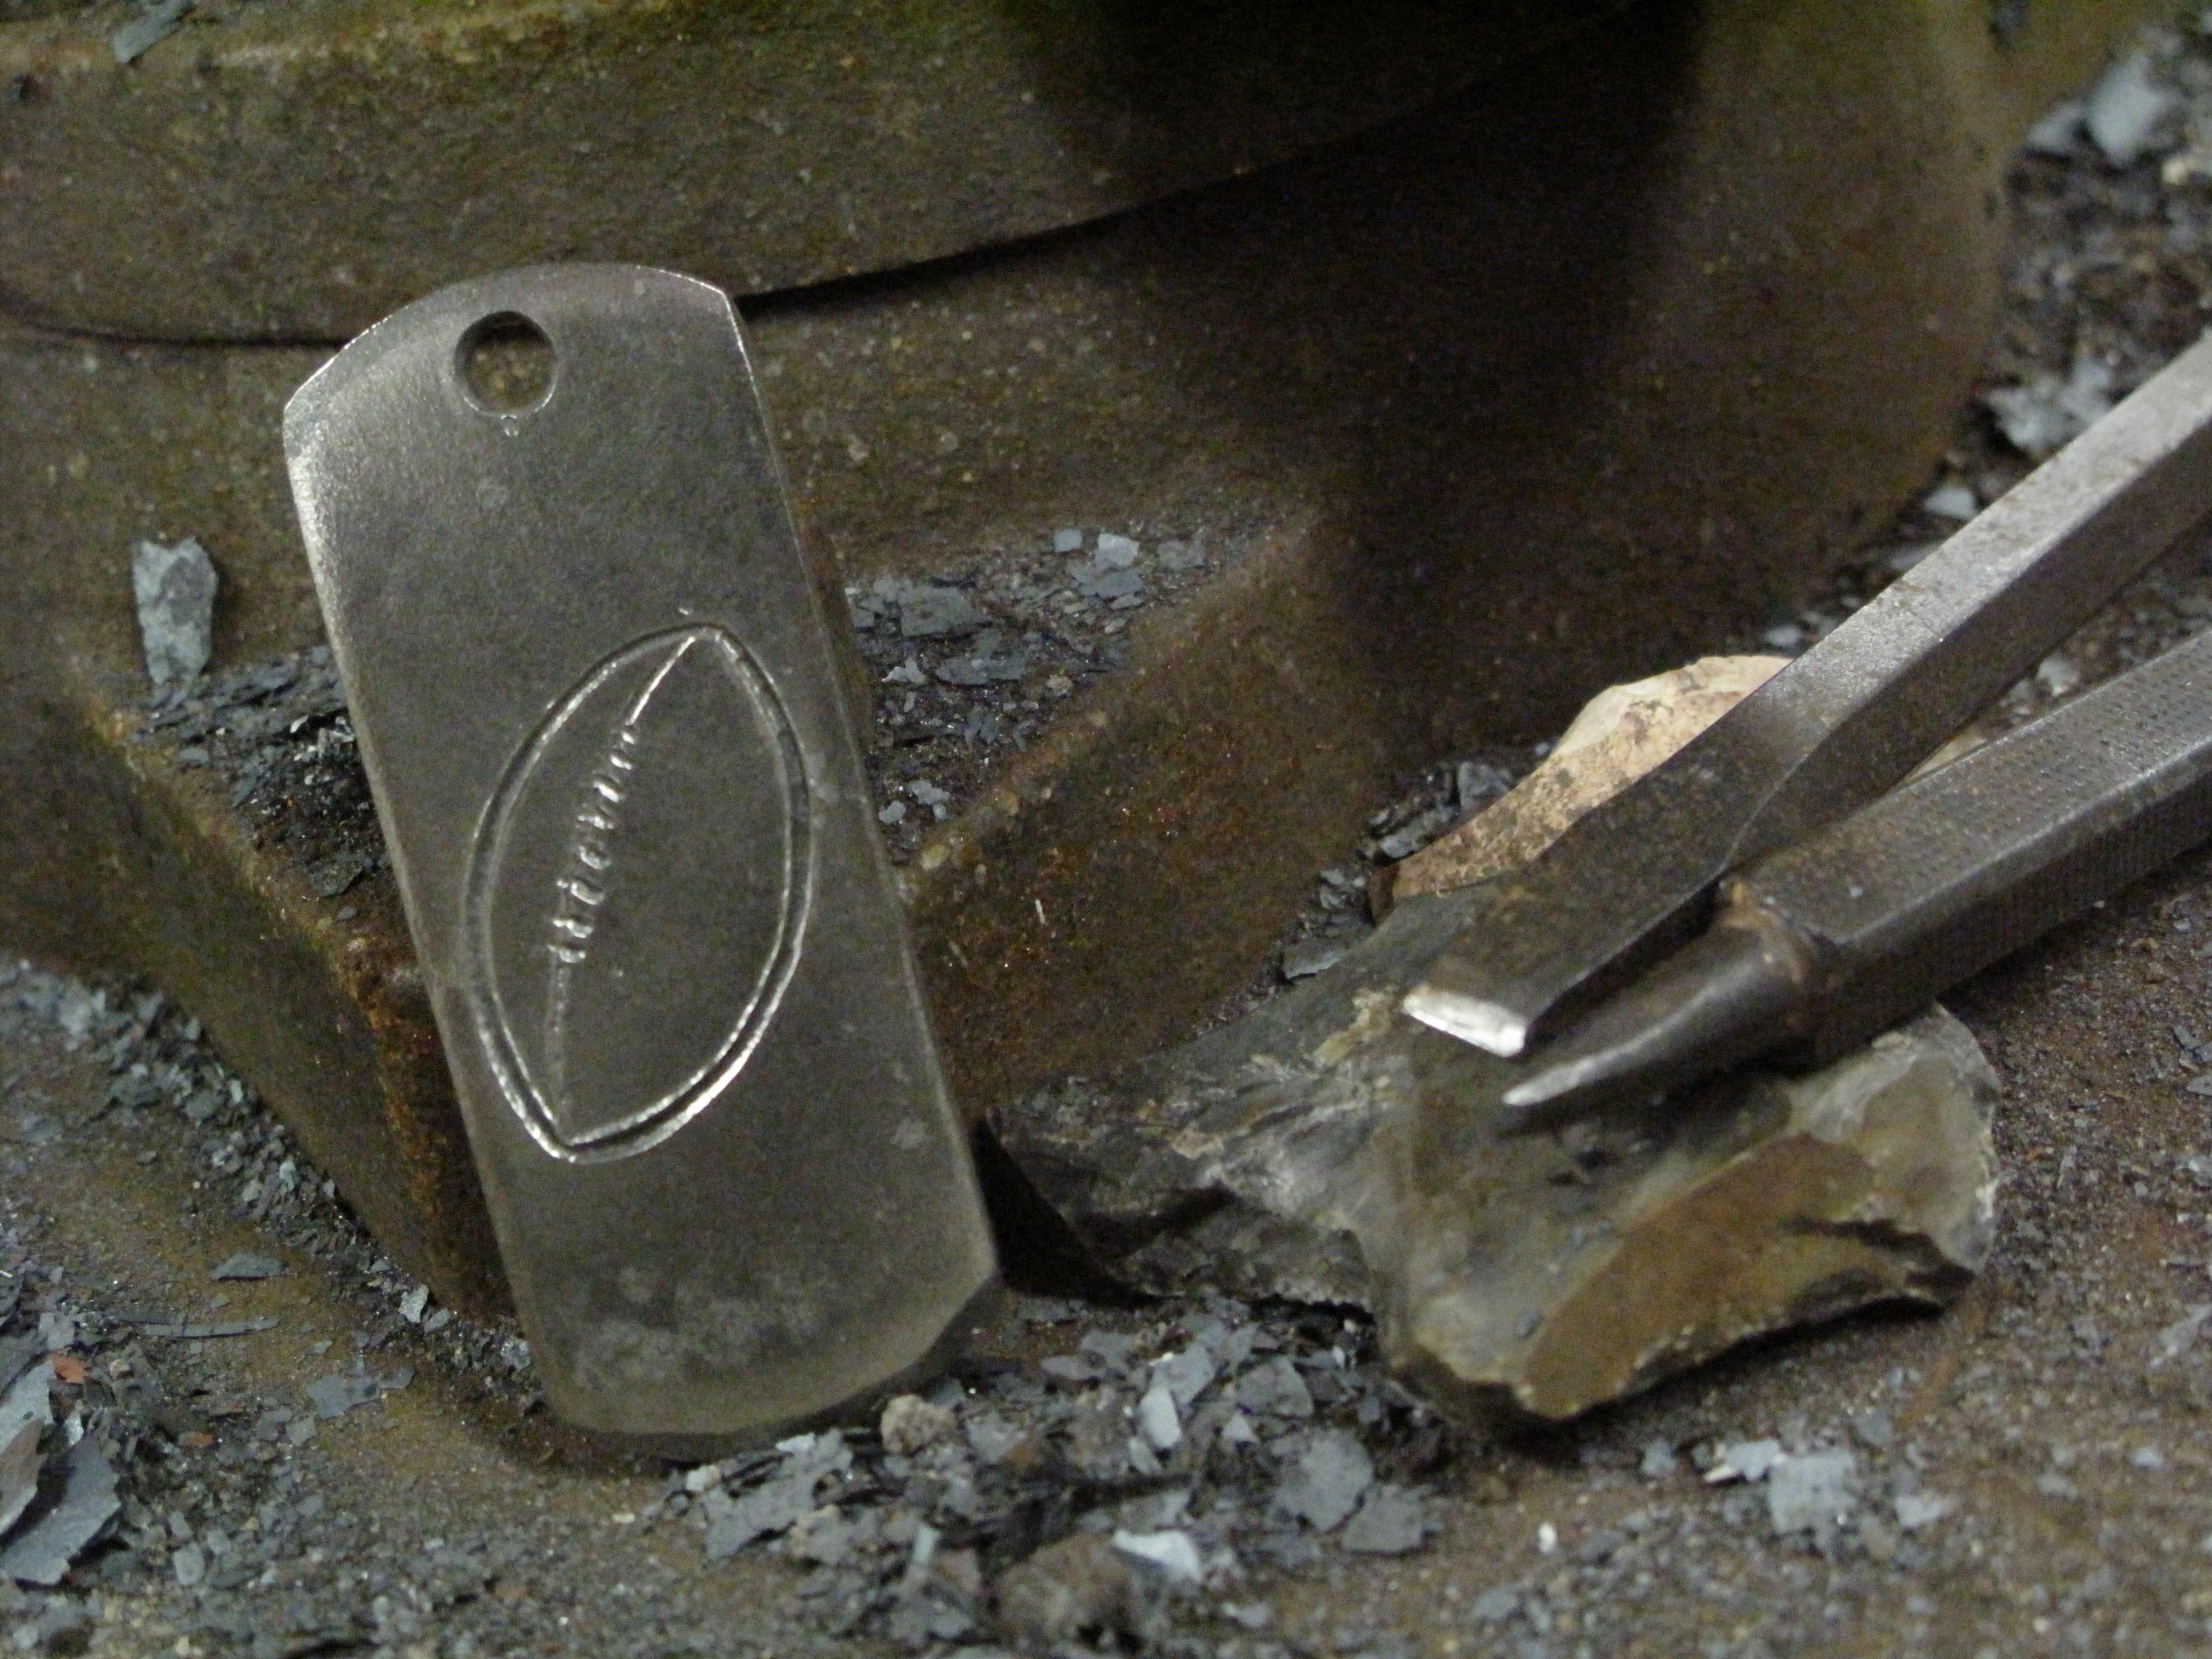
I make three varieties -- the dog tag style pictured, the Cornucopia and the Shield. All three were designed around the idea that they could be wearable and not look out of place. You can attach them to a necklace, or sport them on your knife sheath much like folks do with ferro rods. Of course, they don't have to have chased designs on them. I don't make the big strikers like a lot of folks do. While these are smaller and harder to handle, that's the trade-off you make for the convenience and appearance.
-
Thank you. And, yes, that is Texas flint. I keep some variety of stones on hand so I can test my flint strikers before they go out the door. So far, Texas flint does the best of any stone I've tried. Remarkable stuff, really.
-
Had a customer ask if I could cut a football into a pendant for a dear friend of hers that's a coach. Never tried it, had no idea if it'd work out, but I found a nice line-drawing on the internet and used that as my template. Since it's for a coach, I talked her into going with a 1095 high-carbon alloy that was hardened in the forge's fires for the pendant. I figure the coach would appreciate all the sports metaphors he could get out of that. She agreed.

-
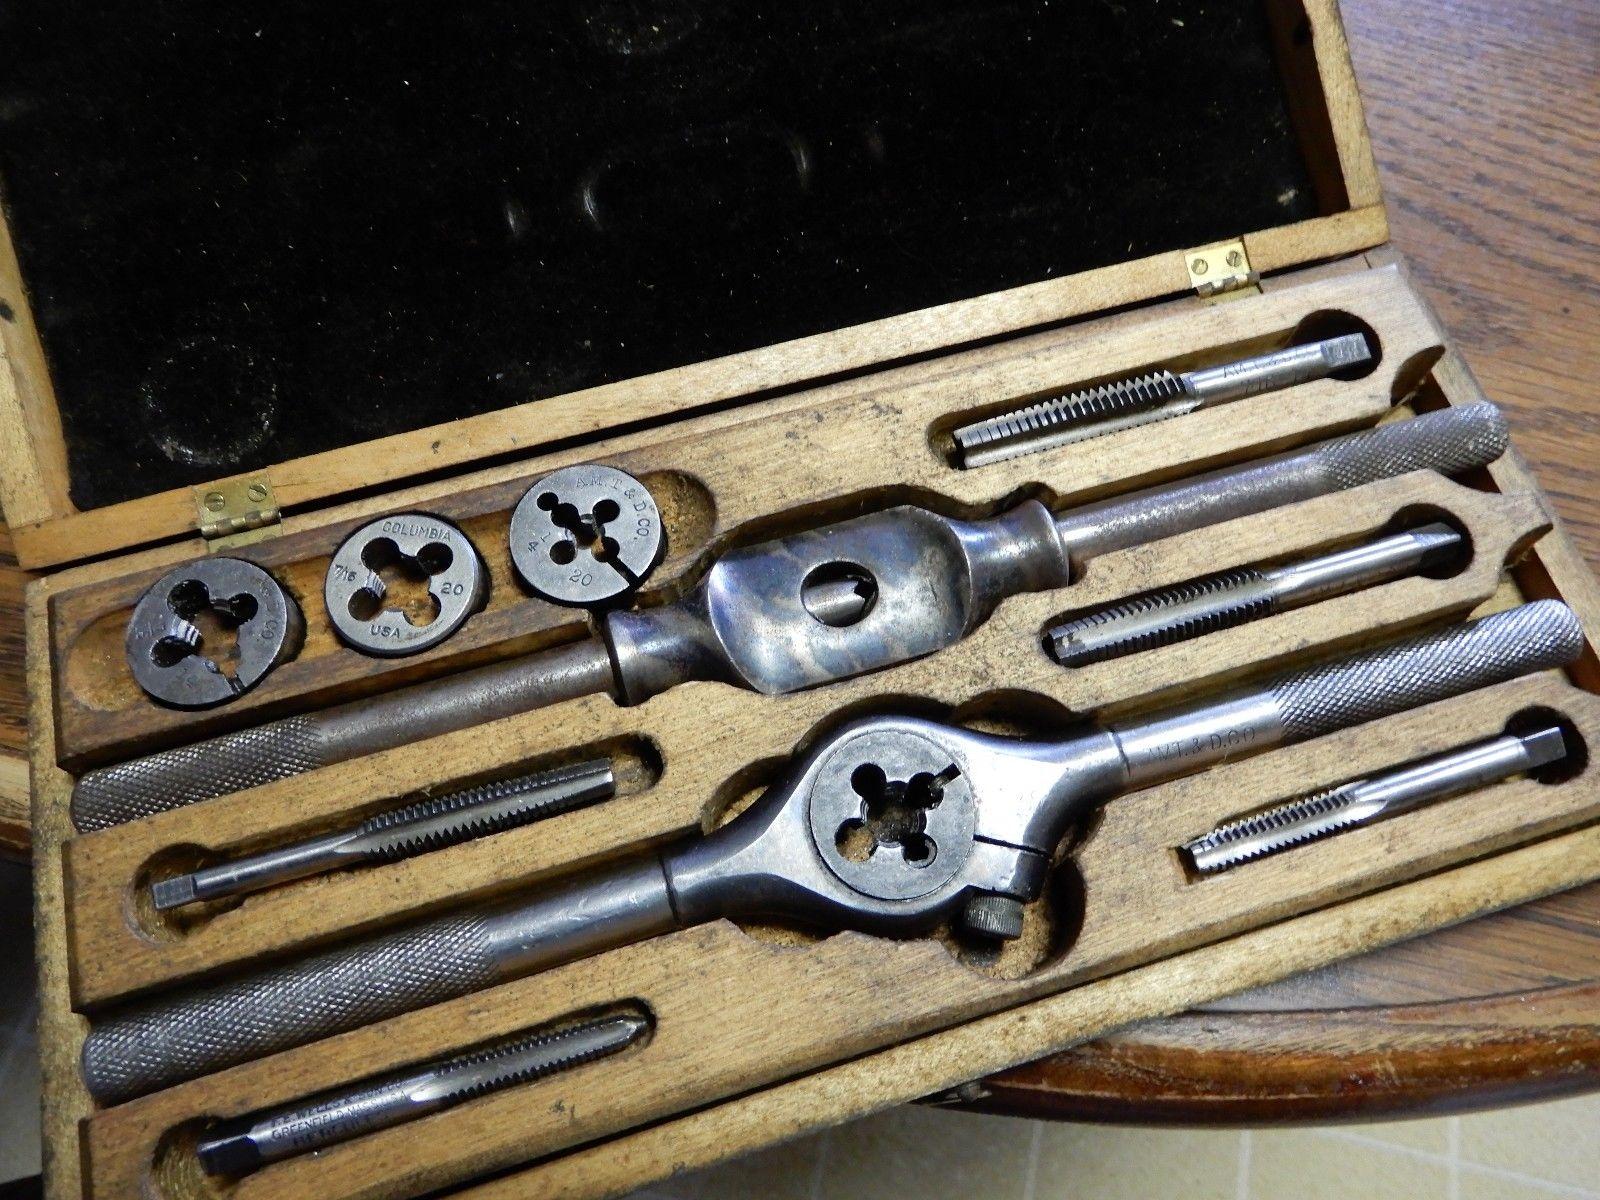
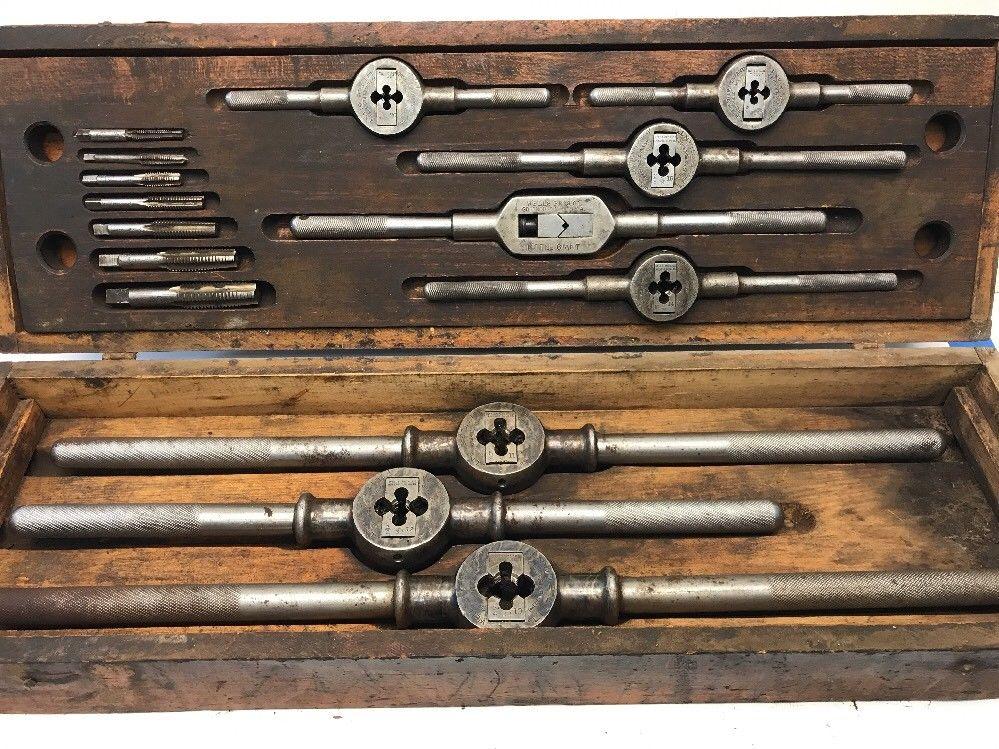
Layered steel will always be a bear to cut with a tap. It's kinda like using a handsaw to cut through plywood -- you can do it, but it's not the easiest thing to do and the large teeth make for a ragged cut and a lot of binding. Greenfield Tap and Die is one of the best brands. Here's a wonderful video on their taps and how you can best use them.... Super-fun to watch! Toolmex, out of Poland, is getting good reviews everywhere I see them mentioned. Guhring/Powertap, from Germany, isn't too shabby and has that German quality that you'd expect. Personally, I love searching for vintage/antique sets in the old wood boxes. Even if the taps are shot, rusted to bits and dull as a fritter, the die stock and tap wrench more than make up for it. If you can get a set with the nice color case hardening still intact.... you're a winner in life. Just look at this beautiful set. A light bit of wire brushing to remove the rust from the tap wrench handles and you'd have a real beauty on your hands! The taps and dies are meant to be replaced as they wear, but those handles are works of art that can't be bought new anymore. Or something like this where each die gets its own handle! Yea, it's an addiction! Even if I never use the blasted things, I'd rather they be in my shop than on the wall of some boutique hairdresser's place as part of a hipster-chic industrial design thing.

-
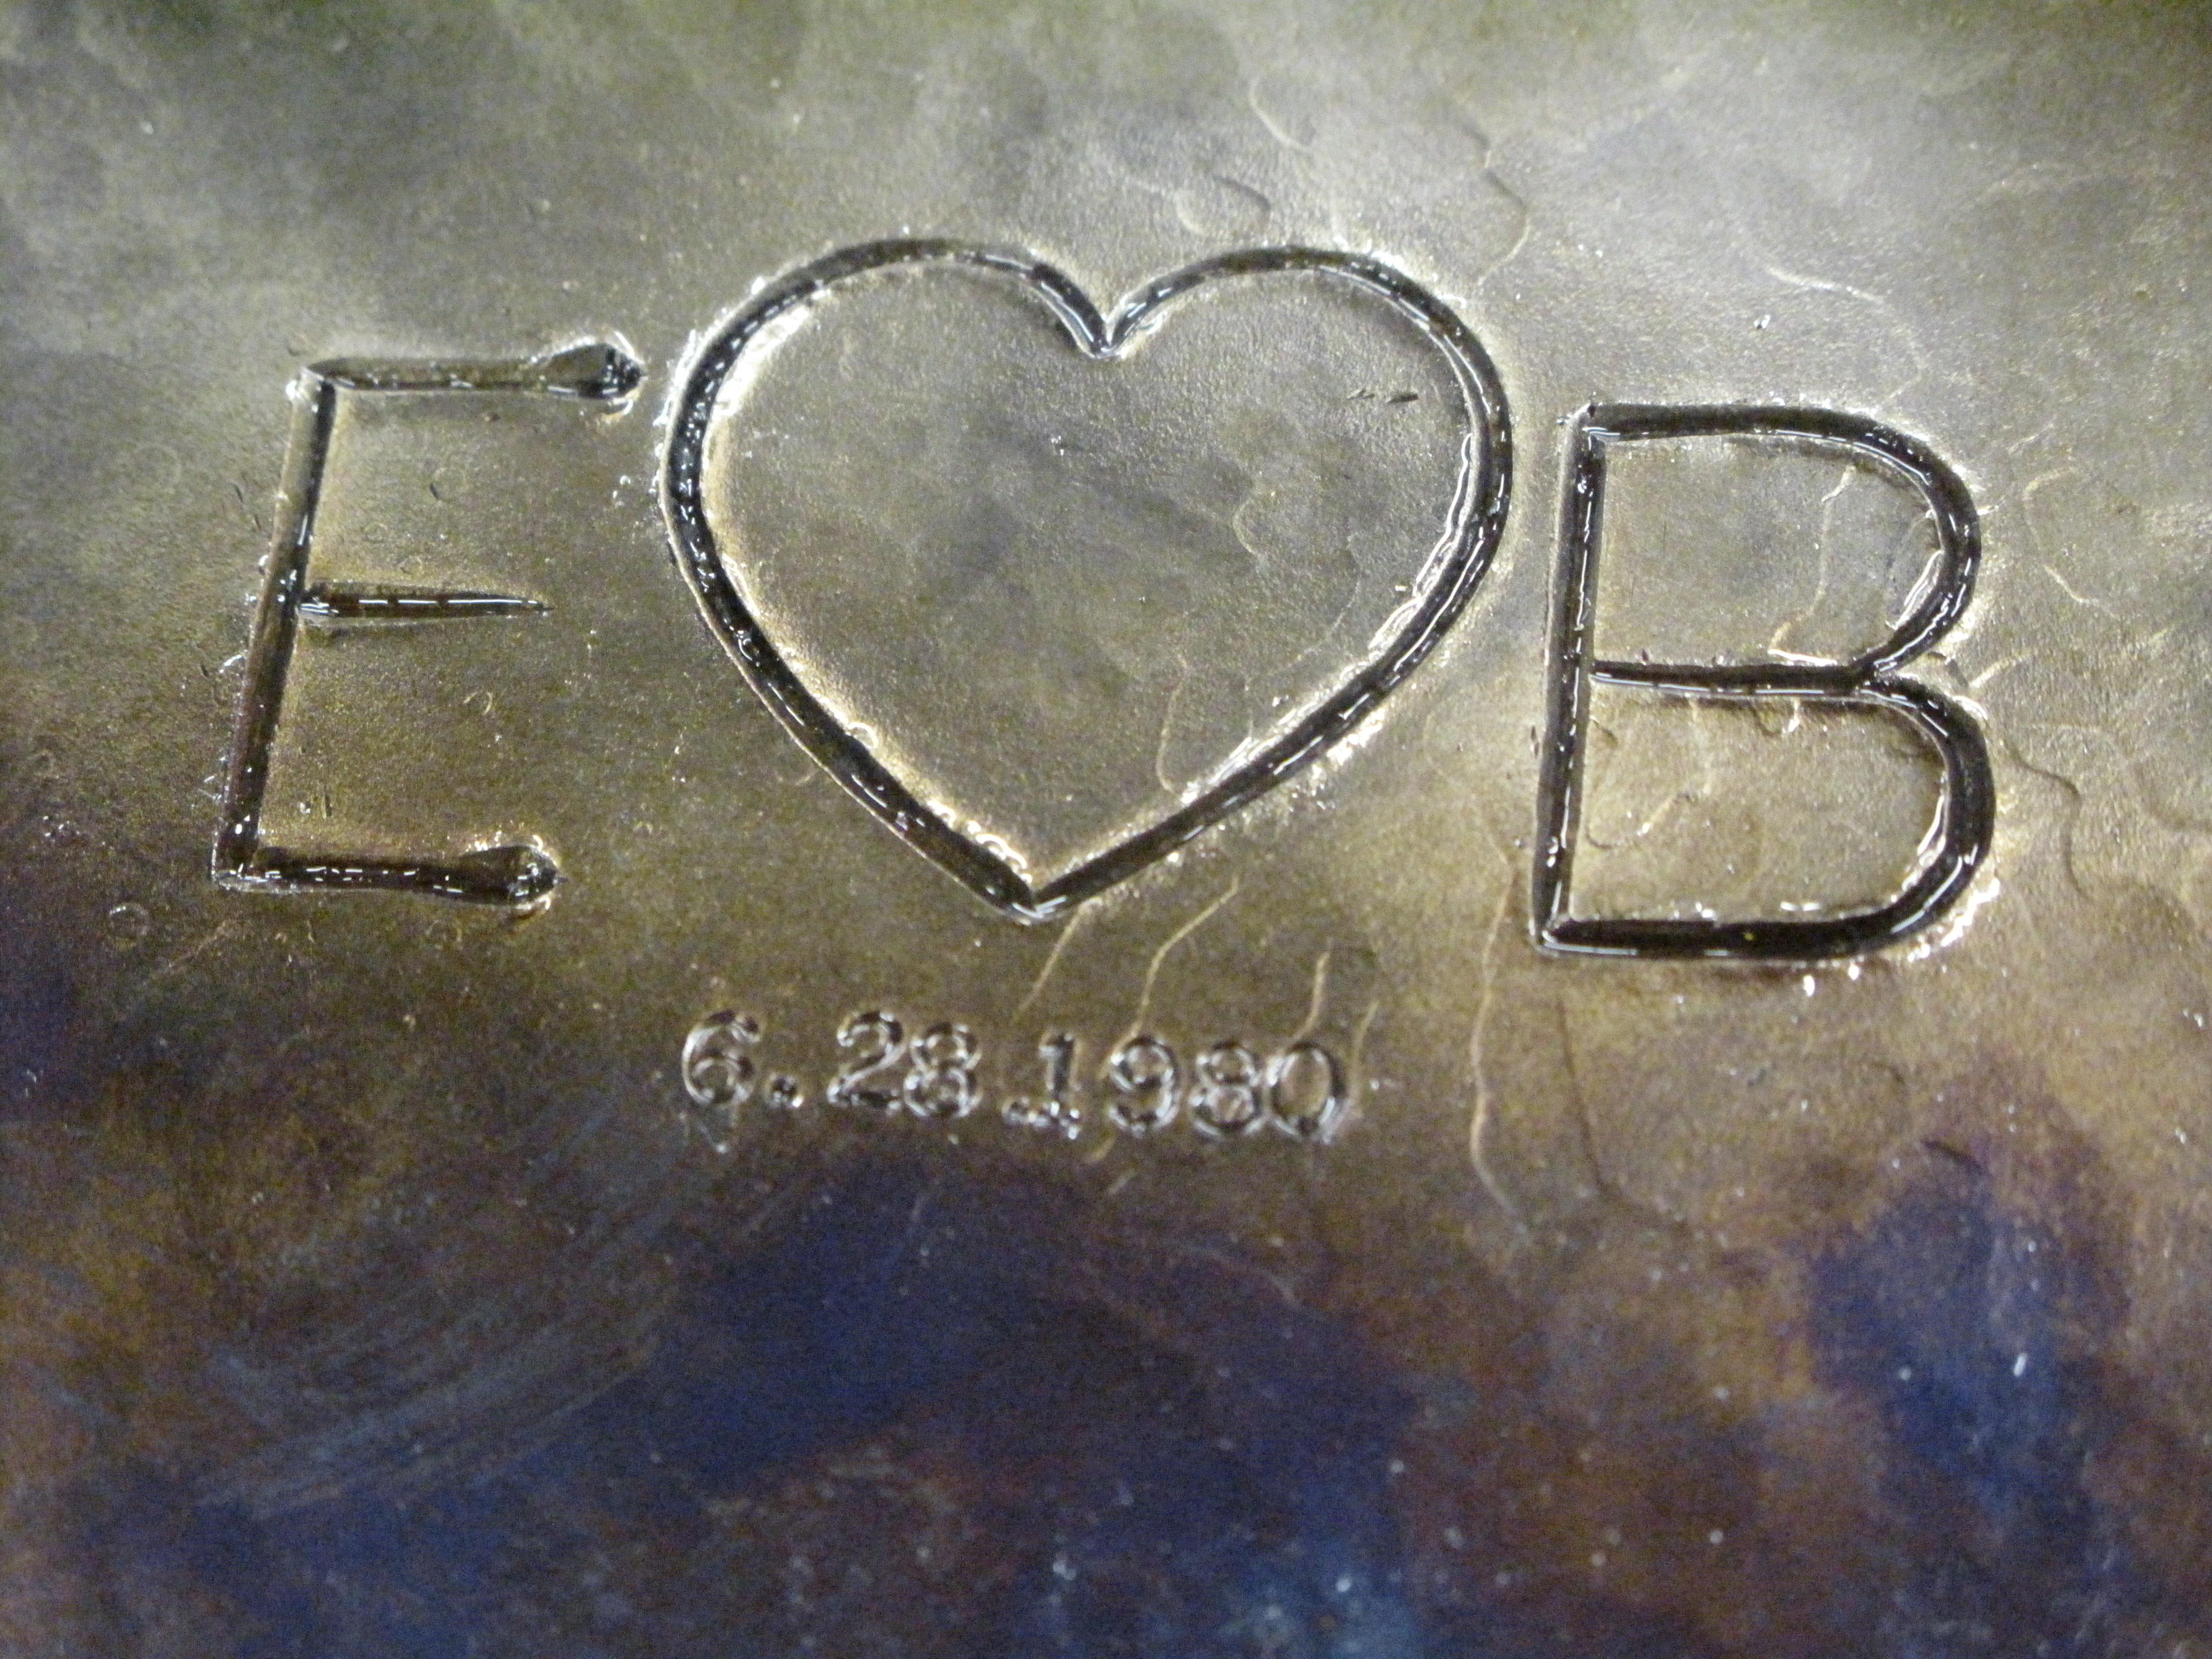
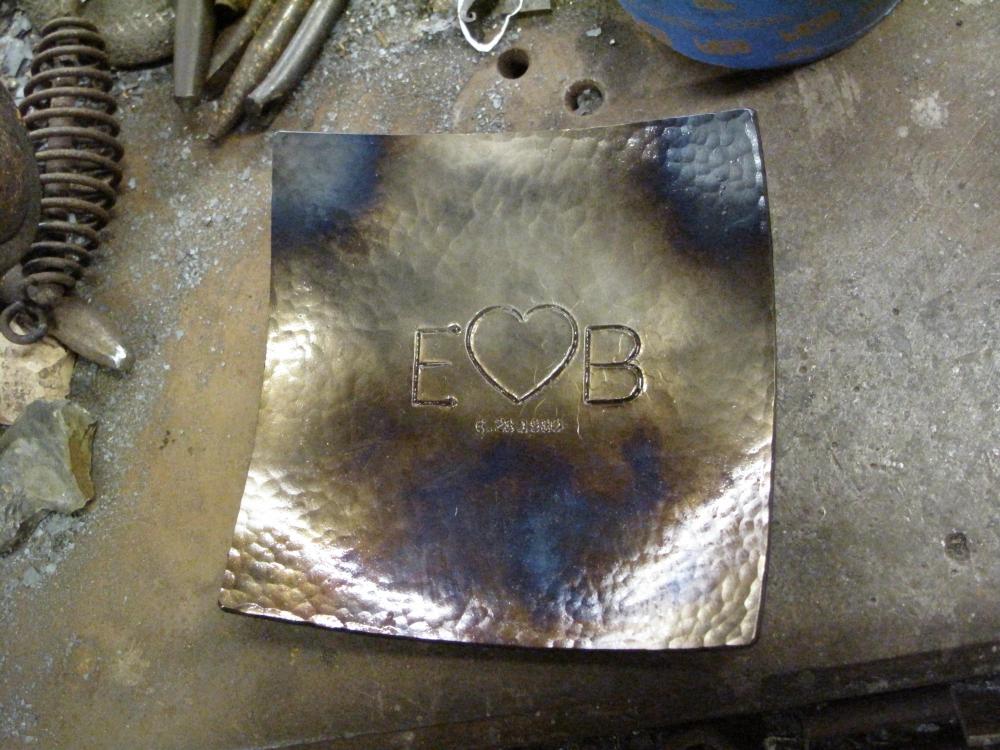
Thanks Duck. Got to do some chasing on a dish the other day. Sadly, when I was stamping in the date, the #1 stamp flew off to parts unknown. Now I have to hunt down either a single stamp... or buy another set. I was thinking about going up to 3/16" numbers rather than the 1/8" that I currently use. Not sure if that'd be a good idea or not, but...

-
That's a reamer, not a drill bit. The trick is that there's a keyway cut into the end. The key is good high-carbon steel with a nice sharp edge/corner just like you'd want on a lathe tool. To increase the cut after every pass, you place a shim of paper under the key to raise it up a hair. It takes a lot of oil and a lot of passes to get your bore sized right and smoothed out. Then it's on to the rifling!