VaughnT
Members
-
Joined
-
Last visited
Everything posted by VaughnT
-
Those "saw" things look like trammel hooks to me. Lots of different farm implements used that same style of adjustment, so it's almost impossible to say what they might be for without being able to see how the ends are formed. Love seeing pictures like this! Makes me really wish I could have a shop that nice.
-
Time spent at the forge is not nearly as important as what you do with that time. The single greatest failure that new people encounter is jumping from one project to the next, thinking that they'll build up knowledge and experience while also making a s-hook today and a nail next weekend. Where this fails the logic test is the fact that you never actually spend quality time developing the fundamental movements that allow you to make nice stuff. By the time you've burned up a year of one-hour-here and one-hour-there, your work is still as rough and rudimentary as it was in the beginning. Why? Because you forget the lessons you might have learned during one episode in the lull between episodes. And because you don't do repetitive work, always trying to make something new and neat, you never get to apply those lessons to the next piece you try forging. You'll certainly make progress, but it will be super slow and where you are in a year or two down the road won't be nearly as far as you would have liked. Mastering the fundamental movements means doing the same exact thing over and over again. I highly recommend you start with a very simple exercise that requires a forge, anvil and 20' bar of 1/2" square stock. Cut the bar to 5" lengths, heat said length and draw the end down to a nice point. As soon as you have the point formed, throw that taper into a bucket and start on the next 5" length. You do the tapers one after another, until you have the entire 20' length of steel turned into tapers. Every strike of the hammer should be focused on. You want each strike to be the best you can make. And when you get done with all those tapers, you'll see a noticeable difference in the quality of your work between the first and last. Most importantly, all that repetitive work will have driven the knowledge into your mind and muscles. Once you have the tapers all finished, you pull one out of the bucket and work the big end half-on-half-off the anvil to create a flat section that is nicely rounded and about half the parent thickness. This is where you'll be putting the mounting screw down the road, but your only concern right now is getting that finial nicely formed and even from all angles. Again, you go through the bucket of tapers, one at a time, repeating the same fundamental movements over and over and over..... You'll get sick of doing it, but it's one of those critical things that you need to do whether you want to or not. As with the tapers, when you look at the rounded heads, you'll see that the first ones aren't nearly as nice as the last dozen or so. This is the learning writ large. With the tapers done and the heads formed, you need to scroll the ends of the tapers to make them decently attractive and softer on clothing. Go through each one and curl the end so they all match. Getting them to match is trial, for sure, and you'll have a lot of fun with it, I'm sure. After you've emptied the bucket yet again, all you have to do is start over and bend the tapers around to make a wall hook, then drill the hole for a screw. By the time you're finished, you've got yourself a ton of hooks that you can use around the shop or give away as gifts. Even better, though, is all the experience you've built up. Every project you'll make will incorporate tapering, scrolling, flattening, etc, so getting solid knowledge in those fields, without jumping around like a chicken with its head cut off, will pay huge dividends. The key things to remember -- focus on every strike pay attention to all the little details keep things very simple don't bite off more than you can chew take lots of notes work smart and try to make the hooks identical to each other.
-
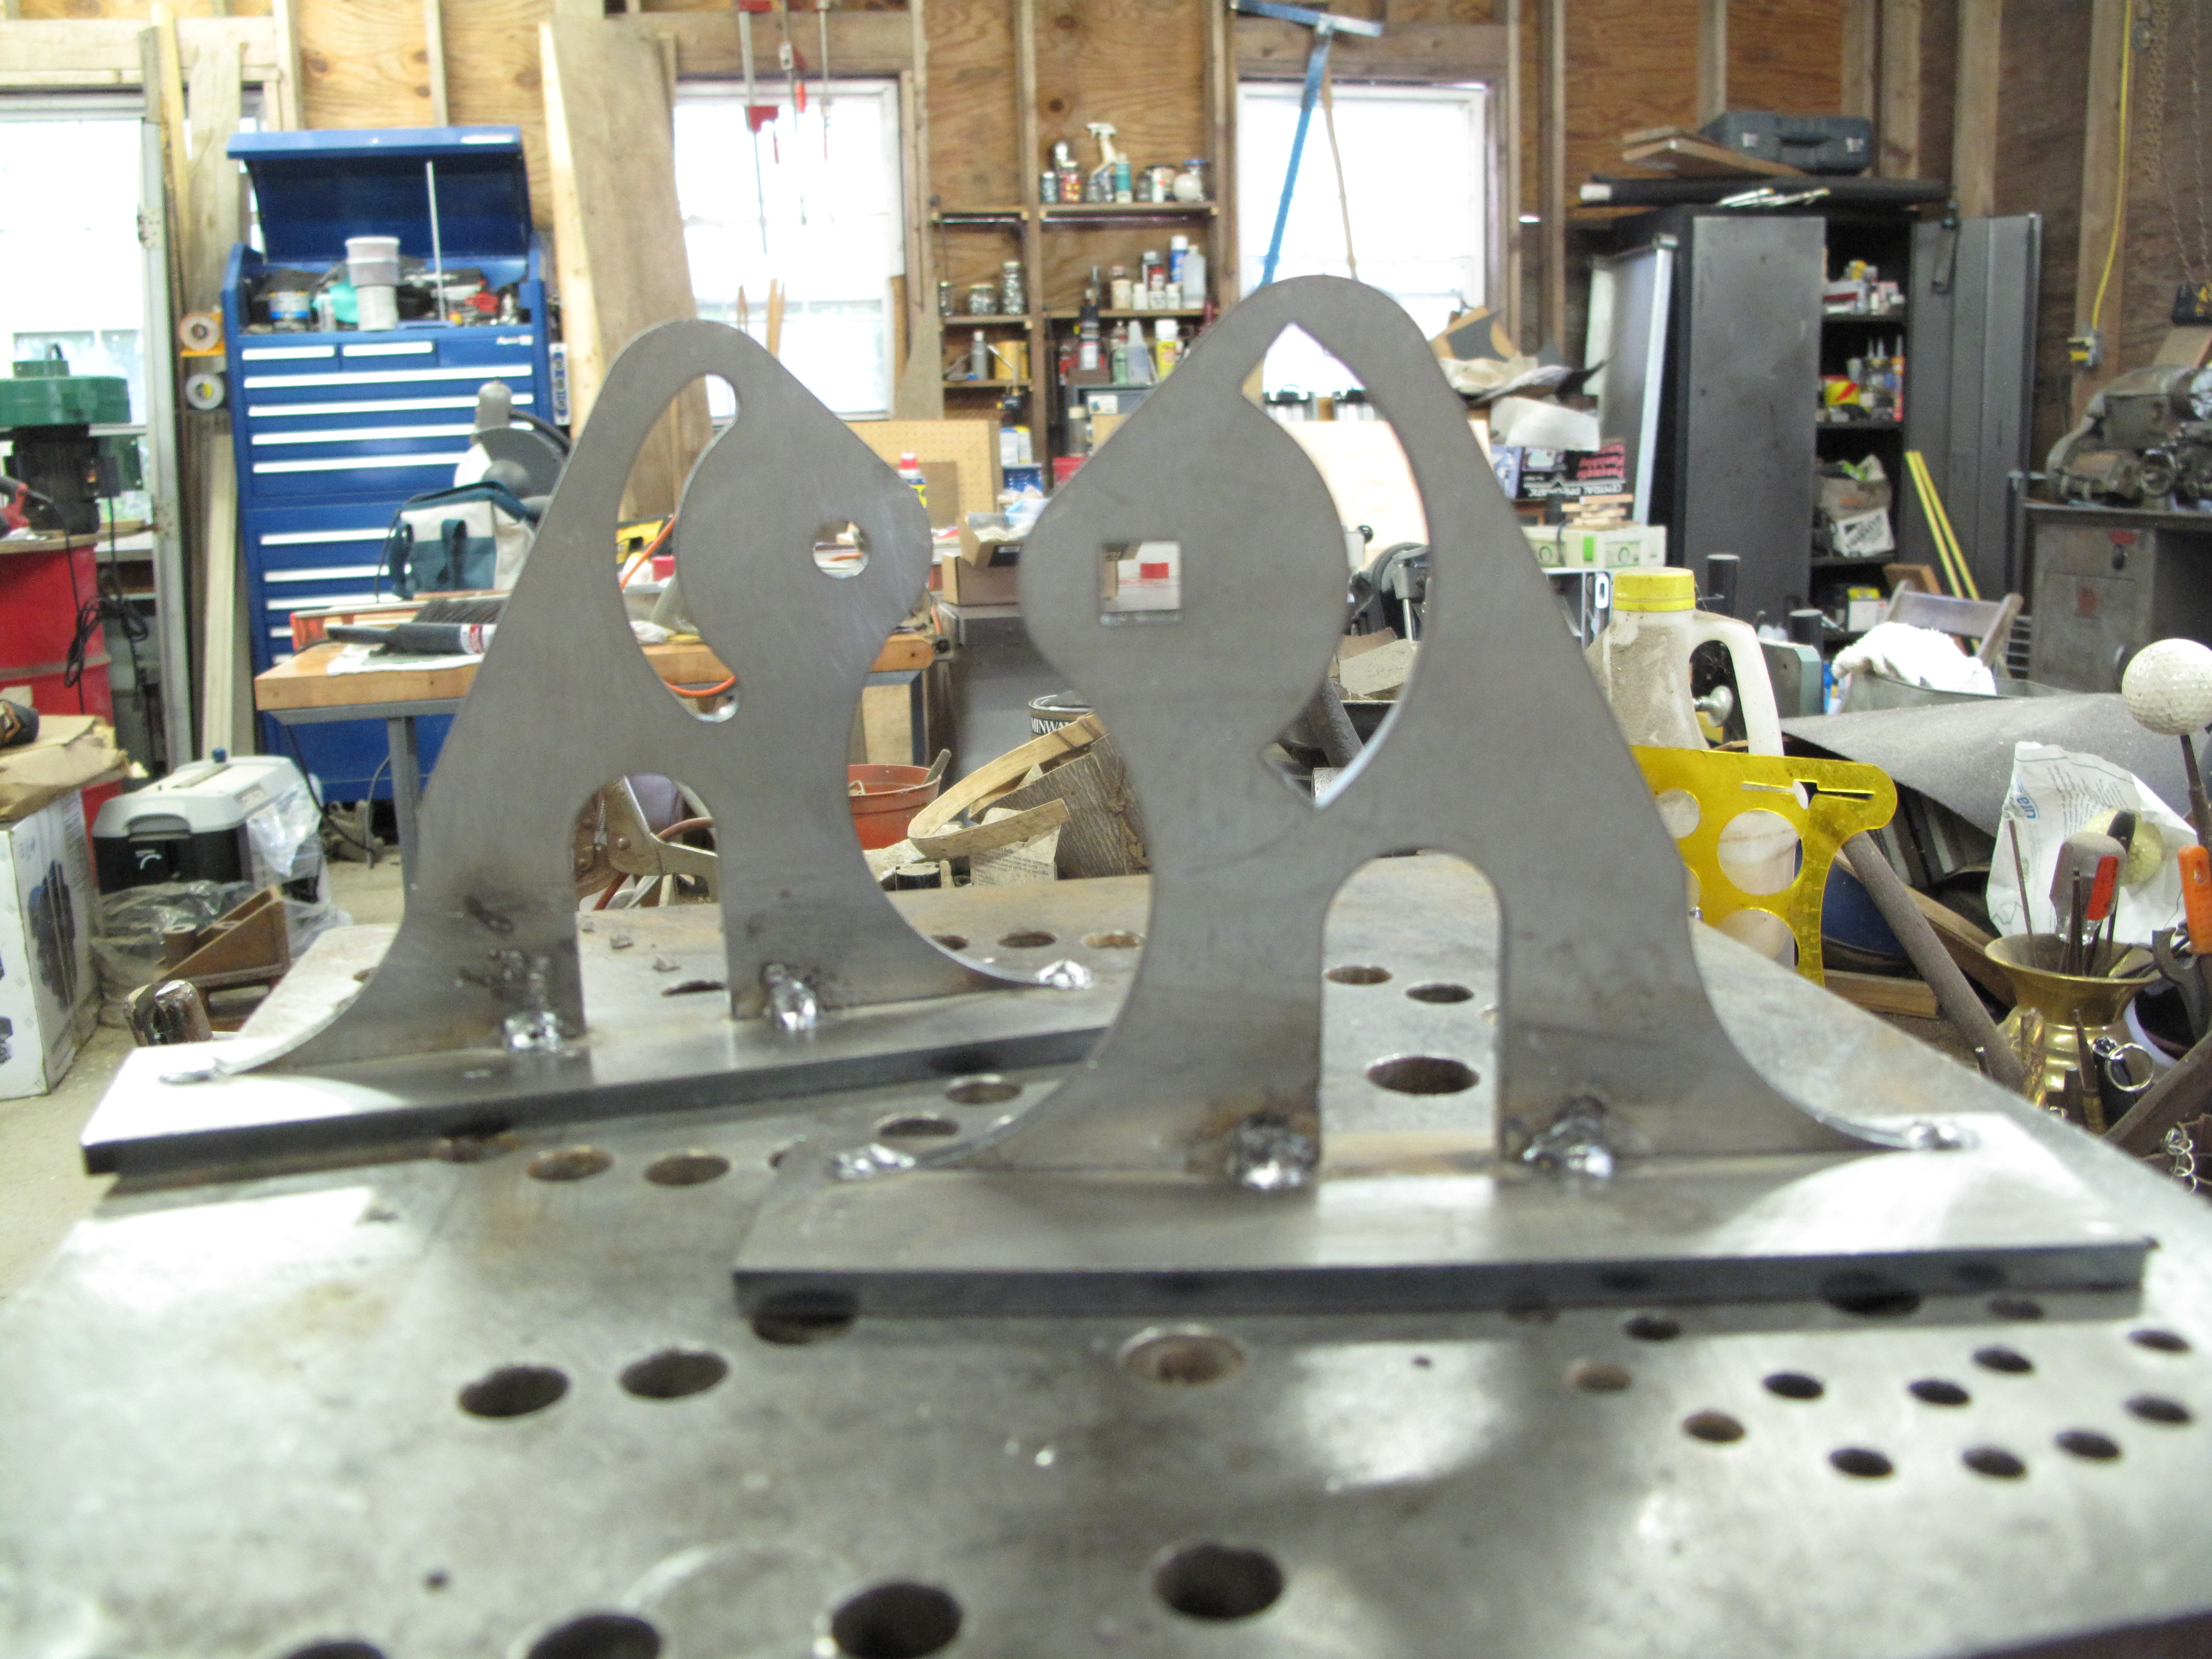
Very nice bit of engineering. If you want to go for a dressier stand that doesn't require welding, might I point your attention to what another IFI member came up with ---- https://www.iforgeiron.com/topic/44551-my-new-block-anvil/ It would take a modicum of modification, but it will certainly get the job done without worry! As for the rounded face, you could take it down a bit with your angle grinder, but you really don't need much more than the size of the hammer you're using. Too many people get the wrong idea that they need a big flat face to make things when the big faces of the "traditional" anvil is there as a result of the overall mass necessary to make a good anvil that incorporates all the various features. The most important thing is having the mass right under the hammer. With a 4" face on an anvil that's 24" tall, you've got a fantastic anvil that puts all the mass right under where you're going to be hitting. This makes her work at peak performance and you'll be able to make all manner of items, from simple hooks to full swords. It's up to you!
- 34 replies
-
- angle grind
- jcb axle
- pin
- heat treat
-
Tagged with:
-
Never case-hardened anything, but I'm sure it could be done. The puck's are just mild steel as far as I know, but I'll ask Dad to be sure.
-
-
Very nice design. I'm always looking for unique ways to incorporate different techniques into a project just to keep things fresh. The last fork I made, i used tenoned lugs like you did and it's holding up very well. No looseness at all, and I've used it to bend about 100 5/8" railroad spikes into hooks. I wouldn't worry at all about a peened tenon working loose over the ages. Initially, I just peened them to hold everything in place while I welded them permanently, but the things are rock solid and I've never seen the need to weld them. I need a fork for some smaller stock, so you can expect your notion to be borrowed! Thank you for the inspiring design!
-
I've seen them in all kinds of shapes, and a lot of them are complex carvings that must have taken some real time to make. I don't think they serve a purpose other than decoration. Those guys were master builders and I just can't see the spires needing many tie rods holding the sides in.
-
You can print out the image on regular typing paper and size it whatever size you like. Then use spray-on adhesive to lock it to the metal of your choice. A Star-in-Circle design is probably the best just from a safety standpoint. And pretty easy to do if you use a drill to get rid of most of the triangle before you take a cold chisel and file to clean things up. Getting a pin soldered onto the back wouldn't be too hard, but think about..... again.... you gotta think about what kids will do with a pin. Of course, a small magnet presents a chocking hazard, or could end up in an ear or nose if it doesn't get lost in the first five minutes.
-
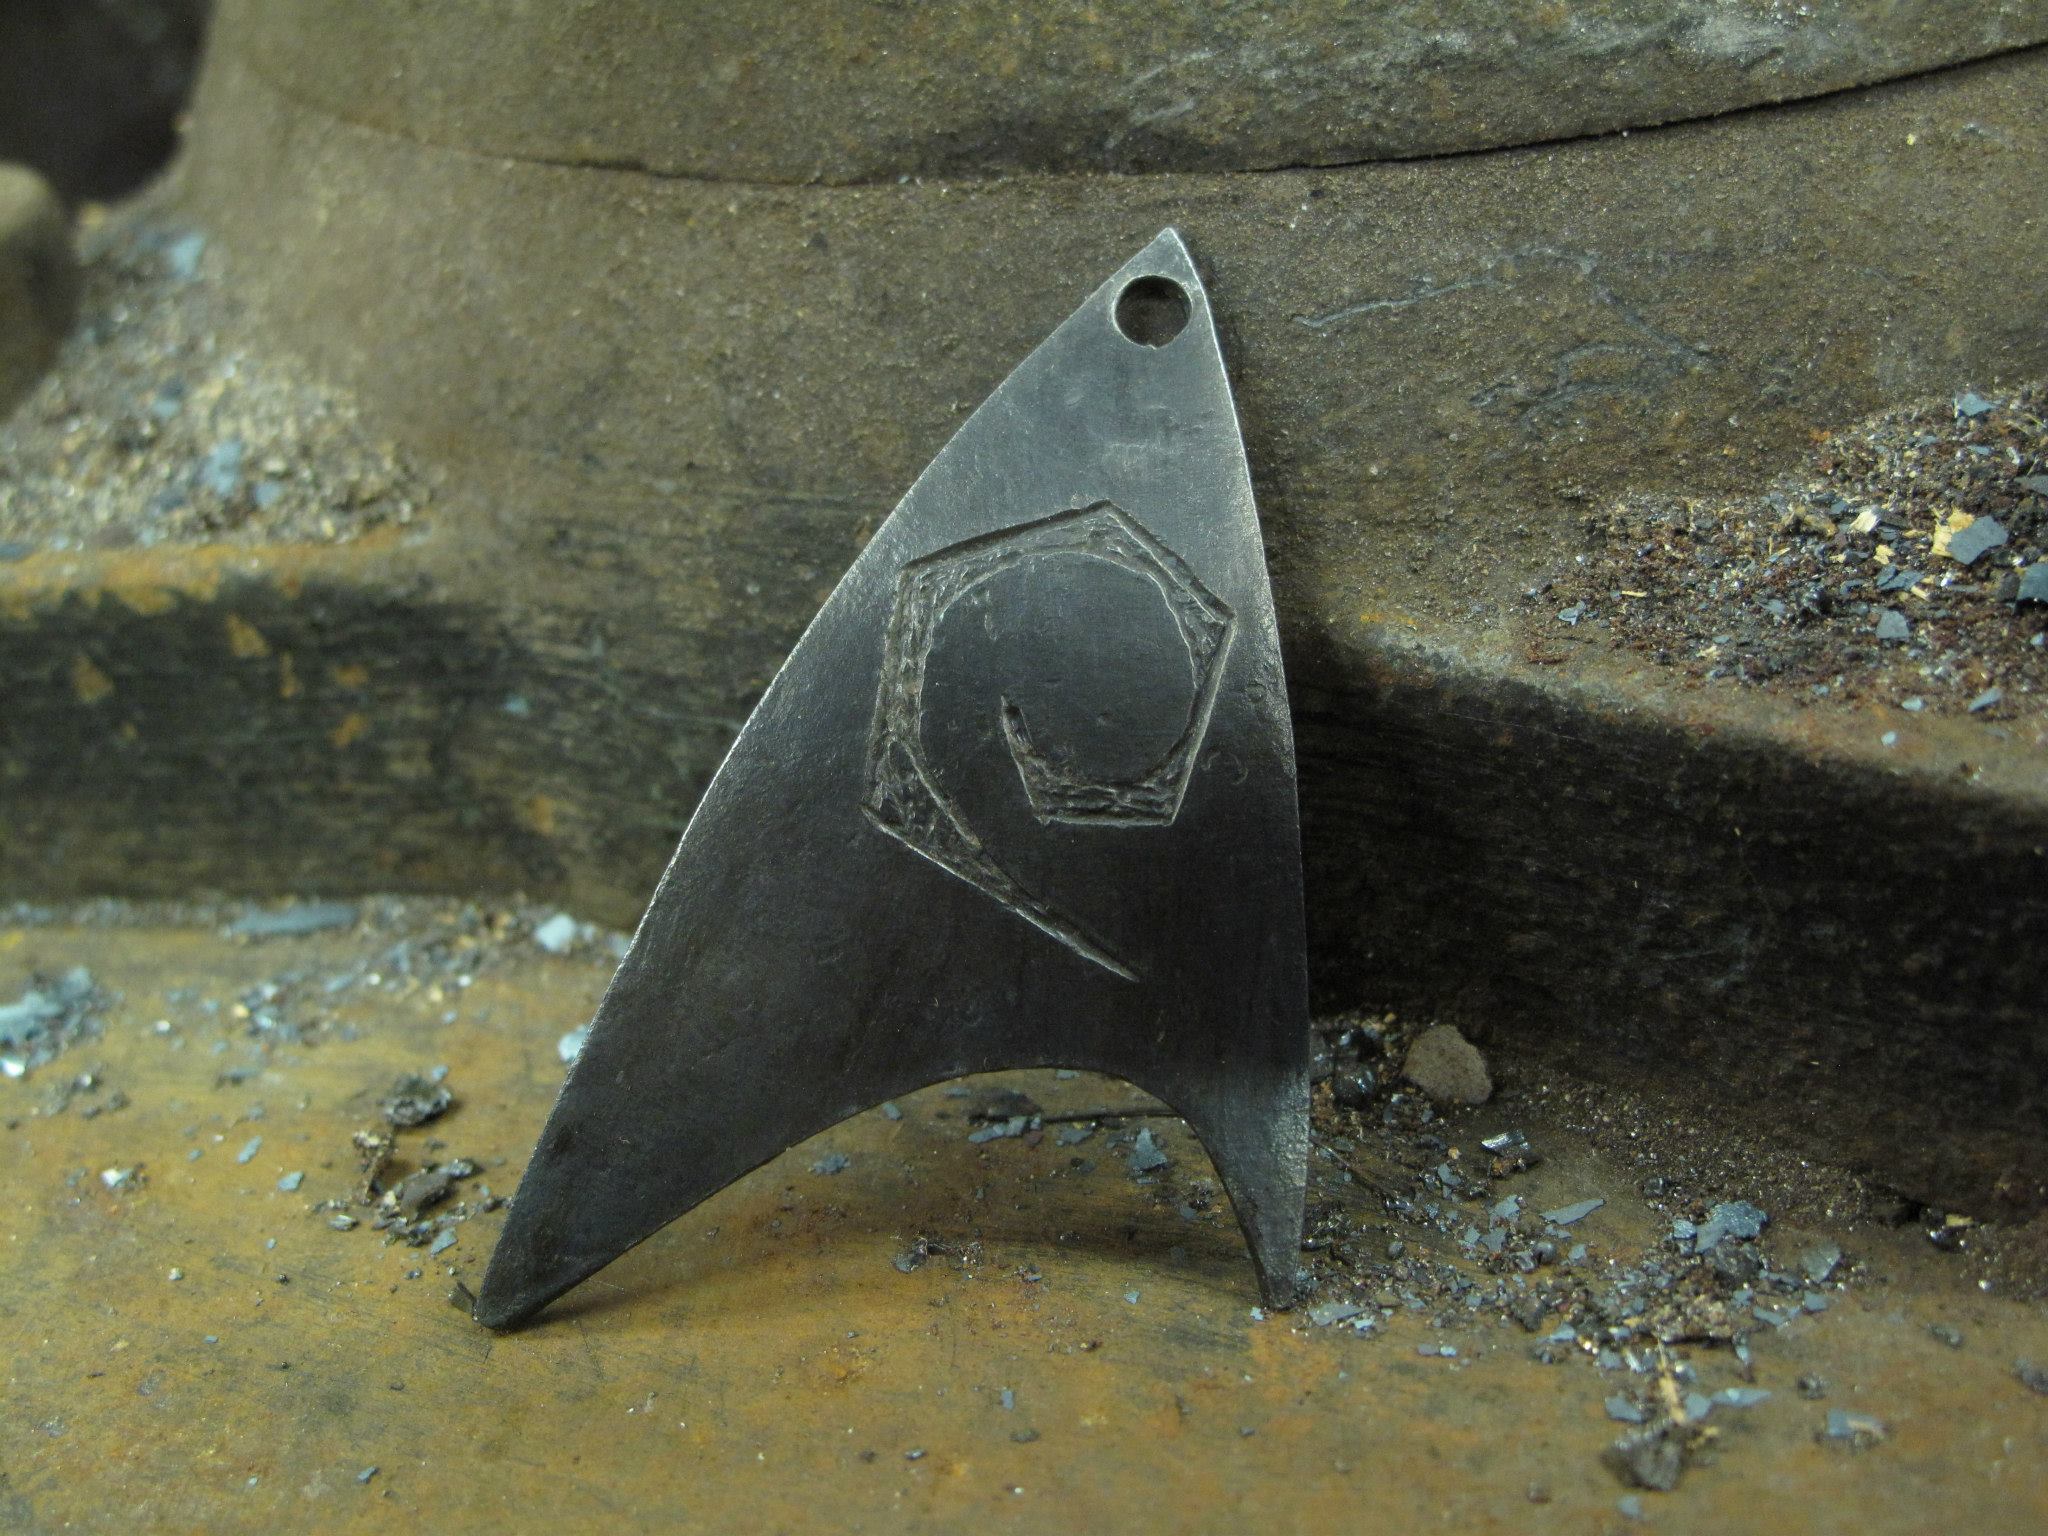
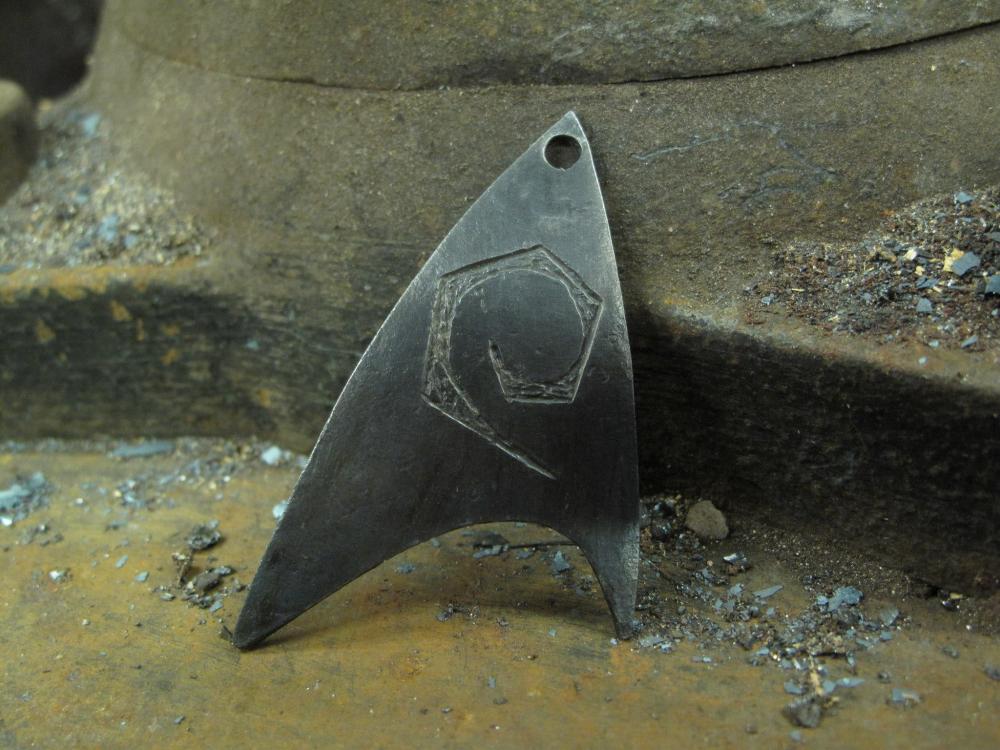
A cold chisel and wire wheel on your bench grinder will go a long way. You can even carve in their initials if you like. Some time back, I made up this "badge" for Star Trek fan. All done cold. All you have to do is clean up the edges with a file to round them off nicely. It's "life size" was was meant to also work as a scraper for one of those ferro rods campers like to use for starting fires. Very thin steel, similar to a saw blade, because you don't need much weight. While I drilled a hole in it, he opted to use a neodymiam magnet to hold it on his shirt in true Star Trek style. Just remember that kids and sharp points don't go together. Even though this isn't sharp, I can see some eyes getting poked with the thing! If I can help further, just holler.
-
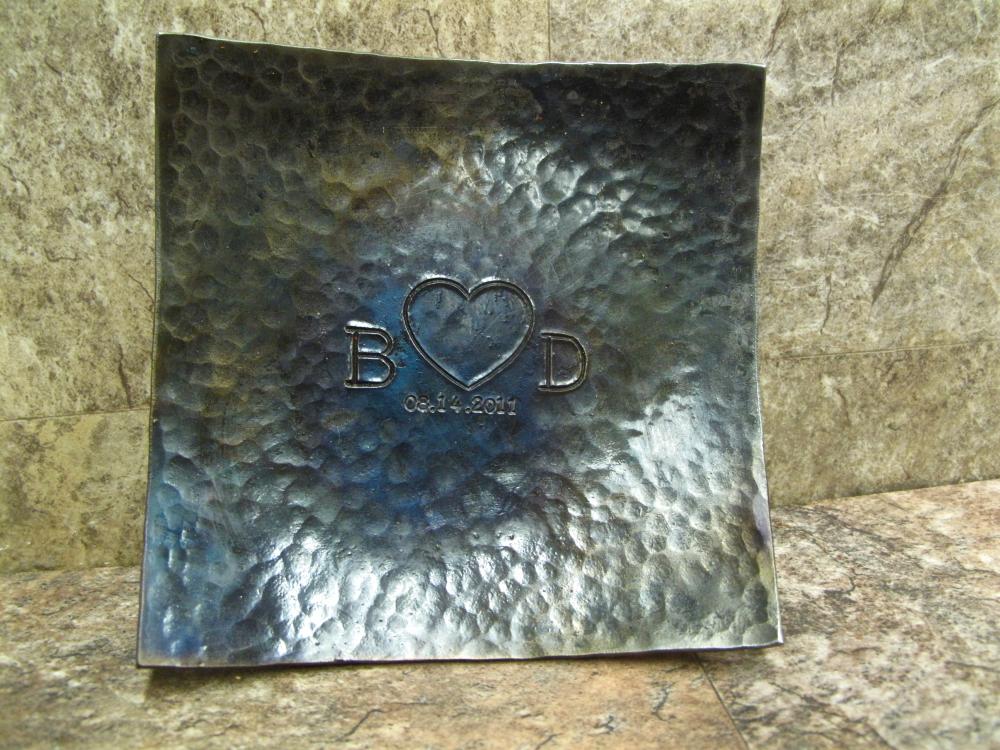
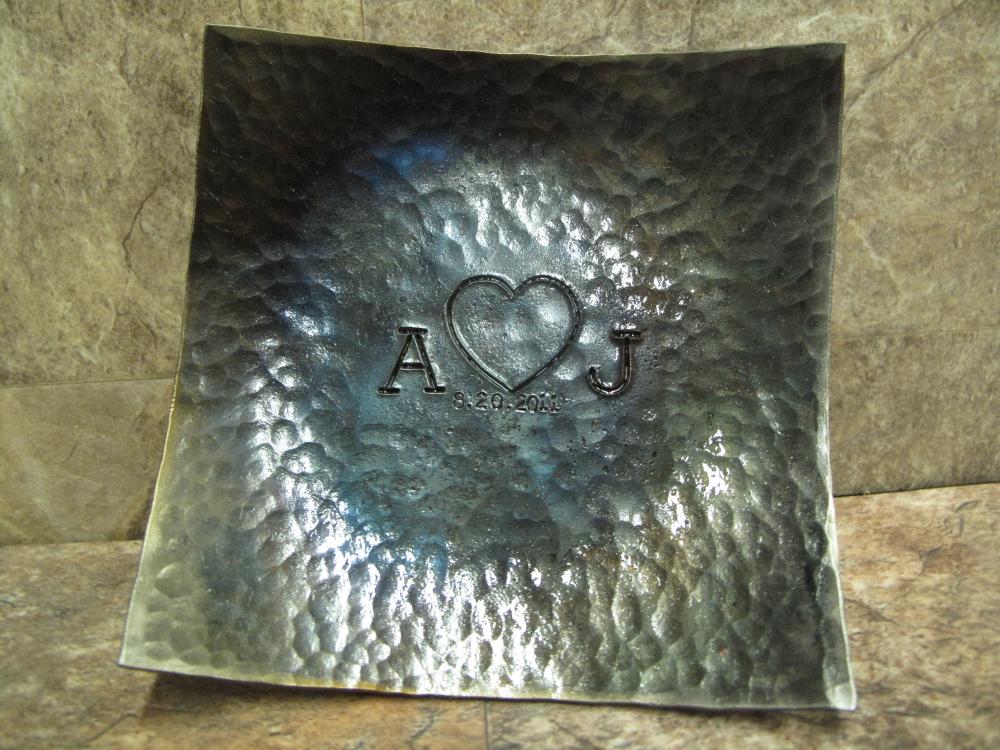
Got a couple of anniversary dishes forged, textured and carved. Always fun when someone wants to use my work as part of their anniversary celebration!
-
Use some old pallets to make a surround that looks "distressed" if that fits in with your motif. It's a whole lot cheaper than getting a new wife.
-
Actually lost track of one of the very first wall hooks I made. This was back in the day when I was trying to be "artistic" but didn't have a lick of sense. Turns out, I had nailed it to the wall beside the bathroom to hang a candle holder for when the power goes out. Dark hallway, shadows, never actually using that candle holder when the power goes out..... I totally forgot it was there until a few weeks back when I turned the hallway light on to better search for something else I had misplaced. Imagine my surprise!
-
Even better, in my opinion..... https://www.youtube.com/watch?v=F3rjjpuhCLI I'd love to get one of those 'rattle stones'. I have a friend over there and she hasn't been able to find one for me. Really makes you appreciate how much our ancestors had to go through to get us where we are today!
-
Bubba, I'm far from being an educated welder, so it's entirely likely that your way is the better way. I used the rods I had and that I'm familiar with. I've tried some thinner 6013 rods once or twice and it was an absolute nightmare experience. I can't seem to figure out what settings to put on the welder to get that stuff to run right, so I stick with what I know. Porosity? Probably. Could be my technique, the rods, the settings on the welder, or a combination of all three. Getting those three things to line up right..... that's the hard part! Got the adjustable square all painted and looking good. The Super Stump got flipped and I spent a few minutes going over the working face with the angle grinder. I'm going to need to weld up the big stamp down in the bottom of the depression, but she's looking pretty good with the 60-grit finish.

-
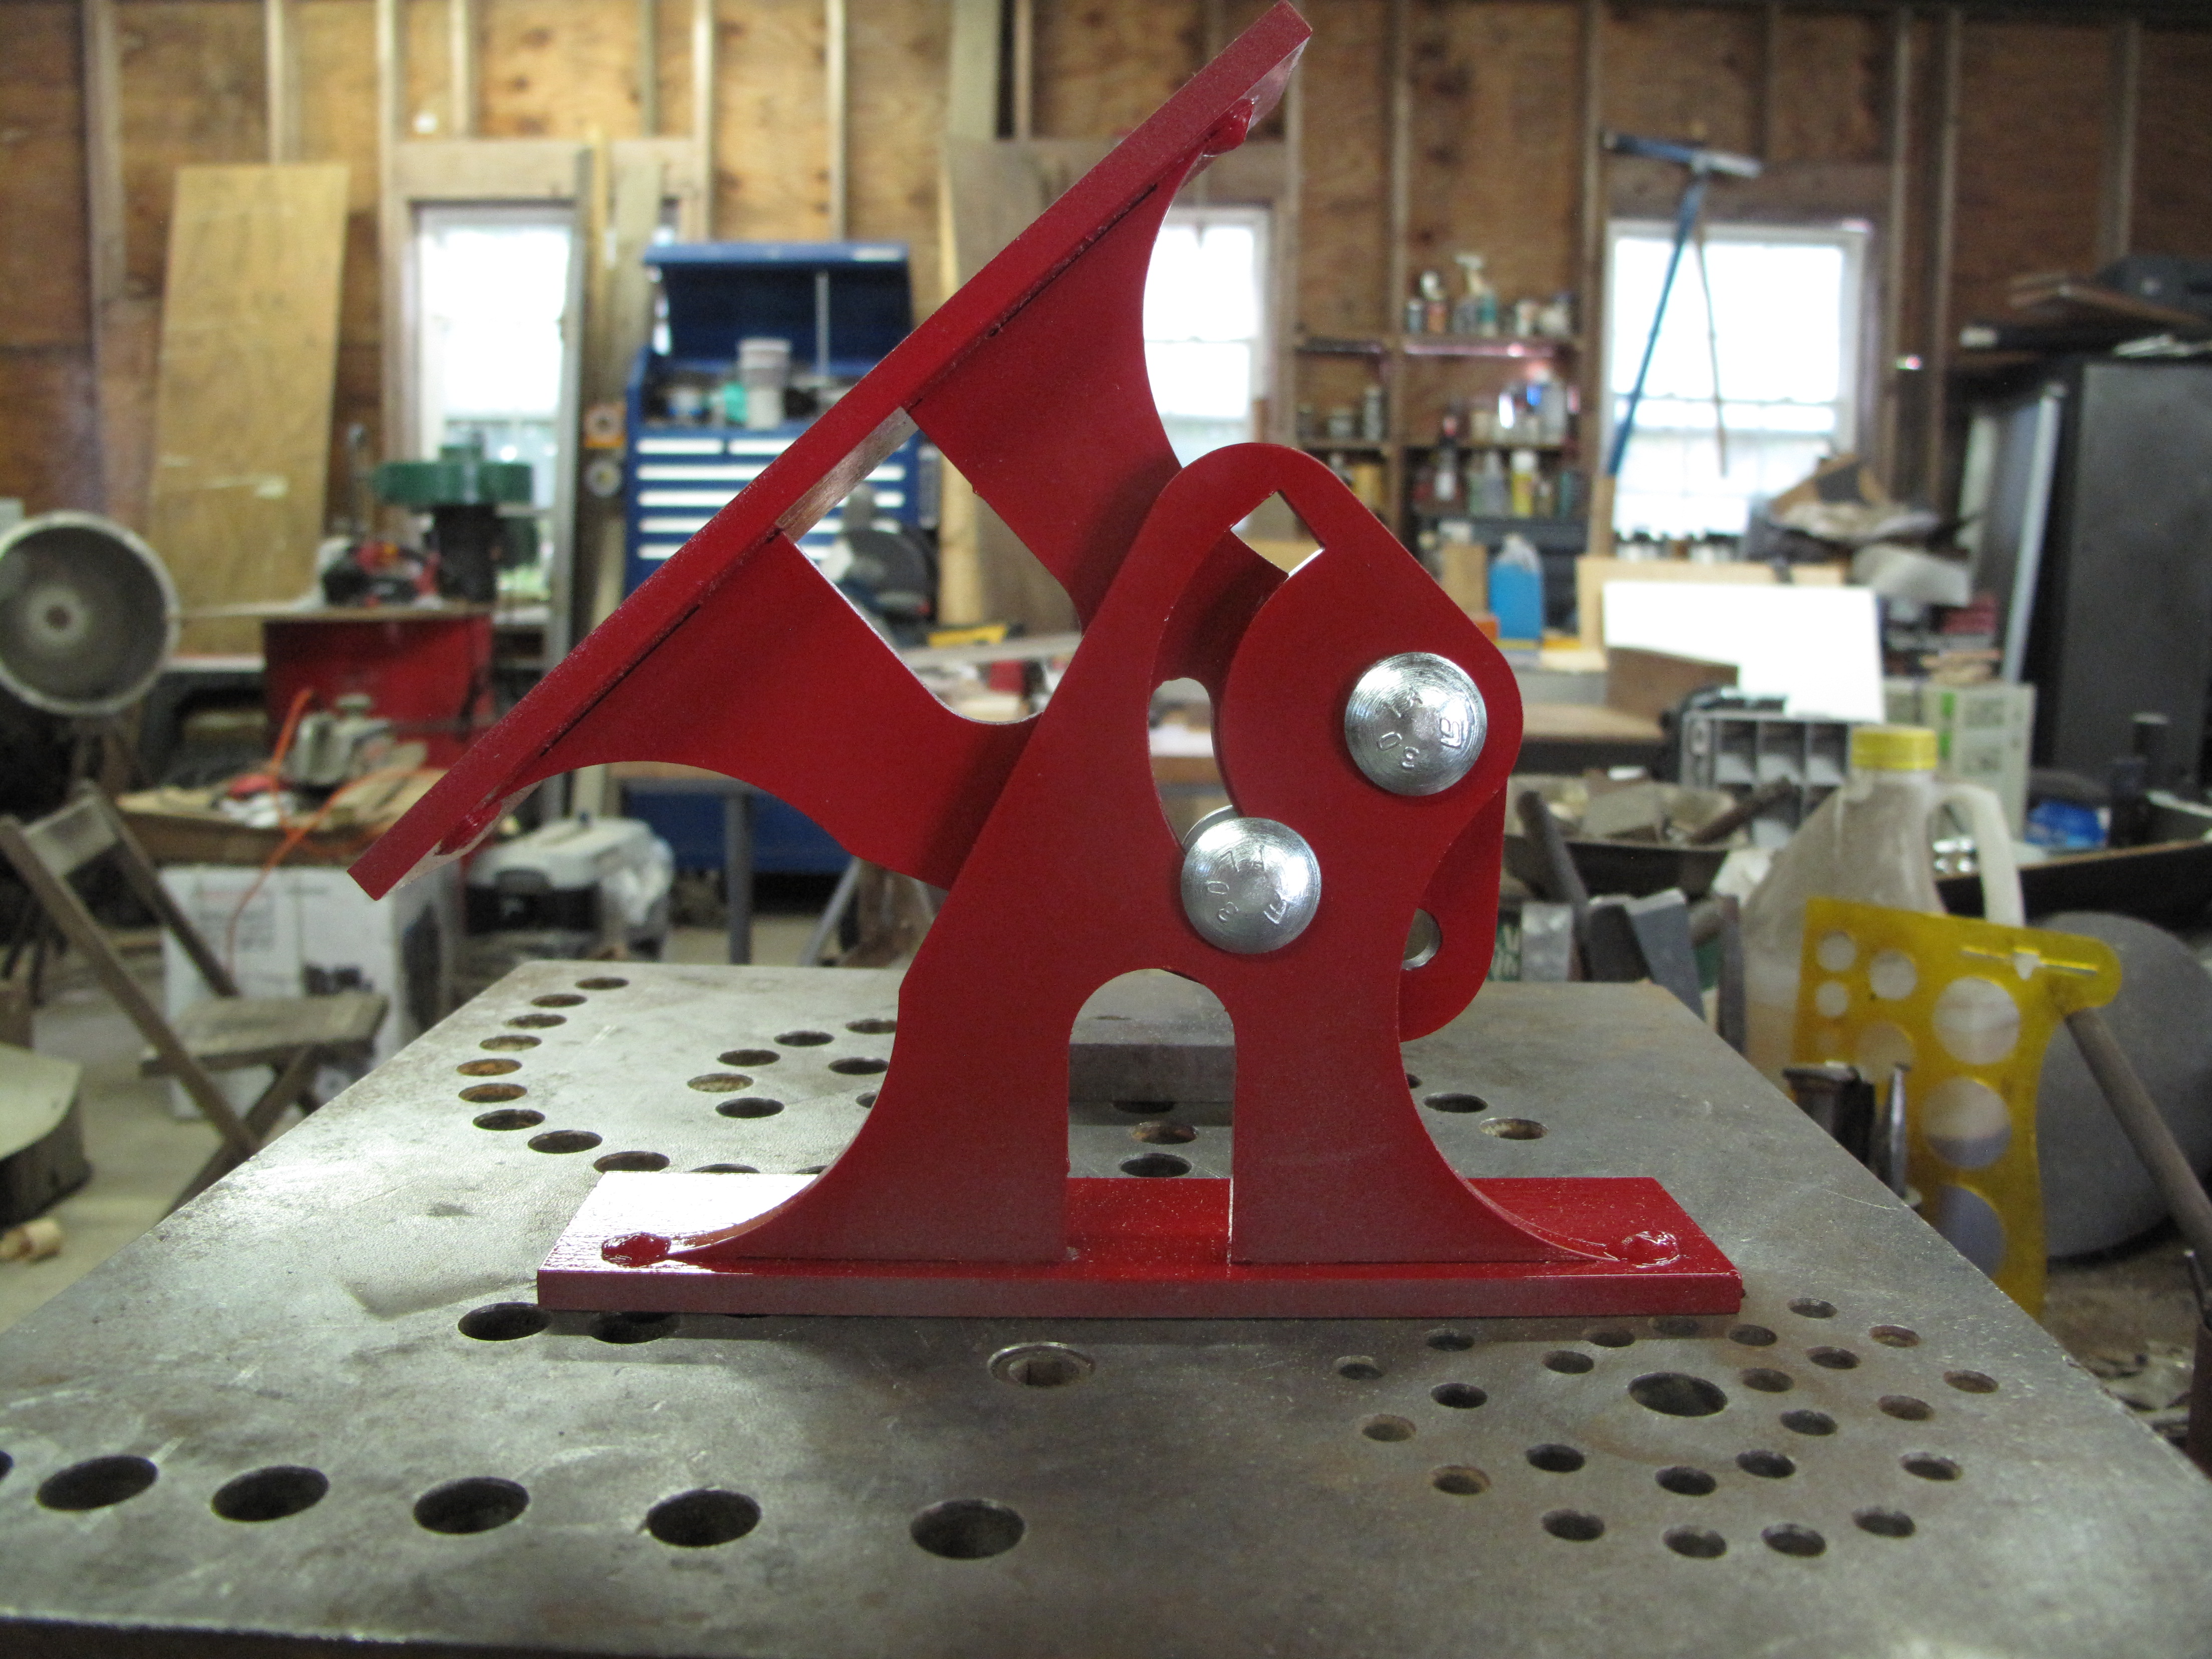
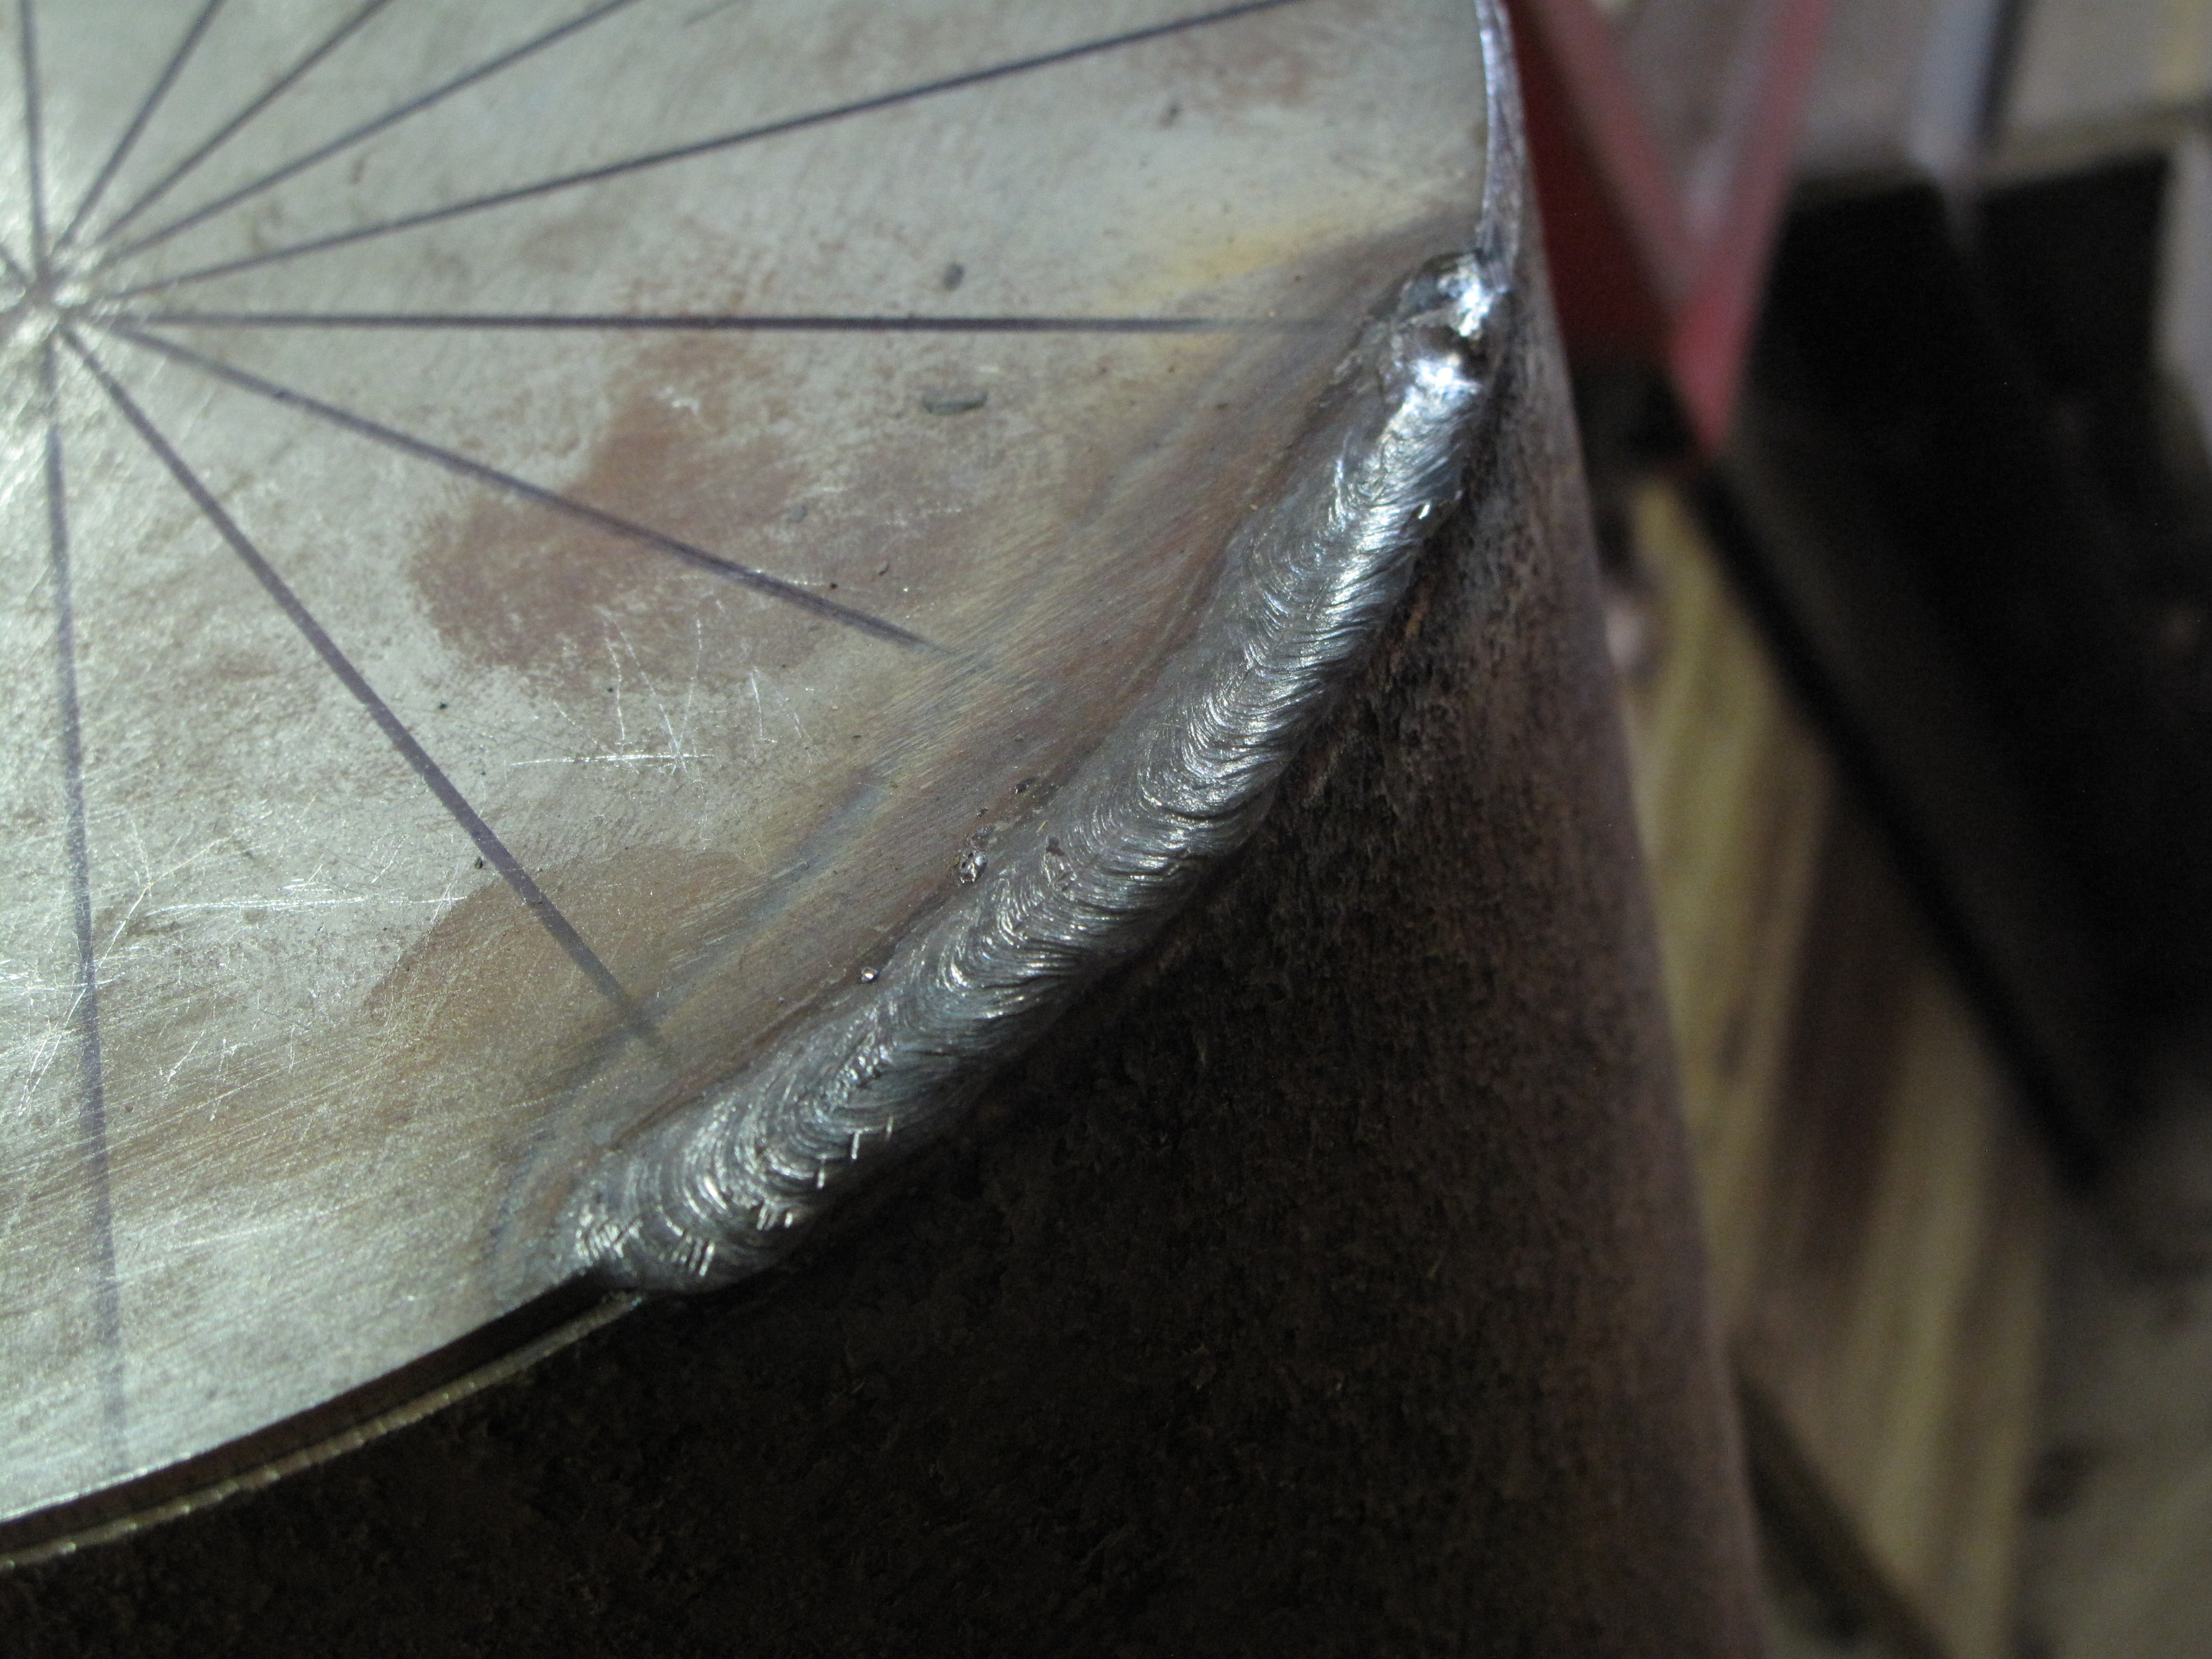
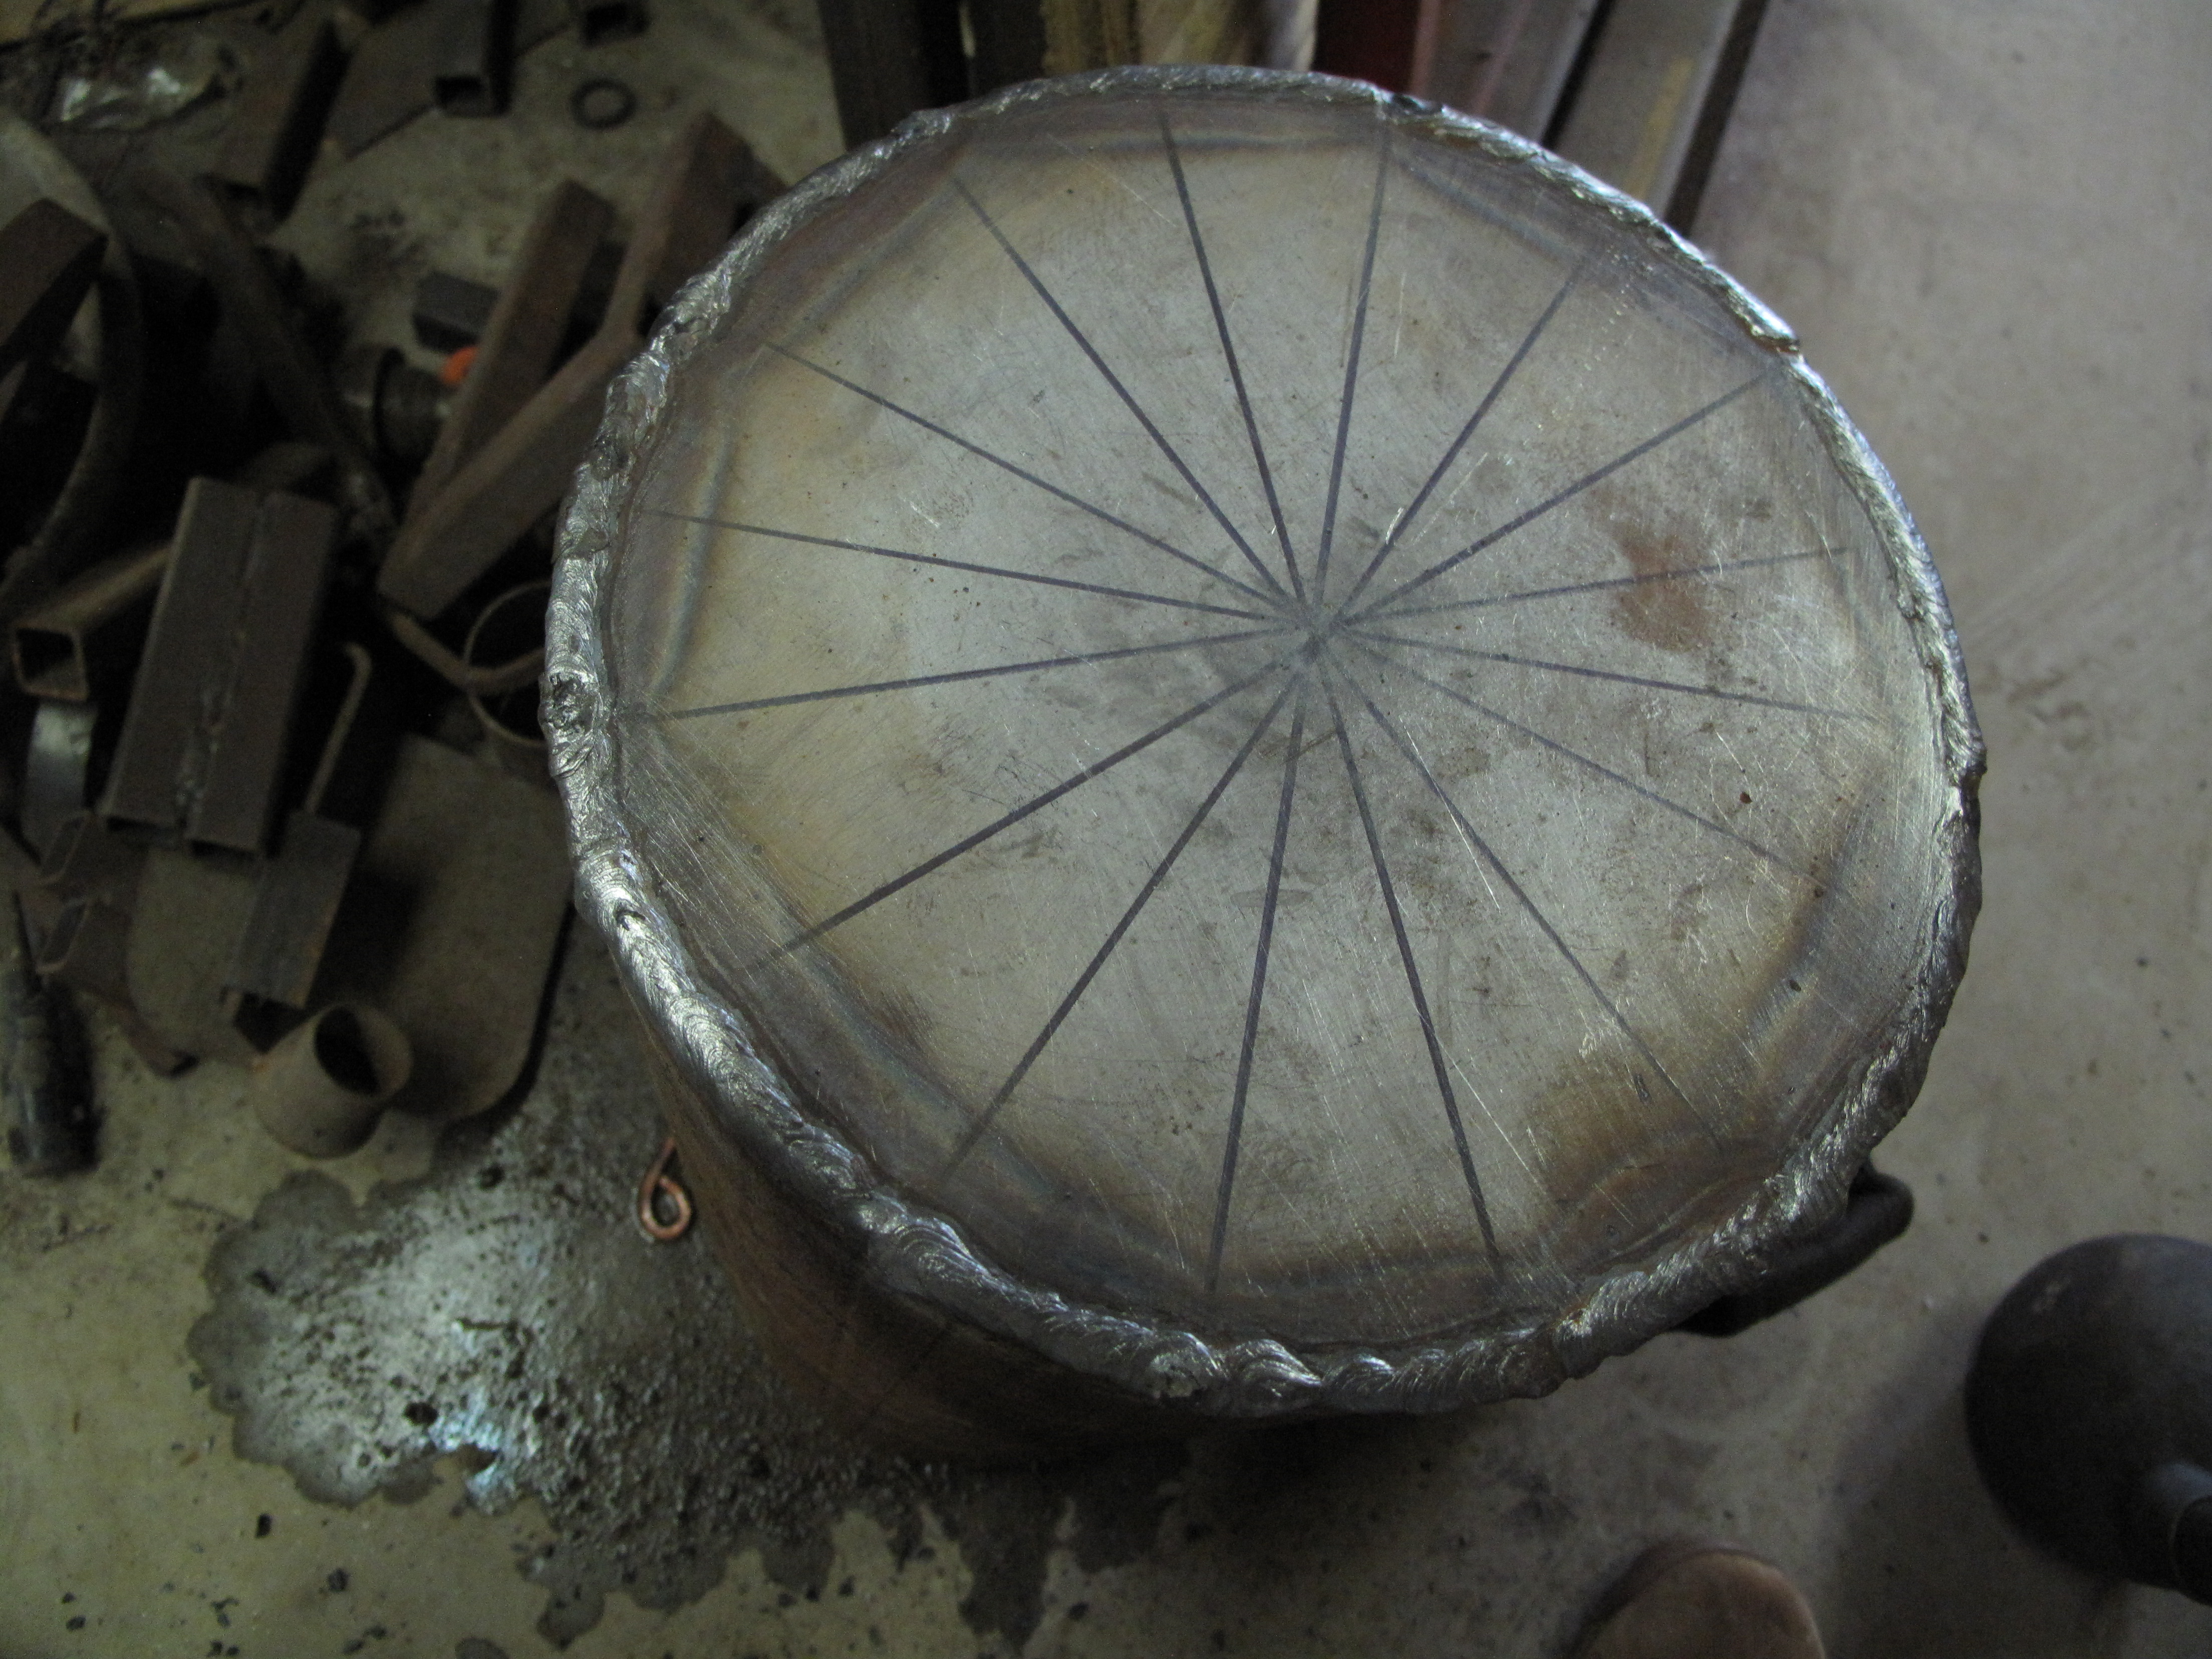
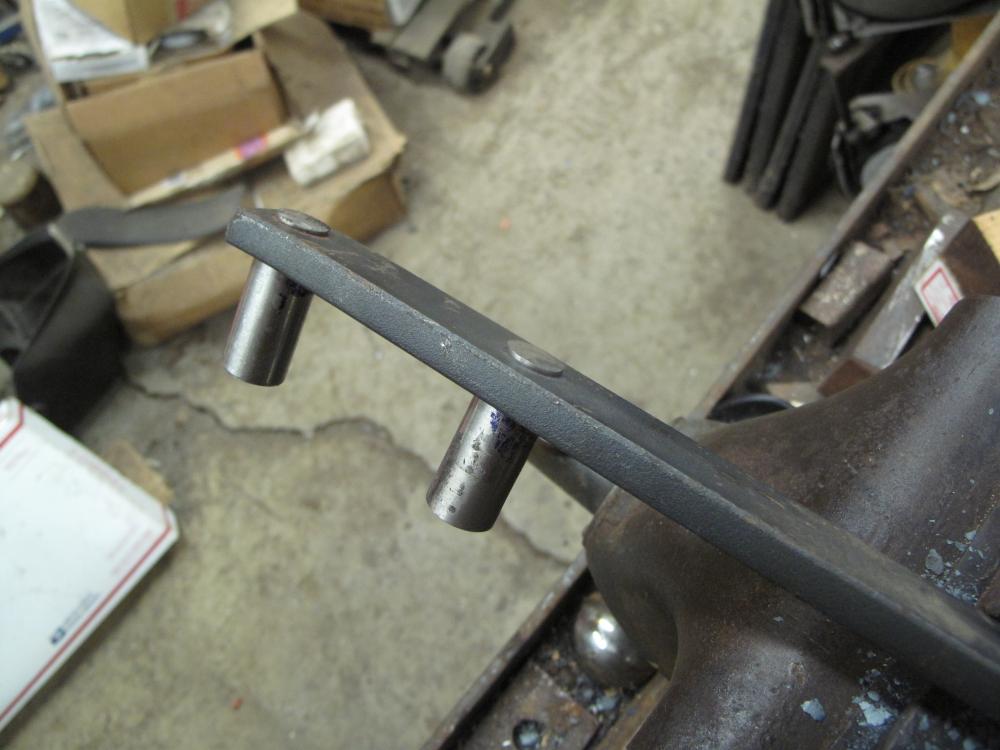
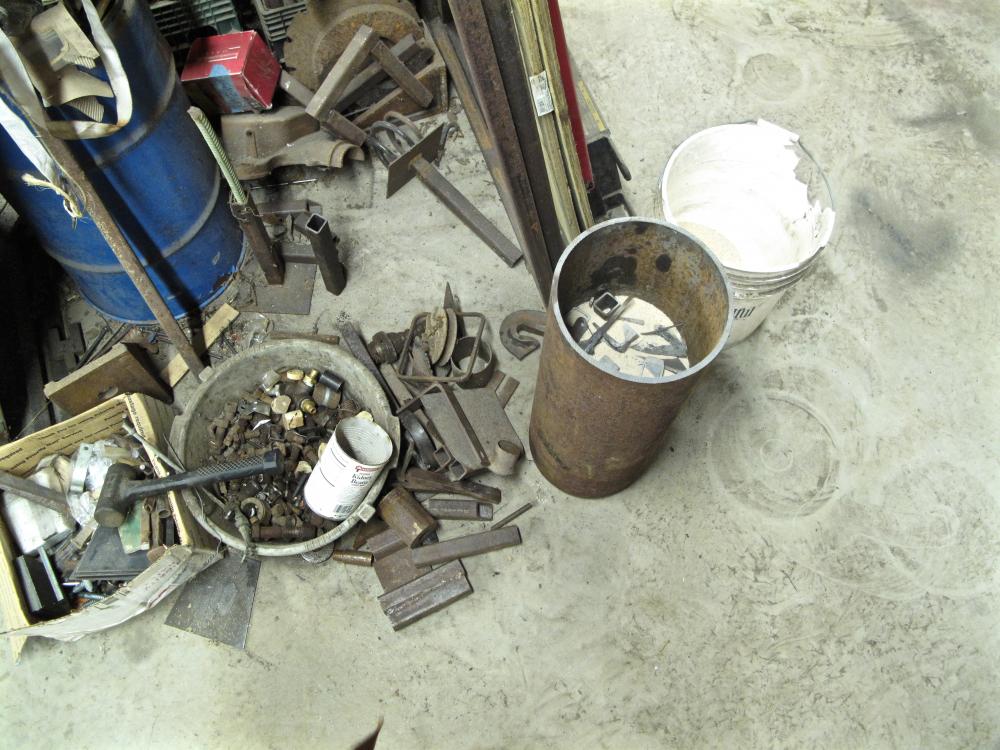
I don't get to do a lot of welding, so I'm always happy when I project comes along. In this case, I filled an old nitrogen tank with sand, oil and scraps of steel to make a nice heavy dishing stump. No idea how much it weighs right now, but I'm betting it's every bit of 300 pounds, if not more. The base plate is 1/8" mild steel I had cut just a hair undersize. The OD of the tank was about 9.125", so I figured having that little lip would give me a nice clean surface between the plate and the freshly cut end of the tank. I wasn't disappointed. Using 1/8" 7018 with my machine set around 116 amps, I went around the perimeter as good as I could manage. Short bead, then go to the opposite side and run another short bead. Once it was tied down at four points, it was just a matter of filling it in. I still have to grind all the beads down so the stump will sit nicely on the floor, and I might have to do some fill-in work if I see any problems. Overall, though, I think it's water-tight and I won't have to worry about the oil eventually leaking out! Interestingly, I noted that whenever I get into long beads like this, I seem to be better going from right to left rather than left to right. No idea why that is, but.... Oh, and to get warmed up a little bit, I tacked together this neat little adjust able angle contraption I picked up. It comes as a kit and all the pieces are laser-cut. All you have to do is tack it at a few points and then bolt the two pieces together. When I saw it, I thought it would come in very handy when I'm building things, acting as something of a third-hand. Clamp one side to the table and the other side to whatever I need held. Being adjustable, I can swing it to any angle and then lock it tight.

-
I've never understood wrapping feet of chain around an anvil. It doesn't mute the ring because the horn and the heel are the parts that ring. If you put a small magnet on the underside of those parts, the ring dies quickly and the anvil is bearable to be around. Tons of chain will add weight and keep people from considering the theft of your anvil..... for a few minutes. Said chain also gets in the way when you're bending over the edge of the anvil. I just made three brackets for a customer and bent all three of them over the far edge. The 4" leg going down the side of the anvil would have hit on a lot of the chain wraps I see people doing - and I've got a pretty big anvil. Does it look good? Honestly, I don't think so. While I agree that it's a subjective thing, I think it's far more attractive to use finely crafted spikes, staples, fences or other methods that actually showcase your abilities. Even if nobody but you ever sees it, you get to look at it every day and be inspired. Of all the ways to keep an anvil on the stump, chromed or galvanized chain, with store-bought bolts and such, is about as garish as it gets. I understand beginners have to start somewhere, but I encourage folks to think outside the box, try new and interesting things, and dress it up to the best of your ability. If you start with shiny chain and bolts, plan to do something better after you've got some forging time under your belt. It's those little details that make a tremendous difference.
-
I do like the idea of doing the combo stand with your vise. Kovko Kova4 has a similar set up on his youtube channel and it looks pretty handy. Since you already have a "proper" anvil and are just using this one as a traveler or odd-job type anvil, I'd go with as minimal a base as you can get. As Thomas pointed out, the flat base is great on a flat concrete floor, but anything that's even a little uneven will cause aggravating instability. I like that you're going for something other than the bucket of cement. Classing up your stand will be a good way to showcase your artistic side to anyone that sees the thing, and you never know how that will impact their thinking of you. Even if nobody ever sees it, just having good-looking equipment in your shop is motivating and invigorating. It's good for the soul.
-
The Tractor Supply near me sells 7014 rods for a few bucks cheaper than their 7018 rods, so I picked some up test. I don't know why they worked so much better than the 7018s I normally use, but they were pretty dang dreamy. I'm just a hobby welder on the best of days, but those 14's made me look almost competent!
-
Worst case scenario, you can pretty much be sure that it'd have enough power to press thin sheet metal. You could set up some dies to help make acanthus leaves, rosettes and such things. It's not much, but it might be a whole lot better than trying to do them all by hand.
-
Thank you. Nothing better than creating something that gets the job done in a stylish manner! Even short lengths of pipe can look good if you do it right, and there's no sense in doing it wrong. The quality keeps me inspired.
-
I'm sure you'll all be happy to know that the Puck is still working well. I've made a bunch of little dishes with it and she's a bit worn, now. Still, hammering eighth-inch cold steel will tend to scratch things up a bit and I can't fault her for being a bit roughened. I was given a couple nitrogen tanks by a friend and am turning the bottom of one into a sit-down dishing stump. These are old tanks with thick walls, but I'm still filling the stump with sand and oil to help deaden noise. Between the Puck and the Stump, I'll be a bowl-making fool!
-
Getting my super stump filled up. Sand, oil, scraps of steel.... this thing weighs a ton and I can't wait to get her finished!
-
Well, I sure didn't get to make a sexy chandelier! I spent the day making 10 simple coat hooks. Seems like it shouldn't take a day to do it, but I had a reporter from the local newspaper want to do an interview and I made him swing the hammer so he'd learn firsthand what it was like. Took forever, but it was great fun and I'm actually looking forward to seeing how the piece comes out.
-
Honestly, there's only one fab/layout table that really impressed the snot out of me and got me thinking about duplicating it. Complicated to make, but simple to use, and very very handy..... I like the slots in the table that allow you to use any of your clamps rather than relying on specialty-made stick-in-a-hole doo-dads. Being adjust able for height would be such a convenient thing in my world!
-
Sadly, South Carolina isn't much on oil production. Even if there were some down around the coast, having to drive 4 hours to get some rod makes it far more costly than just buying new known-alloy. Every once in awhile I can strike up a good trade with folks that live in oil country and have the sucker rods on every street corner.