VaughnT
Members
-
Joined
-
Last visited
Everything posted by VaughnT
-
I'm glad you guys are enjoying it, and I hope you'll post some pics of your trial pieces. It's pretty quick once you get a feel for what you're doing and it makes for a nice way of decorating metal.
-
I'm all about exchanging openers. If you ever decide you need an American opener, shoot me a PM and we can trade. I'd love to get a Spanish bottle opener!
-
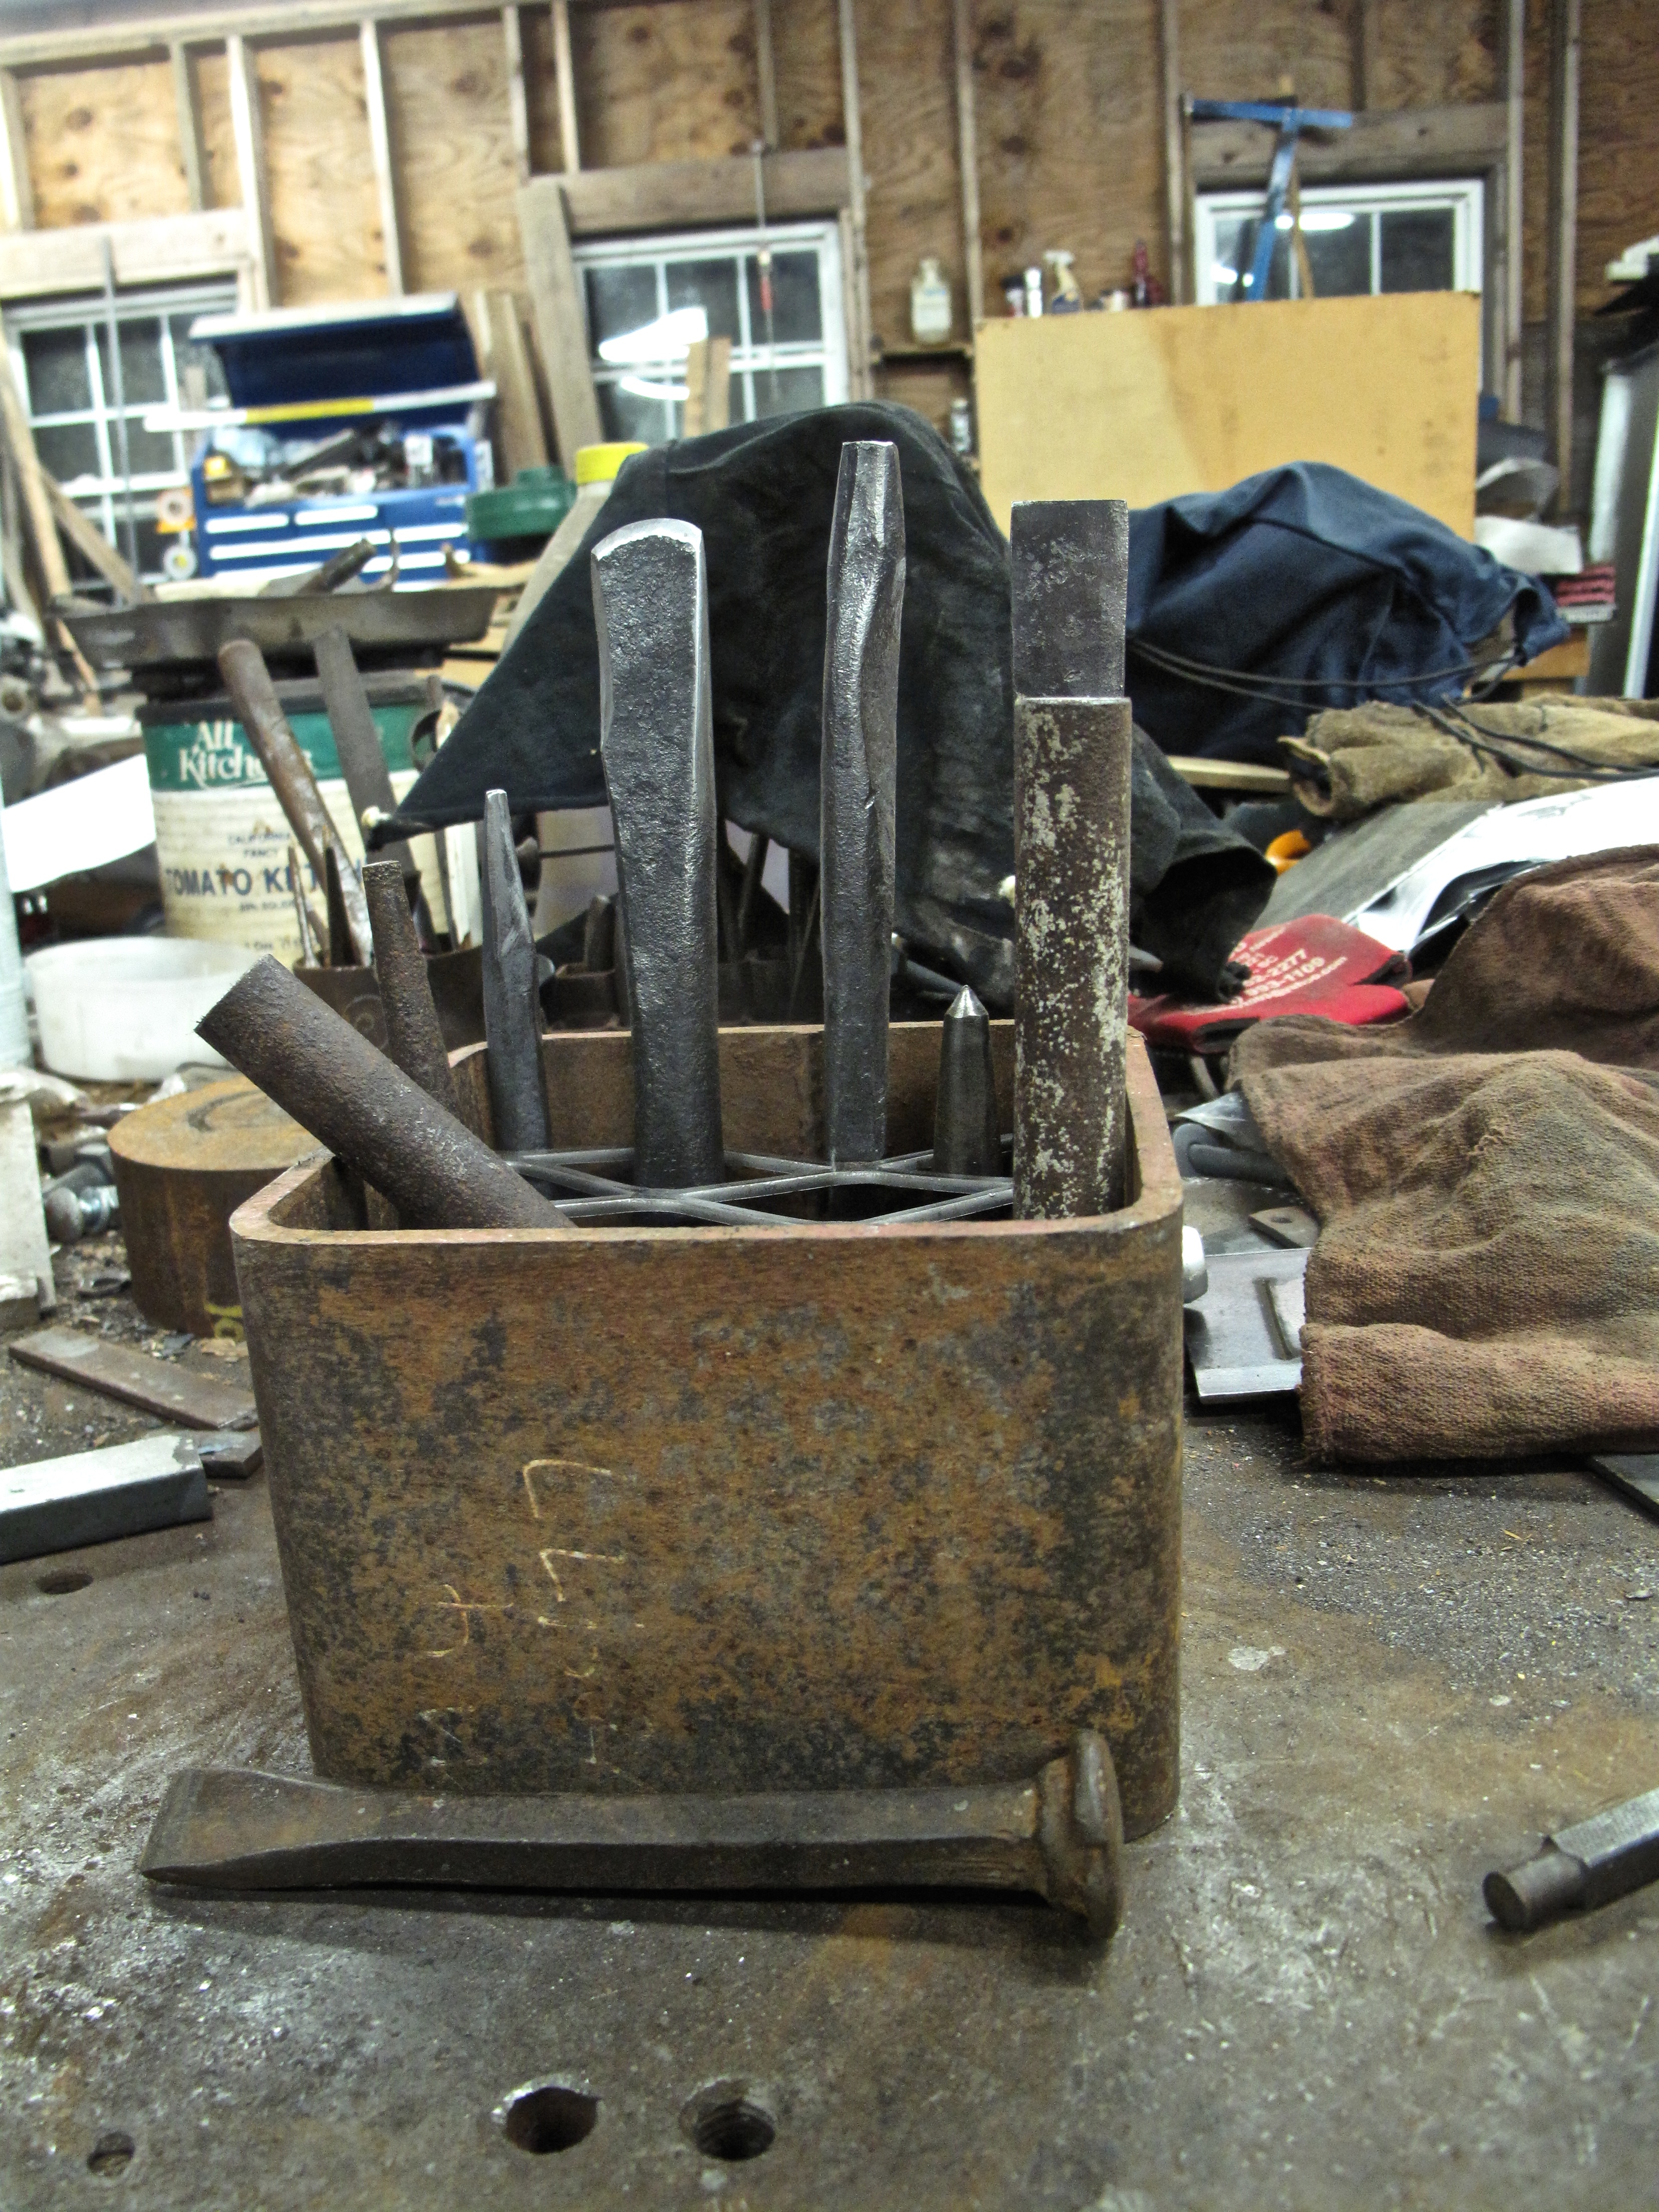
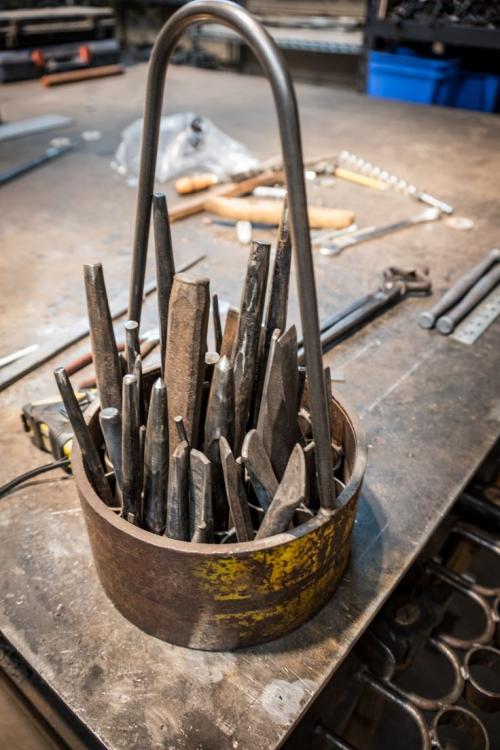
Well, I found a bit of 6" square tube in the scrap pile. I was going to cut off a chunk of 8" round pipe I have, but saw this sitting there looking all forlorn. Since it was already about the right length, I decided to put her to work. Only had to cut off a half-inch to clean up the torched end... I still have to cut the second piece of expanded metal to fit in it. And I'll have to decide what I want to do for the bottom. And I need to decide how I can put a handle on it... or if I even want to. 6" square and 1/4" wall, it weighs a good bit as-is. After loading it with chisels, I can't see moving it very often - especially once I have the new tong rack/cart finished. Definitely has that heavy industrial vibe.
-
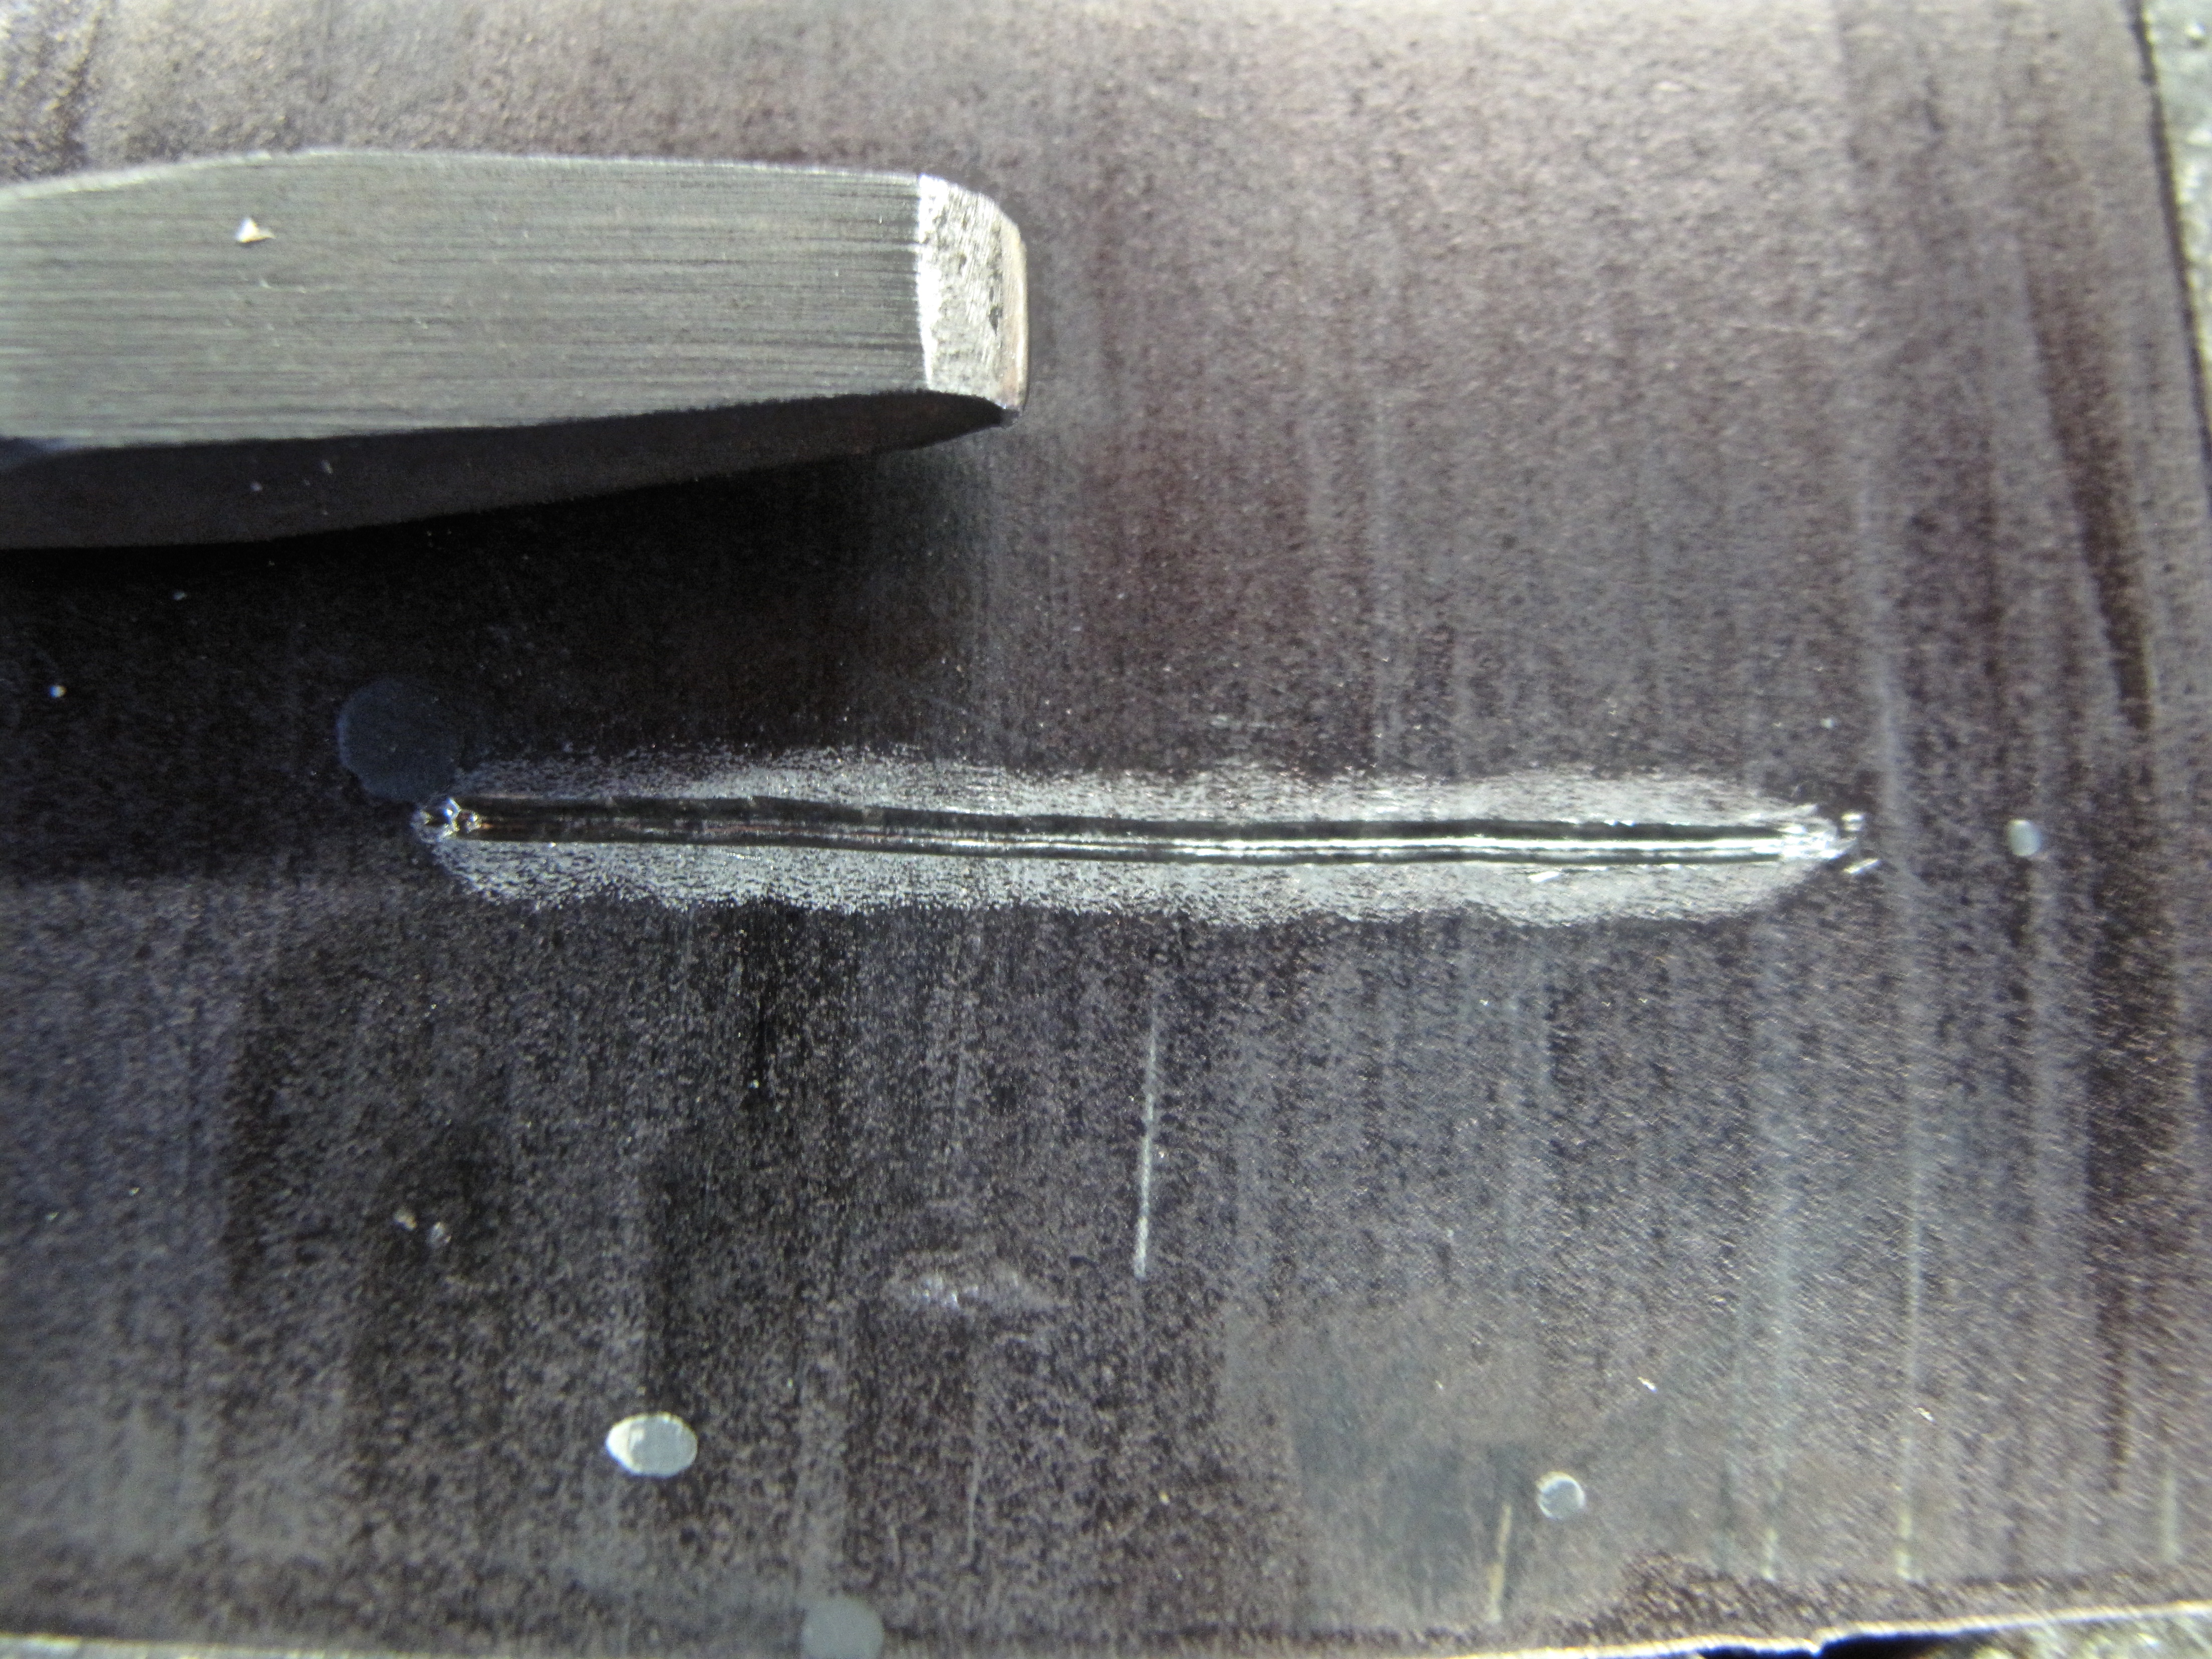
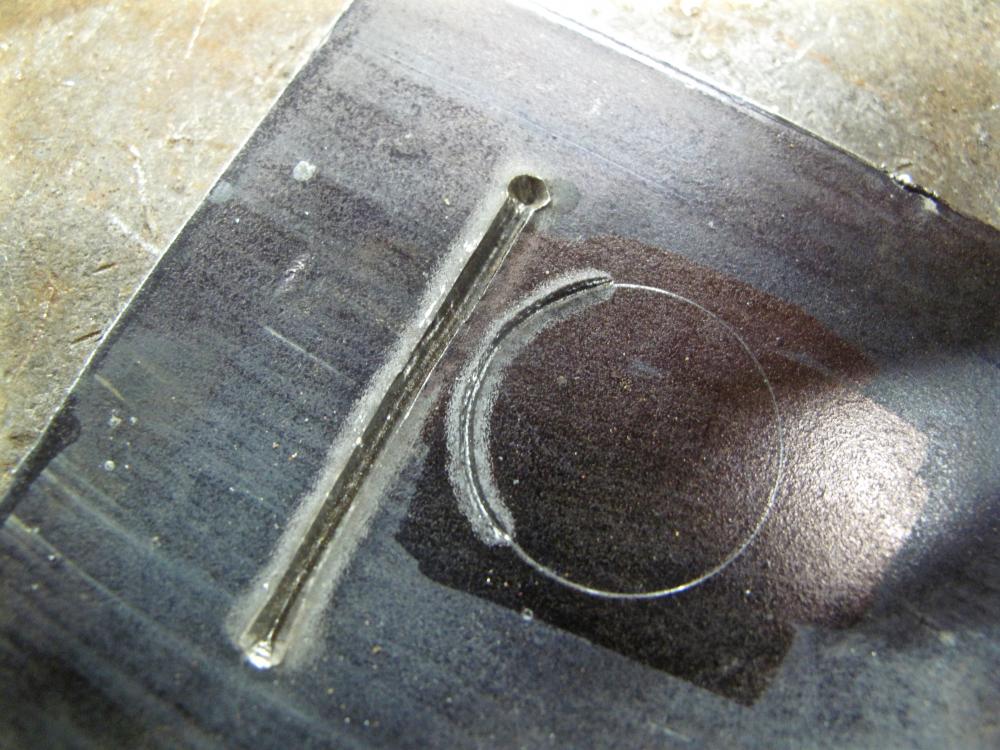
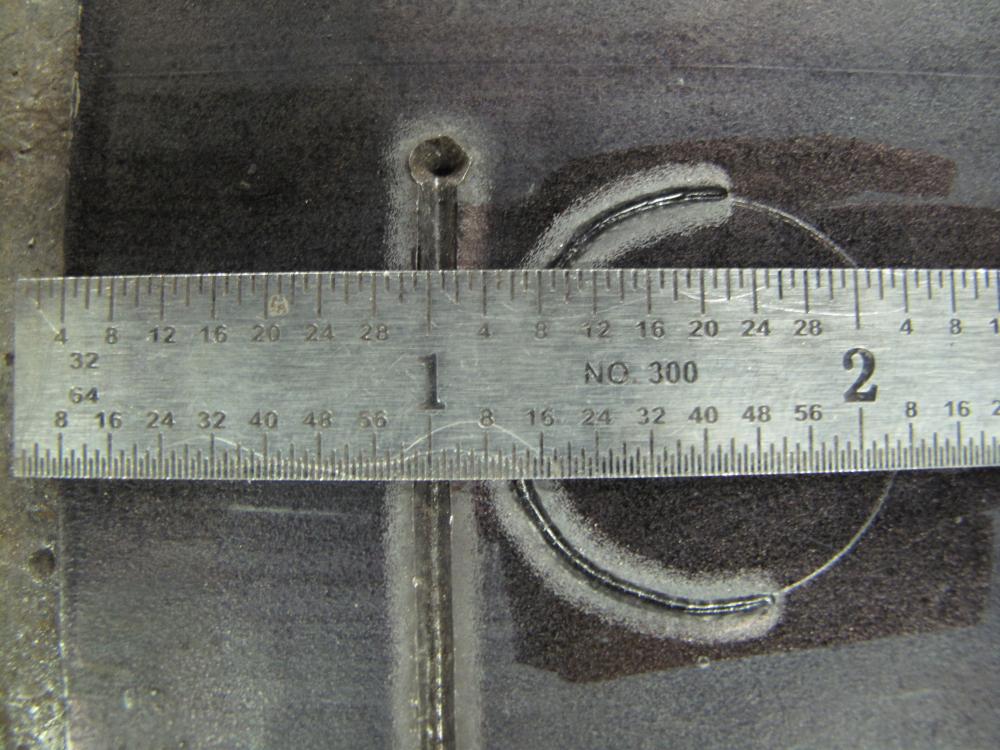
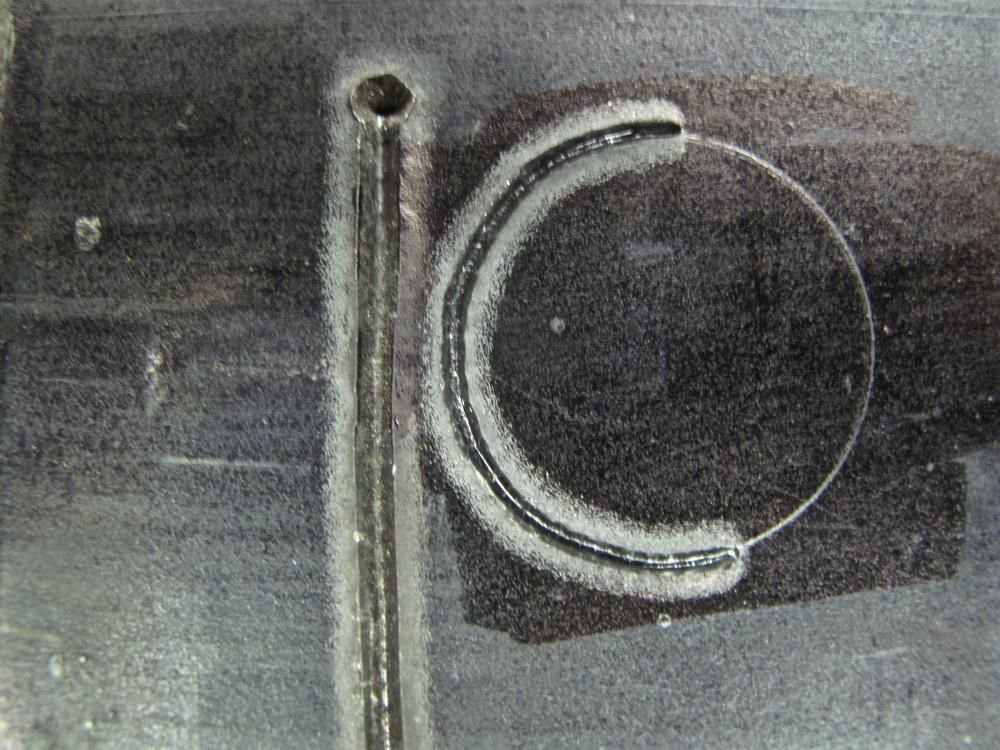
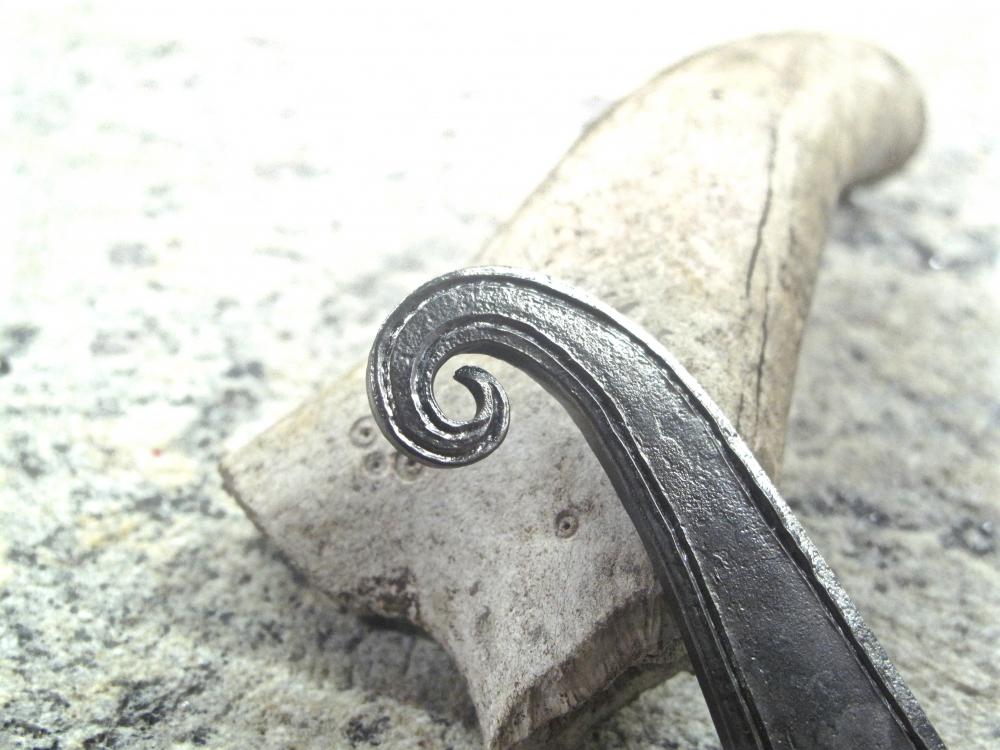
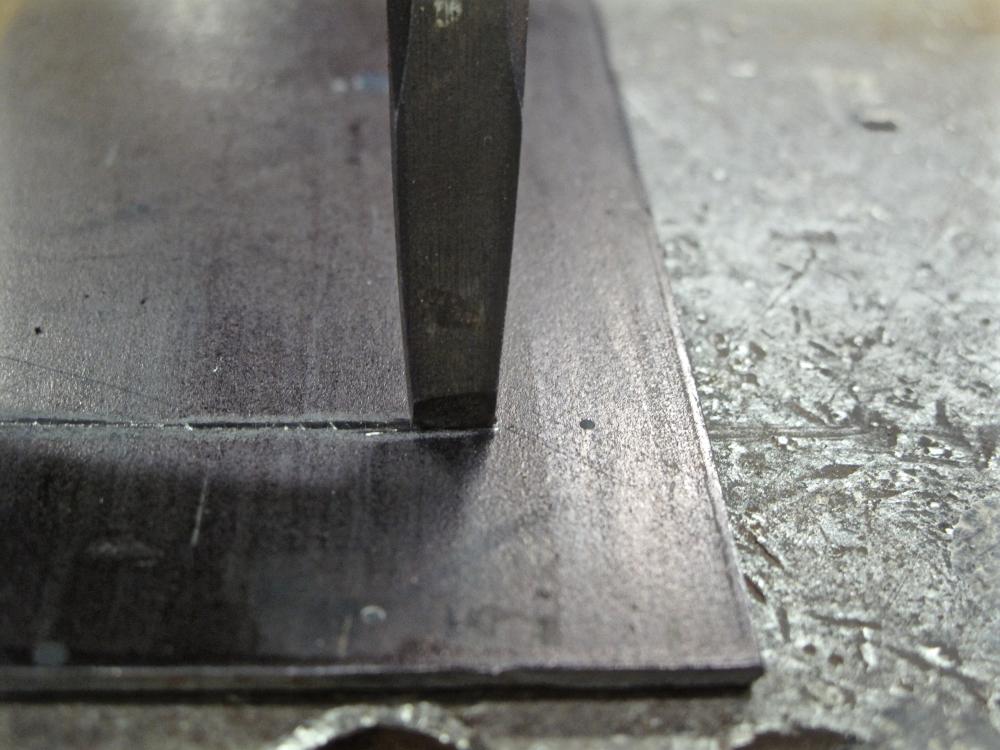
The Curved Line: Picking up where we left off, let's talk about making a nice curve with nothing but a straight chisel. In this case, I put my circle close to the line I've already carved. A lot of designs will require close proximity and you want to be sure that you don't move metal over into the line you've already finished. When the lines are close, I like to start at the nearest point so I can judge how the metal is moving. If you look at the chisel in relation to the scribed line, you'll see that the chisel does pretty good at matching the arc of the radius that it's setting on. Makes it easy to envision how the rest of the process is going to work. Just like the straight line, we make a light tap on the chisel and move down one edge length. The only difference is that this time we are careful to rotate the chisel just a hair so the edge matches the curve of the arc. Once you have the line well established, you can go over it several times to deepen the line and smooth it out. If you want a wider mouth to the cut, you need do some finish work with a chisel that has a more obtuse angle to the grind. Start with the fine edge, establish your line, deepen it.... then widen the whole thing with a second chisel so it better matches the straight lines in your design. As long as the length of the edge is around 1/8", you're golden. The short edge is what allows you to turn a tight curve How tight a curve can you make? Well, this Kokopelli has a head that's about a quarter-inch across.

-
You only need to make a form that's got the right radius. No need to make the complete circle as a form. With chalk and a string, you can layout the radius on the floor, or scratch it in the dirt. Then finagle the bar to shape. If necessary, cut the rim piece into sections so it's more easily handled.
-
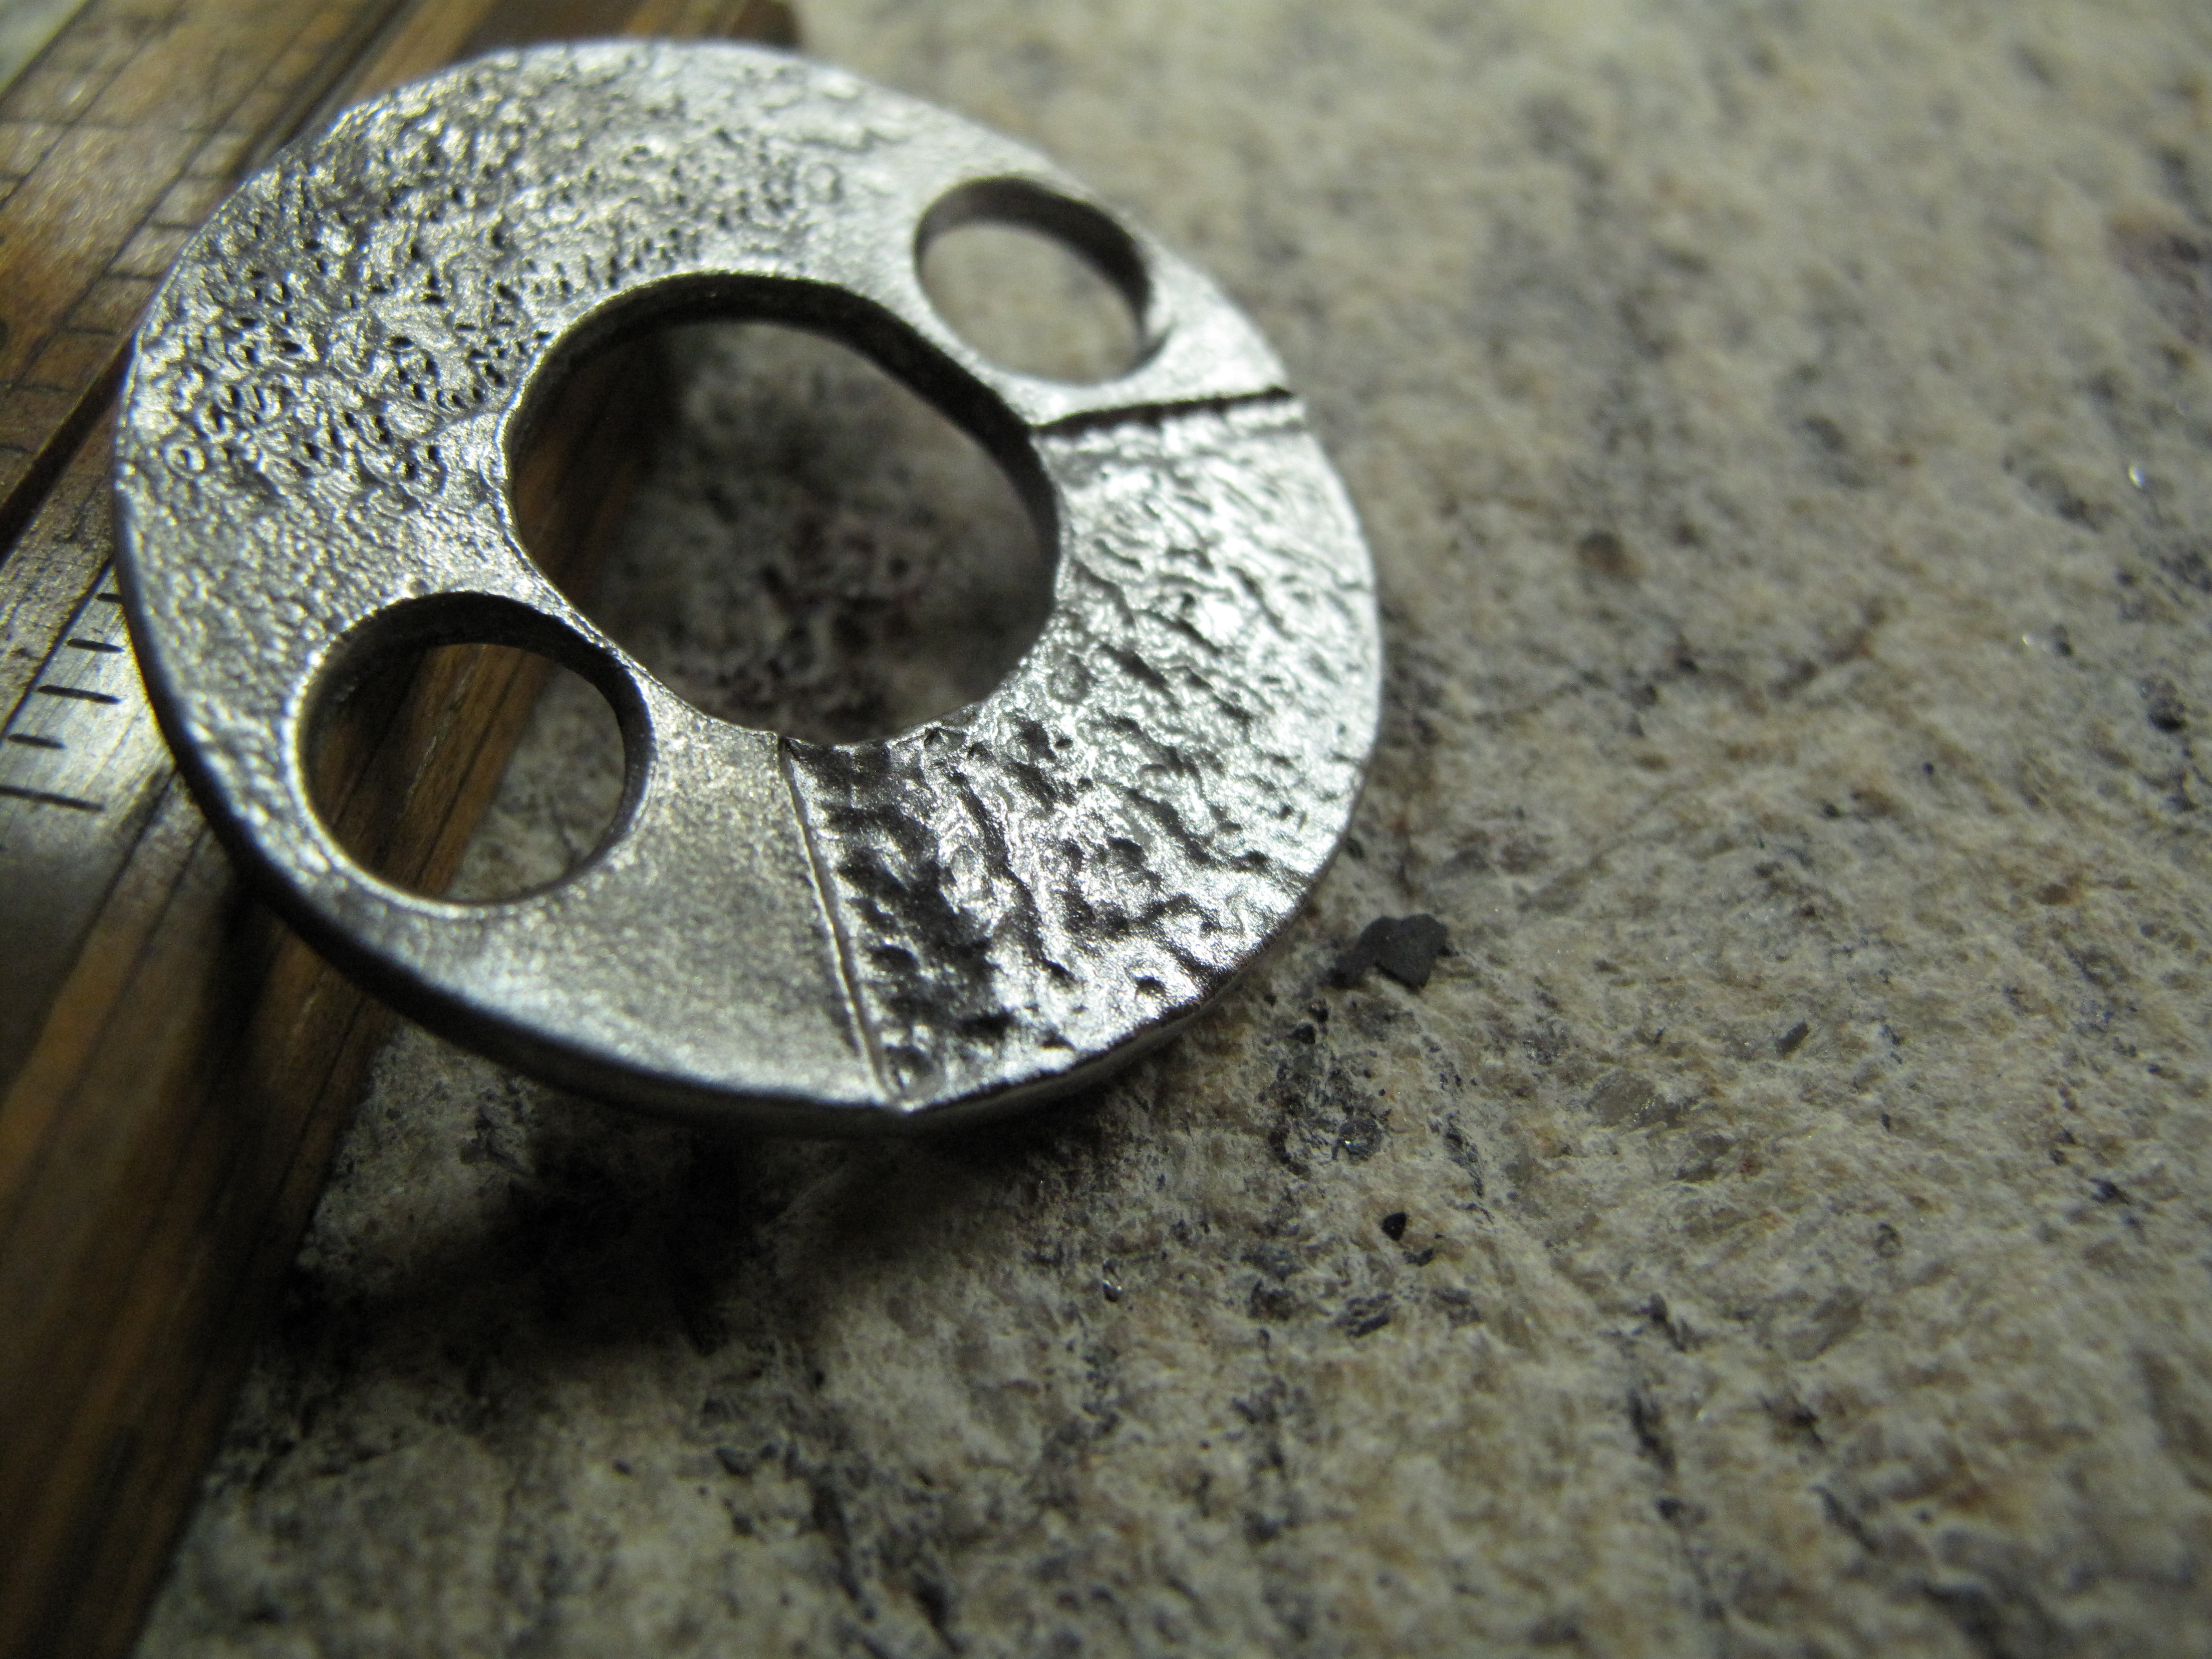
I have a pair of off-set box jaw tongs for holding 1.5" flat bar. They get used very rarely in part because there just isn't much need for the offset feature in general smithing. My standard box jaws and v-bit bolt tongs.... used all the time. I prefer my tongs to be inline with the work I'm doing unless there's just no way around it. When building up your collection of tongs, I'd start with the v-bit bolt style simply because it's very versatile. One pair of 1/2" will also hold 3/8" as well as flat bar between the corners. That's one pair of tongs that will hold three different sizes and shapes of metal, with plenty of room for a curl or curve to pass out the side.
-
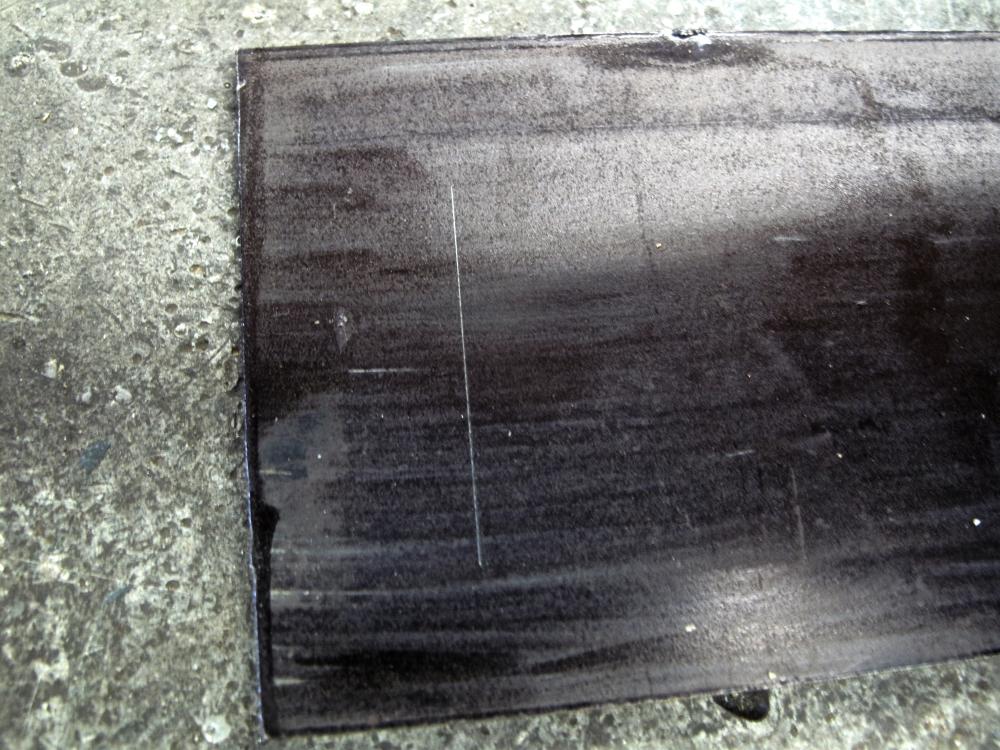
Glad folks are finding it of value. To give a sense of what's happening in the metal, I tried my hand at a poor-man's computer modeling... When you start with the big chisel, you make a shallow cut that matches the grind of the bevel - basically a wide-mouthed valley. Switching to the mid-size chisel with a more acute grind, you end up missing a good bit of the sides of the cut. This allows you to apply all of the force of your hammer blow to the valley of the cut, increasing the depth without spreading the top and creating a wider overall line. The smallest chisel with the knife-like edge, bypasses the majority of the side and goes straight into the bottom of the cut. With almost no edge length or sidewall contact, you get deep penetration with a light tap. This leaves you room for any wax buildup when you coat the metal, leaving the visible carving plenty deep and looking sharp. Because we're not removing metal like with engraving, the metal has to go somewhere. This generally means that you'll have ridges that stand proud of the parent metal. This adds to the depth of the cut and gives the piece a nice tactile feel to it. I'm generally not interested in getting rid of these ridges because I'm carving on textured steel and it only adds to the overall look. If you were working on smooth steel and wanted to keep it smooth, you'll need to plan on sanding and filing this part down. Next installments...... Curved Lines Textured Fields Copper Inlay Working on a pendant..... As you can see, I'm up close and personal with the metal. My bench has a top that's 1.25" thick and the whole thing has to weigh about a gazillion pounds, so it's almost as good as working on the anvil. The anvil, however, has solidity and isn't nearly as noisy so I often use it. That's a mighty tight curve, and in high-carbon steel, too! Took a few minutes and a few curse words, but it was worth it in the end. Carving and texturing adds to the possibilities.


-
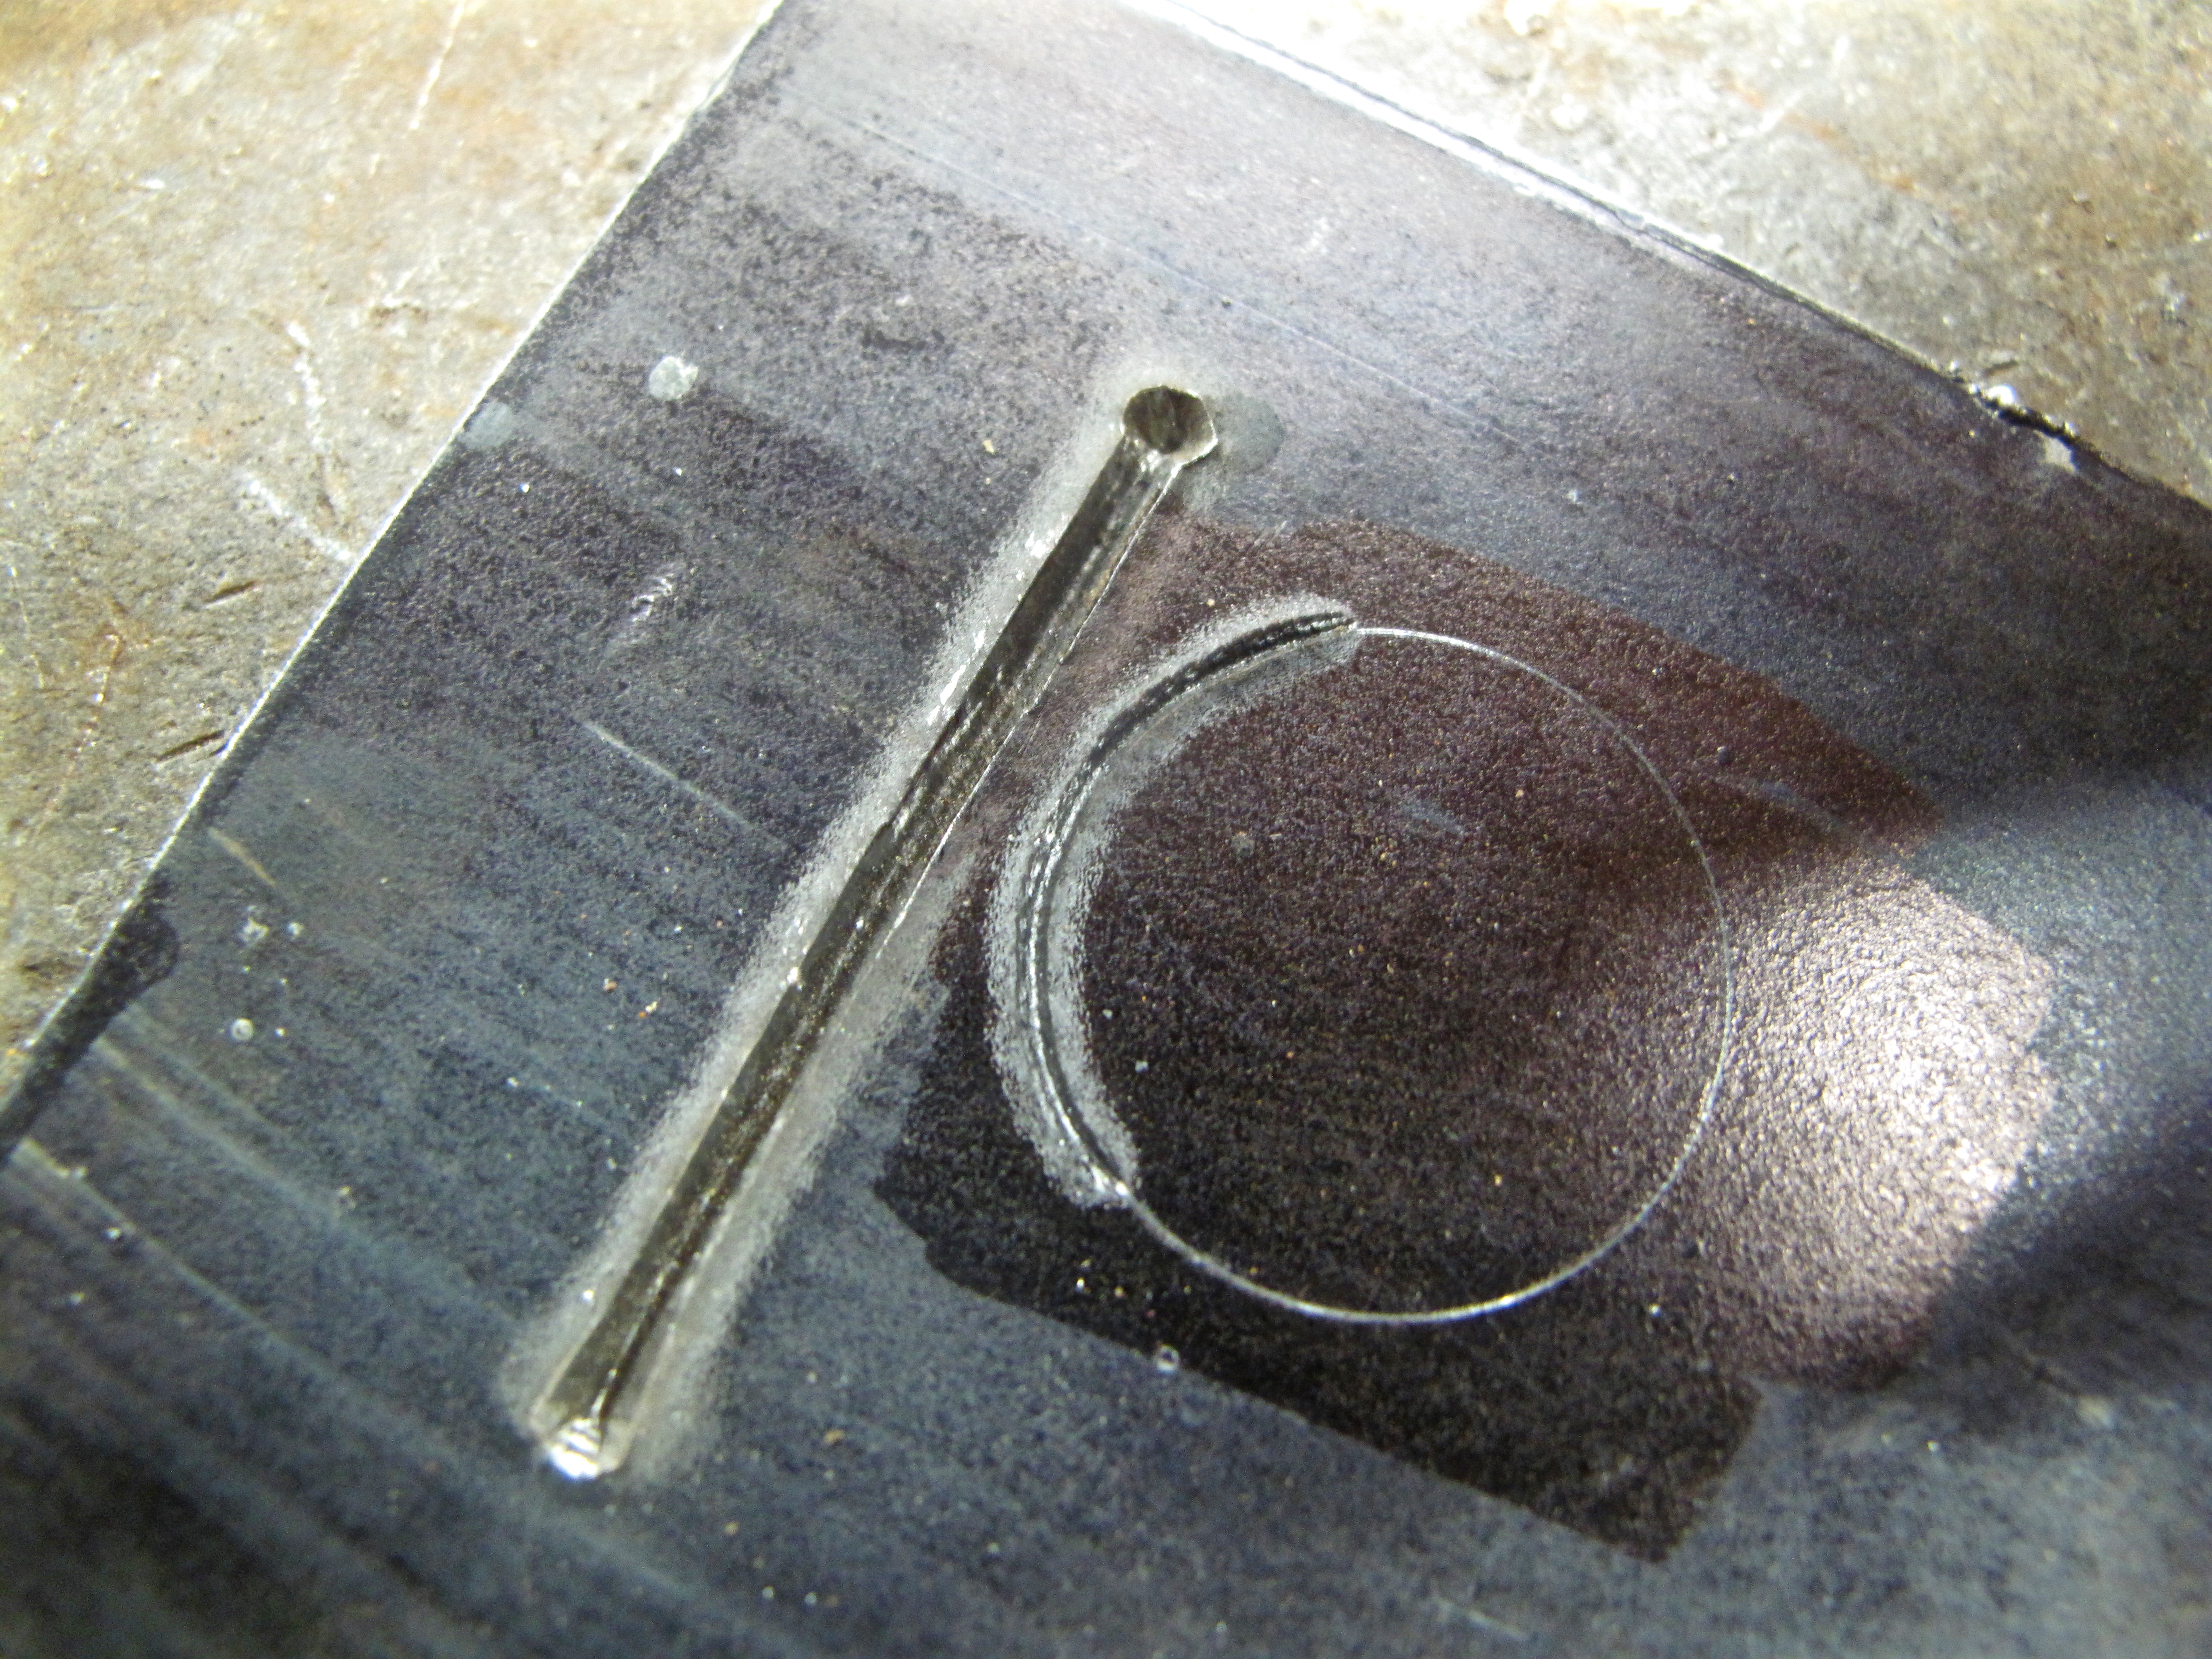
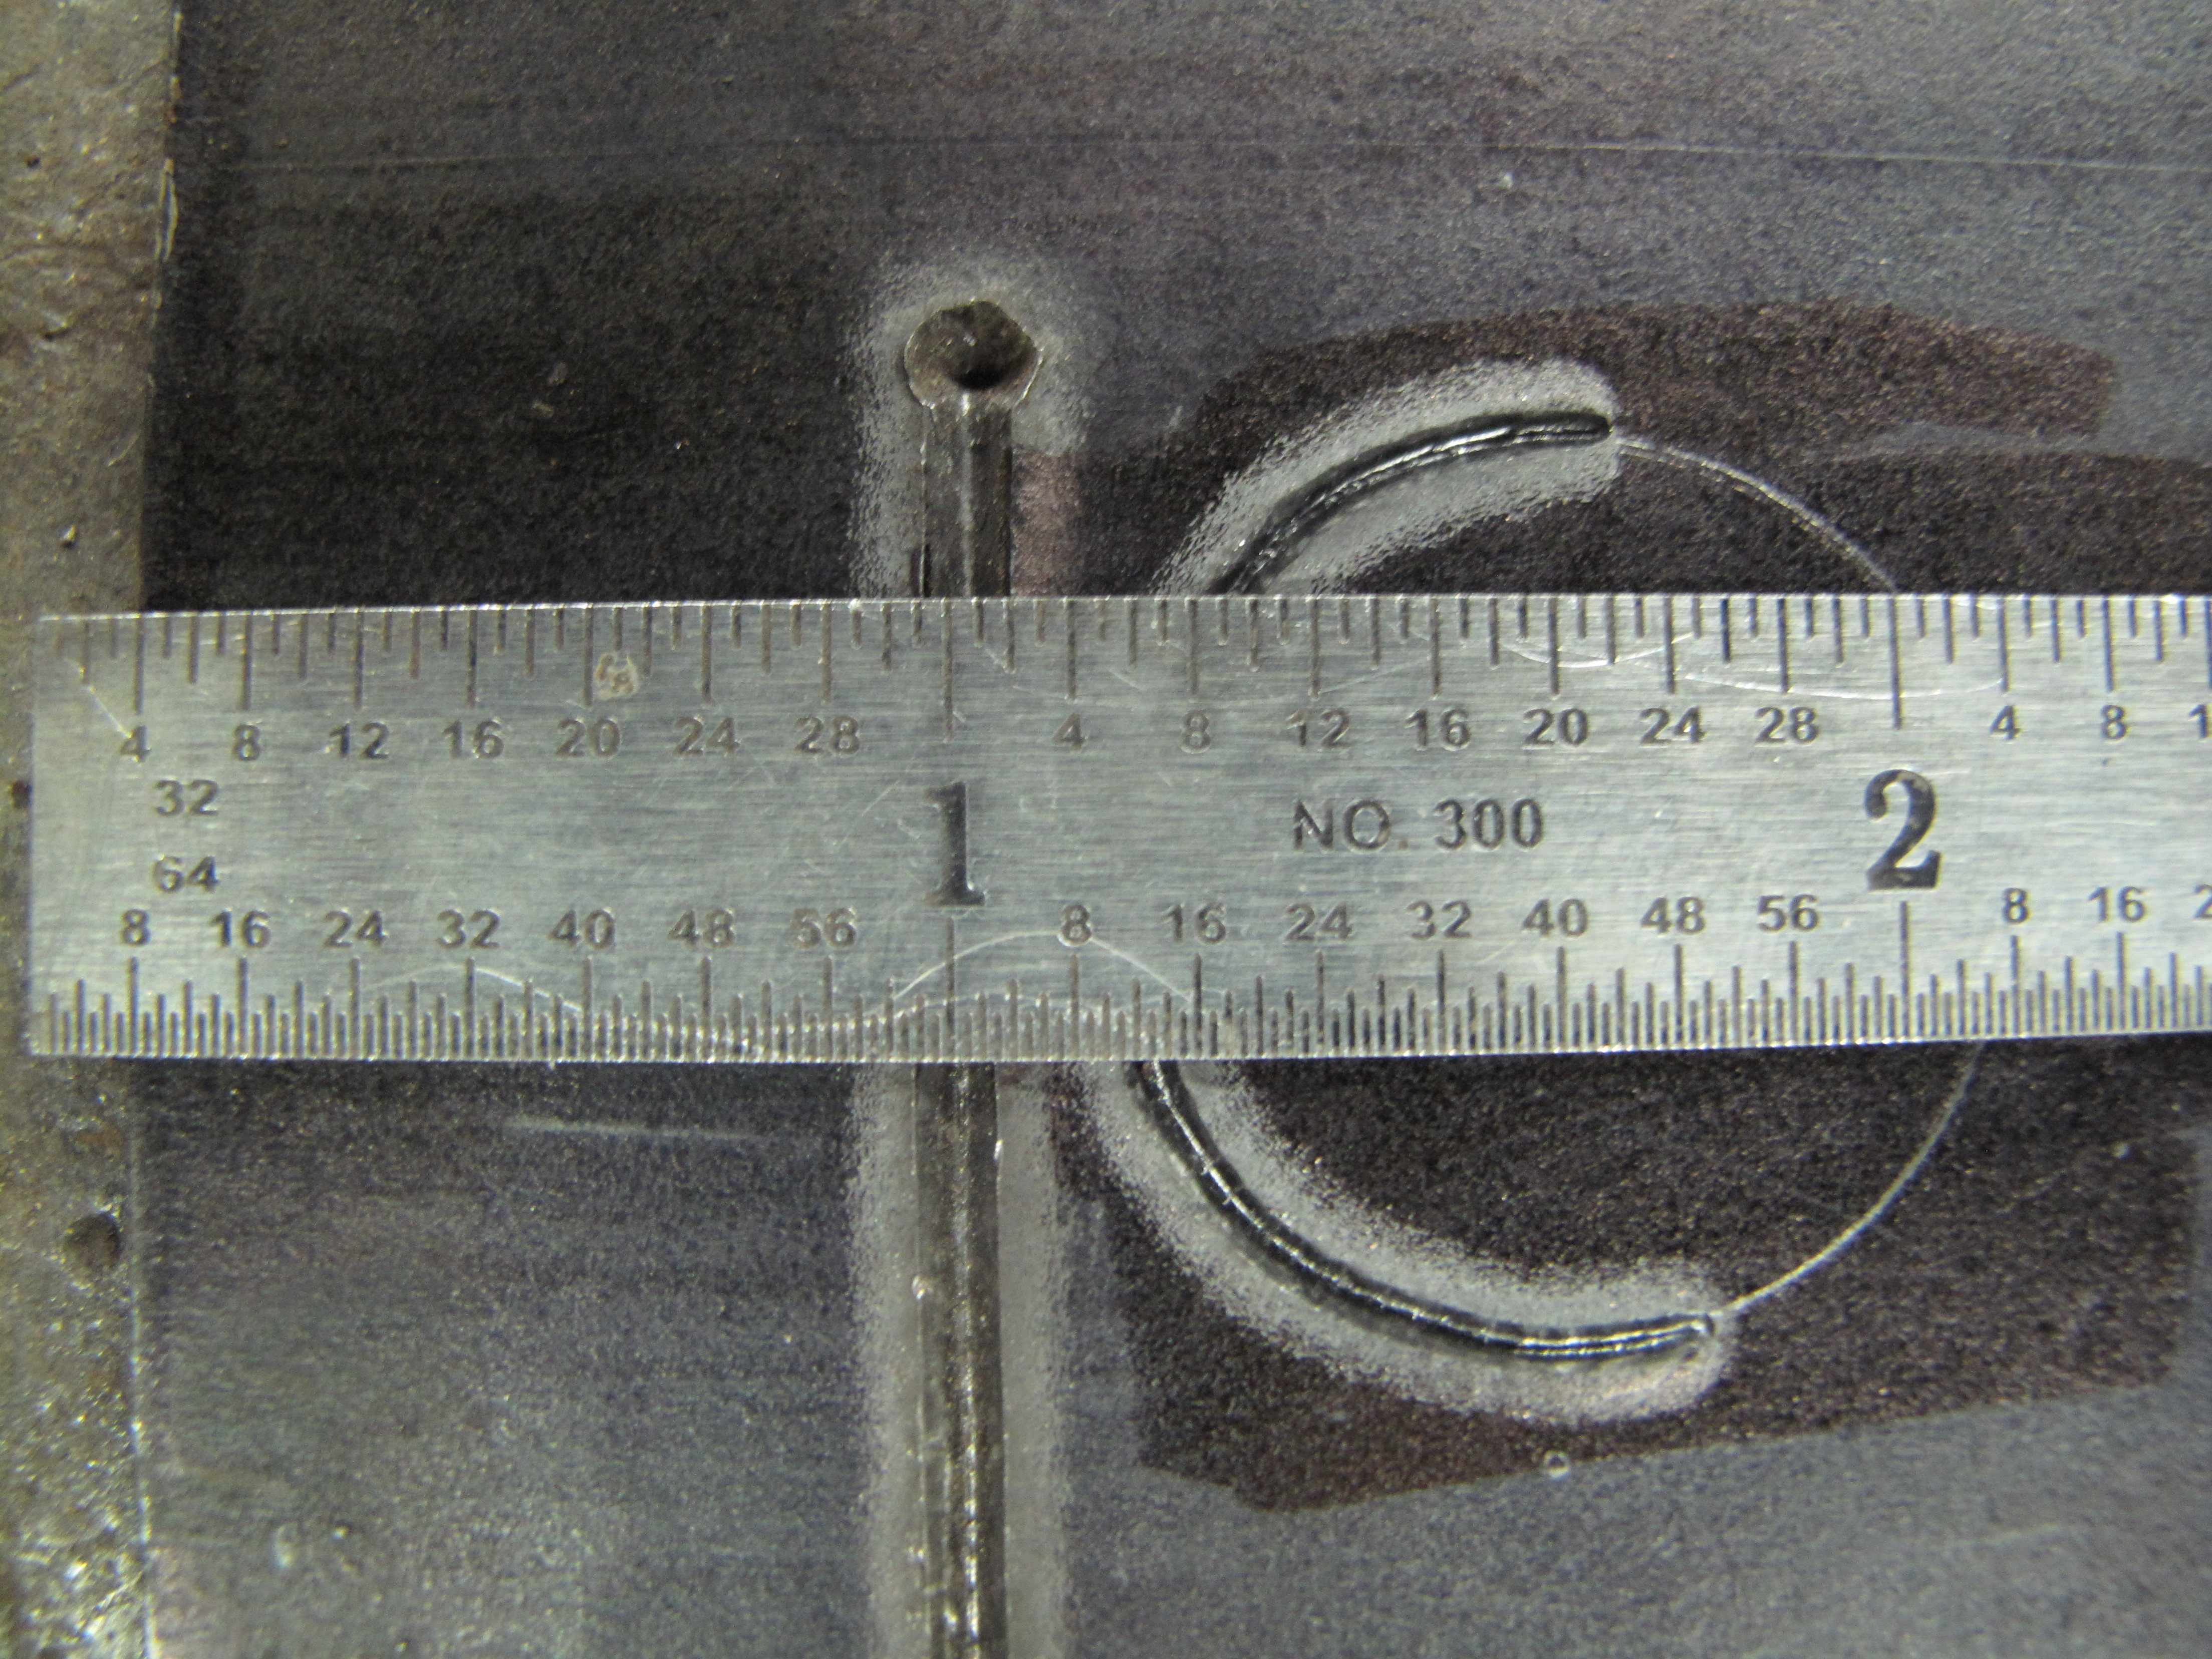
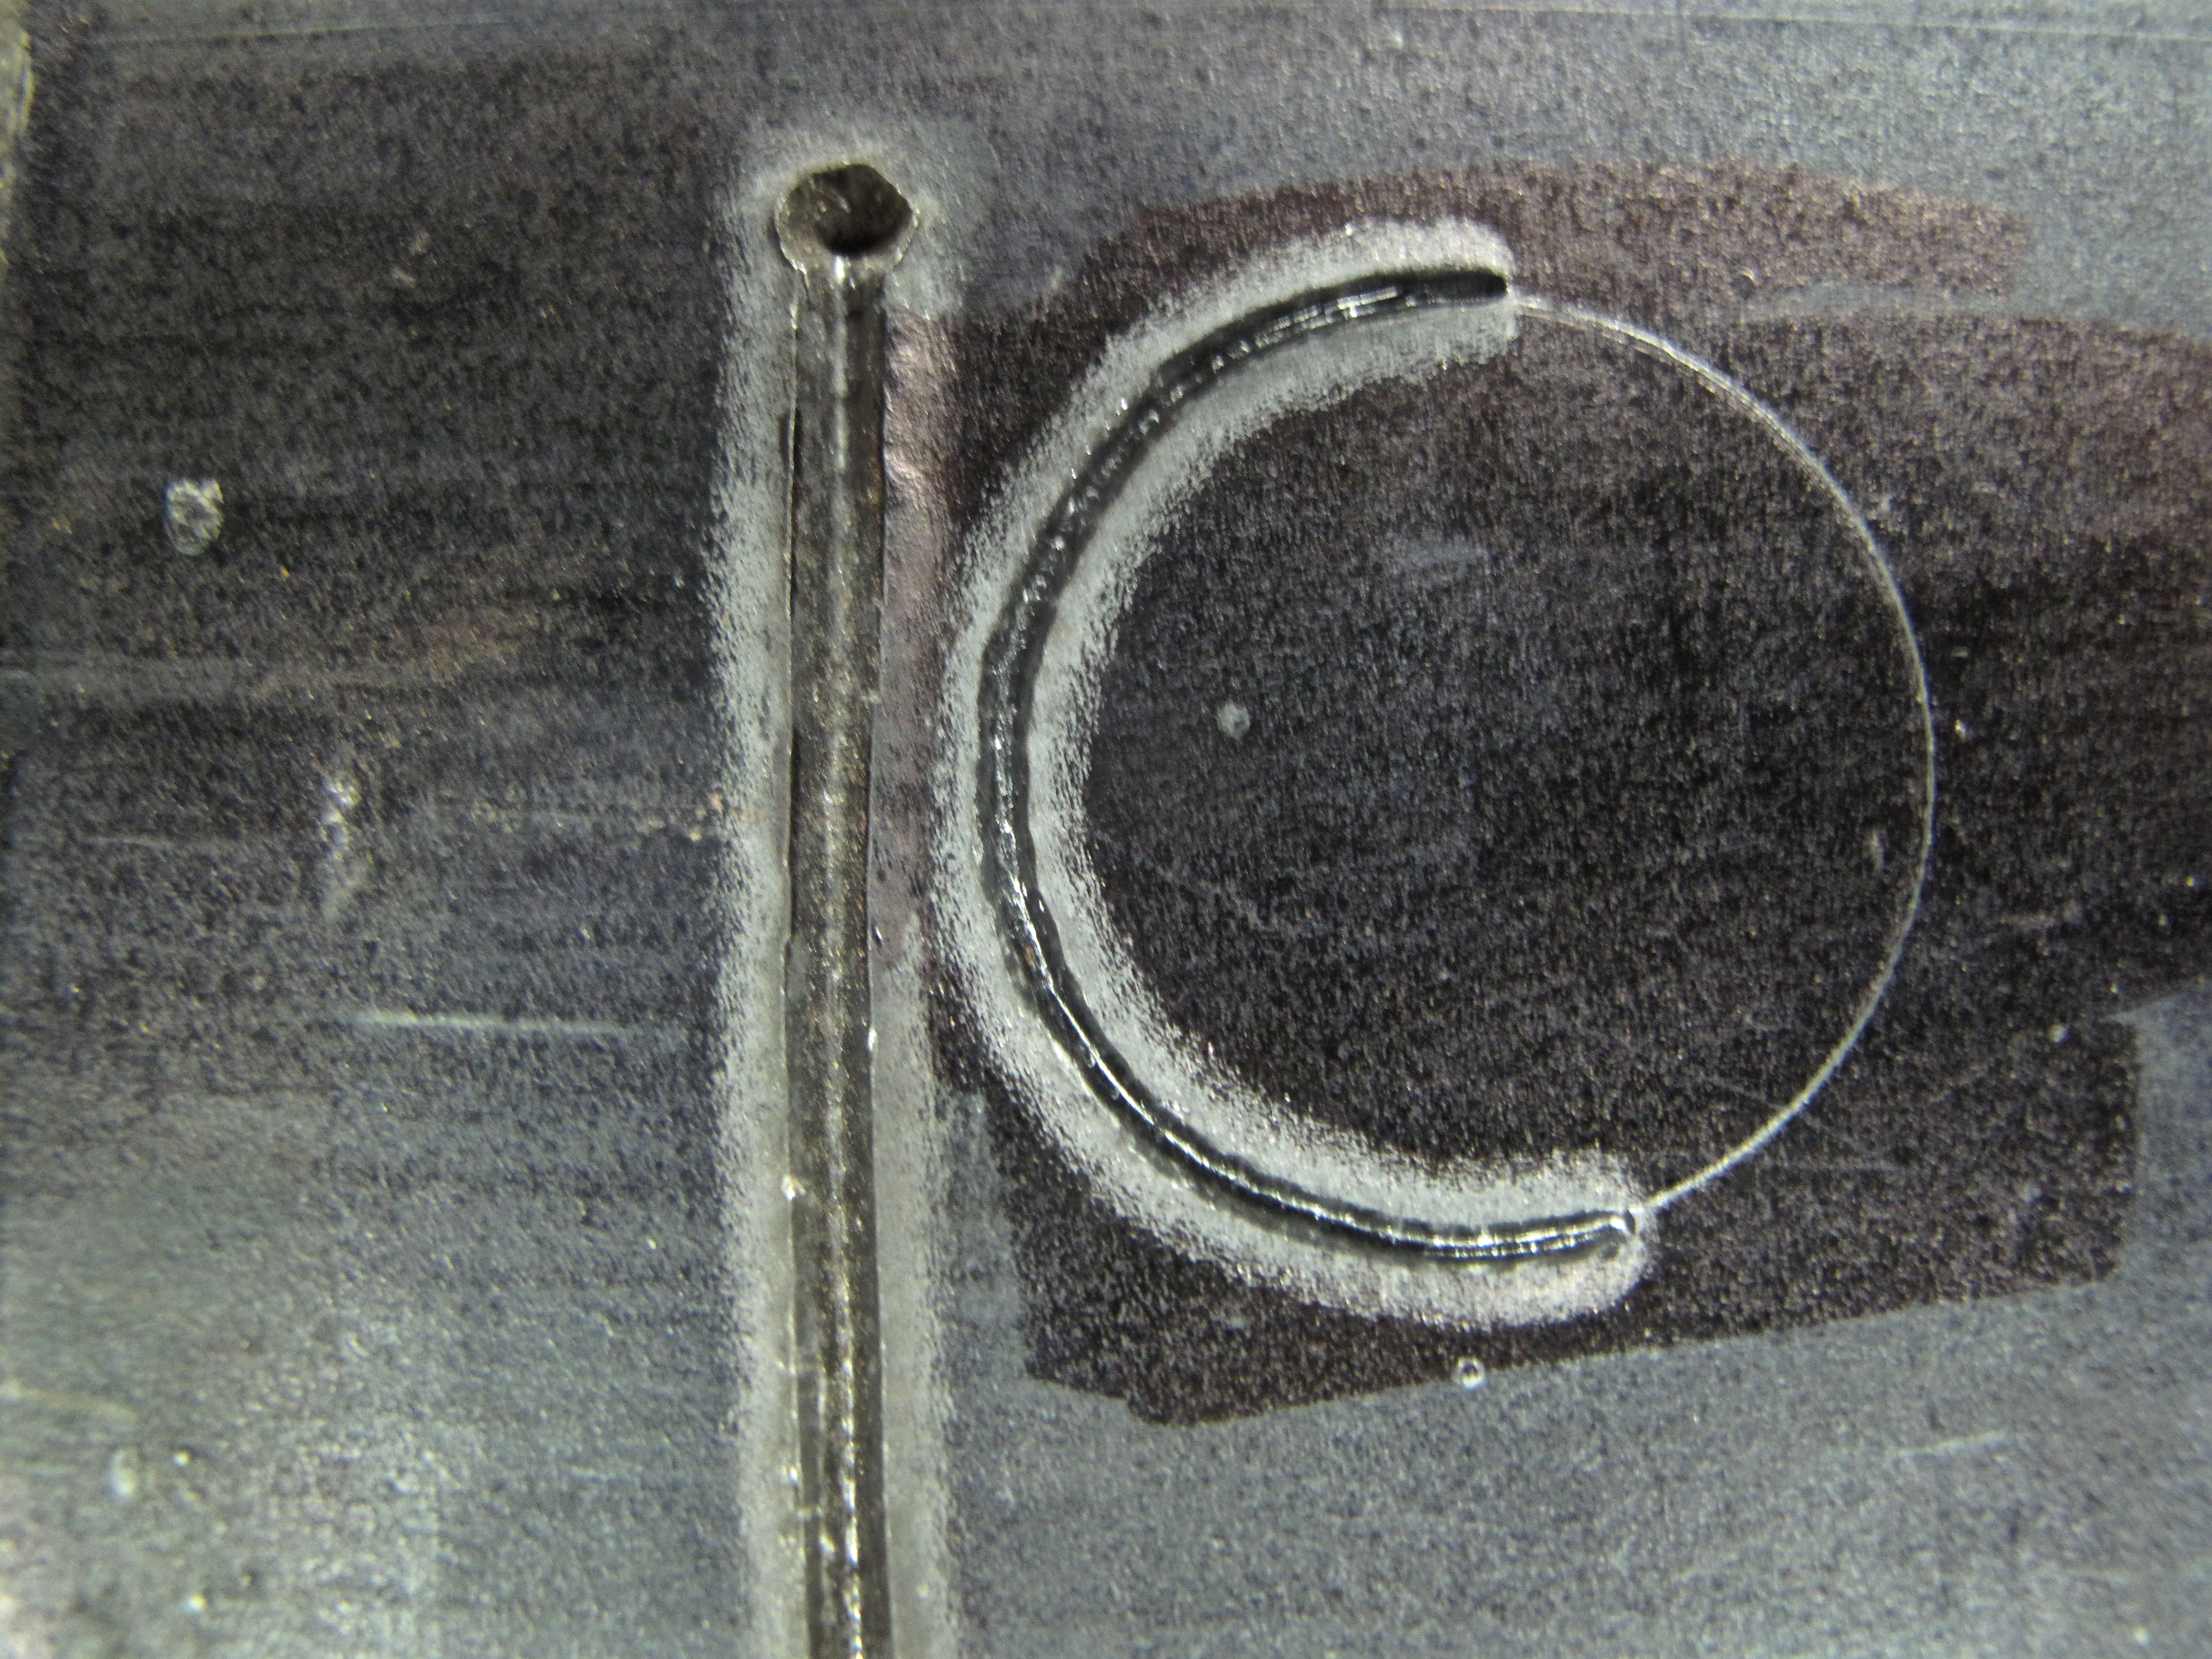
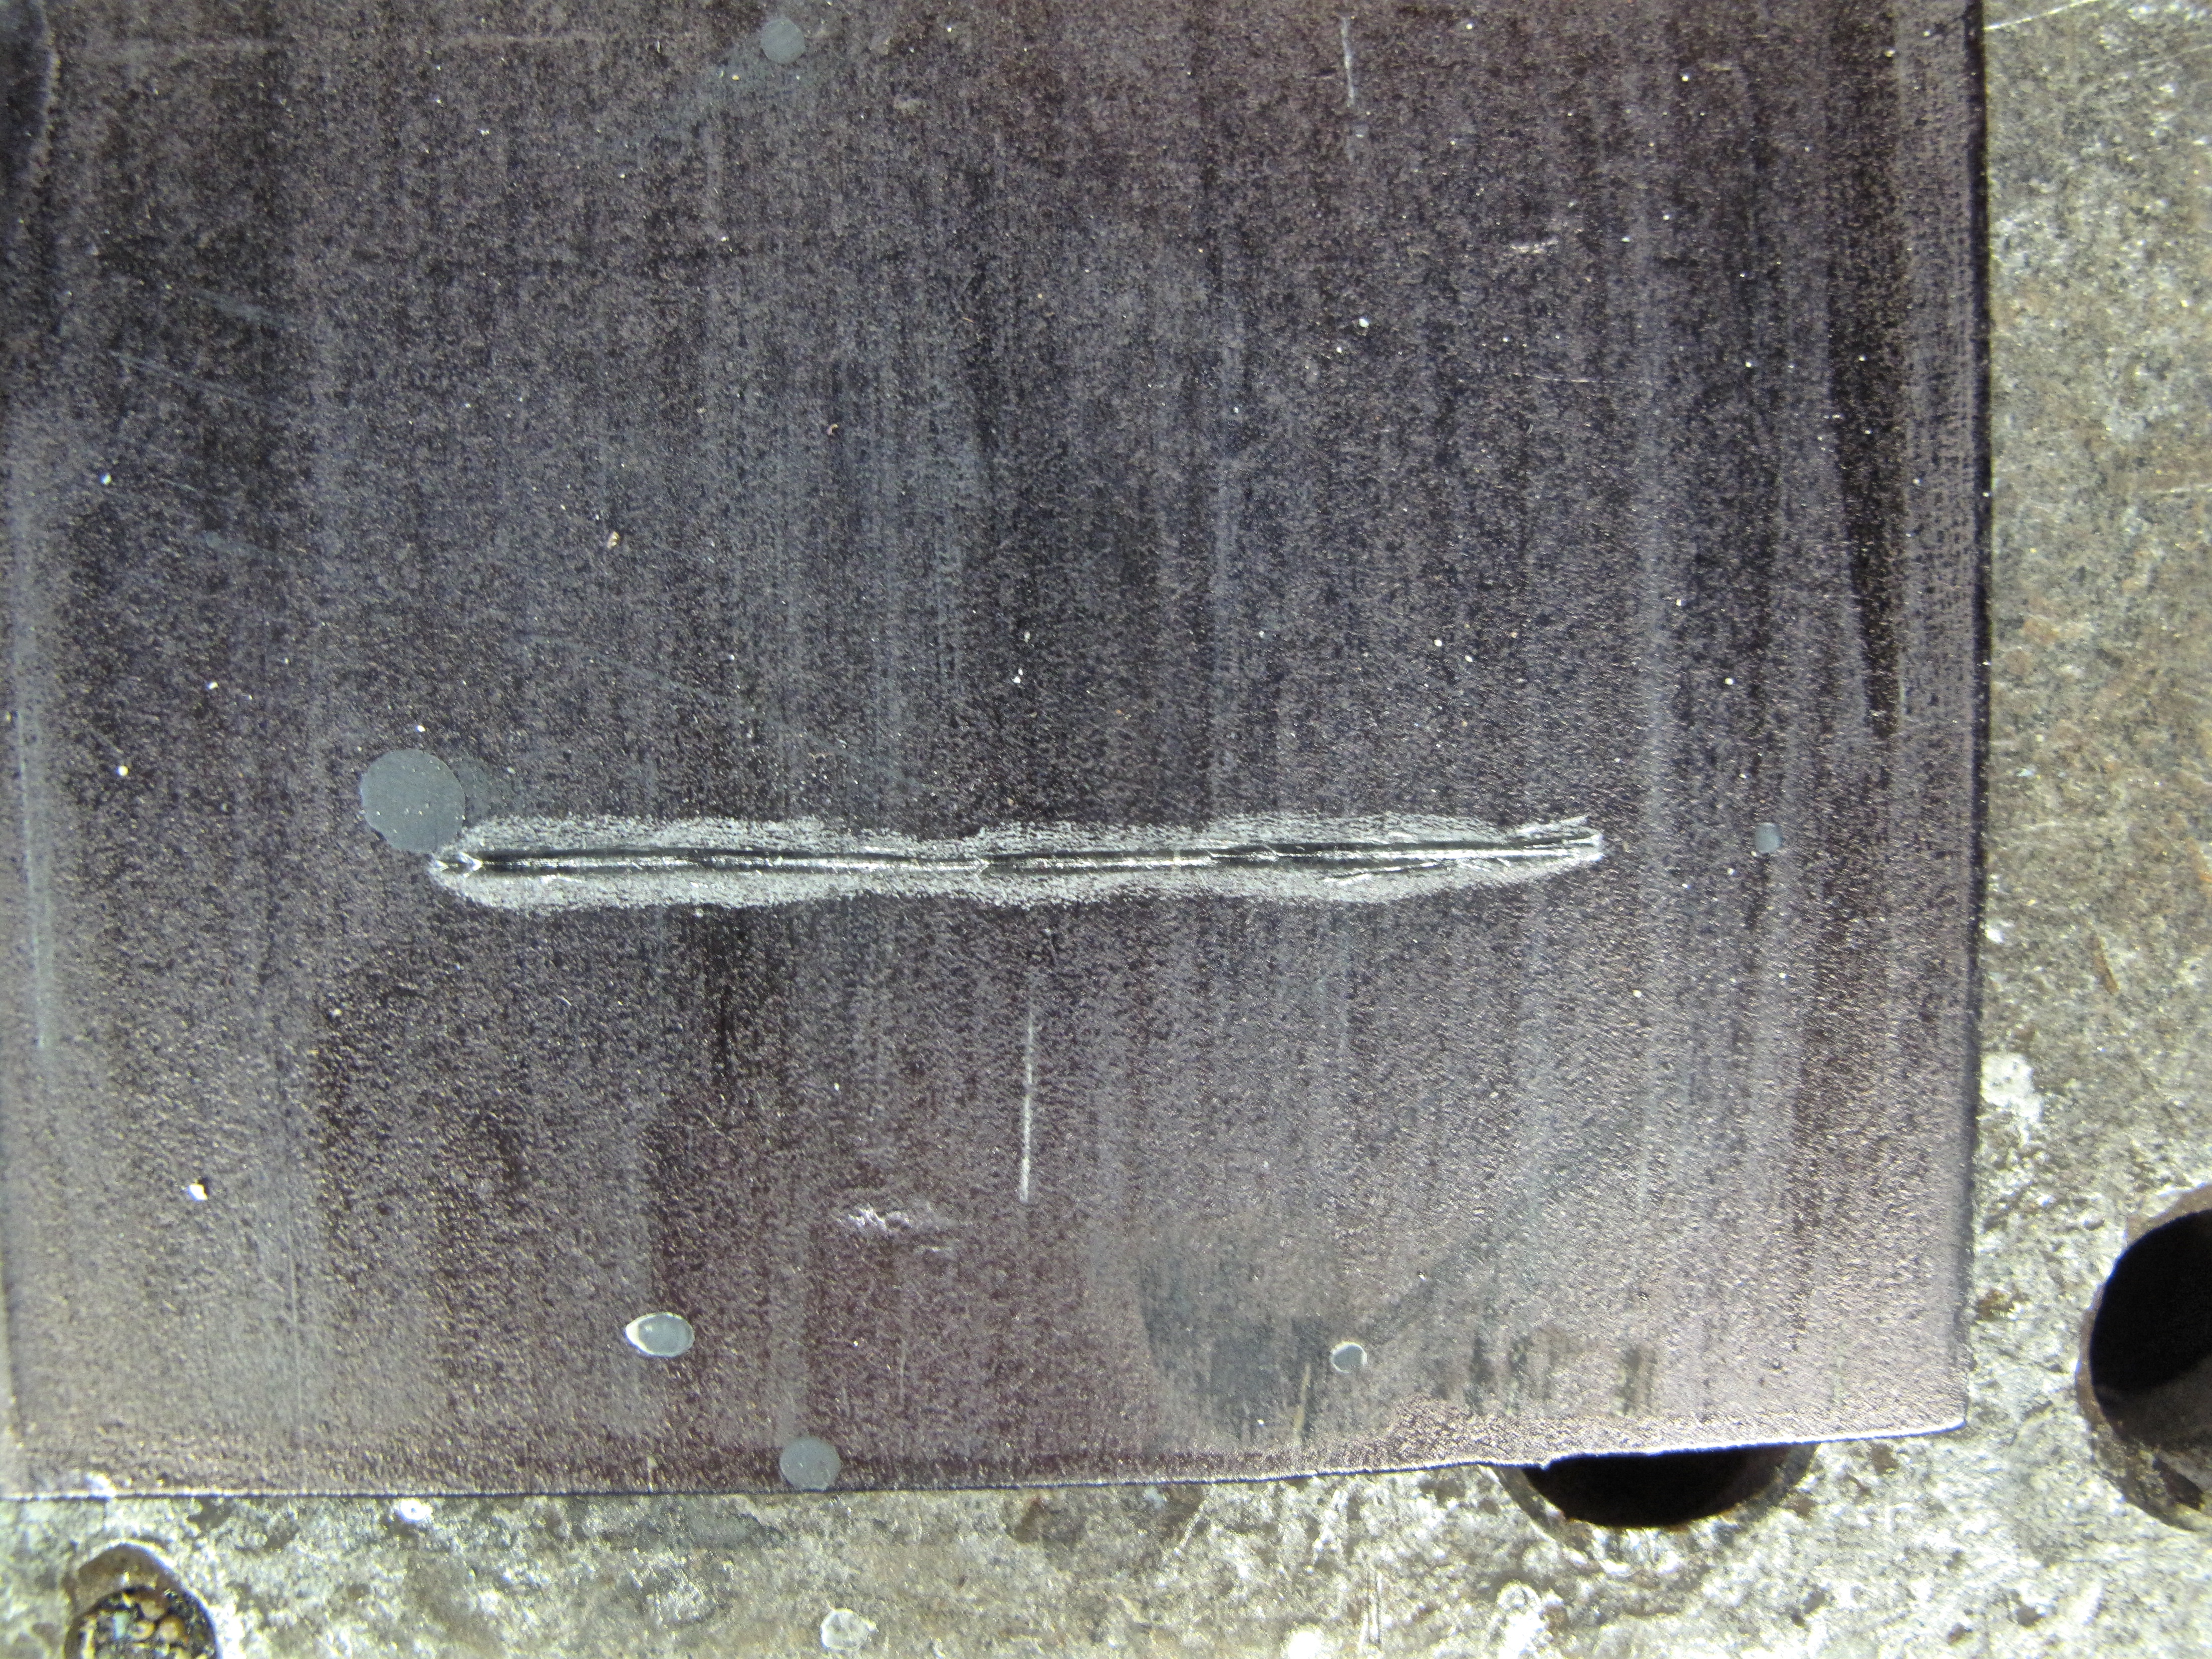
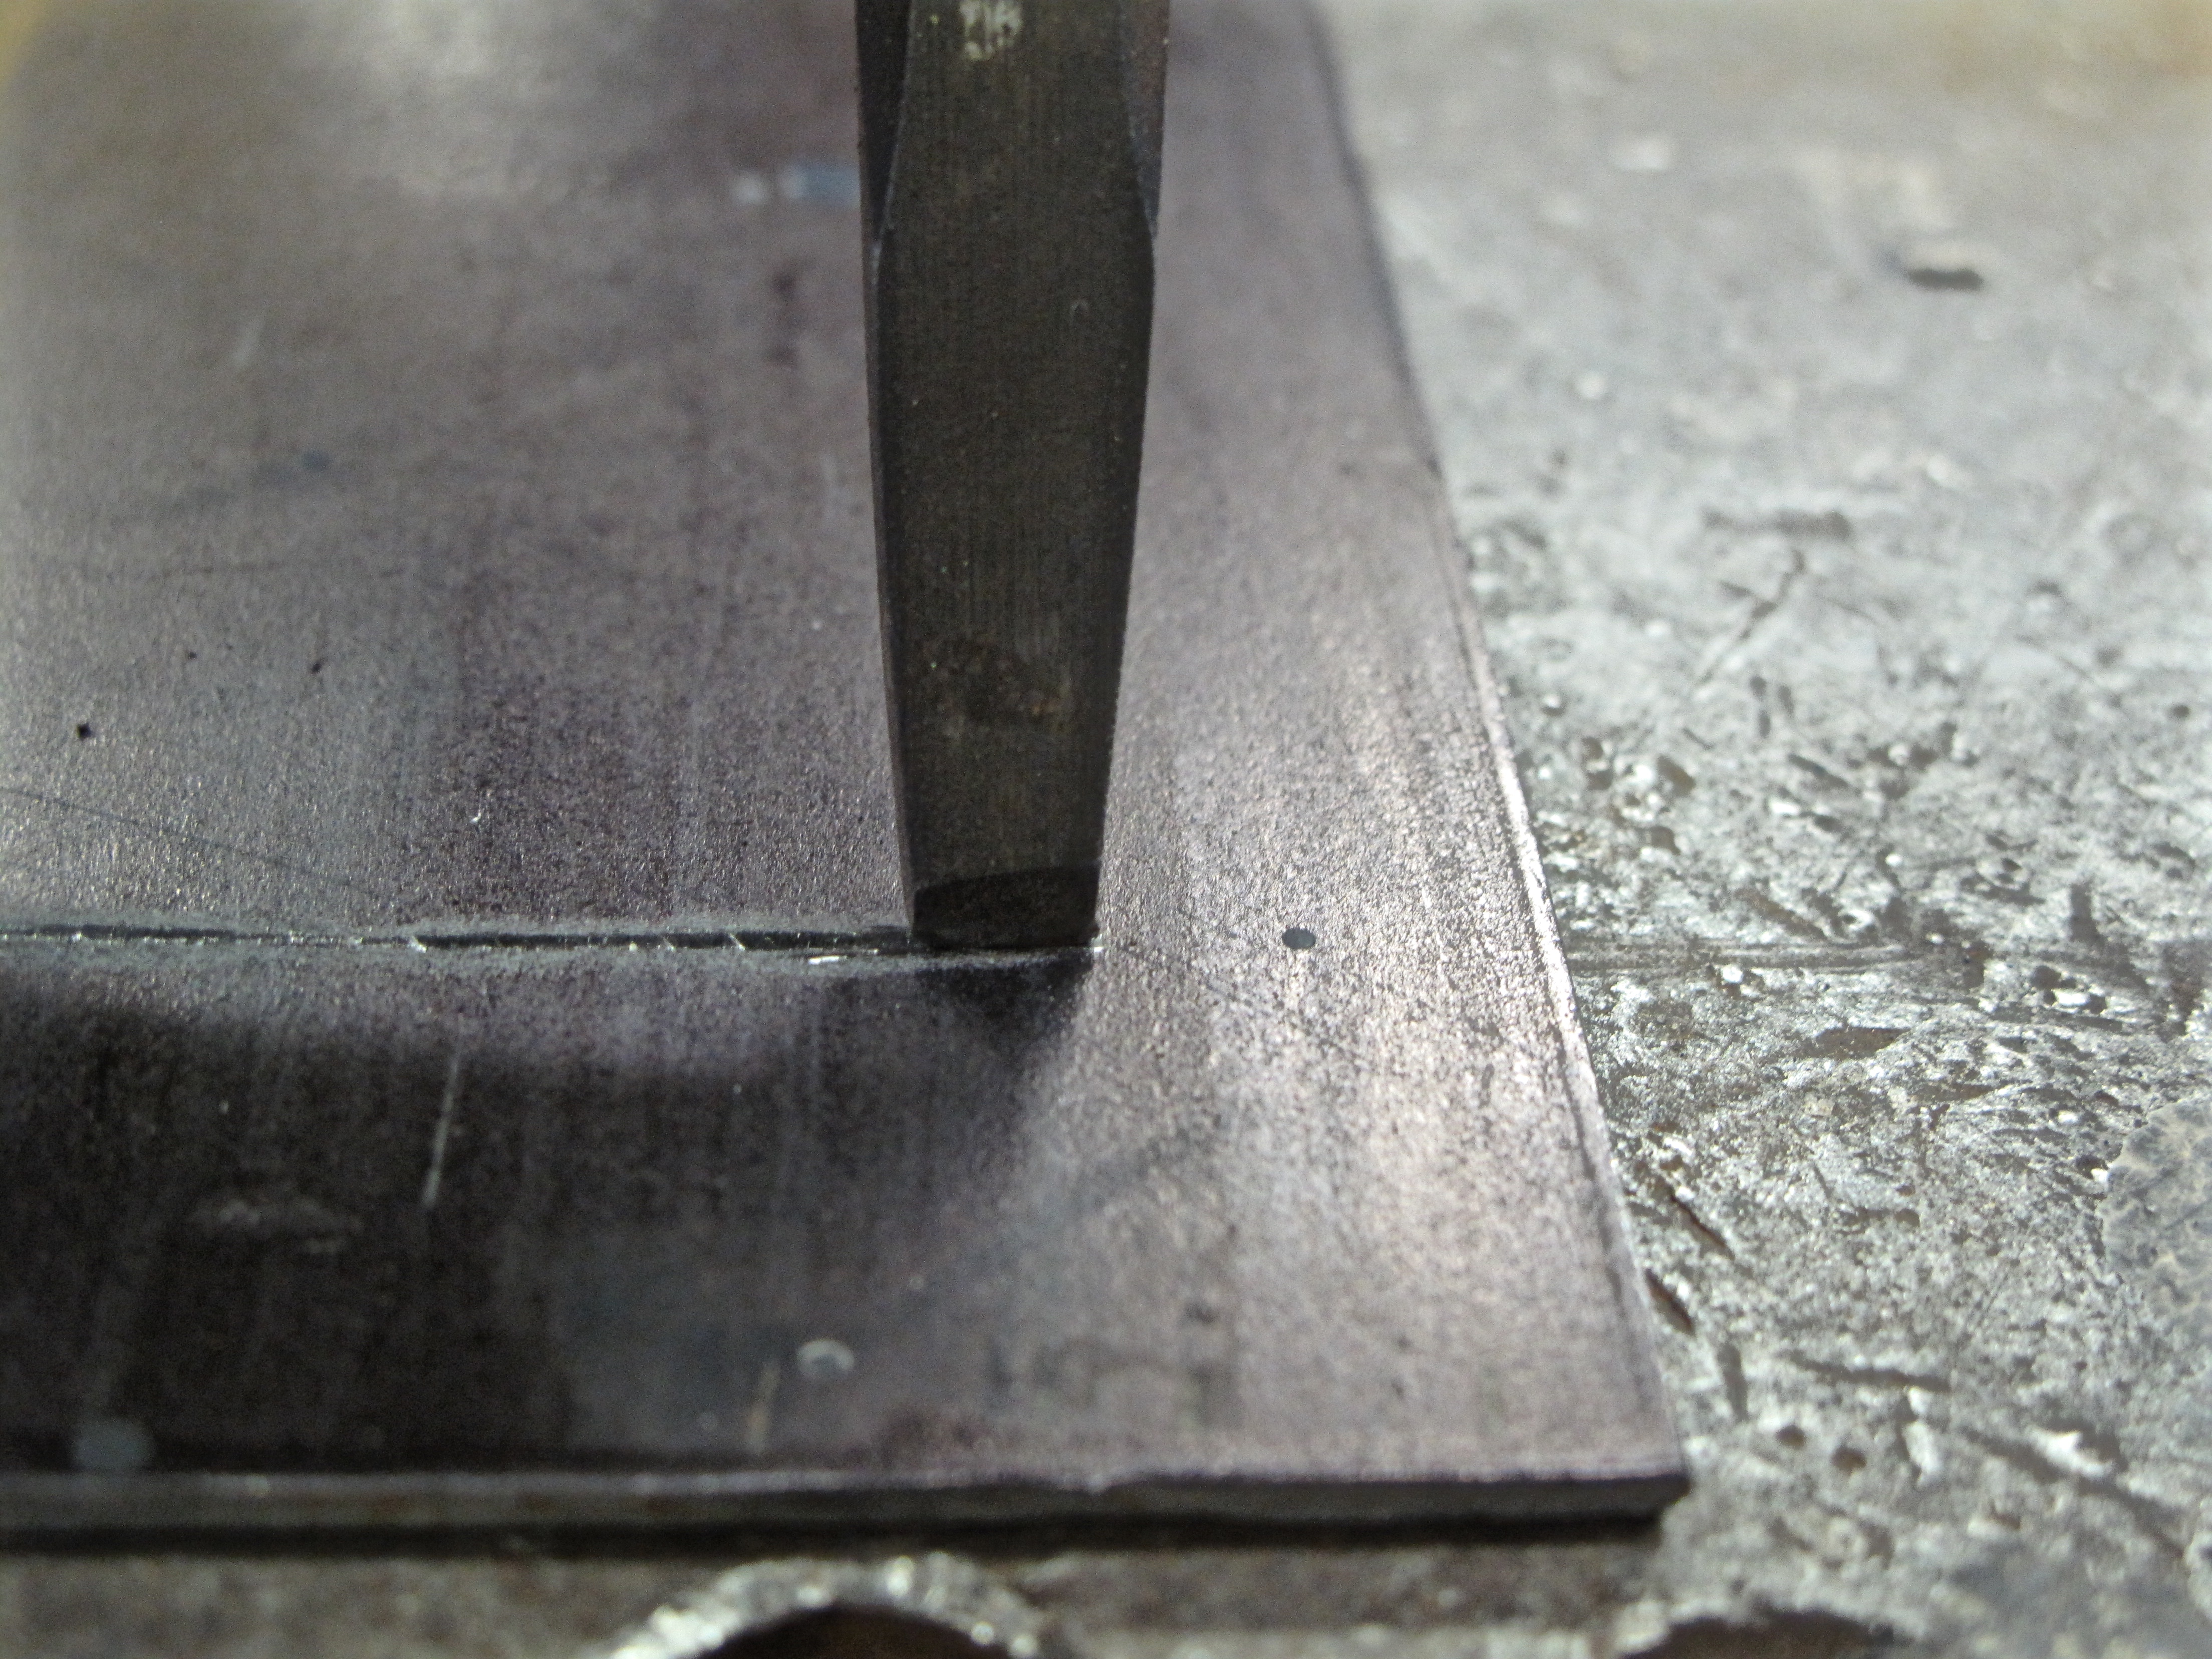
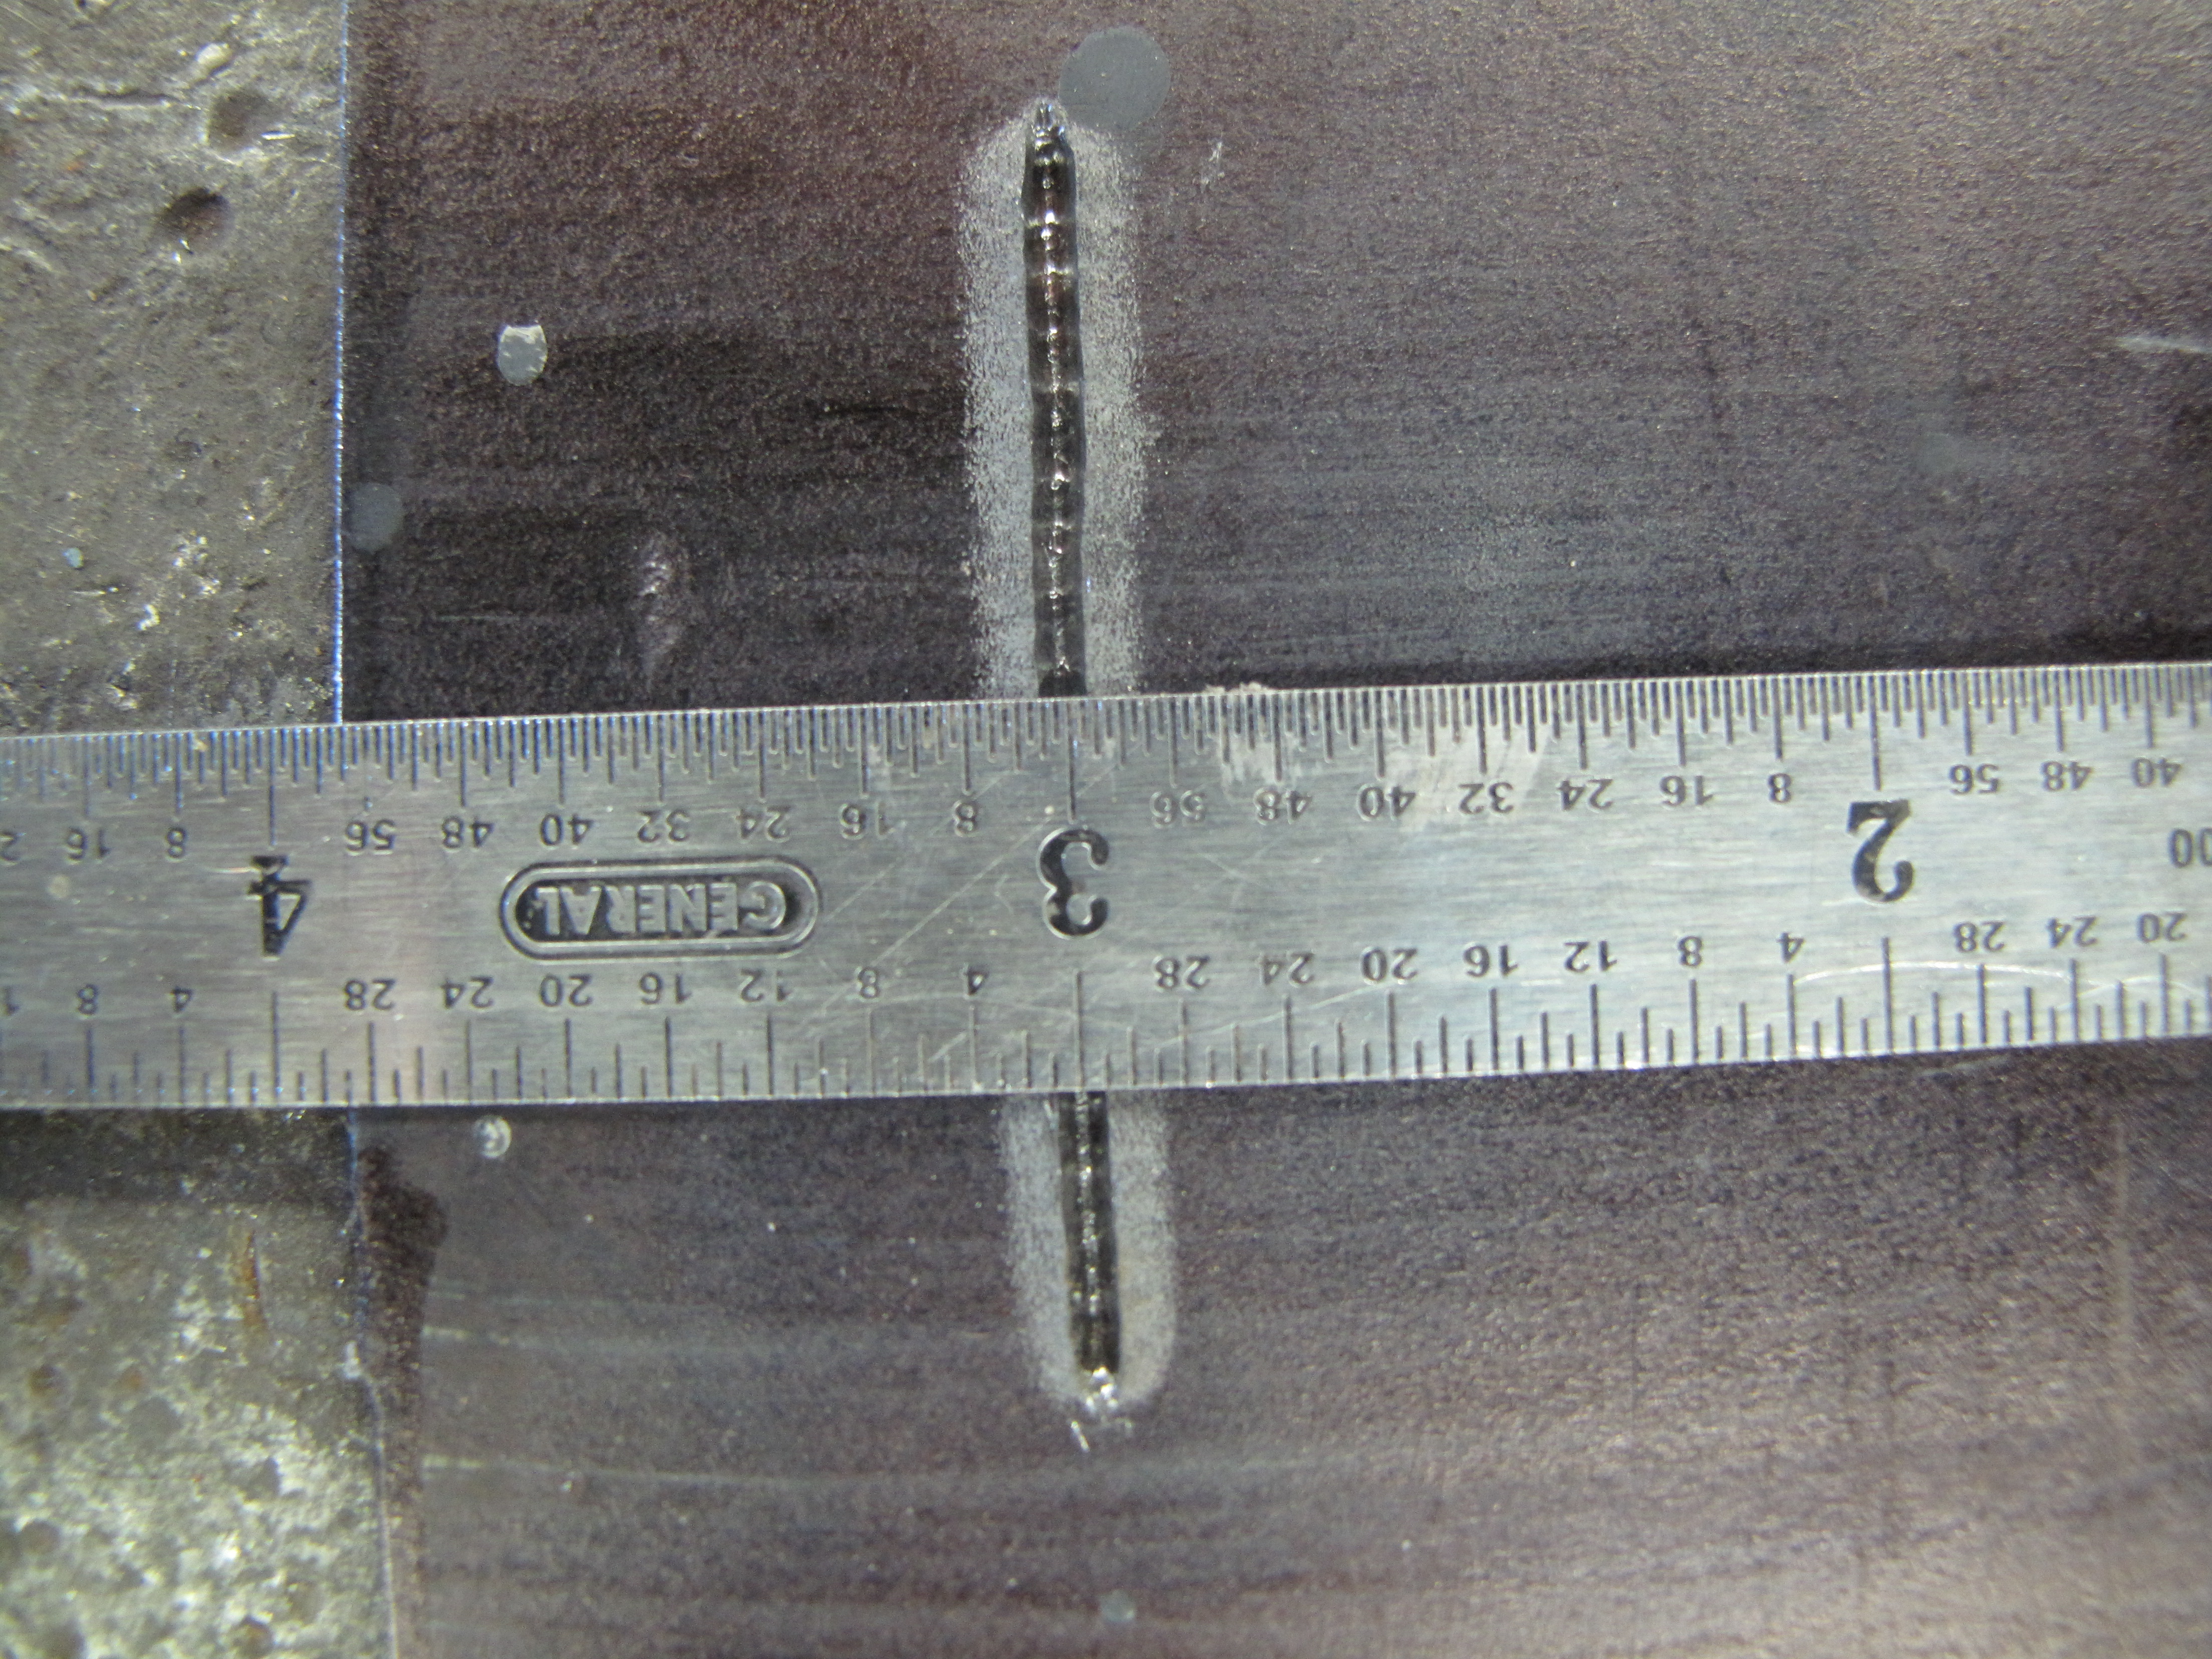
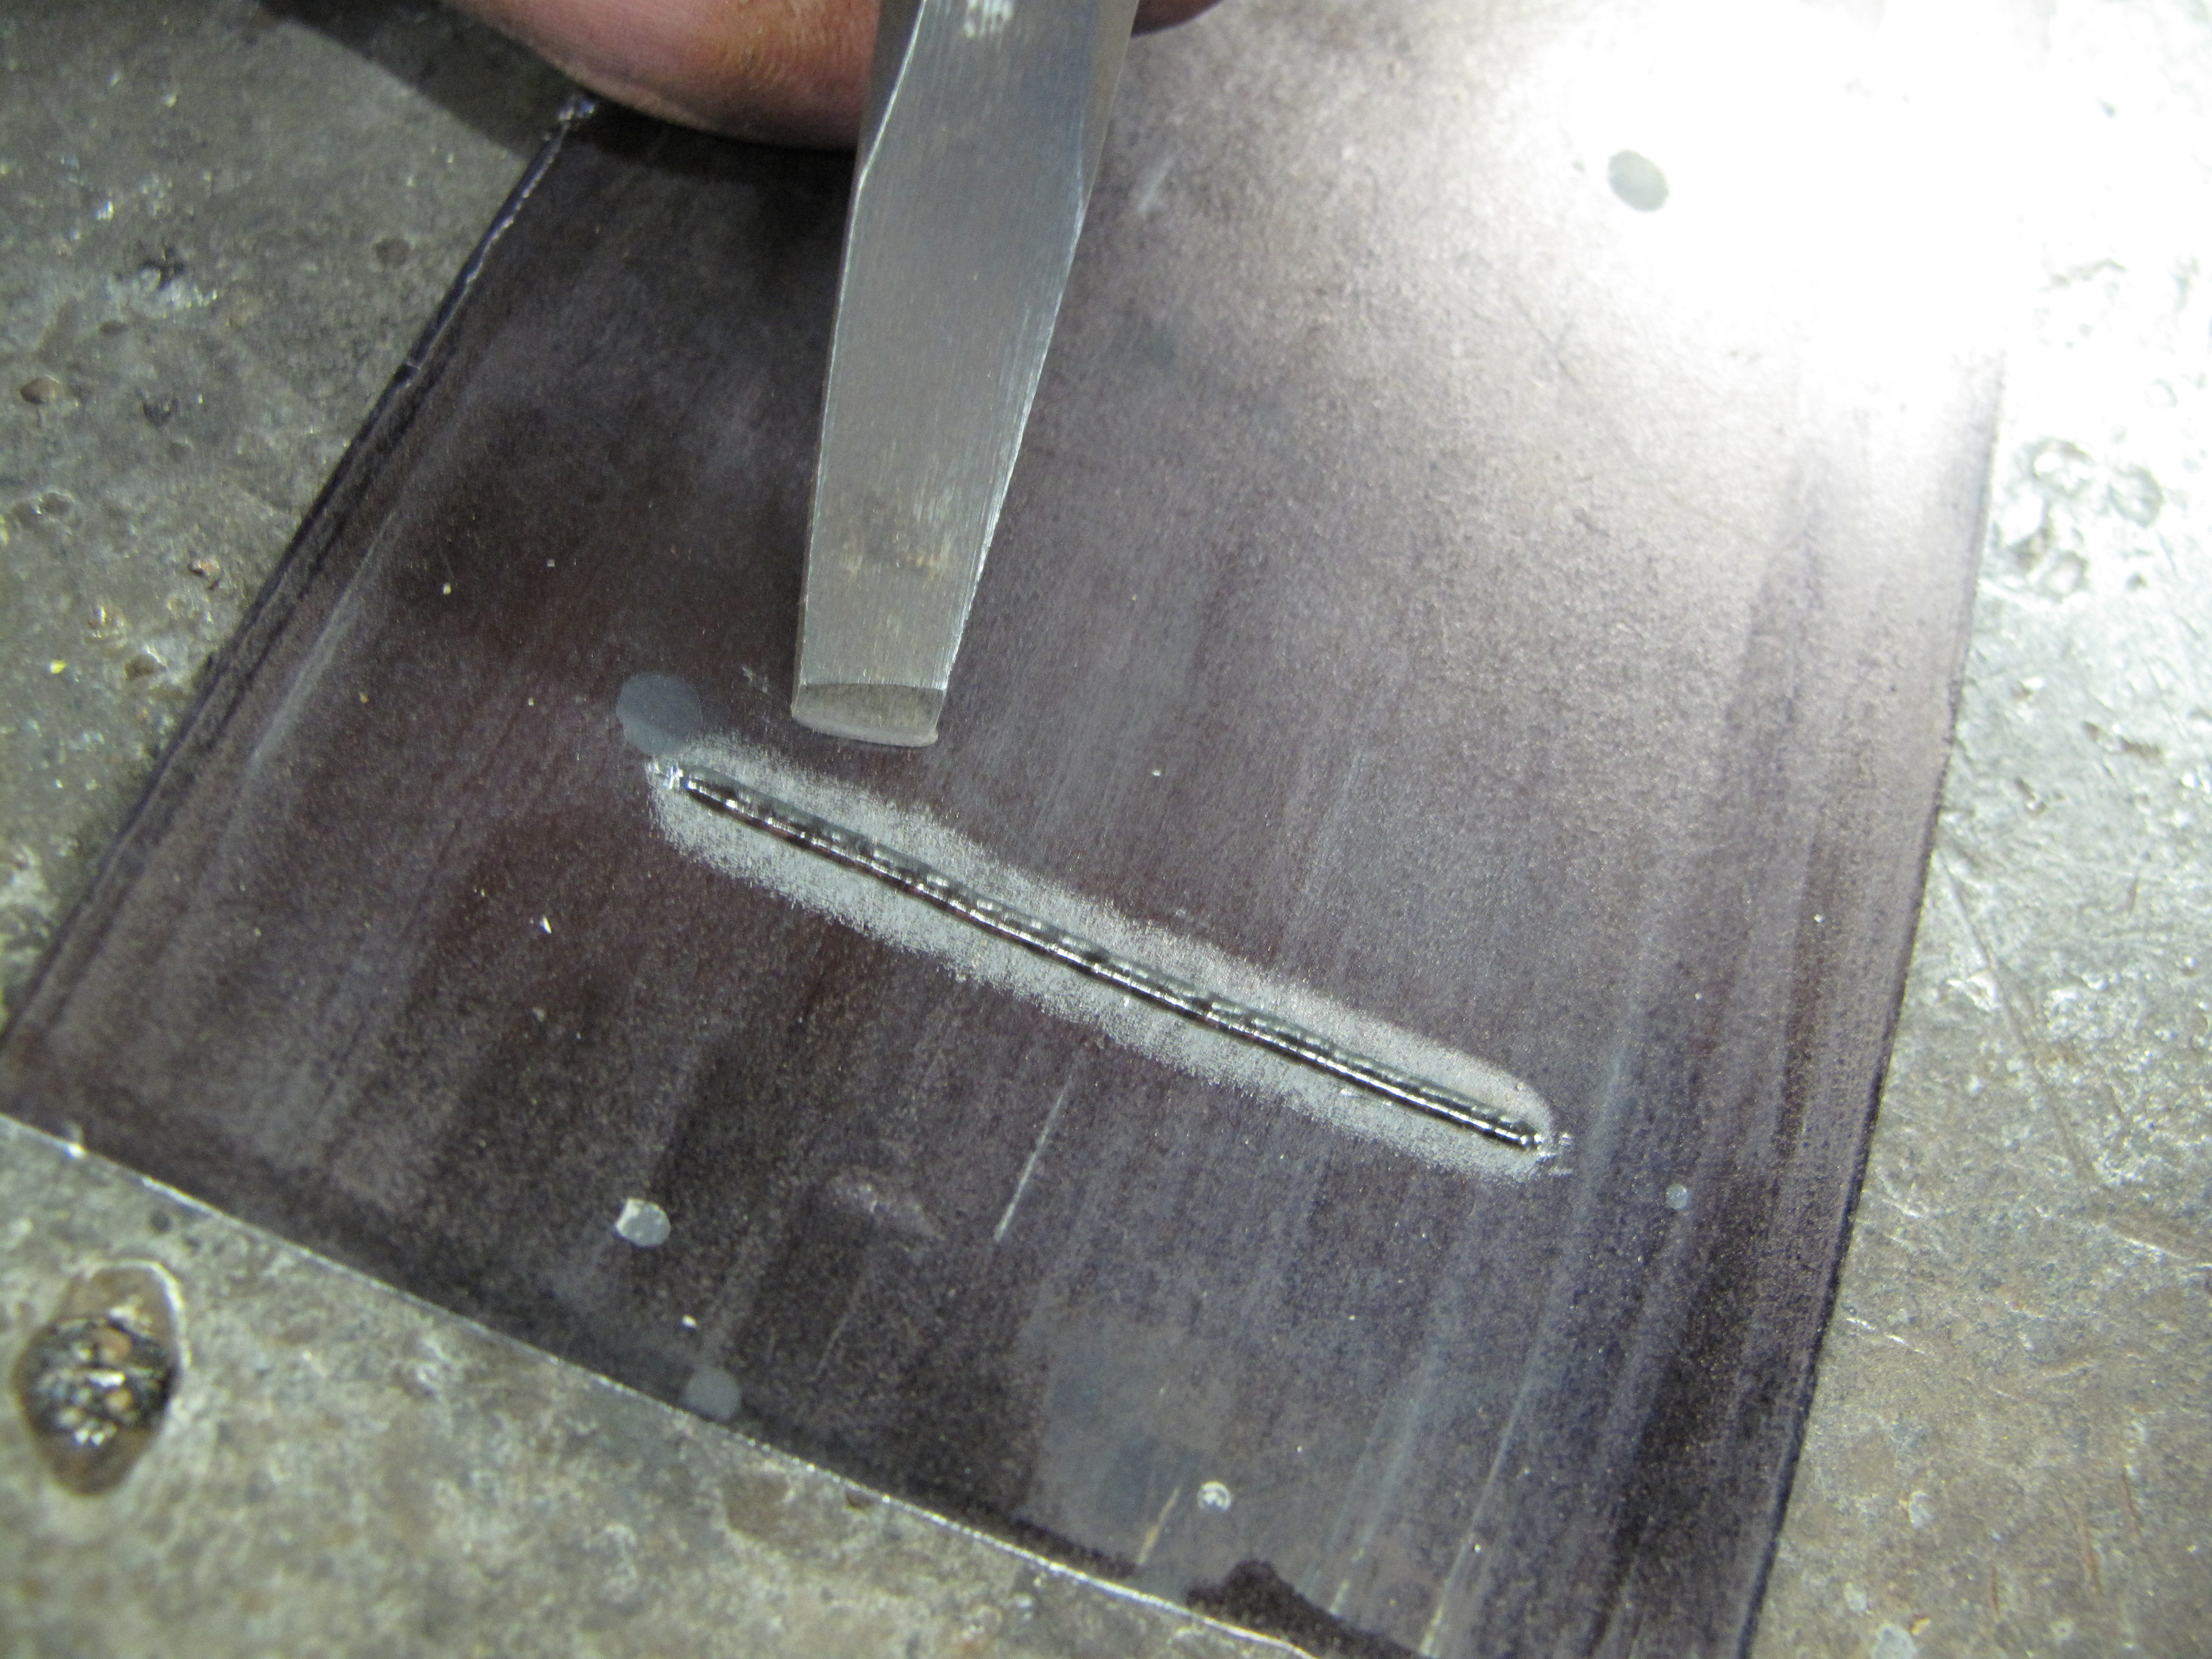
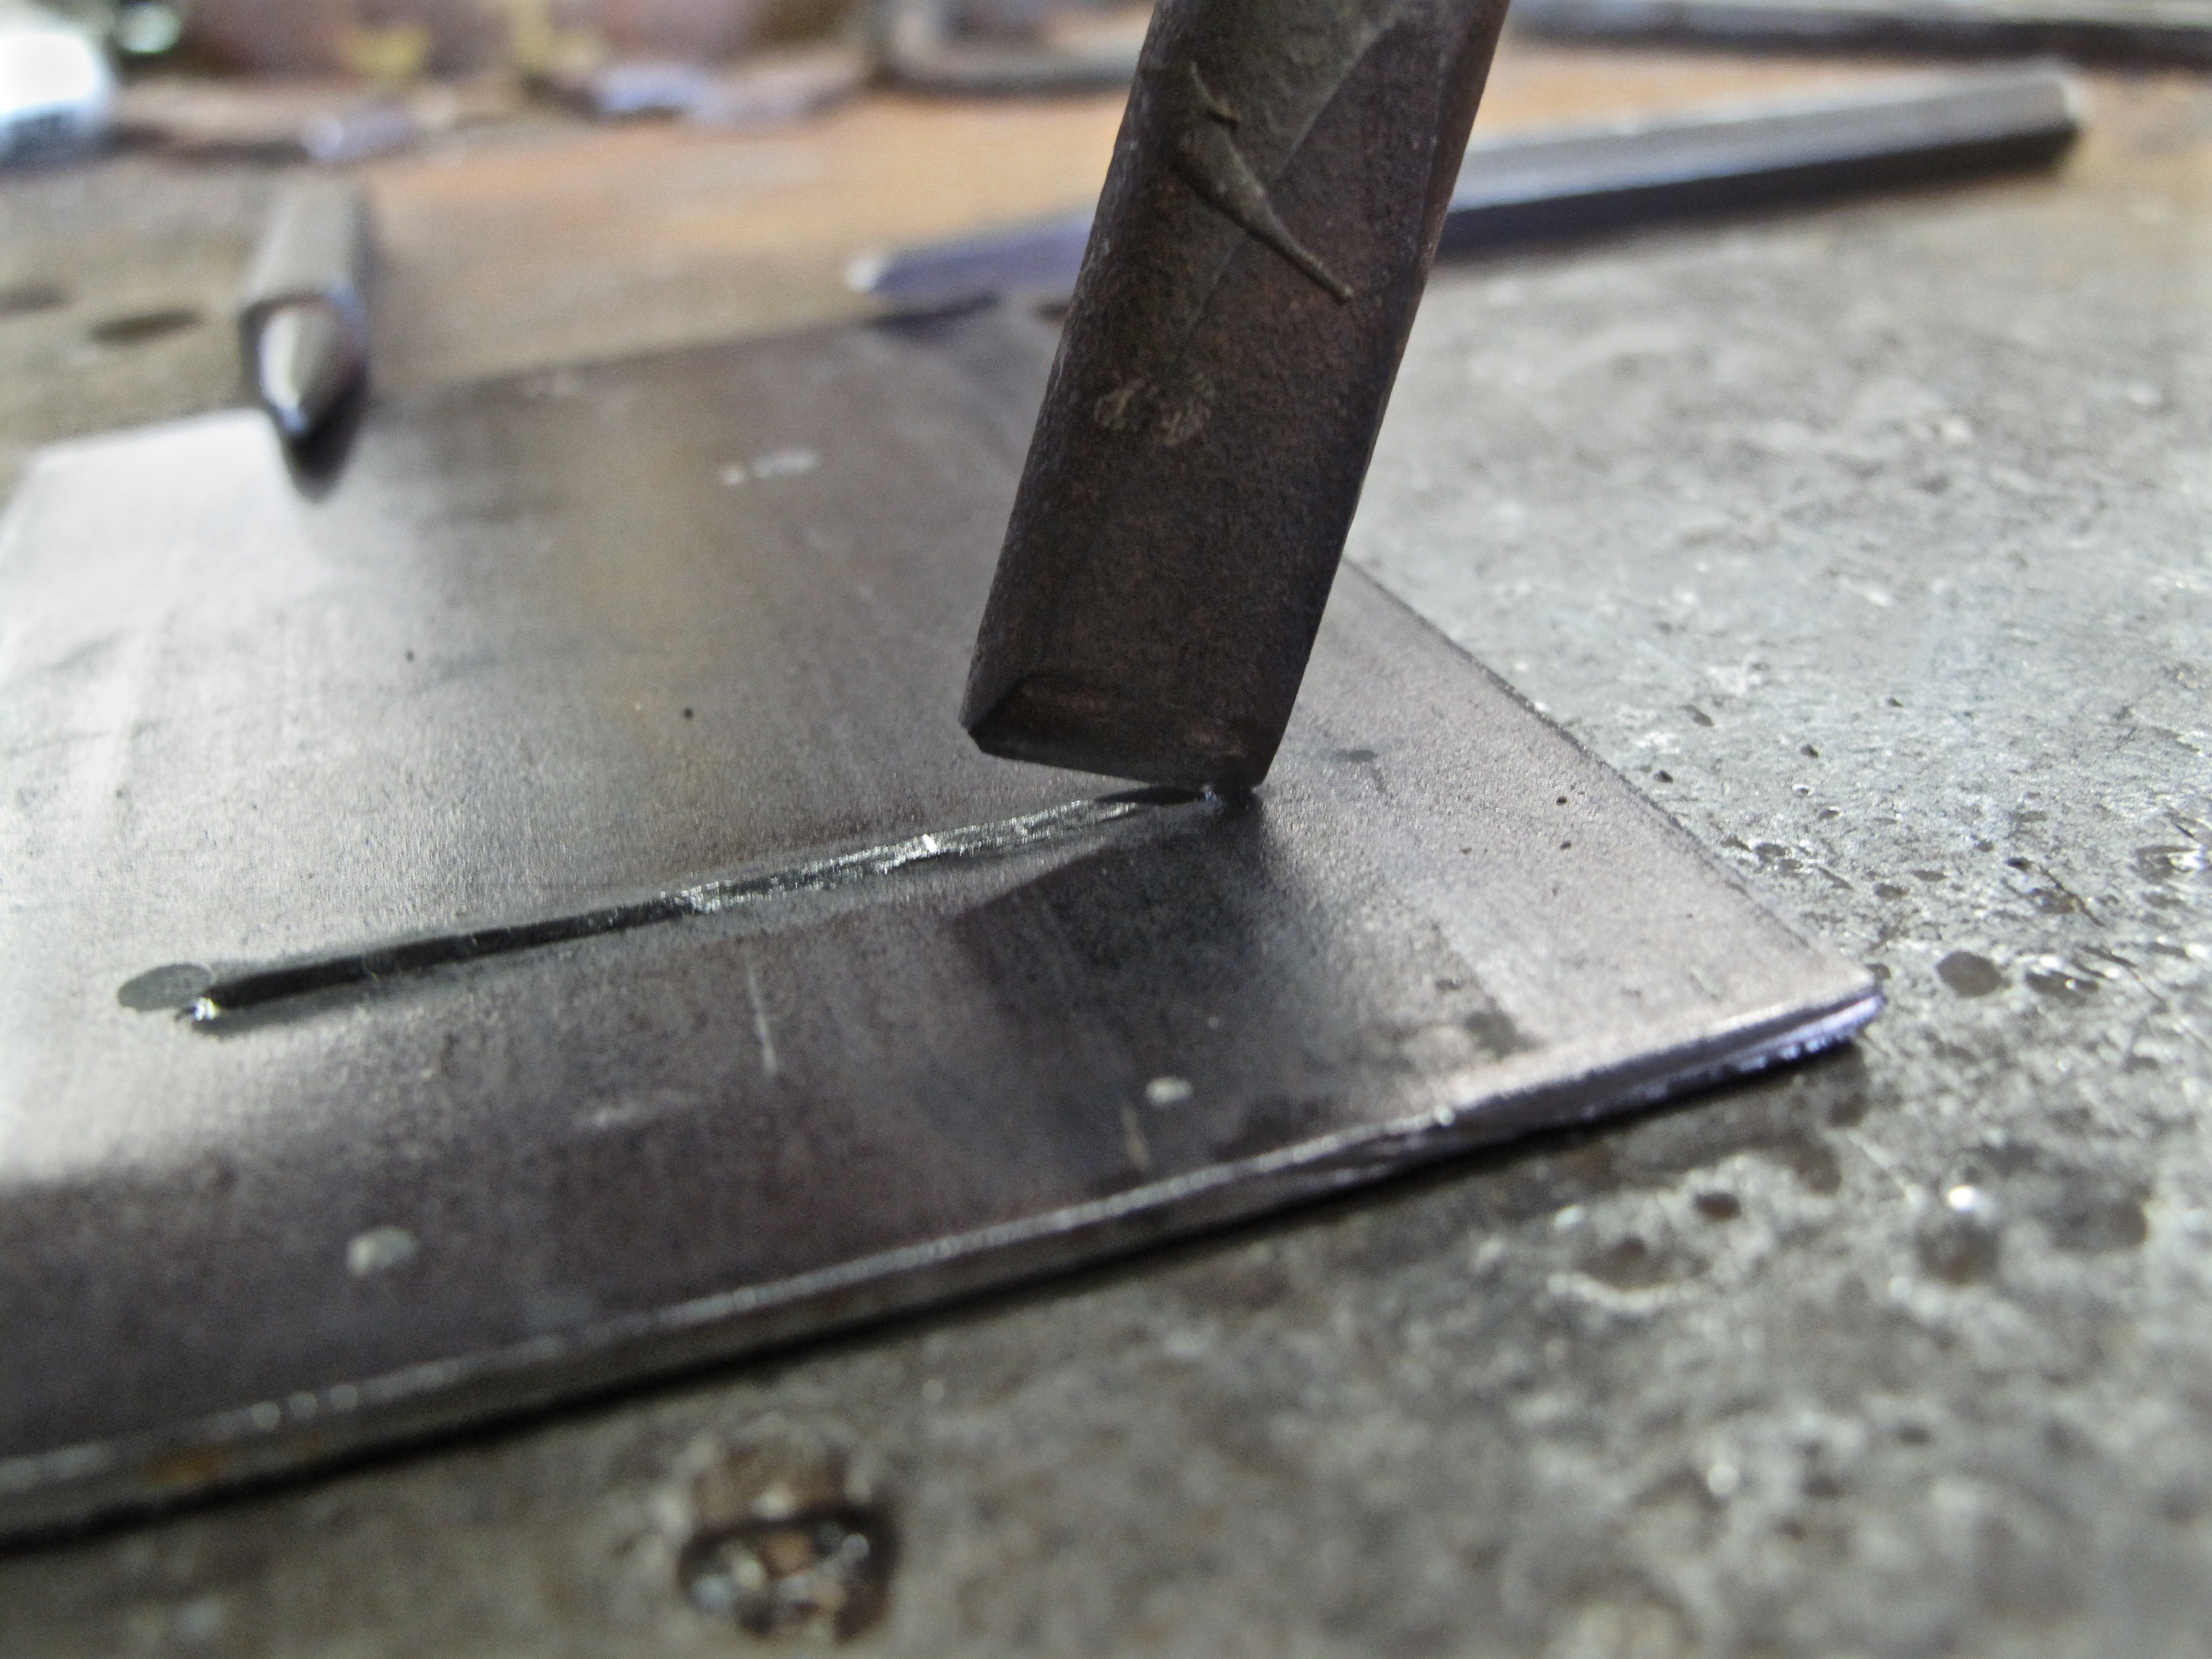
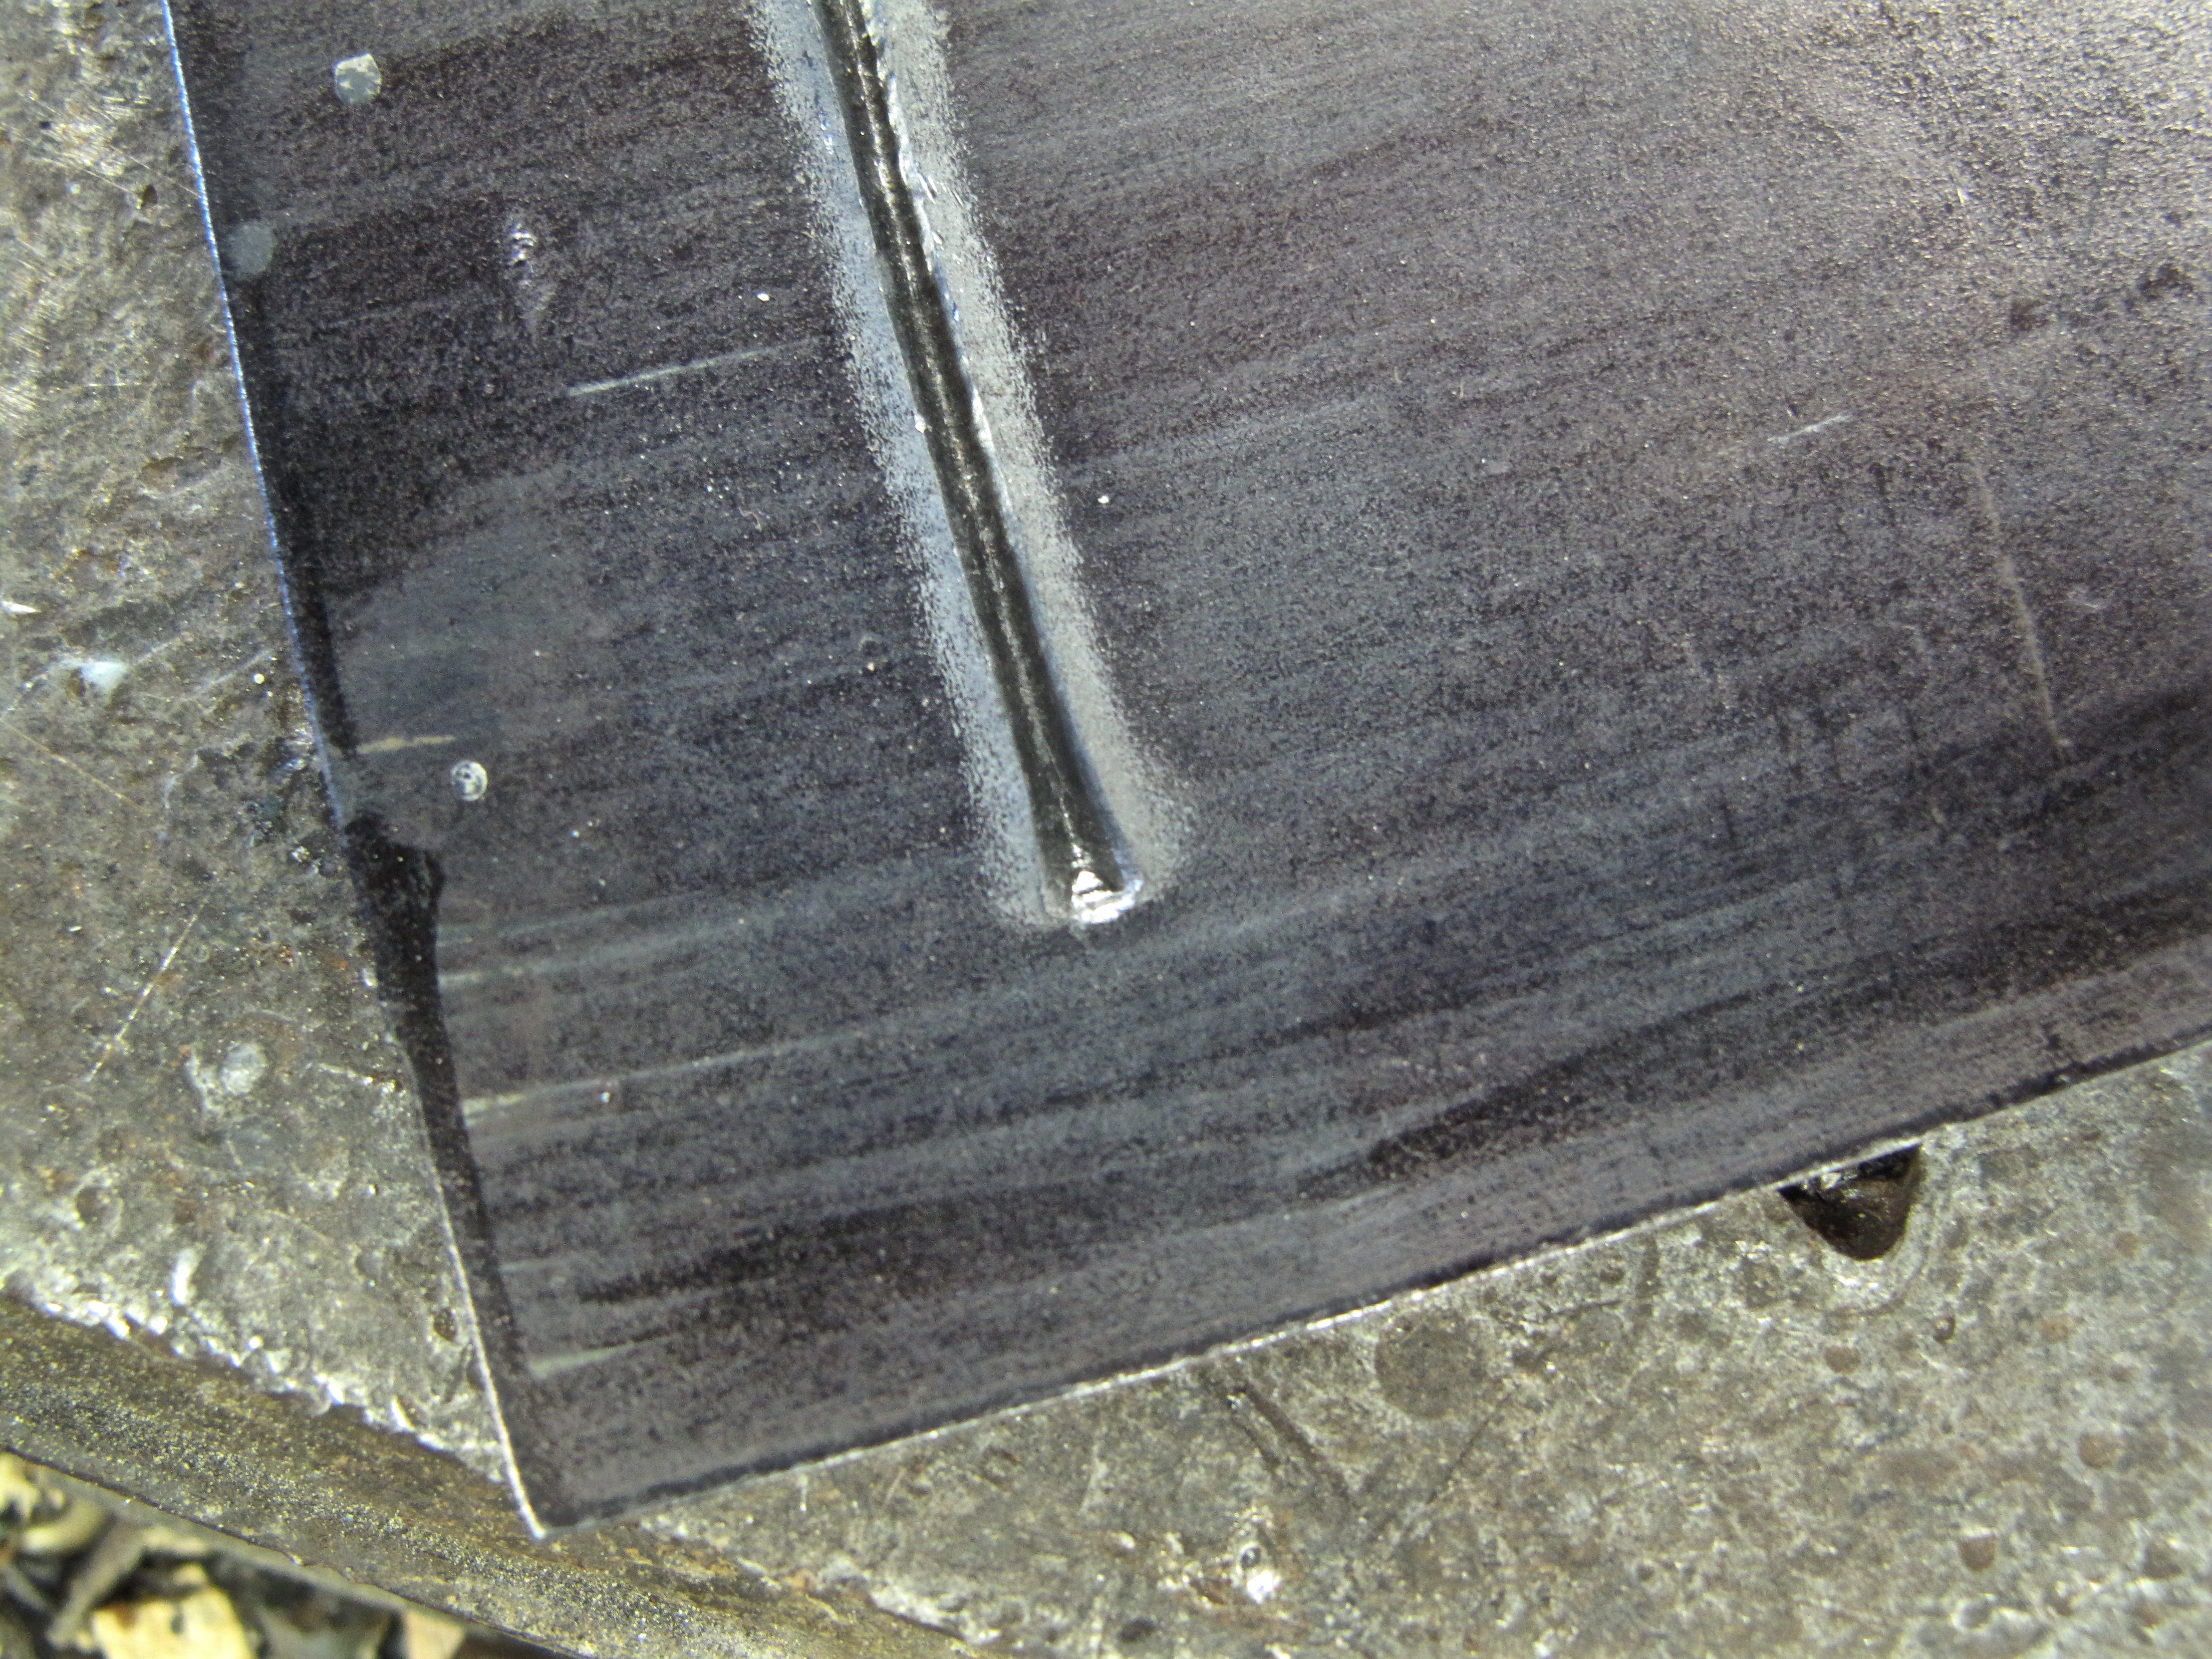
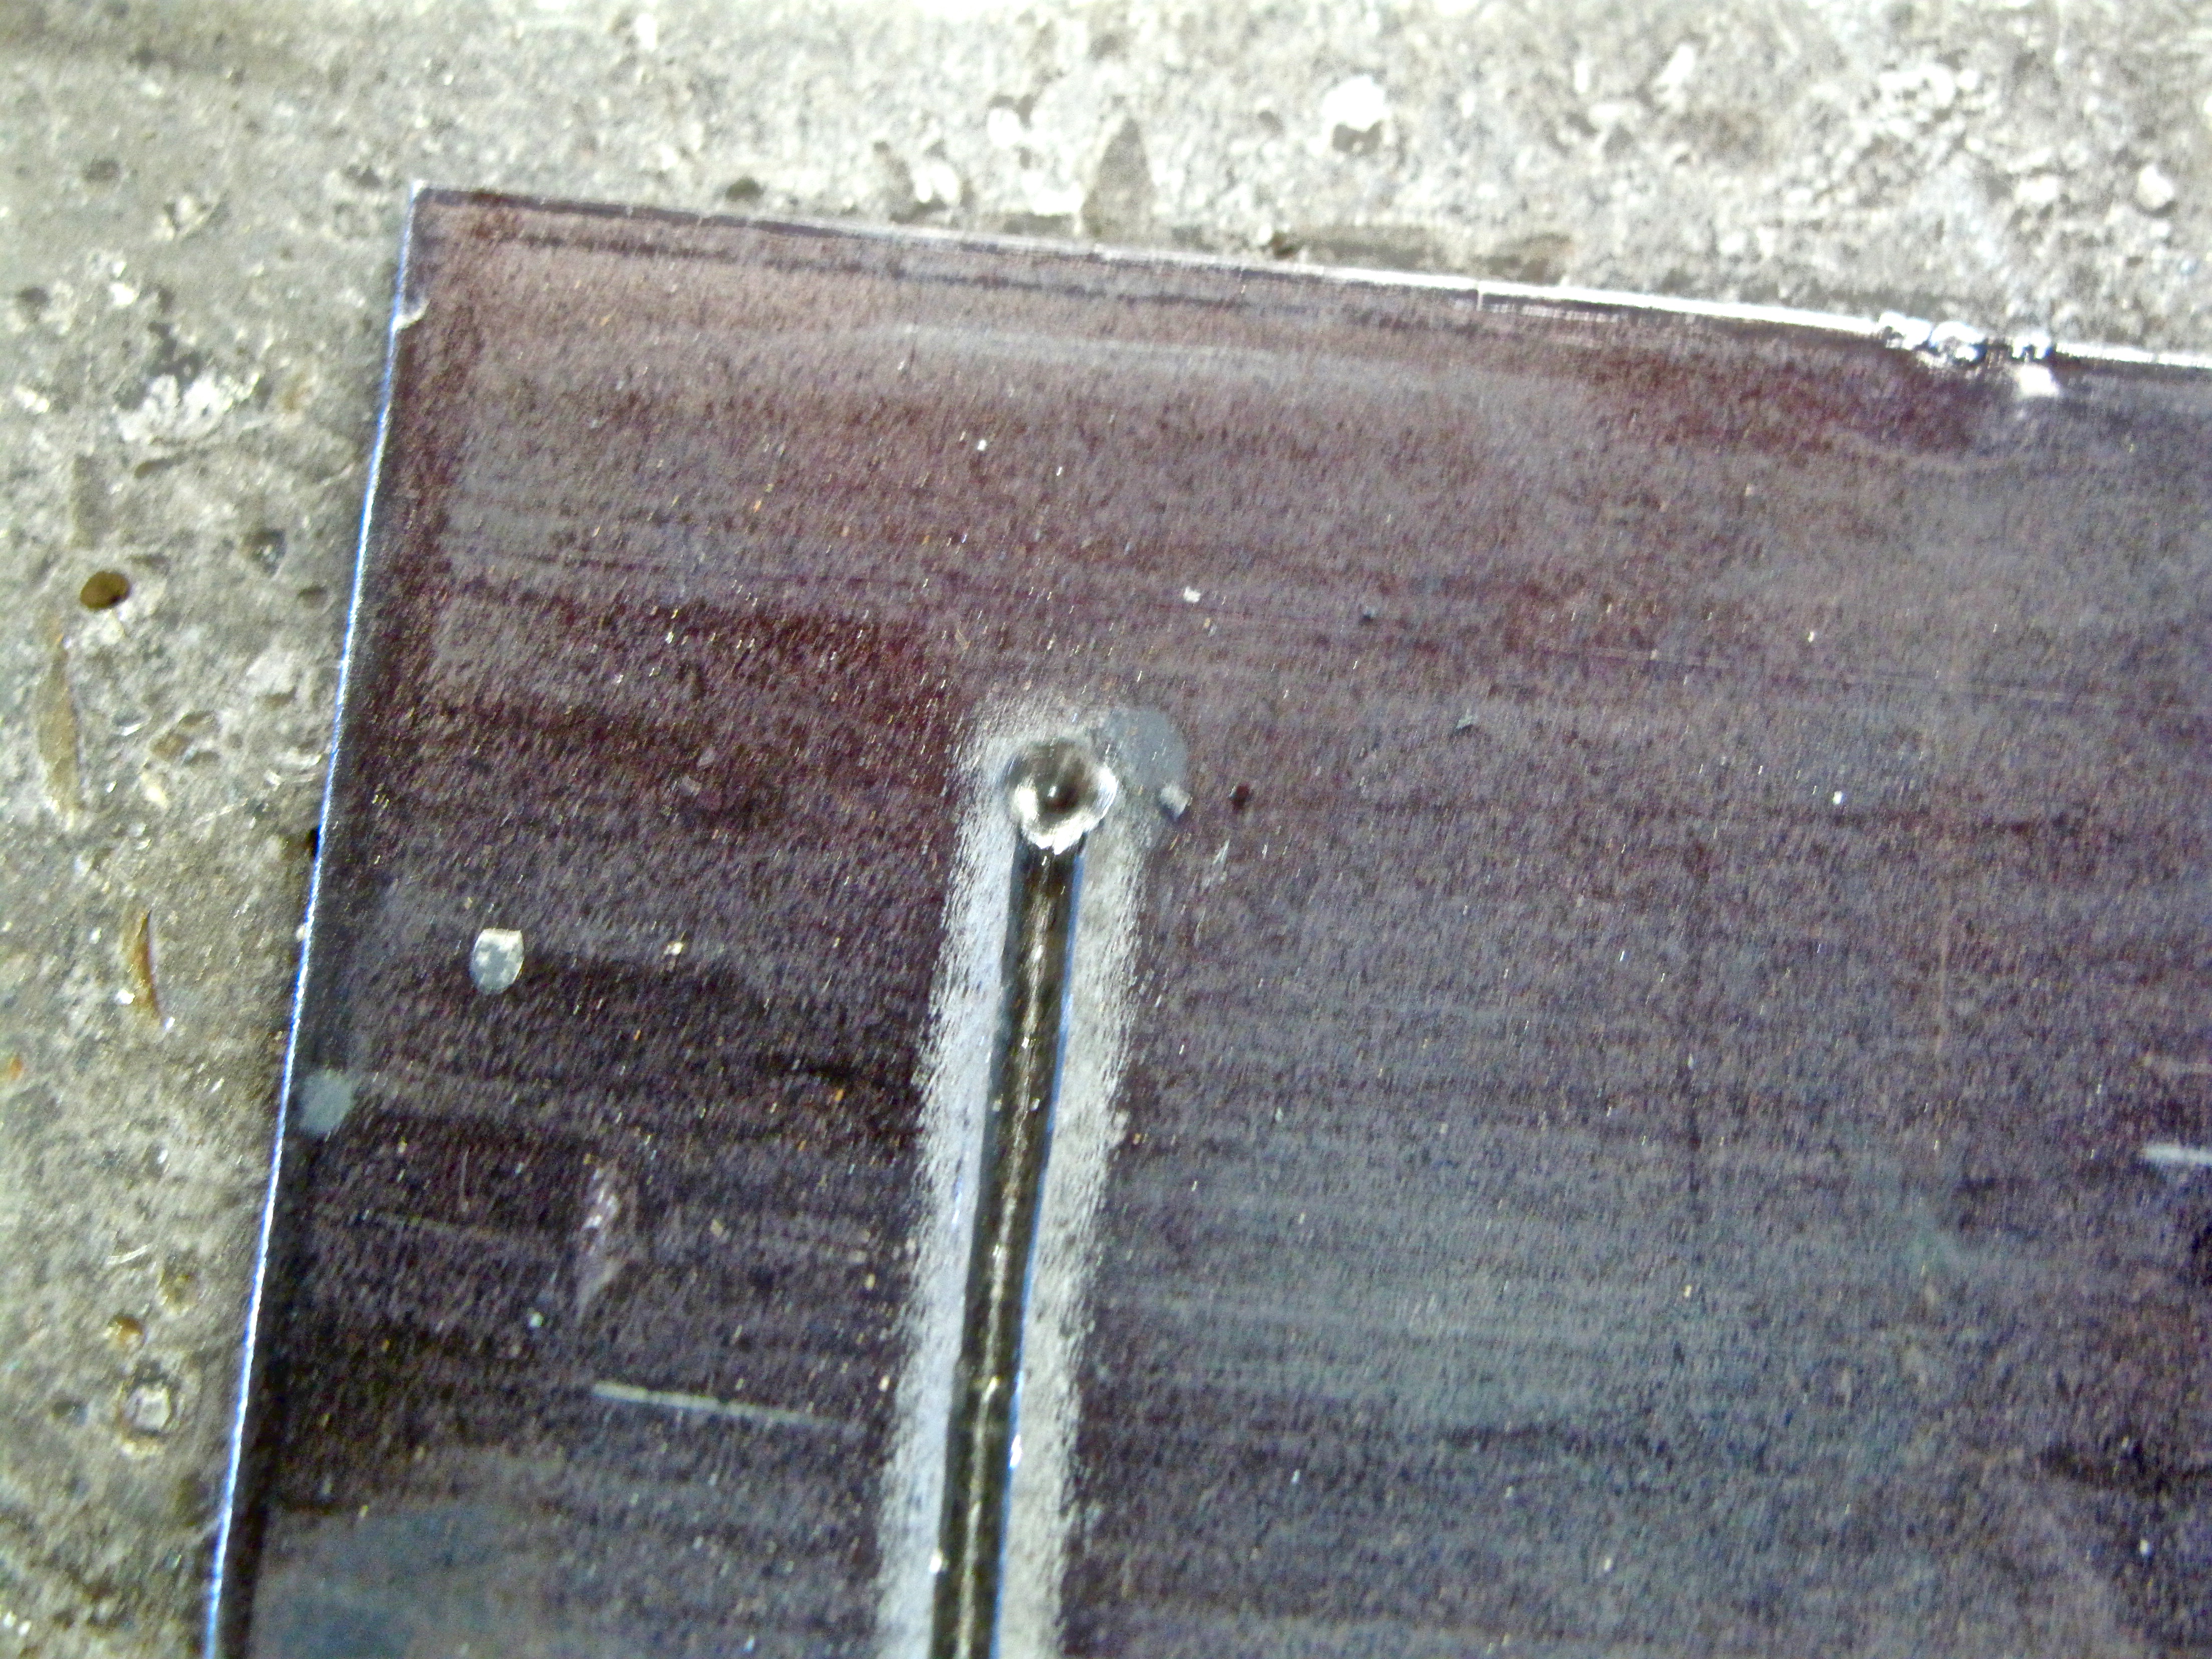
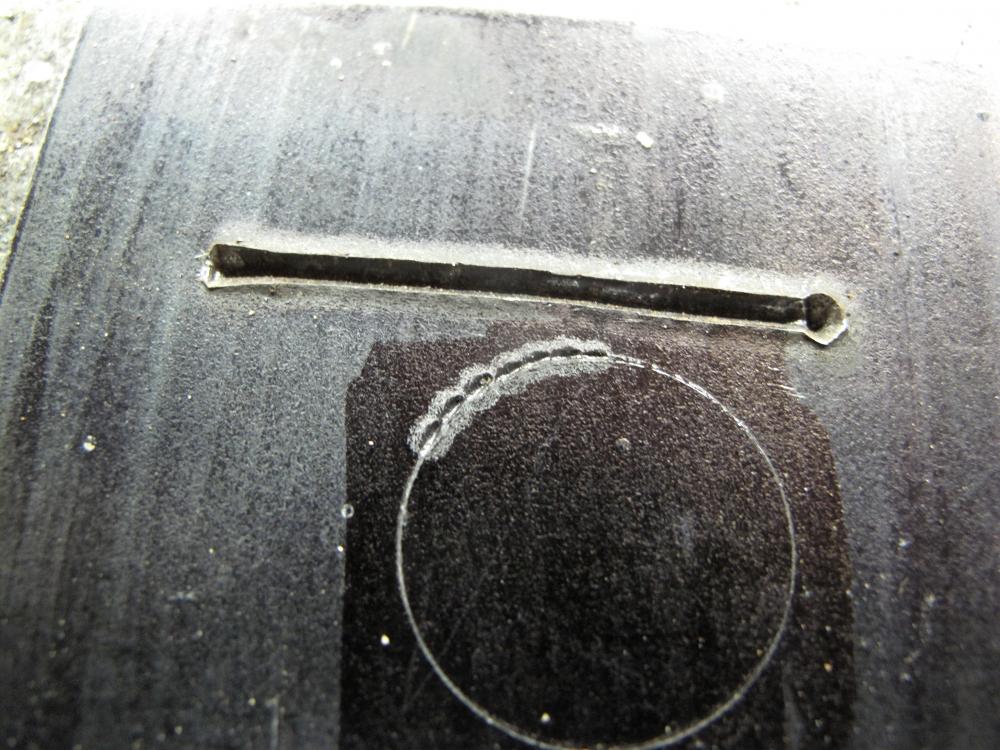
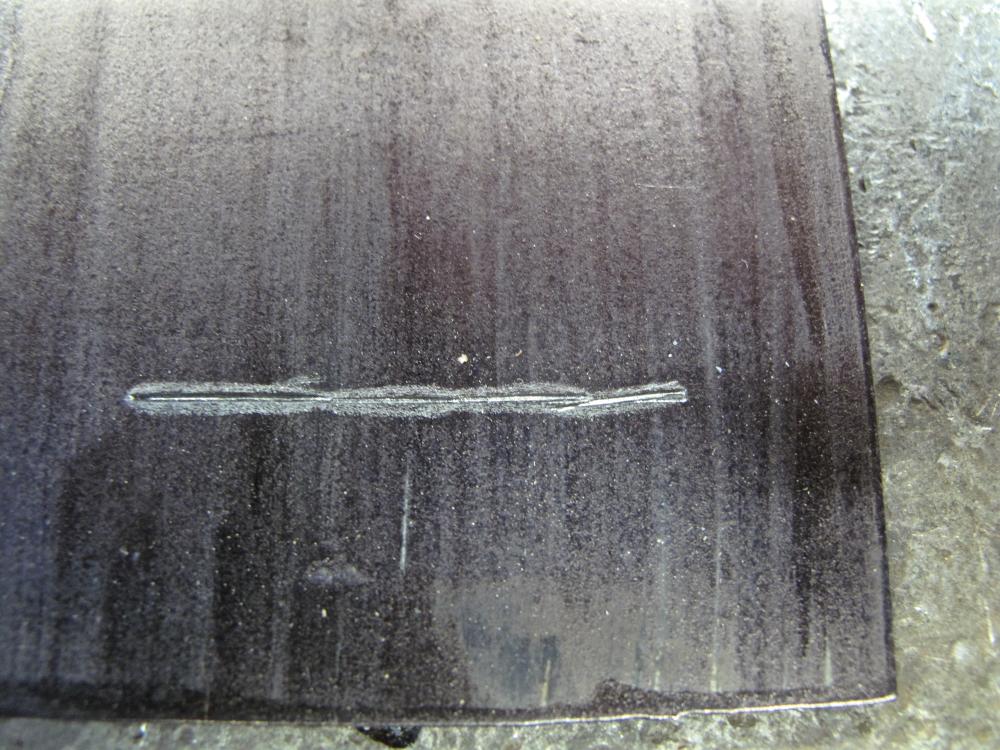
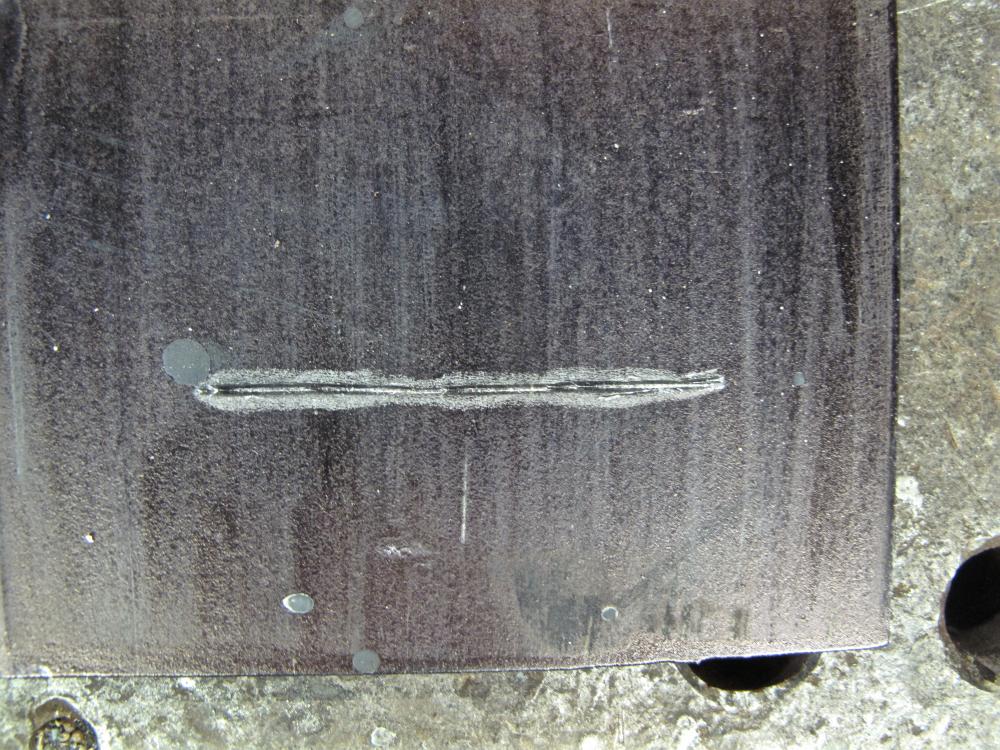
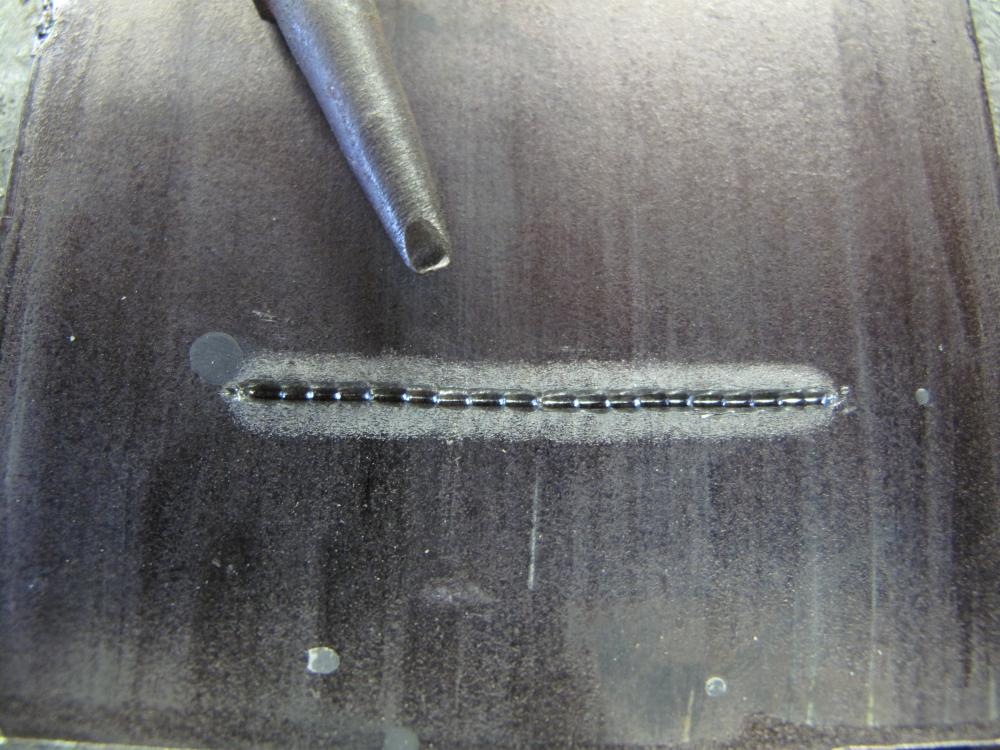
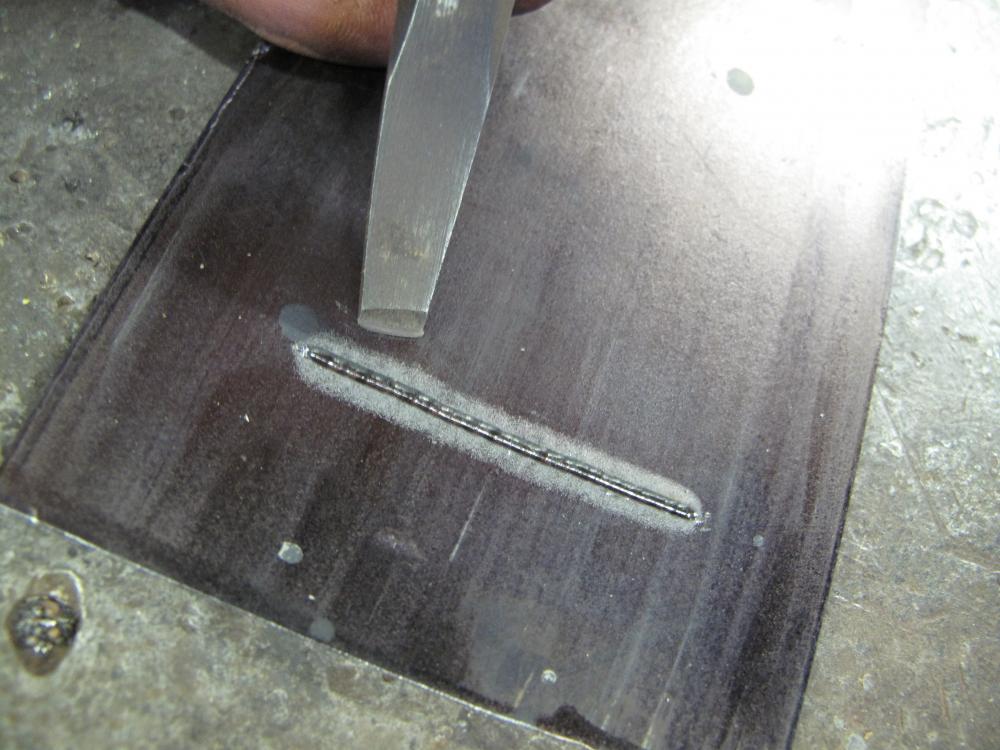
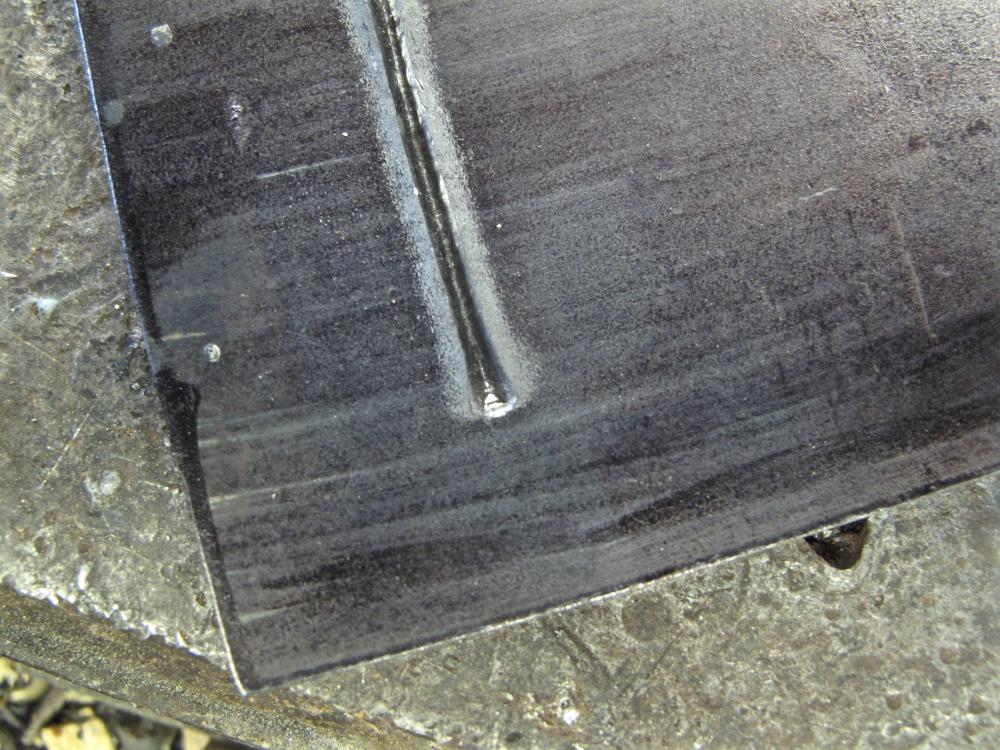
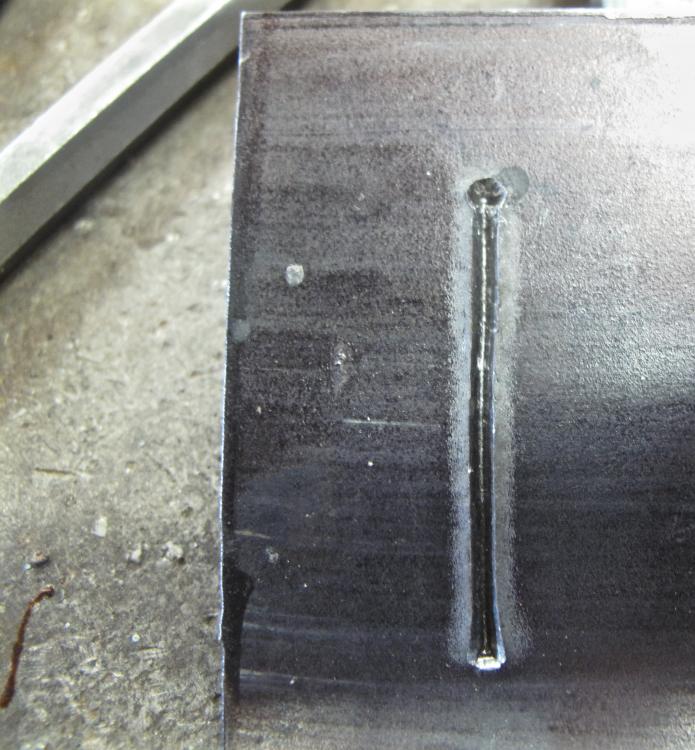
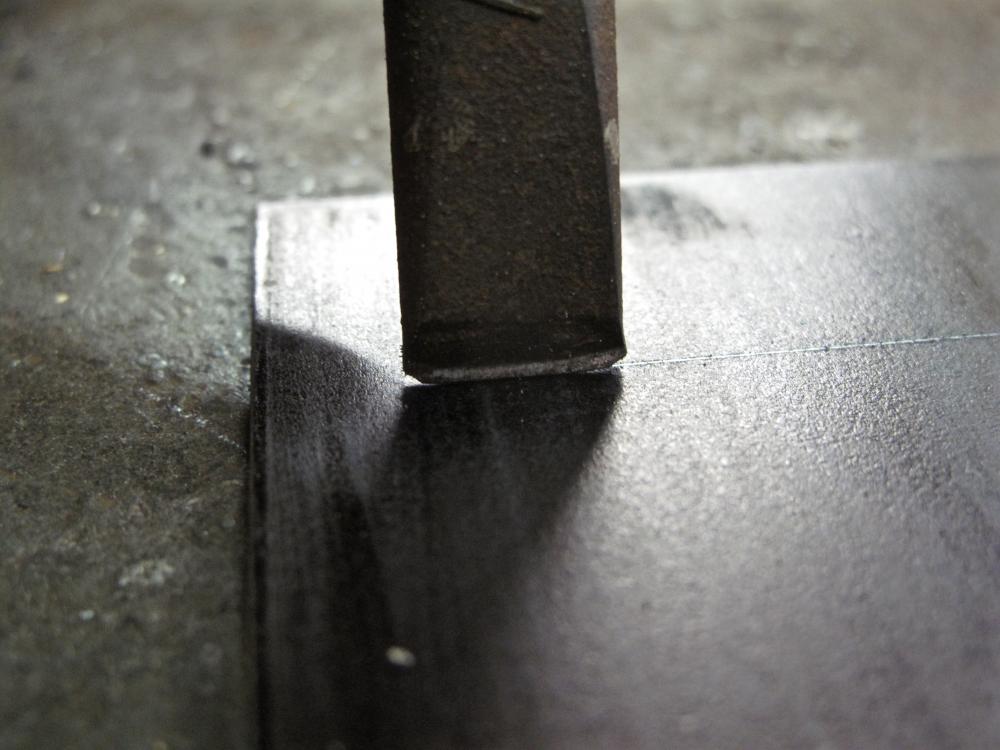
Step 3: Here’s where we go over the line again, establishing it as a solid line rather than a bunch of individual chisel cuts. If you have a line that’s a bit off from the rest, it’s easy to fix by simply bridging the two cuts with your chisel. Now we do the same basic process all over again, but this time using the mid-sized chisel with the fat ¼” edge. Because the bevel on this chisel is sharper than on the previous chisel, it sits down deeper in the cut you’ve already made. With less surfact contact and edge length, a light blow of the hammer really sinks the edge deep. Go along the line with light taps. Make a second or third pass if you feel like it. The work goes quickly now that you're to this stage. Step 4: You’d think we’re done, but there’s still one more chisel to use. I really like using the small chisel because the short, sharp edge gives you extra depth and creates a nice shadow line. Plus if you give the piece a coat of wax, the depth gets filled to some degree and having a bit extra keeps the finished piece looking good. Just like with the other two chisels, you’re doing a single tap and moving down one edge length. On the second pass, you can bridge the two cuts and even everything out. Step 5: The Clean Up. No matter how hard you try, the cut isn’t going to be perfect. This is when you use the two larger chisels to go back over the line, evening things out. If you want to add a bit of "something special" to the ends of the line, there are a lot of ways to go about it. Two of my favorites..... Start just a hair past the end of your cut and drive the chisel in at an angle. This adds just a hit of a flair to the end of the line. Or, do likewise with your center punch to create a ball end.


-
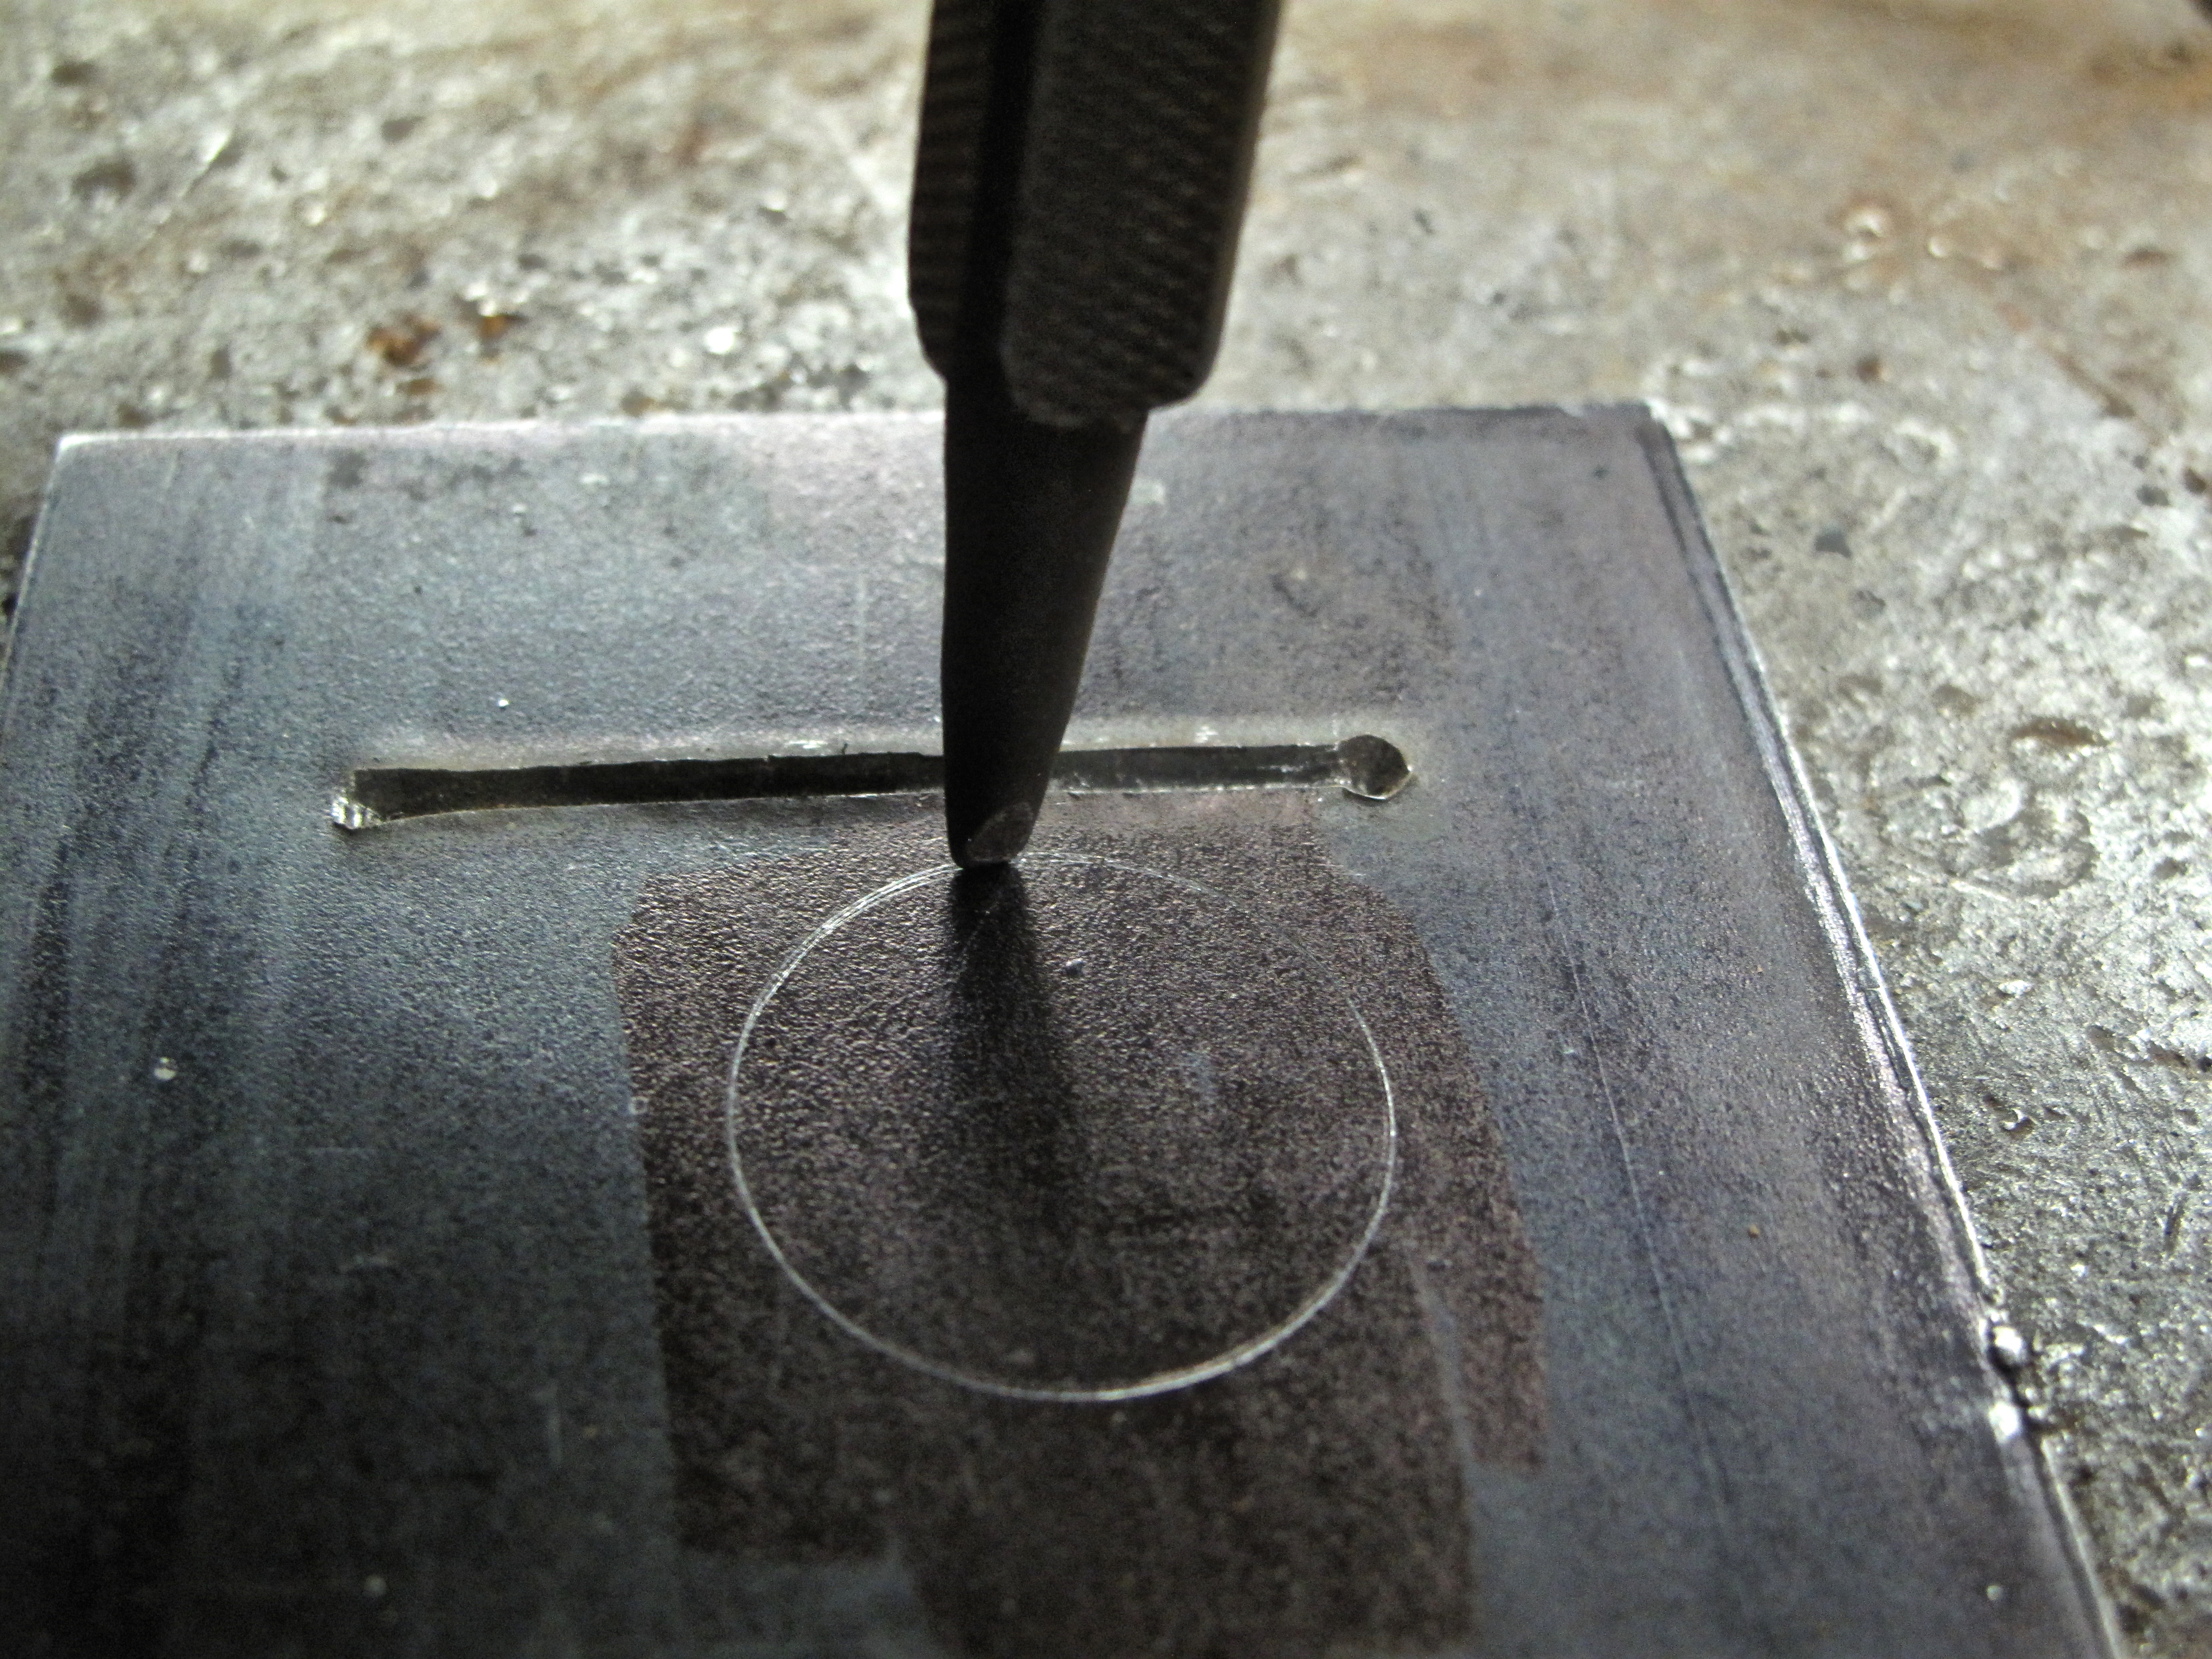
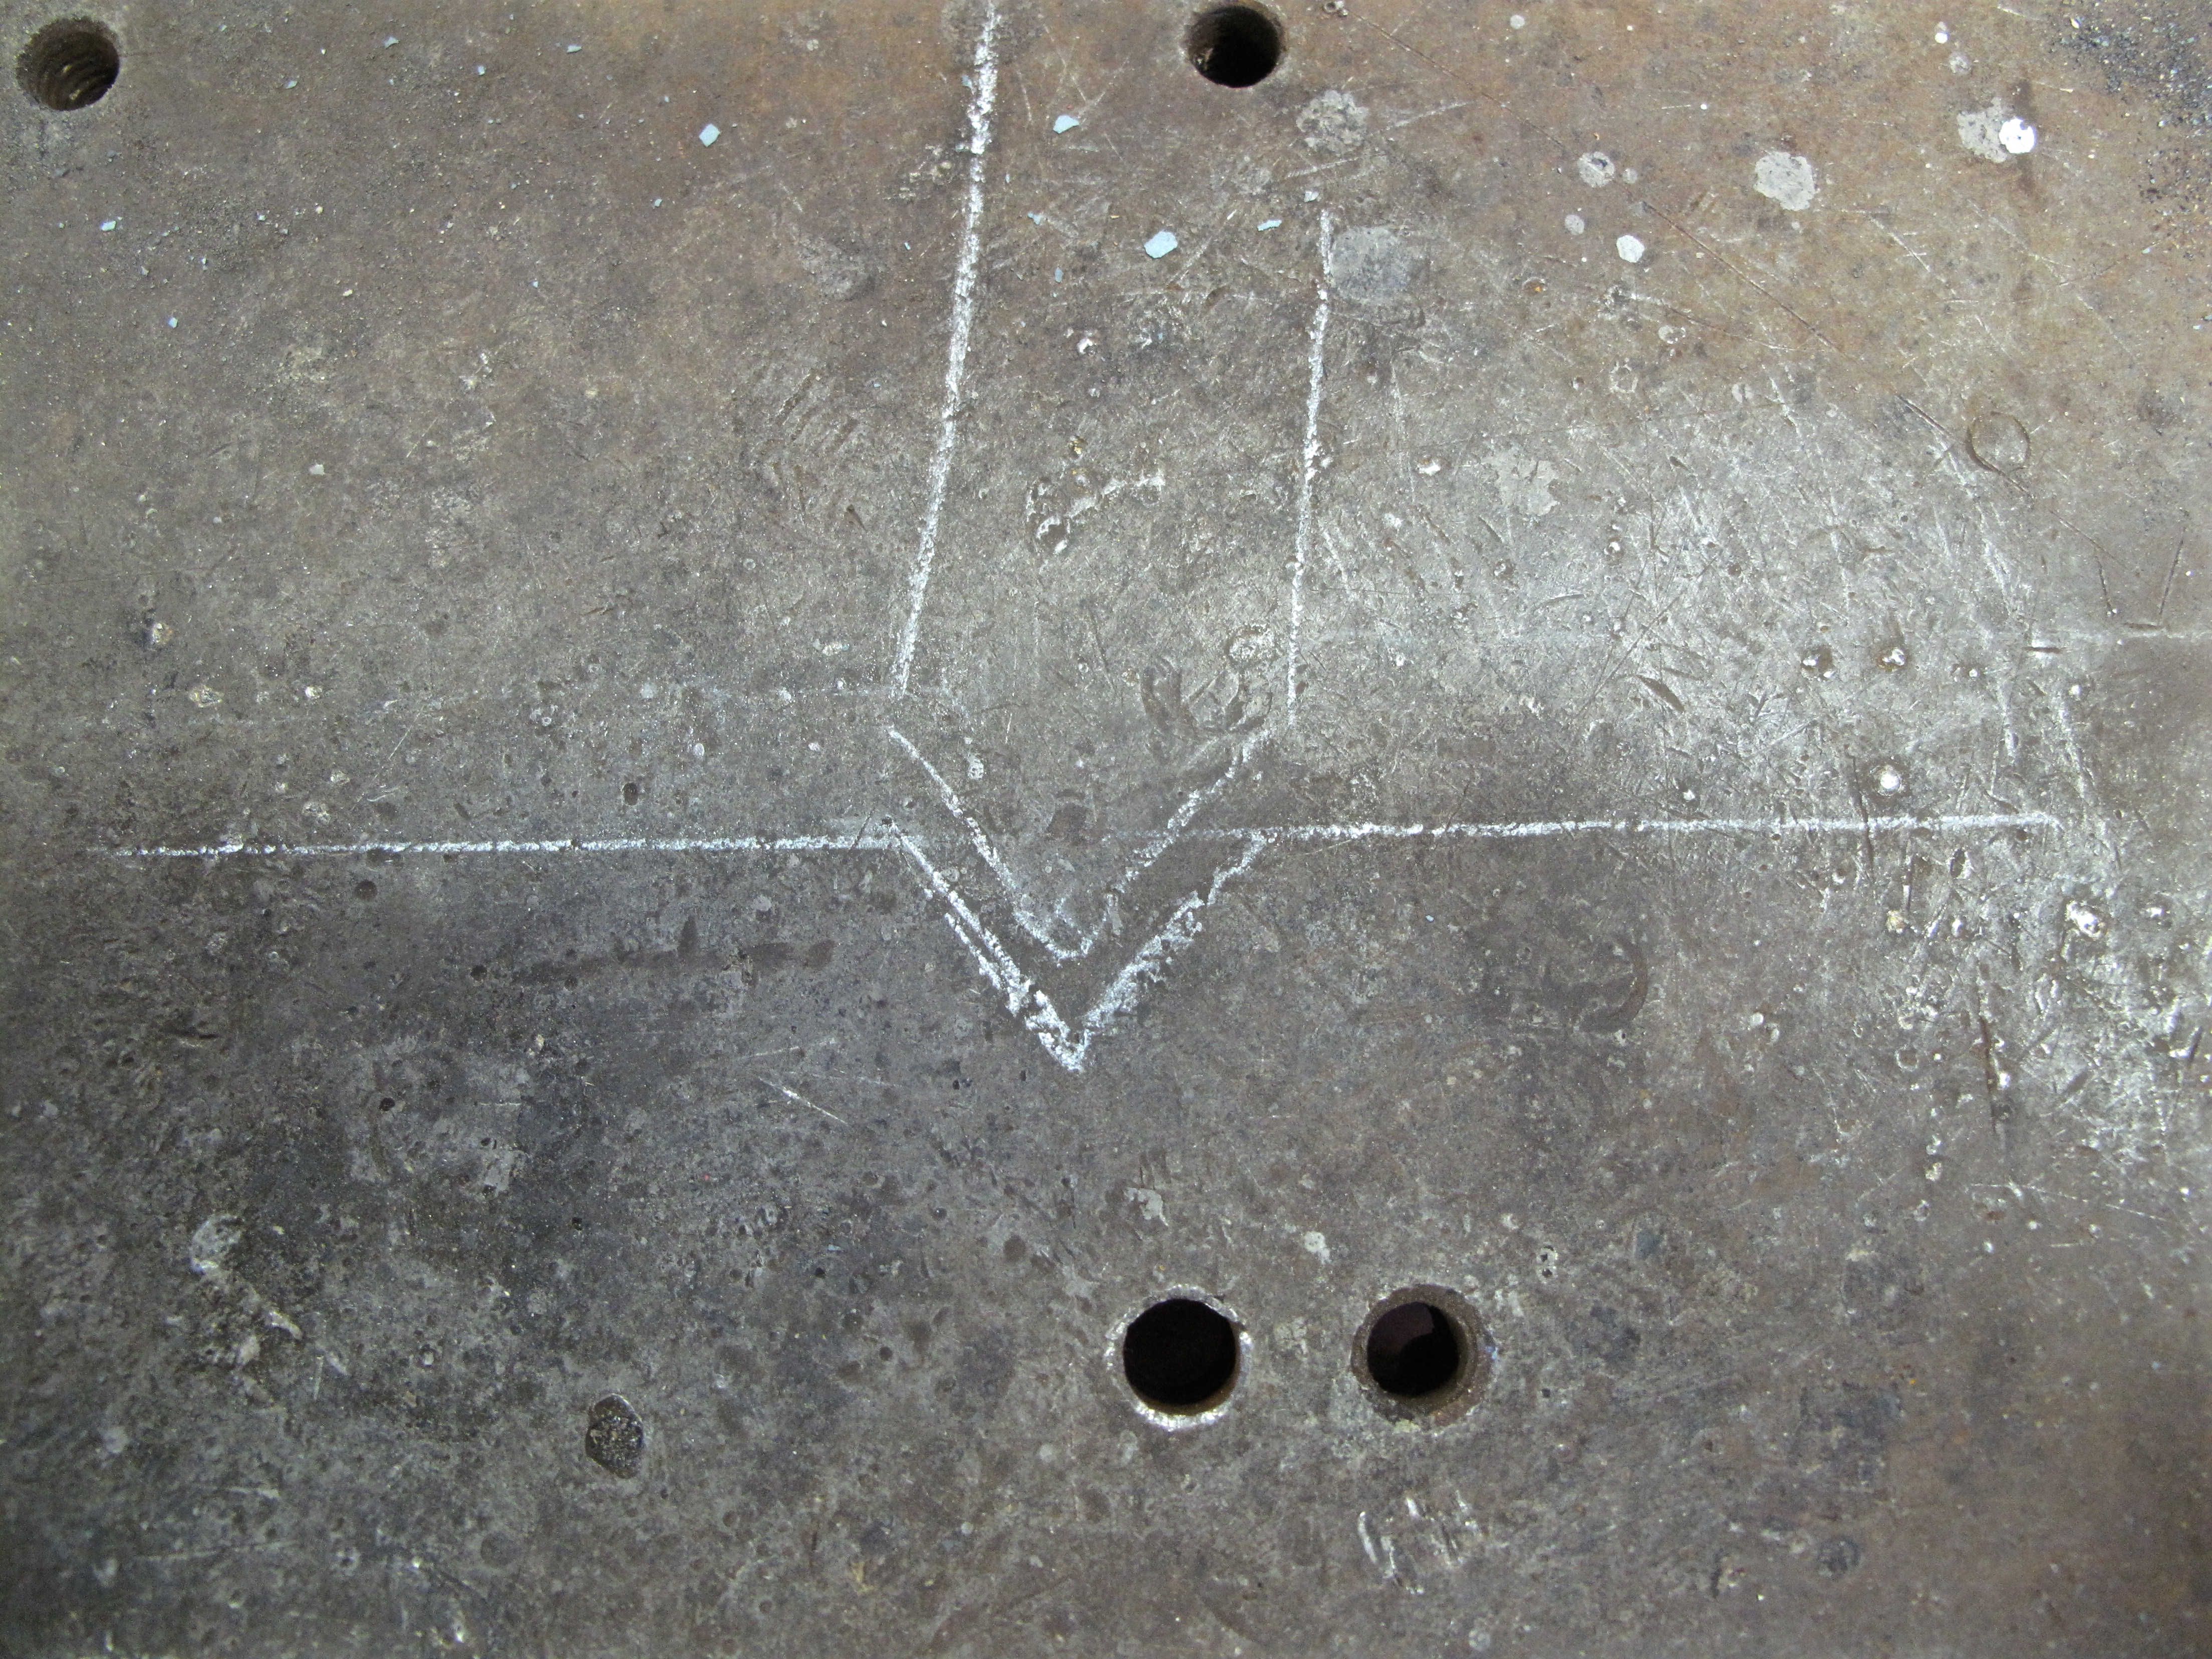
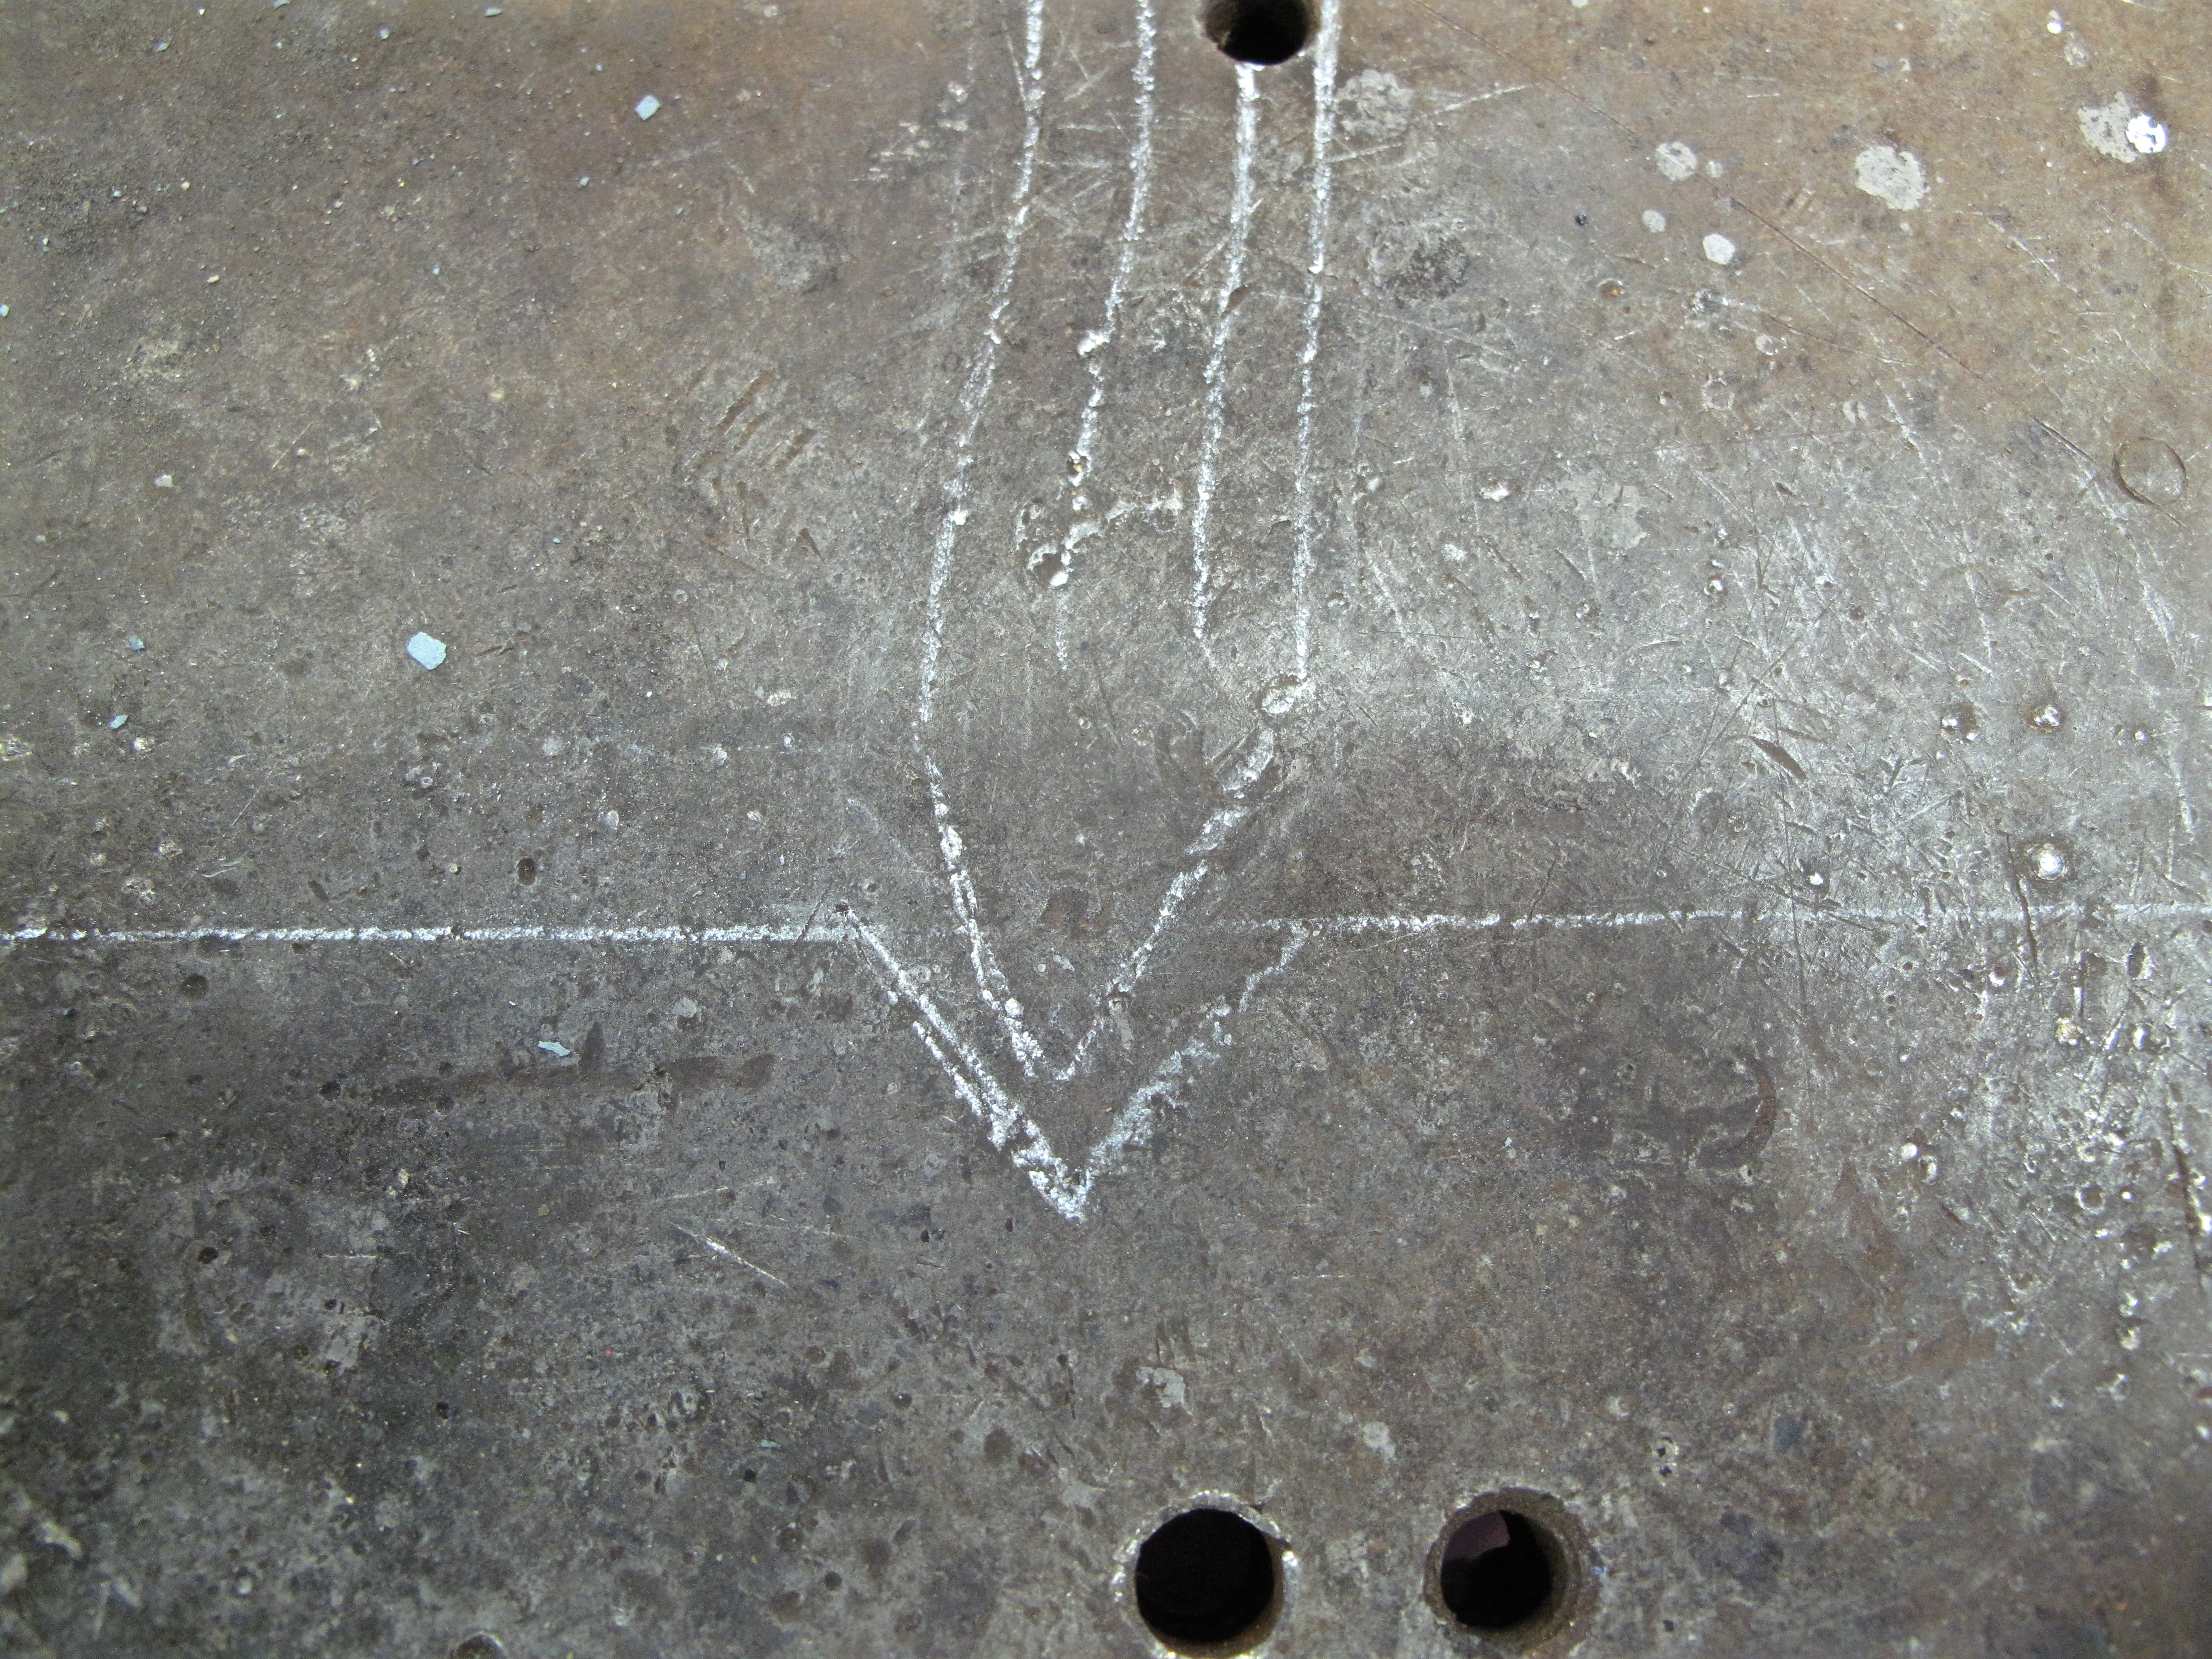
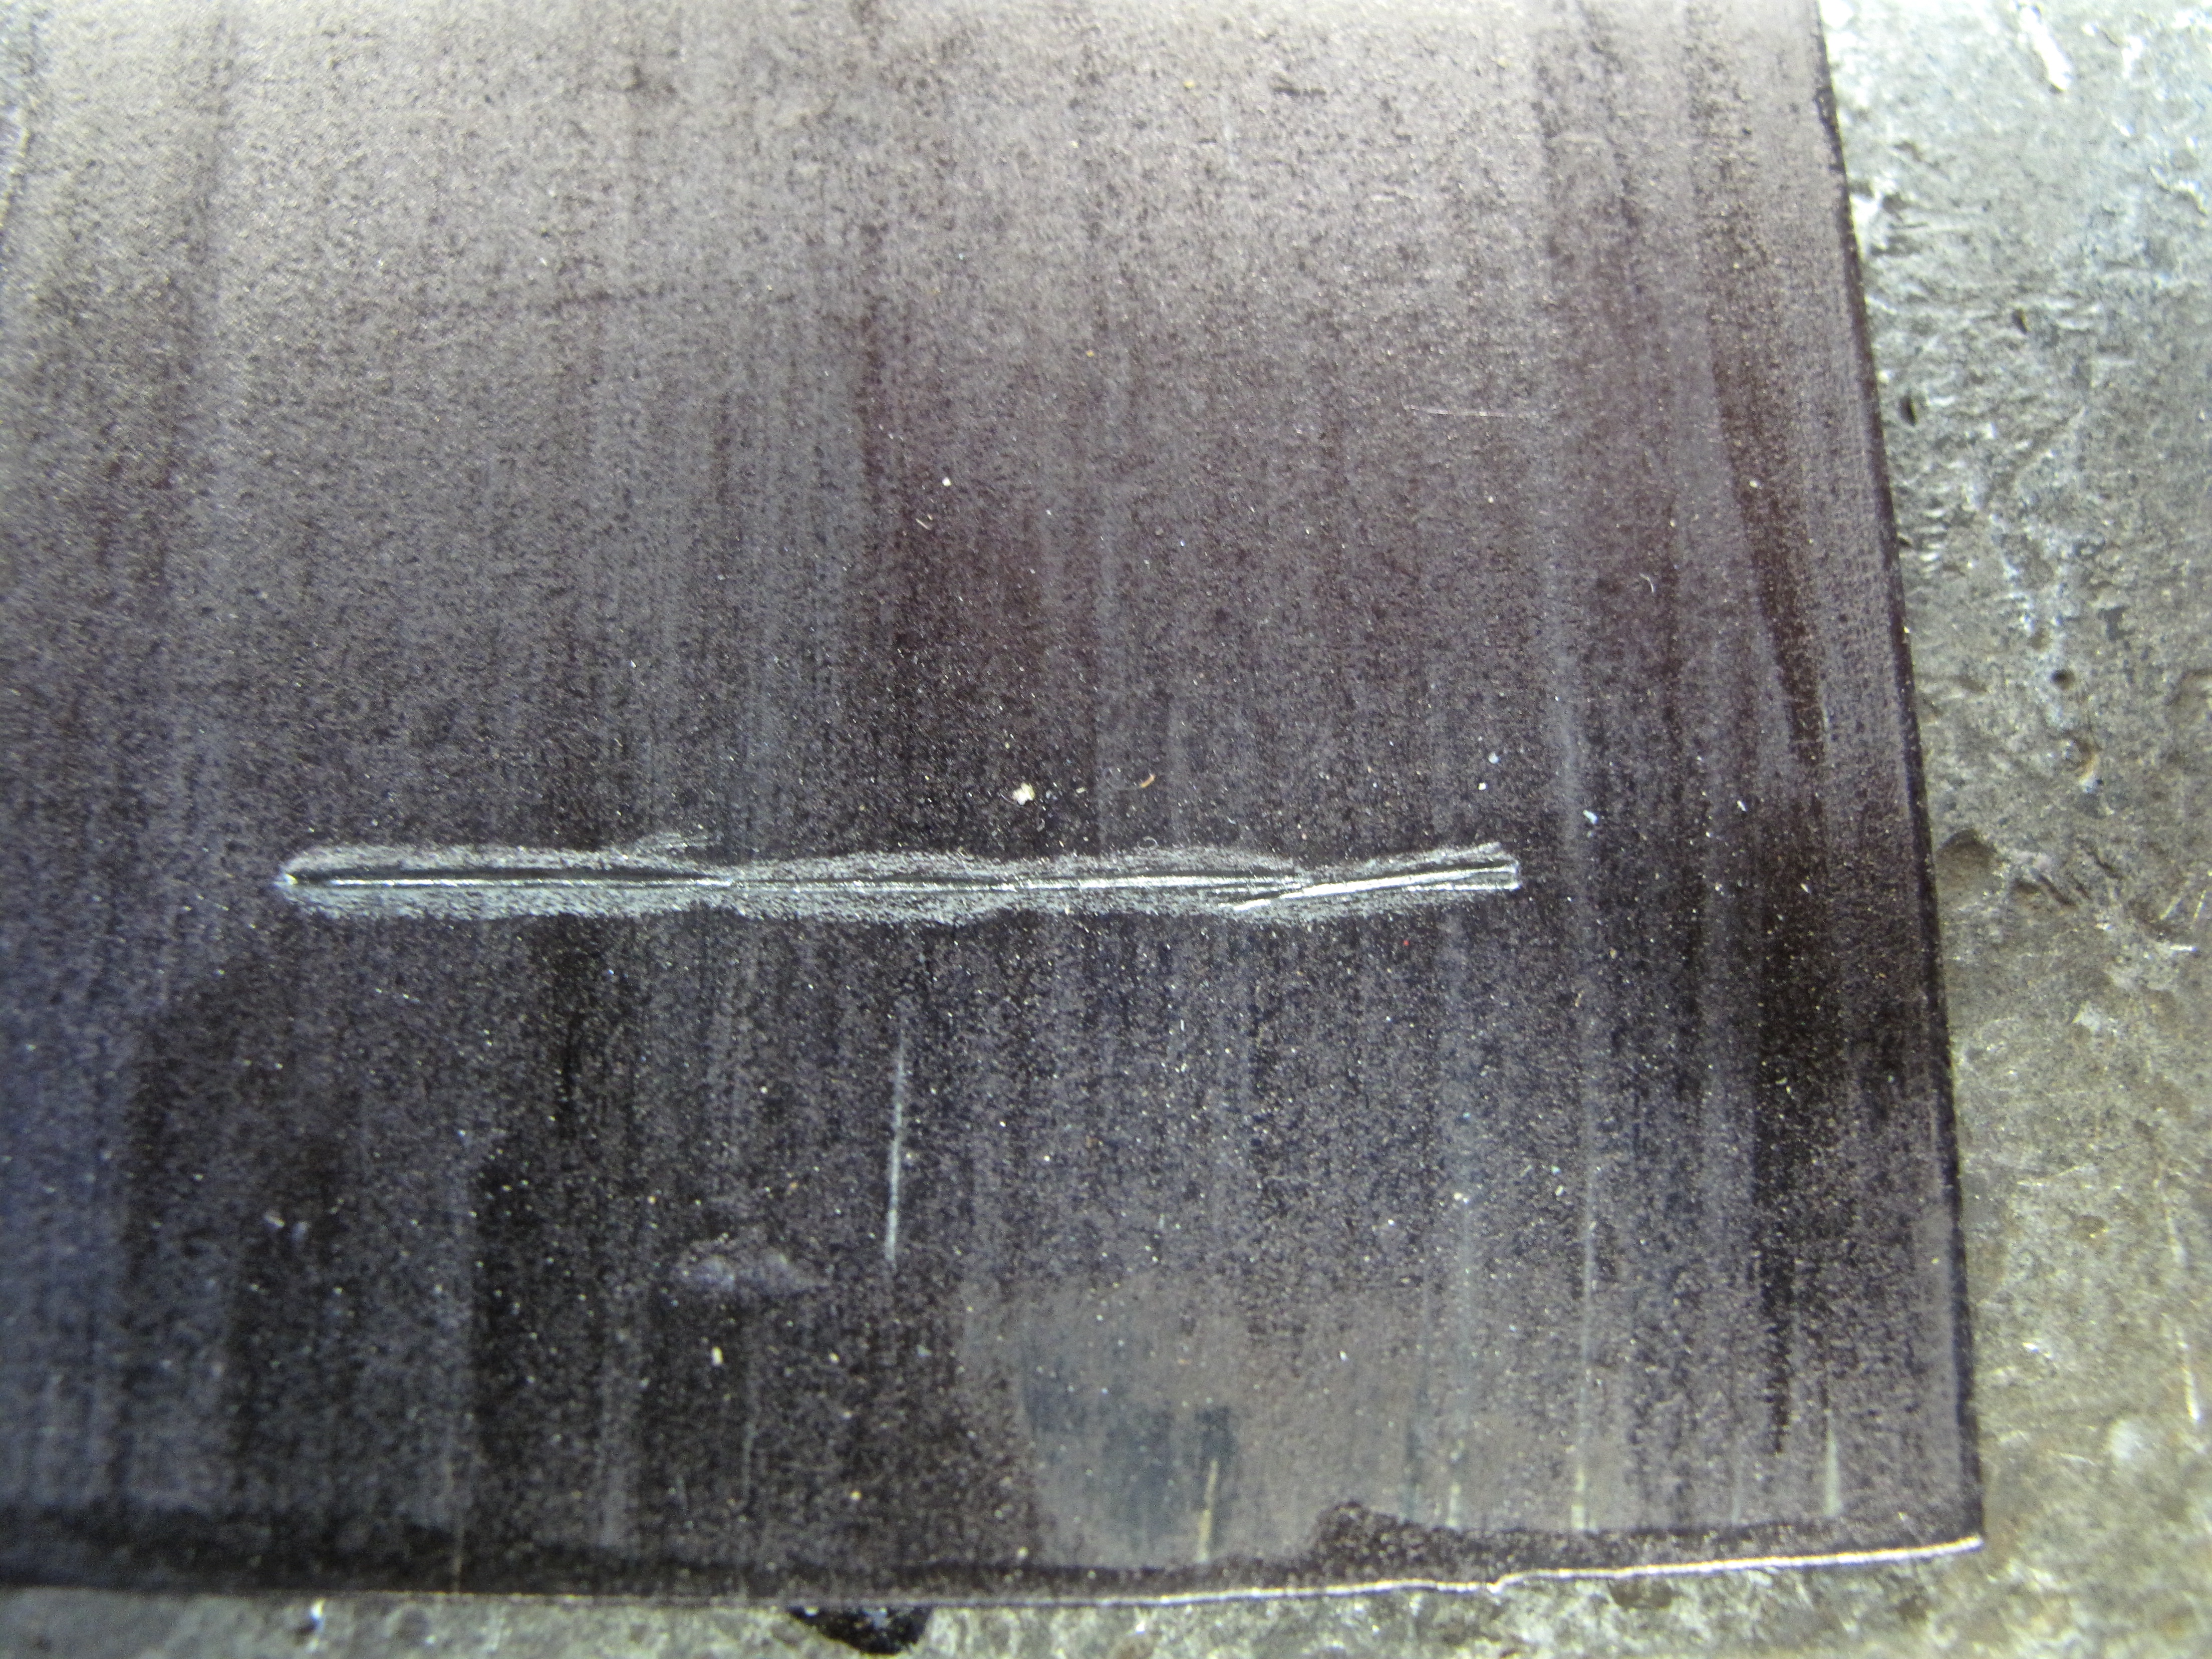
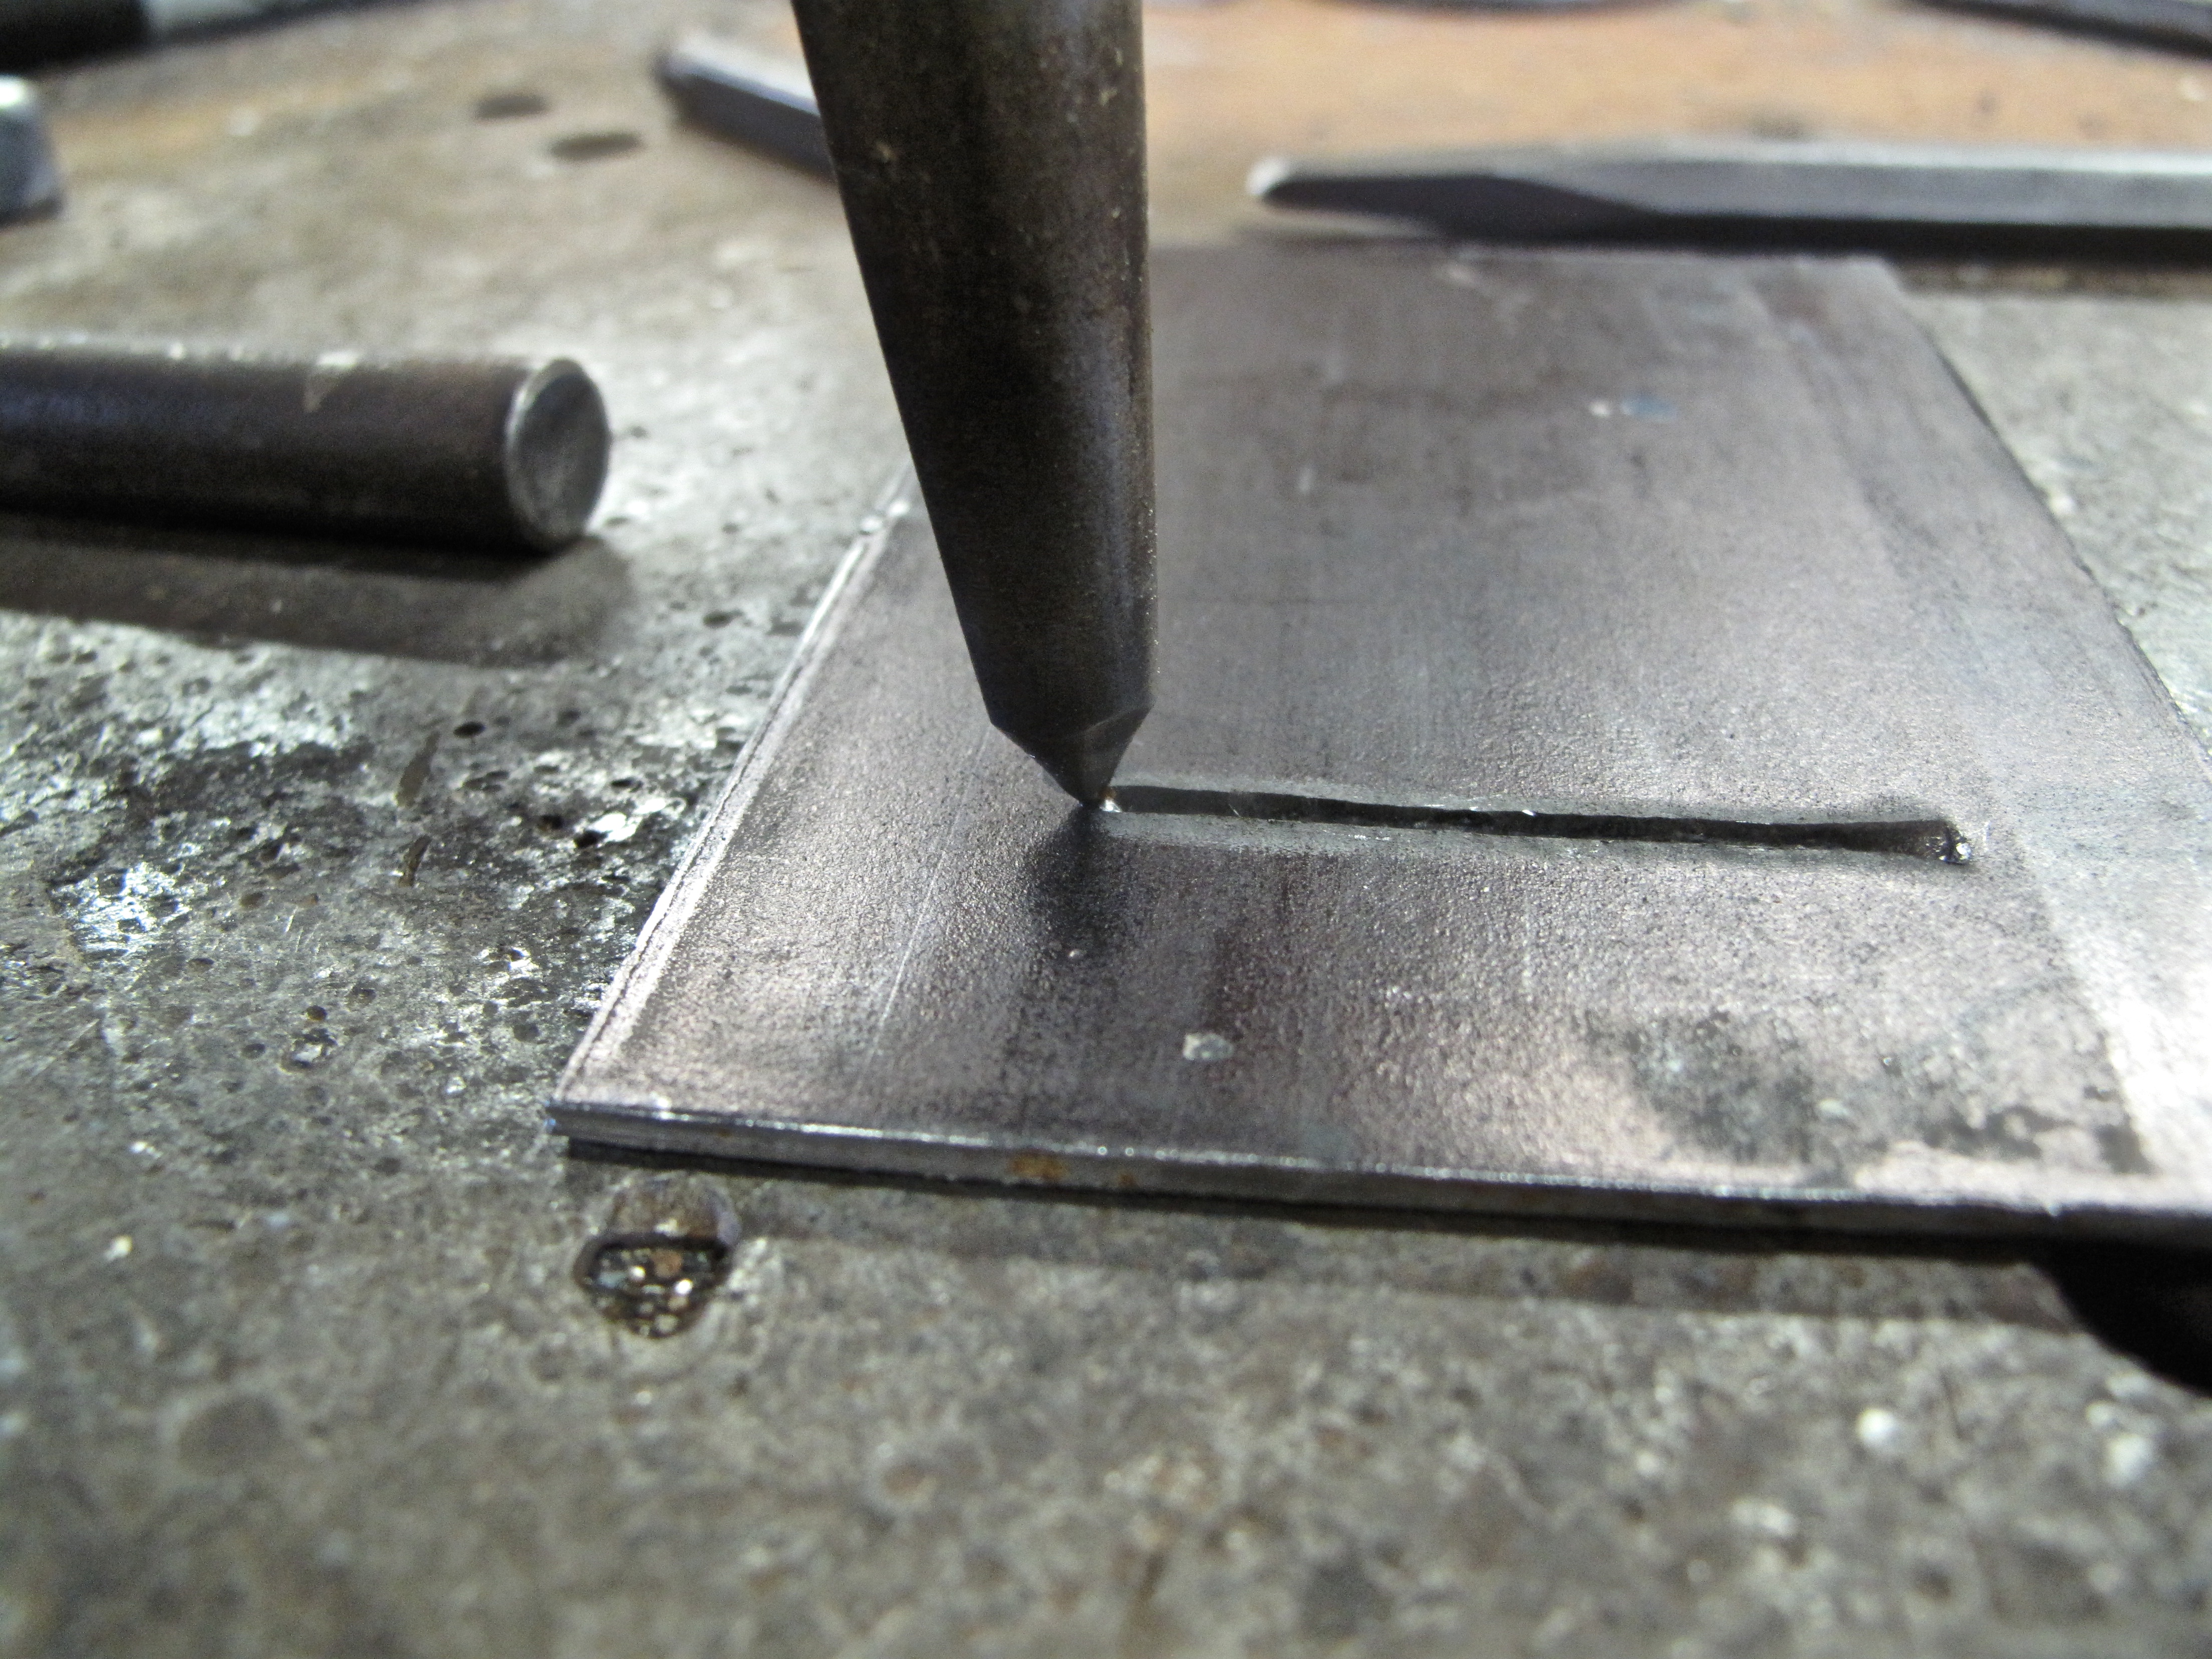
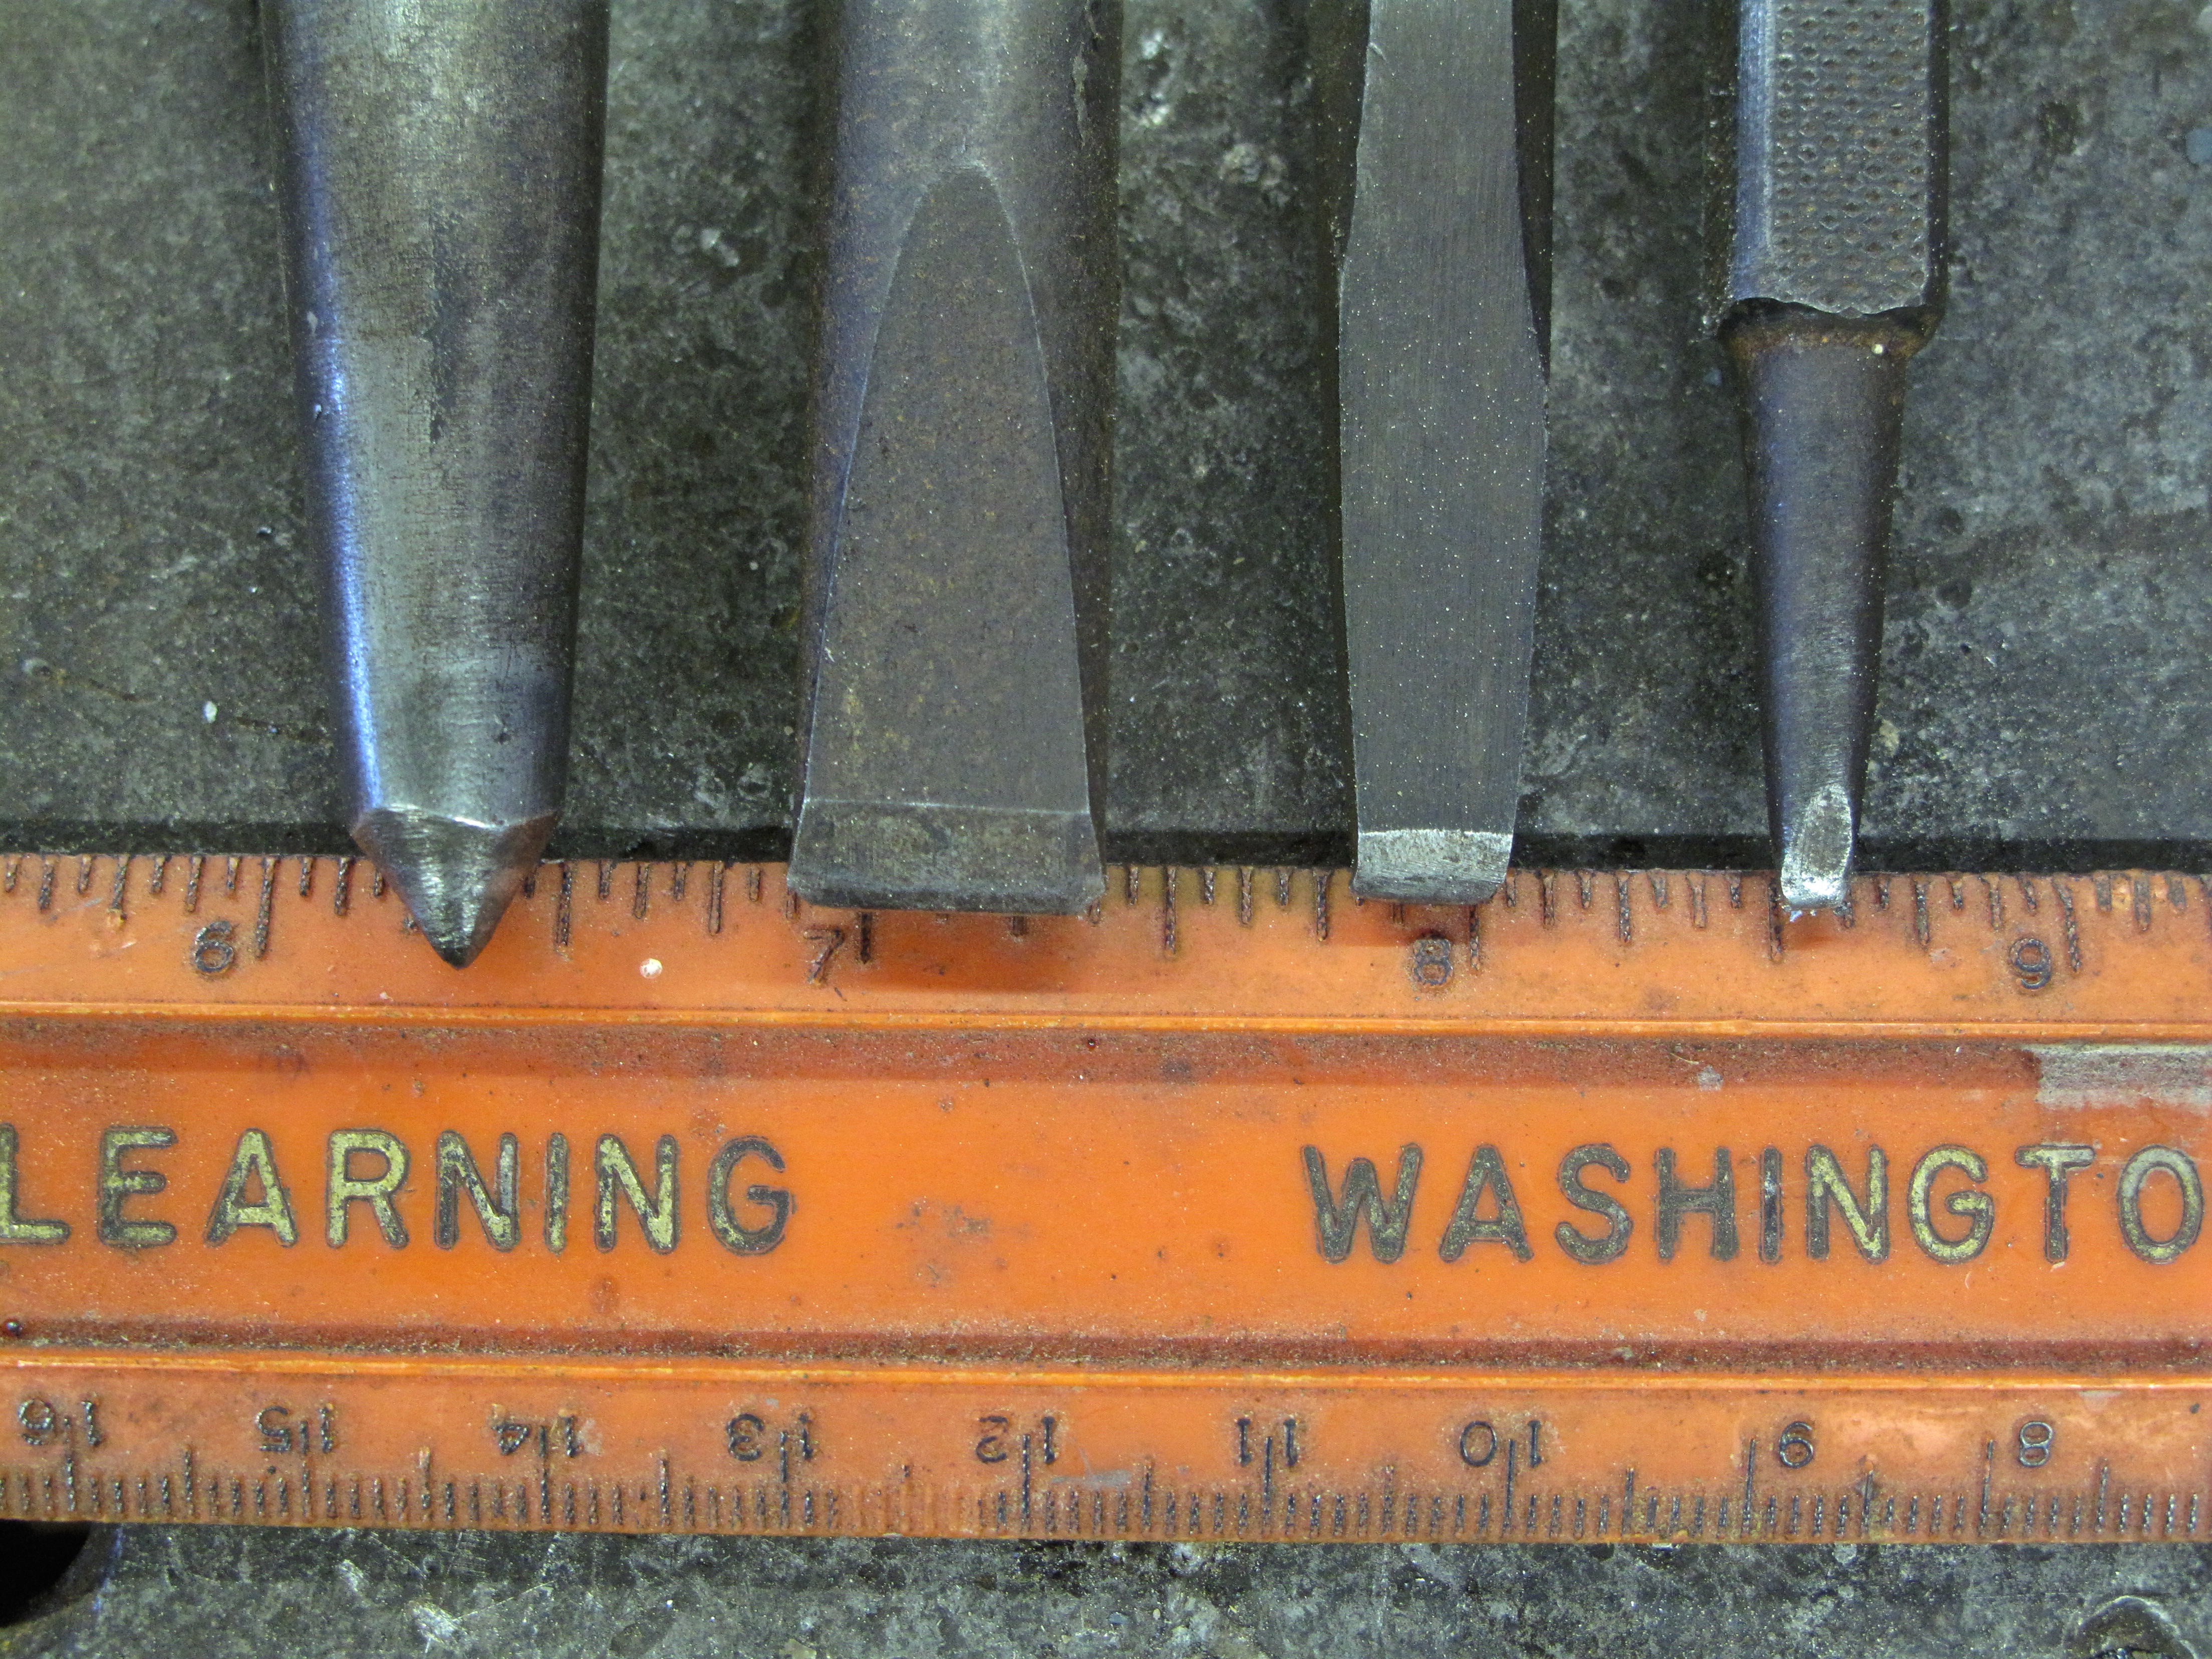
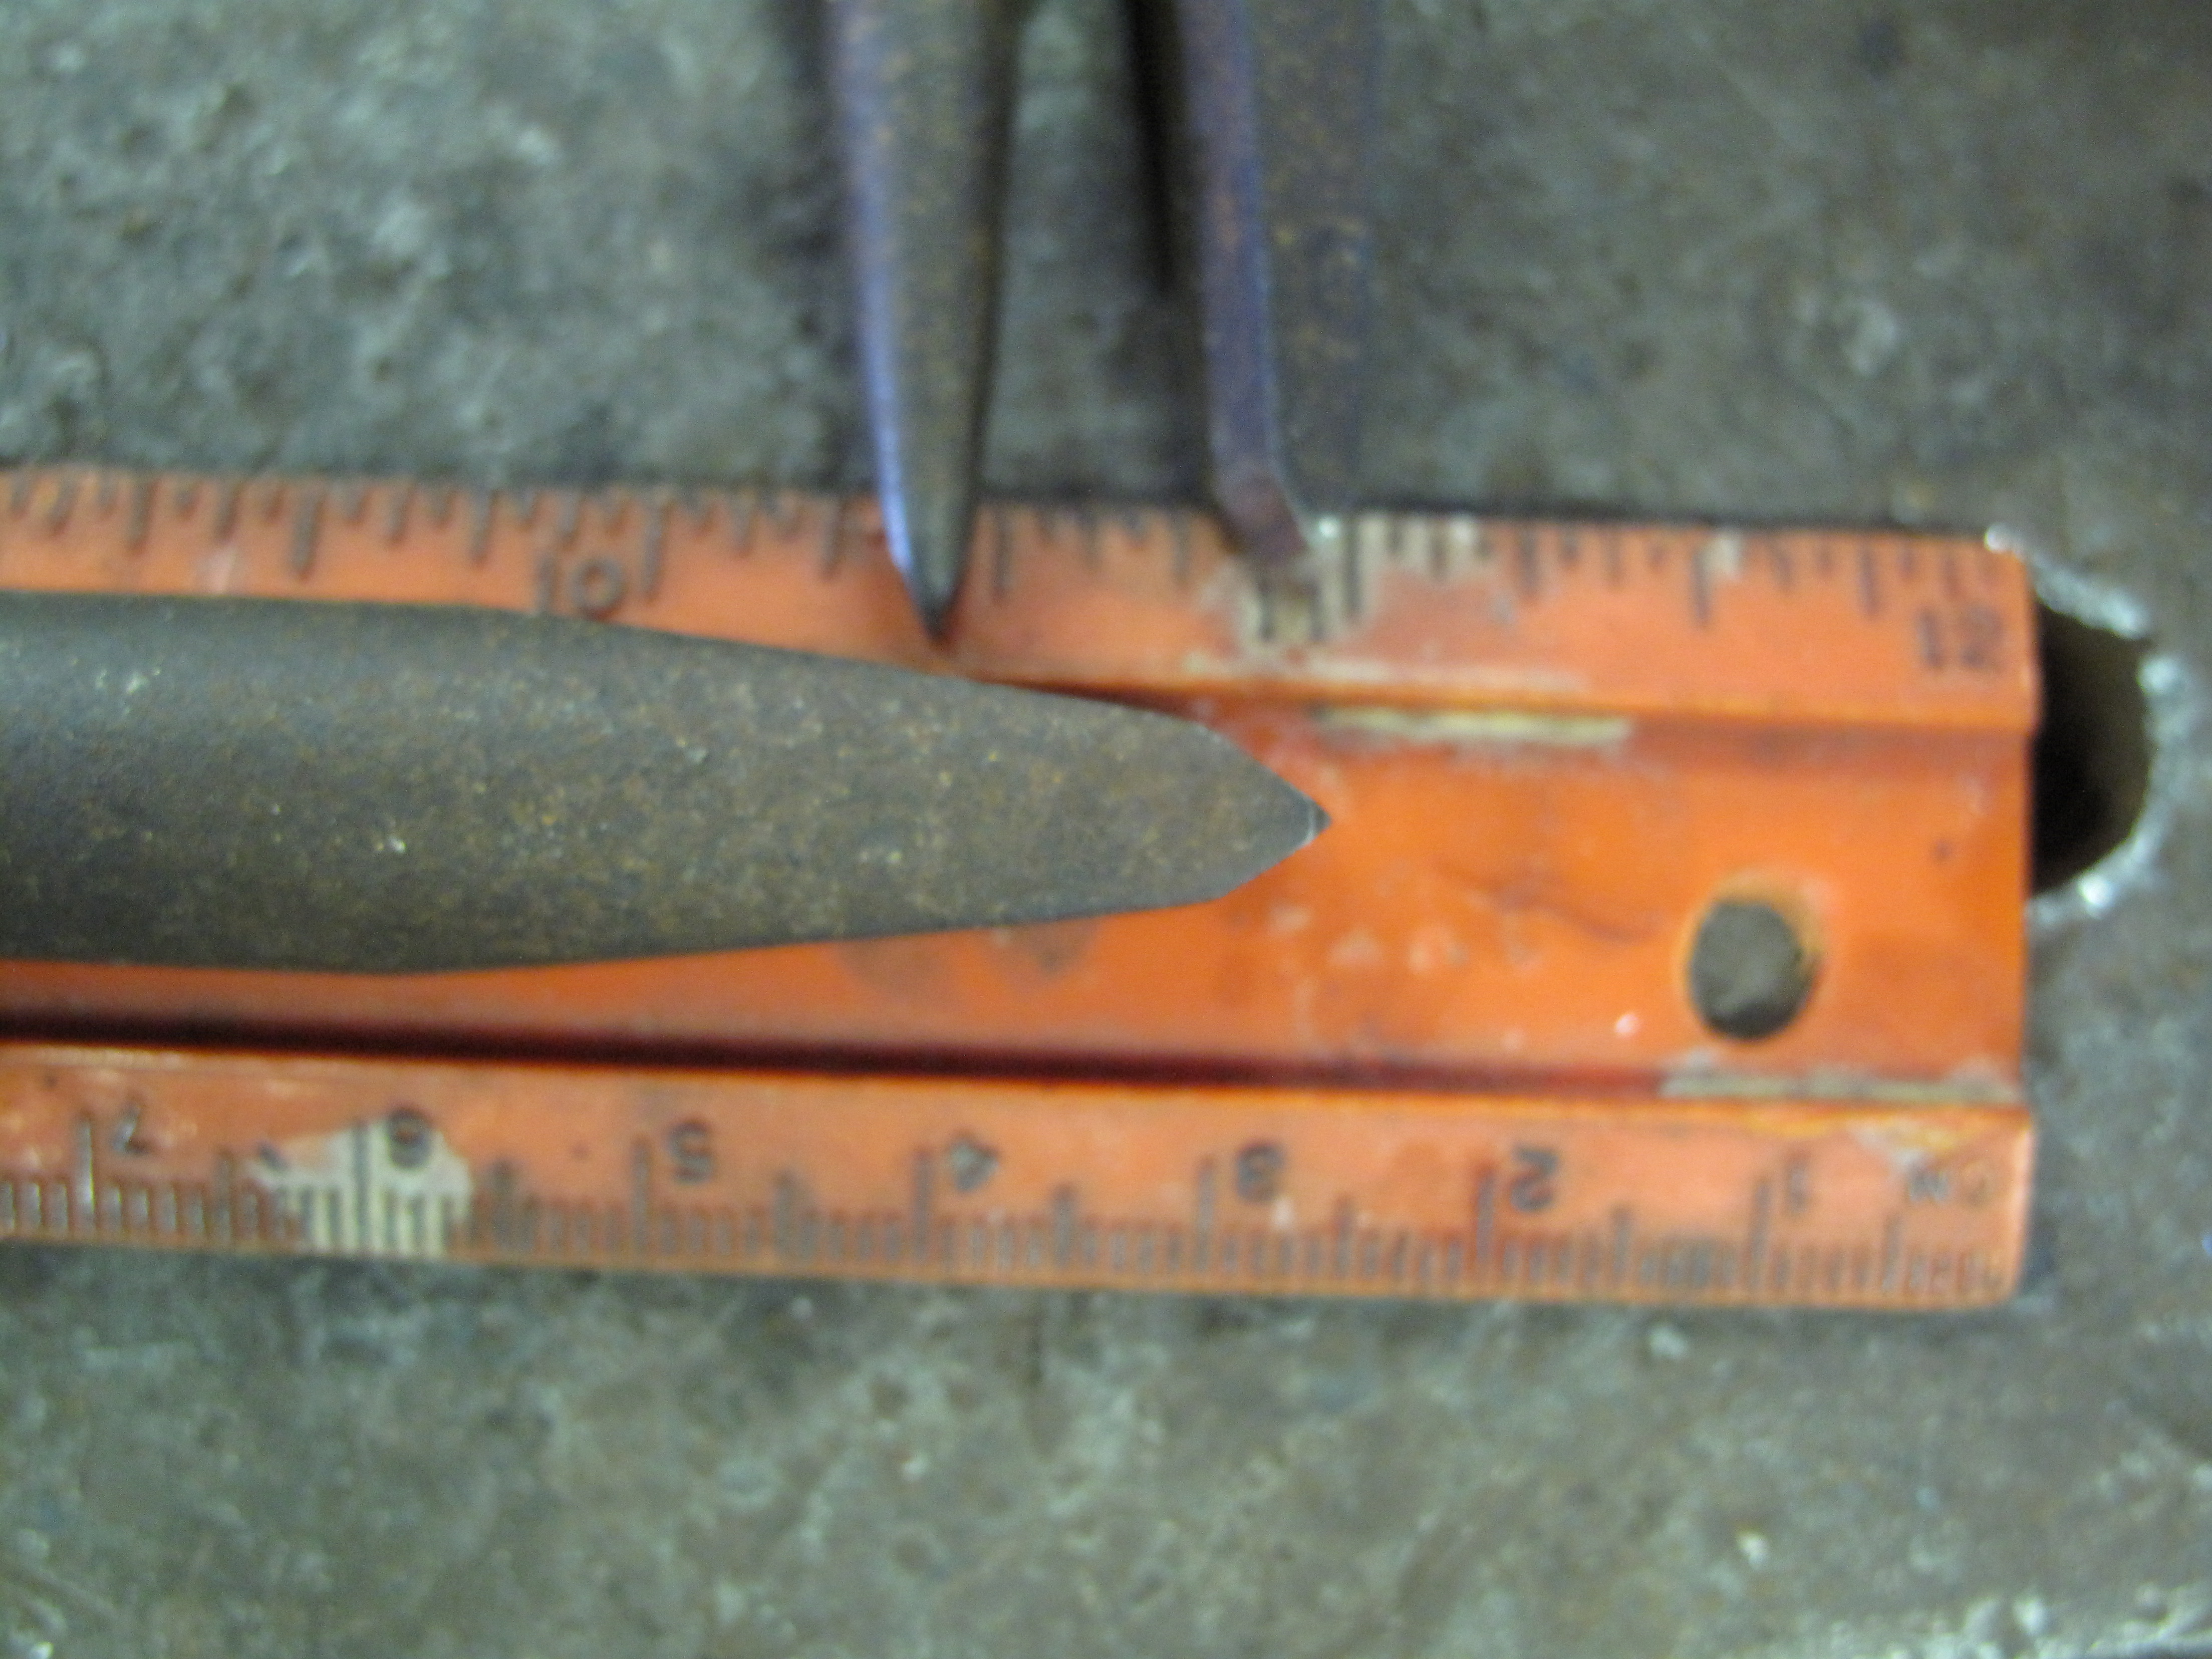
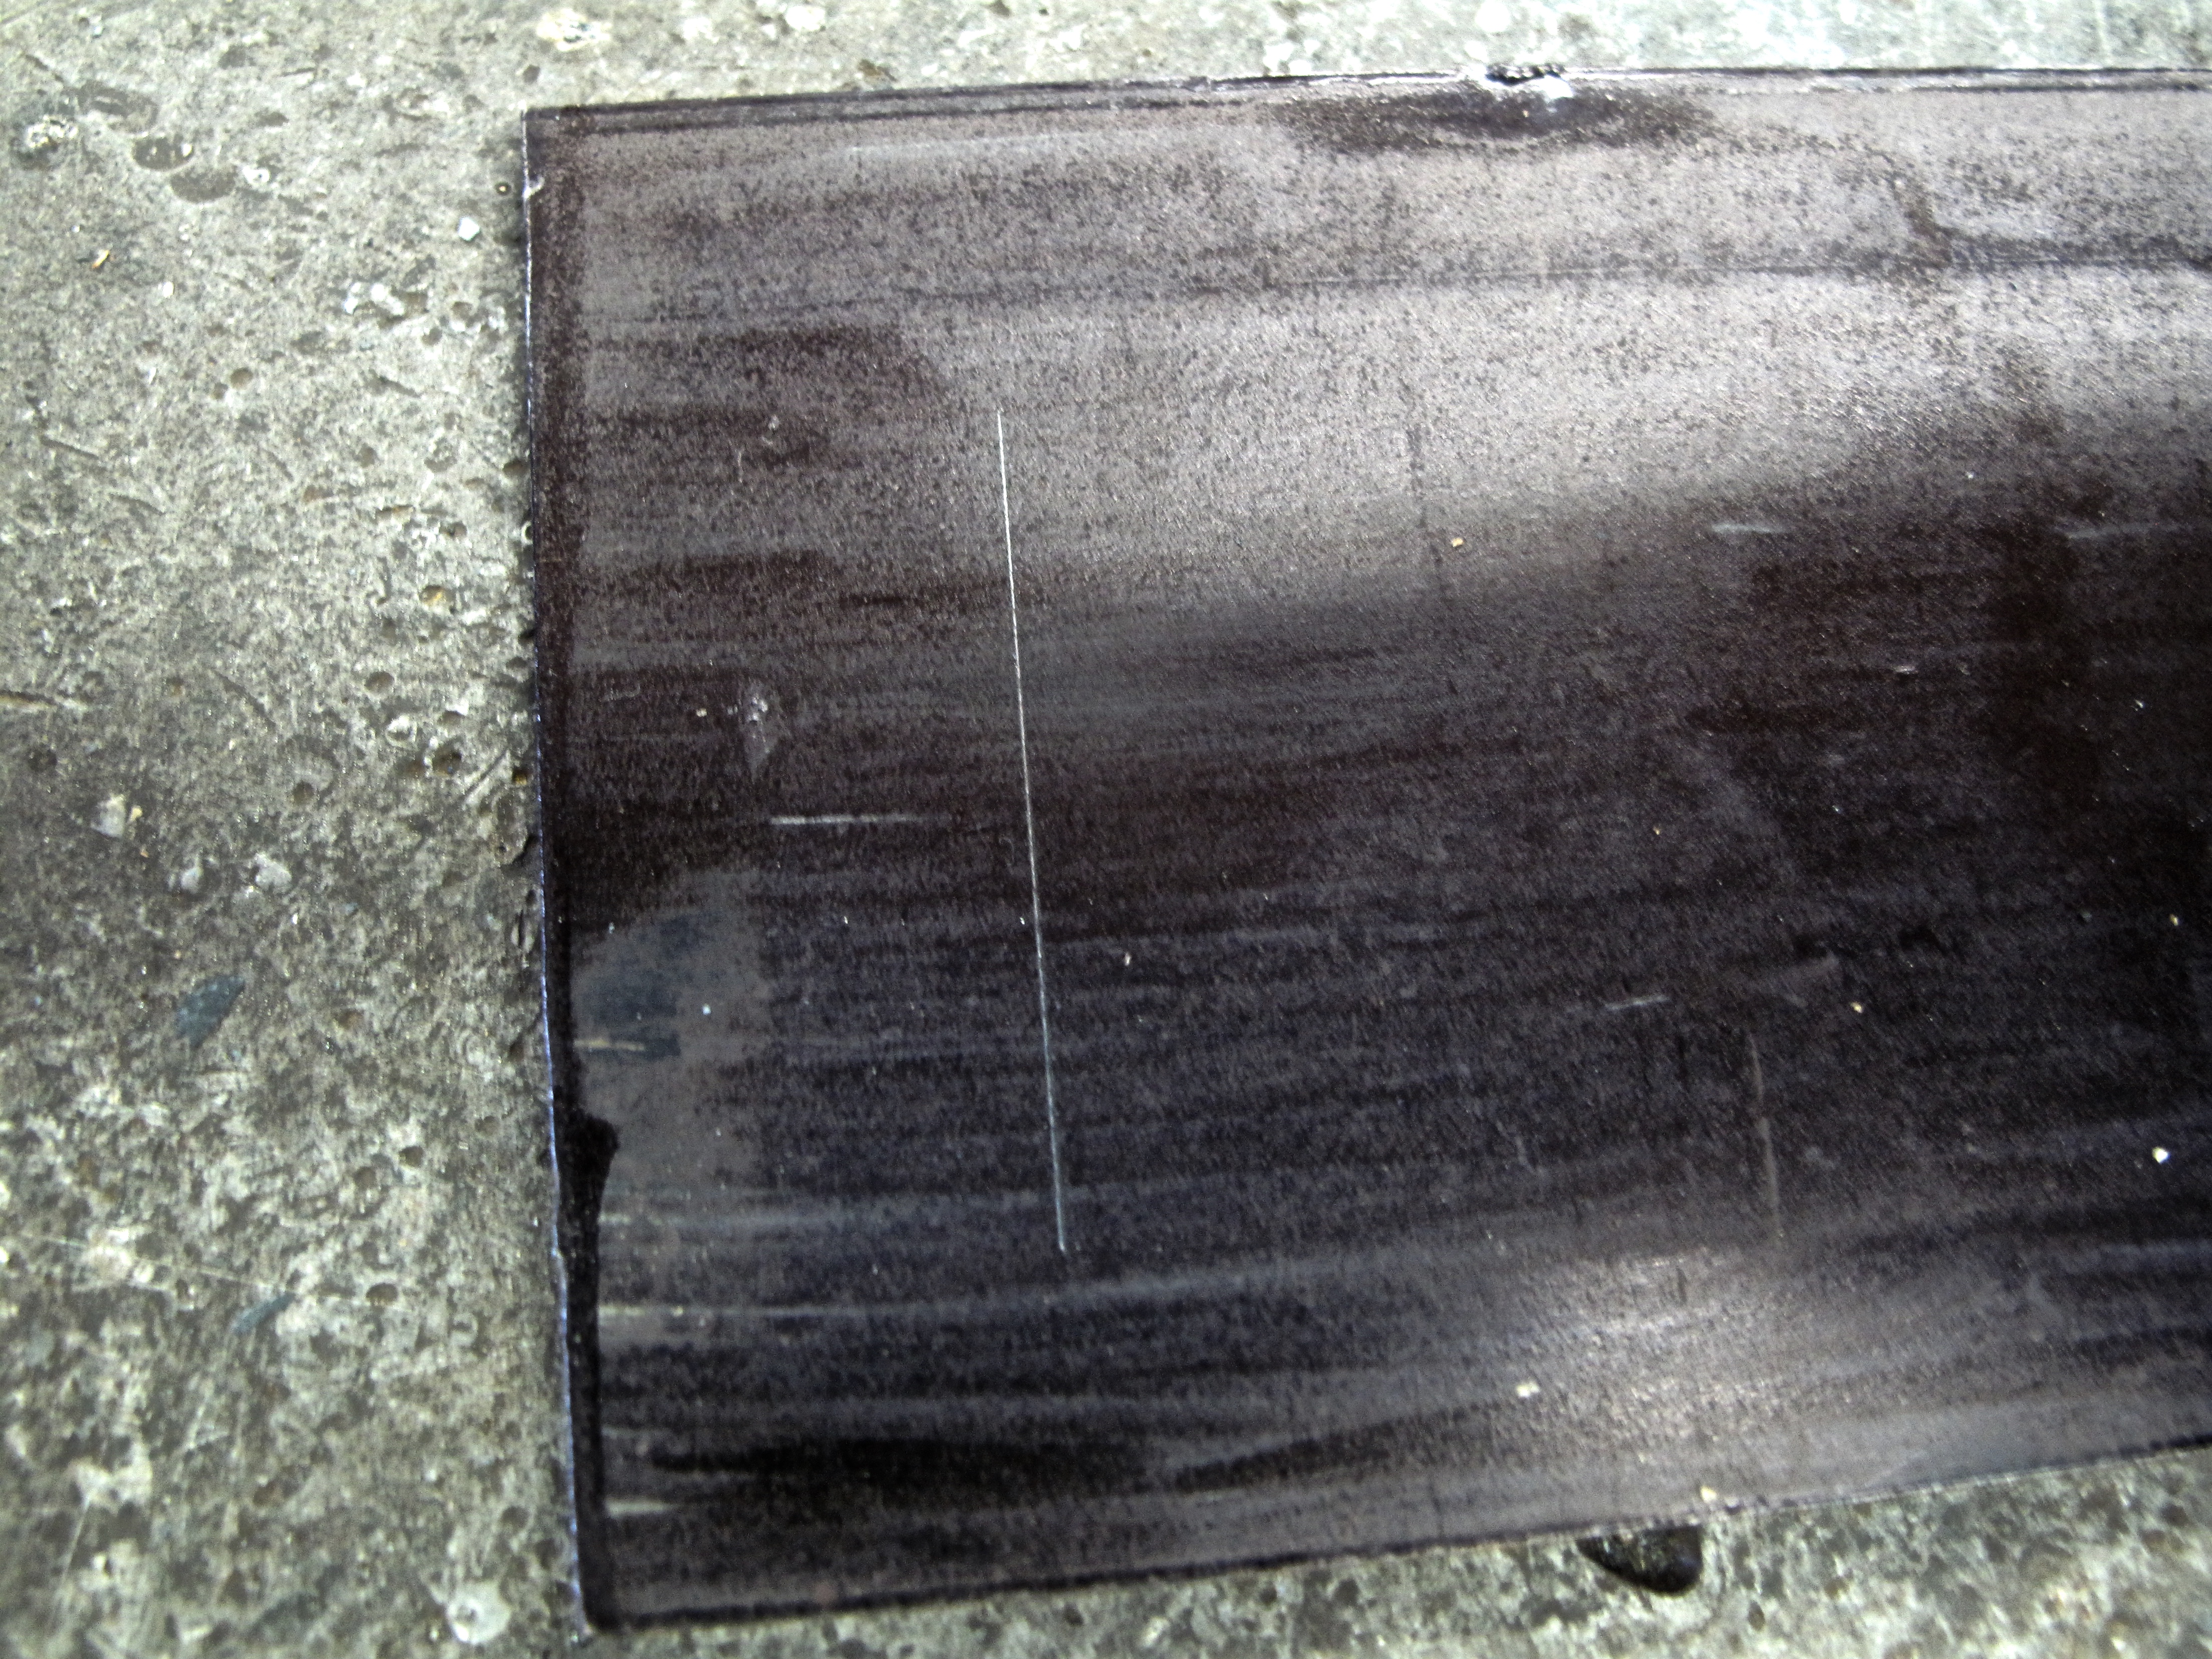
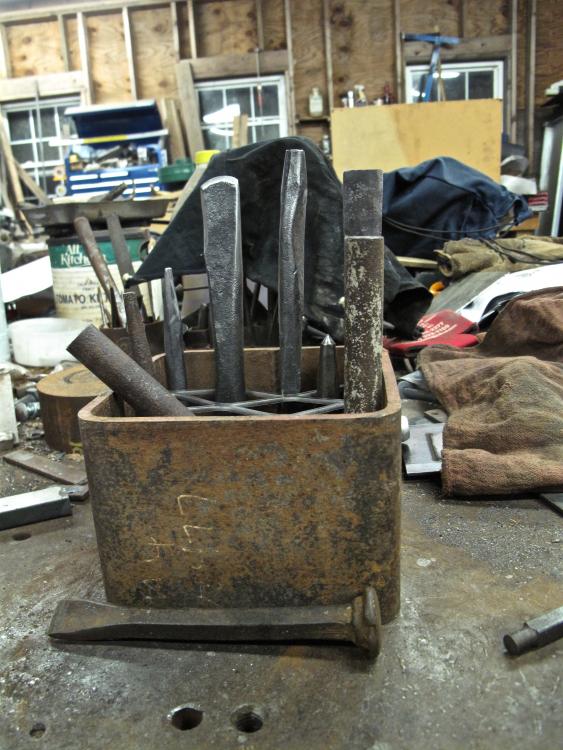
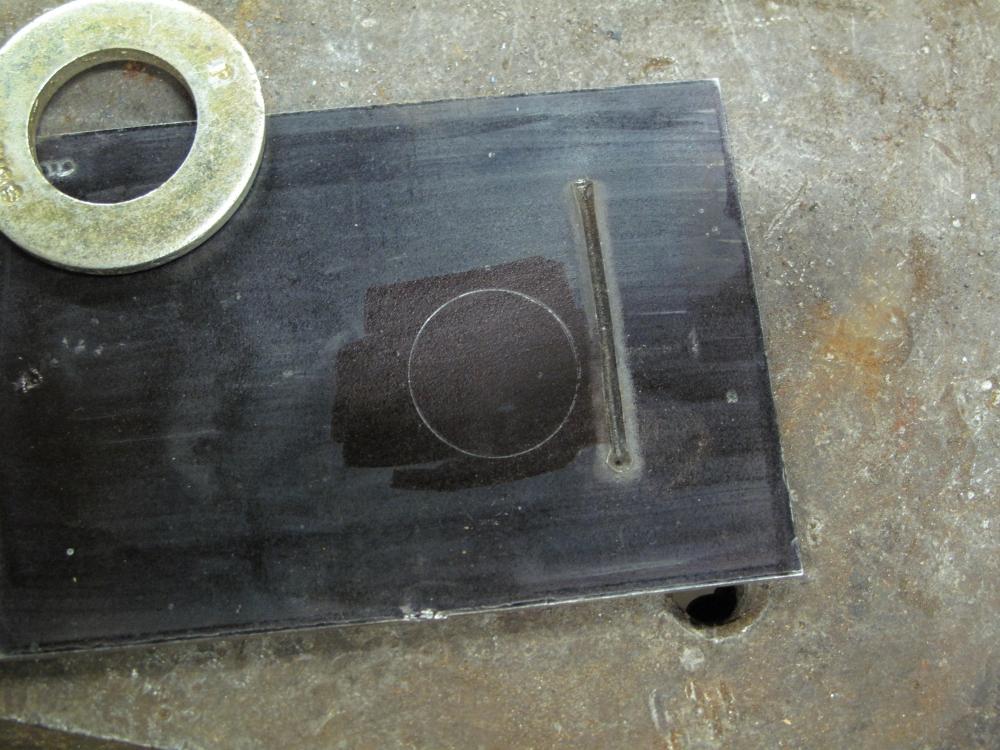
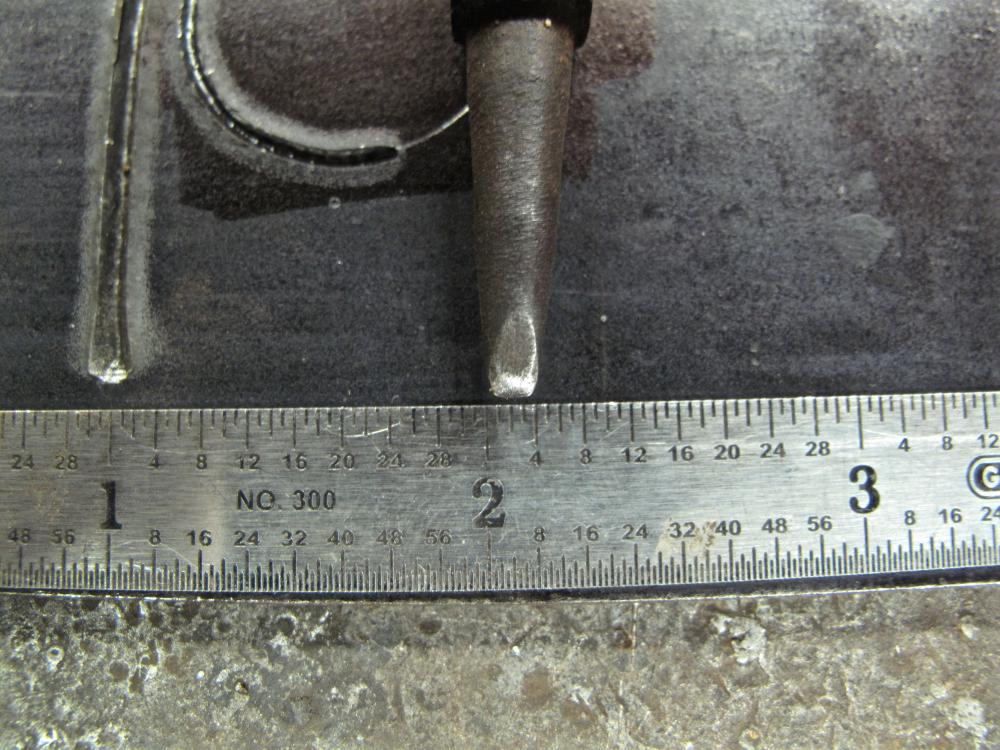
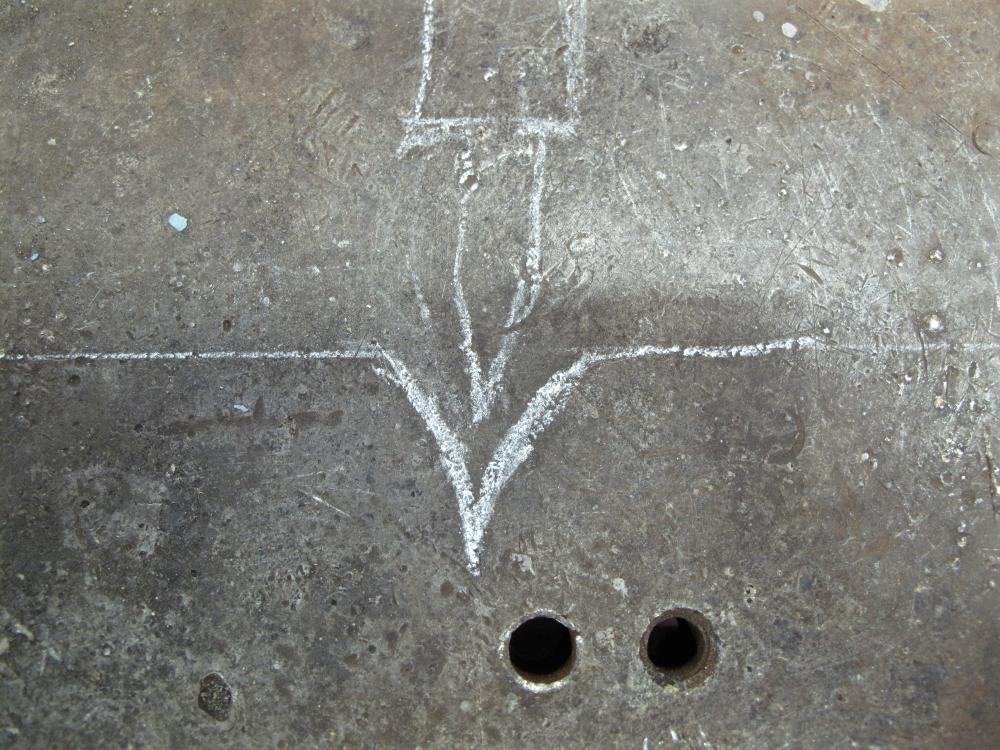
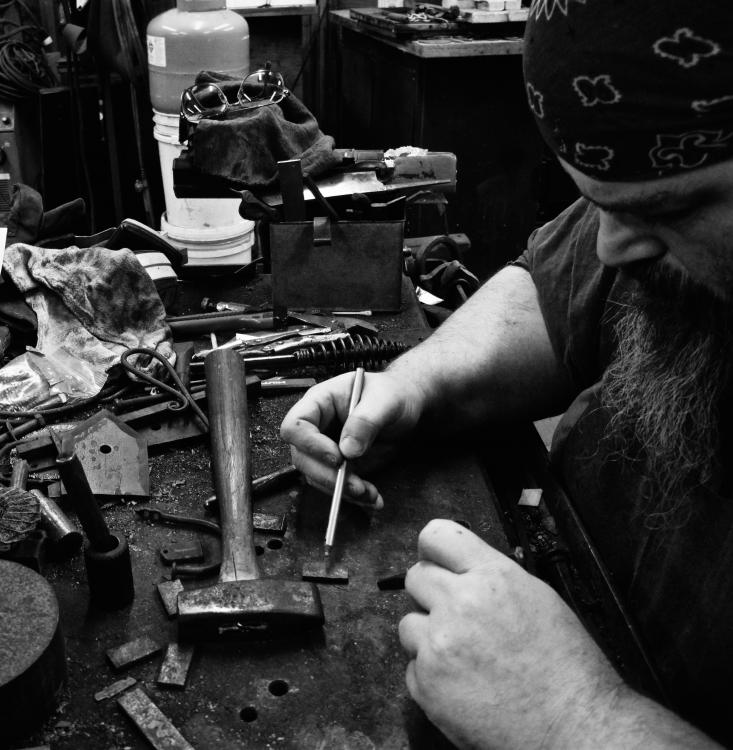
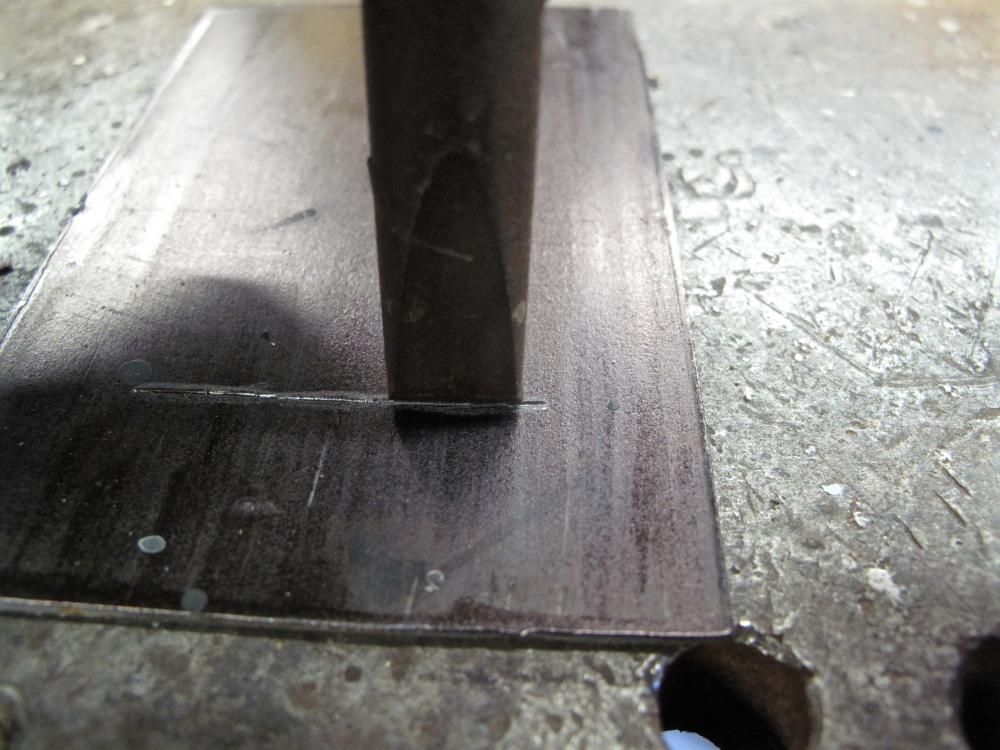
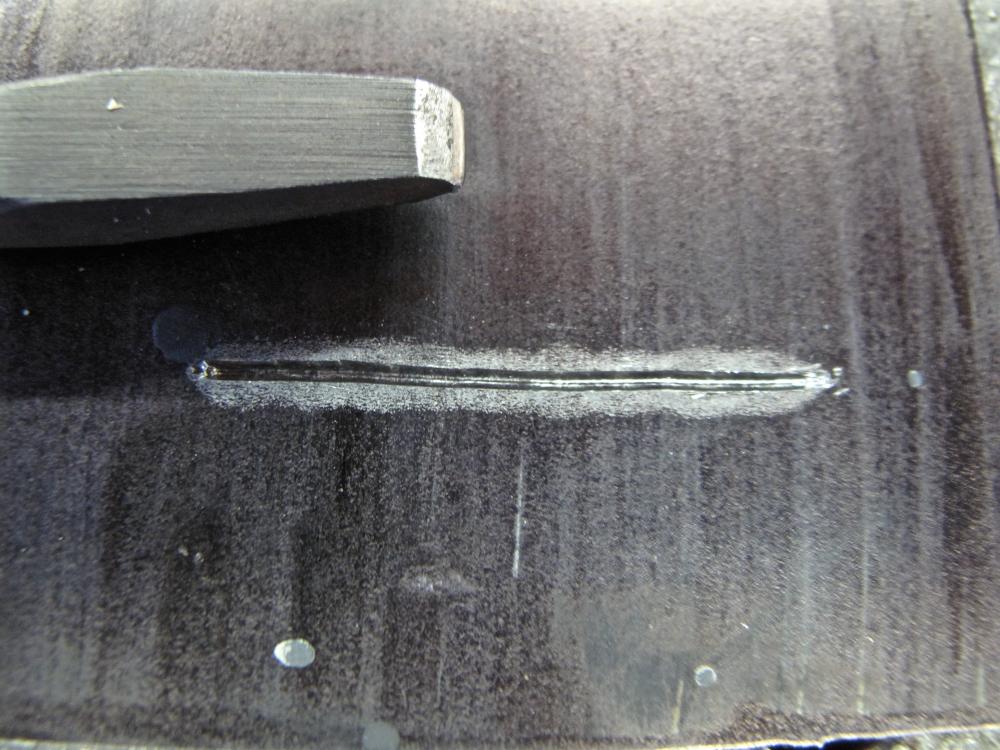
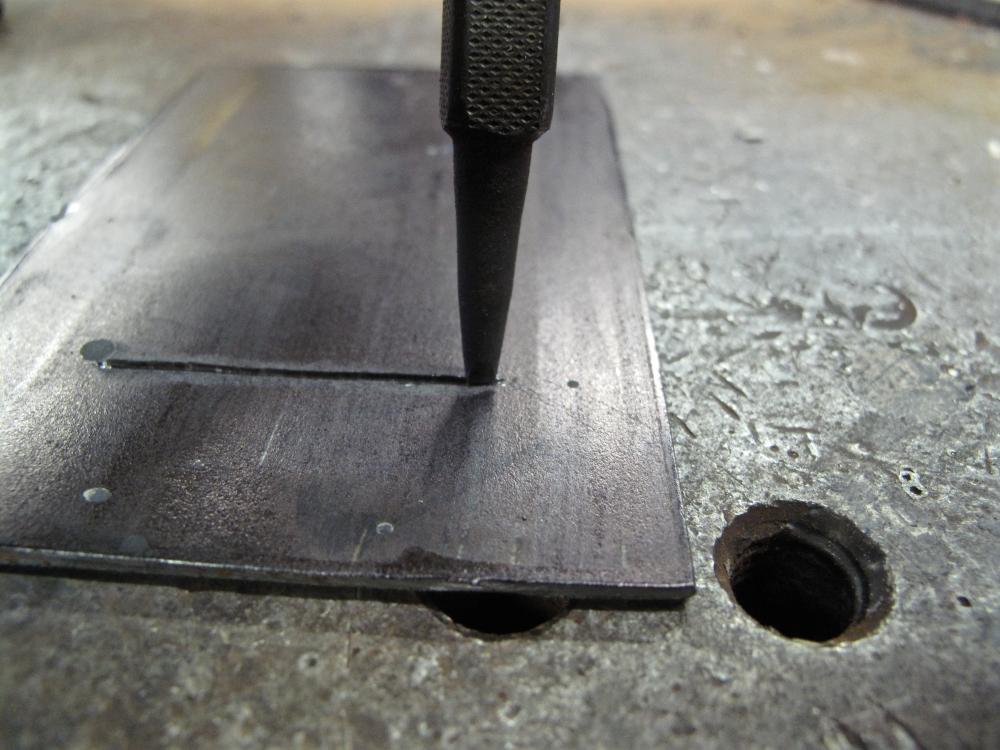
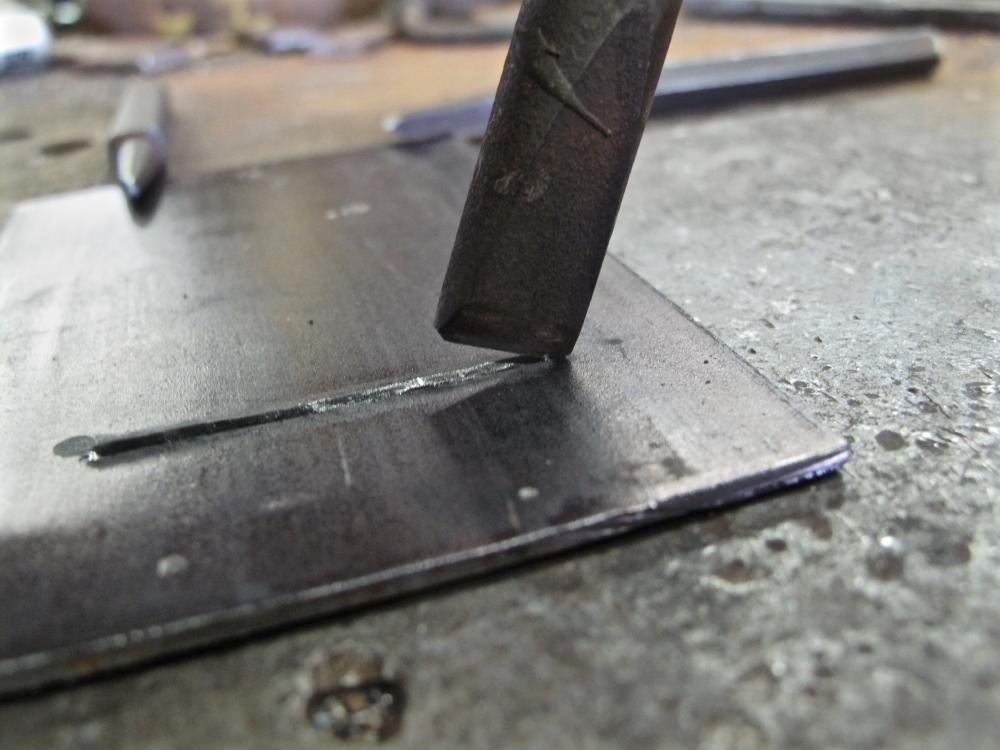
Since there seems to be so much interest in how I carve the letters and runes in the various pieces I make, I thought I’d take some time to layout exactly how it’s done. Firstly, we need to get our tools sorted out. I use a light hammer that weighs just shy of a pound. A light hammer doesn’t fatigue you and maximizes your control. Remember, while we are technically cutting through the steel, we want to do it in a controlled matter that gives us the results we’re looking for. A big whallop with a ten-pound sledge will certainly make a dent in the metal, but maybe it’s not the best option. For chisels, I prefer to keep things simple. Aside from my center punch, I use three chisels to carve the letters -- including curved lines like you see in the hearts and latin characters. You don’t need a curved chisel to make curved lines, odd as that might sound. My big chisel started life as a roller bearing. I left the heat treat as-is and simply ground it to an angle that’s somewhere under 90º. It’s a fat angle and you’ll find that a light tap with the hammer doesn’t make much of a mark in the steel. This is exactly what we want. Chisel Numero Two was a ⅜” cold chisel that I ground down to a fat ¼” and gave a sharper angle to the bevel grind. The Third Chisel started out as a carpenter’s nail set and has the finest grind of the three. The edge is also slightly rounded. The key to remember is that you don’t want a long edge on the chisels because that distributes the force of the hammer strike over a greater surface area and diminishes the penetration you get. It seems reasonable to have chisel edges that are as long as the letter you want to carve, but doing that means you need a heavier hammer, harder strike and have less control over the process. With the chisels ground to shape, look at your work bench. If you have a lightweight wood bench or a metal layout table with a top that’s less than an inch thick -- pull a chair up to your anvil and use that instead. I’ve made many a pendant while sitting at the anvil and it’s quite comfortable. A few welding magnets will help contain the tools so they don’t bounce all over while you’re working. Okay, now for the hard stuff….. Step 1: Scribe a line on your practice piece. In this case I’m using ⅛” mild steel that I’ve coated with magic marker to help with the photographing. I don’t usually bother with coloring the metal since I’m right there up close and personal with it. Step 2: Start with your ½” chisel and lightly tap it into the metal. All you’re trying to do is deepen the scribed line so you can better feel it with your chisels. One tap, then move down an edge-length.....


-
Don't try making tongs as an entry-level task. Tongs are a safety item in the shop, and good tongs should grip the material properly while being light, well-balanced and comfortable to hold. If you have no forging experience, making tongs isn't the way to learn. You can practice the fundamentals by making scrolls, hooks, bottle openers, etc. For the time, material and fuel you've burned up trying to make a pair of tongs, only to end up with something that looks like a drunk chimpanzee was let loose, you could have bought two or three sets of top-shelf tongs. Think about that. V-bit bolt tongs hold round and square stock securely. They also generally do well holding one size down -- a pair marked 1/2" will hold 3/8" or 7/16" stock with reasonable security. What that means is that you don't have to buy a ton of tongs to get a lot of work done. For flat stock, I prefer box-jaw tongs rather than duck bill or flat bit designs because they wrap around the metal in much the same way v-bit tongs do. Again, it doesn't take a huge collection to get you started. 90% of your work will be with a small range of sizes while you're learning. 1/4" round stock is a staple. 1/2" round and square will make a few thousand different things. 3/8" round and square certainly comes in handy. Anything larger than that is probably exceeding your ability right now. Maybe not in a month or three, but for the here and now..... Same goes with flat stock. As you're learning by making s-hooks and scrolls, you'll see what you need to move up. Three or four pairs of good tongs will make your forging experience more pleasurable and rewarding because you're not fighting the tongs.
-
Good to see you, Mud. With all your fine knife work and awesome calligraphy, I'll give you a pass on the smithing.
-
I guess I could be talked into taking some pics and doing a walk-through of how I go about the carving......
-
Great idea!
-
I always recommend that you buy new steel of a known alloy. If you don't know the alloy, you don't know how to heat treat it. If you don't know the proper heat treat, you might find yourself oil quenching an air-hardening steel. A lot of companies are switching over to air-hardening or water-quench steels simply because it's easier in terms of clean up at the factory. If you got hold of the company and they told you it's oil-quenched and around 50 on the hardness scale -- great. You might not know the alloy, but at least you know something of the heat treat. Did you get a good deal on some tool steel? Well, how much would it cost you to buy a brand new length of tool steel in that size? If the bits have the collar on them, they make great hot cuts and other hardy tools because that saves you a ton of work to get the same thing in a plain bar. Even welding on a collar takes time and materials, so a prefabbed collar is a win. Anvil tooling doesn't generally require a heat-treat to maximize hardness or durability and the high-carbon alloy is plenty strong enough in its annealed state to make great bickerns, hot cuts, bottom swages, etc. What I would do is make a few tools that you can sell. Sell them to other smiths and go back for more of the big bits. One good hot cut might sell for $30 or more in your area. That pays for two more big bits. Hunting for scrap in scrap yards might be fun, but it's time-consuming and you don't know what you're going to get. I'd much rather have straight stock in a known size, so I buy straight from the dealership rather than muck about in the mud. If I just happen to be at a scrap yard, I'll pick something up because I'm already there, but I don't go there looking for tool steels. Scrap yards are great places for big pieces that you can't get through the mail. Sections of big pipe, I-beam, channel..... those darlings come in handy all over the shop and are worth their weight in gold if you can get them.
-
And Jim plays his trump card....
-
Everything's done cold so you have a maximum amount of control. It's easy as pie, so to speak, and something like that can be done in an hour or so. Electrolysis works, but I worry about trying it on something with so much texture. You'd have to use a liquid resist to make sure it flowed into all the nooks and crannies, and then you'd have to worry about how the finished product will look once you clean everything off. It's a bear of a thing to try and "fix" an issue because you can't easily reapply the resist and tweak things like you can when doing chisel work. Shoot me a PM and I'll walk you through making and using the chisels. You'll find it's quite a handy way of decorating the steel.
-
I've wondered about the first few, but #4 I can answer. Mousehole anvils are not particularly rare or hard to come by. You MH has no known significant historical value, no ties to a bigwig locally or nationally. It was likely a working man's tool that might have had a flaw from the factory or bing horribly abused as a child. With those first two points in mind, I'd repair it and not feel bad about doing it. If nothing else, you're bringing a tool back to full service and learning a valuable lesson in the process. After fixing it, you won't have to ask your first three questions because you'll know for yourself and can help others by sharing your experience.
-
Holy Mackerel! I actually beat Jim Coke at something? That's got to be one for the record books! Can we make that post a sticky so it doesn't get lost? Honored that you think so highly of my design, and you're right that it can be made with scraps. Mine was actually made with scraps as a way of using up some of the scrap in the scrap pile. Of course, now I'm in a position where I need more room for the files and chisels, so I'll be adding at least one more row of square tubing. As that holder is on the bench to hold all my little chisels and sundry, I thought I might make something a little different for larger pieces used at the anvil. I found a picture online and kind of fell in love with the idea, so it'll be built just as soon as I get a round to it.... I have some 8" pipe that would make a dandy "basket" and plenty of scrap expanded metal to make the grate inside. I like the simplicity of the design -- almost thought about dressing it up with some decorative forging, but then I got the notion that the reason the think is so attractive is because of its rugged industrial-ness. Everything about it looks "right" and I'm sure if you had a few of these hanging around at a demo that people would remark positively on them. Can you imagine her all filled up with a nice selection of hot-work tools like Jim's block of wood? Maybe even do a wooden insert like Jim's to keep the tools from tilting one way or another as the expanded metal will allow?!?
-
Looks fantastic!
-
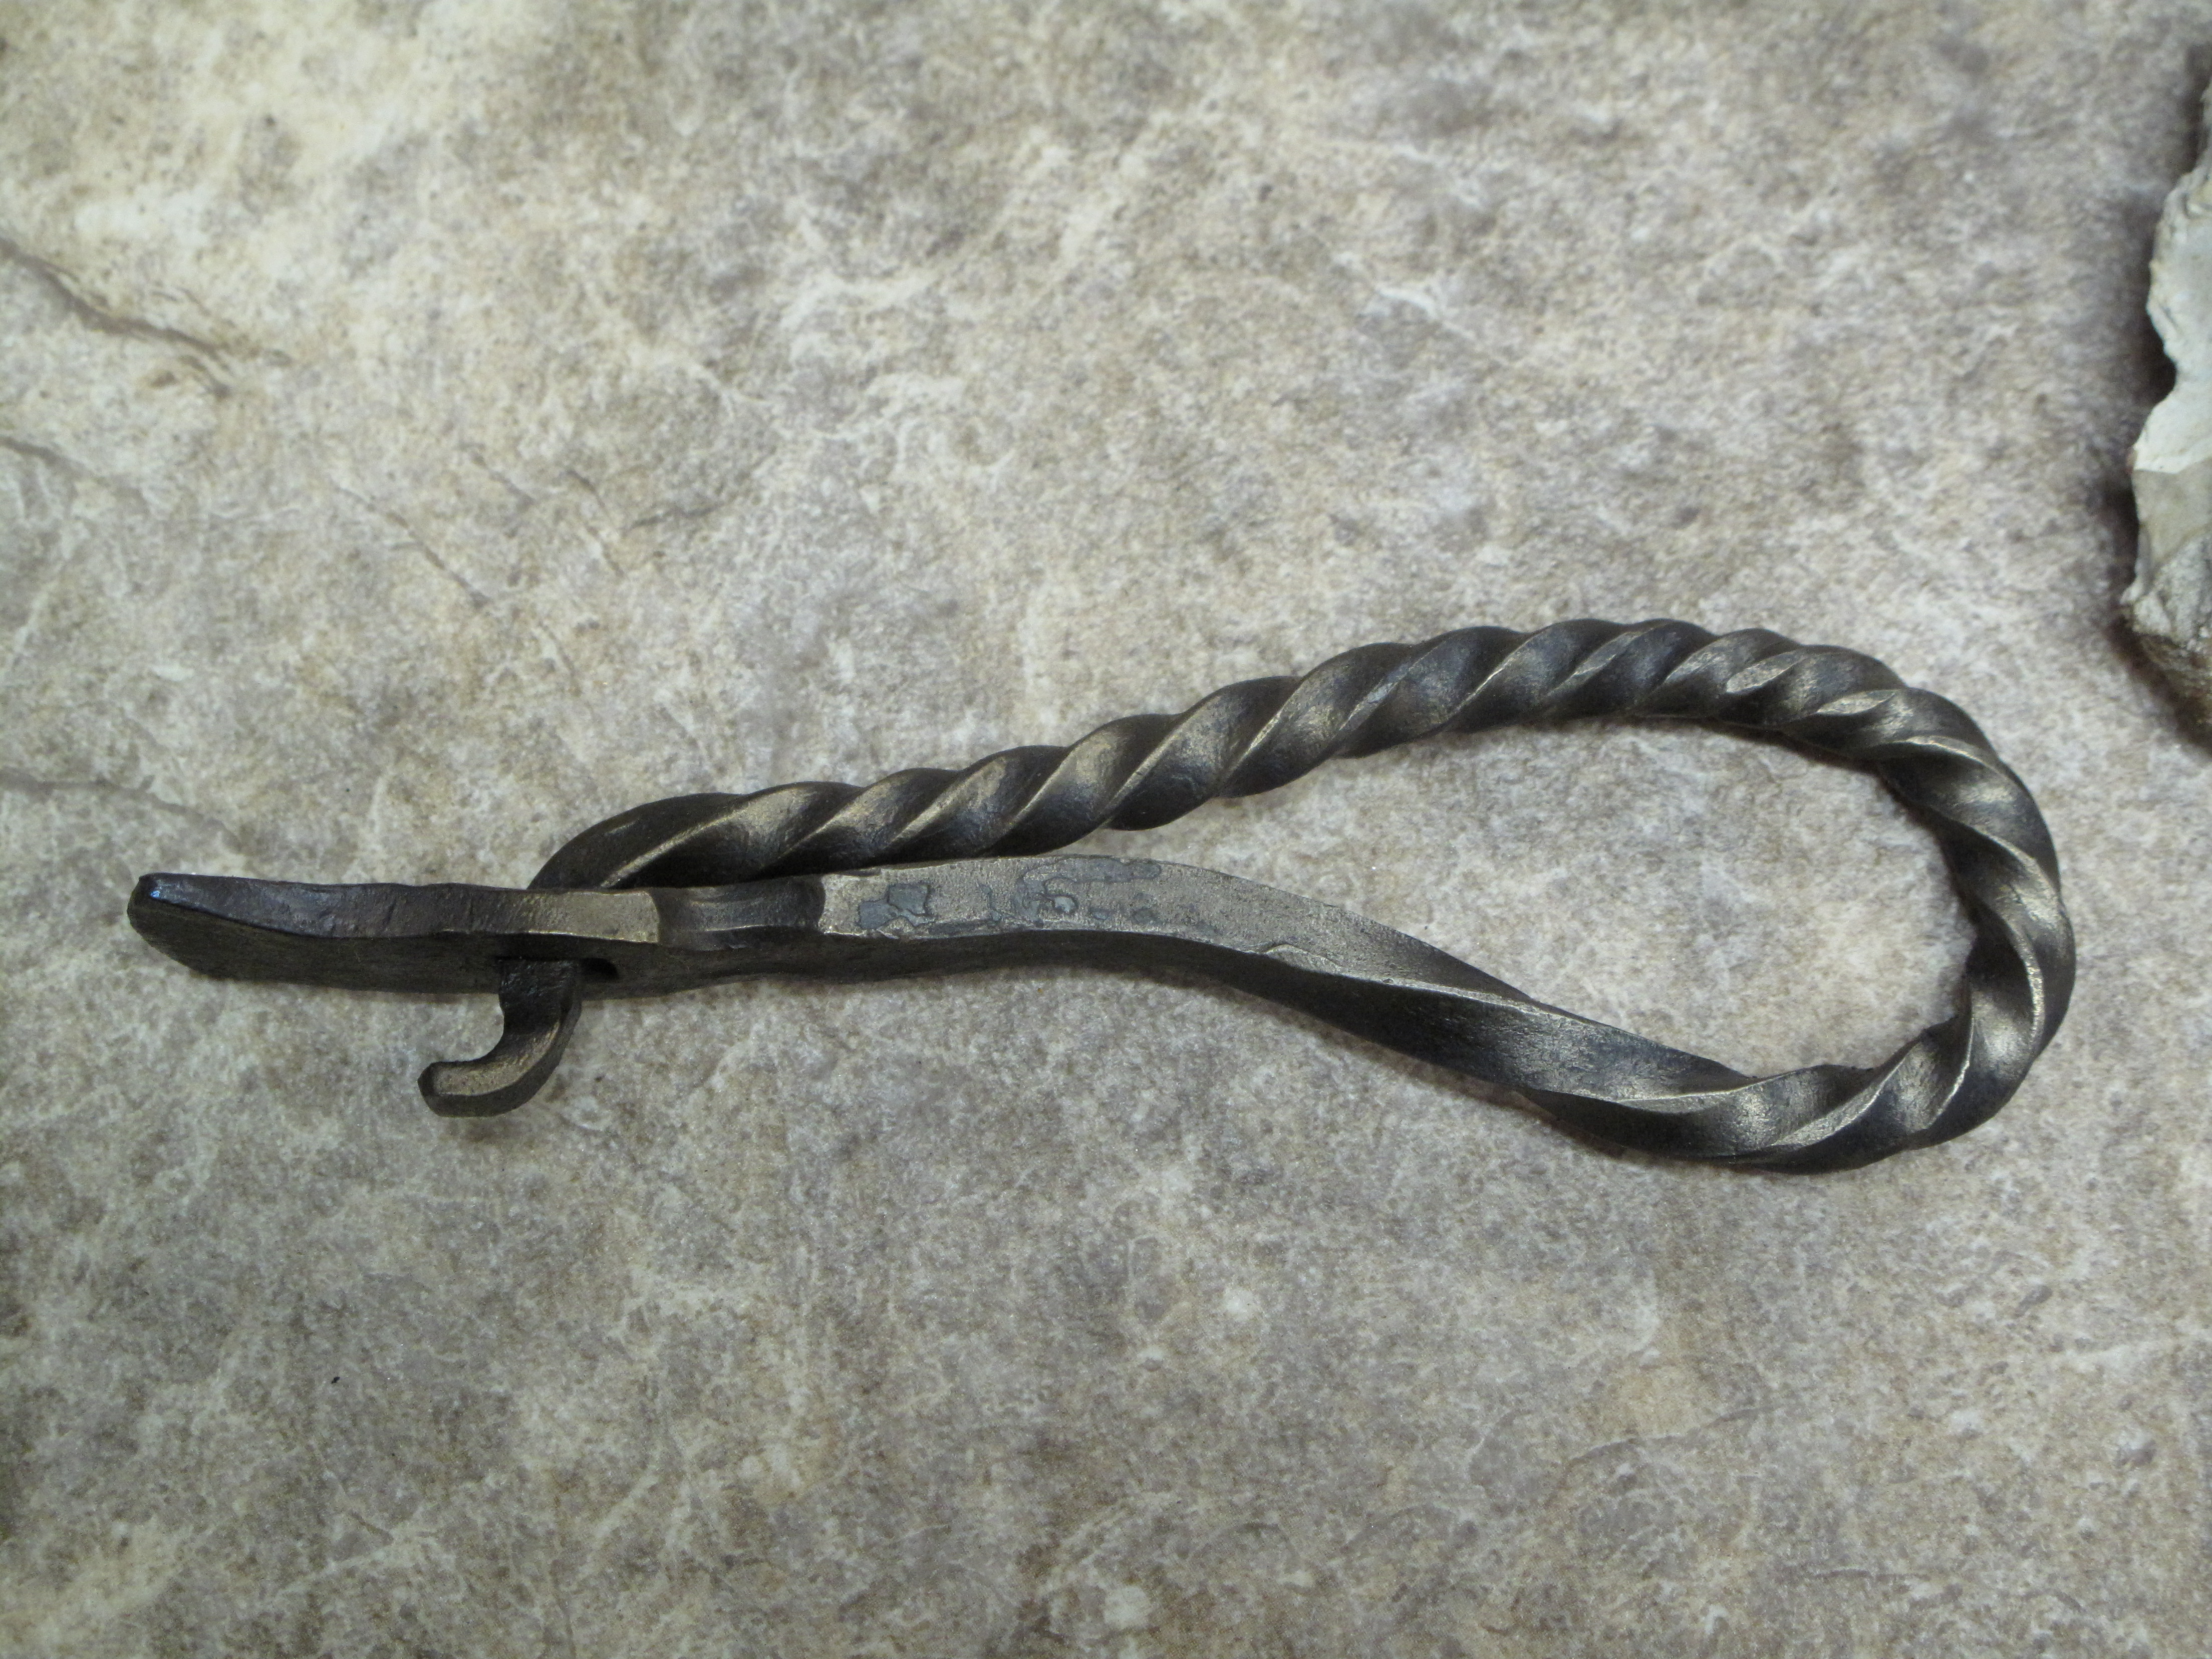
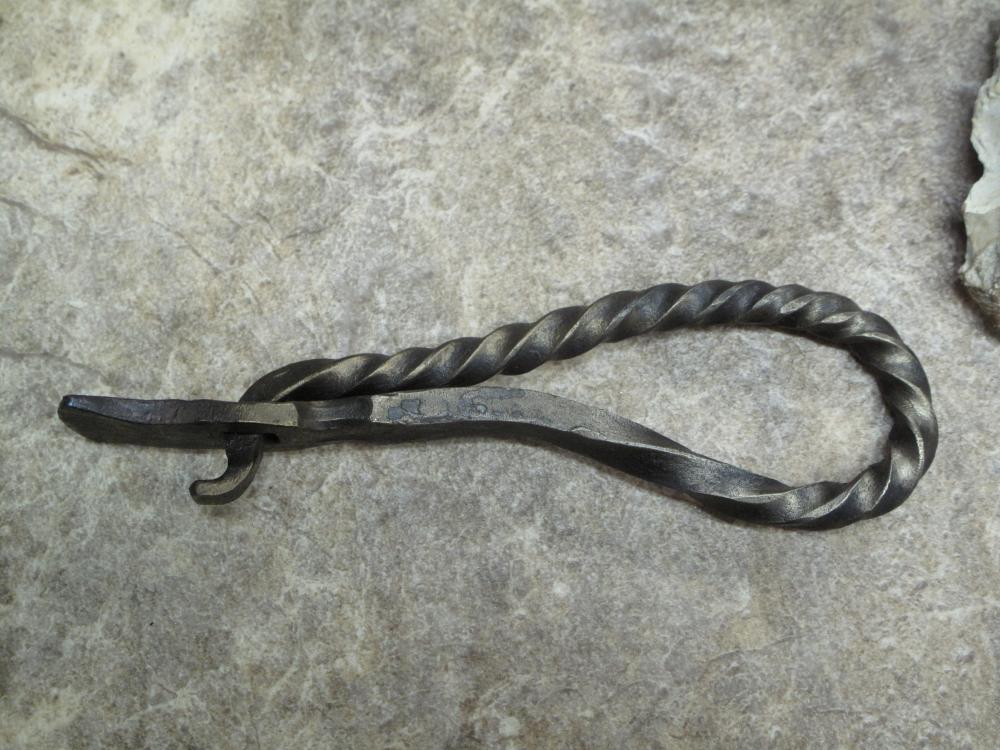
Thanks, Frosty. Folks don't understand that a lot of the cost involved in bottle openers is actually the testing that goes into making sure they operate properly! Thank you. Came up with it a few years ago as a way of demonstrating some of the fundamental movements in a product that people could use every day. They don't sell worth a hoot, but everyone seems to like the look. I hate whoever came up with twist-off bottle caps!
-
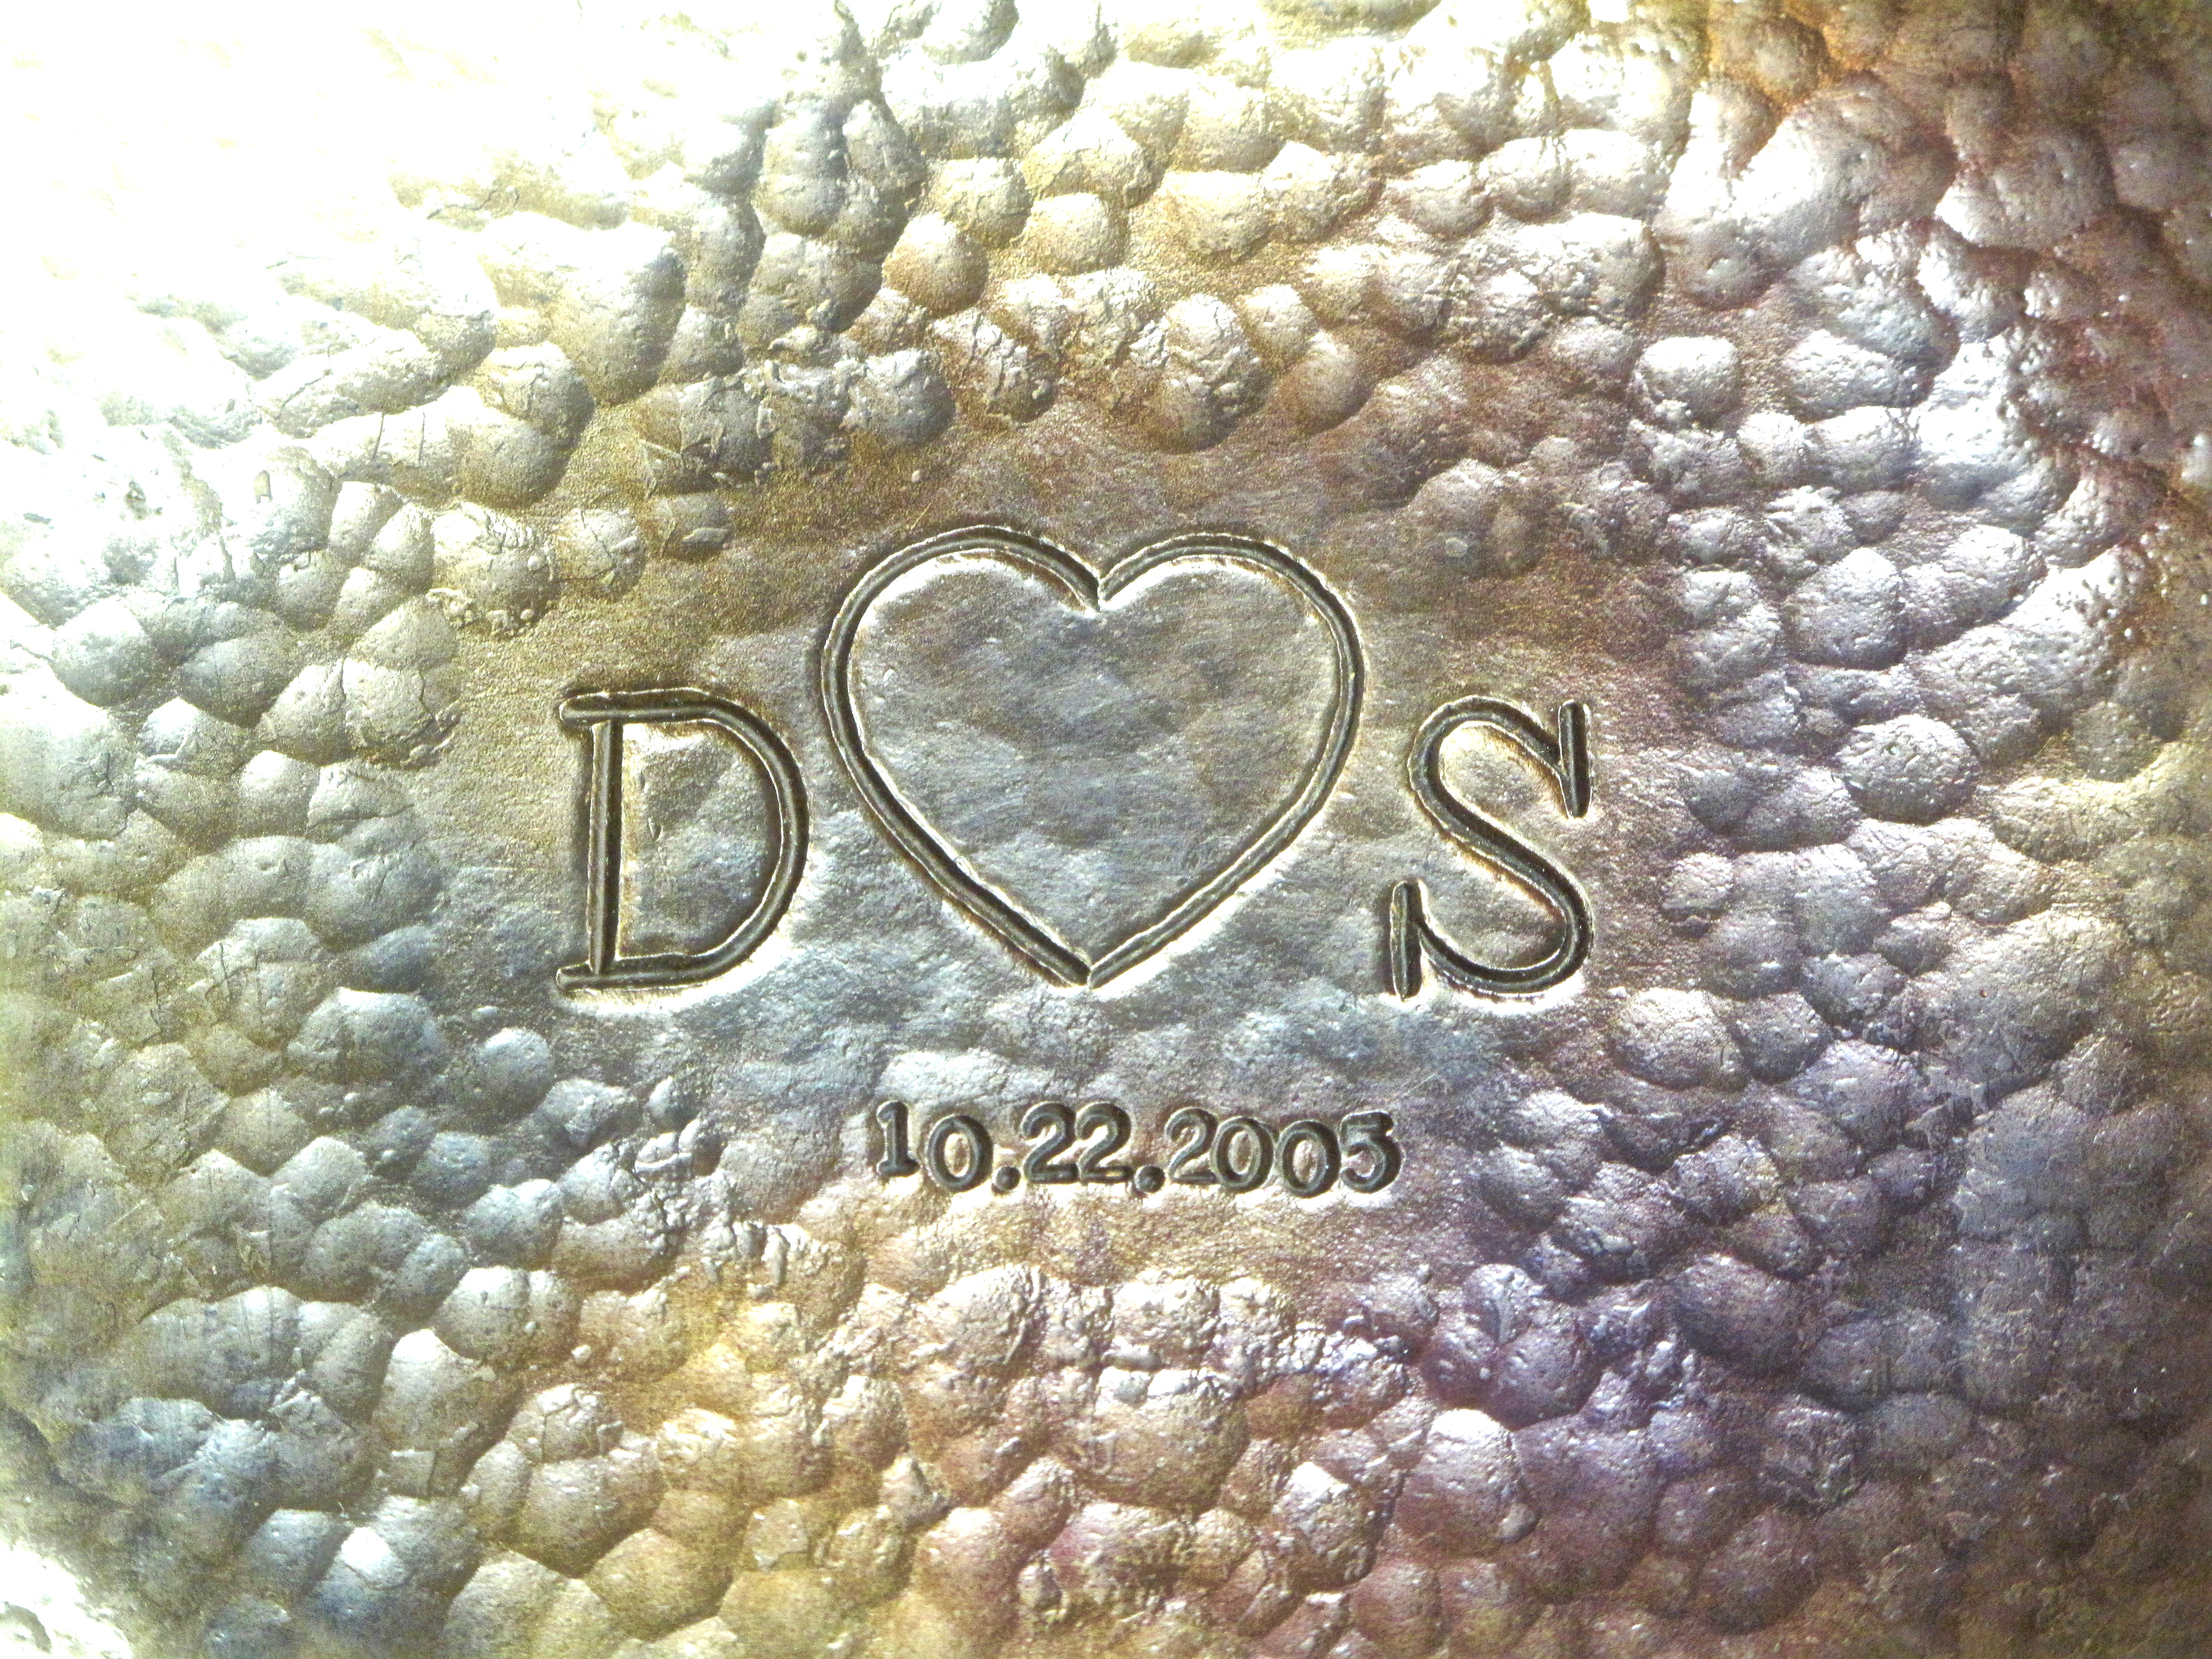
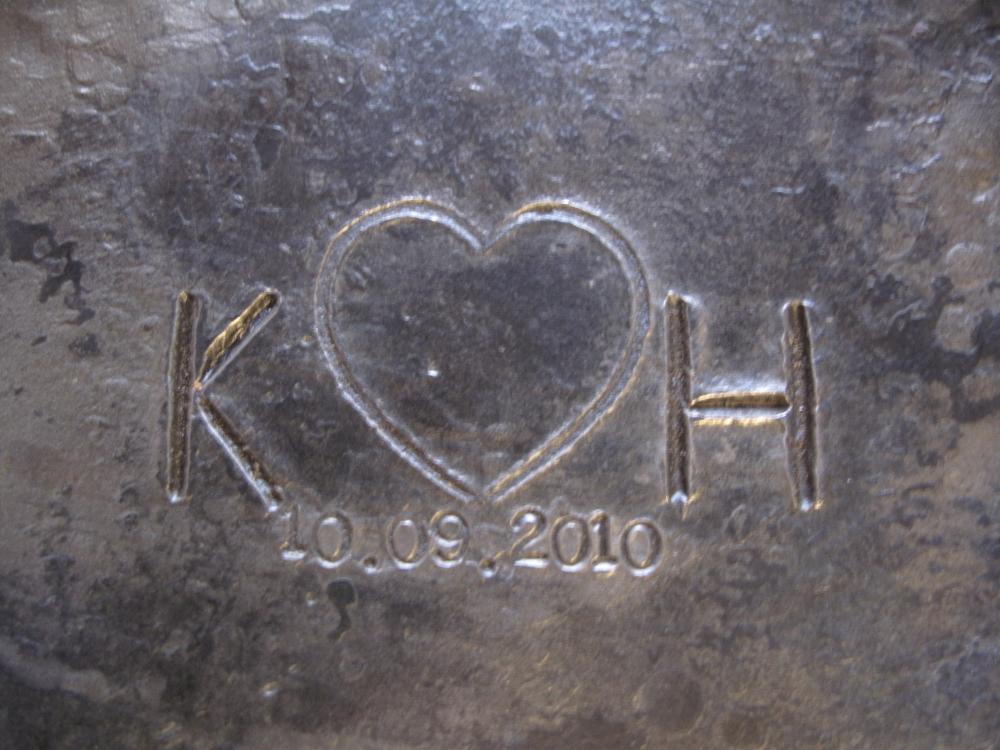
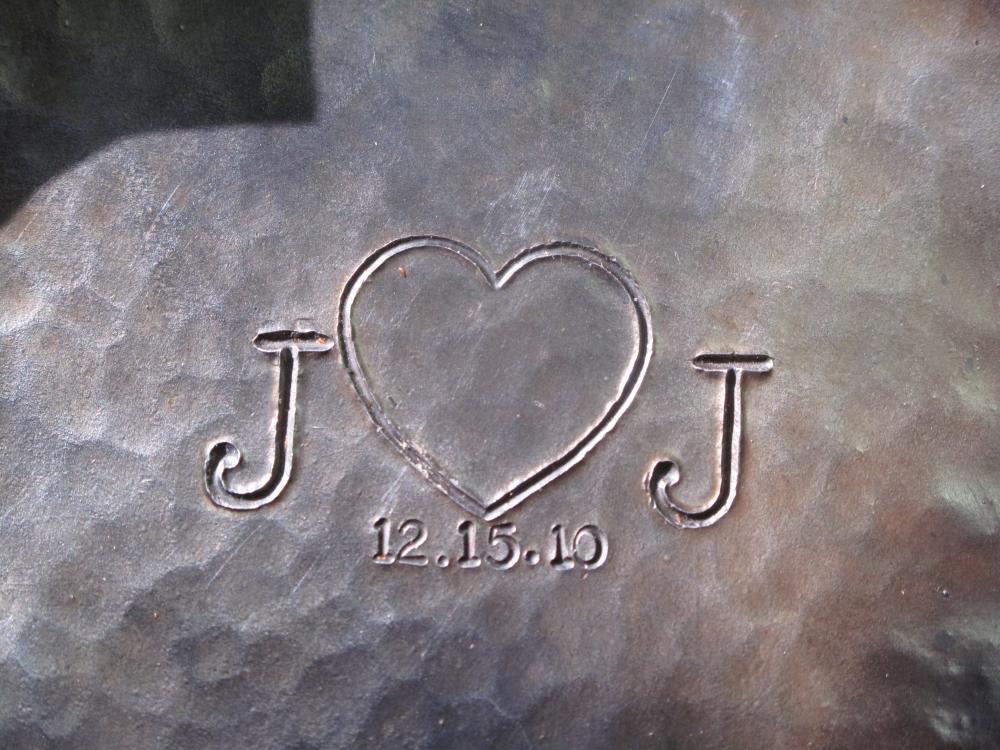
With the rough texture of the steel, I don't think you'd go wrong with slightly rough lettering. I do a lot of initials for the bowls I make and think the coarseness compliments the texture.... The letters and heart are all cut in with chisels, and the numbers are from a generic stamp set I bought on eBay. What I like best about "my" style is that it has a sense of substance and doesn't look somehow fabricated or mass produced. The chisel work is deep and wide, with all the little idiosyncrasies you'd expect from hand work. Making the chisels is super simple as they aren't something exotic. You likely already have most of them in the shop and just don't know it. And, yes, the curved lines were made with a straight chisel. Nothing fancy about it, just gotta get the order of operation right. Once you establish the line.... it pretty much carves itself.

-
Finished this one last night and had to test it on three beers before I got the tooth just right! People think being a blacksmith is easy work, but they don't see all the trouble we have to go through to get things working properly.

-
Yea, the first pics made it look fantastic. The new pics, though, don't really diminish its value. After you've used it for a year or three and have an idea what you'd like to forge most, you can radius the edges and make those chips disappear. The amount of radius should vary on both sides, from sharp to not, so you can get the most service out of the anvil. A lot of basic projects require working on the near side and far side, and you want matching radii in a lot of cases. Getting rid of the cut will be the most problematic and I don't recommend even trying to radius that much. All told, an excellent piece of kit that will last another hundred years or more. If I was selling it, I wouldn't even hesitate to charge $4/lb for the thing. I'd probably start out at $6/lb and let someone talk me down.
-
So great to see a Fisher in such immaculate condition. It looks like it has never seen a hammer strike. You can buy brand new anvils that are in similar condition, so you should value it "as new". Anvils don't depreciate unless you beat them like a redheaded stepchild. And because it's a Fisher anvil, something you can't get any more, that adds to the value. It's not an antique, but it's still a rare thing.
-
Nothing is set in stone. I figure that you have to have a height for the tool cart, so why not make it the same height as the anvil ..... when your anvil is already set pretty tall to prevent stooping. Would I ever use that feature? Probably not. However, a cart that's 30" tall isn't that odd, I think. Still, nothing is certain at this point: I started out with 3 levels to the thing and am now leaning hard to only 2 levels. Maybe that middle shelf will get added later on, but maybe it won't be needed at all?