VaughnT
Members
-
Joined
-
Last visited
Everything posted by VaughnT
-
Why would you never say "pounding metal"??? That's what you're doing after all. I do get a kick out of how foreigners talk. Those little idiosyncracies are what make things fun. Found out from a friend in Holland that they think Americans are very loud and brash. Of course, then I thought of how I must come across.... and that seemed like a apt description.
-
Being outside in the dirt isn't an issue. What we're worried about is overall usability/function. Putting it high, you're limited to using a handheld hammer or standing on an unstable box to get the height needed for sledge work. If you put it on a different support beam like you see most striking anvils, you'll still be able to do light work with a hand hammer, but it'll also be better for hammering with a sledge. Going through all the work to make this, it seems wrong to short change yourself. Drifting thick stock can benefit from using a sledge. And if you ever decide you want to do something bigger, like make your own bottom swages, having the piece down at sledge height makes a big difference. The smaller holes for under 3/8" won't get used much, if at all. They'll be handy for that once-in-a-blue-moon thing, but it's not a big priority. It's all about planning ahead. Right now, maybe all you envision is using it to open the eye on a bottle opener. That's cool. It'd certainly be great for that. But what about next month when you decide you really want to drift open an eye on a thick bar.... just for giggles?
-
Good job, Shady! I've been watching that marketplace with some interest, but I've never seen anything like that haul! The closest I've come is some large i-beam for well over a c-note. I'd give my eye teeth for a sweet deal on some thick angle and channel like that!
-
-
Hello Jim! You might be right about that tank having some cool alloy to it. I noticed when I was welding that there was a "buttery" feel to it as I ran the bead. Everything just went so smooth and fun, and the slag popped right off. Almost got me thinking I was a competent welder for a minute!
-
Oh, no. I wish! A lot of Yellin's work is still "known" because it's on historically significant buildings and they're really proud to have some Yellin work. The Yellin shop is still operating, last I heard, too. You can see the cut-loop technique used on some of his pieces, but you have to look for it because it's not something you'd expect to see. Sometimes it looks like a flaw or a weld line, but when you see that same thing pop up on every single through-hole in the grill, you kind of get the idea that it was intentional. I'm pretty sure Yellin or one of his guys commented on it, saying something to the effect that it was faster/cheaper/easier to assemble a piece when you could just lay everything together and then close of up the "collars". As long as it's on the back face, away from the viewing public, nobody is the wiser and everything looks like it supposed to look. When I saw your pics, the first thing that popped into my mind was the cut loop technique because it would have kept the outward appearance yet made assembly so much easier.
-
On the new apron, I'm going to spec something other than copper. I'd almost prefer no rivets since they seem to corrode yet don't really provide "support" that's above and beyond what good quality stitching does. Even my Tilman apron, cheap as it is, shows no wear on the stitching. The leather gave way. The rivets died a miserable death. But the stitching is as good now as it was when brand new. Leave me wondering if riveting isn't one of those things people do because they think it'll help... but it's more psychosomatic than anything else.
-
Six bills for an apron? That's definitely rich! Of course, with the cost of leather being what it is, I can see them being pricey. I'm factoring on something under four bills, and that's my absolute limit. I don't mind paying for quality because I know it'll last. More importantly, it'll look good and let customers know I'm serious about what I do. You really can't go wrong with buying custom-made stuff. If I'm asking folks to buy my ironwork, the least I can do is support other craftsman looking to make ends meet. Maybe that means buying tongs or a t-shirt, but we can all help make a difference if we just give it a try.
-
Well, after much back and forth, the Three Rivers Forging Apron is officially underway. I'll have to mail him my current apron so he can get all the measurements from it, and I'll miss her more than you'll know. But, the upside is that I'll have a far better apron delivered to my door in just a few weeks and he might actually keep the pattern on hand if anyone else wants one. At $300 or so, I don't see a lot of people chomping at the bit to buy one, but that's okay. It's there if anyone decides to give it a go. The key points will be proper reinforcement wherever there's something that normally breaks or wears out on the aprons already on the market. I've never used a split-leg apron and I'm not keen to try one now. My anvil is high enough that holding the tongs between my legs is a no-go at this station. My current apron is solid and has worked well when I'm at the anvil or sitting down to do some welding, etc. I wouldn't mind trying a split leg design just to see what it might be like, but not when I'm spending three bills on a design. Better stick to what I know, right? The straps, I'm pretty sure, will be 1" cotton/poly webbing because I like how they feel on my Tilman apron. The material is light and breathable, and doesn't rot through with all your sweat and grime. Even using oil-tan leather, I'm not sure how long leather straps would last since I seem to have a very caustic sweat that eats copper rivets. Something that'll dry out or need constant cleaning.... ugh. After two years of service, my Tilman apron is dying at the leather, not the nylon straps. Can I expect better from a quality leather strap? I really don't have that much confidence in the stuff and don't want to always be scrubbing the things with soapy water. Anyhow, fun times ahead and I'm kind of excited. It'll be a good way to start the year!
-
That'll definitely get you by for awhile. It's certainly better than nothing! A leather apron is the bee's knees and something you should definitely plan on for the future. I used a Tilman 48" apron for the last two years and it was worth the $40. I'm now upgrading to a quality apron that'll set me back $300. Is the price difference worth it? Indubitably. The look and feel of a quality apron sings to your soul like sirens to the sailors -- you want to get into the shop and armor up. Making things when you're wearing a sweet apron is a joy!
-
That anvil looks almost new. If that's the case, it's definitely worth consideration. However, as others pointed out, you will have the purchase price as well as the cost of lost wages if you take a day off work in the hopes of getting it. Weight looks like something around 120lbs. That's a beautiful size, very practical and desirable, so the chances of it being around after two or three days of people moving through..... super slim. Overall cost -- buying anvils off eBay and such places is not nearly as expensive as you might think. You might have to wait a bit, and then strike while the iron's hot, but you can get a very nice anvil for less than buying new. The key is arranging shipping. I used u-ship.com to arrange for my 300# anvil to be shipped from Massachusetts to South Carolina. Cost me all of $200. With the anvil's cost, I was still below $2.50/lb for a very nice anvil that's head and shoulders cheaper/better than similar new anvils in the same weight class. Moral of the story -- don't get skittish about shipping. If you can find a decent anvil online, price it against the cost of a brand new anvil in the same weight range and then look at what it might cost to have someone bring it to you. Generally, it's pretty cost-effective and you come out ahead of the game.
-
Well, looks like the problem was solved by the good smith at Athens Forge. I was wrong in my guess, sort of. On the right track, but still wrong. The only consolation is that I was thinking the same thing as the great Peter Ross!
-
Looks like they'll work well enough for the job. The ol' timers had tons of oddball tongs for just such types of work and it's always fun to try and decipher what they were used for. There doesn't seem any good way to hold a wedge, imo. Part of me wants to make the one jaw a box that better wraps around the taper of the wedge while the opposing jaw is just a finger to push the wedge into the box. But, you certainly got something that'd work and that's what makes the difference. If you have a bunch of them to do, or think there will be more in the future, you can always upgrade the design. Maybe come up with something truly stellar then put out the word that you'll be happy to reshape wedges for folks. Don't know how much of a demand there is for such, but....
-
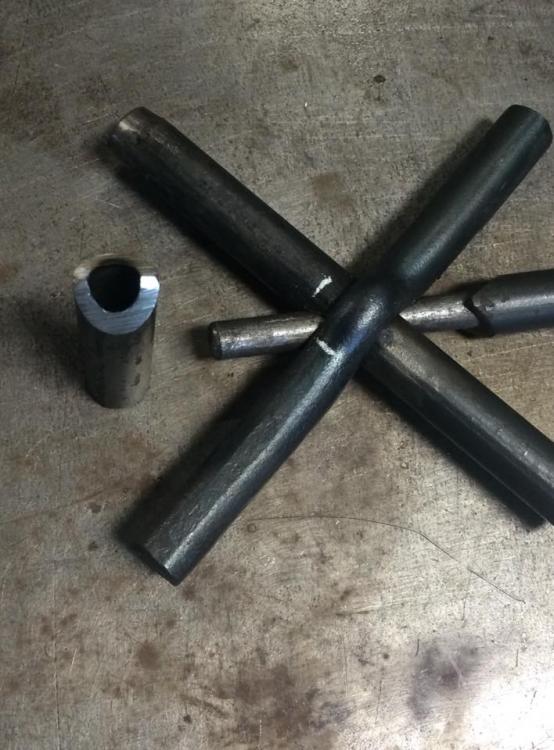
"...the largest I can see putting on this...." yea, everyone says that then they decide to make a tool or bottom swage. It'll happen, just a matter of time. And since you're trying to grow your tool kit, being able to make a bottom swage can be quite tempting! I would increase the thickness to at least 1/2" plate. You really can't go too strong. Since you've got it for your pole/stump, portability isn't an issue. Weight doesn't matter. But too thin a support and it'll collapse the very first time you try to upset a bit of heavy bar with a sledge hammer when you want to make that bottom swage or hot cut. If you could find some heavy I-beam, that'd work great and you could sink it down the side of your stump to strengthen everything, add some mass and give you more room to work. Also, height from the ground is important. You want it low enough that you can get a good swing of your sledge. Too high, and you've eliminated the use of a heavy hammer, which means you really don't need the larger size holes since upsetting something like a 3/4" bar is a thorough pain with a "light" hammer. If you do go with a higher placement, it'll work great for when you're drifting open holes. Making bottle openers, for example, can really benefit from something like this, but because it's not really heavy or firmly fixed, I ponder what you might do with the square hardy hole in the center. With the thing freely rotating with every hit, using a bottom swage in that square hole would be a pain. Also, you can close the gap significantly with the smaller holes. I can't recall the last time I needed to upset some 1/8" bar to make a rivet (I just use nails), but the 1/8", 3/16", 1/4" can share the same footprint/hole because they heads are so small. Does that make sense? You could put the 3/8" and 1/2" at opposite corners of the square pass-through in the support. Basically, it's 5 holes in two square inches since none of them take up much room and don't have to be spaced out evenly along the arc you've described in your drawing. Anyhow, I'm rambling and that means it's nap time. I'll come back in the AM to see if any of this was remotely coherent!
-
Thinning the leg and flattening out the buckles will be the troublesome part. There's a good vid on youtube that shows two smiths forging a curve into some angle, but I can't find it right now. Basically, the gist of it is that you work on a large steel table with a couple pegs in it that you can use to bend the section that's hot. Most of the time is spent working to maintain the shape of the angle because it wants to go all wonky when you're trying to bend it. It's a constant battle between bending, flattening and thinning. It gets done, though!
-
Cutting the holes in it could probably be done with a water jet. If you go with something like torch or plasma, you'll lose the heat-treat that made the block so hard. Of course, that's not necessarily a bad thing because you don't know the hardness of the chunk o'steel and it could be too hard to work a sledge on. Generally, swage blocks are cast iron or modern versions have been cut from mild steel. The idea is that they're soft enough to withstand an errant blow from your sledge. The 1/4" support would die a quick death if you did any serious hammering on it. Plenty good enough for 1/2" and smaller, but if you tried upsetting a swage or the like, I'd expect it to buckle real quick. In an application like this, mass is your friend.
-
This is the truth! I just bought a pair of tongs from Jakob Faram and they are a genuine work of art. I'm almost to the point that I don't want to actually use them, but put them on a nice plaque so they can hang in the house where everyone can admire them! Expensive -- yep. Worth it? Most definitely. More than that, though, I'm finding that quality and appearance become far more important to me as I age. Even if nobody else ever sees them, you get to be surrounded by it and I firmly believe that it rubs off on you. I'll always opt for the more expensive, but more stylish tongs simply because you can see the effort the craftsman put into them.
-
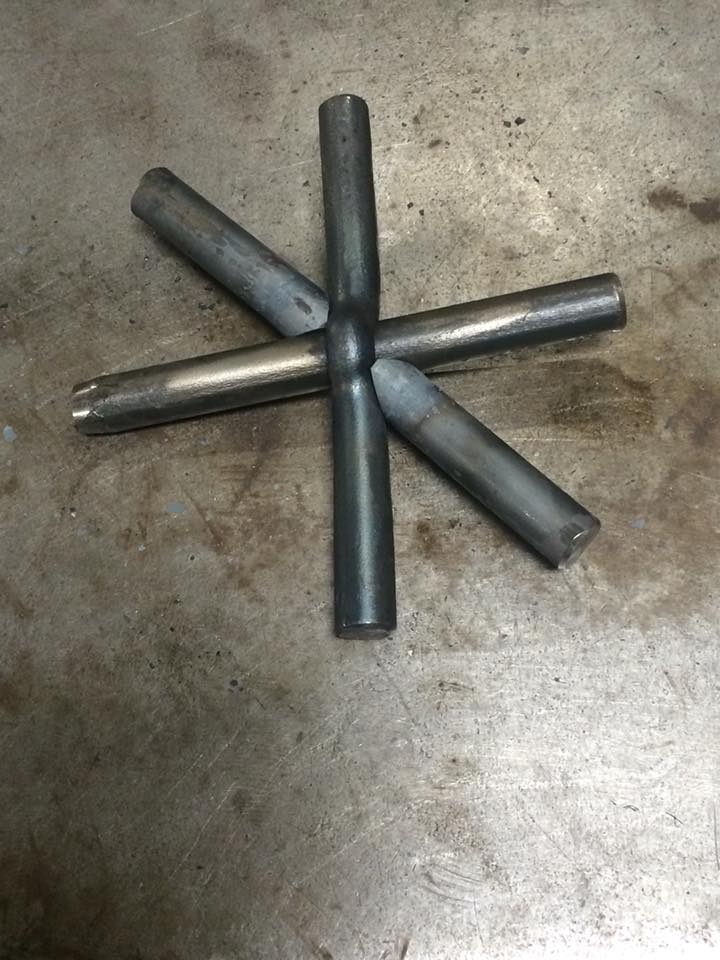
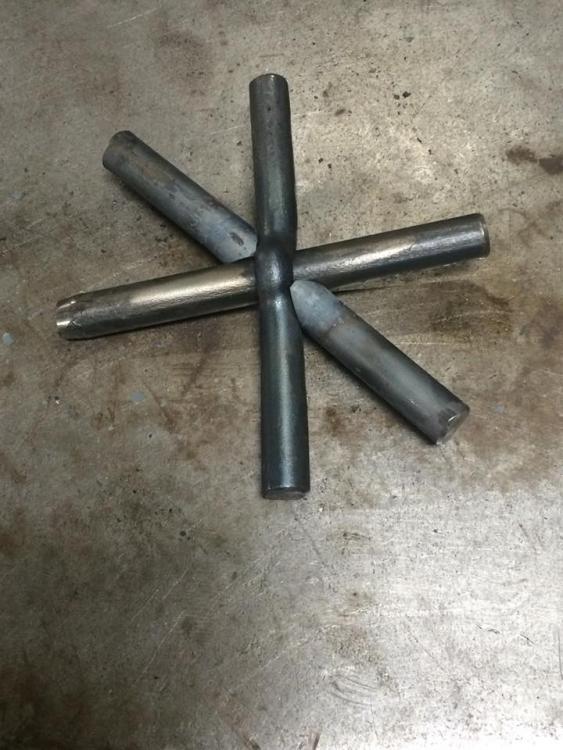
My take on it -- don't assume that smiths back in the day would have "refused" on something or "insisted" on something else. They were humans just like us and leaped on new tools and technologies. Rivets, welding, brazing.... at one point it was all "new". If it made the job easier, they were generally all for it because it could decrease labor, increase profit, open new design pathways to more customers, etc. As to the design, like others have said, it's impossible to pierce a three-way intersection like shown in the pics. What I think they did, and a pretty common "trick", was to assemble the horizontal bar and the diagonal bar. If you look at the joint, the two bars have a very nicely fitted joint that looks like it took a lot of filing. If I was doing this out of wood, it'd be a half-lapped joint, coped, filed and sanded to give me a fine intersection. In steel, the joint would be an absolute bugger to do and get that level of clean angle between the two pieces. Someone spent some quality time with a file! The two pieces might have been forge-welded together with top/bottom swages dressing everything up. Those old shops would have had tons of swages, so it's entirely possible they used the same thing time and time again for different applications. Maybe brazing was done to fill the joint, then someone came in with files to make it look pretty. The vertical bar has all the piercing work done on it. All of the other members could have been forged and riveted into place. The hole made for the crazy corner intersection was then cut on the back face, opened up, and the crazy corner inserted. We see this technique used by Samuel Yellin quite a bit. With the cut in the loop on the back face, customers can't see it. It's also easy to fill in with some weld, but that would usually not be opted for since it wasn't showing and would only add to the labor/cost of the piece.
-
First thing I'd note is weight. Steel is heavier than brass, so a 5" ring that's made of steel, and has all the extra mass added with the leaf and twists.... well, that might not be something a woman is comfortable toting around. Women are weird about how "heavy" things are, and it's odd that they find things heavy that menfolk think nothing about. Going from 3/8 square to 3/8 round serves what purpose? Why not start with 3/8 round? If you're interested in texturing the steel with hammer blows.... that can easily be done even when you start with round bar. I'd opt to go with something smaller than 3/8 diameter bar since that's pretty substantial for no particular gain. I think 5/16" bar would be too thick and heavy visually, and would likely go with 1/4" to get a balance between weight and strength as well as keeping the design "feminine". Sometimes the best design is the most simple design. Joining the ends with simple curls interlocking would be easy enough for someone with limited time/experience and would come out looking very nice. It's understated elegance that still showcases the blacksmith's trade.
-
Focus on what you will be doing the most of right now. Wanting to do XYZ in the future is great, but you can burn up a lot of fuel in the mean time if your forge is over size for what you'e making until you get to the point you can do XYZ. Ribbon Burners are way more efficient than naturally-aspirated burners, but they also require electricity and a fan - both of which add to the cost/aggravation for a lot of people. The side door, in my estimation, is just a bad idea all the way around because it opens too much, allowing out too much heat, without giving you a ton of benefit. You already have a hole on the short side, so if any side is going to be hinged to open, that's the side that makes the most sense. This allows you to keep the most insulation forming a solid wall.
-
If mobility is needed, I'd use the wood beam. You can make a nice steel base for it and forge a nice strap to go around the top. The wood-iron combo is sexy every day of the week. While not as heavy as the all steel construction, it's also easier to move around the shop when you need to. If you go with all steel, it'll certainly be heavier. I wouldn't fill the tube with concrete. I'd opt for sand so the whole contraption could be dumped out when/if I had to move. Both stands are "less than perfect" because they're not bolted to the floor. That means you'll get a bit of wobble and all that. It's a trade-off between stability and portability, circumstances being what they are. It seems like life is always demanding a trade off of one kind or another! No reason to worry too much about either design. Whichever way you choose, do the best work you know how to do so folks are impressed with your craftsmanship.
-
Well, you can certainly do the lag screw option and get something done. That, however, is the last thing I would do because it reflects so poorly on you as a maker of things. I'm a firm believer in surrounding yourself with quality as that quality will rub off on you. If you simply cobble something together.... you'll always be cobbling. Now is the time for you to shine. Use this opportunity to do something that stretches your creative wings, and makes you really strive to impress yourself. Even if nobody else sees it, you will. You want to be a blacksmith? Well, why are you shortchanging yourself when there's iron to forge. You've got the anvil and it's plenty stout enough to do some work even just sitting on the ground. Might as well use it to forge yourself some nice brackets that will join the two stumps together in a way that's inspiring. Sure, you might not have amazing skills yet, but what you install now doesn't have to be permanent -- just better than some garish lag screws that show neither creativity nor inspiration. Can you do something similar? Well, by golly, you can certainly try! First impressions are lasting impressions, after all. While you're waiting for the stumps to dry out a little more (probably take a year) get some pencil and paper and start drawing ideas. This is the reason why you wanted to get into blacksmithing in the first place. Make a valiant effort. Get your mind in the game, stretch your creative wings and do something your ancestors would be proud of. If the vikings could make wonderful swords and armor with hardly any kit at all, surely you can do something moderately fetching with some cheap iron bars from the hardware store.

-
Wonder if it's just their California operations that are closing. They have a location in Texas that might be doing well enough, but can't use all the tools and materials from the CA facilities. Still, it'd be neat to see what comes up on auction. I can't afford anything, but I don't mind some eye candy!
-
Over the last few years, I've made a concerted effort to get rid of all my "regular" scrap. I keep one or two coil springs around because I use them pretty regularly for punches. Once the coil is down to the last few inches, though, I can pitch it without too much worry. Those tiny little pieces from the saw and such... they go in the bucket and get tossed as soon as the bucket is full. I'm not going to make damascus or bloomery iron from them, so there's no sense keeping them. Of course, one 5g bucket doesn't take up a lot of room in the shop, so it's not that big a deal. One thing I did last year was to use the off-cuts and other garbage to fill in a cylinder that I turned into a dishing stump. Sand took up most of the space, but all the little bits of steel going in was a nice way to add some weight and get rid of the mess. I couldn't believe how much stuff was at the bottom of the bucket, things I thought were great and I would use one day.... but which ended up buried and forgotten. Two years later, I found them as I filled the cylinder and figured that it was better to simply entomb it all! Pieces of flat mild steel that's 5" or longer... I'll keep that around because it can be used for a lot of stuff. Keeping it organized and handy so I can find it when I need it -- that's the real problem!!

-
I'd leave it as-is. It's a neat bit of industrial design, though that part might be lost on a woman. They can be weird like that! Maybe weld it to an 8" piece of 3"x1/8" flat stock and add a small calendar or business card holder to the other end. or a short length of tube that could hold some pens and such. That way she can keep it on her desk and always think about you. Practical, but also artistic. And if you give it a nice paint job, something that compliments the ironwork like some brass or copper wash that leaves a bit of the steel showing through, then hit it with a matte poly overcoat..... Or maybe put it on a heavier base, say a 5" piece of 3"x1/2". That way you'd have enough weight in the base that you could make a tree that reaches up and allows her to organize her jewelry. I've seen them on pinterest and they look like a neat way to hang necklaces, bangles and earrings. Women seem to coo over them a good bit so that might be better than a desk organizer.