VaughnT
Members
-
Joined
-
Last visited
Everything posted by VaughnT
-
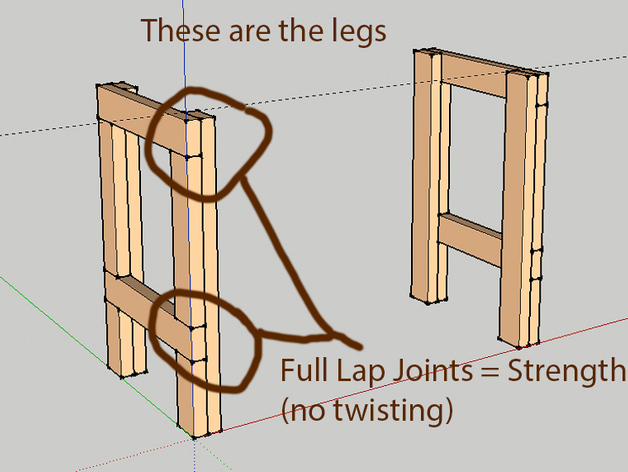
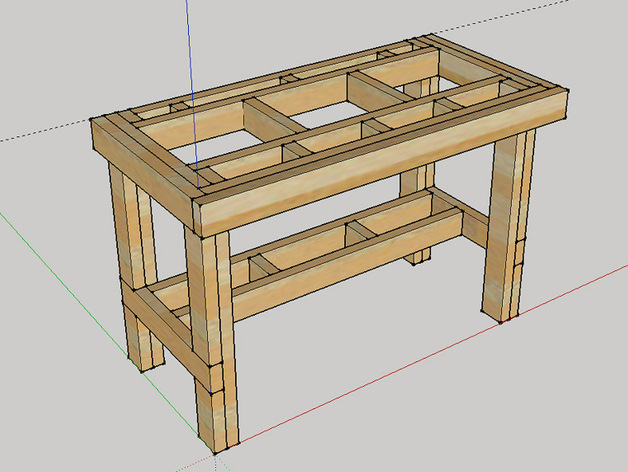
By joining the 2x3's together, you're creating a laminated top. Doesn't matter which direction you're gluing them up, they're still laminated together. For what you want to accomplish, I'd skip the 2x3 top altogether. Use the 2x3's to make the frame of the top, then fasten down two sheets of plywood. This will make the top very rigid and heavy without all the work of gluing up the sticks. You can use the 2x3's for the legs easy enough. And you can double them up so you don't need any fancy tools to make half-lap joints for the top and lower shelf to fit to. It's super easy and leaves you with 4x6" legs that are plenty stout. Bracing isn't the same as legs. You can have six legs and still be a very wobbly bench. Corner braces oppose the wracking forces that come with working on the bench -- and it's those twisting forces that break loose the joints between the various parts.
-
You're going through a ton of work to make the laminated top.... why? If you're not going to plane it flat, you could save yourself a bunch effort and still get very good results by simply building a good frame and covering it with plywood. If you're going through the effort to build a nice laminate top... go the extra step and plane if flat. Even though you're not an awesome woodworker and don't have much in the way of tools, you can do a good job of it if you take your time and pay attention to the little details. In the end, you'll have something that you can be really proud of. Putting thin sheet metal over a substrate of laminated boards that aren't planed flat -- just asking for problems as the metal deforms through use. You're idea of putting thin bit of sheet metal on top isn't bad. A lot of shops have wood frames with thin sheet over top to protect the wood and make for easy clean up. It's a tried and true style. But if you have wavy wood under the metal, you're creating voids where the sheet isn't supported. Drop something on it and you put a nice ding in the sheet. After a year or so, no matter how careful you are, you'll end up with a top that's dinged and bent. The joint between the top and legs is really important. Screws are nice, but they don't hold over the long term as the wood expands and contracts. All benches will wiggle a little bit, and this breaks the joint between the screw and wood. Wherever possible, you want to use half-lap joints so all the wood members are as well supported as possible. Cross bracing -- can't say enough about it. You need braces that counter tendency for the bench to rock and twist as you work on top of it. Even if you can bolt the bench directly to the wall, corner braces are a must. All tying it to the wall does is decrease the number and stoutness of the bracing needed. I don't worry too much about working with hot steel around a wood bench. As long as you don't have saw dust piles up, you don't have much worry about starting a fire. The mass of the wood in the bench means that you can drop a red-hot chunk steel on it and it won't burst into some huge conflagration. Yea, it might light up in a little flame, but nothing you can't put out by simply wiping it with your hand. And how many times to you plan on dropping red-hot steel on your bench??? Small stuff, the kind of thing you use for tinder when making a campfire, yea, that's dangerous to have around when you're throwing sparks from your grinder. Big slabs.... well, it's just like spewing sparks onto a log. It ain't gonna catch on fire. Look around the internet for old-school woodworker's benches. Those guys were pros and had their benches designed very well. Copy them. They knew what they were doing. No need to reinvent the wheel.
-
Not bashing Joey, but I think this is a good "teachable moment" for folks. Joey is not wrong for wanting to stick with the "traditional" techniques, but that does limit him in what he can produce and market, and that limits how successful he can be. I support his decision to go back to hobby smithing because that's where he's happiest and where he can actually do the things he wants to do. Business is what the customers want, not what the makers want. It's a hard balance to strike, and often folks get confused into thinking along the "Field of Dreams" idea -- if you build it, they will come. I wish! I build lots of things, but finding customers for those things is a chore of Herculean proportions! Customers always say they want to support the arts or support the mom-n-pop shops, but they run to the mass-producers in a skinny minute when there's a dollar to be saved.
-
I talked with Joey right after his announcement. He did quit the professional smithy in France and has moved back to Holland. I don't know if he actually bought into that company or was simply given the opportunity to work there full time. Without going too much into our private communique, I think Joey's happiest with smithing when he can do it his way -- that means only doing forge welds and not getting into projects that require more modern wielding and lots of grinding. Again, my take on things after chatting with him. I can understand his frustrations, but the market is what the market is.
-
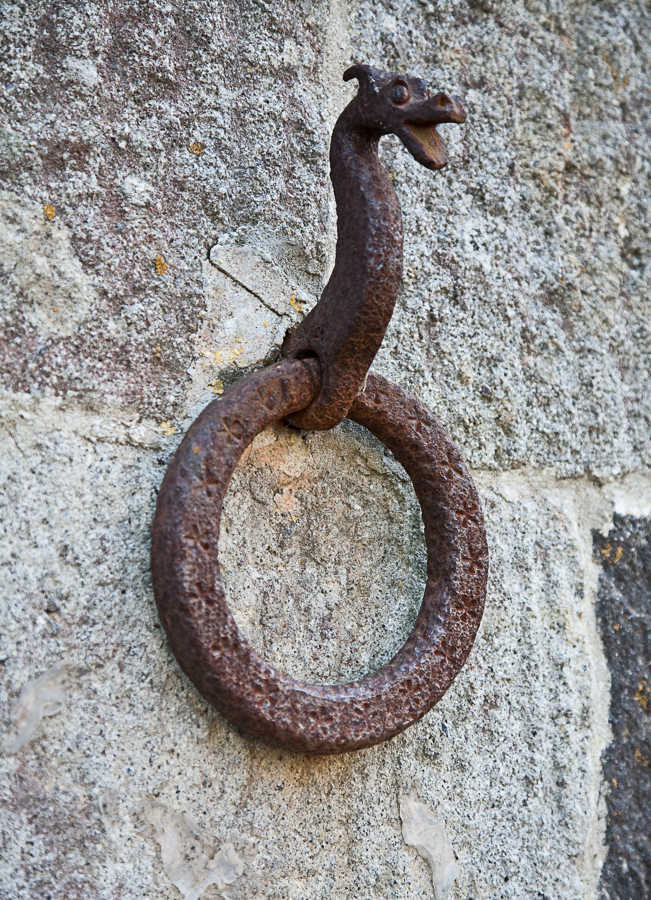
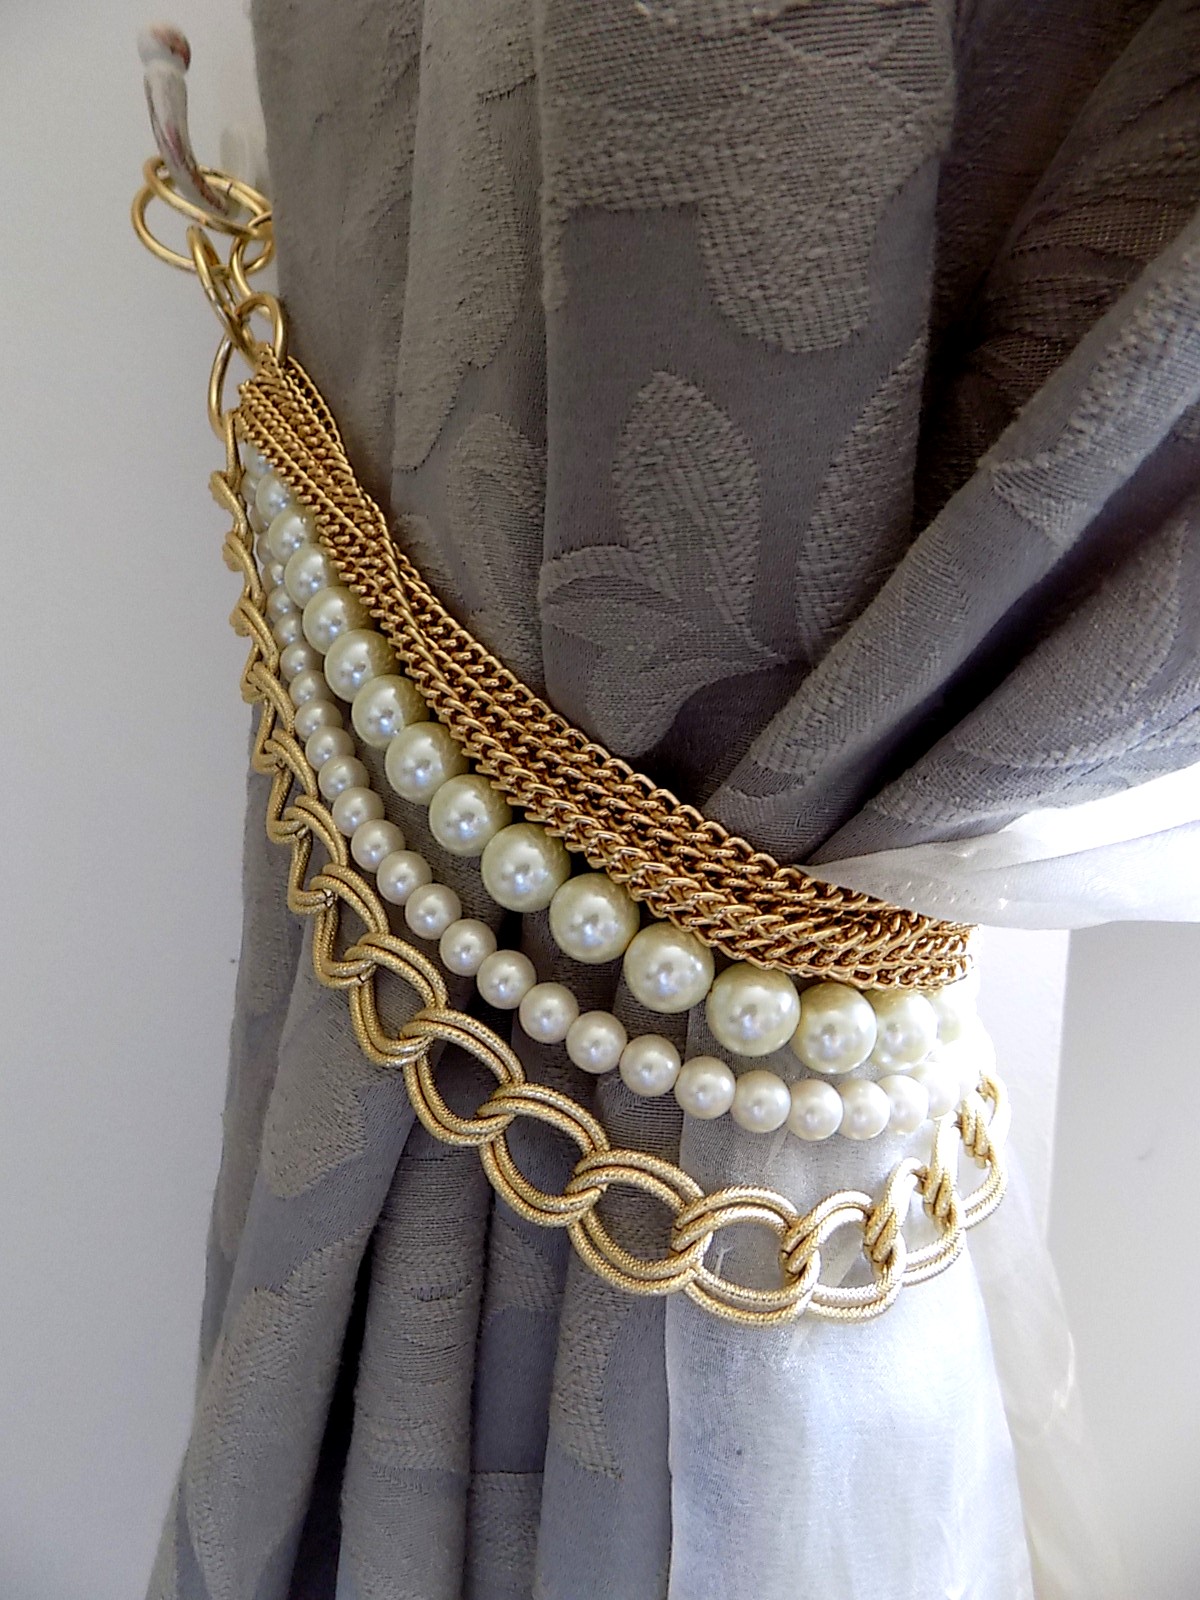
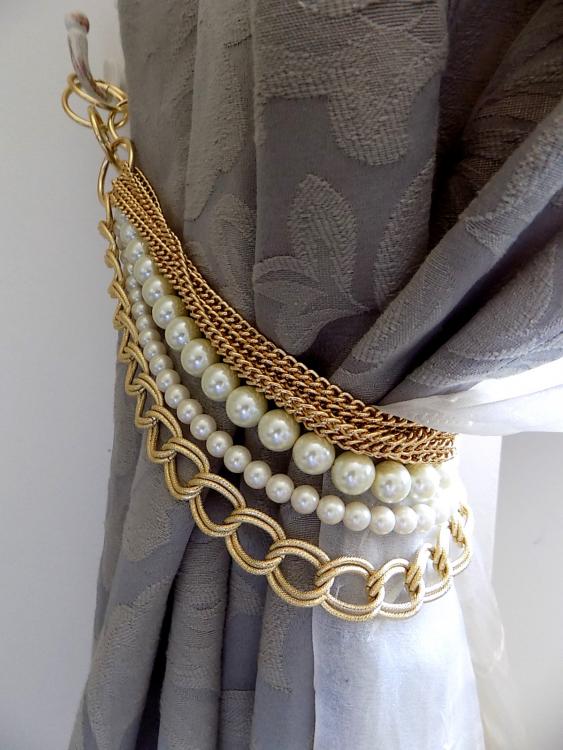
Made bunches over the years, mostly from round bar. One of the "gotcha" moments is when you make your first pair and realize there's no way to get a driver in there to run home the screws because you put the bar in the way with your design. There are a lot of ways to go, though I recommend keeping it as simple as you can if you're going for something that you can sell. I like simple scrolls, mirrored so they look balanced on the window. If you're going to make a lot of them, make up a set of sizing jigs and whatnot so you can knock them out one after another and have them looking the same. Folks might want to buy several pairs at once to outfit a room, so they have to look reasonably similar. Jigs are your friend! If you're doing them for your own home, make them as complex as you can do while still keeping them looking good. There's nothing more important than filling your own home with testaments to your smithing ability. And don't be afraid of replacing them in a year as you get better. Always keep your own place in fine fettle. And don't forget to think outside the box. One of my favorite is the simple ring style. You use a bit of decorative rope to lash the curtain to the ring, and the ring is left fully exposed so you can showcase your work. They can be anything from something simple like a towel ring type, to something super complex and awesome... like this old hitching post ring on a castle wall.

-
I've always heard those called finger vises. Machinists and engravers like them because they hold odd-shaped parts.
-
I love the heavy industrial vibe of your stand. I'm thinking about redoing my stand and that's definitely a great model to keep in mind. The offcuts will make great hooks for the shop. Cut the full ones in half, draw them ends out an bit, and bammo, you've got some great pieces to hang your hat on!
-
I can certainly believe that after watching this guy get at it!
-
So, have you got it yet? Are you still dilly-dallying around? That's a fine anvil, and a super-fine price. While I'm not a fan of things "not Fisher", I'd still snatch it up at that price and not think twice about it!
-
Amen! Back in the day, I worked a job that required me to have a pistol on my hip all day long.... and I was certified by the two states I worked in. I had to pass annual decertification training in one state, but not the other. Was one better than the other? No, because the company I worked for did the certification and was all too happy to "cheat" because they knew the state officials never bothered to look into it. With the other state, not getting recertified meant you had employees that got their card when they were 25 and never had to re-up. Now they're in their 60's, with shaky hands and bad eyes.... and still fully compliant with the law. What would a guild accomplish in either situation? It sounds like it would be a nice thing, but it would soon become a bureaucracy with all the chiefs and not enough indians. Politics would soon start and favoritism/nepotism/cronyism would become the order of the day. We can see how it happened in the unions and there's no reason to expect that a guild of some kind would change. Things like the Screen Actors Guild don't assure standards; they only keep a stranglehold on the industry and force folks to either pay "dues" or not work. Every b-rated movie with lousy acting, camera work and writing.... all produced by folks with SAG cards. As to the OP's thoughts on the videos, I always look at the format first. Is the camera held stead on the anvil or other tool so you can see what's going on? Or, are they jumping around with edit after edit, showing the smith as much or more than showing the work? Is there a lot of unnecessary jibber jabber, or is the verbiage only related to what is being done with the work? Sound Track --- nothing makes me flip the channel like garbage music playing. Are you trying to be cool or hip? Do you think your selection of music will make you look cool? If so, stop. Be a DJ or be a blacksmith trying to show folks something. If I wanted the nightclub experience, I'd go to a nightclub. In my estimation Mark Aspery and Gary Huston have the best smithing videos on the internet. While they have distinctive styles, they both place emphasis on the learning and teaching, and don't try to come across as something other than a smith spreading the gospel.
-
A repetitive stress injury usually requires a lot of the "repetitive" part before it manifests itself. Since you pick at a guitar, I would look at that as the culprit and the smithing as the part that added just enough extra stress to make things start popping on you. At your age, you shouldn't have anything wrong. However, if you've been picking and grinning for several years, you can expect that to put a huge strain on the growing body. Contorting your hand/wrist/arm to work up and down the neck isn't easy on the joints and tendons. In youth, it's especially troublesome over the longterm because you're still developing. I pinched a nerve in my shoulder/neck area a couple weeks back and it's been playing games in my left arm ever since. Right now, my whole arm is on pins and needles as I type this. When I sit in the easy-chair to watch some tv, the tingling goes away but there's still some ache in the arm. When I sleep, I can't sleep on my left side at all, and trying to sleep on the right does really wonky things to the injury. All that to say.... if it's hurting now, it's only going to get worse as the years stack up on you. I'd recommend you stop doing anything with that arm that isn't absolutely necessary. And if you get an MRI or the like, make sure they take "pictures" of the hand in various positions to see if there's impingement when you move. It doesn't take much to put pressure on a nerve, vein, ligament, etc!
-
That's a nice apron, Frosty. I was thinking about a long pocket like that for a ruler, but wasn't sure how practical or useful I'd find it. Have you found that you use the ruler a lot since it's there?
-
Post some pics, Frosty! I'm always looking for ideas, so post away, my friend.
-
Honestly, I wonder if those big hoods aren't a bit overkill for general grinding. I can see where you have some gases that might get you, but I've never been a proponent of full-face respirators because they always fog my glasses. That, and I can't imagine that my work area is any more dangerous than the general world in terms of particular size or PPM. That said, I've used a Wolfsnout All Sport Off-Road dust mask when I'm going to be grinding a lot. With my shop being rather open and a fan running to circulate the air and bring new air in, I think the Wolfsnout mask is about all I need. It's a fantastic bit of kit, and the only mask I've ever found that doesn't leave me blind in a few seconds. I can grind for hours with the thing on, and I never notice it, really. Even with my beard, I don't feel like I'm breathing in any particulate and the boogers ain't black. For as cheap as the things are, I wasn't expecting much. But I had to do some work under the house and didn't want all that dust dropping down on me when I was driving nails. Very happy I found the things.
-
Aprons are wonderful things and I can't imagine forging without one. Yes, they're hot and it's always a fun experience forging in a South Carolina summer! The downside to the apron is the heat and sweat. Okay, that's a pretty good downside. The upside, however, is safety, cleanliness, confidence.... and you don't ruin a ton of shirts. I would easily go through $300 worth of shirts in a year simply because they got filthy working in the shop. Even if they didn't get ripped on a sharp piece of metal, they'd still get loaded down with dirt and grime and become useless for anything but working in the shop. If you do any welding, the splatter from that will burn through any cotton or nylon/polyester material, leaving your clothes looking like swiss cheese. The $50 apron I bought two years ago has saved me at least three times that in ruined clothing. Psychologically, I find that I move more confidently when I have an apron on. Simply put, that leather barrier adds a bit of armor and you aren't skittish about simply propping something up on your stomach, or pulling the tongs in tight to your side. The only caveat I would offer about an apron is to make sure you get the kind that has Cross-Back suspension, and don't go with one that simply wraps around your neck. Getting that strap off your neck will make a huge difference in how you feel because you don't have all that weight dragging you down.
-
Never thought about corn starch, Tommie. Thanks for the tip! I'll run into town tomorrow to get some.... just in case.
-
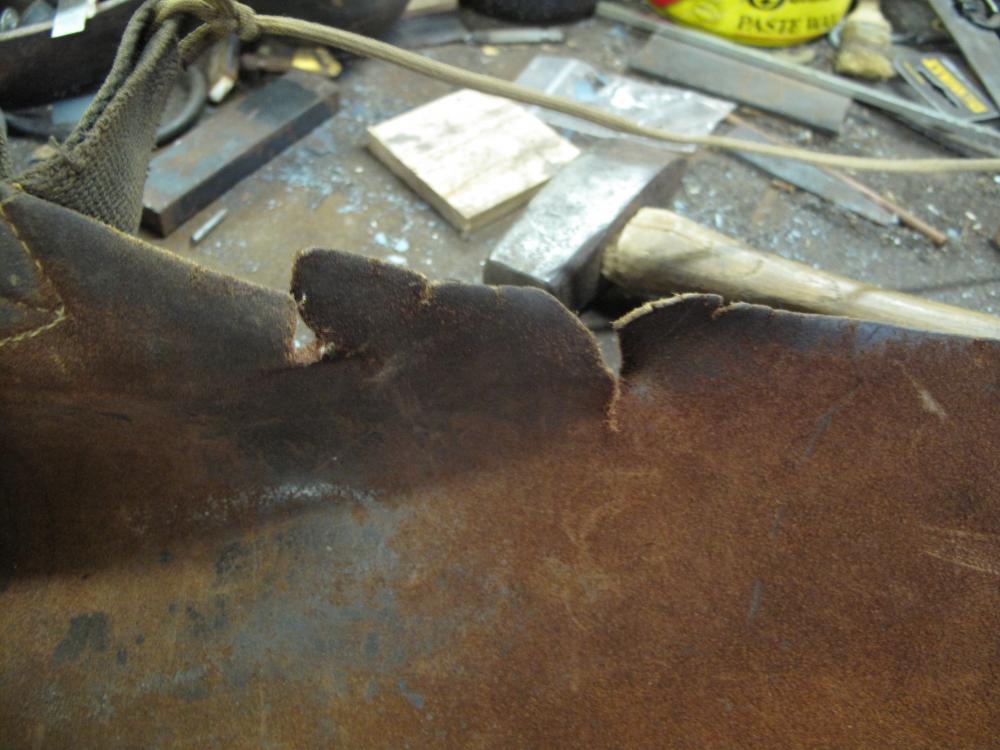
Well, I had some neatsfoot oil in the shop, so I dabbed a little on the leather where it was tearing or looked like it wanted to tear. Now I'll wait to see how it looks in the morning. It sure did soak up the oil quick! My worry, looking at it now, is that it will always have that oily feel. I don't know if the oil will leach out into my shirt after a day of sweating in the shop. The only damaged or dried out areas of the apron are by the arms and neck where the sweat gets heavy. On the bottom portion, the leather is in fantasy, almost-new condition. Maybe, if the oil dries a bit and doesn't feel too oily in the morning, I'll go ahead and oil the entire top half. I'm still looking at doing up a really nice apron that I won't be ashamed to be seen in public with.
-
Always glad to talk brain-tan. It's good fun, if a bit smelly! I'm not sold on the notion of oiling leather v. just buying oil-tanned or latigo leather to begin with. If I was starting over with a brand new Tilman apron, I could see oiling it. The problem there is that I'm not really keen on buying one of their aprons when I know I'll have to immediately revamp the straps because they have a screwy design.
-
I've tanned a few hides in my day, too, Tommie. Of course, I was doing brain-tan and don't want to think of what all that shop grease and whatnot would do to one of my beautiful skins. Oiling an apron? That's got to be a fire hazard somewhere! And with my luck, I'm sure to find out about it sooner rather than later! The split front design is something I thought about, and the Tilman is made from three pieces so they could easily adapt it to that. I've never tried one of those aprons simply because my anvil is too tall for the crotch-clamp style of forging. Better for my back that way! Still, something to keep in mind as I move forward with the build.
-
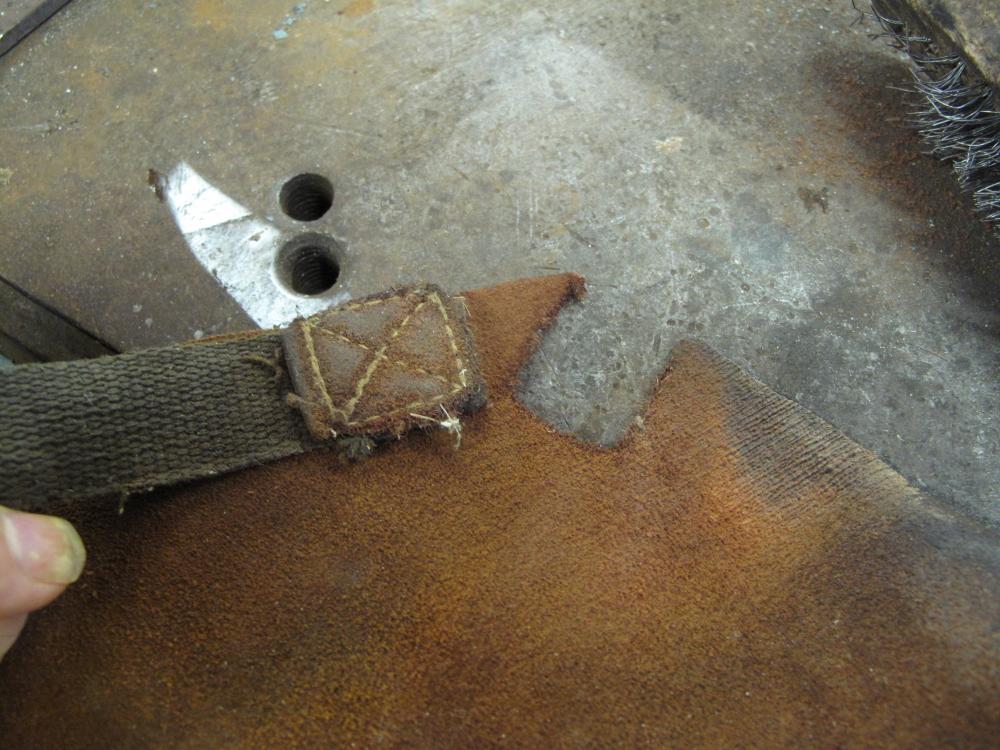
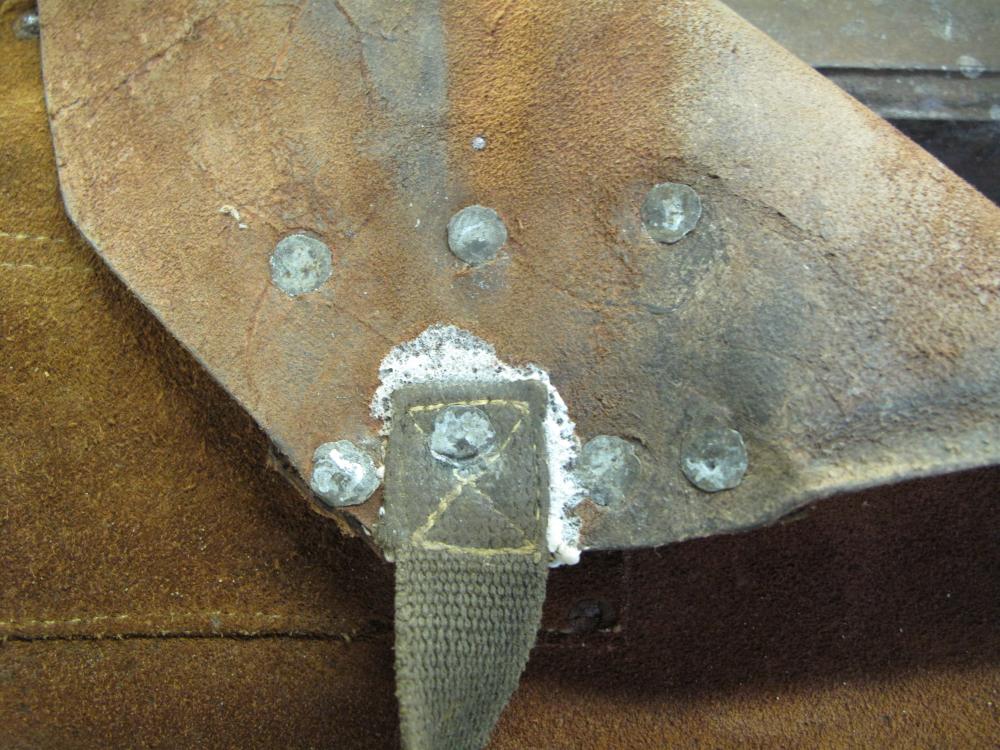
There was once a time when I didn't wear an apron around the shop, but one day I tore a brand new shirt and that was that. A leather apron is hot, sure, but I bet I've saved over a thousand dollars in t-shirts since I started using one regularly. Even when you're not forging things, there are plenty of stuff that can destroy a shirt, so the apron really does help. Plus, I liken it to a uniform; when I put it on, I'm in work mode until I take it off. The other day, I left my hammer on the anvil overnight and the devil came in to play. I've never seen leather give way like this, but leave it up to me to find new and interesting ways to ruin something. All around the apron, the leather is getting hard and brittle wherever the sweat and grime was thickest. I guess I should have been more on the ball with washing the apron. Lesson learned..... To get me by until I can get a new apron, I used some roofing nails, gorilla glue and a bit of old leather to patch the strap. No telling how long the repair will last, but at least it's fixed for the time being. Looking around the internet, I'm seeing a few very nice aprons. None of them really catch my eye, though, because I was a bit spoiled by this Tilman apron. With a body that's 24"x48", she covers me all the way down to my instep. I had to rework the cross-back straps to make them actually functional. When I did, imagine my surprise when I found out that I didn't need the horizontal waistband! The way the straps tie into the sides of the apron is perfect for keeping the apron in place, so I cut free the waist strap and haven't missed it a bit. Even the cloth shoulder straps have proven better than leather straps of aprons past. They don't roll up, rot through, or get thick with gunk...... which makes me wonder why everyone else is using leather. Anyhow, all these little design points come up when I was shopping for a new apron and everyone seemed to be missing one thing. Maybe too short, or had too many pockets, or leather straps, or whatever. I like the Tilman, but don't want to spend the money on something that I'll have to immediately change (strap system) when it arrives in the mail. If it wasn't for that, I'd be okay with paying $50 for a new apron every few years. Since I can't get Tilman to change their design, I thought I'd go forward with making up my own apron design. There's a local fellow that does really nice leatherwork, but he's used to working on motorcycles, not blacksmith gear. He's open to helping, but we're stuck on what kind of leather to use. Obviously the Tilman apron isn't a good guide in this regard, so......? I'm thinking a good apron should be as thick as a nickel, or slightly under that thickness. And it should be oil-tanned so it's resistant to grease, grime and sweat. I sweat buckets, so all the help I can get is appreciated! Thoughts?
-
Very sharp bit of work! I really like the clean transitions between the scrolls and parent bar. Did you drill through the 1/2" stock and plug weld the scroll ends? Definitely very nice.
-
Very sweet ideas. Those split-jaw grips are great when you want to hold a hook in place while you plug weld from the back. Never thought about welding one to some angle iron, though....
-
To clarify, I don't mean to imply that you should work the entire 20' of bar in one sitting. If you work for twenty minutes and get too frustrated with how the tapers are coming out, quit. If you can go an hour, that's fine, too. The key is repetition. When you do quit, place your last taper off to the side so you don't lose it. The next time you light up the forge, that last taper sets the standard. What you'll likely find, though, is that your first few tapers will look more like the first few tapers from when you started on this path. Why? Because you lost the mind/muscle connection in the lull between sessions. It'll come back to you pretty quickly, but it's something to watch out for and illustrates why you see new folks not moving forward in terms of quality when they're jumping from one thing to the next whenever they get some forge time. The reason you set your last taper aside when you quit your last session is so you can see how far you progressed and how much you forgot. You have to have good tools, too. You'll hear a lot of people advise you to forge your own tongs, but that's probably the worst advise you can get. Tongs are safety equipment, obviously, because good tongs keep the steel from flipping out and hitting you or flying off to parts unknown and causing a fire. On top of that, they are also the #1 cause of aggravation if they aren't comfortable or don't fit the stock properly. You'll progress far faster and have far more fun in the smithy if you invest in quality, brand-new tongs to get started with. It doesn't take much, so don't think you will have to spend a fortune on a giant collection of the things. You'll be working with 1/2" round and square, and they can both be held by the same pair of v-bit bolt tongs. Those same tongs will also hold flat stock of the right size by trapping it between the corners of the bits. That's one pair of tongs holding three commonly-used sizes of steel. Tongs that will hold 1/4" round will also hold 3/16" round quite securely. Box jaw tongs are great for keeping flat bars contained, and you only reasonably expect to work a few sizes of flat bar while you're in the learning stage of things. Maybe you can hold off on that for a few months while you tinker with round and square bars. The latter is pretty cheap to come by and there are a billion projects you can make without every touching some flat bar. So? Maybe $100 max for enough brand new tongs to get you by for the first six months of serious practice. And if you follow the taper project, you'll have a bunch of hooks you can sell to buy more tongs if you need them.
-
-
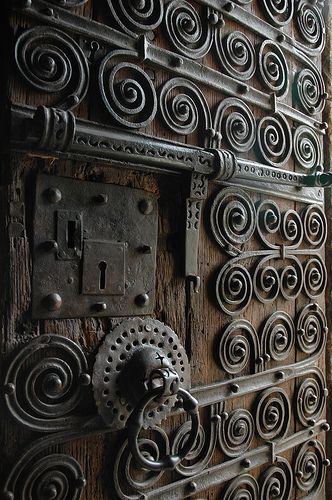
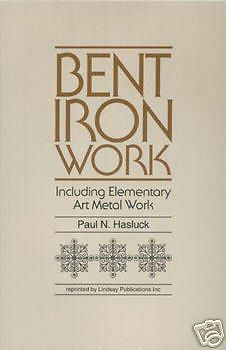
1: Remember that you suck. It's okay. You're new to the game and you're supposed to suck at it. Don't get discouraged when your hour's worth of work looks like crap. 2: Repetition is the only thing you should be doing for the first six months. 3: If you can't make a pretty s-hook, you can't make a knife or whatever so there's no sense biting off more than you can chew. To illustrate the point, this old door is covered in scrolls. They might be fairly fancy scrolls, but they're still a very basic bit of forging. You can do a ton of wonderful stuff just with a combination of scrolls. And scrolls are really nothing more than s-hooks that have gone a bit off the tracks. In his book "Bent Ironwork", Paul Hasluck does a fantastic job illustrating a bazillion projects you can make with almost no tools and no skills. I highly recommend the book simply because it's such a great illustration of how much you can do by combining steel that's been curved one way or another. None of the projects are overwhelming because they all rely on the most basic of movements. All you're doing is making the curves bigger or smaller and then combining them in interesting ways to arrive at a wonderful destination. That his projects also require very little in the way of tools.... well that's just icing on the cake. If you can't get metalwork out of your mind, that's a good thing. It means there's something about it calling to you, and that something will keep you going when things aren't quite working out as you'd expect. Keep plugging away at it and you'll have a lot of great stories to tell!