
Latticino
2023 Donor
-
Joined
-
Last visited
Everything posted by Latticino
-
Feel free to "Rube Goldberg" up anything you want, of course . If it were me I would just keep the second tank filled up as a standby and if the first one ran dry swap the tanks manually. Again this shouldn't take more than a couple of minutes. A 100 gal tank should last you quite a bit of time forging, assuming you have a decently efficient forge. If I had a more critical operation where I couldn't tolerate a 5 minute interruption in gas flow I would either directly pipe natural gas (as coincidentally I currently do - though not for continuity of service, just laziness) or manifold the two tanks in parallel with manual 1/4 turn ball valves to quickly switch over. The problem with overcomplicating things is that you give yourself more potential points of failure. For balcksmithing my watchwords are more often "robust and reliable".
-
Most folks who run dual cylinders simply run them both manifolded in parallel, drawing them both down simultaneously. You still have essentially the same overall working time as in your staged configuration, but the relatively lower draw per tank leads to less chance for freeze up. It doesn't help all that much for the recharge cycle, but most of us are not running a production shop where a short break to refill a tank is a significant issue. Actually if I had a productions hop I would just run parallel tanks and have one (or two) extra full one/s as standby for a quick switch. With experience you should be able to switch out a tank in a couple of minutes, and if running multiples in parallel you could still keep your forge running during that.
-
Acids in the food reacting to the surface steel. Call it a patina and enjoy it. Look at most older carbon steel kitchen knives and you will see this. Many view a patina as a desirable thing.
-
Most likely the press is air over hydraulic. Typically these are much too slow for effective forging, but better than nothing correctly setup. You select a compressor based on both the compressed air flowrate and pressure your press is rated at (the compressor gets rated at a certain flow at a specific pressure. beware of the ones where those two quantities are separated). The motor should be continuous duty. I'm not a big fan of oil free compressors and prefer two stage units, but YMMV. Also remember you get what you pay for. I was lucky to get a good second hand compressor from an auto repair place. It was their backup unit, and lightly used, but it aged out.
-
You might end up wanting to reinforce the opening with some thicker sheet steel. All the super sucker inspired hoods I've seen get very hot at this opening over time. Your thin steel will get hot and start to scale away (even stainless).
-
Cold cuts and hot cuts are two different animals. Honestly I have a cold cut hardy and never use it. They need a very steep edge angle and hardening and tempering are much more critical than for hot cuts IMHO. Even if you only use them for marking mild steel, the cold cut will deform over time. That is why I use a cheap, flea market cold chisel for any markings of that sort; which is easy to regrind.
-
Agree with other posts: Leaf spring should be quenched in oil, not water. Grain looks fine for the tool in question. Temper after hardening. Ideally up to straw color at the business end (after surface cleaning so you can see the oxide colors). Shank should be well past that, to a dark blue. at least. If you heat the entire piece during hardening you can "auto-temper" the bit by only quenching that section, letting the shank cool in air, and watching the "colors run" up to the edge. Shank should fit securely in the hardy hole, but not bind. It is a bit of a juggling act there. If I recall correctly JLP has a wonderful video on forging a hot cut. Some of the techniques there might be a little past your skill level right now, but still well worth a watch. Also, how were you using it: As the name suggests, the stock being cut needs to be hot (at least glowing). Once it cools down to black, reheat before using the tool. Also avoid hitting the top of the tool with your hammer face. Once it gets thin enough, grab with two tongs (or the like) and bend it till it separates.
-
I'm not sure of the practicality of your flue gas re-entrainment strategy. If your forge is already using the coal efficiently, the flue gasses will have greatly depleted oxygen content (which is what is needed for the combustion reaction with the burning coal). The gasses will be hotter, which can aid in efficiency, but since you will have much less O2 in the mix, you will need much more "air" in your fireball. I think you will quickly hit a point of diminishing returns. Now if you can figure out a system to have the flue gas preheat the incoming air using a heat exchanger, that would be another thing altogether. I doubt you will get payback in any reasonable time schedule on a hobby forge.
-
Nothing better than attending an in-person class to get you off the ground and running. In your shoes I would be looking for a class at Peter's Valley (not too far away in Jersey), or at one of the other schools listed on this site: https://workingtheflame.com/blacksmithing-classes-pennsylvania/ Local ABANA groups may also be able to help you out: https://pabasite.org/
-
Either shape will work quite well for heating stock. The big difference is the flat floor. For some projects that can be an advantage, in others a curved floor will help you lift flat stock. Personally I like a flat floor. Certainly easy to cast in place.
-
Look up Varaics or ECM motors. The former are old school and work with some non-synchronous motors much better than dimmer switches. I have never seen anyone who has had good long term success using dimmer switches on AC motors. Steve can probably tell you why they don't work well for fans. The latter are fairly new technology, and expensive. Still can be available from liquidators and the like if you are crafty. As far as I know, for using VFD you need 3 phase motors, even if the VFD will convert from single phase to 3 phase. I use those on my grinders, but they are certainly overkill for a coal forge.
-
I personally use Eclipse butterfly valves, but that is because I picked up a couple for free dumpster diving years ago and I don't currently have variable speed on my forge blower.
-
Almost exactly, word for word, what I was going to say. Sure you weren't a HVAC engineer in a former life?
-
Also recommend that you rethink the final shaping of the eye after the weld is complete. You are really using a mandrel to shape it (most hammer blows should be with the mandrel inserted and the "side" of the eye on the anvil face with hammer blows from above) and should not be doing any major drifting to increase the opening size. For the inevitable first shaping of the somewhat wonky forge weld I suggest you trap the welded section in your post vise securely when you first seat the mandrel. Also, always weld from the front of the eye towards the bit. The front of the eye is the critical location and most difficult to get cleanly welded. Of course I always weld a HC bit into my hawks, so I do that side afterwards. Still, as John mentioned, keeping the stock fairly thick while welding (light hammer) seems to help as well. Even with your coal forge you can oxidize the surfaces, making for a difficult weld. Make sure you are in the reducing zone of the fireball.
-
Mike, Pretty good aside from my knees starting to fail, my memory apparently going to the devil, and still having to work instead of retire and get to indulge in my hobbies full time. Why, do you know something I don't?
-
Frosty, Only you could elevate curling to a contact sport . Hope you get better soon.
-
This is excellent advice. I have seen too many tents blow away at shows (at my first one I foolishly connected all my shelves to my custom designed tent structure. I was exhibiting hand blown glass and lost most of my stock when a big wind came through). If you are on dirt, some longer tent spikes with a twist forged in will help (some folks go so far as to use the dog stake style, but as a smith I think you could make something pretty easily out of 1/2" stock that would serve. If you can bring some extras to loan, trade or sell to your neighbors. If you are on asphalt, weights are your friends. I used to use 3' pieces of 3 x 3 x 3/8" angle iron, but some folks tie on barbell weights. In that vein, one of the things that has saved my sanity at a show that wasn't going particularly well was commiserating with (and trading with) other vendors. Got my wife a lot of nice stuff that way over the years. Think she misses that aspect of my former avocation. Again good advice, but be sure to pop out of it to speak eye to eye with potential customers when they come to see your work. Alternately use a director's chair at "bar height", which should keep you at a good elevation. As others have mentioned, enthusiasm is a big part of having a successful show, and lounging down in a chair while the attendees are getting tired walking around can be off-putting. Piano wire is great stuff, and ideal for making springs. It can be a challenge to cut using "normal" wire cutting methods - and will quickly kill the jaws of most cutting pliers. Best method I've found is using some form of abrasive wheel. I used to use an old 6" bench grinder. The "corners" of the wheel cut it easily and you can quickly finish the ends with the wheel "face".
-
Thanks, I never thought of that. Guess I don't drink to much with tabs (not a soda drinker, but have to admit the newer Guinness cans with the marble inside work pretty darn well to give you a fairly authentic pour). The wife thinks I should try selling these. I think I'm too slow (at least right now) to be able to make it worthwhile. Etsy has some for under $20. You have got to be pretty quick to make money at that price point.
-
Anvil is correct on all points. Just to be clear, the typical two issues that come up are the height above the roof (well described above) and the penetration of the roof itself. It appears that you have wood construction for your roof, so you need to conform to the code requirements for penetration of a combustible horizontal plane. Most codes will require 18" of clearance from any combustible materials for a "low heat" solid fuel industrial appliance. If you are penetrating a wooden floor as well you have the same issue. As others have noted, there are some tricks that can be used to reduce this clearance requirement (like using special double wall insulated "zero-clearance" ducts, but they aren't inexpensive. Research roof thimbles. I would never recommend a scavenged blower be used for powered flue exhaust unless it was specifically designed for that purpose. 6" is pretty small diameter. I typically like to see at least 10".
-
For what it is worth, I have finished the hammer in the photo above and used it successfully on many forgings. It is a great pattern and size. The only thing I will change for any future hammers of this design would be to move the "nostrils" a little further towards the peen. When I ground the slight radius into the face after forging the edges in those locations aren't as well supported as I would like.
-
Thanks all, lovely to get feedback. It is nice to stretch and forge something other than knives and axes.
-
That's my favorite as well. It is a fun challenge for me to work so small on my 250# Fisher anvil with a 5" wide face. The mini spirals without touching the "coils" are interesting as well. Thanks for the feedback.
-
That's a cutie Steve. I like the multibar pattern.
-
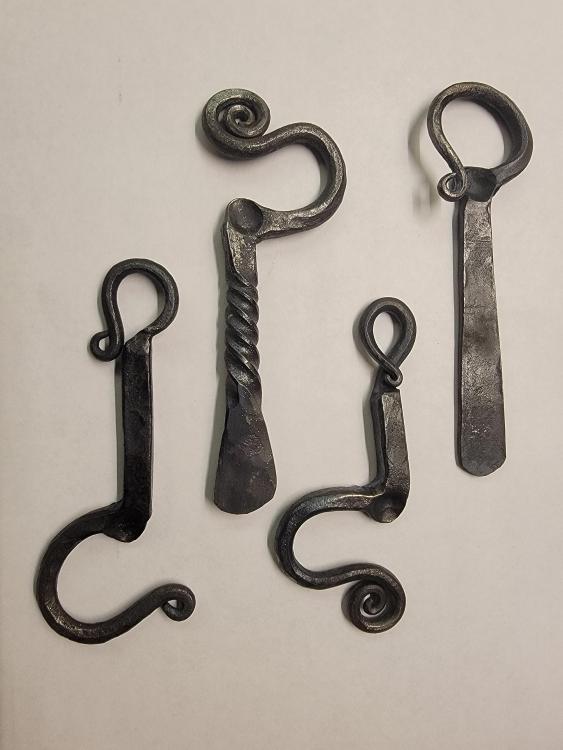
just playing around in the forge. Have no real idea what a "Viking" style opener is, but here are a few I knocked out this weekend:
-
No, they had just finished a test when we were surveying the building. We had been instructed to not talk to the techs, so I didn't get to quiz them, but clearly it had some power under the hood. Looked like you could put whole truck frames inside and pull or crush test them.