Latticino
2023 Donor
-
Joined
-
Last visited
Everything posted by Latticino
-
Two recommendations: I do typically put the bit much farther into the mild steel body, unless a special construction where I want to reveal more of the core (i.e. a pattern welded bit). This also helps with getting the full package up to welding heat without burning off the HC bit (ask me how I know...) Make sure you scarf the ends of the two sides of the body where you are putting in the bit properly. Hard to tell if you are doing this in your photos. It is tricky, but I usually try to work that scarf down as cleanly as possible in my first welding pass (or second at most). Be careful, since the ends of the scarf are thinner, they cool rapidly down from a welding heat. You also need to flip the billet over after you get a few hits on each side so the anvil side doesn't suck out all that heat. Note that when heating for welding it will certainly help to have the rest of the body hot as well so the heavy sections don't suck out the heat from the weld surfaces.
-
Looks to me like the ventauri burner is connected to some form of multi outlet burner head as an aftermarket modification. If that is the case you may not need a longer mixing tube, as the current configuration may have enough mixing as is. However, that part of the assembly may put too much of a backpressure to flow to not allow enough air induction by the gas jet. This kind of setup needs a lot of testing and tuning (see the NARB burner threads for details). This is one of the reasons I run a forced air burner. A couple of things to try before dumping this burner and swapping out: Definitely get an adjustable regulator. Even some of the great burners can't run "all out" (at maximum gas pressure) until the forge chamber is heated up enough to speed the flame front. Typically that results in the flame lifting off the face of the burner, so may not be an issue here, but still worth checking. Start your burner at 5 psi and see how it responds. While the orifice size may not be able to be adjusted, the position might be. If you can shift it back and forth in line with the burner axis, you may be able to get to a point where the gas jet induces air more efficiently. This is known as tuning the burner. Open the air gate fully Secondary air induction is certainly worth considering, but I don't see how it can be varied with the existing setup.
-
Depending on how you plan on using your hammer, the dies don't necessarily have to be that hard (and as you alluded it would certainly be a mistake to harden too far). In fact I took a class from a professional smith who runs one of his hammers with mild steel dies that he only hardens with Super Quench. Theoretically you shouldn't be abrading away the surface of a hammer die in the same way you do by sharpening things like Knives and axes, so a relatively shallow hardness is acceptable. I certainly witnessed him using this hammer to straighten out cold laminated steel knife blades with no apparent damage to the dies. That being said, from what I can tell I would expect 4340 would make great dies for your hammer. If it were me, I would perform my own anneal on the stock to make sure it was as soft as possible to allow easy shaping and harden and temper afterwards. Since I wouldn't be concerned about maximizing hardness, I would quench in a medium speed oil and temper immediately after stock drops down to 140 deg F. Note that apparently there is a variety designated 4340H that can be subject to quench cracking, so extra care might be needed if you have that flavor.
-
Jen, Custom thimbles is the way to go, but you aren't going to believe how much they cost (I am still struggling to get an "industry discount" for one and they initially want $1K+ for the custom double wall one I need for my wood and shingle roof). Please be careful to check with your local code regarding the specifics, but typically you need to have on the order of 18" clearance from any combustible construction and terminate on the order of 3' above an adjacent roof. Non-combustible metal roofs are a bit easier, but i would look carefully into the insulation near the penetration location. You might want to cut it back at the location of the flue. Depending on construction and conditions you may want to look into guying the stack above the roof. Are you going for a single penetration serving multiple forge hoods?
-
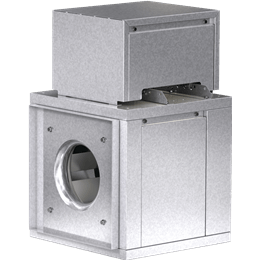
Yes, an inline, belt driven fan like the Greenheck BSQ (below) will certainly work to exhaust a significant amount of air. Needs to be correctly sized to match hood and stack configuration. However, with a 30' rise you shouldn't need one. A fan powered system does work nicely for a school setting where you want to combine multiple exhaust flues for a single roof penetration.
-
As Billy noted, the codes are the critical point. In particular, pay attention to the local mechanical code for proper penetration of your shop wall or roof as well as the one for minimum height of termination above an adjacent roof. Remember that if you install a system that is not code compliant, you may have difficulties with your insurance in the unfortunate case of an incident. A building inspector could also ding you. Also, don't forget that you need makeup air for any exhaust. Fortunately an open window or door is usually enough for that. I am not a big fan of motorized exhaust for forge flues, unless there is no other choice. With a 2 story rise, you should have more than enough draft under proper circumstances.
-
Vulcans have a fairly thin forge welded tool steel plate on the working surface. Usability of this one is predicated on whether this plate is still intact or starting to break off. If you tap all over the top surface and hear a noticeably "dead" spot, that can be a good indication of a failing top plate. With a failing top plate I wouldn't charge more than 1 $/LB. If the top plate is intact, in this condition, you may be able to get between 2 and 3 $/LB (though anvil prices do seem to be starting to drop again).
-
You might also want to consider going the cannister route and using 1095 powder (you could even "San-Mai" that around a 1095 core as well). A Western style heavy cleaver is going to take a bunch of stock. An Eastern style, light vegetable cleaver considerably less. I'm one of those who likes to switch to a lighter hammer to set welds. Two reasons for that. First, in the excitement of getting my first weld pass to stick, I want to force myself to use a lighter tap that sets the weld without knocking it apart. My 1.25# ball peen does this nicely. The second is that you can certainly make lighter blows with a heavy hammer, but it either takes a bunch of effort to hold back some of the weight, or requires you to choke way up on the handle (which gets your hammer hand awfully close to the screaming hot metal and spitting flux). I suppose if you are using a 2# hammer for general forging hammer control won't be that difficult, but I tend to use a 3 or 3.5# hammer for the larger stock manipulation I typically have when I forge weld (pattern welded billets, axes, hawks...). Someday I hope to get into more ornamental smithing, and this may all change. Do what works for you.
-
Very nice work for your first forged blades. The proportions are very well thought out, though I usually prefer the heel to be a little closer to the front of the bolster. The poured bolsters and caps are particularly nice. Did you dye the antler yourself, or did it come that way?
-
Thanks Frosty. I got the hammer used with (3) dies (flat, combination, and "ball shaped"). I found the hammer too small to effectively use the combination dies on any reasonable size stock. The flat dies were better, and if I make more tooling I might try using those again, but the distance between dies on this little hammer is kind of short and the hammer hits with pretty quick, light, blows - so not ideal for using tooling. The "ball" shaped ones are supposedly omni-directional or some such thing. I suspect would work pretty well for sheet metal work, but I don't really know how to do that (yet). I've thought of repurposing them into a kind of Japanese knifemakers set, but haven't gotten around to it. The dies I've made the most use of are a set of their drawing dies that I bought direct from Anyang. These work a treat on stock up to around 1.5" diameter. After that it is a little slow going.
-
Two by hand and two using my little Anyang 33. Could have done it all by hand, of course, but why not use the tool if you have it. Someone better with a power hammer (or maybe a bigger hammer) could probably get it down to two heats, but I'm hardly an expert.
-
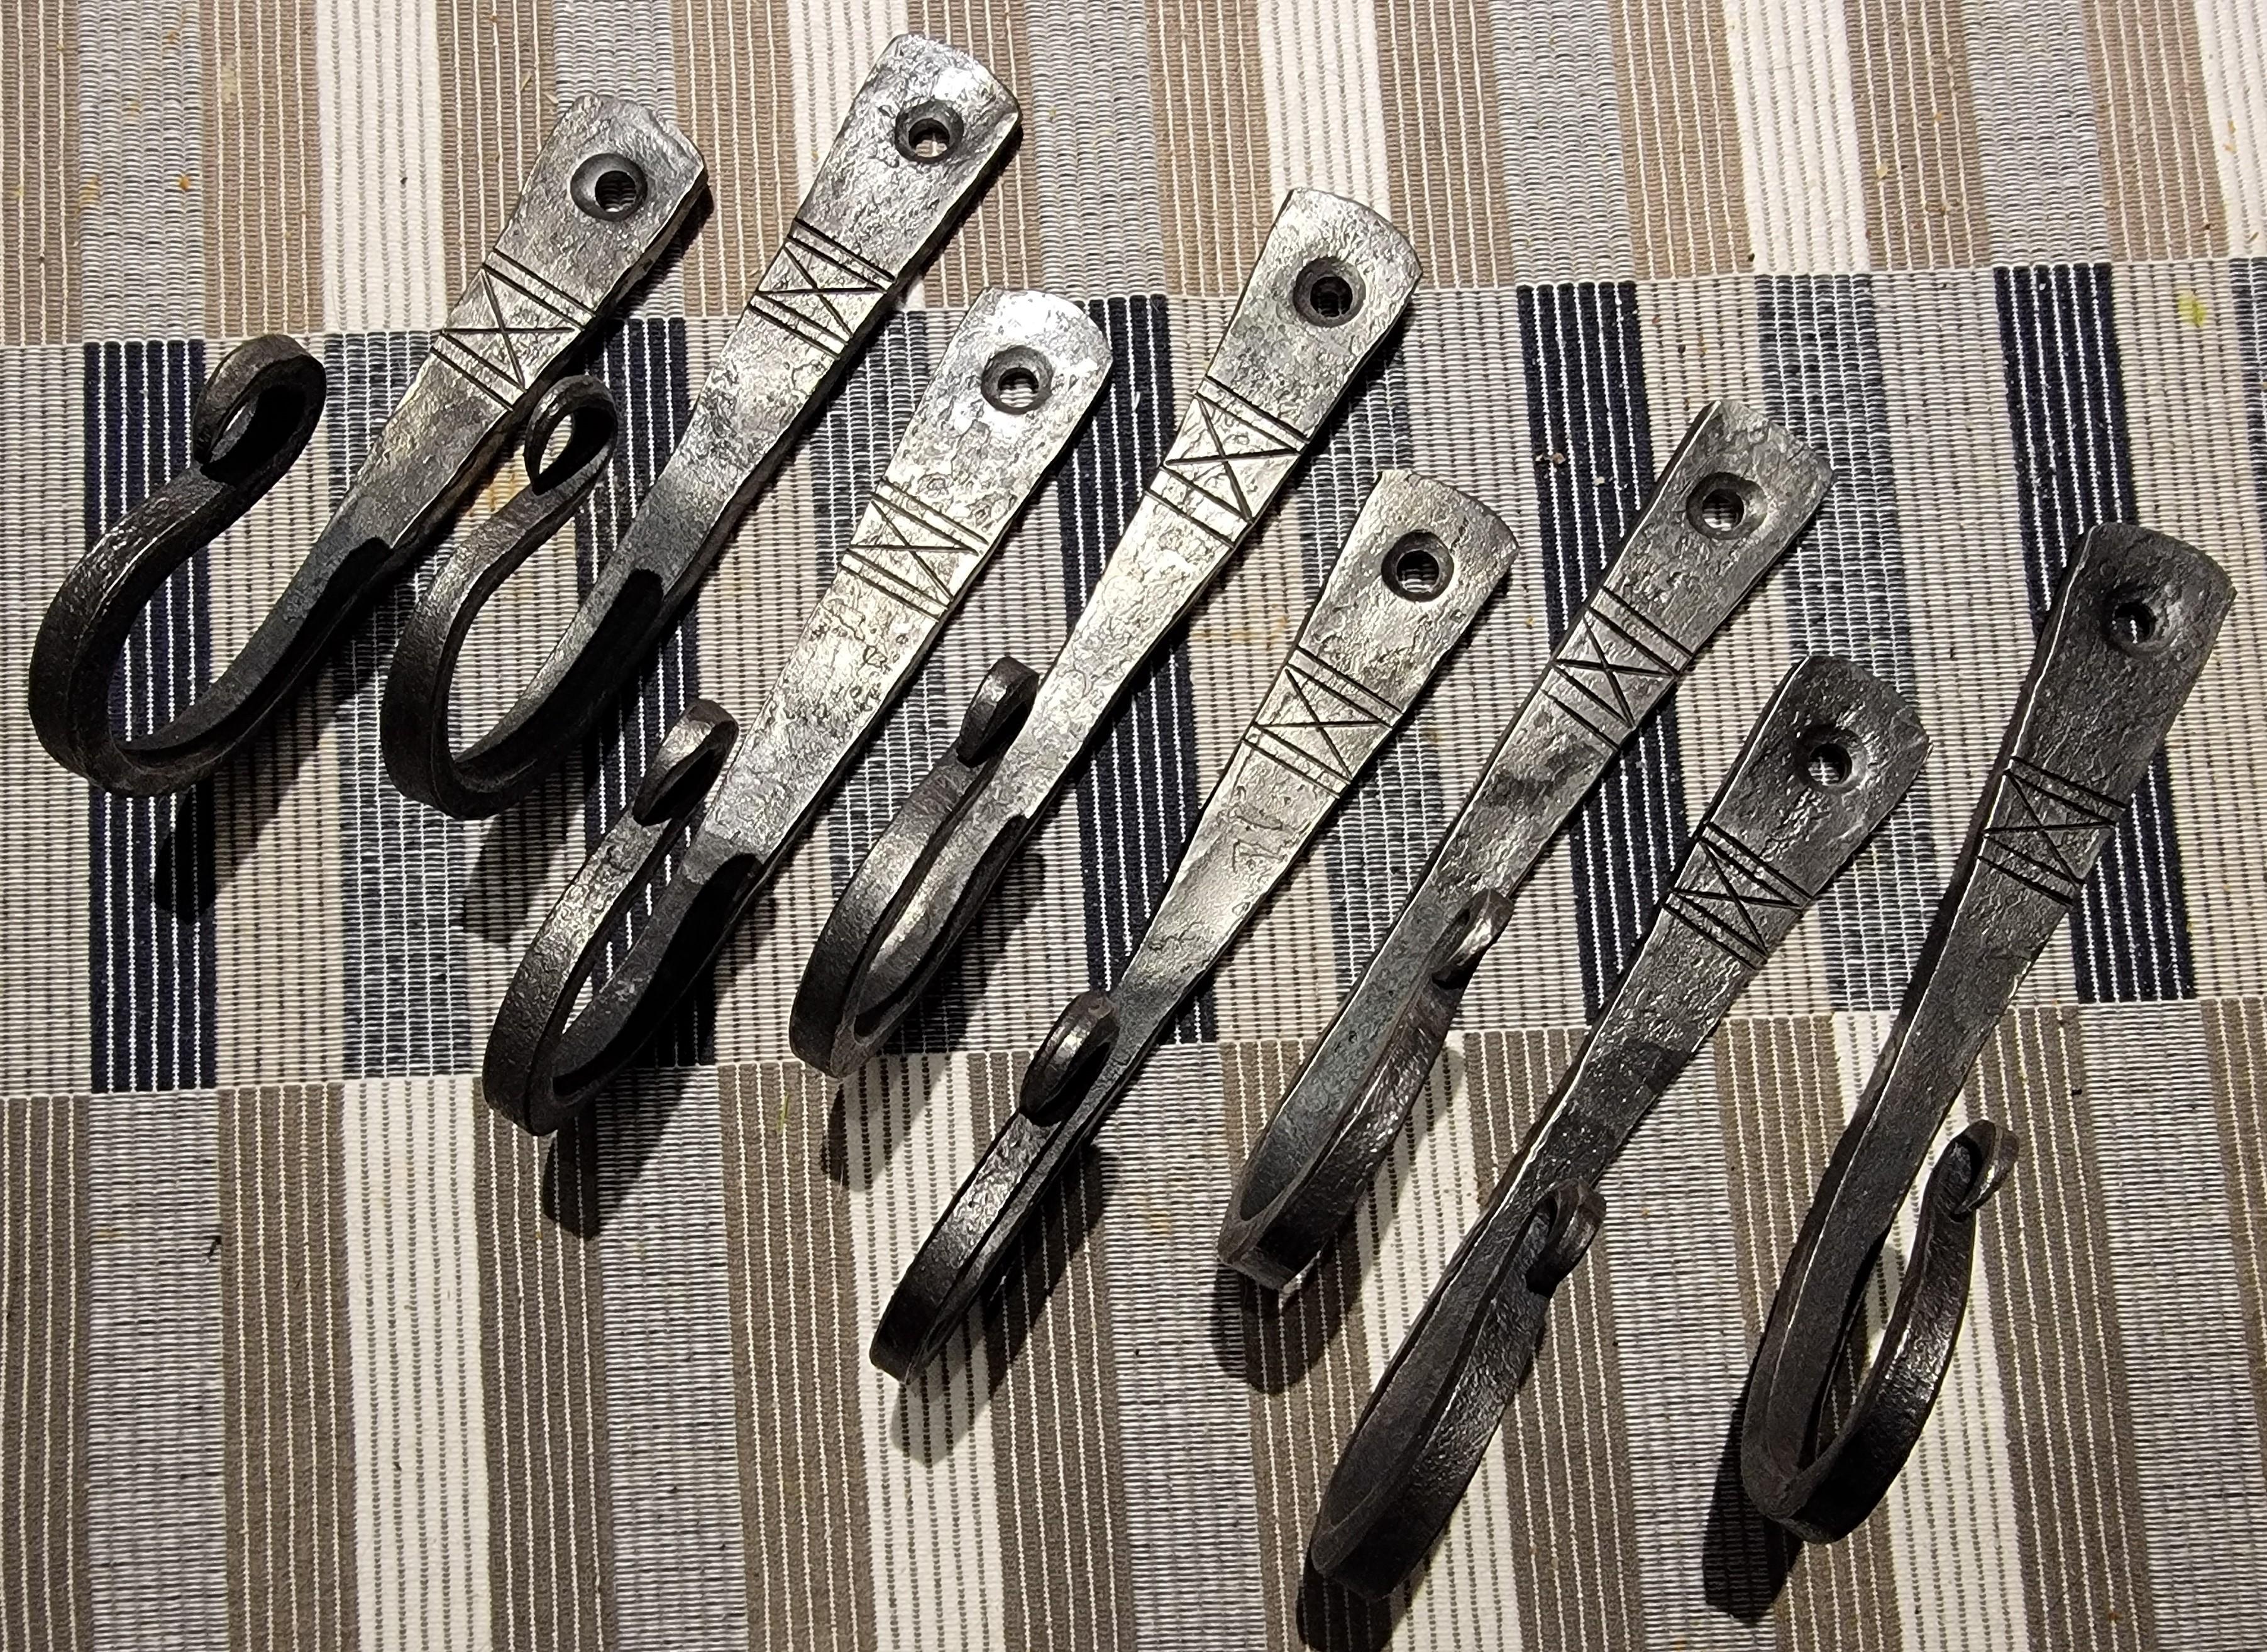
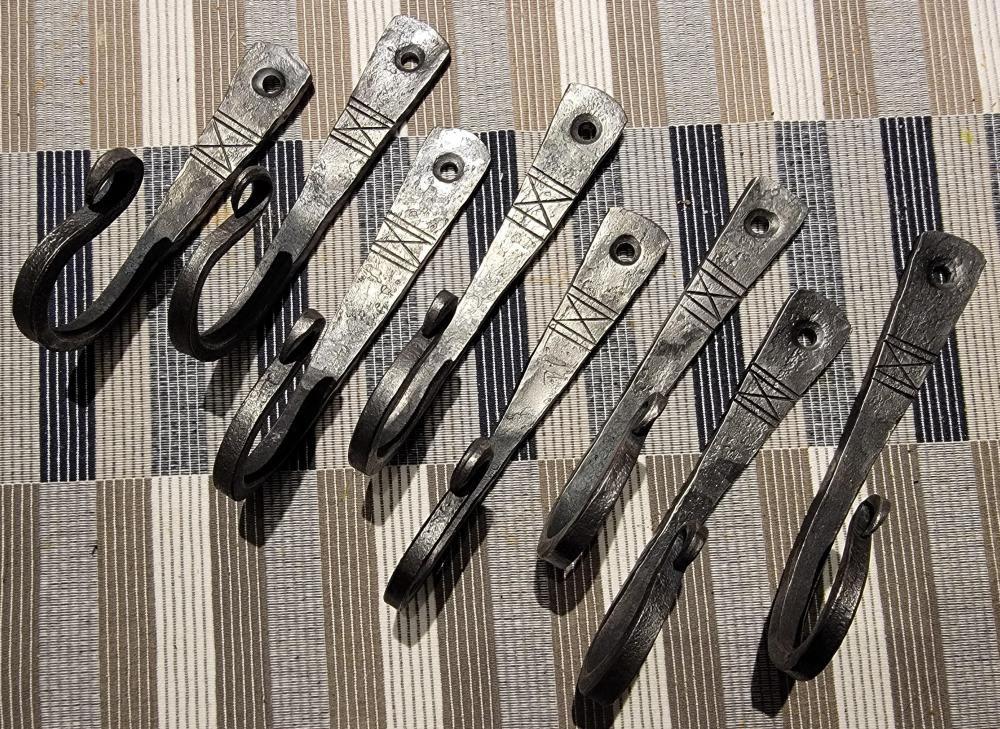
Just a quick run of hooks to give to my team as end of year holiday gifts. Simple and effective. Forged from 4" of 1/2" square stock (because that was what I had). Tried to keep it down to (4) heats, but at times had to add an extra one to true things up and set the divot for the drilled hanging hole.
-
Nice work JLP, as usual. Even the failures look viable, though not up to your high standards I suspect. Going for some form of ornamental rivet? That will be fun.
-
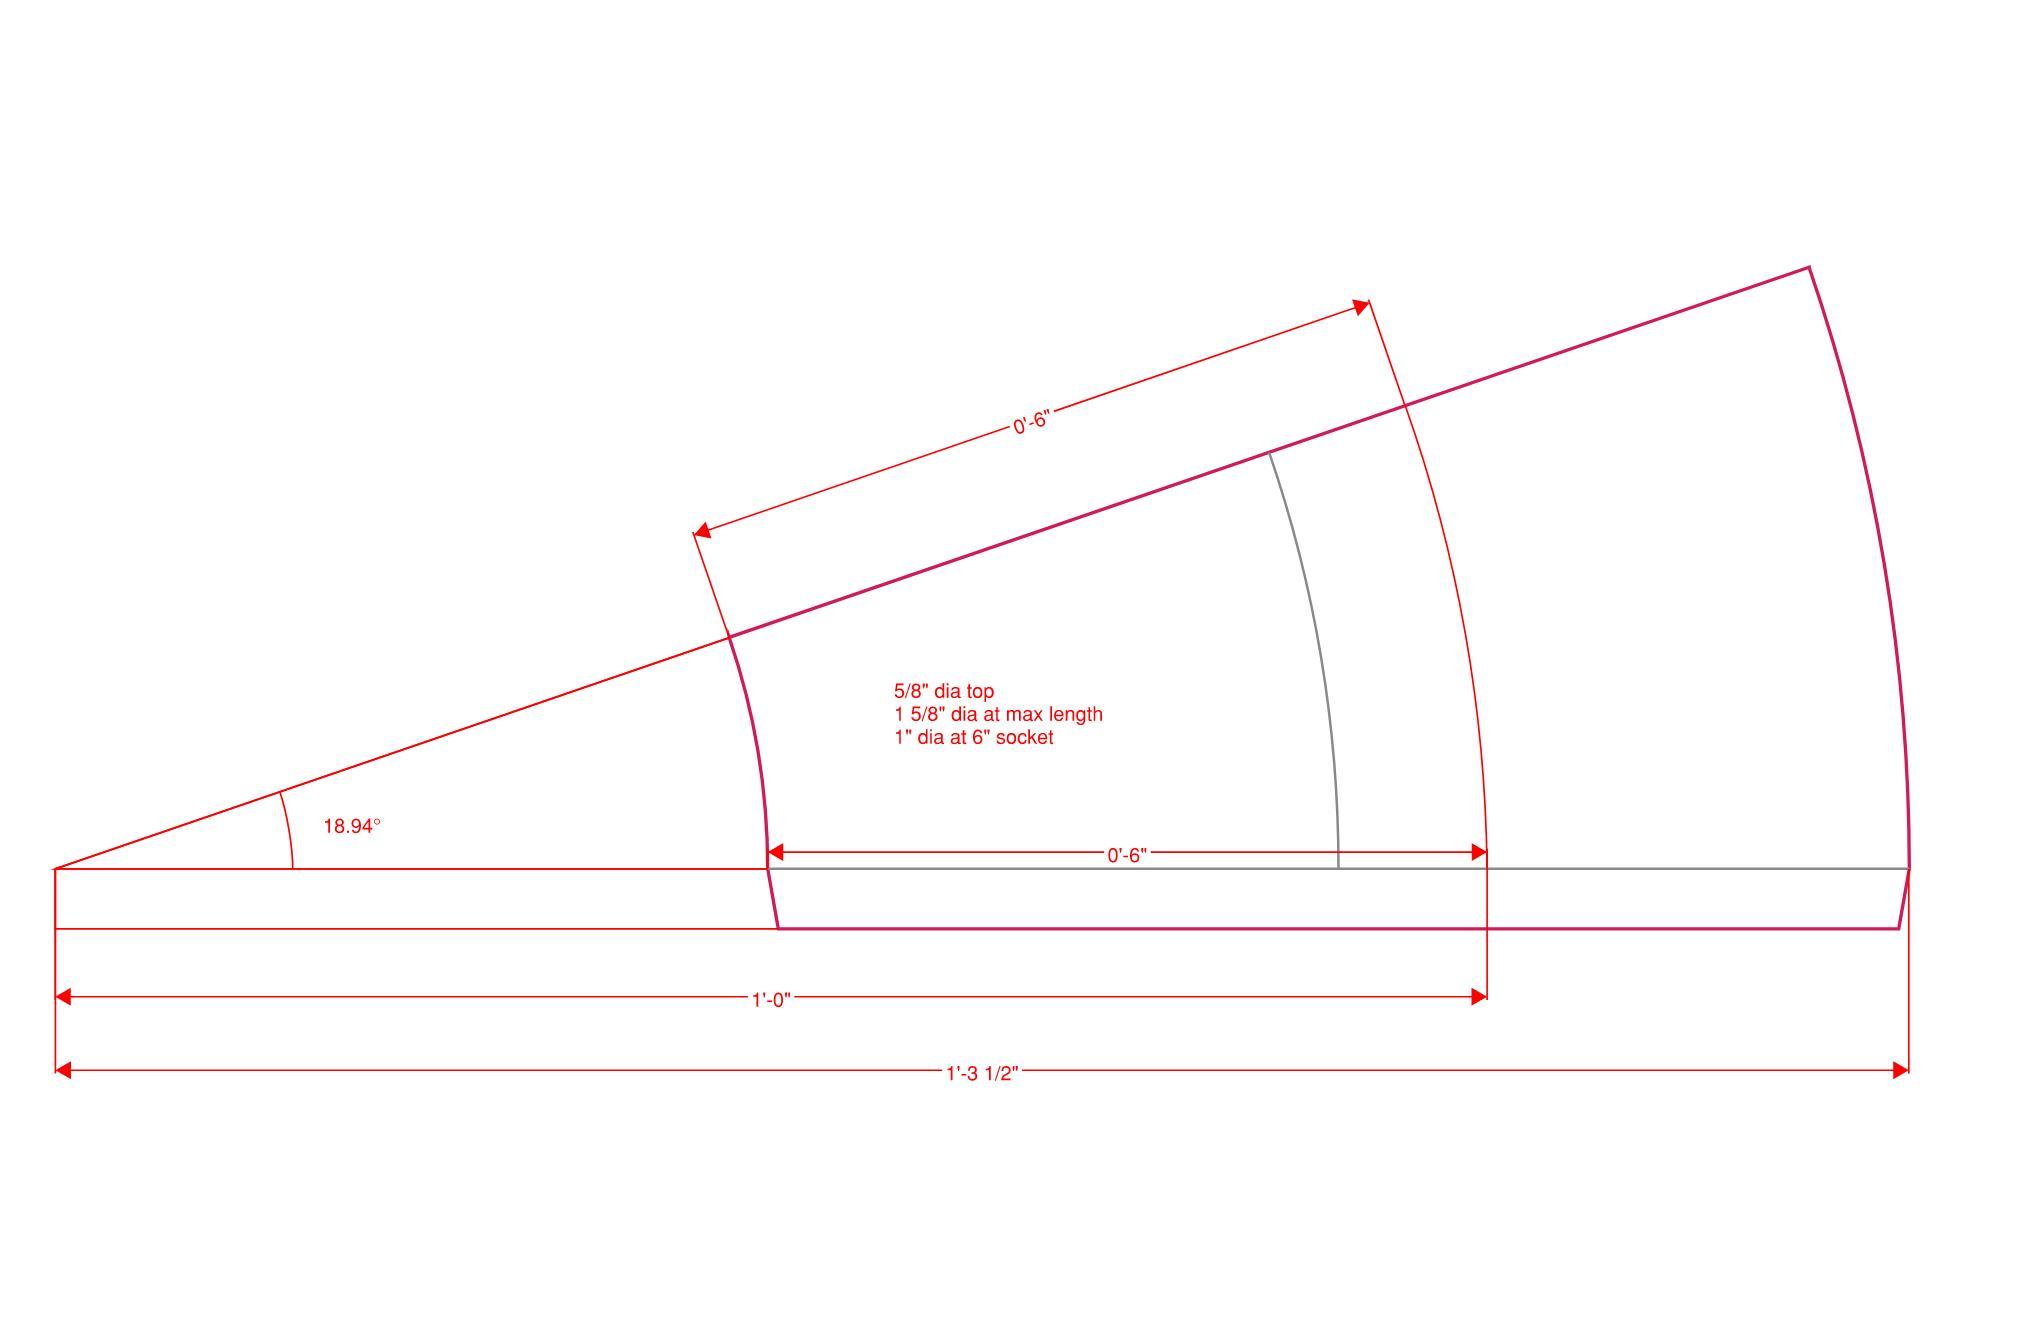
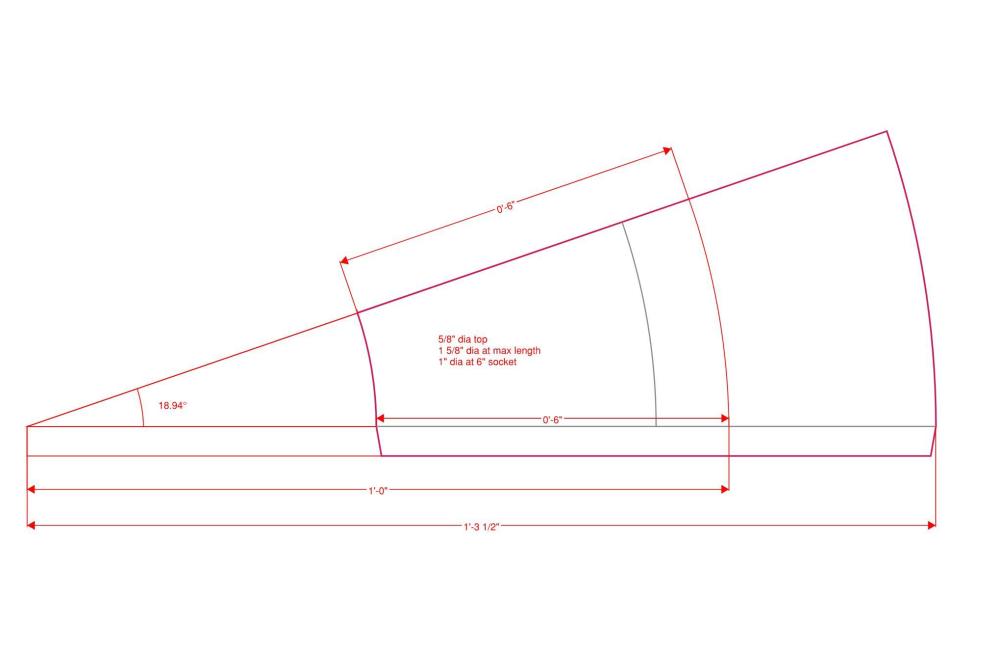
George, Good questions. The socket was made separately from a sheet of ~3/16" thick wrought iron which was then forged to the assembled spear blank. The core of the blank needs to extend past the blade around 3/4" with a stub tang. This then gets hot fit into the top of the pre-made socket right before forge welding the final assembly. Note that the transition between socket and blade becomes much easier if you have the core section of the blade, at least, slightly larger than the diameter of the OD of the front of the socket. That was the major mistake I made in my piece, and resulted in me flattening the center of the spear blade rather than having the full central ridge I had been intending. A flattened center is still acceptable and even traditional, I just had to pivot during the grinding to maintain proper distal taper. If you use wrought iron for the socket be careful of the "grain" orientation of the wrought. Unless extremely well refined, it should be set to wrap around the circumference rather than longitudinal. This helps to limit splitting along the socket length with the relatively tight bends required. Some of the smiths in the class elected to use forged black steel pipe instead of forging a socket from sheet when they had difficulty with the latter. This was a lot simpler, and afterwards it was hard to tell the difference. A decent swage block or bottom swage is your friend for this. I brought the attached pattern with me that I drafted up in advance (Print to scale on a 11 x 17 sheet. I'm not sure if the server will accept attachments, I will try to also include an image). Please note the overlap "tab". I forged bevels on each side of the socket to gain a little extra width for that overlap and made sure the "thick" sections overlapped, and the bevels served as scarfs. The socket should be forged a little smaller in diameter than the eventual plan to allow for some adjustment as the process goes on. I ended up using a 5" socket length due to the heat treat oven restrictions. Please note that this socket design was made to match my bick and mandrel. Feel free to change to suit yours. Overall spear head length, including socket, is just over 17" if I recall correctly. Look forward to seeing yours. Socket template.pdf Frosty, Agreed. This is my favorite type of vacation. I felt like I came back with new skills that I can apply for the rest of my time black/blade smithing. Don't be jealous, just do it. There was one guy in the class that must have made a bunch of money along the way because he said that he tries to take between 10 and 12 classes per year! Now that made me jealous. I'm lucky if I can fit in one or two. I think one version of heaven for me would be to be taking craft classes almost full time. Improving my skills, learning from new instructors on the way, and hanging with like minded individuals. Certainly the students all came from different walks of life, and had widely different perspectives, but all had a true passion for the craft (which shows in the final products).
-
Thanks again for the feedback. Really appreciated as I'm not sure my friends' and coworkers here understand or appreciate what was involved. Frosty, I try not to consider the overall cost of the vacation to keep from being depressed. The school rates are in line with similar others at around $830 for the week including material fee. Then there were hotel fees, meals, travel expenses... I'm pretty certain I could have commissioned a spear head of equal quality for what I laid out for the week, but for me it is more about the experience than the end product. I got to work with a great group of guys and learned a bunch about what I am capable of making. Next one will be even better. The transition between the socket and spear body is difficult to execute well, and basically sets the stage for the rest of the spear geometry. I was lucky enough to get to handle a fair number of original Viking artifacts (several spear heads and one small axe) at the class that were brought in by a collector. Even with the centuries of corrosion I was able to take tracings and some thickness measurements. For the next I will try to be more true to the originals, particularly in terms of the mentioned transition and associated distal taper.
-
Thanks for the feedback. Unfortunately not a patch on the phenomenal Sutton Hoo sword, but it was only my second multi-bar billet, so I still feel pretty good about it. The socket was welded using a coal forge, swage block and a "cold" mandrel. I did use the bick I forged for final shaping, but the mandrel I made to match it was just a little too large in diameter (that will go back in the forge soon, or perhaps I can figure out how to do a tapered turning on my small 1914 Dalton desktop lathe...). I ended up using a mandrel they had at the school that looked suspiciously like a repurposed bull pin. It was nice because I could use it with a glove and put it directly into the socket to pickup the stock while still in the forge to not lose any time. The whole class took a full 5 days, running a solid 8-5 and working hard. There was a lot of prep work to get the various elements prepared, and we worked together on some of those. I'm not sure I could do it much more quickly at home, particularly without the big power hammer or hydraulic press they have there. Probably would speed up a little once I make more of them. Emiliano mentioned that I was pretty deliberate in the shop (which probably is a code word for slow), but I don't mind being methodical with such a challenging build.
-
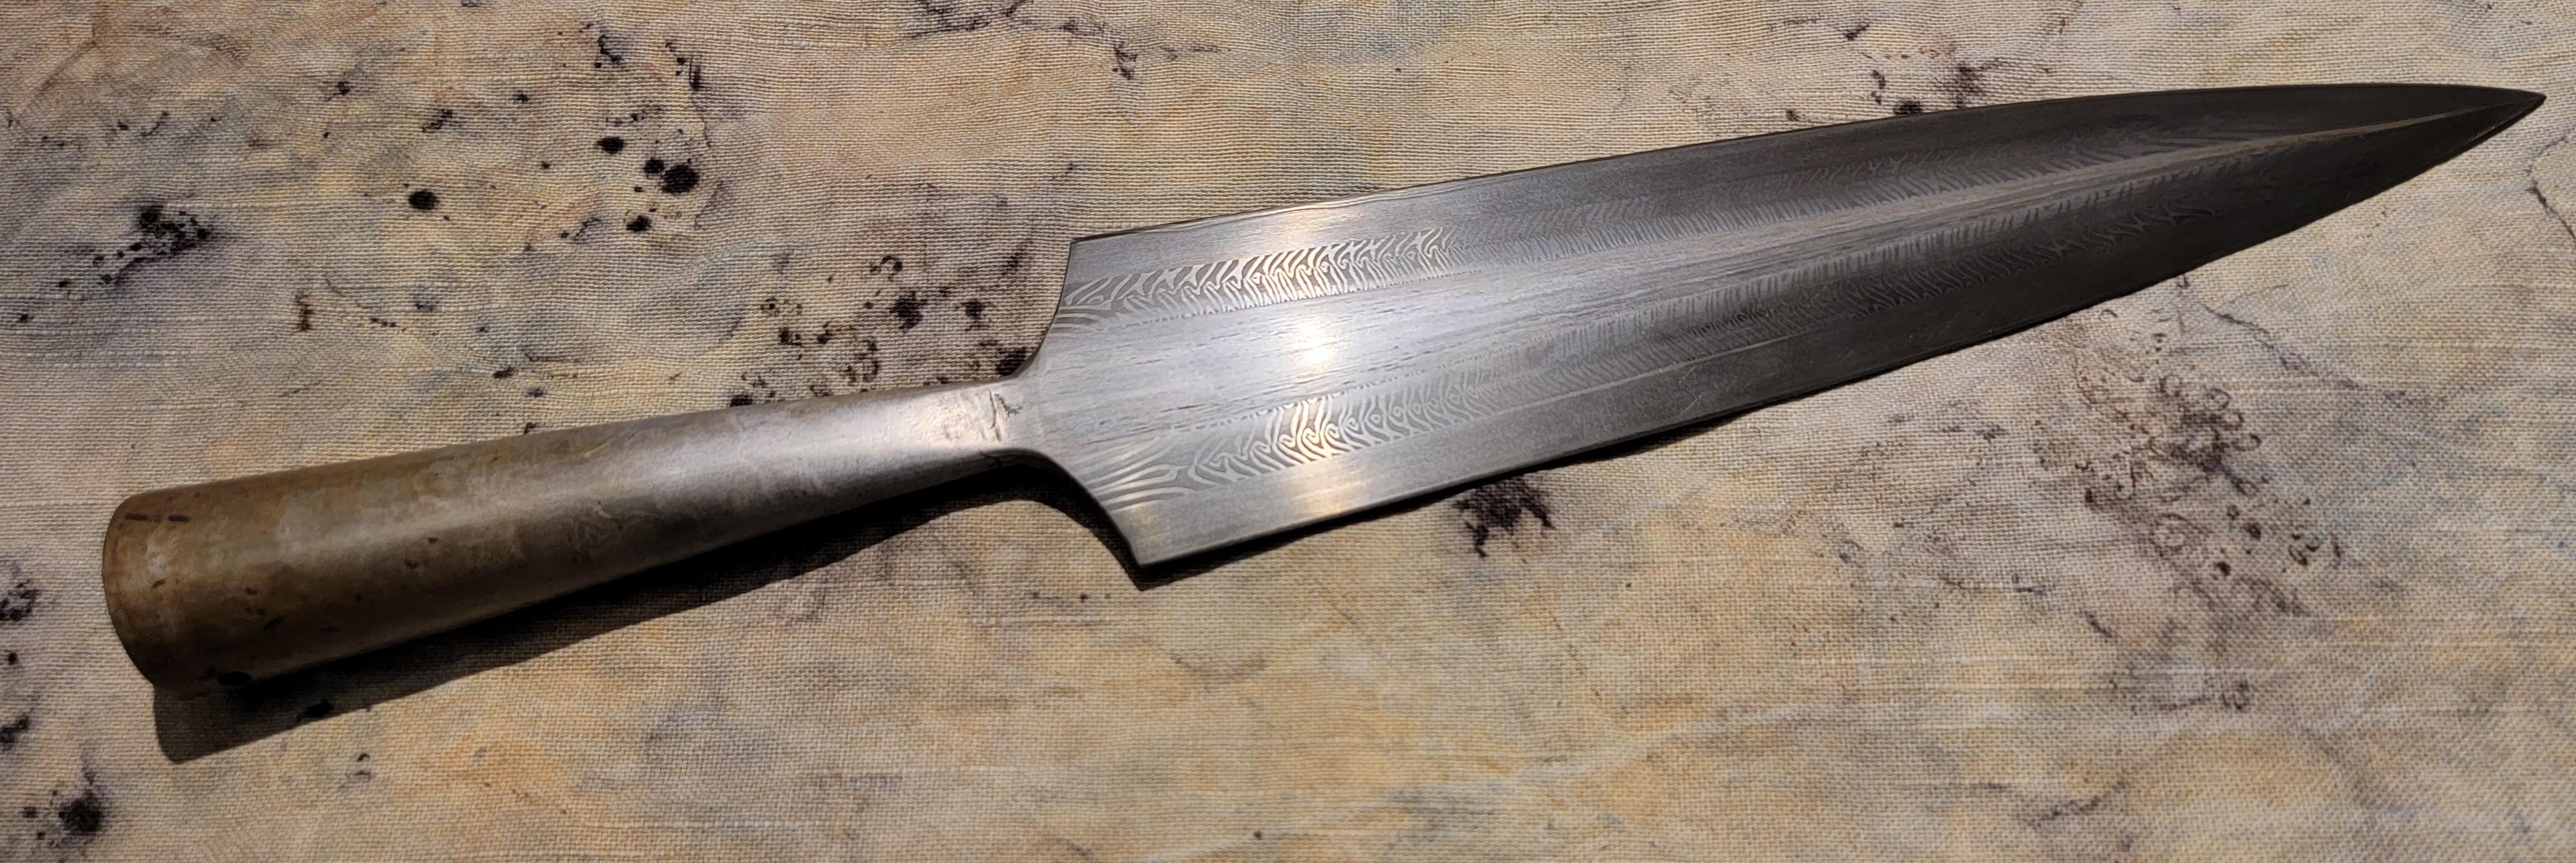
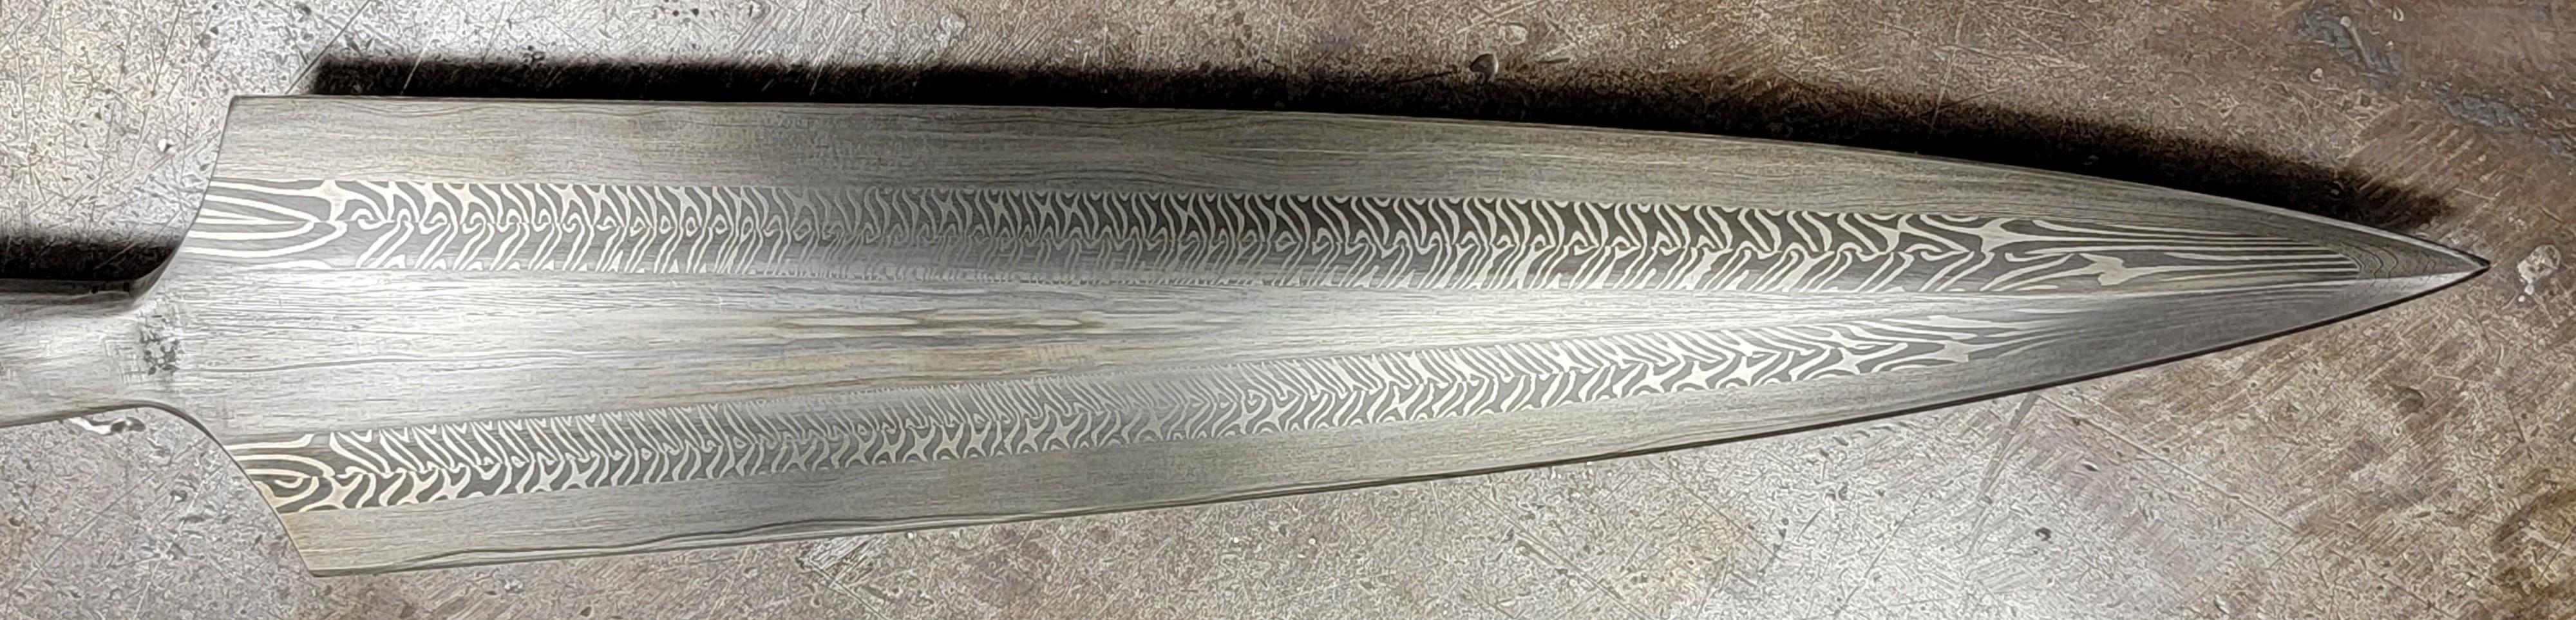
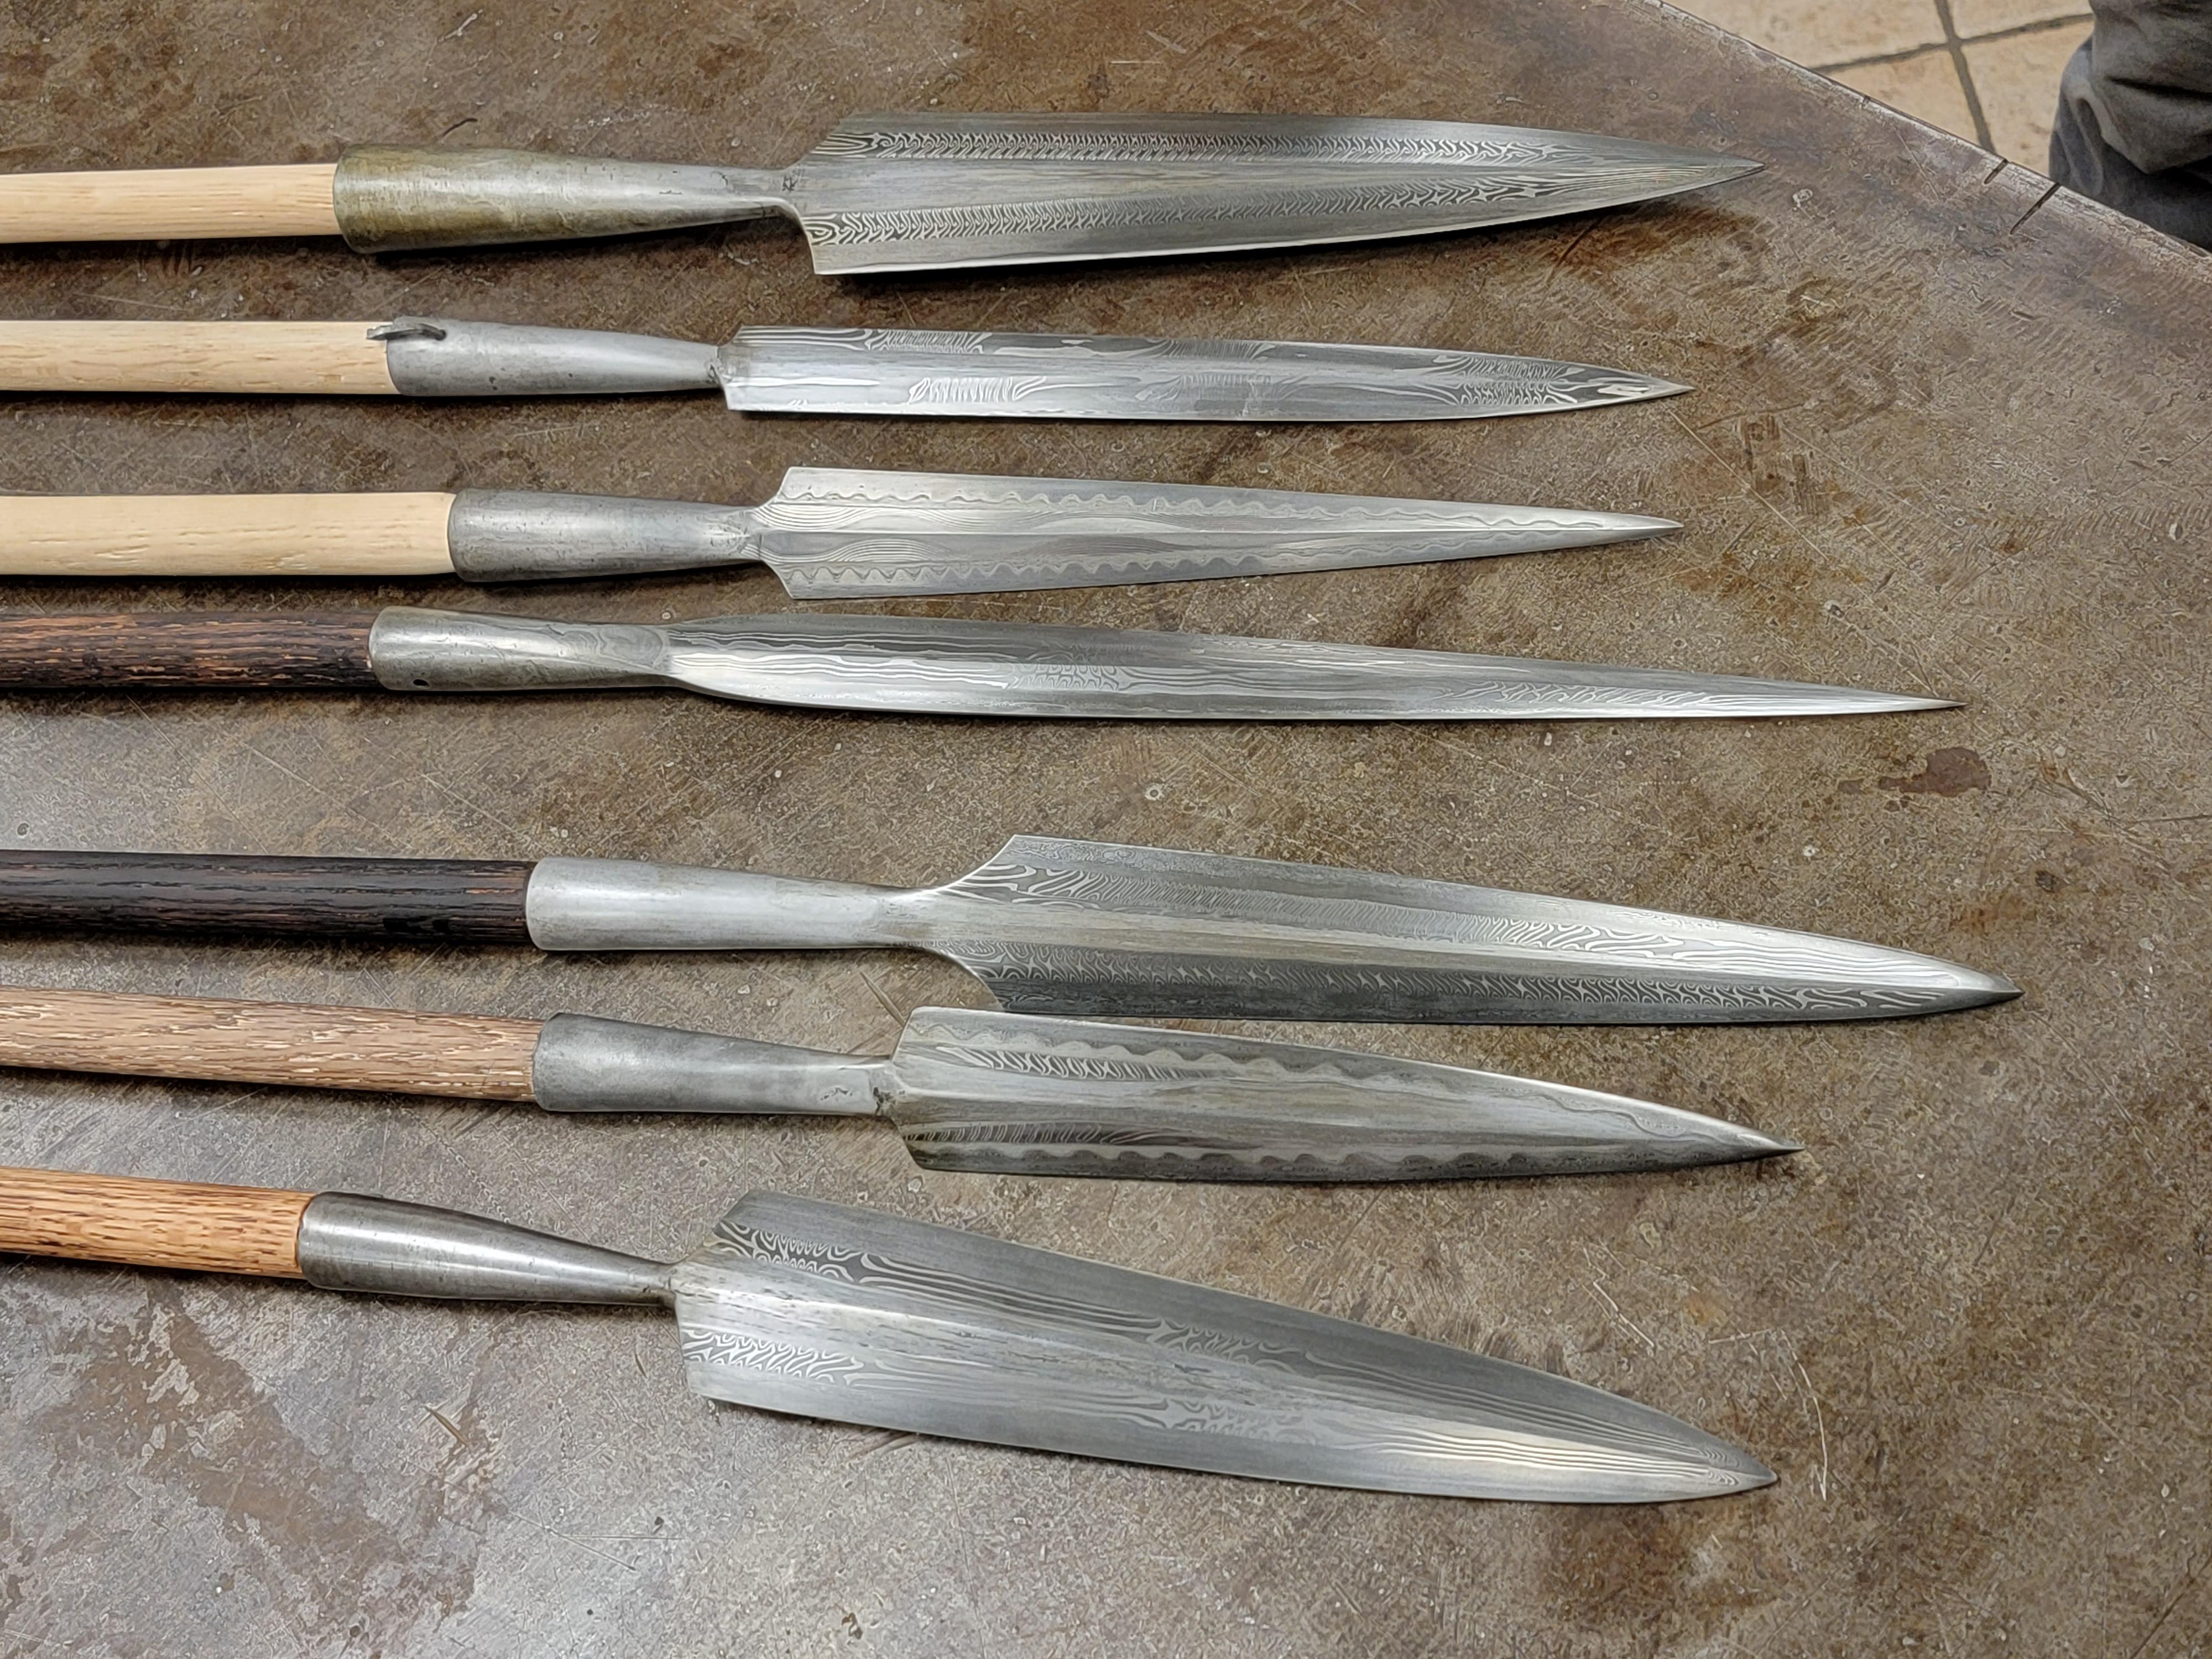
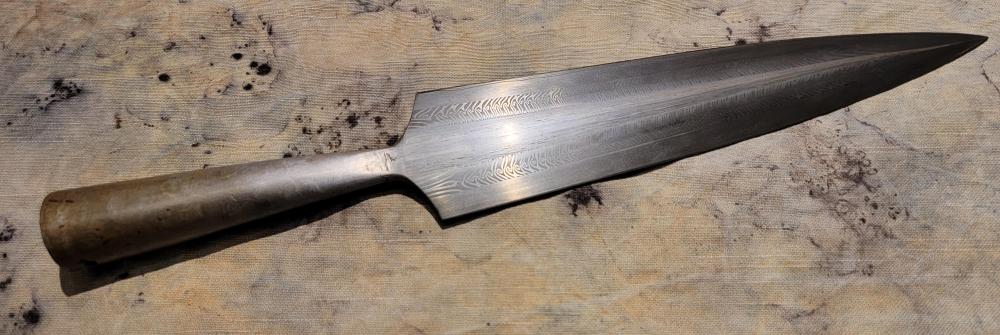
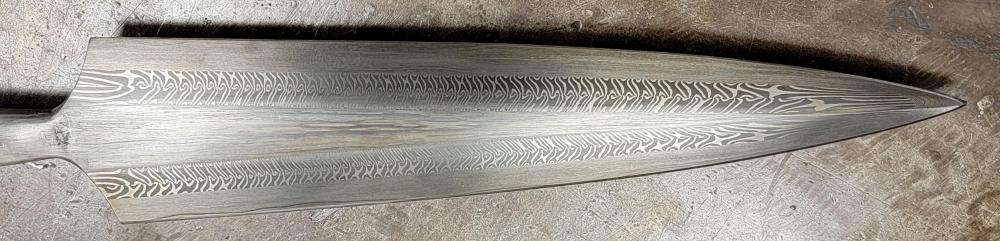
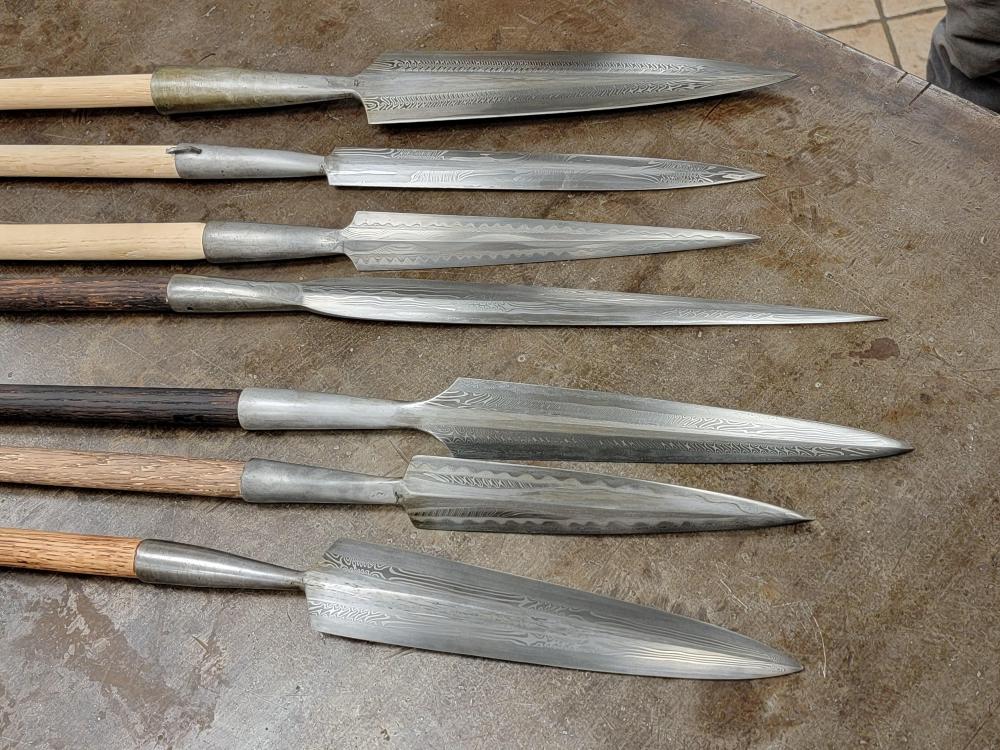
Just got back from a great class at the New England School of Metalwork. The guest instructor was Emiliano Carillo, a very talented young smith who has been doing fantastic work in period reconstruction pieces. The project drew inspiration from multi-bar Viking work and all participants developed their own versions. Here is mine: Core and socket are forge welded wrought iron, (4) twist bars are 7 layer 1095 and 15N20, and edge bar is 300 layers of 1095 and 15N20. I went for a fairly simple pattern, as this was my first try at a full forge welded spear and I felt that was enough of a challenge. I also brought some wrought from home for the socket, which unfortunately wasn't all that figured, but it blended fine with the core and welded nicely. Wanted to forge out the blade further, but ran into concerns with the size of both the heat treat ovens and the etch tank. In retrospect I should have just forged what I wanted and heat treated in the forge. Was worried about tempering. Here is the rest of the class (mine is on top):
-
Best suggestion for improving efficiency I can give based on your narrative is to cast up some insulated door panels. 1.5" thick Kastolite with a steel angle frame works great. 1/4" plate will certainly help with the radiant losses, until it heats up itself and starts losing energy...
-
Thanks all for the lovely and thoughtful responses. Sometimes all we can see in our own work is the flaws. Good when it spurs us on to work harder towards our goals, but it can also be disheartening. I also applaud the range of skills, interests and perspectives that we enjoy on this forum and in the blacksmithing community in general. I appreciate the support.
-
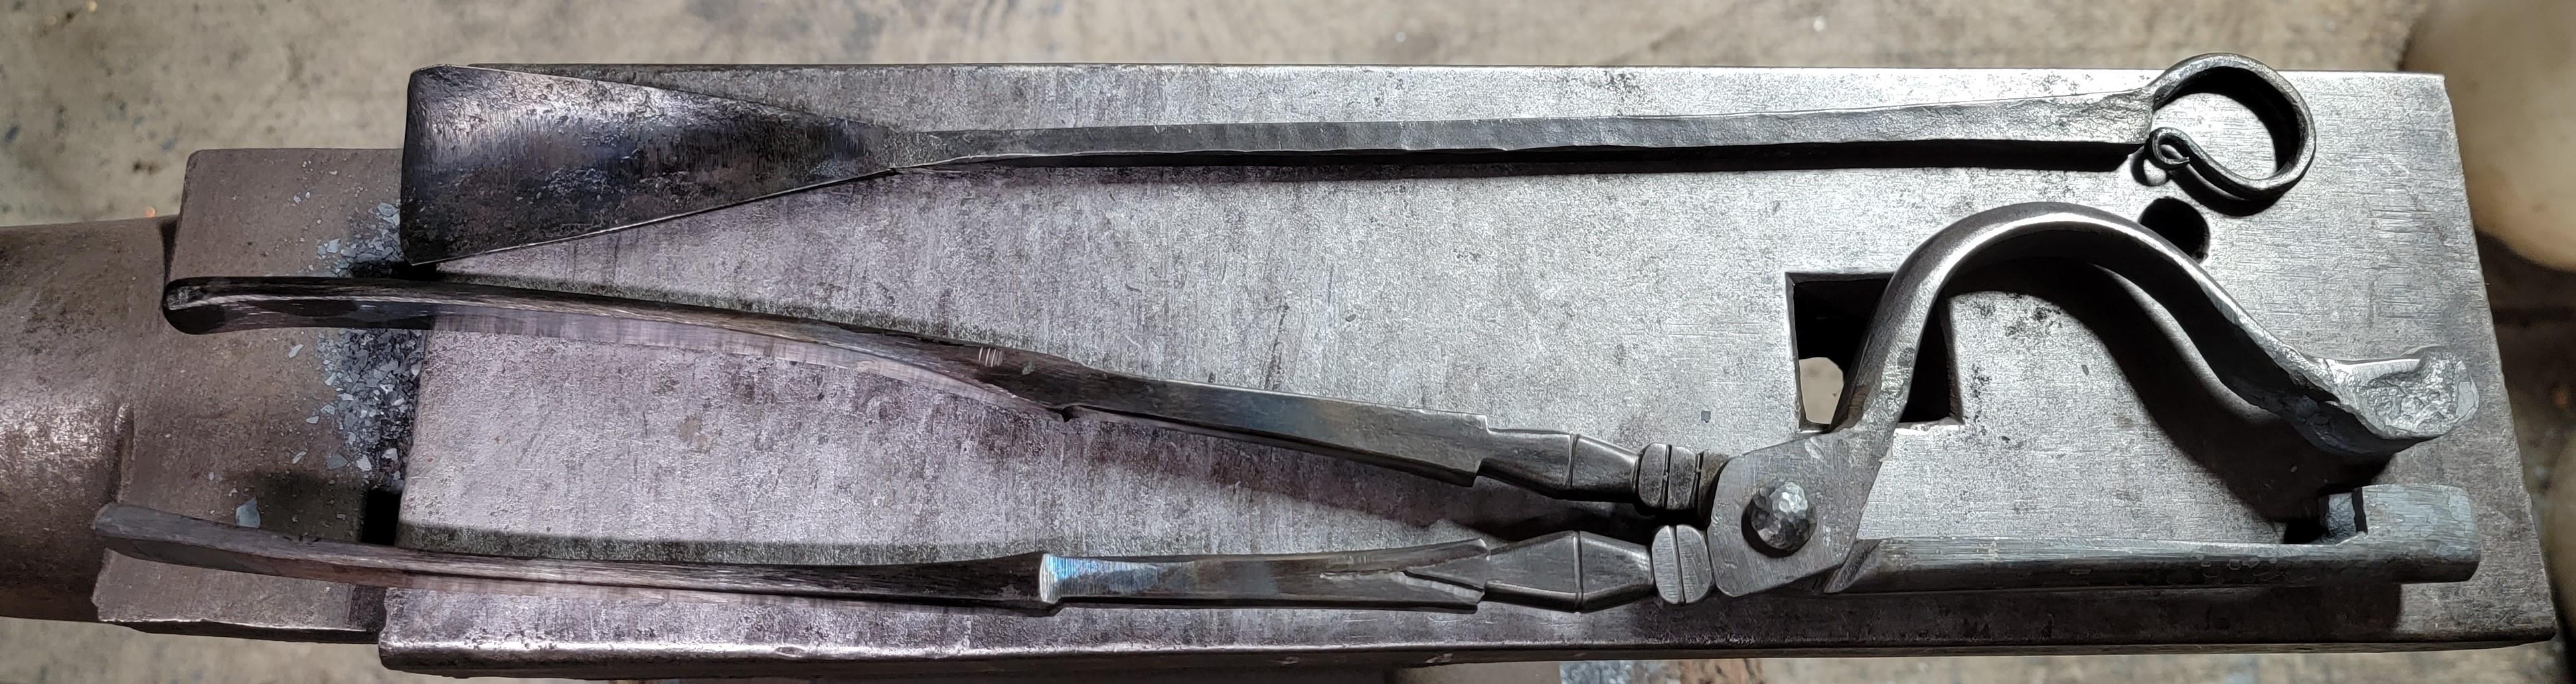
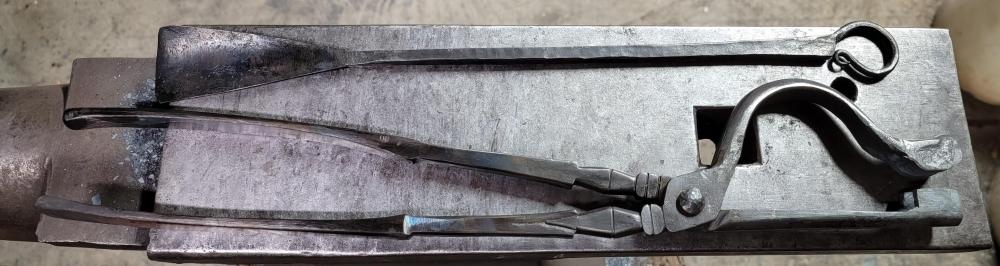
Sorry, these are bladesmithing tongs that are similar to/inspired by the ones that Matt Parkinson makes. I just wanted to give him credit for the basic design.
-
I also suspect Emiliano will have everything all worked out and I will follow his direction. However, it is a full class and I am trying to bring extra tooling for myself so I won't experience a holdup waiting to share tools from a limited stock. Of course, Emiliano might pull a Jim Austin (fantastic teacher BTW) and bring enough tooling for each student to have a set, but this way if I have guessed right I'll be prepared to make more sockets at my home forge. In any case it was a good exercise to make the bick and mandrel. I'm really excited about forging socketed tools (everything from wood working chisels to shovels). This will be the Viking Pattern Welded spear class at NESM. I strongly suspect that we will be using wrought iron for the sockets and the initial thickness will be somewhere in the range of 1/8" to 1/4", but can't be sure. I agree that the thinner stock will be tougher to keep at the right temperature long enough to get to the bick, so that is why I also made up a mandrel and was asking about resists. Already packed. Don't leave home without it...
-
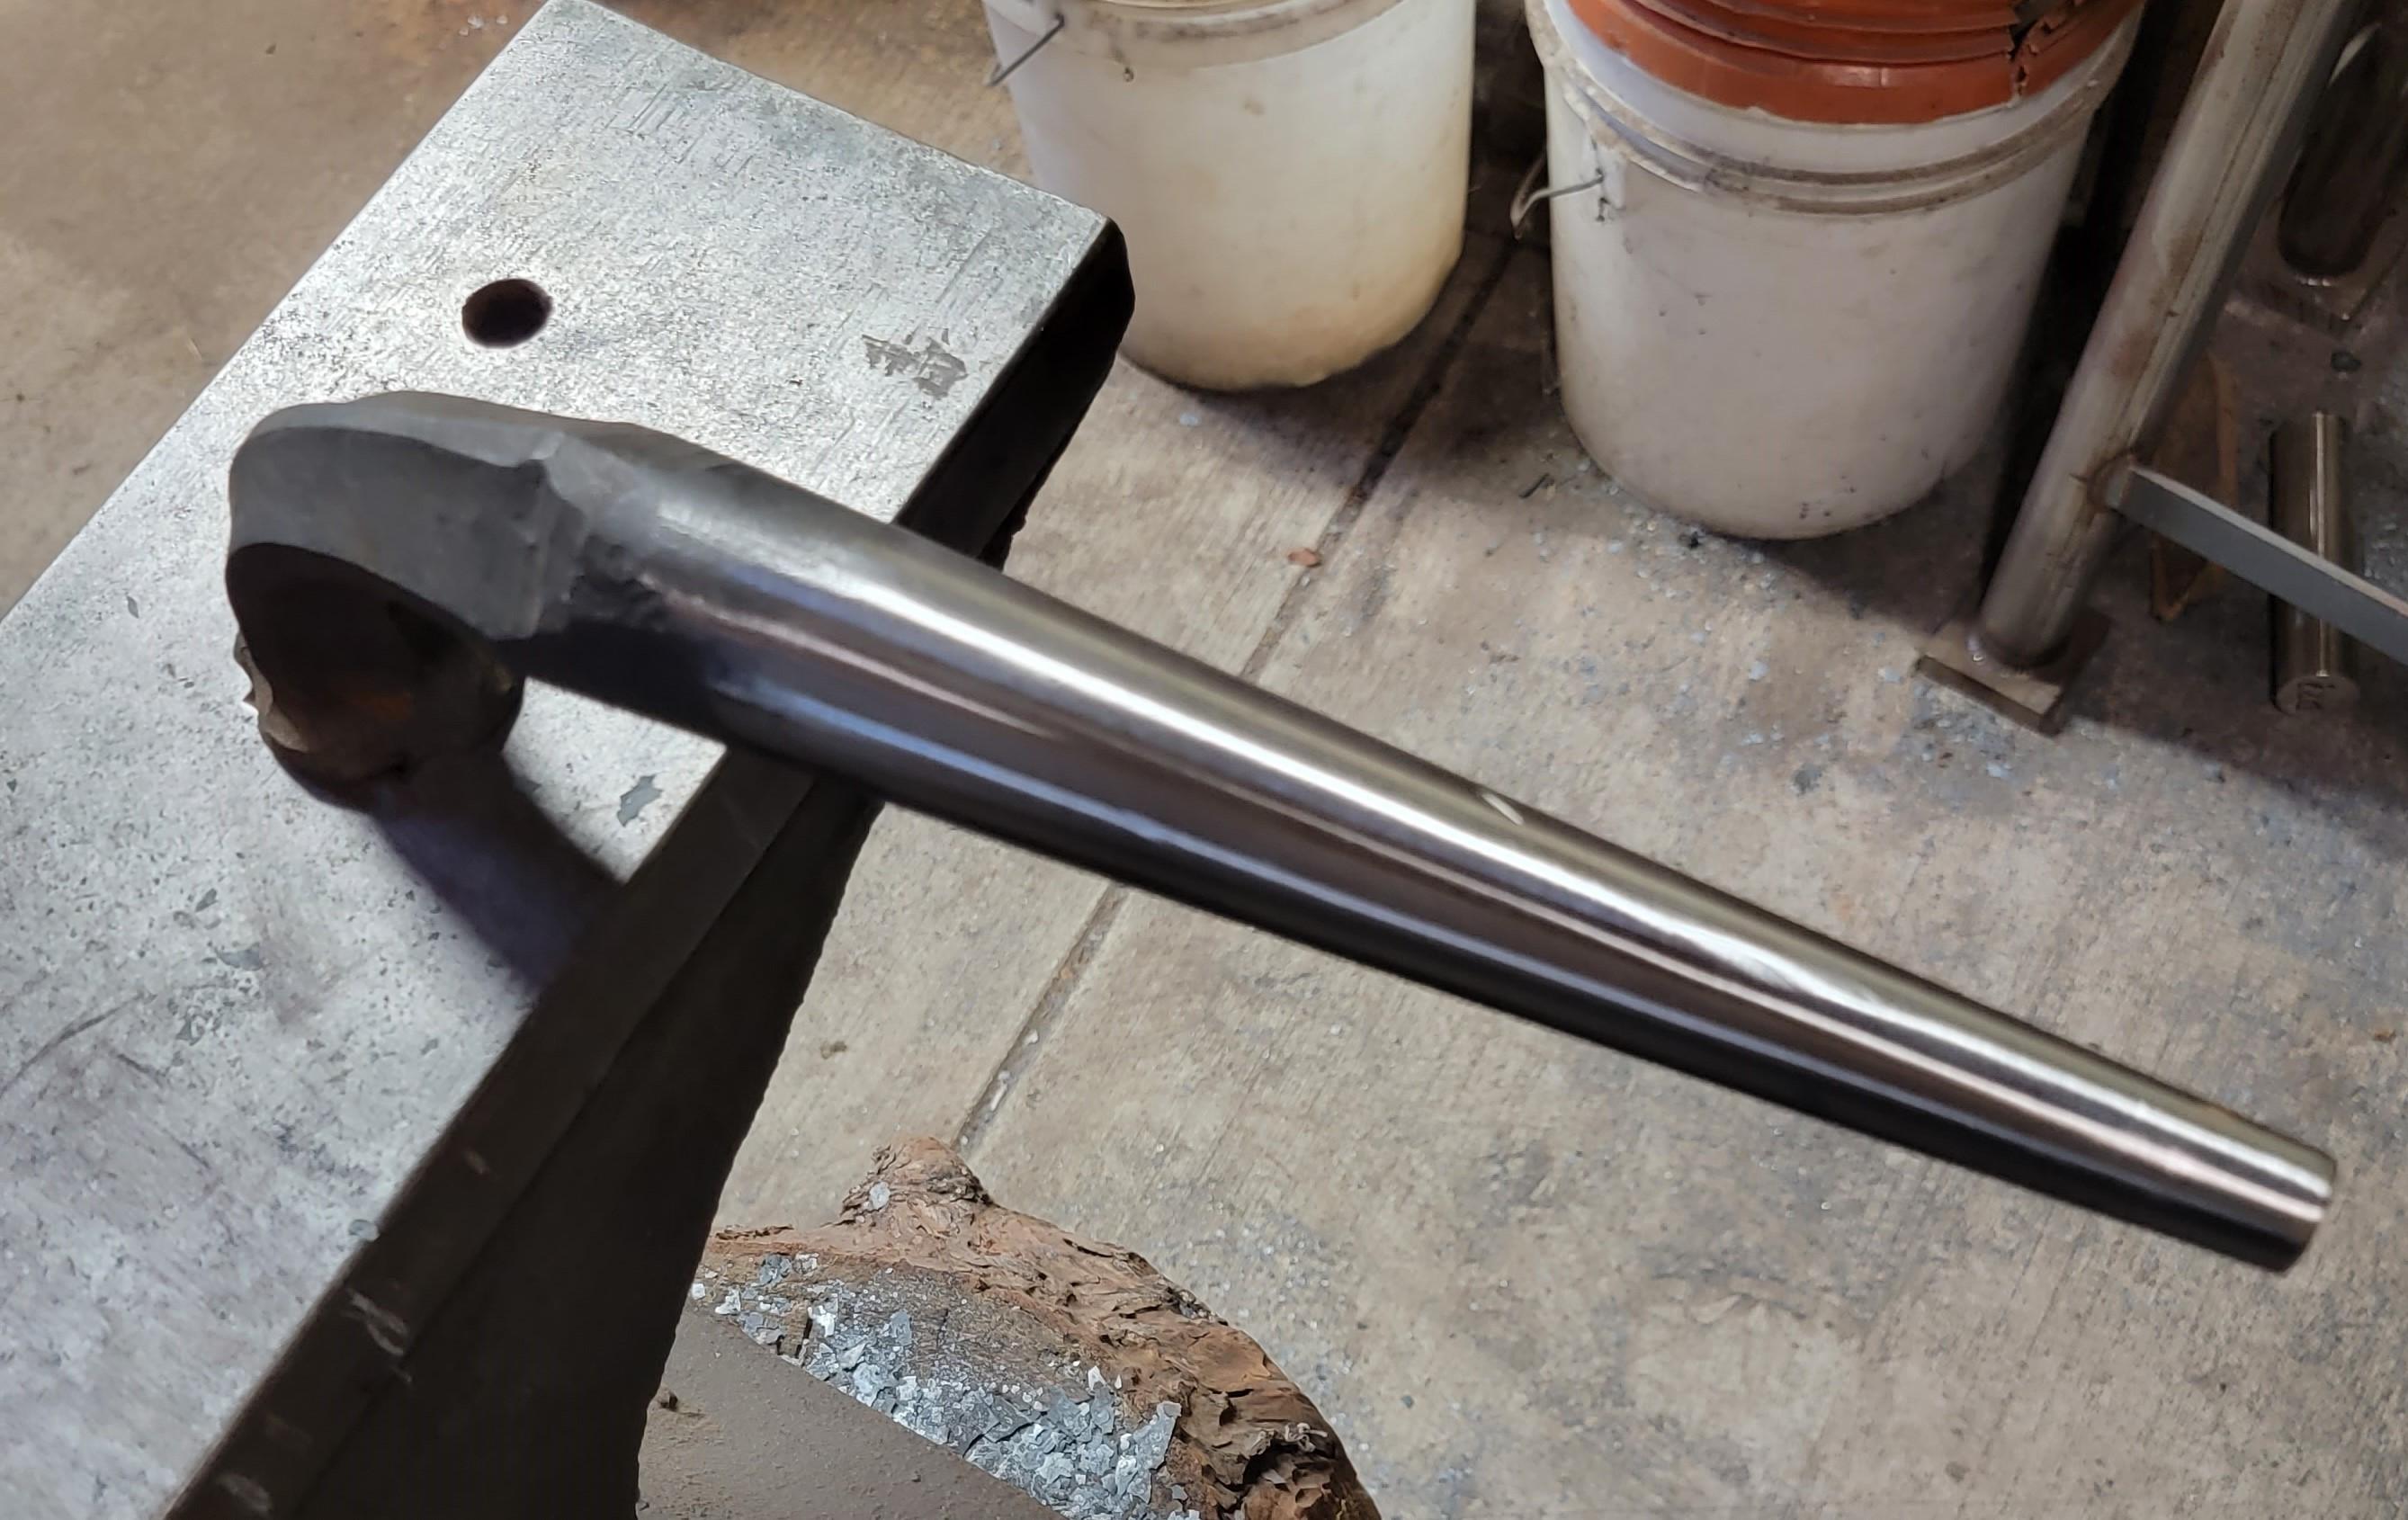
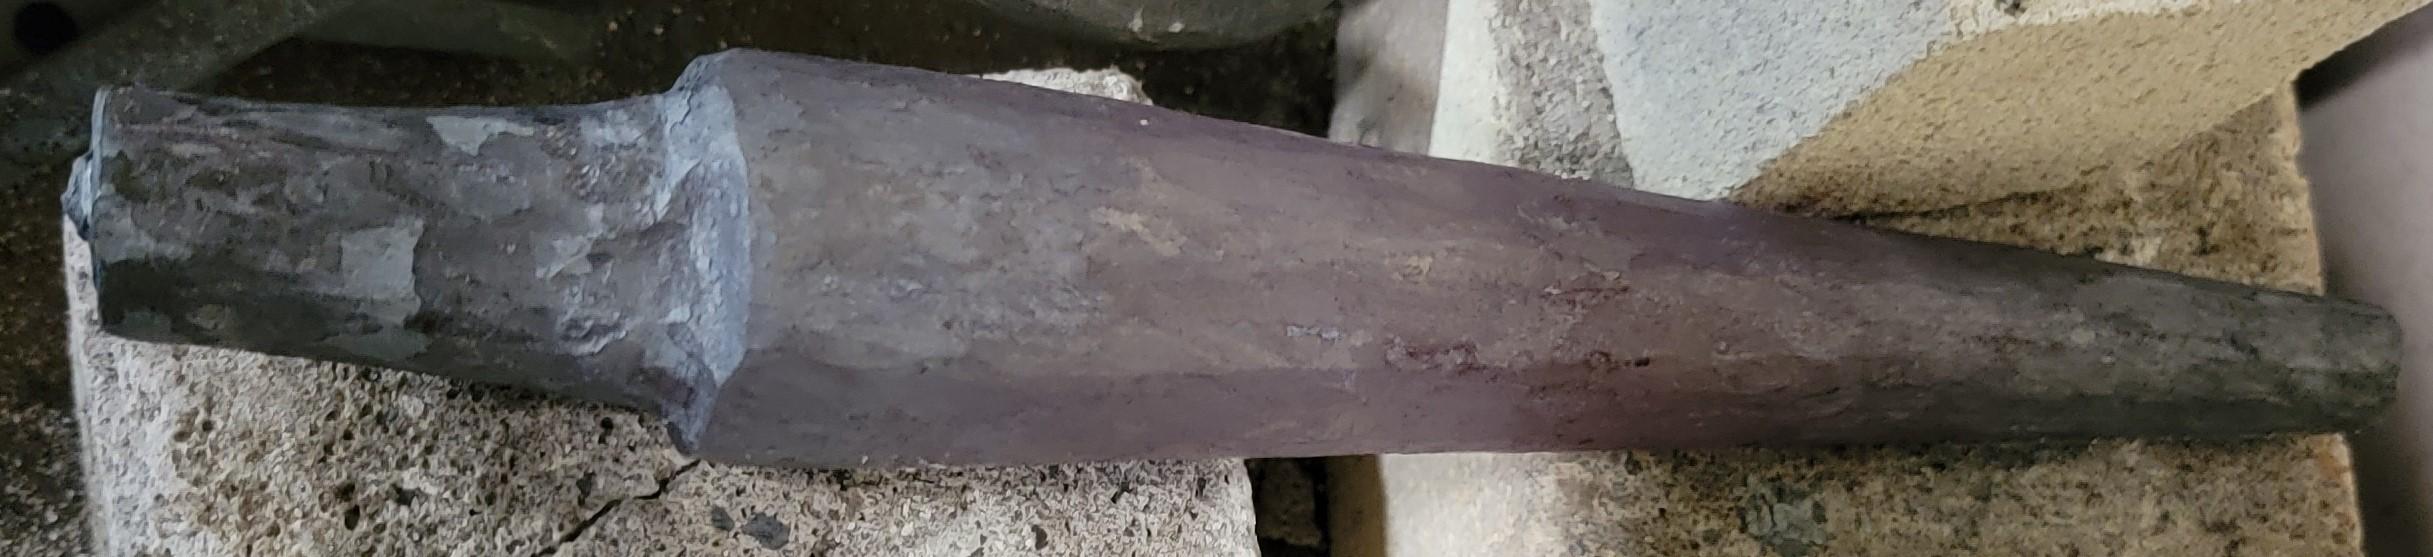
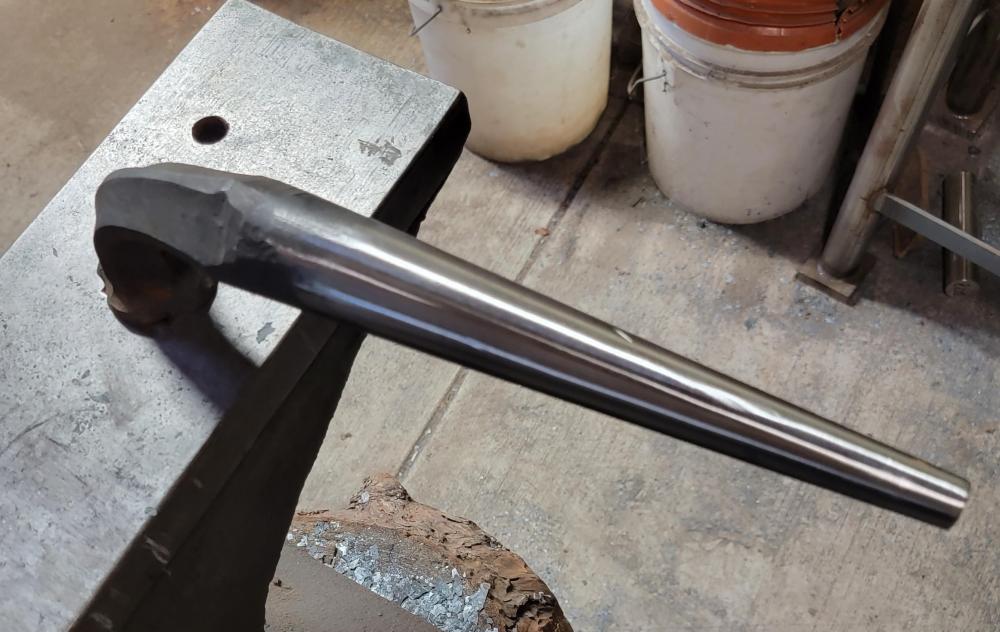
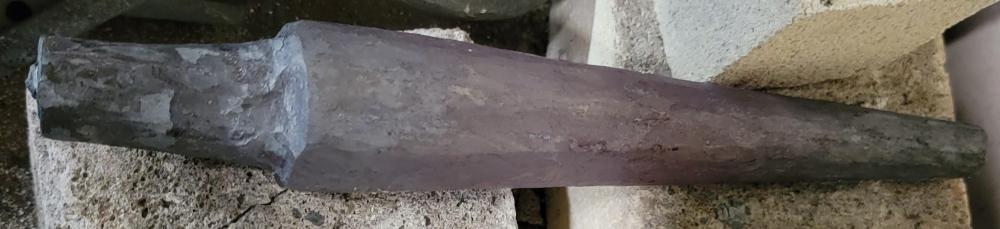
Thanks Jen. Very helpful as usual. Here is the bick I forged up to help with final shaping (and possibly the forge weld, depending) as well as the rough forging on the mild steel mandrel I forged out. The latter is now ground clean and polished up to match the bick. Both made from 1 1/2" stock. Bick was 4140 and has been heat treated.
-
Wanted to finish up these Parkinson style tongs and since the forge was hot, nocked out a shoe horn for my new boots that are still a bit tight. Love making tools. Even played around with a little filework and chasing on the tongs. Obviously need a bit more practice on that, but I was rushinga nd we all have to start somewhere. Here is the back side of the shoe horn. On reflection I should have made the transition a little more carefully with my set hammer to keep it centered, but the nice edges on my Fisher are pretty effective...

-
This is the way... Well done.
-
As I understand it, tempering a second time is often recommended to address the martensite that can get transformed from retained austenite after the first tempering cycle. This is also one of the reasons you are supposed to let the quenched billet cool down to room temperature before tempering so you can improve the overall transition of austenite to martensite that mostly takes place during the quench. Of course a lot depends on the specific steels you are using, and the heat treatment requirements and processes can vary pretty widely. The guideline for double tempering is for more typical blade/blacksmith steels like 4140, 5160, 1075, 1084, 1095, and 52100. Note that when you "run the colors" to temper a tool it is usually recommended that the oxide tempering colors are brought up more than once as well...