-
Posts
2,169 -
Joined
-
Last visited
Content Type
Profiles
Forums
Articles
Gallery
Downloads
Events
Everything posted by Latticino
-
Cross posted with Frazer, who I completely agree with. Probably the easiest path for making a sort of bearded axe as a beginner is to start with a fairly large ball peen hammer. Forging the beard will still be a real trial for a beginner. Spreading out the width will take some doing, as will redirecting the mass into a dropped beard. You may be able to keep them involved by using top fullering tools and letting them strike. As far as projects to lead up to axe making, the typical blacksmith projects of learning to taper, spread, bend, punch, drift, and forge weld will all be of value. Heat treatment will also be required. I have taught rank beginners how to forge wrap and weld tomahawks before, but a lot of hand holding and "monkey see-monkey do" direction is required. You can't teach what you can't accomplish easily yourself, so be sure you have a really good handle on how to make one yourself.
-
You could certainly try a similar technique (overclamping the reverse twist to a piece of angle iron) for the second and third tempering soaks. I'd probably just bin it or cut it down to a puukko, but I enjoy the forging part of bladesmithing more than the grinding or finishing.
-

Issue with marks in the blade
Latticino replied to Yann Kastell's topic in Knife making Class General Class Discussion
Vermiculite from a garden store is another good source for a slow anneal. Honestly these days I don't do many full anneals, settling for a subcritical tempering at around 1200 deg. F to soften the steel instead. Of course I have a good 2 x 72 grinder and ceramic belts. If I were draw filing I'd do whatever I could to get a spherodizing anneal for the stock. -
I'm not familiar with that particular propane regulator, but suspect if the max pressure it will put out is 37 mbar (0.5 psi) you will never get the velocity at the mixer orifice to entrain any air. A 0-30 psi adjustable regulator is typically what is needed. Your air choke is closed as well, and that won't help, but the first step is likely to get a proper regulator. Other problems: ceramic wool insulation doesn't appear to be sealed, no top (lid), questionable material for forge body and burner (is it galvanized?). Clearly you purchased a budget piece of equipment. Does the manufacturer provide any support at all? BTW, you have this in the wrong section of the forum, and may not be seen by folks who are looking at melting furnaces.
-

What tools do you use the most?
Latticino replied to Glenn's topic in Blacksmithing, General Discussion
TONGS, you can't forge it if you can't hold it... -

New grinder won't run. Starts, then slows to stop.
Latticino replied to Lord Bob's topic in Grinders, Sanders, etc
VFD can be tricky. Some are designed to convert single phase to three phase. Some are not at all happy if they have been designed for 50Hz source and you use a 60 Hz source. Others need quite a bit of programming, or even switching around jumpers to get working properly. Of course they can also be burned out by misuse, like any electronics, and are prone to overheating or metal dust shorting out if put in the wrong type of enclosure. The KBAC-27D has become a pretty common standard here in the states because it is pretty easy to use and fairly bulletproof in a NEMA 4X enclosure. Others are a lot more of a challenge. -

Issue with marks in the blade
Latticino replied to Yann Kastell's topic in Knife making Class General Class Discussion
You might consider going to an automotive spring shop and asking them for some cut offs. Both coil and leaf spring can be made into quality knives, longer blades like you are making in particular. If your grinder doesn't cut you can always go the hand finishing route. Anneal your finished forging in a barrel of wood ash. When cold soak overnight in white vinegar to dissolve scale. Draw file bevels with first a coarse 12" bastard file then a finer tooth one. Hand sand to 120 grit with sanding block. Heat treat using the proper normalization, quench and tempering process for your steel (probably 5160 or 9160 will work). Final sand to at least 300 grit with sanding block and put on a handle. -
"Manufactured" most likely, not Mankel (I think they only make forges, but could be wrong).
-
I've got a used '33 as well. Mine sits on a raised plywood stacked base, no need for reinforced concrete slab or independent base. Nice little hammer, good for my residential neighborhood. Would love to have a larger one, but this is pretty convenient right now. If at half price from new you should be able to use it essentially for free until you are ready for a larger one. The US rep stands behind these units and will help with tuning and replacement parts if needed. Dies are pretty small, so combination dies are pretty useless, but flat and drawing dies work well up to around 1.5" diameter stock. All depends on what you plan on making. Certainly won't replace a 300# Bradley, but can give a 50# mechanical a run for its money. Self contained unit doesn't need a compressor.
-

Frazer's Corner of the Internet [photo heavy]
Latticino replied to Frazer's topic in Member Projects
Saw this one in person. Brady is a very talented smith and generous with his knowledge as well. -

Frazer's Corner of the Internet [photo heavy]
Latticino replied to Frazer's topic in Member Projects
Some real nice work lately. -
Hard to tell on the chain till you do a break test. I would say there is a pretty good chance you have wrought. If so, nice score...
-

What did you do in the shop today?
Latticino replied to Mark Ling's topic in Blacksmithing, General Discussion
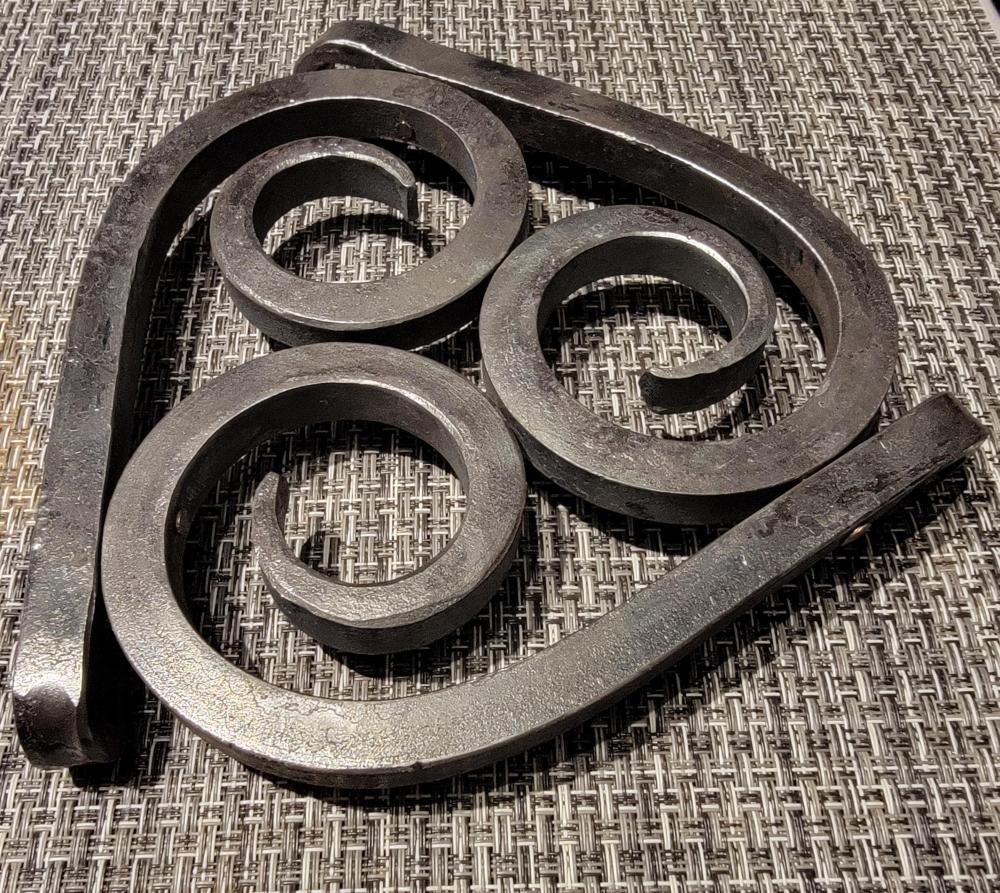
Thanks for the feedback on the trivet. My version had the sections joined with 1/8" copper rivets. Don't have it here in front of me, but stock size was on order of 1/2"-5/8" (basically whatever I had enough of on hand at the time). Defect is that the last spiral I riveted on doesn't touch the other two in the center area, making it a little looser. I forgot to clamp it there when I was drilling the last hole for the rivet. Also the rivets were cut a very little longer than they should have been so don't have as clean a crown as I like. Next one will either use collars (if I ever get a collaring jig tool made up for my little fly press) or brass rivets for a little more strength. Mine differs a little from the one Pat showed as I used a looser spiral and forged down the "legs" using 1/2 face blows to make a more subtle support. Unlike Thomas, trivets I use at home are better shorter to avoid being top heavy. -

What did you do in the shop today?
Latticino replied to Mark Ling's topic in Blacksmithing, General Discussion
-

Refflinghaus or Ridgid ?
Latticino replied to echosierra3's topic in Anvils, Swage Blocks, and Mandrels
If the maximum size stock you will be working is 1/2" crossection you don't really need an anvil larger than 150 lbs IMHO. -

New and looking for advice
Latticino replied to Iron Fangs's topic in Blacksmithing, General Discussion
Strongly recommend you look into the classes at Touchstone School, which should be pretty close to you. A couple of good formal classes in blacksmithing and bladesmithing will save you a ton of time experimenting and answer a lot of your questions. BTW your first hook was quite good and shows a lot of promise. -
-
Well, since you are a smith who likes to do his own work I would recommend that you use a torch, or forge, to uncoil one wrap of your torsion spring then reharden it in oil and temper it in an oven. The tracking adjustment should ideally be made using a fine thread rather than a coarse one. This will also help with the number of threads you engage in the tapped tube. I would have probably welded on a fine threaded nut rather than tapping the tube in the first place, but it isn't clear that you have a welder. You could tap and mount a small piece of 1/2" plat to the outside of the tube using additional bolts on either side of the plate to accomplish the same thing. Another thing that you can do is put a little spring pressure on the adjustment screw by adding a concentric spring in between the hand knob and the tube. Of course then you would need a longer adjustment screw...
-
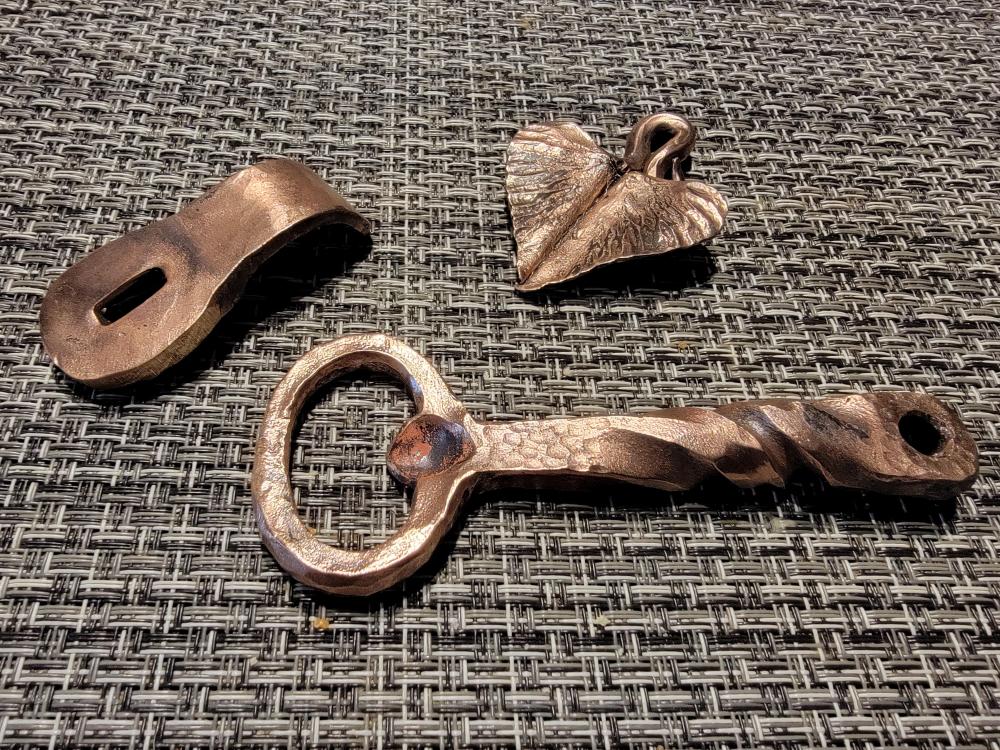
The survey group at the company I'm now working for is moving. As you do, they are trying to trim down on their stock before the move -and one of them remembered that I mentioned enjoying smithing. They had about 10 of these bronze 3.5" domed survey markers that they thought were brass and were kind enough to donate them to the cause instead of tossing them. Decided to try them out, so cut one up and putzed around with the pieces a bit. Forged quite easily, punching and drifting were fine, and even the working range wasn't too bad. Not particularly good product, I was still trying to find my way around the material. Definitely want to do more of this.
-
Mikey, Just off hand glassblowing for the most part (working with molten glass). Tried a bit of casting, cold work and torch work, never slumping. Was fair at casting, but annealing is so time intensive. Grinding and polishing cold work is for perfectionists and gets old fast. Never took to torchwork either, but I was a pretty fair glassblower. Have posted images of my stuff before, so won't bore anyone with a repeat.
-
Some of the irregularities appear to be from hitting with the edges of the hammer rather than the flat portion of the face. Try to keep the hammer face a bit more square with the stock and overlap blows. Also learn how to make planishing blows at the end of your heats (lighter blows at lower stock temperatures) and definitely before completing your forging.
-
That is what I use (left over from 10+ years of lighting my glory hole for glass blowing on a daily basis). Have to say at the school I sometimes teach at the push button sparker propane torch does an easier and cleaner job, but those are much smaller forges.
-

The Absolute Last Final Word on Anhydrous Borax Flux
Latticino replied to JHCC's topic in Fluxes used in blacksmithing
5160/9160 leaf spring is notoriously difficult to forge weld to itself. I have heard it said that it has something to do with chromium content, but don't have the metallurgy to back that up. I've had plenty of success welding it to other steel, or even wrought iron, but otherwise it is a real challenge. If you come up with some sort of aggressive flux that works better I'm all ears. -
Interesting idea, but I think you may find that the differing thermal expansion rations between the ceramic nozzle and the burner pipe threaded to it may be a problem. This will be particularly evident when the forge is turned off after a work session. It sounds like you will have your burner semi-permanently mounted and the radiant heat from the forge will heat the parts after it is off and the air gas mixture is no longer cooling the burner. I'd stick with a heavy wall stainless steel nozzle and protect the very end of it with castable forge lining, but you idea is worth a try. Note: the sales link will likely be removed by moderators shortly based on the site TOS. For other's potential interest here is a photo of the nominal 1" TIG ceramic nozzles in question:


