uncle mike
Members
-
Joined
-
Last visited
-
Holy xxxx Fellas! I was expecting a bit of brainstorming about this joint design between different smiths who have different backgrounds and different experiences. However, I never expected someone to head out to their forge and make one! You guys are awesome! That dowel set-up is exactly what I pictured! The bars can easily be drilled on the lathe so they would be dead center. The birds mouth could be roughed out in the mill. The entire unit gets HDG after construction, so all joints should be sealed up nicely. Maybe a simple drill jig to line up the angled dowel hole. This jobs almost done!! We just have to do that 491 more times! Heh heh heh. I agree. This is a fairly common design, and this is probably how it was done. If that bottom tool was made like a monkey tool, that would mean one bar was forged with the tenon and the other was drilled. I think I'll stick with the dowel though since there are a few different size grilles and the angles would be real simple to change accurately. Does this mean you have had the honor of working on something of Samuel Yellins? The majority of my work is restoring and reproducing historic metalwork, but have never seen Yellins work up close. Unfortunately 99% of all metalwork I see has no indication of who the creator was! Unless you see something familiar, or the owner knows the history, you can only wonder about the artist behind the work!
-
The frames will actually be a little different from the one in the pics. No bends. All bars will extend straight out to a square bar frame. The whole unit then gets screwed into an angle iron frame so that they can be removed easily from the inside. They're actually going to be window security grilles. Gene, yes, I think Marc mentioned something similar. I think that design might be the closest thing to a "traditional" handling of that joint we have come up with. I worry that it may be too much work though for the quantity I have to produce! I would like to take a minute to apologize to anyone I may not have answered. Everyones input is very much appreciated! Thank you!
-
Heh heh, yes Marc, time is always the big part of any "guesstimate"! I have most of the summer to do this project. At the moment I have 2 helpers in my shop. I may put on another since I have other jobs as well for the summer! I always allow for a decent profit, however as anyone with an artistic bent can attest, I almost always use every last second allowed for to make everything "just right". (and then some) I'm not too worried about the fit. I'll probably set up a mill like Jeremy mentioned. Happy birthday Jim! I'm sure I would enjoy working together as well! One of my best friends just turned 80 last week and he forges almost every day! Seems like blacksmithing is good for our health! Heh heh.
-
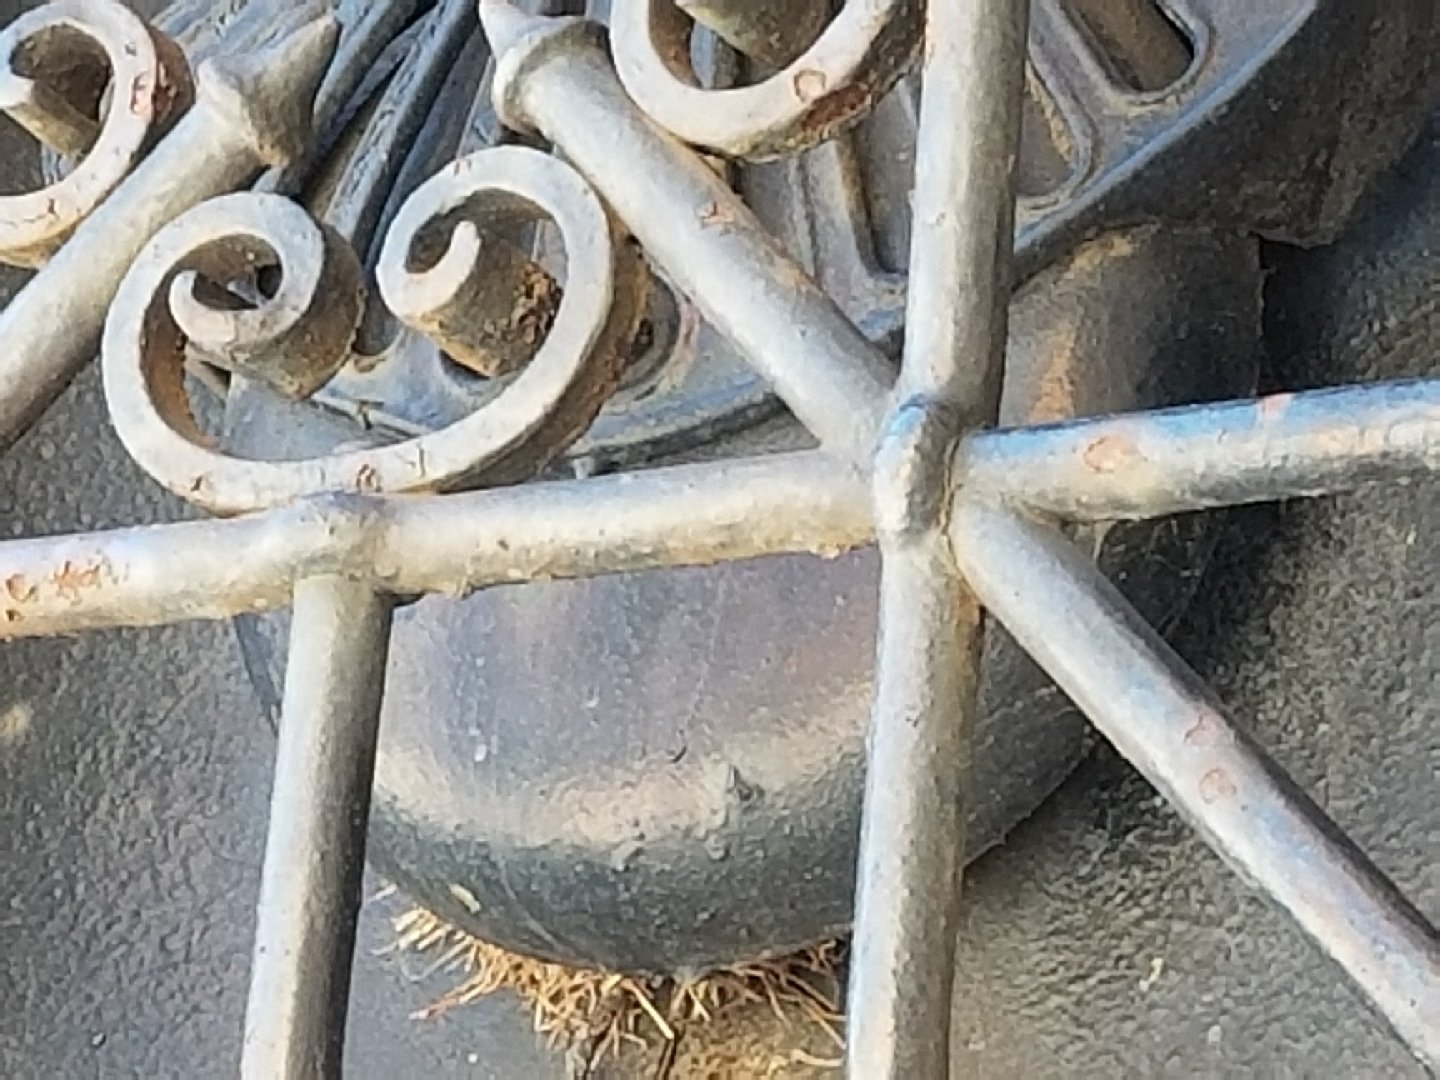
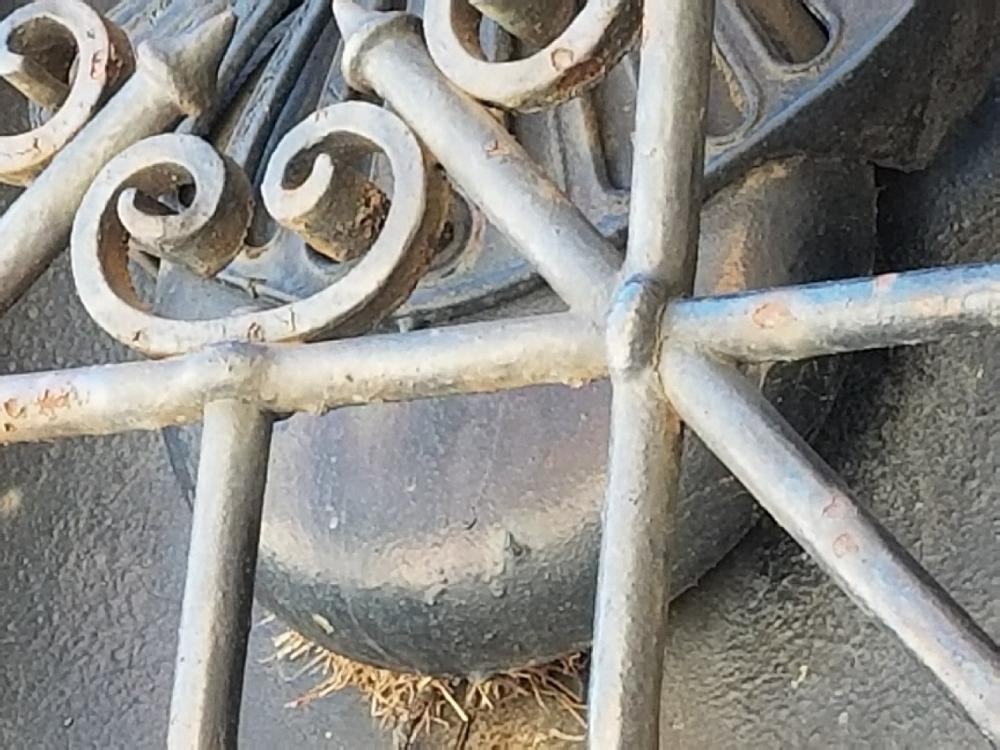
Wow, we have some activity now! Thank you all for your input! So, the grills are definitely forged, not cast. The job is on a municipal building, so the "buildup" that everyone sees is simply years of bad maintenance and poor prep under a typical slap of Rustoleum. I agree that the angled members are not structural. The grilles that I will be reproducing however will be considerably larger, so the joint integrity is fairly important. I am going to be building 123 of these grilles, so assembling these joints in a timely manner is fairly important as well! That being said I am more about delivering a good product than I am about a profitable one! (not very businesslike, I know) The "rivets"that hold the scrolls are actually large round head screws! I was thinking maybe I would make a slight taper on the ends of those particular bars and drift those swells with a matching taper instead of straight thru. Then the screw would pull everything tight. The other two intersections of the scrolls are a mystery, however, I agree with Marc 1, I have seen rivets in some of the damnedest places! (and this is a tight one!) As far as the 3 way joints go, I also agree that craftsmen from this era would only weld something as a last resort. However, this project would have been more industrial and less artistic, and it may well be that brazing is the best option??? I have been doing restoration work for 40+ years now and I don't see a lot of brazing in historical work, but I do see it. I would still have to forge the first pass thru properly, and the fit of the diagonal member would have to be done nicely..........
-
I guess the pics worked! heh heh It's hard to tell but I was wondering about maybe some short, angled tenons for the third member. If I make really good fitting joinery and make the angled bar in two pieces??? I was hoping there was some traditional layout method that I was missing.... These grills are aprox. 100 yrs old and the building is on the historic register, so I'm pretty sure I would catch some flack if I tried to disassemble one! I hate to "kick a dead horse" but, did I mention they were all the same size? If I drill a 3/4" hole thru a 3/4" bar I'll cut it in half. That makes me think of something else though, maybe a dowel right thru the center of the third bar??? Then the hole only needs to be maybe 3/8".
-
Thanks for the input guys, the custom bolster and pre-drifting the second bar is a good idea, but did I mention all 3 bars are the same diameter? I'm going to try to attach a pic or two. Jeremy, that coat stand is awesome! Looks pretty substantial as well !
.thumb.jpg.f110c35a84b4c974fcc39ac999f1afc1.jpg)
.thumb.jpg.40e84ffc974971a5dfc5fff1c15b8fa0.jpg)
.thumb.jpg.6dd820eeee2034c35e316e880cd33842.jpg)
-
Hey Gang, I'm hoping to get some input on a project I'm starting soon. I'm sure everyone here knows what a pass thru joint looks like and how to forge it. I'm talking about a simple Split and Drifted round bar with another bar of the same dia. passing thru it @ a 90deg angle. What I'm struggling with is finding ways to pass another bar thru the same intersection @ a 45deg angle using traditional blacksmithing techniques. To be clear, I'm talking about 3 bars total going thru 1 joint. It's not an uncommon design element in grille and gate work. Of course I can weld in the third bar, but I like to try to forge my work using traditional methods first and save the contemporary methods for a last resort. I'll try to include a pic if I can. Unfortunately I'm better @ Hammer and anvil than I am @ computer and mouse! Heh Heh Heh.
-
Well, I'm pretty certain that the flywheel bearing is the culprit. I was able to limp through the work I needed by Tweaking the motor out a little with a shim. I basically made the motor match the crooked flywheel. After using it for a few more hours, the whole machine has a nice little wobble to it ( kinda like a girl I knew once, hehe). I'll give Sid a call tomorrow and see if he has a bushing. once I figure out the photo situation, I'll post some. It'll give me a chance to show off my tooling anyway. I'm sure you guys have done fancier stuff, but I'm pleased with it. I had to forge 1" round into 1-3/8" half round to match a colonial era railing. I made the tooling with a fuller on one side to spread the bar sideways and a low crown "flatter" on the other side to smooth it out. Thanks for the help gang B)
-
Thanks guys, Yes Frosty, I set the hammer up originally with 2 belts centered on the crown but as soon as you step on the treadle the flywheel moves to the rear a bit and the belts are no longer centered. The one that is the loosest goes off on walkabout. The hammer seemed to run just fine on 1 belt, so that's what I've been running ever since. Doc, I was wondering about that rear bushing! There's not a lot of play, but if I grab the flywheel and try to tilt it on the shaft, there is a slight movement. The babbit bearings on the shaft are in great shape. It's not like the problem has been gradually getting worse, it just started. And naturally I'm in the middle of a job!
-
Anyone having problems with belts flying off their LG power hammer? I've been using this hammer for years. now all of a sudden I can't keep the belt on it! It is an older 50# unit with a crowned wheel. I'm running an industrial "V" belt. 2 belts on the crowned wheel don't want to play nice together, but I've been running a single belt since I got the hammer with no problems. I tried cleaning the wheel and the belt to be sure there was no oil. I tried sanding the circumference of the flywheel lightly for better grip. I always keep the machine well lubed so there is little drag. I'm thinking the alignment is not quite right? Any suggestions? Thanks in advance, Mike
.jpg.cc14ff1adcc3eb7c2897f01dbe041c02.jpg)
.jpg.9f34c5b2333cedb11e5746365d2671a5.jpg)
.jpg.ff1bb5a9e097d379593c53ecb133931d.jpg)