VaughnT
Members
-
Joined
-
Last visited
Everything posted by VaughnT
-
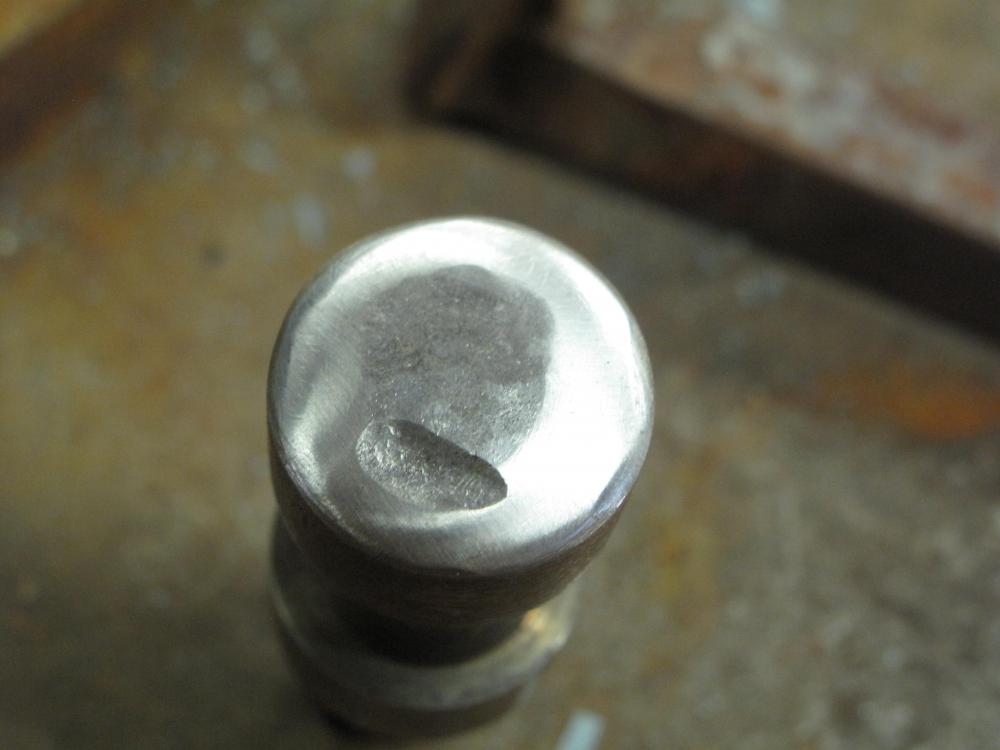
I didn't make it, so that's certainly not on me. Using it is a no-brainer because it's just putting a divot on some really hot steel -- something I think I'm qualified to do. Is it expensive? Well, cost me $60. To someone that can drop $350 on "questionable" stuff at an auction, that might not be costly. To me, it's a tidy sum. Can it be repaired? That's why I asked. This forum is chock full of people more familiar with H13 than I am.
-
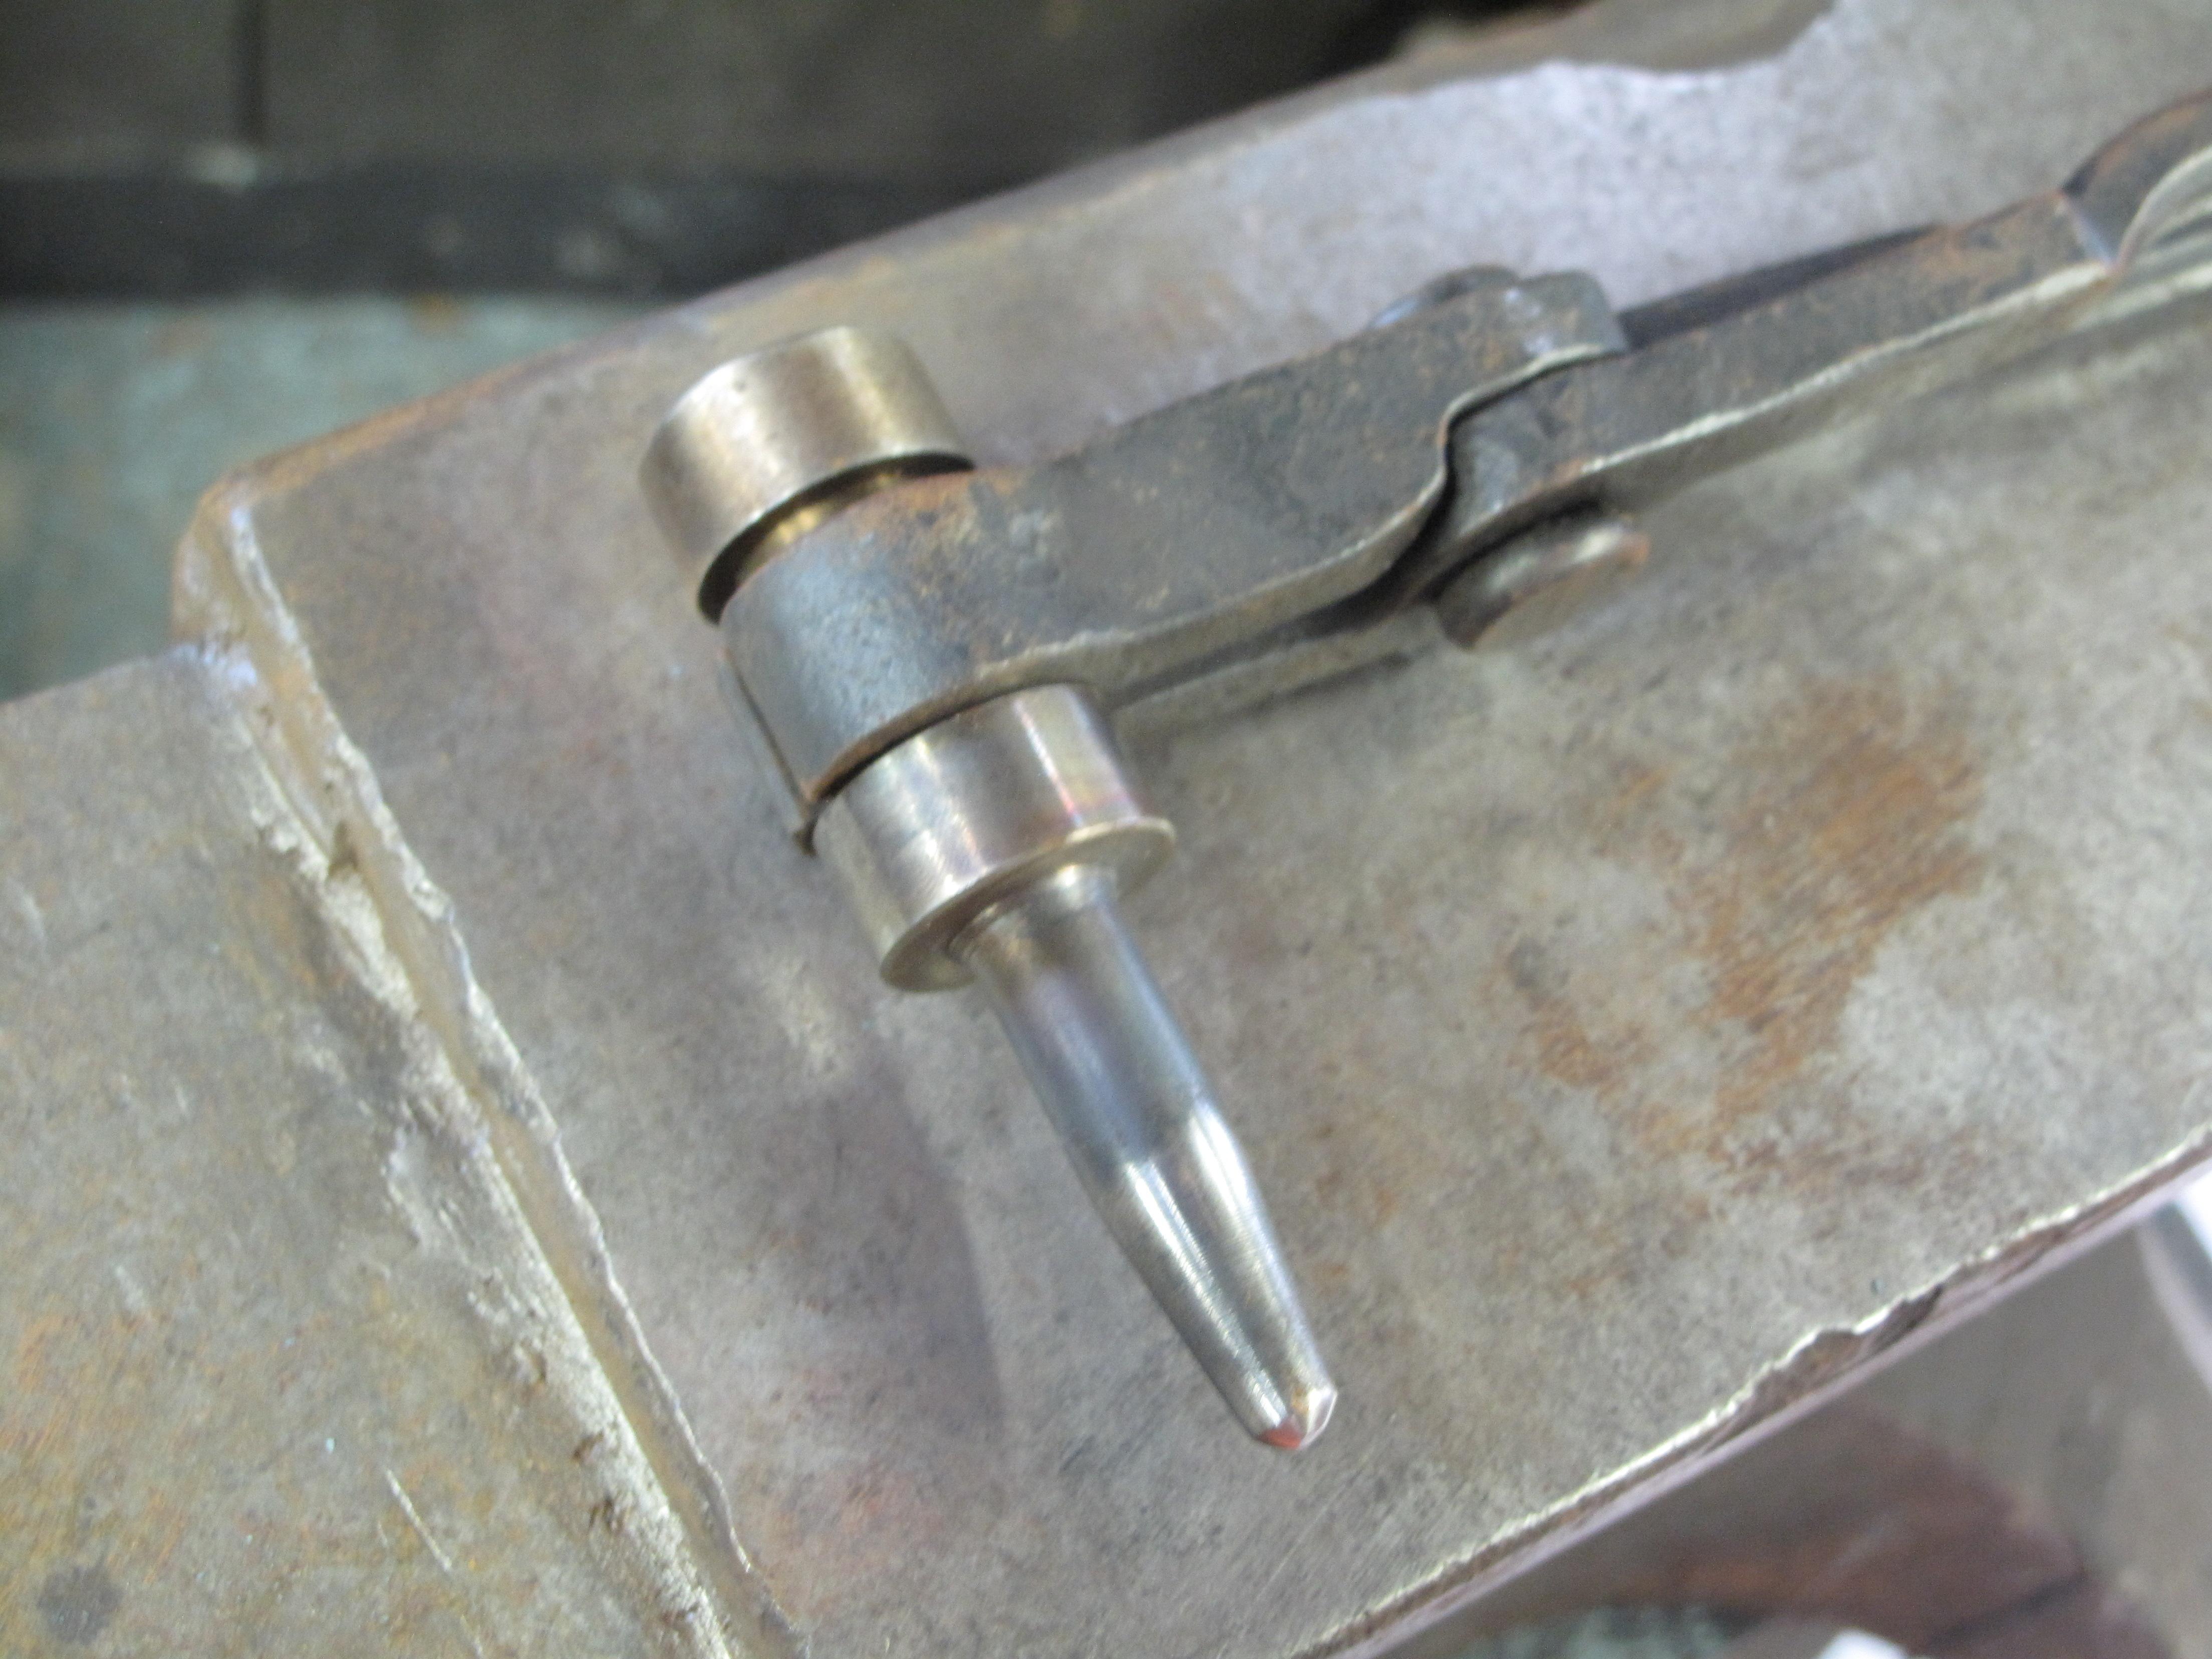
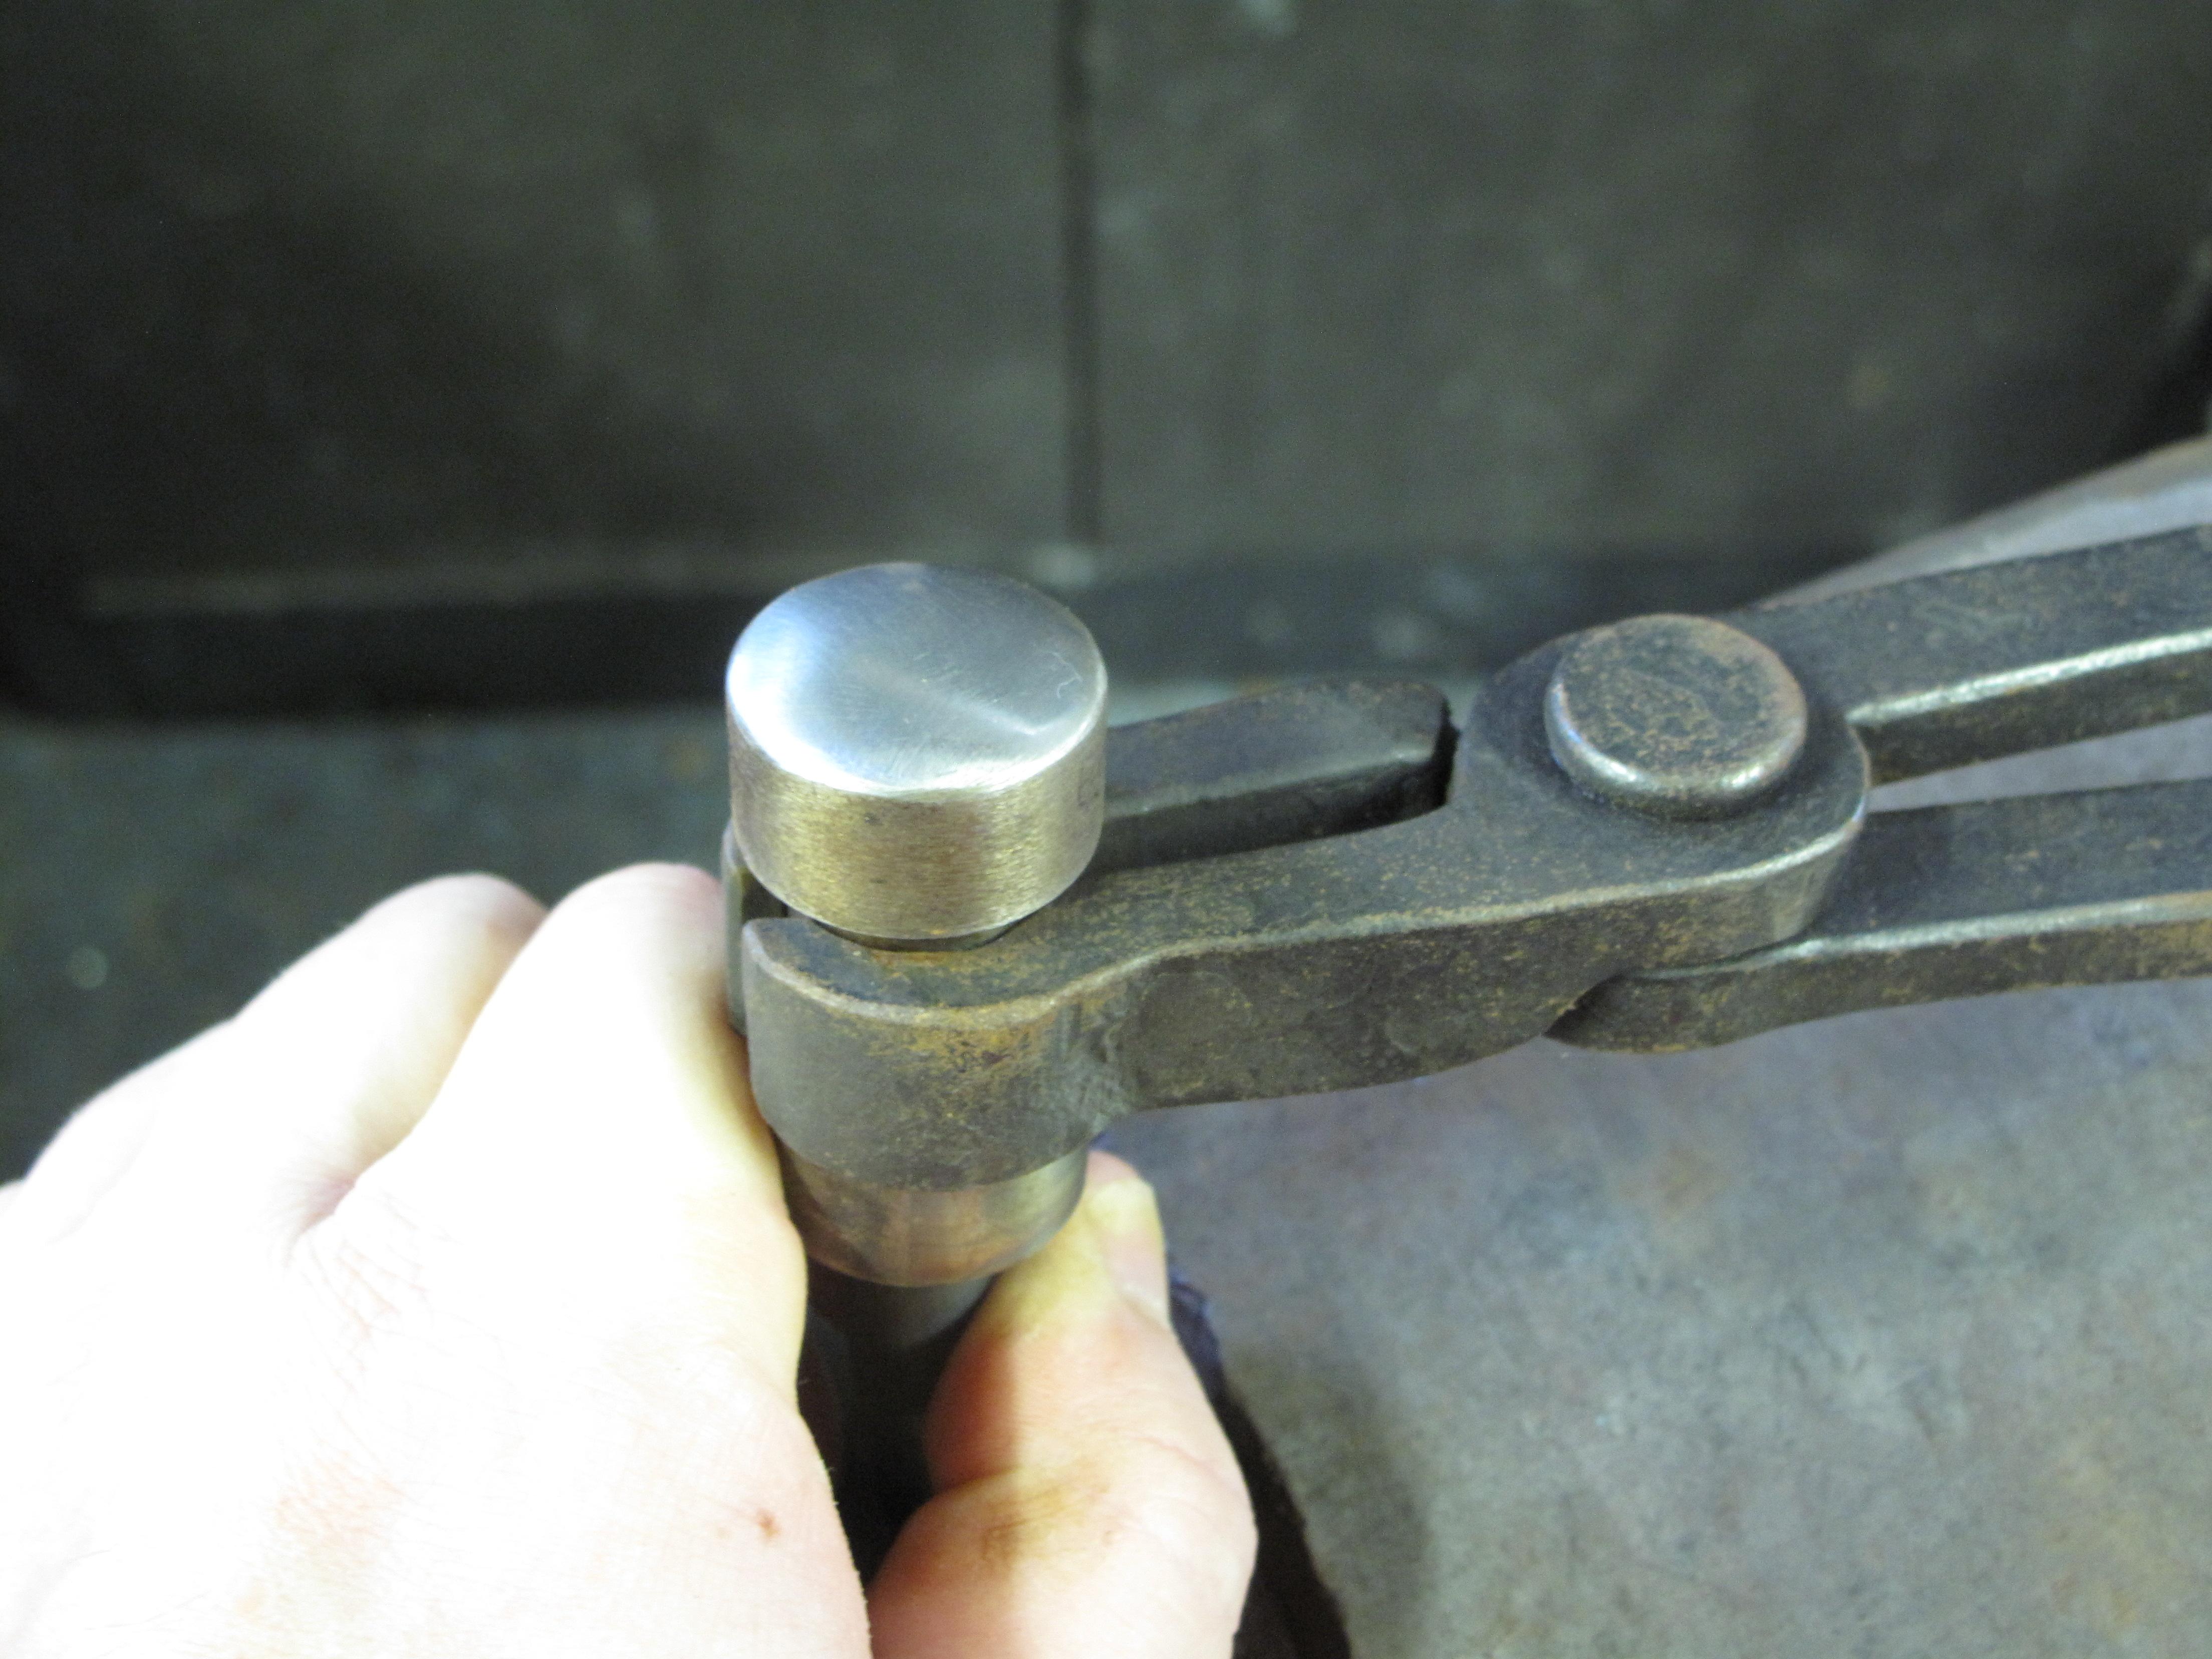
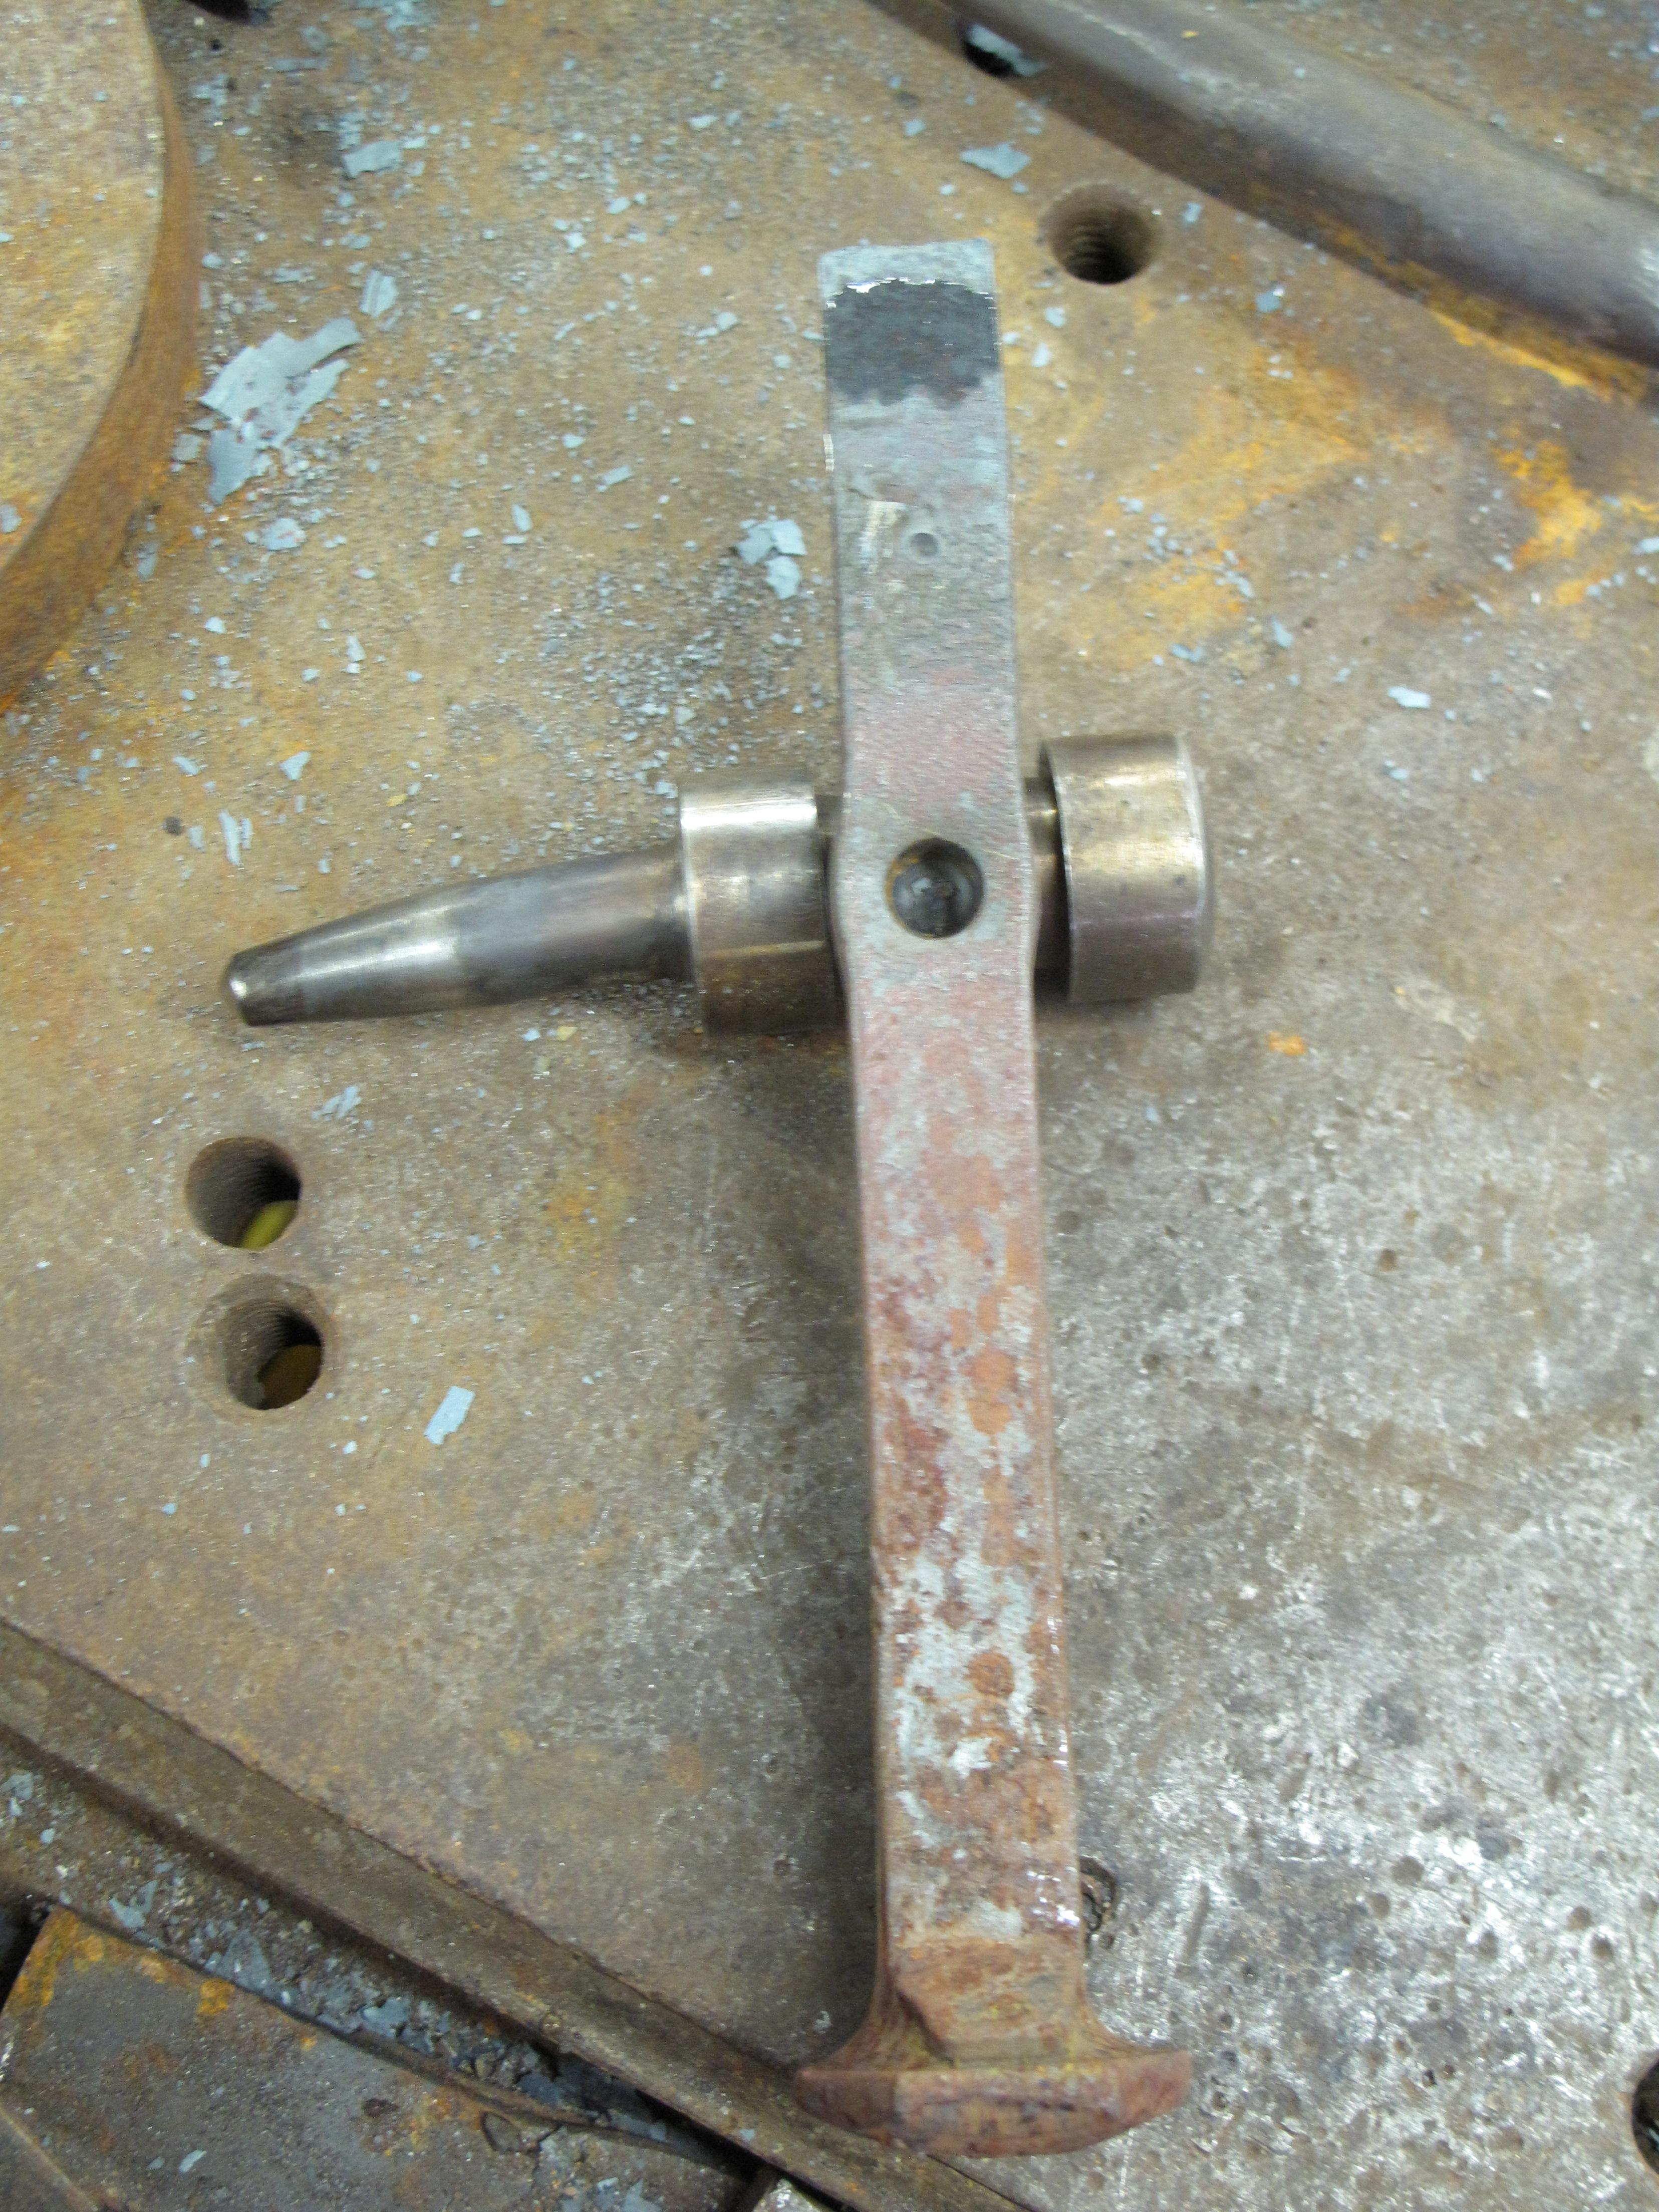
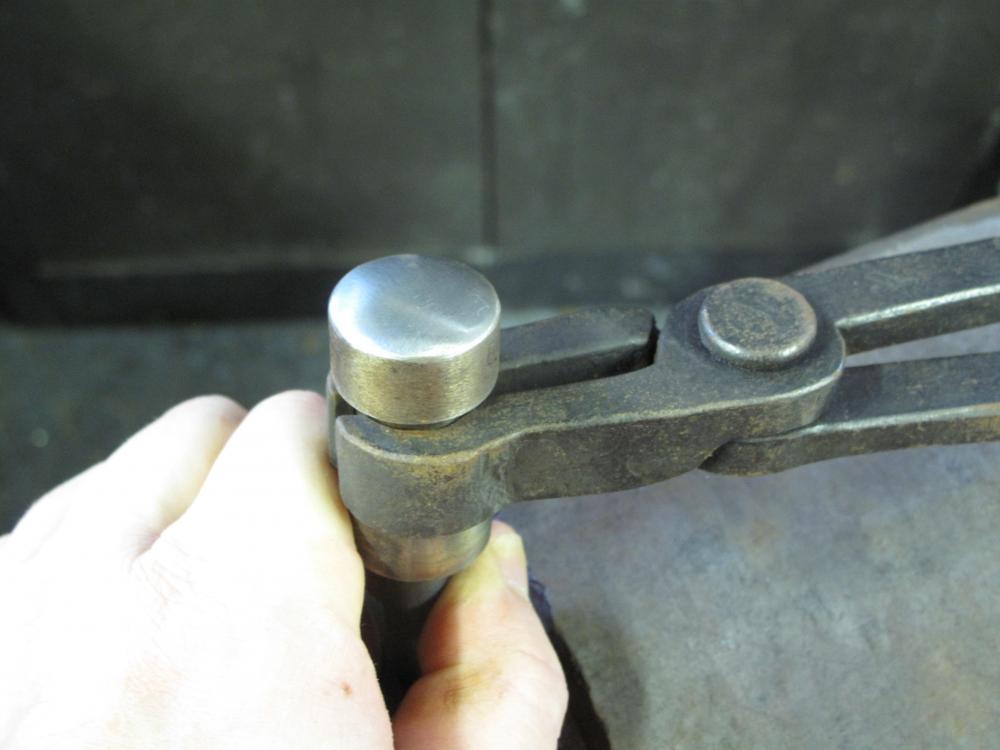
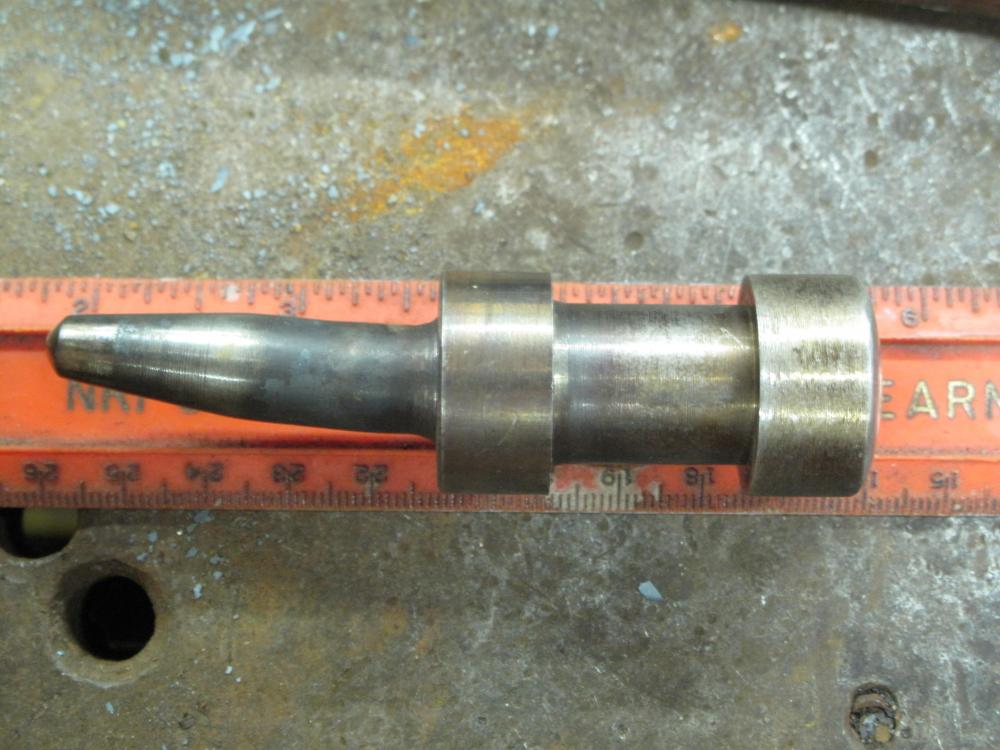
The thing was only ever meant to form the countersink in the railroad spikes. The thicker middle section is just so it can be held in the specialty tongs I bought from a member here who does awesome work. There is a whole range of H13 punches available from the blacksmith supply shops that work with tongs like these -- basically a fancy handle with interchangeable bits. It's a ding. The maker said it was annealed on the struck end but tough and would last for years. With this much deformation in just a few hits, I'm seriously doubting the veracity of that claim. At least it didn't chew up my hammer face!
-
Funny that you mention GS because I emailed him about getting one of his handled punches before I opted for this one. Glenn was very nice, easy to deal with, etc. I just opted for someone different... for no particular reason. I'm seriously regretting that decision now! Is the maker well-known? I'd say no, but he's trying to get up there. Posts a lot on FB, though I don't know if he's a member here. He posted pics of a punch he'd just made, and it looked exactly like what I was envisioning I'd need for the countersinks in railroad spikes. Then he sends me something completely different. Then what he sent me bends in the first five blows, not even getting one hook finished. Ugh! I guess I should file a claim with Paypal. His last communication with me said he'd make up a new one "in good faith", like I'd done something wrong and was at fault... but he was going to be cool about it. Kinda irked me, especially considering that what he sent isn't what I ordered. That was a week ago and I've not heard a peep since.
-
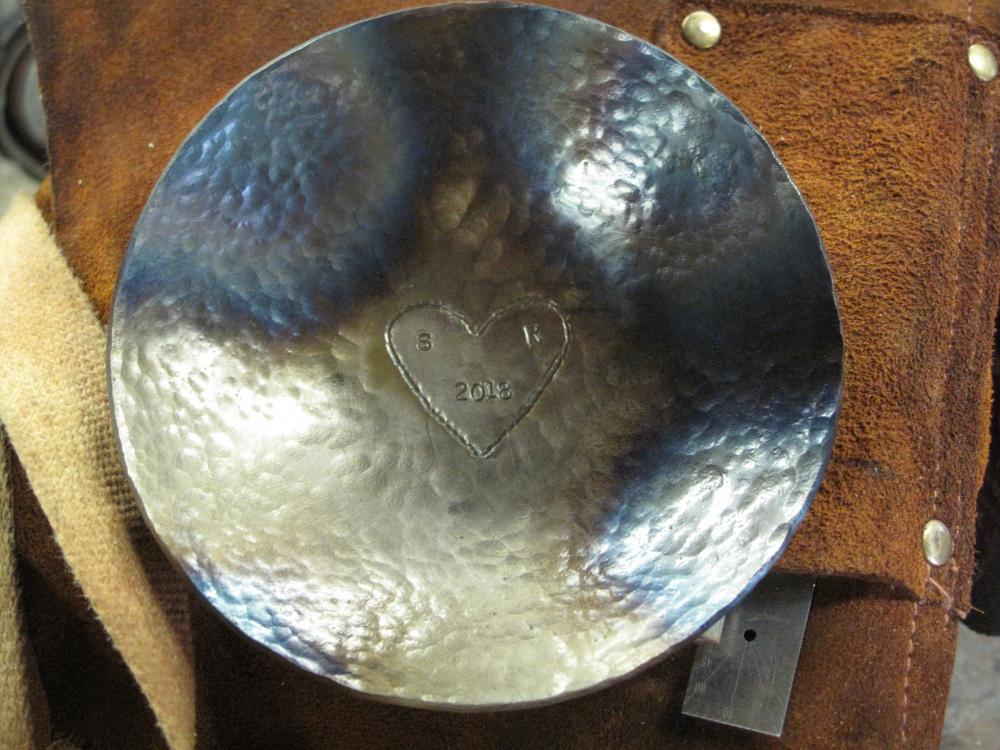
Thank you, gents. He might never decide to work with his hands, but at least he has a story to tell. I thought the best part was when I asked him if he wanted me to go over it and clean up the lines to smooth it all out. "No thank you. I'd like to do it all myself so I can honestly tell her I did it myself." The only time he asked me to step in was on the date, and only because he'd screwed up the initials. He couldn't get squared away because the surface was uneven, so he asked me to take the helm just so he wouldn't double-stamp again and make things worse. As the wise Mr. Eastwood said, "A man's gotta know his limitations!"
-
I was wondering about the alloy because everything I'd heard suggested it would be seriously tough. That's why I wasn't worried about it when the smith made an unauthorized change to the design. Sadly, the only option I have now is to fix this punch. The guy's been pretty clear that he's not interested in replacing the tool. I could contest the charge via Paypal since he made and shipped something I didn't exactly order, but... that'll get my money back and I still won't have a punch. Sucks because I intentionally bought from him so I could support another smith. Paid double what I could have gotten an H13 punch from Blacksmith Depot or the like, but chose to do business with a craftsman.
-
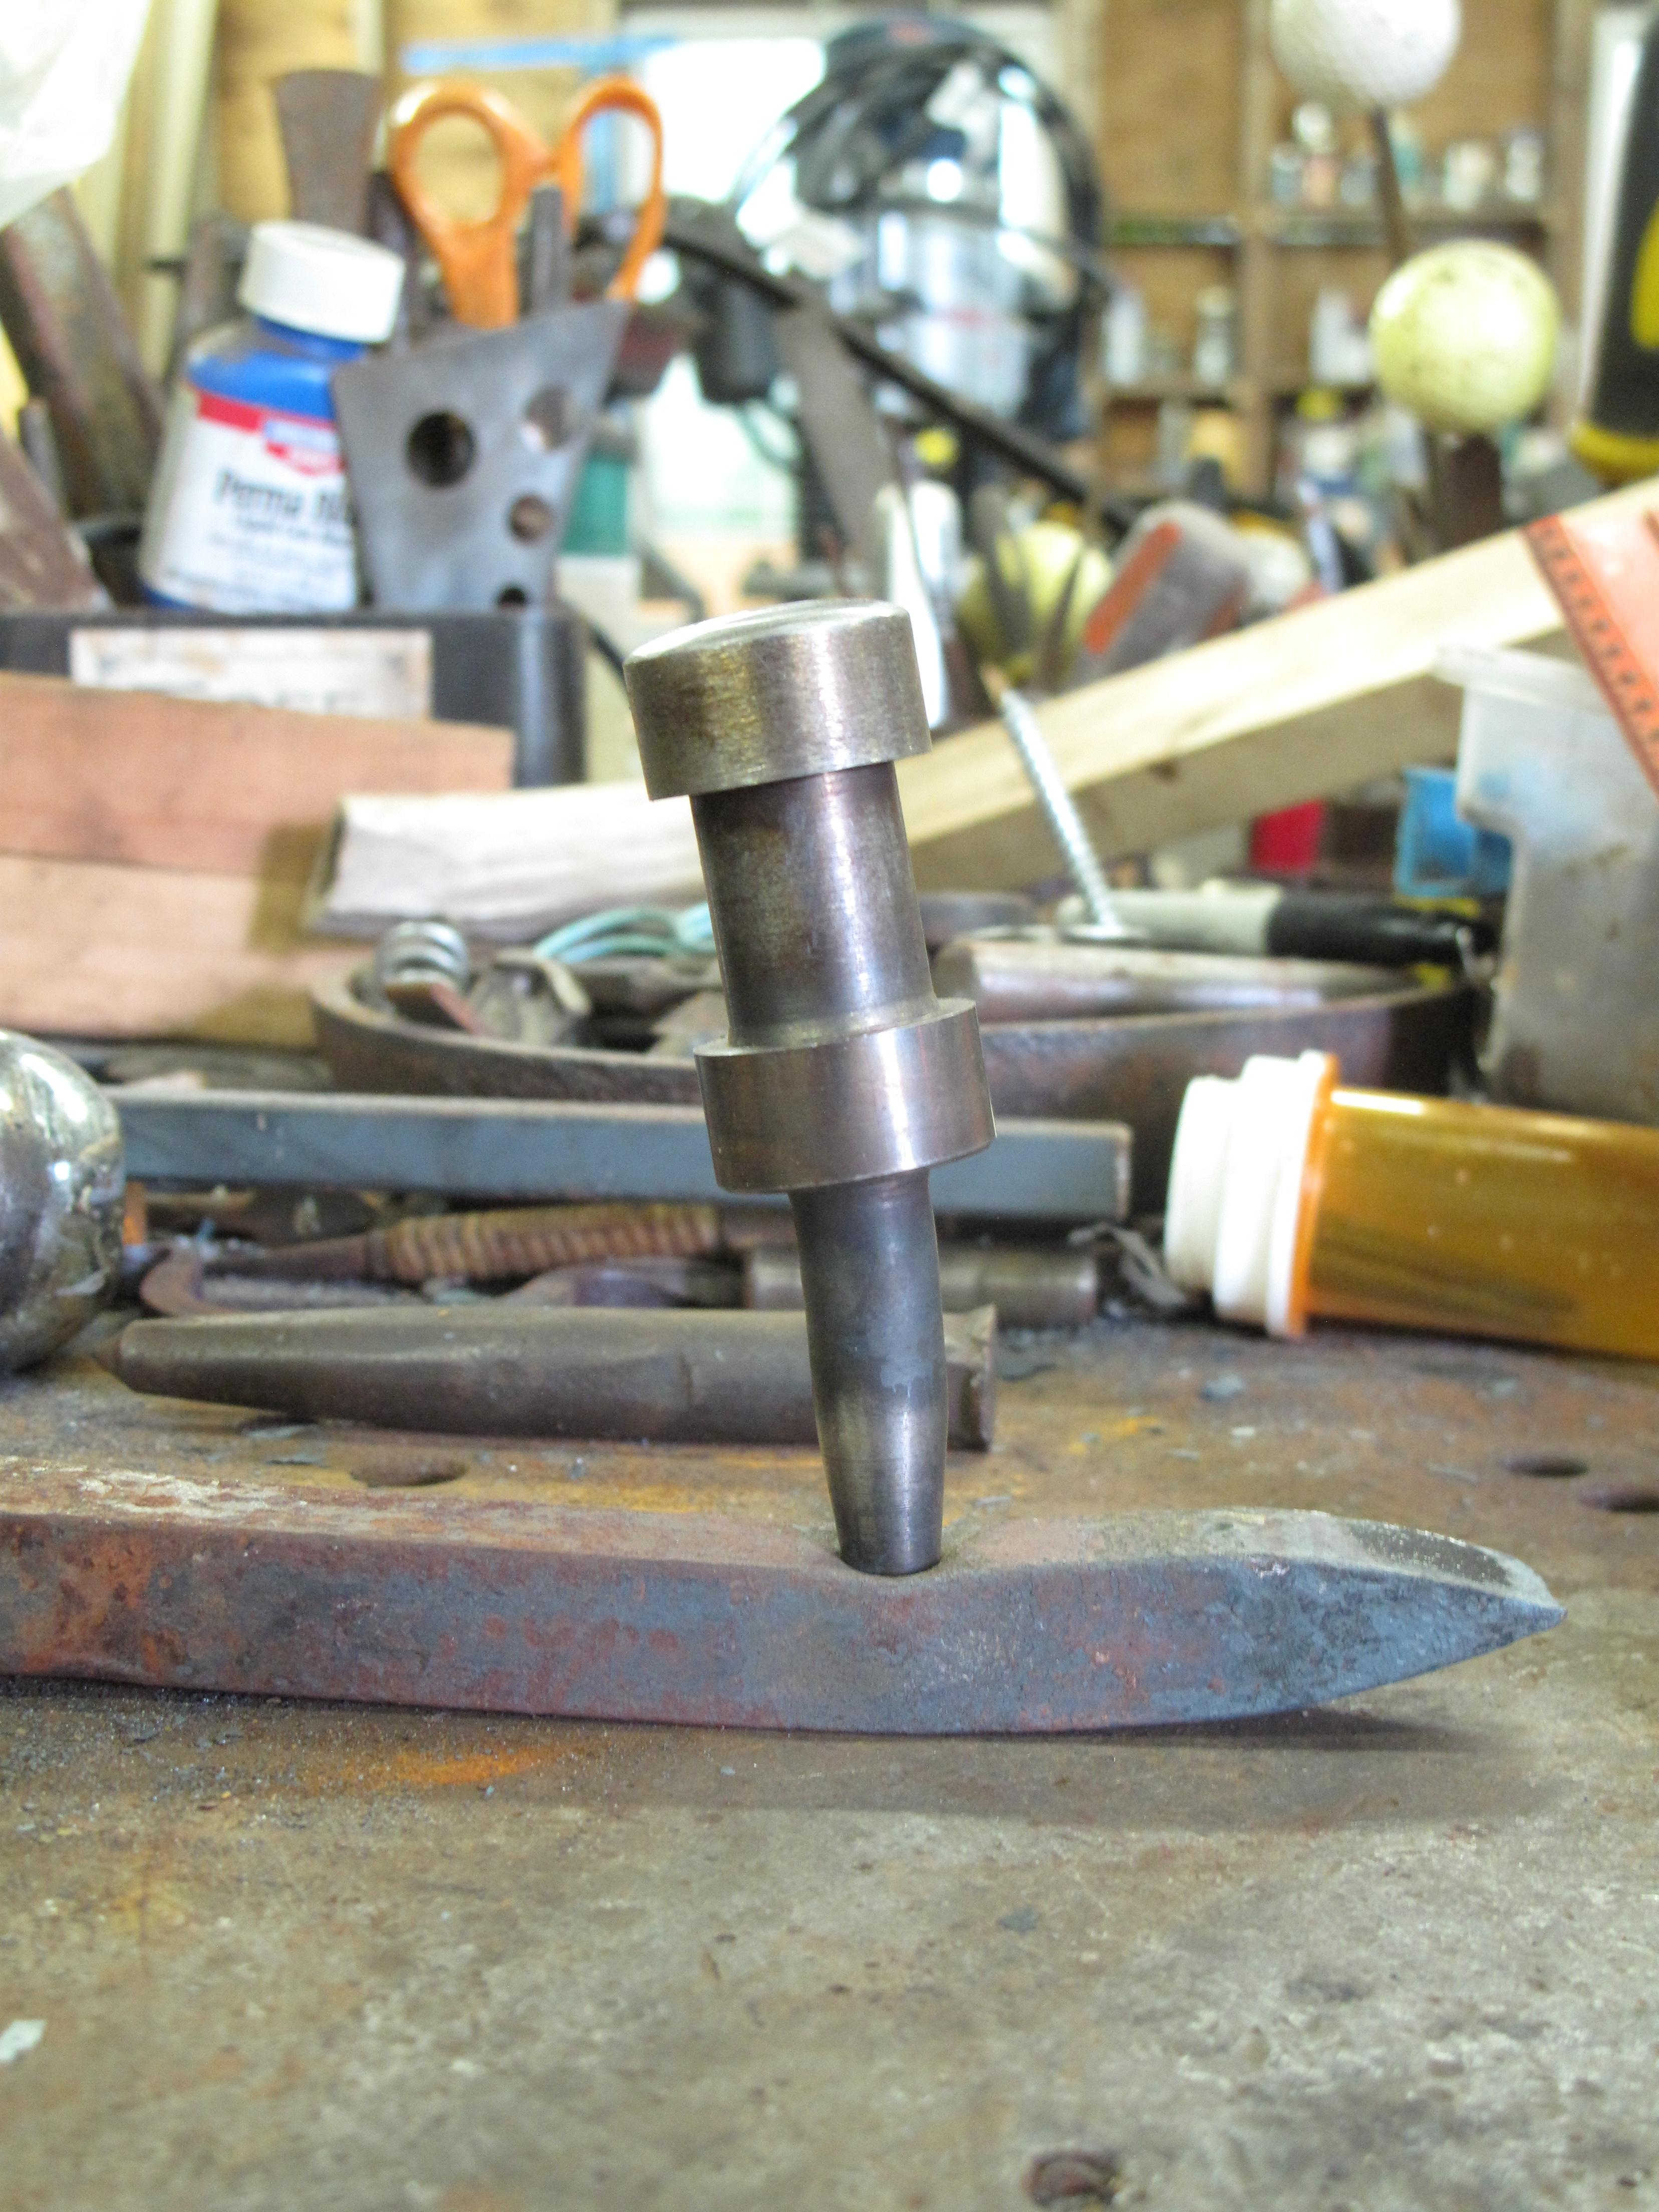
Long story short, I bought a punch from a smith. He said it's H13 and I have no reason to doubt it. I've never worked with this alloy, so I was looking forward to the experience and not having to constantly reshape the working end. Sadly, the tool didn't survive the first go. Maybe five hits with a hand hammer and it bent. Fair to say that I'm unimpressed. I wasn't trying to punch through the railroad spike, just form a countersink divot. The spike was orange hot, and as you can see from the discoloration on the punch, I got about 3/8" deep before calling it good. The punch didn't produce as great a swell in the sides of the shank as I would have liked, but it's certainly serviceable as far as countersinks go and lets folks know this is hand forged. I've never worked with this alloy and I'm definitely unhappy that it would bend so easily. My current punch is made from 5/8" car coil spring and hasn't bent, so I think maybe the punch would have worked if it hadn't been only 3/8" in diameter. Should the H13 have performed better? Is this a sign of bad heat-treat? Can I salvage this? I was thinking about trying to straighten it out, but don't know diddly about H13 and how it works. What should I expect? Maybe the best option is to cut the working end down and regrind it while it's in the lathe?


-
Gorgeous work, Rain. I think they came out perfect, and the little oddity to the steel circle only makes the piece look better. Something of a Japanese aesthetic, I'd say.
-
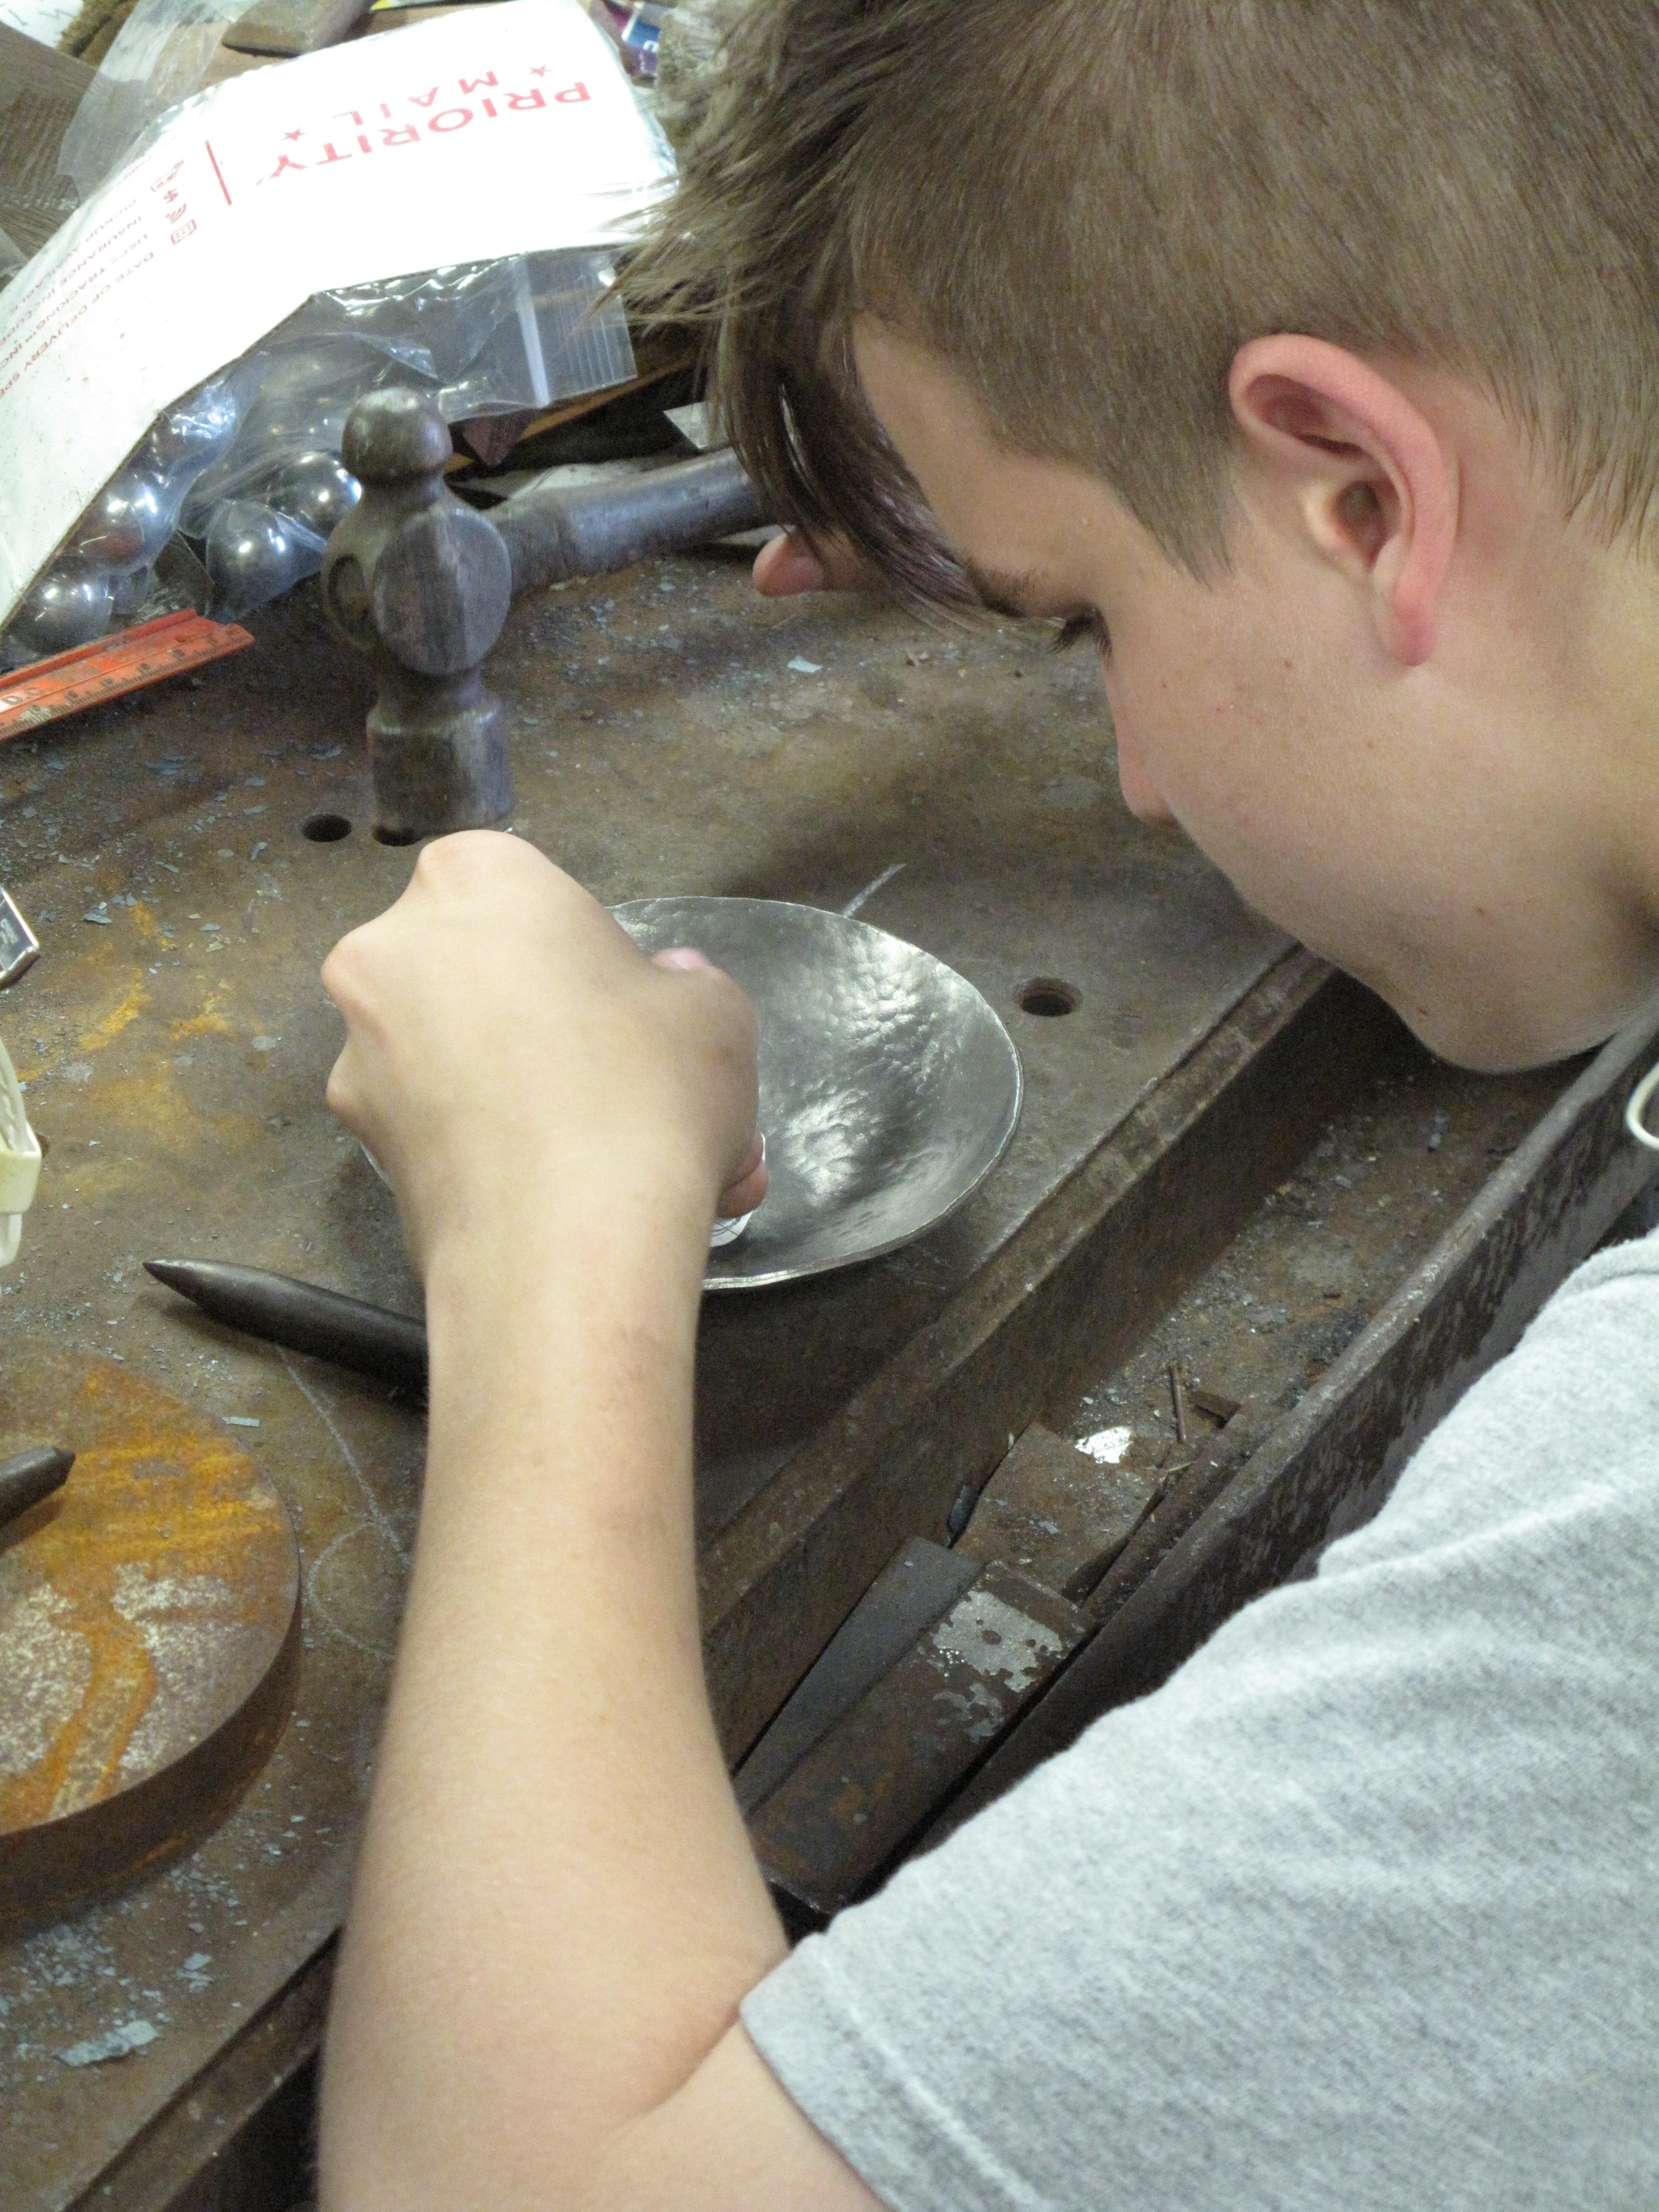
My nephew wanted to make something for his girlfriend, so I offered to show him how to do the chasing. I already had the dish mostly formed, so all he needed to do was give it the texture, draw up the design, cut it into the steel and put on the finish. He did amazing, in my opinion, and really concentrated on the tasks once I showed him how to do things. Just goes to prove that guys haven't changed in millions of years -- if there's a chic needing impressed, we can hunker down and get things done!

-
Now that you have the anvil secured, your first project should be to make some nice spikes that will replace the hanger strapping you've got on there. Good practice and a nice way to dress up the whole thing.
-
Lots of ideas..... https://www.pinterest.com/search/pins/?q=blacksmith card holder&rs=typed&term_meta[]=blacksmith|typed&term_meta[]=card|typed&term_meta[]=holder|typed
-
A little something to warm up with. A good way to start the day!
-
I have to wonder what that press was designed for in the first place. With only a few inches of supported travel, that's a ton of room underneath the ram for the workpiece. It had to have some kind of specific industrial purpose.
-
Generally, I've found things to be pretty safe when loaning to a professional group, especially if they're large pieces that are hard to "accidentally" drop in a pocket or tool box. A blacksmithing group is likely to be full of good joes. Still, it makes sense to mark your pieces simply so you don't get back the wrong pieces. One post vise looks much like another, and there could very well be two identical Iron City vises loaned to the operation, etc. So pick a nice color and give your tools a splash of paint. If you have letter stamps, stamp your name somewhere obvious, and then somewhere that'd be awkward to get to, and grind off. You can't stop theft, but I really don't see someone trying to make off with a big tool like that. If you give it a splash of paint so a potential thief can see it's clearly marked, that's half the battle won right away. Take pictures so you can show the people in charge, email them copies so you can prove you showed them proof of ownership. Kick back and relax with a cold one!
-
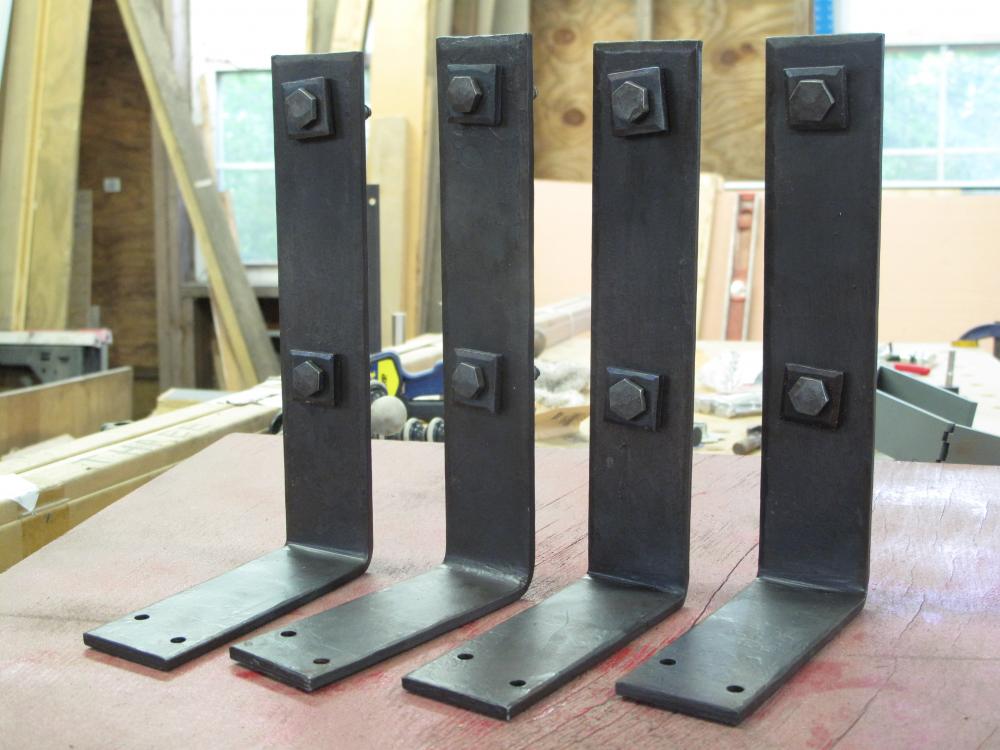
You could make them from mild steel and be within code, I'm sure. The key part is the area right where the bolt passes through. You can't have that surface area too small or it won't distribute the load sufficiently. As you get out away from the center, the amount of load bearing transferred drops off considerably, especially since the ends aren't connected to anything. The flex and twist in the steel doesn't need to be much. On that last pic, I'd expect something at least 1/4" thick. Note the raised ridges that help to stiffen the metal nearest to the bolt. That's an important feature you should plan on.
-
I'd weld a plug of mild onto the top. Once it mushrooms, and it will, just cut it off and weld on a fresh button. Annealed high-carbon steel will work, too, if you have it handy. It's not necessary, but it's a good way to use up some scraps. The idea is that the striking surface needs to be soft and give way under the face of the hammer. This means you'll necessarily have some mushrooming, but that's better spalling or gouging your hammer face.
-
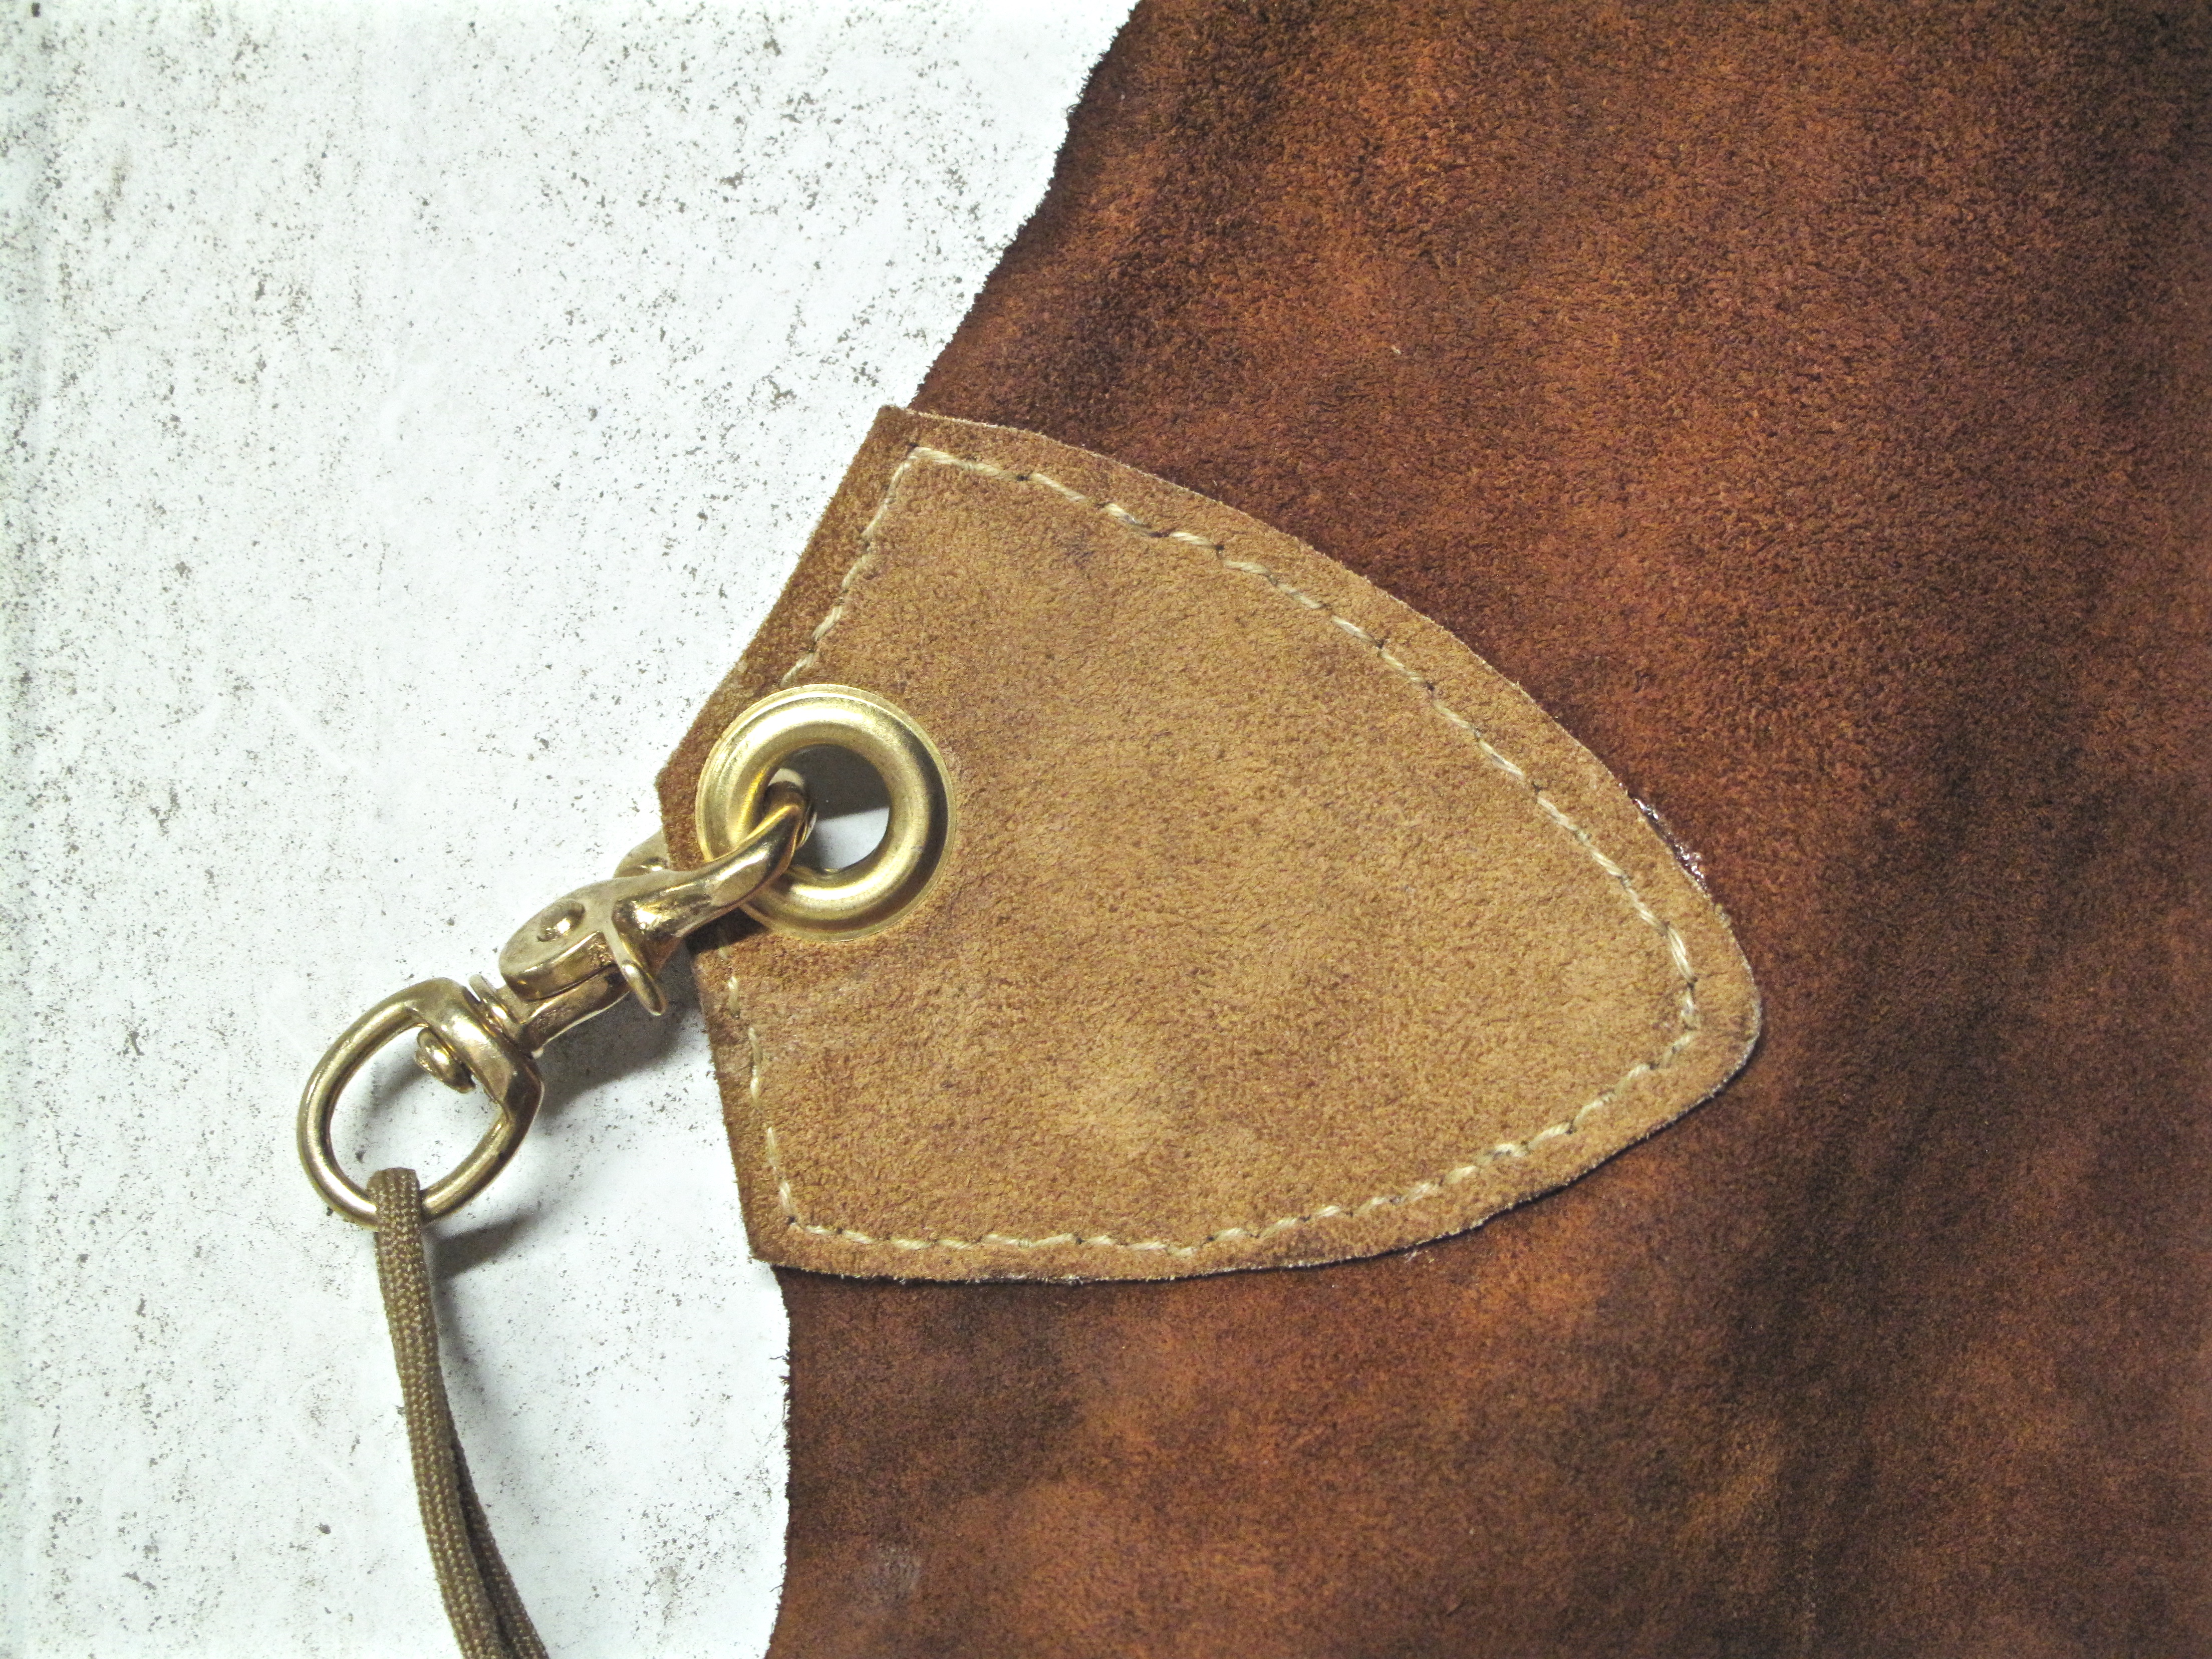
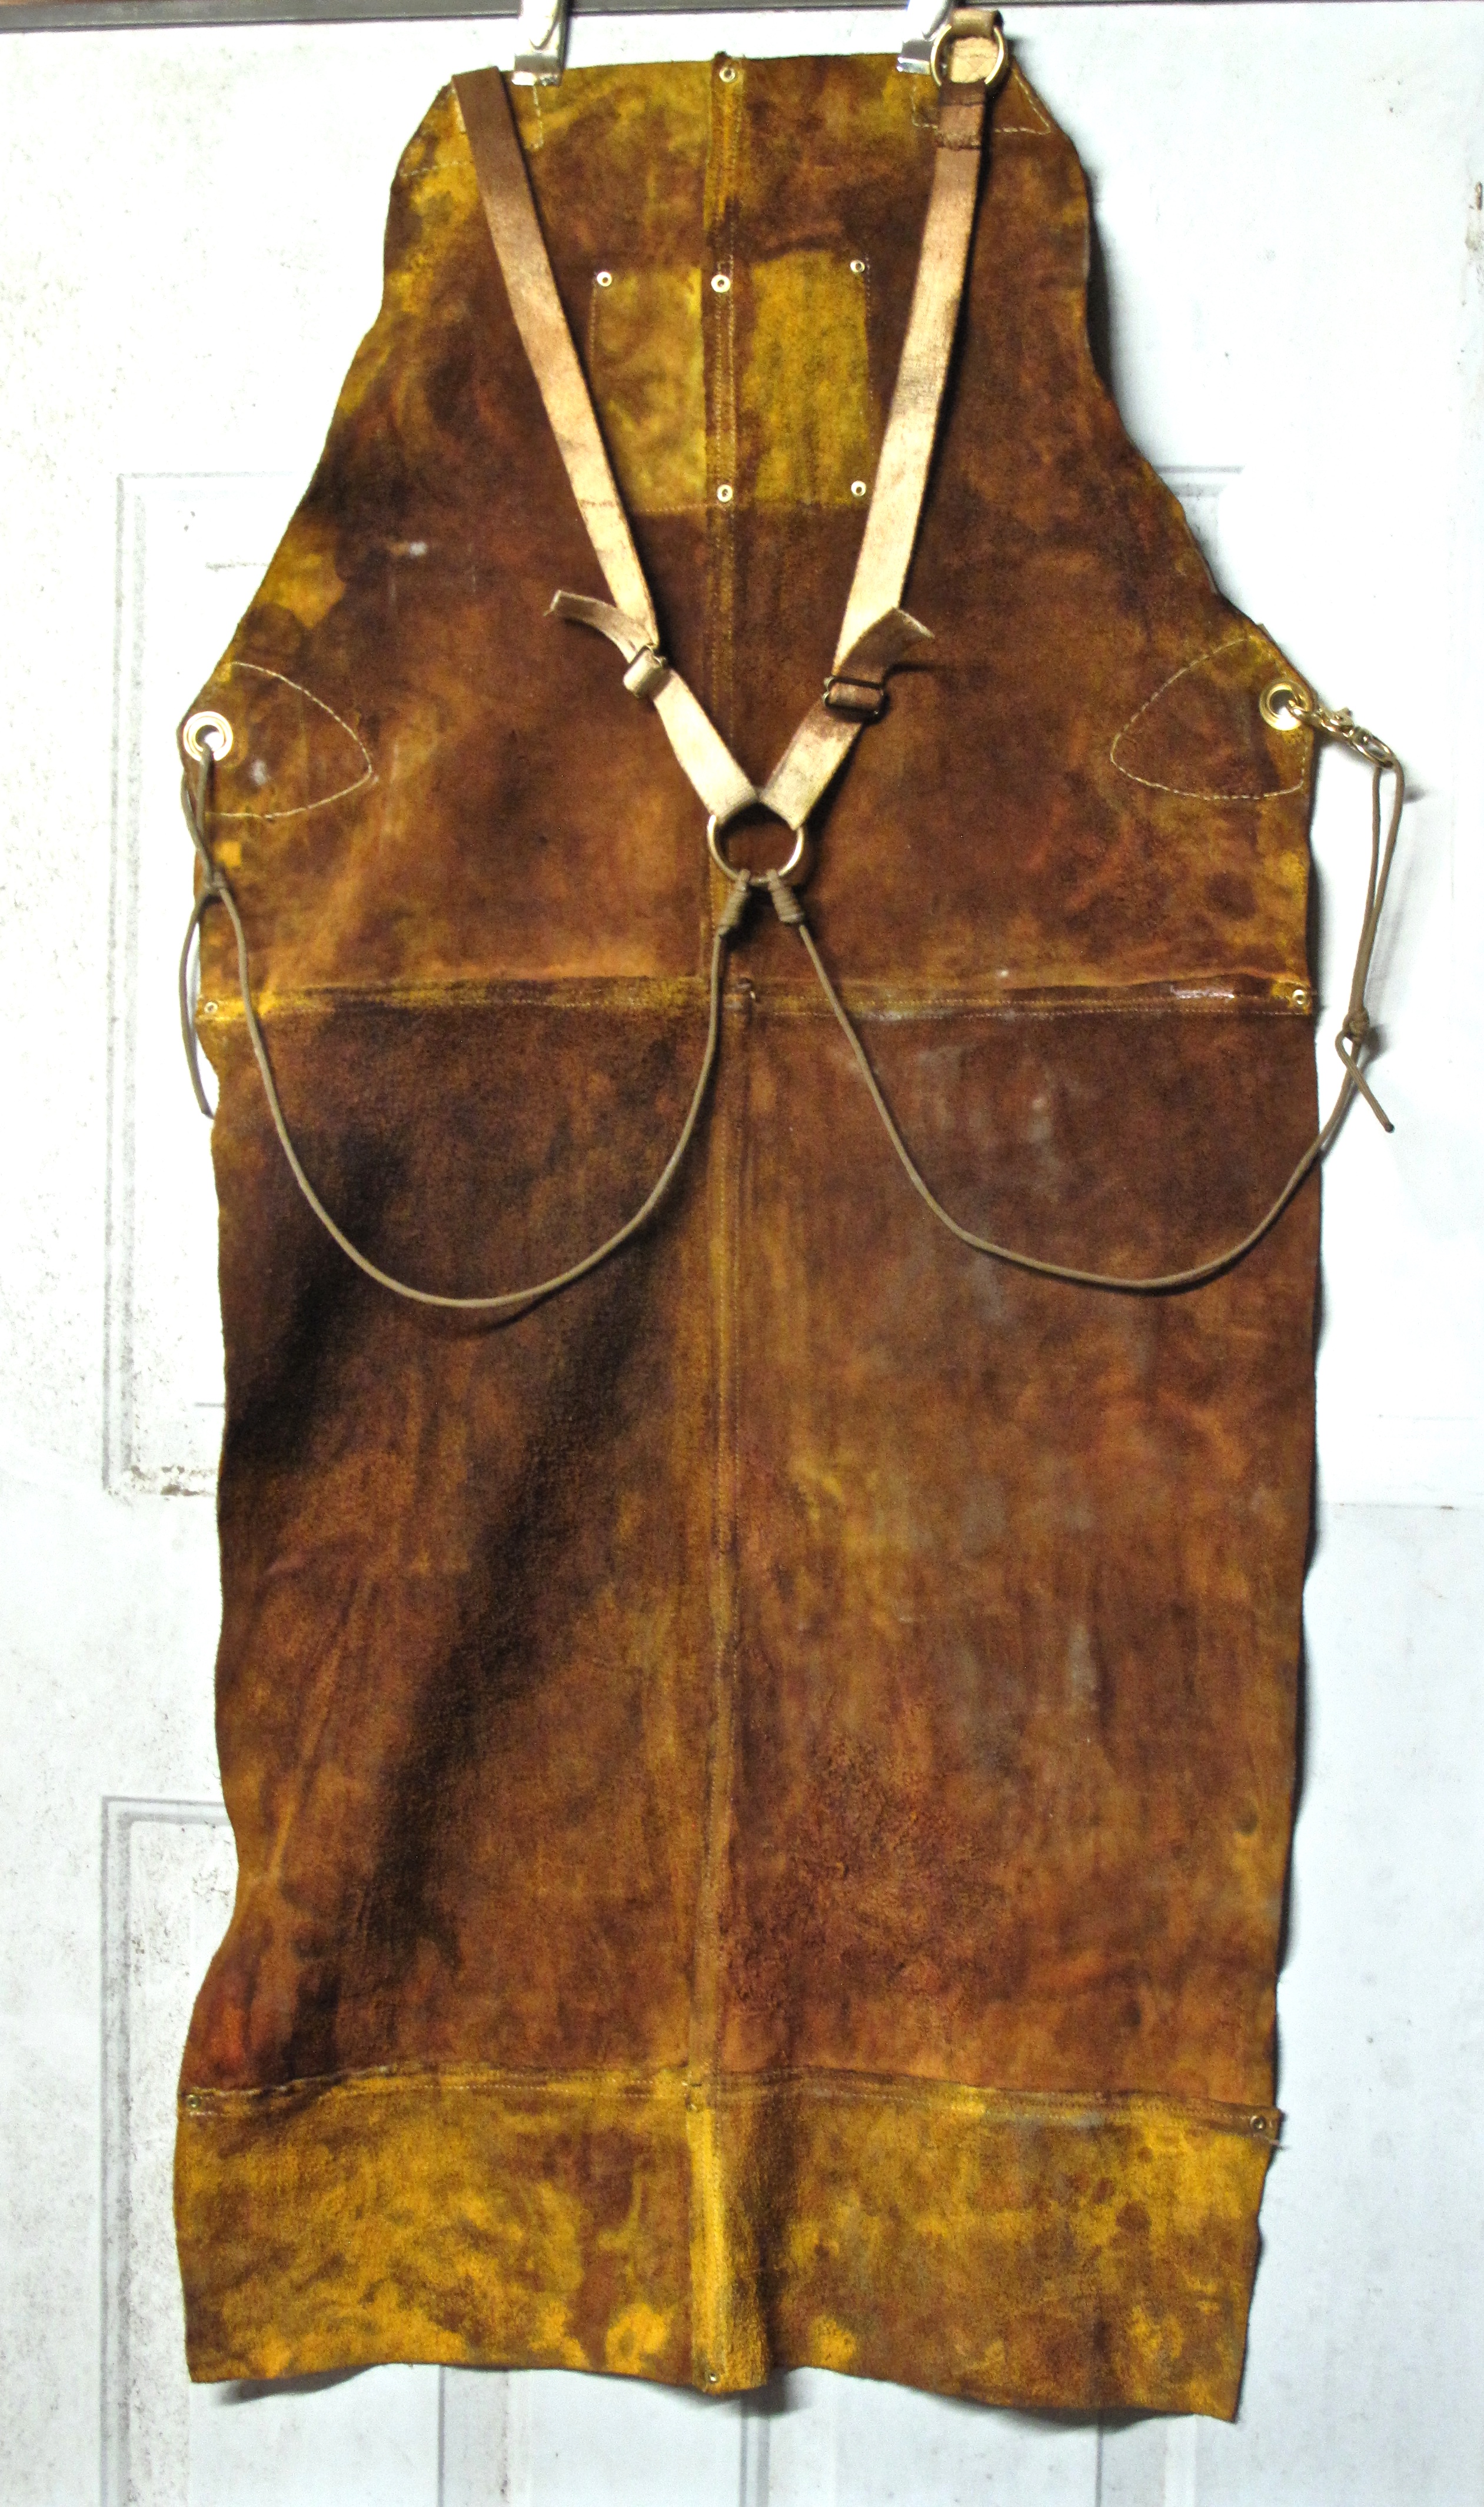
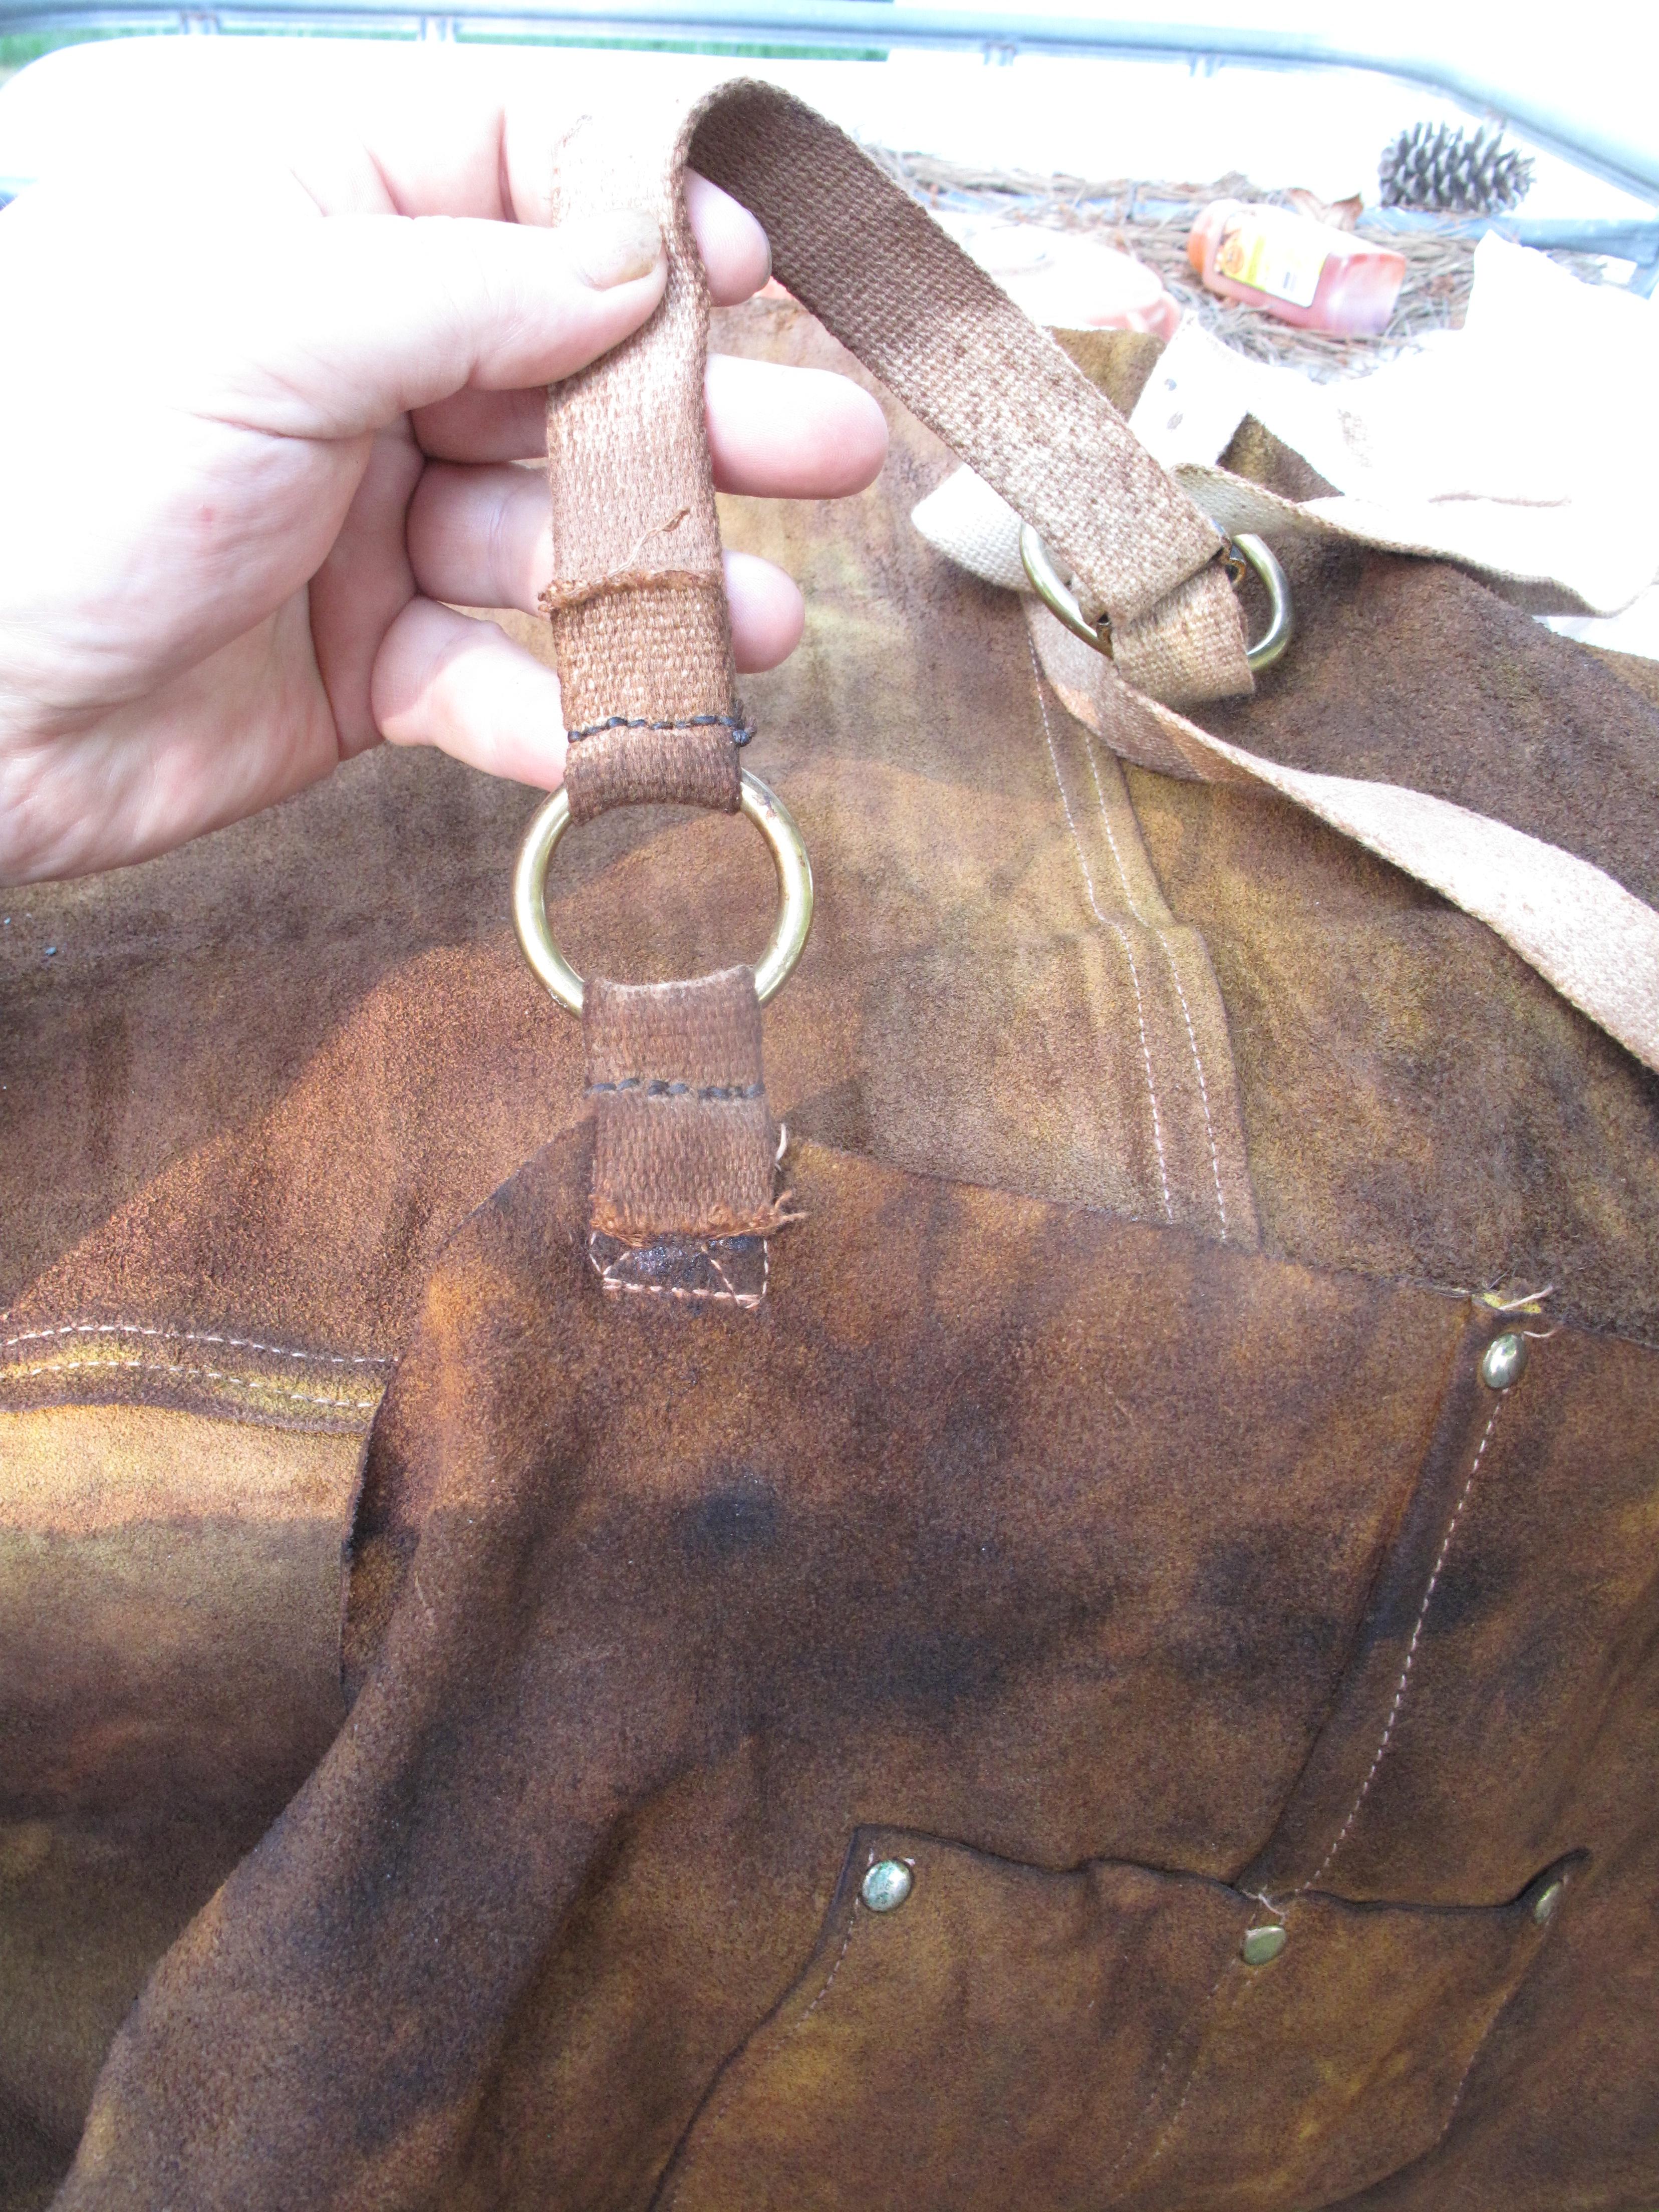
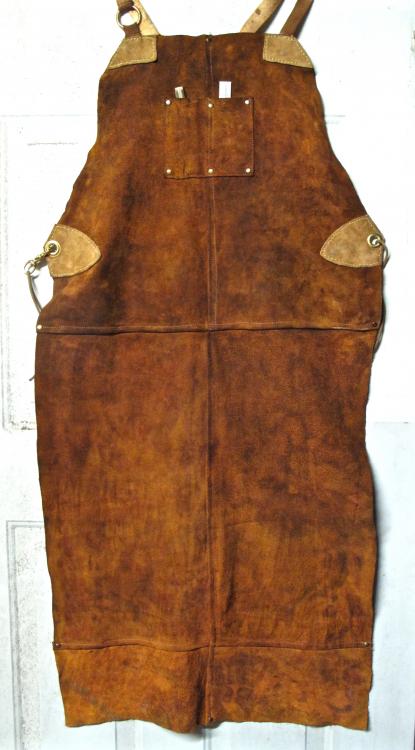
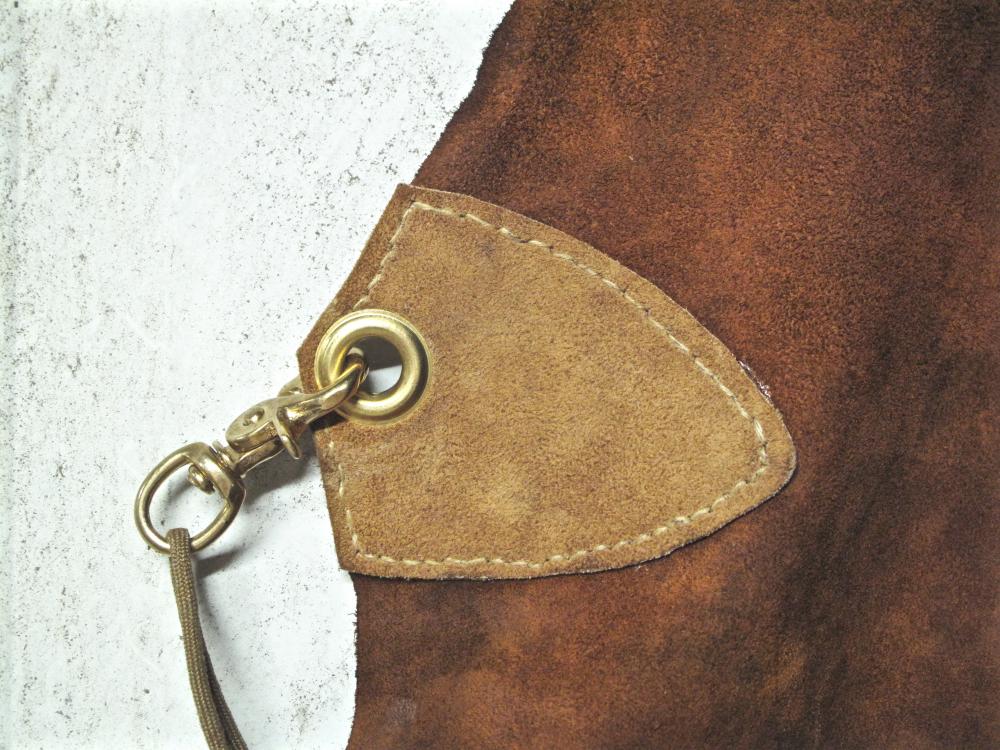
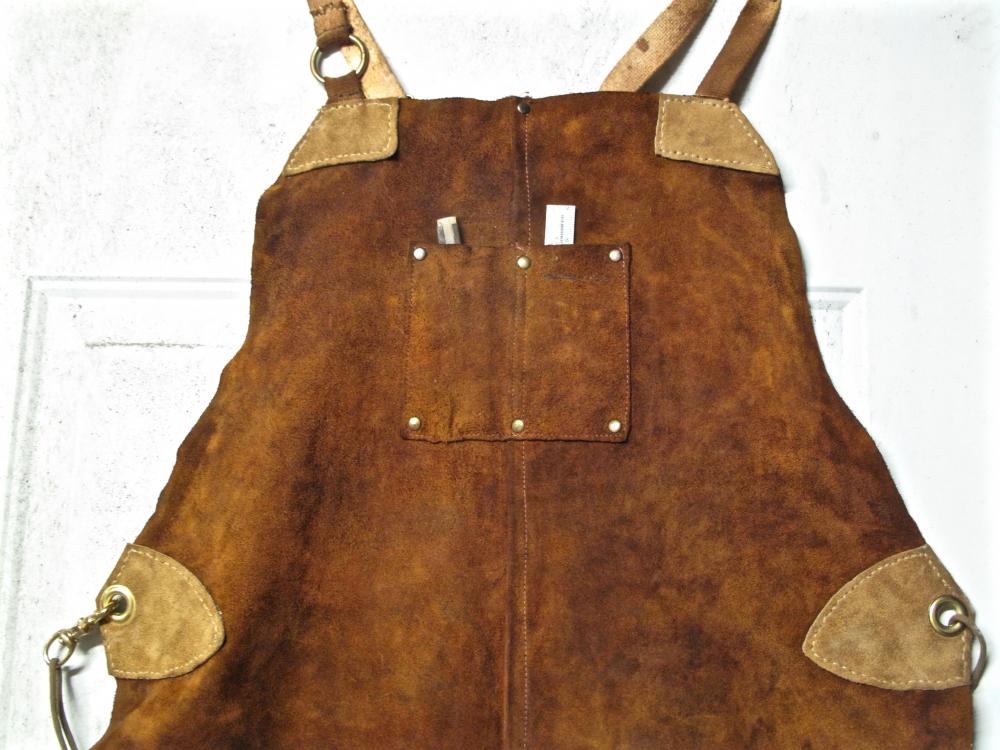
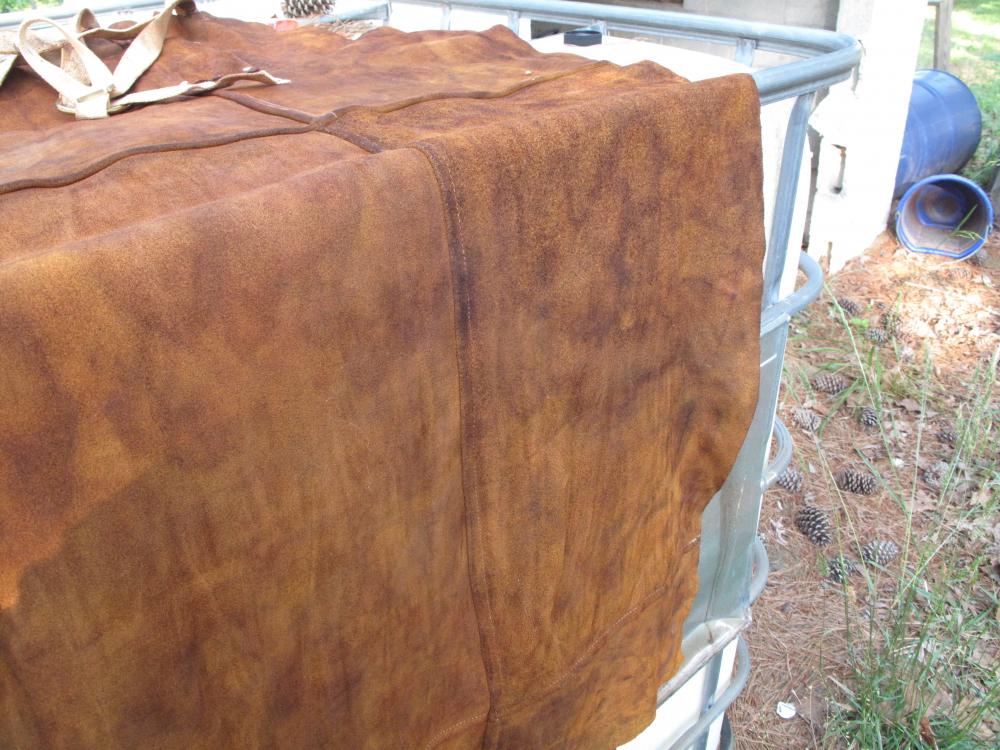
Well, she's officially finished. I got the grommets set in place this morning while I was in the shop, and since I needed to get a couple dishes forged, it seemed like a great time to break her in. The color/dye is splotchy, but the look is growing on me and I'm sure the grime she's soon to get plastered with will even things out a bit. Here's a close-up of the reinforcing patches. I removed all the OEM strapping and stitching on the lower section, but left the cotton/nylon upper straps because they are pretty dang comfortable. On my last Tillman apron, the leather failed right around where the straps were sewn on, so I figured it would be wise to address the issue from the start. Only time will tell if I made the upper patches large enough. All the patches are glued on as well as sewn, and I hope that'll do for awhile. . The grommets let the lower straps move around as much as possible. While the left strap is tied loosely to the apron, the right side has a snap link to make it easier to get out of the apron. Parachute cord for the lower straps as well as nice brass hardware to match the grommets. I didn't see any sense adding more 1" webbing for the lower straps since the parachute cord is plenty enough for the job and you don't have to worry about the things getting all twisted up. A couple noose knots join to the brass ring for a bit of embellishment, and simple slide knots at the sides allow for easy adjustment should I gain more weight or put on a jacket. Overall, I'm calling this a win. Stitching on the reinforcement patches is the most time-consuming part, but I managed to get all four done in just three episodes of White Collar on netflix. Now that I have all the tools assembled, I'm thinking about buying another apron to tinker with. The grommet kit came with a dozen grommets, so I might as well find a use for them! Oh, and you'll be happy to know that the brass ring at the top of the bib works just as I envisioned. Not only does it look good and add a bit of panache, it also makes a perfect hanging loop!

-
Another option, and one not often mentioned, is military-spec battle dress uniform (BDU) pants in a "ripstop" cotton/poly blend. With the double-thick knees and seat, as well as the extra-heavy stitching, they are a great bit of kit in an environment where you are working hard. I would often use a pair of small snips to pull the stitching on the thigh pockets because I'm not a fan of them. Getting rid of the thigh pockets made them far less prone to snagging as I moved through the woods or workshop, and I never missed the loss of storage capacity. I found them very nice for working in warm weather. Never had a seam tear or such, so I'd usually only be done with them once they faded to a point or I gained a few too many pounds. Like the Tin Pants, the BDU's are a tool in the toolbox and come in mighty handy if the circumstances are right. The only downside is finding a make/model that fits you right. With military gear being all the rage for police, reenactors, ambulance crews, et al, you can get them in all the hues and shades you might like, but a lot of the makers are just churning out junk that's cut wrong and fits poorly. Best to visit a local store to get the right pair, and then stick with that brand. I'd buy several pairs at once, trying them all on, and then hope the maker didn't change things up by the time you return for another set of britches.
-
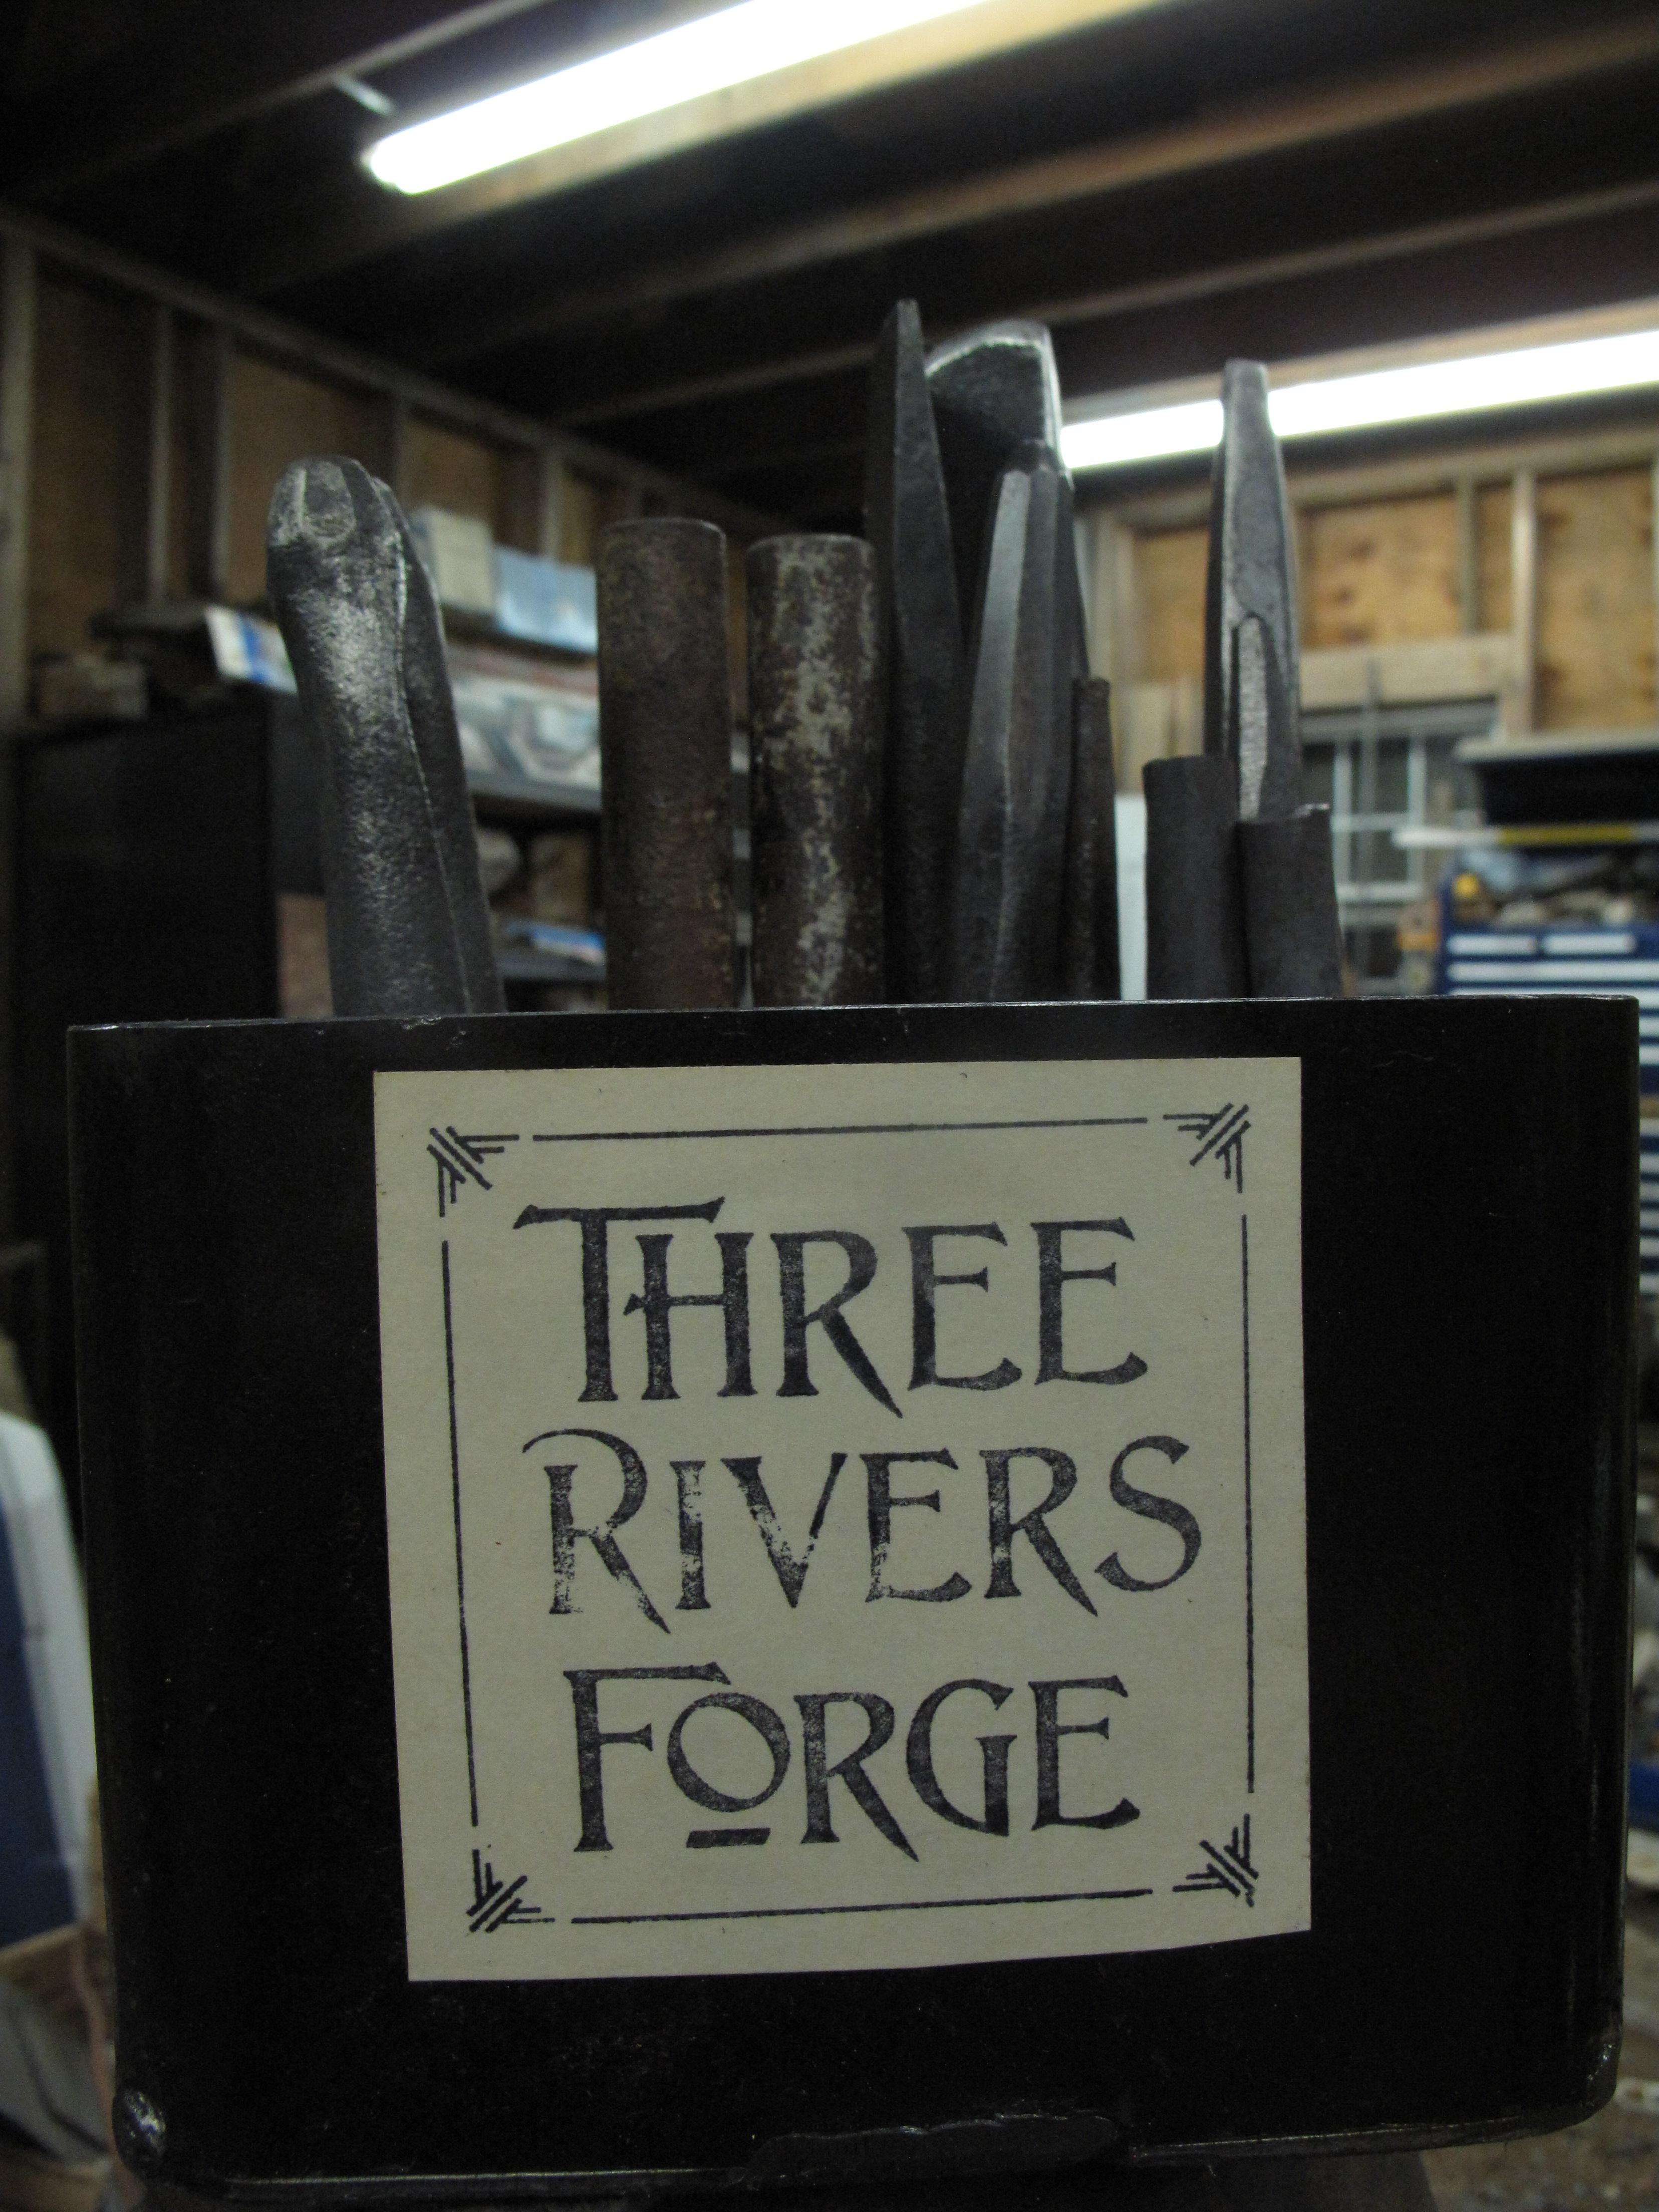
Looked all over my little corner of the world..... and I don't have any signs. I thought I'd have one or two, but the only thing that qualifies is my little sticker I made. It's card stock stamped with the shop name, and I have three of them glued to various things around the shop. I really need to get some cool signage up!

-
It's a shifter handle off some old piece of machinery. The little latch kept it in place so you wouldn't have to worry about vibration causing it to skip on you.
-
If the suede is more absorbent, why didn't it absorb? That apron was uniformly dark chocolate in color when I applied the dye, then most of the color simply disappeared as the thing dried. The orange OEM dye is still showing through in some spots, and the splotchiness is strong, but I'm calling it quits as far as the dye goes. It's been a good learning experience, but.... The brass ring is the important part. Still have to attach the leather patch to reinforce this area, but that'll be easy enough as soon as I figure out how I want to go about doing it.

-
If your anvil is ringing like a church bell, bed it in silicone caulk. Squeeze a tube of caulk out on the stump, set the anvil on it, let it dry.... boom, nice and quiet -- or as quiet as a non-cast-iron anvil can get. Metal buildings are echo chambers and magnify sounds far more than they diminish them. They also increase the heat inside the building when the sun is shining on them! I'd opt to make something on my own, using pallets as the mainstay for the walls. With some posts on the corners to secure things, you can have pallets up and secured in a day. Just make sure you can get enough pallets of the same size so you don't have to cut too much. Think of it like the old wattle-n-daub construction once so prevalent in Europe. The main beams carry the load, and the infill between the beams supports the outer sheathing. You can even rip the pallets apart and use the planks as shingles of a sort. The upside to using old pallets is that they're relatively cheap and give you room on the inside for storing things. Go with as high a roof as you can manage. Even if it's a lean-to style roof, getting it up well above your head will help to keep things cooler in the summertime. Ideally, you should have windows way up at the top so you can open them and allow air to flow out, keeping things even cooler.
-
The apron project is coming along quite nicely. The dye stuff has been a nightmare and I've officially quit trying. I figure that if three bottles of dye can't get the job done, the job doesn't need to be done! I even tried wrapping the apron up in a plastic bag so the dye wouldn't evaporate off, but it still disappears into thin air. When wet, the leather was a very nice dark coffee color. Wait a few minutes, though, and the dye would start to simply leave for parts unknown and the OEM color would start shining through. Tried wetting the leather first. Tried adding water to the dye. Nothing seemed to make the color stick. The only thing I can think of, now that I've done some searching, is that the dye sold at Hobby Lobby isn't meant for suede. I'm seeing bottles elsewhere that are specifically labeled for "suede and roughout" leather, and my bottles didn't specify anything of the sort. Maybe there's something crazy about suede that it needs a special dye all for itself. The good news is that I found the brass rings and grommets. I'll never understand why some HUGE place like Hobby Lobby doesn't have that stuff -- it's a craft store, right?? Imagine my surprise when I ran across exactly what I needed at the hardware store. Yep, I was at Tru-Value to get some screws and anchors when the employee asked me if I needed any help. I bet he was surprised when I said yes! Totally out of the blue, but figured they just might have grommets and whatnot.... and they did! On a trip to Tractor Supply, I found the brass rings and snap link to complete the ensemble. So, the apron has been rinsed and is drying in the sun. As soon as that's done, I'll be working on the straps. Could have her ready for pictures by tonight!
-
That something to ponder on. The bottom stop would need to be adjustable for different lengths, which should be easy enough to finagle. It's the geometry of the bending part that flummoxes me!
-
Got all four brackets made and delivered to the customer. She met me halfway, which was awesome, but I kinda wish I'd driven all the way and done the install myself just so I could be sure everything went together like I envision. Now I have to come up with a way of bending these brackets more efficiently. Right now, I just clamp them in the vise and knock the leg over. The downside is adjusting for different lengths of legs because I have to put a block under the vertical leg in the vise. I'm thinking about buying a section of rack that will allow for 1/4" adjustments while still supporting the lower leg. Not sure about that, though.....
-
I'd keep it and use it. There's a ton of usable face, and having that drop down where the plate broke off just means you have something akin to a tapered square heel. I can see a lot of instances where that would come in handy! And, in the future, when the budget isn't as tight, you can always reconsider getting the girl properly repaired.