bajajoaquin
-
Posts
495 -
Joined
-
Last visited
-
Curious how your S7 anvil top plate worked out. Did you weld it or solder it? How were the results? I'm in the process of doing a similar project.
-
Newbie Power Hammer Questions
bajajoaquin replied to NewfoundlandLaw's topic in Power Hammers, Treadle Hammers, Olivers
Just a guess, but if a name is Newfoundland Law, he’s not in Vancouver. (As an unrelated aside, I was born in Toronto. Like most Canadians if that era, we made fun of Newfies. When I moved to Southern California as a child, I did t understand that they weren’t a universal source of fun. Now that I’m an adult, I dream about having enough time to go to Newfoundland and think that the people there are probably among the most enviable on earth.) -
Welding on an S7 Face Plate
bajajoaquin replied to bajajoaquin's topic in Repairing and Modification to Anvils
Yes, I have those options, but they really don't address my goals, and really don't provide any new information. If mild steel was as good as tool steel, we'd see anvils made from mild steel. I have an anvil with a tool steel face, I don't want to go backwards. A saddle of S7 would not be a part of the mass of the anvil and would lose a large amount of efficiency. This would be a backward step. That JHM anvil is ductile iron rather than steel, and would be darn near a thousand bucks by the time I get it shipped. It's significantly smaller than my current 185-lb anvil, and I don't care for farrier pattern anvils. I really don't want to go down 33% in mass to a cast iron farrier anvil for that kind of money. You're talking about quadrupling my budget here. That's not insignificant. Consensus is not to do Gunter method on anvils unless the damage is really bad, making the anvil unusable, which is not the state mine is in. There are issues with HAZ softening. There are issues with specific alloys being required and skills for working on wrought bases. The level of expertise is generally described as "don't do this unless you are an expert." I am trying to come up with a solution that trades some of the advantages I have (materials, information, design), for those I don't (expert welding technique). I didn't say I wanted sharp edges. I am aware of the issues with edge sharpness.This is not a thread about how to properly dress anvil edges. It's asking about the feasibility of fabricating an anvil with materials and equipment I have current or inexpensive access to. But since you asked, I want better edges because it's hard to get a clean shoulder when doing half-faced hammer blows. I'm particularly working on drawing out over the edge of the anvil when making shoulders on leaves and such. I prefer drawing out on the edge like that to drawing using the horn. I could get a block, but that has the same issue as a saddle, and it's not as good as simply having good edges on an anvil. Tool steel drops are not thick on the ground around me. I could probably find one eventually, but a forklift tine will have clean edges when laid out horizontally, which is suboptimal. Standing it on end will require cutting, grinding and fabricating, which I can do, but then why not use the 300lb of steel I already have? The answer may end up being that the fabrication involved in cutting and grinding a forklift tine is within my means where adding a tool steel face isn't. That's exactly what I'm trying to find out here. Some other shape? Sure, but it's likely to be smaller and I don't need an improvised anvil. I have a serviceable 185-lb London pattern anvil, and I don't need a makeshift anvil. The goal is to get better. I know what duty cycle is. It's 30% at max output. If I'm not spending the money on a new or good-condition used anvil, I'm also not buying a new welder. This is the equipment I have. Note that duty cycle isn't the most significant issue. It's the question of whether 180 amps is sufficient to get enough heat into the weld zone and build up the solid mass of metal. It may well not be enough. But that is why I'm asking. I'm not entirely clear on what you mean by hardfacing rod: are you suggesting that running S7 MIG wire is a better choice to attempting to weld on a plate using the method suggested, or is this a repeat of the suggestion that I should buy a new welder? If it's an opinion that MIGging the face is a better choice, thank you. Can you elaborate? I haven't been able to get pricing on the S-7 wire yet, but Stoody hardfacing wire is $7-$10 per pound. The only other hardfacing wire I've seen that is available in 0.035" wire is more for abrasion resistance than shock resistance, so is not appropriate for this application. In fact, I have a roll of it sitting under my workbench that I bought seven or eight years ago before I understood the difference between shock-absorbing and abrasion-resistant hard-face wire. In general, I understand that this is an extensive, difficult undertaking. I understand that it's going to be hot, heavy, dirty work that is going to take a bigger time and effort commitment than I'm allowing for, and I'm allowing for a lot. That's exactly why I'm trying to figure out if it's feasible with a reasonable chance of success. Welding consumables would be about $150, the tool steel plate somewhere around $100. Perhaps more than Super Quench, but quenching a mass of steel like that is not without its own challenges. That's one of the advantages of S7: it's air hardening. There are issues with hardening the thick cross section, but that's one of the things I'm trying to figure out. Yes, the plan is to weld two blocks together, perhaps all three. If I can weld two big blocks together, then I can also weld on a tool-steel face. There are frequent comments here about using the technique of spacing the plate with a piece of rod and back-filling with filler rod. However, I haven't really read a lot of discussion about the details of the technique. How did it work out? What was learned along the way? If you were doing it again, how would you do it differently, or would you do it at all? The way I analogize it in my head is that you're using the welding arc to slowly pour steel into the gap. It's of course different, because you need the heat of the arc to penetrate sufficiently into the base metal to get good adhesion. However, because you're asking the joint to function in compression rather than shear or tension, the main concern seems to be porosity and getting smooth, complete fill, rather than what would be considered "strength" in a pipeline weld. So it's not clear to me how much flexibility this technique has. I had considered testing the process with the two blocks of mild steel. If I can successfully join two 95-lb masses, I should be able to join one 18-lb plate to a 95-lb plate. But now that I think of it, I can buy scrap mild steel that will mimic my application, and for $50 in welding wire, I can test it. I can test the rebound of the 95-lb block, test the rebound of a plate set on the block (worst case), and then test the rebound of the plate welded to the block using this method. Hmmm... Interesting. Still, since my family demands a lot of my time (happily!), I was hoping to get more insight rather than adding more labor. -
That's a great read. It will be something else that my wife looks at on the bedside table and shakes her head. I am at work, so I can't really read it, but I don't see anything in there that indicates I can't run a reasonably efficient multi-loop coil. I need to pay attention to design, but it looks like there's no theoretical problem with it.
-
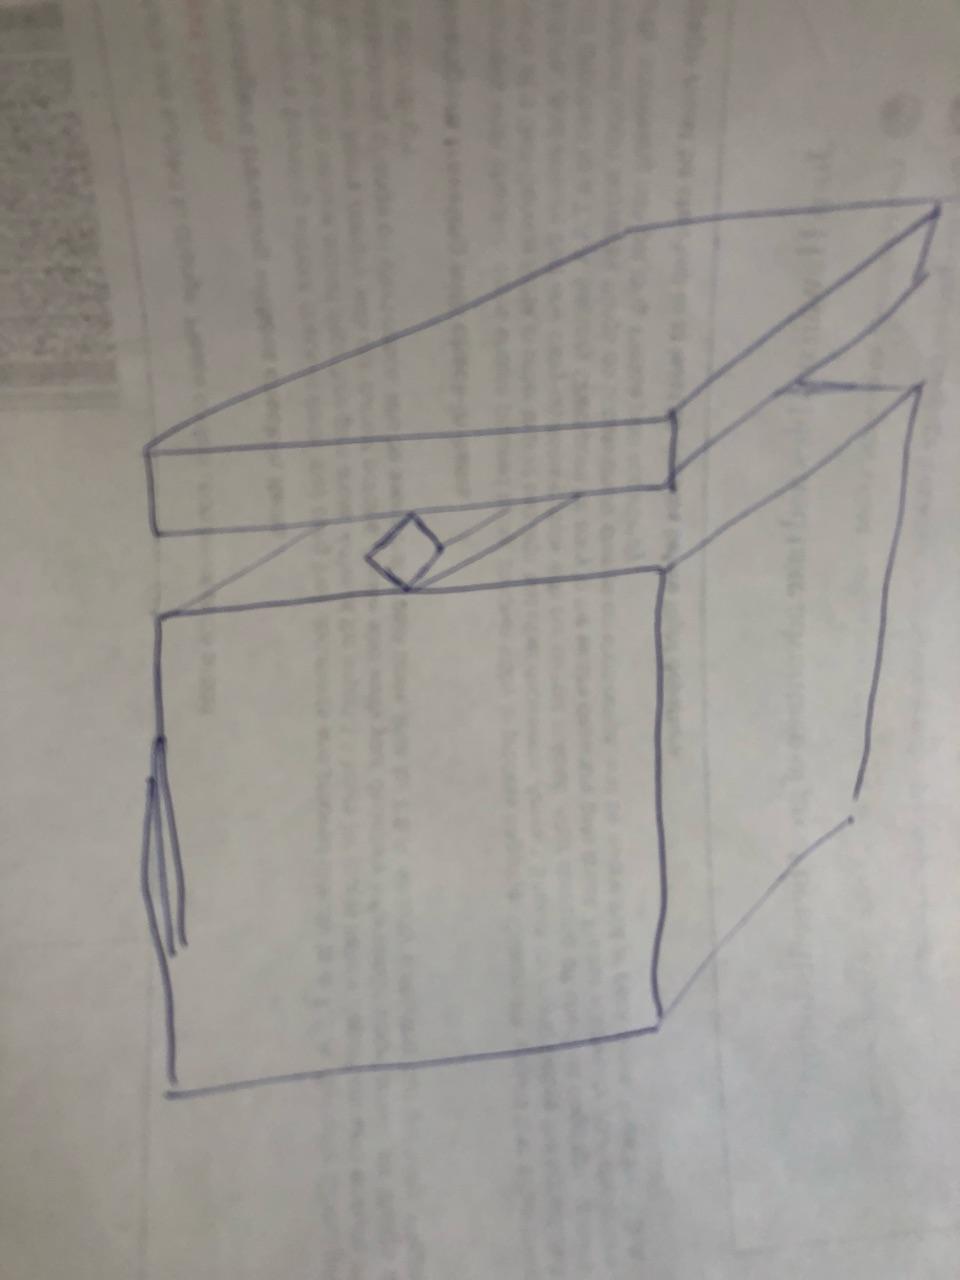
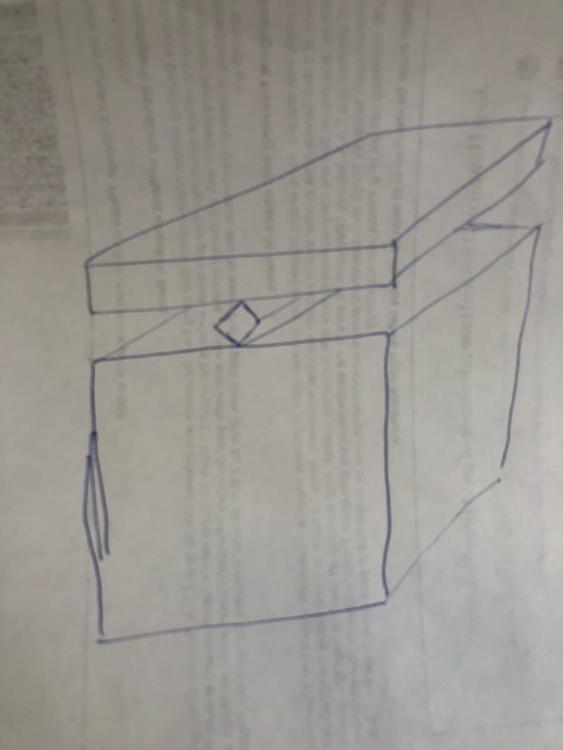
I've been dancing around what to do with anvils, since my Hill has beat up edges. Prices of anvils in my area (Southern California) are unreasonably high, and I have a small stash of 95-lb mild steel blocks. Some searching shows that I can find an S-7 plate of the right dimensions for my steel blocks for about $100. This would be a 1" thick plate. The idea is to use the technique of using a steel bar to support the center of the plate off the steel body, then using a welder to fill the void with welding wire. I was looking at drawings, and decided that having it on the diagonal would give a better liklihood of having no dead spots in the middle where there wasn't full penetration. I'd repeat this with a second (and possibly a third) block underneath for something over 200 or 300 lb. The goal would be to have something with similar or greater mass to my current anvil (185lb) with like-new, unbroken edges. The material sheet for S7 says it should be pre-heated to 500F. I can accommodate that. It's an air-hardening steel, but in sections over 1" it should be quenched in oil or interruption-quenched in water to achieve full hardness. I might be able to accomplish that, but I might also be okay without maximum hardness. My welder is a small 180-amp Lincoln MIG, so there would be lots of passes. But the cost, including welding wire, would be around $250. Spending low four figures on a "new" anvil is just not in the cards right now as that money just went to try to fix a car project that went pear-shaped. An anvil fabricated with a single mild steel block would be about 125 lb, with two blocks would be about 235, and three blocks would be 350lb. Another option is that Eureka Alloys sells S7 MIG wire which could be used to face over build-up wire. This would be a MIG version of Avadon's TIG'd S7 face. Here are my questions: Am I likely to get sufficient penetration, or adequate fill with this method to be worth the effort, or am I looking at hours and hours of work to achieve a dull thud with little rebound? I don't want to find crazing and stress cracks after all this effort, so any comments on experience with welding S7 to mild steel? Would this process be better or worse with a thinner (1/2" or 3/4") face plate? Is the toughness of S7 a bigger factor than the hardness, or what is the importance of maximizing hardness and figuring out quench? Assuming average competence, and not a lifetime of welding expertise, am I likely to end up with an anvil that is superior to a block of mild steel? Is MIGging on S7 wire for a hard face a better option?
-
To be clear, I think what you're calling the "base" is what we would call a "stand." If you're asking if Hay Budden ever made a cast-iron "base" then people will think of the bottom half of the body where the waist blends into the feet. That's the "base" of the anvil. Did Hay Budden ever offer a cast-iron stand? I don't know, but that's a different question.
-
Mettle works has them
-
Any opinion on multiple loops per fixture? What are the downsides of having a 3/4”, 1.5” and a 2.5” (or similar) on a single coil? That way you could have multiple size ranges without having to change coils.
-
Looks to me like that Champion is set up to run off a line shaft.
-
Show me your Bottle Openers!
bajajoaquin replied to Arbalist's topic in Blacksmithing, General Discussion
Corian is a nice material. It would make a nice opener handle. -
5x5x20 calculates out to 142 lb. Thats a nice sized anvil. Whats it from? Who knows?
-
Carbon Arc Forge Idea
bajajoaquin replied to Peter’s forge's topic in Induction Heating, Oil forges, etc
Charcoal, surpisingly, is carbon neutral. Tree grows in our lifetime, absorbs carbon. Charcoal made and burned, carbon released. Okay, you have carbon input to make charcoal and transport it, but the fuel itself is neutral. The problem with fossil fuels is that it is carbon sequestered over millions of years being released in decades. So if you live in the Pacific Northwest, they have like 90% hydro and induction is probably cleanest. In coal county, charcoal, and hard to say what would be best in natural gas states (it’s pretty clean given its transport costs but it’s still a fossil fuel). in other words, everything needs energy to bring to forging temps. Life is a series of compromises. -
I’ll read that, thanks. I’m curious to see as my heaviest use was for an hour a day maybe an hour and a half. It was idling for well over half that time. So if it’s just the appearance of a draw, I don’t think that would account for $350 at that amount.
-
I think what he's saying is that the profile of the draw gets surcharges. My interpretation is that if you have very high peak draws, you get charged more. I haven't read my bill that closely yet, but it makes sense. I used my forge a lot in July when it was very hot, and grid load was also likely very high. That seems to me to be the conditions under which you'd see a surcharge. I remember having this discussion with Grant Sarver (RIP) about electrical use. He believed that the net cost of use was lower than coal or propane, and it was based on the same calculation as you are indicating: the total draw over time is fairly low. It may not have accounted for the variation of power companies' policies or a difference between residential and commercial service. But we shall see. Incidentally, that case is black, but all the controls and internals otherwise look like mine. OP did a heck of a lot nicer job routing the cooling lines than I did, though! Oh, and more comments on your setup. Your home-made cooler is really quiet. Nicely done. I have two coolers: an older Miller which needed a pump seal rebuild, and then an inexpensive TIG cooler I bought from Amazon. I'm guessing you spent less than I did, and have more cooling capacity. On the other hand, I have more unnecessary junk in my garage, so I've got that going for me! I also like that you're experimenting with the amperage controls. I just run everything cranked up all the way all the time! I've seen as high as 814, I think, but maybe only 812.
-
Hmmm. That might explain my $350 electric bill. I thought it was the AC