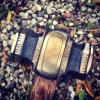
April 24, 201412 yr here's a rounding hammer I just finished up. Head weight is a tick over 3.6#. The handle was requested to be a bit shorter. The handle is antiqued, and has some simple filing near the head to add a little decoration to it to match the status of the head. This one was prettied up with some file work, and with the use of some chisels. The chisels I use for this are itty bitty little things. They're not 3" tall, and are pretty narrow too. When working on a piece cold, I like chisels of this length and size as it allows me to better control the work I'm using it to accomplish. Also, it's nice to be able to rest my hand or fingers on the piece itself to help steady my hand. The chisels used for this one were quite simple, a couple straight ones of different lengths, and widths. Sometimes I used one with more of a "knifepoint" for finer lines, and sometimes I have reason to use one with a blunt angle, much like a cold chisel, if I want a thicker, more pronounced line. The "teeth" on the sides of the faces were done with a thicker one like this. I established them in flat, at the groove, then lightly tipped it to make the teeth taper out thinner near the ends. I think a small "S" chisel would do excellent for this-would give the appearance of stylized flames. I also used a very small, very acutely pointed center punch for the dots. The curved line on the flat oval on the cheeks was also done with a small straight chisel. With a small enough chisel, and enough overlapping blows, it's easy to walk it into a curved design. I'm pleased with how this one came out. The bronze colors are done by using my super secret method of coloring steel. It's so secret that even if I told how it was done, none would believe me. Can you say 1980's broken down toaster oven? :) After bringing to the desired temperature (color) I quench in oil to blacken all of the recessed areas.I've made a few of these decorated hammers now, and plan to do more. Aaron Post edited to remove facebook link. No reason to have part here, past there, and part somewhere else. If everything is posted in one place it is much easier to read.
April 24, 201412 yr Awesomeness is an understatement! Gorgeous work.... let me know I can come pick it up! ;)
April 24, 201412 yr O...M...G... I have never seen a real steampunk hammer before. I would need a waistcoat and tophat with brass goggles just to pick it up!
April 24, 201412 yr Gorgeous! One complete newbie question, though, can you or someone explain how the quenching in oil that you mentioned produced the blackening of the recessed parts? It's beautiful but I don't understand how that works?
April 24, 201412 yr The hot metal scorches the oil, and it bonds to the metal, just like a well seasoned cast iron pan. If you then soak that crusty layer with oil, it makes a rust resistant coating. To get the two-toned look, polish the exposed surfaces. If you want the peacock hues, heat in an oven or muffle pipe in the forge to get the colors to run.
April 24, 201412 yr I like that a lot. When I make a hammer, I'll have to remember to gussy it up a bit.
April 24, 201412 yr Make up some blanks and then work on them when the weather is too hot, cold, "other" to work at the forge. Look at some of the file work done on knives, engraving, etc.
April 25, 201412 yr yes this is very sweet how would you even know how to charge for work that intricate. you should go for a patent on that design
April 25, 201412 yr Author Thanks all for the kind words! I really don't do much layout work, if any, I just file and chisel as I go. I add one element, and see what might look good next to it. I've seen some nice filed hammers, and some beautiful antique ones, so that's where I've drawn some inspiration from. Old Jewelers hammers have some very ornate designs. The chisels I use are very simple. I used 3/8" round, 4140, as that's what I've got a bunch of. I forged it octagonal, with a tapered end for the striking end. I then either forge or grind the chisels and shapes to shape. Heat treat/temper and call it a day. Aaron
April 25, 201412 yr I think the steampunk outfit to go with the hammer would be pretty cool too, I like the waistcoat and brass goggles idea... that would flat rock;-)
April 25, 201412 yr I think the steampunk outfit to go with the hammer would be pretty cool too, I like the waistcoat and brass goggles idea... that would flat rock;-) I agree, the hammer has a delicious 19th. century Victorian style. I wouldn't be surprised to find it in a tool box on Nautilus. Waistcoat, brass goggles, telescopic goggles of course, stovepipe hat, indeed, check. Hmmmm, slacks, dark maroon I think, with gold braid piping and brass button fly, highly polished gold laced brass buckled boots stopping just shy of the knee. But most important of all, gears, a nice planetary gear train breast signet and a gold pocket watch with external gearing, on an ornately forged solid gold chain of course. Oh oh, a PIPE! How can a gentleman BE a gentleman without a proper pipe! Meerschaum of course, self tamping with a dottle ejector and mechanical match striker arm to light it! The tobacco pouch automatically measures the perfect amount and preshapes it so the autotamper can place and tamp it to perfection. Oh yes, I like this direction. Frosty The Lucky.
April 26, 201412 yr Greetings Aaron, A true work of art... Picasso of hammers ... Forge on and make beautiful things Jim
April 28, 201412 yr Author Here's the three main chisels/punches I used for this piece. two small straight chisels ov different widths, and a very acute center point of sorts. For cold work, I like the smaller length, it allows me to steady the piece too. I'm working on the anvil, but put a piece of leather over it. Helps to not mar the piece, and helps add a bit of grip as well. For layout work (If I decide to do any) forget a ruler, couldn't get by without these. They give unchanging units of measure, allow you to pick a pin point spot to mark with ease, and make finding harmonious proportions a breeze. I've got a pair that I forged in pickling to descale it, because I should really be using a pair I made myself. :)
April 28, 201412 yr Thanks so much! great tools, going to be ordering some 4140 and work on my metal carving skills. do you anneal first?
April 28, 201412 yr Thanks for a "peek behind the curtain"! Ever thought of doing a video? Would love to see your craft in video format.
Join the conversation
You can post now and register later. If you have an account, sign in now to post with your account.