SJS
Members
-
Joined
-
Last visited
-
They didn't want to have "as forged finish" with genuine ballpein hammer marks... Thank you Thomas, that is exactly what I was looking for
-
I took a class with Mark Aspery, and he quoted a traditional saying in the "British" English version, and I can't remember the wording exactly, and I like to be precise... But the quote is: If a blacksmith would an edge make keen, then he must forge it thick, and file it lean/theene??? I just wanted the nice colloquial flavor, of a traditional saying, any help from across any of the ponds, or local for that matter? Thank you Shane
-
Thomas I thought I remembered that James Nasmyth had done testing that said that even a good weld only had 80% of the strength of the parent material? But of course when I went looking all I found was a Scientific American article where Nasmyth mentioned that eight of ten fractured links were due to "defective" welds where the scoria (oxides) was not ejected properly... Not quite the same thing
-
When you run across a "unicorn".... Just shut up and cough up... Before you walk away think about how likely you are to see another one, and will you regret this for the rest of your life... Save your pennies and wait for the good stuff.
-
I like 1045 for making hammers. It's a simple fairly tough, but not harder than my anvil. It's super easy to harden with just a water quench. 4140 is fine for hammers too. 4140 and 5160 for most tooling. I especially like them for tongs, you can forge the reins down pretty light and springy. You need to be careful to not forge too tight a radius in your transitions from boss to bit, and bit to reins. They are stress risers and will fatigue with heavy use. Crisp transitions make for a pretty tong, until it snaps... I like making handled struck tool/top tools out of 4140 & 5160 as well as swage type bottom tools/ hardies. Most of the time heat treat is very simple, forge to finish, and allow to normalize. I really like S7 and H13 for hot work tools, but I have to keep a few brass and copper hammers for striking the fancy tool steel. The struck end will be much harder than a 1045 hammer face, or even a 4140 hammer face. I have tools that I made at least 10-15 years ago, that have seen a fair amount of use that I rarely have to sharpen. I only had to redressed the struck end on my running chisel, because I used a cheap Chinese #2 hammer on it, till it spalled badly. I have easily cut over a hundred feet of steel with that running chisel. H13 is flat the best thing going for making a long hammer eye drift that you will use as a mandrel to forge the cheeks of the hammer eye. I don't recommend either steel for turning forks, I made an S7 hardie turning fork and it split? Could have been a bit hot short, or other bit of operator error. Better to use a tough steel with some vanadium in it, safer and less expensive. Blacksmith shop heat treat for these is get them hot let them cool. Don't be afraid of them, they are air hardening, so it's basically like normalizing any other steel. Except they get hard and stay pretty hard. S7 you can do an interrupted oil quench if you want to push the material as much as possible, but you don't need to, and it's safer with expensive steel to just do the air hardening. If you hit these tool with a good hammer with a hardened face, bad things will happen, A.) you will damage your good forging hammer, B.) the struck tool will eventually spall. These spalls are very dangerous, when the steel lets go there is a great deal of energy and heat. Not something you want to catch in the face, and not something you want a spectator to catch...
-
He is in Kansas, the other Oz, like Dorthy I don't think we are in Kansas anymore... It looks to be a later style Little Giant with plowshare dies if I'm not mistaken...;-) Couldn't read the maker, that pattern was made by several different companies over the years: LG, Moloch, Meyer bros, ECT..
-
My preference is to use round, I find it easier to get the transitions from bit to boss and reins... I also prefer 5/8" to 3/4" that has sufficient volume if you handle it well... If you get good at slitting, you can use 3/8" x 1" flat forge a jaw on each end and then split the reins apart. Then you can finish drawing out the reins and smooth them out and break corners and such... :-)
-
Large triangular file... They do long nice, good proportions and you matched the lengths very well.
-
You are always chasing the twist, to be honest. Even when you do each step in order, and yes you should try and break the corners, or chamfer the reins in a long run. Finishing each step throughly, even if it takes two or three heats to do that process to the entire length of the reins. If you work in short sections invariably your work gets lumpy when you are starting out, and sometimes after you have been doing it for awhile... ;-) Take a long heat working the reins back and forthe in the fire, and then chase one corner down the entire length, stopping as needed to straighten the stock, and reheat. Its a good idea to work both sides when you are breaking corners, the hammer will break it down deeper, so to get them to look even, you need to do both sides. Then move to the next conrer and chase it the whole length. If you have someone to strike for you, you can use a flatter to help smooth things out. Smaller flatters or set hammers are nice for chamfering work because you can see your work more easily, you just have to be gentle with them. Weither you are using a hammer, or a flatter you are always working to knock down the high points and clean up the lines. Hot rasping can help too. If you want to hot rasp to clean things up, use an old farrier's rasp, or a big farrier's finish file, or a heavy cut bastard file. Working hot is hard on your good files, which should be saved for clean cold metal. Rasps and files are expendable tools, but no sense being abusive... Get the peice hot, wire brush it good with a big Butcher Block Wire Brush on the anvil where it is supported, then clamp it quickly and start smoothing your work with the rasp. A Caulking vice, or a farrier's step vice are great for this, a post fice is fine, but a little slower to get engagaged. You can buy or fabricate a small vice out of a pair of vicegrips, that slips into your hardie hole that is quick for hot rasping. The thinner the section the harder it is to do, and the more gentle you have to be to not bend it around,,,, Those scrolling tongs I hot rasped the bits quite a bit;-) and the boss area some, but didn't do anything with the reins, just as forged (so they look just a little lumpy;-) Like I said a belt grinder can hide a multitude of sins;-) If you use a bench grinder to strip the scale off, or pickle it in vinegar overnight, you can use some good files to clean up your reins, and everything else really. To get the most out of your files, it is best to strip the scale off, it dulls the files too quickly... It is much easier to do whitesmithing bench work than hot rasping, the cold metal doesn't bend all over the place, and you can take your time and do a nice job. Files are easy to use, and do a good job. They are slower than a power tool, but much safer, for you, and for the piece;-) Aftre you get it as smooth as you like, you could gently reheat the whole set to a dull red, and then let it normalize, to get a nice rust resistant scale coating on everything, you might wire brush it lightly if your not gentle with the heat...;-) Lots of things you can do. But like I said earlier, the smoother, and better you make your tools the more enjoyable they are to use, and the better they work... Look forward to seeing what you come up with :-)
-
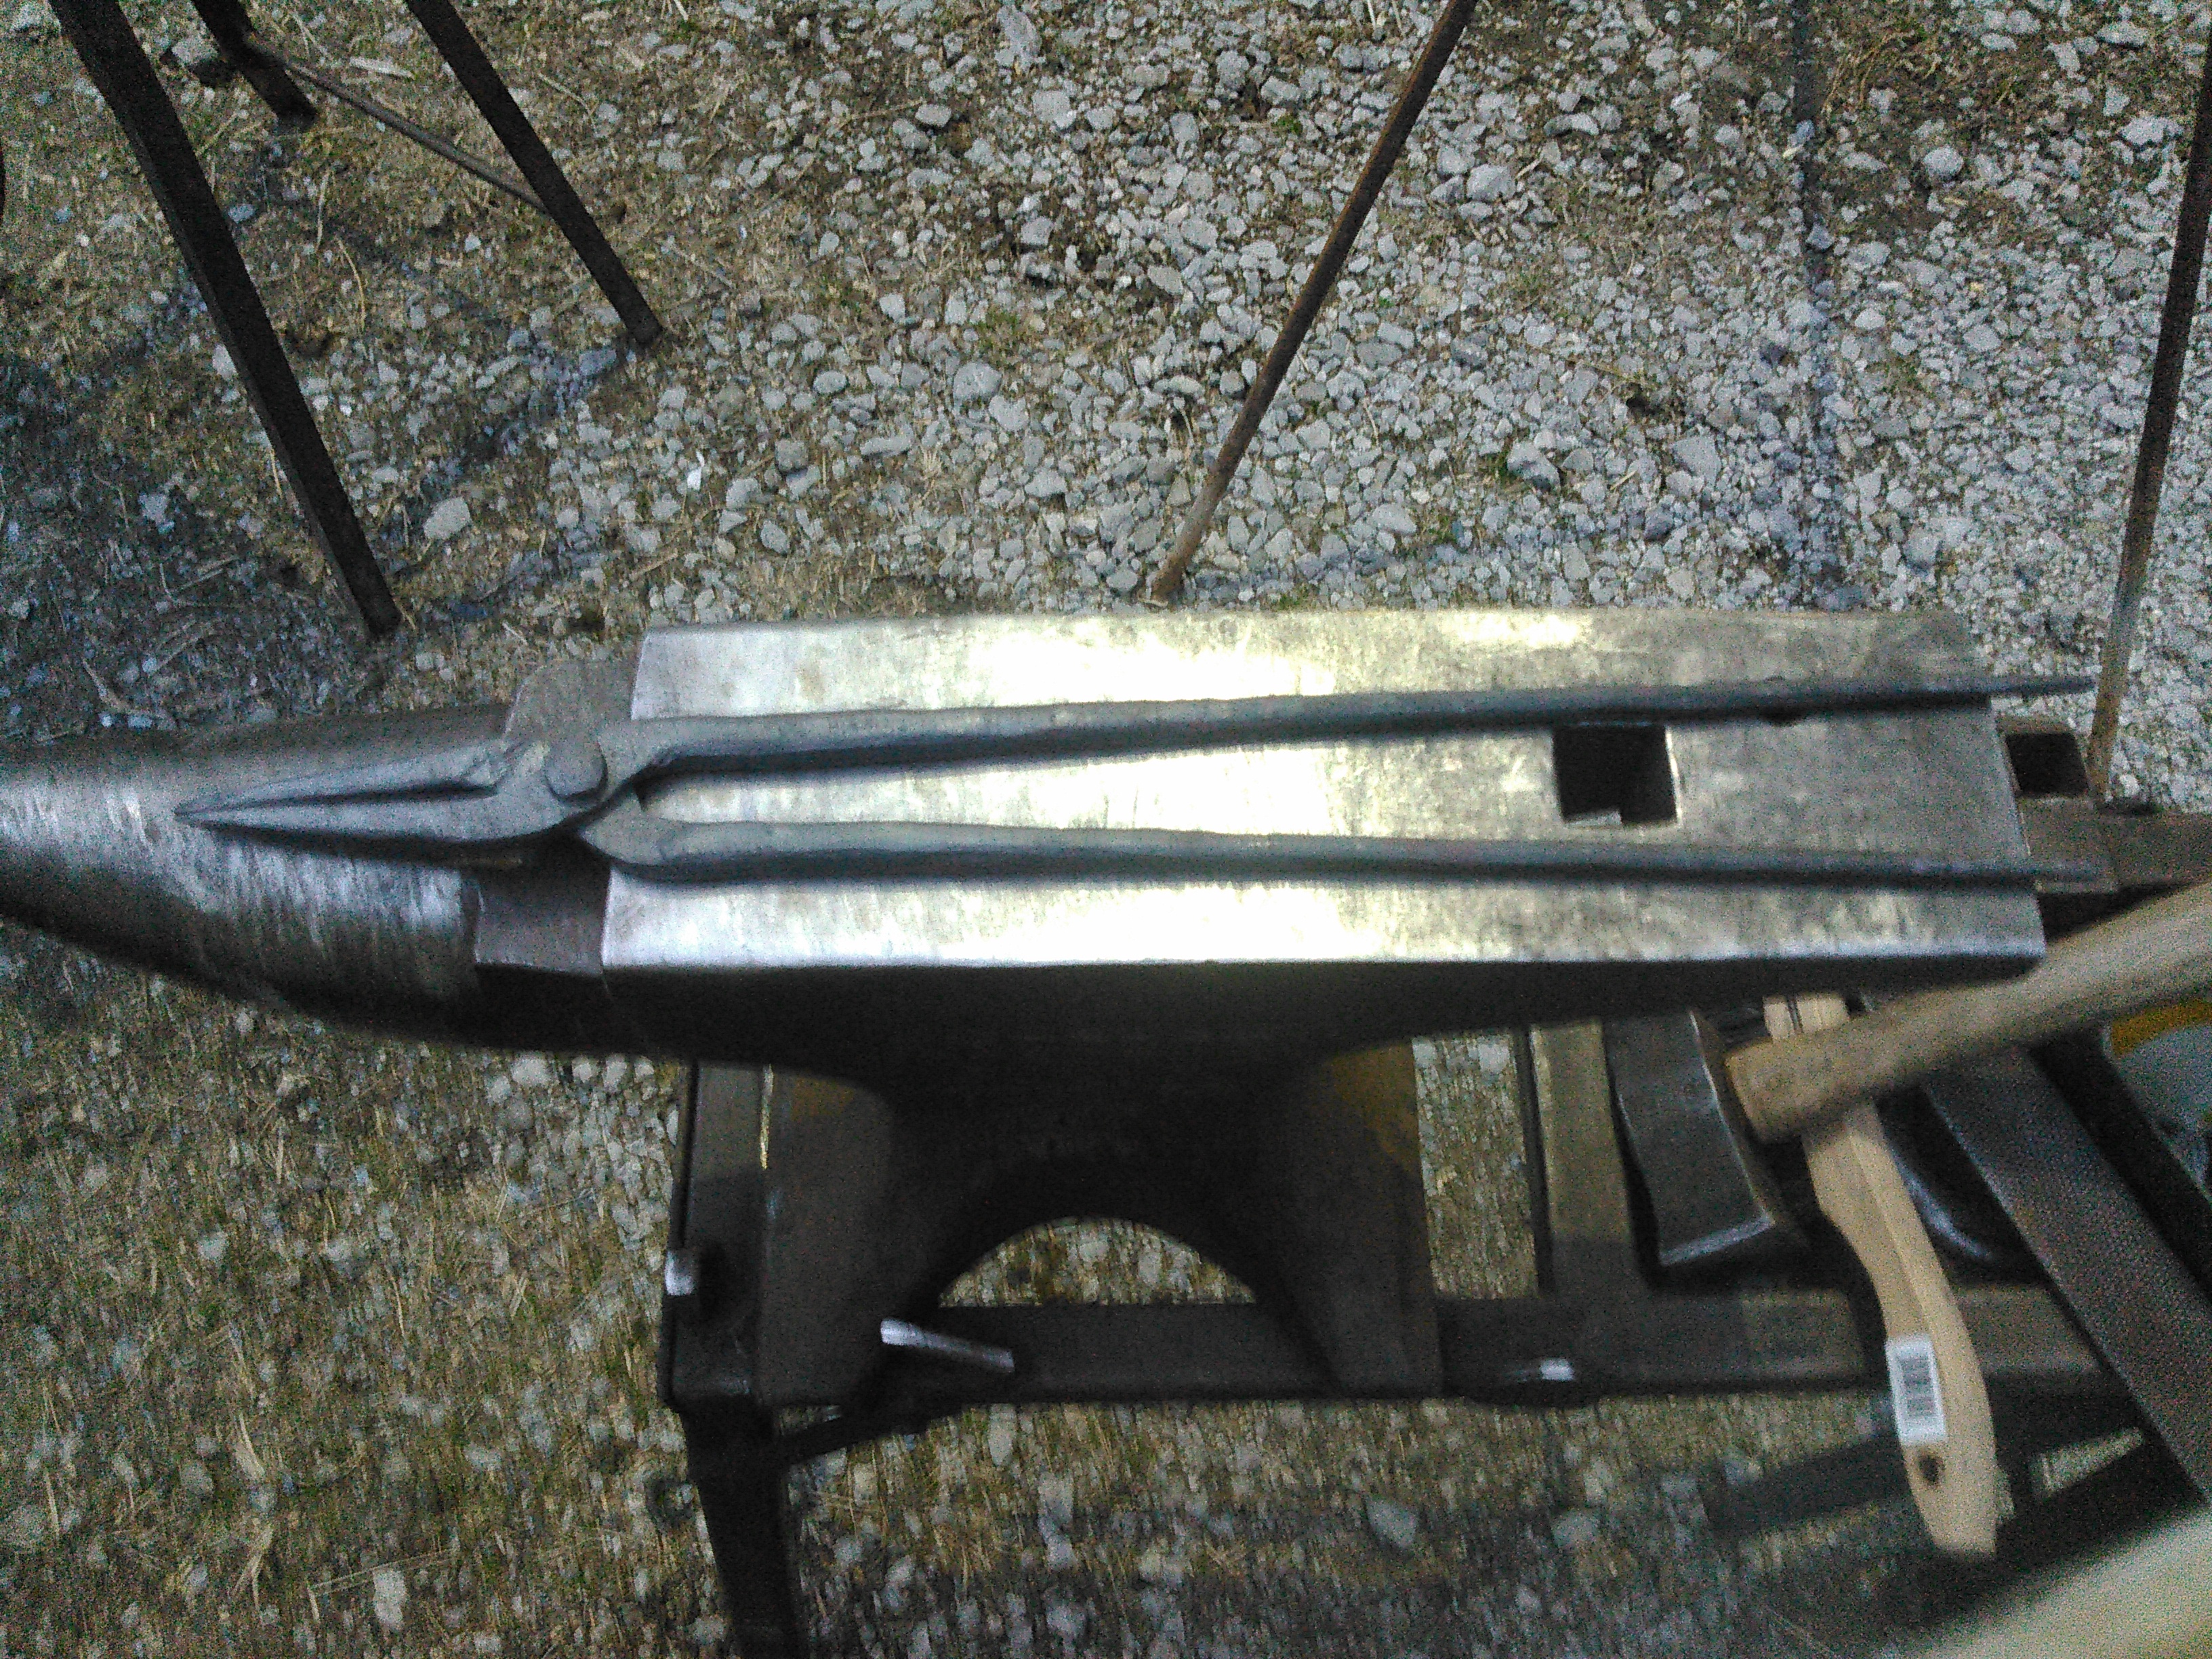
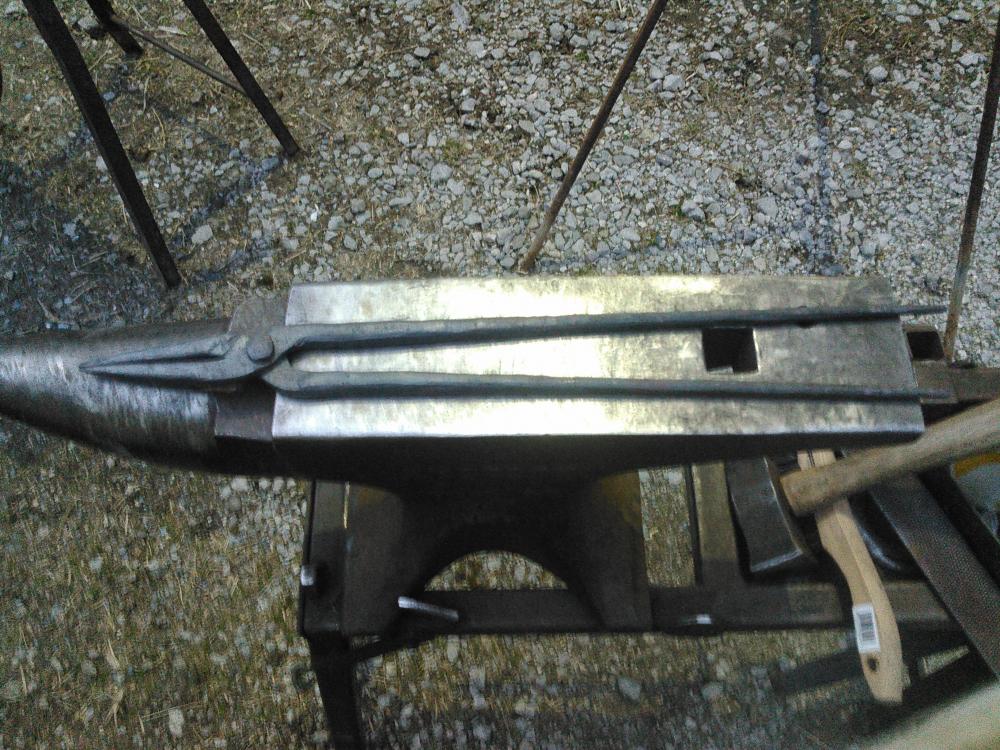
Here is a pair I forged out of 1/2" square. I only had the tools I carry on my farrier's rig. So I kinda had to McGuiver these. The rivet was a horse shoe, apparently I should have used another shoe to make a bolster, and forged the rivet head before riveting the tongs together... A little over confident I guess. The reins and the bits look decent though. The boss area is sad... Since I was making scrolling tongs I was hesitant to take a normal bite to set the jaws and the boss like I would with a normal flat jawed tongs. I hate using 1/2" square too, much prefer 5/8-3/4" round, and a power hammer, or even 3/8" x 1" flat. I kinda muddled along with only the tools on hand. I had to use my creaser to trim the rivet, and the tongs off the end of the bar. My normal bosses are much better, really ;-) The anvil's face is 13 1/2" long for a good idea of scale. But they feel pretty good, and should work fine...
-
Years ago I had a lady really want to sell me a beautiful Armitage Mousehole, probably that size exactly, of course she wanted 900-1000$. It was a truely lovely anvil, wonderful crisp lines all the way around, even down through the feet. The thing that made me want to cry, more than the price...;-) was that there was a good size chunk missing from the face, and there was a large section of the steel top plate that went back toward hardie hole that was delaminated. It was fixable, but it wasn't going to be quick or easy. And she was convinced that it was STILL worth atleast 3$ a pound. I told her the truth she really didn't want to hear or believe, that if it had be in perfect condition it could fetch up to 6$ a pound, but as it was it was really only worth 1$ a pound... She didn't believe me, because it wasn't in her economic best interest;-) those are always the Truths that are hardest to swallow... It was a lovely anvil, except that one HUGE flaw. Just made your heart sick... At the time 300$ would have been a strech for me, but 900$ was unthinkable for an anvil in that condition, even if I could fix it with 20-40 hours grinding, preheating, welding, peening, wirebrushing, welding etc...
-
"Dorthy I don't think we're in Kansas anymore...." 5k is a little high for a 25LG, but if you can swing it, and it is a slick running POLITE hammer, it could easily be worth it to you... A hammer makes a world of difference. A hammer that runs, beats two in the bush...
-
A right angle grinder can hide a multitude of sins... And belt grinder can do it quicker... Those look functional, but don't give up too soon... And even though you have already riveted them, that doesn't have to prevent you from working on them more if you want them to look nicer... Tongs work SO MUCH better with good finishing. When you are working down the reins on these kits, chamfer the corners with your hammer, lightly up near the boss where the rivet goes, and more heavily as you reach the end of the reins. Then come back and chamfer the new corners you just produced, again lightly up by the boss, and a little more as you get to the end of the reins. So you go from 4 sides, to 8 sides, to 16 sides, then you can just lightly round the ends of the reins. If you have a swage block or a hardie with swages you can hammer the reins into the swage. You want to use the swage to round up the outside of the reins, when you hit with your hammer on inside reins. You can wire brush the pieces while they are hot, a lot of this type of work is done at a lower temperature so as you planish the facets the scale will clear itself somewhat. I still like to wire brush to get a nicer forged finish, some guys don't bother. Often times it is nice to file a chamfer on the edges of precut kits like that. When you are forging tongs out from bar stock the jaws look fine, but the unnatural sharp edges on the kits look like they need, to be hot rasped, or filed cold before you even fire up the forge to round the reins and do the bends... In the hinge at the boss, I would be tempted to file a chamfer all the way around the boss on the outsides, I would leave the mating surfaces with the corners still on if the tongs don't bind. Kit tongs like this don't tend to bind as much as tongs forged out of bar. If you make a mistake in how you take the bites as you forge the bits, the boss, and the transition to the reins, you sometimes need to come in with hot rasp, or a file and smooth things up so they don't bind or interfer... One other improvement I might suggest, is to heat the whole boss area up again, and adjust the reins so that the tongs can hang on a rack, without spreading the jaws open too much... The tongs look nicer hanging on the rack with the jaws closed, and they are easier to get off the rack as well if the reins hang with some distance between them,,, Otherwise the rack forces the reins out, and they seem harder to get off the rack... Keep at it. I'm sure the next pair will look better... ;-)
-
Bruce's comments on the Sheffield cutlers hammers has always been a favorite of mine. They were working on good sized anvils, Bruce had mentioned that he picked up several 7 hundred weight anvils when he was back in the Sheffield area. They were also doing blade work, and using a long faced heavy cutlers style hammer. At the end of your hammer stroke, where the hammer falls on the anvil face, especially doing a lot of blade bevelling is crucial. Forging the soft face back to where it landed just prefectly, and then dressing it, and hardening it is a brilliant idea... But the face was essentially dressed for one man, at a particular anvil, at a particular height. If you are bouncing around on several different anvils, all of which are set at different heights, and doing a wide variety of work the technique isn't quite as effective as if you were dong blade work on one anvil... You would still need to physically compensate for the differences in the anvils height, and even the type of work. Anvil height effects the total ergonomics of the blacksmithing system of hammer, anvil, and smith. Too many people end up with the anvil at the wrong height, and it bothers their back, or their shoulder, or elbow, or their wrists/hands. If you have to always compensate for the anvil being at the wrong height it is going to hurt eventually, weither it is too low, or too high. For some people the discomfort is immediate, others it takes years for it to wear them down. People are endlessly adaptable, but don't push it. Work very hard to figure out what is the most comfortable height for your anvil, and what is the most comfortable and effective swing for you. It makes a huge difference... I have cracked and crushed a number of hammer faces over the years. I use the edge of the face, hit hard, and am often working harder alloys, or thinner stock, like blades... It's generally the left edge or the heel of the hammer since I am right handed, or I forge a flat spot on the curve of the pein... I have noticed that farriers often see their tools modify themselves over time, as the hammer wears away and is deformed unevenly from how the farrier uses the tool over their carreer, Sometimes that wear improves the tool and makes it better for the purpose the farrier is using it for, other times it goes past what is useful and efficient, and to tool needs to be rebuilt or replaced. I'm sure that there are a number of blacksmiths who have worn hammers and other tools to the point that they work better than when they were new and too sharp... But I have seen it more often with older farriers, who's favorite clipping hammer is positively deformed, but they can draw a lovely clip with that hammer... Another good reason NOT to use a supper fancy high alloy steels for making hammer heads. Its bad enough when a water quenched medium carbon steel spalls. It is often much worse when some air hardenind steel harder than your anvil finally fatigues and blows. If you do this long enough you will wear your tools out, and they will need to be rebuilt or replaced. It is best to figure out what works best for YOU, what lets you get the most work done, with the least amount of pain, and the most pleasure... Good tool that suit you, makes the work more pleasurable.
-
Experiment!!! Find things that work for you... It doesn't hurt to watch guys who can REALLY move metal... Most blacksmiths can move metal, but some move it better, faster, and smoother than others... Again I recommend looking at Uri Hofi's Eronomic hammer technique, and Brian Brazeal's Why I use a Rounding hammer videos. Both men use a fairly aggressive approach to the anvil, and using the edges of the anvil, and the edges of the hammer. The trick in blacksmithing is to get as much done with each heat, as efficiently as you can. Don't be afraid to make it a bit ugly, before you smooth it out. Stand up, practice your hammer technique, trust that you are doing what you want to do to the steel, and watch the steel transform under the hammer, and adjust...