
Will W.
Members
-
Joined
-
Last visited
Everything posted by Will W.
-
MastaStan Thank you, Stan. It's appreciated. Johnny Thanks. By "them" I assume you mean the fittings. Those came from a company in the Ukraine who's name I cannot recall at the moment.
-
Beautiful work DIVO. The whole thing, sheath, grinds, engraving, all looks very well done.
-
I've considered building a 2x72, but I really don't have time for it at the moment. It's on the to do list though, once I finish up the laundry list of commissions I have (on top of working 50-60 hours at my day job.) As for the first set of questions, the drive pulley, and more speed is what i had in mind. I understand the safety precautions that youre speaking of. This is by no means a high quality machine.
-
Boy, youre fast, Frosty (Frosty the Quickdraw?) I'll try cutting the belts down. Thanks for the tip. What is your opinion about changing the pulley? No increase in power, just sending it forward differently.
-
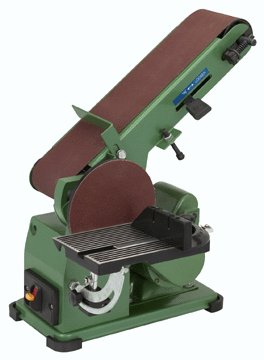
Good day everyone. I bought a belt sander very similar to the one pictured below. 4x36" 1/2 horse Harbor freight special! Lol. It works fantasticly well for wood, but for steel, it is a little underpowered, it will cut it, but it's slow to do so. I want to upgrade it. I was thinking about hooking it up to a 1 hp motor that I have, or changing the drive pulley to a larger one, to increase the ratio, or both even. Do you think these upgrades will be enough to make it work for steel a little bit better? Currently the pulley ratio is 1:1, its simply a 1-1/2" connected to a 1-1/2". I was thinking of putting a 3" on, to double the speed of the belt. The single hire motor I have actually already has a 3" on it. I don't expect it to ever work like a Bader, mind you. Lol. Thanks in advance for any advice.
-
I used to use solely anthracite and failed at making Damascus quite a few times. Switched to charcoal, and success has increased tenfold. The biggest problem I encountered was feeding the fire enough air to keep welding heat going without creating an oxidizing environment. With charcoal, its easy, with anthracite I found that it's a very fine line you must walk. I also have a speculative theory that the sulphur content in anthracite inhibits welds. I have bits and pieces of personal data about this, but no hard evidence.
-
Good on you Stan. You may have just stoked the flames of a future blacksmiths fire. He will remember and cherish the time he spends at the forge with you. And I agree with Smoothbore, it is vital that the younger generations learn to make things with their hands, see that the world is not all digital. It teaches them the value of hard work, and the sense of confidence when a seemingly insurmountable challenge is overcome. Keep at it with him! And keep us updated on what he makes!
-
You could neutralize the entire solution using something like sodium bicarbonate, but there's really no need. The amount of zinc found in a gallon of HCl after a few galv removals is miniscule. I would not concern myself with it. On top of that, the acid is still good after a few galv treatments, and still has uses. No need to dispose of it.
-
Definitely worth noting. Thanks for the heads up.
-
-
Area code included or excluded? Either way, im apparently in the wrong line of work. A cool looking piece. Aus pretty much summed up my exact thoughts.
-
No it's not incorrect, there's no "this is the ONLY way to do things" anywhere in blacksmithing. When dealing with small knives, I find it best to quench the whole thing, but try not to get the tang past critical. Therefore, quenching does zilch to the tang. Regarding the tang being a heated mass, I always leave the blade in the quenchant until the tang is relatively cooled, and then immediately clamp the blade in between two heat sinks, so they soak up any additional heat. If the tang is brought to critical and quenched (like on a small knife), I agree tempering it back at least to blue is the best way to go. And yes, drill your holes before heat treat
-
I've never heard that one either. And I am a machinist! Lol. Good tip.
-
In my case, both. I only heat and submerge the blade. The tang is both (relatively) cold and above the oil. In the case of an ax or a pick, I only quench a few inches from the edge. These processes have never lead me astray.
-
Back to the topic on hand, however, your blade looks pretty good so far. Leagues better than my first attempt at a knife. Keep at it and keep us updated!
-
Hawk The main reason we harden the blade is to make the edge more wear resistant and last longer. We temper it to reduce the brittleness. The tang absolutely does not need to be hard. It does not have to hold an edge. And if you have a heavy use blade like a Bowie or a cleaver, its better for the tang (and the blade, to a degree) to have a little give. On top of that, a tang meant for scales has holes in it, so if it is hardened, a failure is more likely to happen there, if used heavily.
-
Yes, true. But there are ways around it, if yours is not. Place another piece of steel on the underside. Or, with a single piece of steel, rotate the blade every other heat. Or get a big block of steel to use just as a flattening anvil.
-
True lol. Hammer control comes with practice though. I find it effective, in lieu of a proper flatter, to use a fairly thick piece of flat steel,1/4 inch or better, as a flatter. Place the steel on one side of the blade as a top die, and the anvil as a bottom die. Make sure the steel covers the whole blade. You can generally get the blade pretty darn flat this way.
-
Why would you harden the tang? That would actually be detrimental unless you tempered it back to blue, and even then, its better to be softer than that.
-
This would be an effective method for spot tempering, but i dont think it will normalize it, let alone anneal it. Probably wont nake it soft enough to easily drill. I think you are on to something though.
-
I agree with JHCC. Easier to never make the marks in the first place. If that doesn't work, though, grind the crud out of it.
-
Sounds to me like a crack developed during the quench. Or a crack that was already developed was just exacerbated by the quench.
-
You definitely should have researched before you just went at it. Hopefully it isn't TOO badly ruined.
-
As if it needed to be repeated (maybe just a little more reinforcement) polishing and oiling are the way to go. You could also clear coat the blade, if you really wanted to I suppose. What buzzkill said about the acid reminded me; the acids in food like tomatoes, limes, oranges and onions (I think that was another one) will work a number on a carbon steel kitchen knife. After dealing with foods such as these, always wash the blade, immediately dry it, and hit it with some oil. That will keep the rust at bay.
-
Great work, Bill. I really like the look of this blade. The pattern in the steel looks like a continuation of the pattern in the wood, it seems to just flow right forward. The way the handle is shaped and the way the blade curves backwards before the edge make it look very welcoming for the hand.