
Latticino
2023 Donor
-
Joined
-
Last visited
Everything posted by Latticino
-
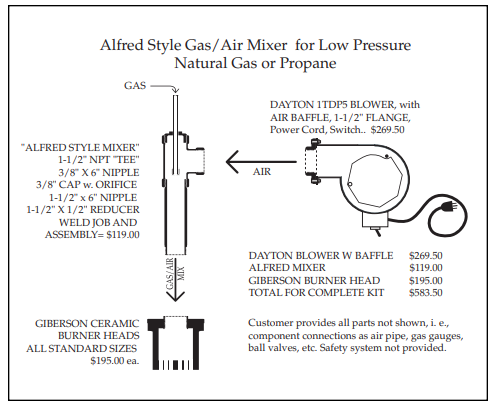
Options for blown burners from Giberson's site:
-
Will be taking the hammer rack class at Peter's Valley in July with Peter Braspenninx. Long time admirer of his sculpture (check it out if you want to be wowed by super clean and precise forging) and feel lucky to get into the class. Decided to try one of his wedged tennon joints in a piece of 1/2" mild I had laying around. Pretty happy with the results except the length of the double set down used to make the tennon. Hope he has a trick for making it closer to the required 1/2" length. Maybe using 1/4" thick stock for a spacer to do the setdown and let it expand to the 1/2" length when the width gets fixed?
-
Provided you have decent grain from heat treatment and no stress risers due to design or construction, flexibility without snapping is primarily a function of the blade thickness. If your material selection or heat treatment is off you may have other problems (difficulty keeping an edge during use, taking a set after bending, corrosion concerns...), but it looks like in your trial piece you have hit the thickness target.
-
George is on point, as usual. So many different versions of a seax are available. Typically the modern full tang blades with clip points (and ricassos, plunge grinds...) that people call seaxs are only loosely based on the historical originals. For a 13 year old, who may be more influenced in his design work by video game versions than historical references, I wouldn't be overly concerned with accuracy. I can tell you that the trapezoidal tang crossection makes it rather difficult to fit a spacer/bolster (as I have done on some of the ones I've made). Presumably you have already seen this: For what it is worth, I was also one of those who shot up to 6'-2" by age 13 and had a similar experience to George's as well.
-
A no-no in terms of what? In your experience do they hold up to use, or are they wall hangers? If he is forge welding the sections together prior to heat treatment, that is an acceptable method of construction. Historically there are many axes that are constructed from multiple parts that are forge welded together. Typically only the bit and poll surface were a high carbon steel suitable for hardening, and the balance was cheaper wrought iron or mild steel. Even today many smiths use a variety of forge welded configurations for making axes. On the other hand, if he is arc welding the high carbon blade to a mild steel eye after the former is heat treated, I would find that unacceptable. However, if the correct welding procedures and materials are used, and he properly heat treated afterwards, the axes will likely be functional. Aesthetically I'm not a fan of the grind marks he leaves at the join between blade and eye sections, but that is subjective. I think it detracts from the hand forged look of the piece and certainly makes me think he is arc welding the sections together, but he could just be having trouble blending his forge weld. I'm also not a big fan of pinned axe heads. You can see where it apparently split the haft in the photo.
-
It is very nice to have a swage block with the same size square hole as your anvil hardy. Not only can you share tooling between them, but you can also forge anvil tools in the swage block. Jon's response covers this as well. I'm in exactly the same boat and will look into adopting something like this.
-
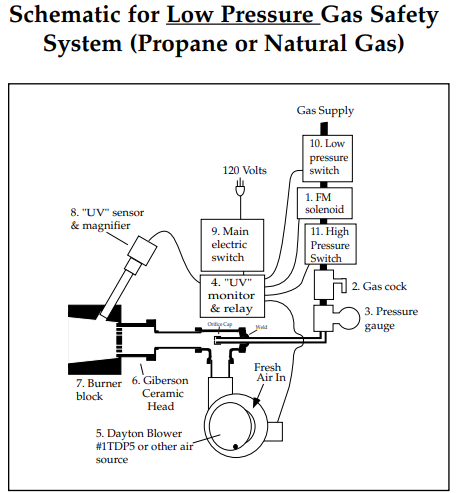
Also, make sure that the quick connect you are using is rated for flammable gas use, not air. The latter are not acceptable for this application.
-
I caught Jen's first demo on the strap hinges. Inspired me enough that I had to get into the training tent myself and bang on some steel. She gives a very comprehensive and well thought out demo. At each step I found myself saying things like: "oh of course, now it seems obvious". Have to see if I can get to a coal forge and try it myself. Unfortunately couldn't get to her other two demos, but there is just so much to do at these and you can't catch it all. Got to study with Mark Aspery, and learned some finesse tricks to help with improving my quality of forge welds as well as success with drop tong welding. Didn't quite have the social experience that Jen did at the event, and wish I had known about the evening events, at least the informal forging competition (but probably was too tired from working bent over at the short forges and anvils they had there). Learned a lot more about induction forges. Guess they are good for things other than subcritical annealing on knife tangs to allow drilling after the blade has been heat treated.
-
If you are doing this for a NA burner Frosty has more experience, but from a purely mechanical perspective the mockup should match as closely as possible the planned ribbon burner configuration you plan on making in castable refractory. This includes length, width, and depth of burner block (so the burner ports are the same length as the final product) as well as the configuration of the "backbox" used to connect the mixing chamber and the hole pattern. This should be done for either NA burners or fan powered, but is more critical for NA burners as you don't have as many modulating options.
-
Anyone who hasn't burned their clothing or even set it on fire at least once isn't working hard enough with these. Great tools if treated with respect.
-
Sorry you are feeling poorly my friend. I know how you feel all too well, unfortunately. Similar cold that I'm just now coming out of after 3 weeks. Rest up and get through it.
-
I have grown to like using Danish oil for a finish on my wooden knife handles. I used to use tung oil, but it takes forever to dry. The Danish oil is quick and gives a nice finish. A top coat of furniture wax, polished out gives a very useful finish that can be easily restored.
-
Nice job forging the profile of your travel kit knife. Your general strategy should work fine, and is a fairly traditional method for handling a "patch knife". A few things to consider: Drill pin holes in the tang before heat treatment Don't forget to anneal your rivet material. Make tang as flat as possible to mate up cleanly with the wood scales (sand those flat on a surface plate or piece of tempered glass as well) Consider use of a period adhesive if possible (i.e. rabbit skin or horse hide glue). If you do a nice sequence is: drill pin holes in tang (I like three 1/8" diameter, but you go with your preference), glue one side scale on and drill through the scale using the tang holes as a template, glue the other side on and drill holes through the second side from the holes already drilled in the first side Take care riveting the pins in place to avoid too much stress on the wood from expansion. If you go the period glue route, you might be able to shape the scales in place first, then rivet. If you do that a nice enhancement that is very period is to add a washer (brass or copper) on each side of the rivet which can be hammered to a slight dome shape.
-
Be extremely careful about banging on the section of your mount that is lying flat on the anvil face. It looks like it might be cast iron. If so, it will be extremely brittle and not forgeable at all. The bracket holding it looks to be mild steel and can likely be forged.
-
I honestly don't remember seeing induction forges on FIF, let alone large ones. I know they have sizable propane forges as well as electric heat treat ovens, but I don't recall them using induction. I well know the lure of purchasing new equipment for a new hobby, but you might be getting a little ahead of yourself. I recommend you hookup with some of the Ohio smiths and see if there is a group near you, or a class that you can take. You can learn a whole lot more from in person direction than from watching Youtube or FIF. If I recall correctly, there is a pretty large contingent of smiths in Ohio, and even though it is a large state I suspect there will be a branch of ABANA nearby (or near Pittsburgh as you appear to be close to there). Now that I think of it, the annual ABANA conference is just outside Pittsburgh in June. If you want to see some fantastic work, tailgating and comradery you might want to look into that as well.
-
Coal Ironworks recently came out with a 15 and 25 kW units. Might be a little more support, at least, than buying a cheaper overseas version.
-
Rojo, That is exactly what I was planning on recommending (and indeed was my first hawk forging and actually third thing I ever forged). Just remember to use an older ball peen hammer. Some of the newer, cheap, ones are not made from easily hardenable steel. I would spark test the face first to be sure. Around here they are readily available at garage sales and flea markets. Without a handle you shouldn't need to pay more than a few bucks. They also make great blanks for forging various top tools (punches, hot cuts...)
-
NO! Hopefully you would research it enough to get to this CDC site which would tell you that even though it etches metal just fine, it is horrifically dangerous to use: https://emergency.cdc.gov/agent/hydrofluoricacid/basics/facts.asp#:~:text=What hydrogen fluoride is,may be called hydrofluoric acid. Please learn to do research from respectable sources.
-
You appear to be misreading my note. You will likely NOT GET ANY SIGNIFICANT TOPOGRAPHY etching cable, so polishing afterwards is NOT RECOMMENDED. Hopefully this is clear enough for you to understand. Pretty sure Moses didn't try to etch cable damascus... If you mean he got "close enough" to the promised land, I doubt he would have agreed. Recommended class or reading good reference is to avoid getting hurt yourself, hurting others or the environment. Acids are not something to play around with. What would you have done if you saw someone posting that hydrofluoric acid was a good option for etching your blade?
-
Couple of suggestions: Get yourself a pair of vinyl gloves and use them during the etch process. Muriatic acid is not good for your skin. Also avoid breathing the vapors. Cable Damascus is a very subtle pattern. As I understand it, you don't really have two different types of steel, so you aren't really etching for topography that you can later emphasize by polishing the high points with a hard backed 2,000 grit sandpaper. I believe that the white lines between the darker areas are just showing the decarbonization at the welded interface between cable wires. I recommend that you complete your etch, neutralize, and clean off oxides with soap and a soft cloth. During the etch, if you must remove oxides, also use a soft brush. Some folks recommend going with a slow, light etching solution (white vinegar or ferric diluted at least 1:4 with distilled water) and letting it etch for a long time. I haven't been very successful getting a cable damascus etch to really stand out (which is why I switched to pattern welded 1084 and 15N20 even though I love the traditional cable look), so can't give good advice on that, but you might want to try a final soak in highly concentrated instant coffee. In pattern welded steel it can really punch up those blacks. George's advice for test coupons is really on point. Strongly recommend you follow this.
-
If you know what you are doing you can make a smaller "viking style" hand axe out of the 1.5" round 4140 stock. It is certainly possible to hot punch the eye solo with a good drift (see videos by Brent Bailey or our own JLP). It is a lot easier with a helper swinging that big hammer. It's a great team project with a striker, but it helps if you make the tooling first. You need at minimum a hammer eye punch or slitter and an axe eye mandrel/drift. You may find it helpful to have a flatter and a radiused top tool to match the curve of the belly you likely think you need (note there are a great number of different types of "viking" hand axe. Some had rather simple lines, some superlative silver inlay. You can go in either direction, but I don't recommend going for a bearded axe on your first try unless you are a fairly experienced blacksmith).
-
Frosty, Yeah, on my phone to answer and conflated locker room showers and residential restrooms.... It is exhaust duct either way. We typically don't call it "ventilation" exhaust.
-
In my opinion flexible aluminum duct is not appropriate for either kitchen hood exhaust or forge flues. It is just barely acceptable for laundry dryer or bathroom shower exhaust.
-
More importantly it might be worth investigating what you want to use the forge for to see if there are more economical alternatives, or if the whole undertaking is impractical. For example if you are only going to bend or twist 3/8" rod, you can likely do it cold with the right leverage. If you plan to make knives, the fuel cost is only a small fraction of what can be required for abrasives to finish the work. Certainly not discouraging you from getting into smithing, but if sourcing a 55 gallon drum is going to break the bank, forging may not be a reasonable path. I see preowned, reconditioned drums around here for around $20 -$30.
-
So something like this? curtis jere crane lamp

