ClevelandGuy
Members
-
Joined
-
Last visited
-
Forced myself to go out to the forge on this cold, wet grey day and do a little work to move this project forward. Current situation as pictured. Still need to do the clips and then some cleanup and then finishing.

-
Productive day in the forge, while the rain trickled down here in CLE. Current progress.

.png.bfee6e9df8eb5f615346dc22f21cc00f.png)
-
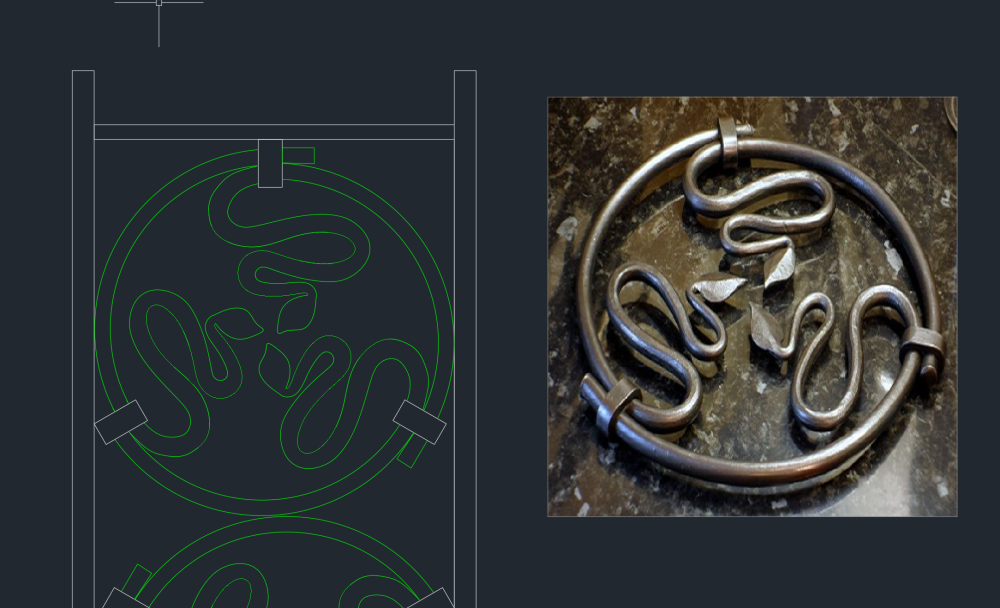
I think some of you may be missing the point. The "4-digit" precision on my drawing is not to imply that I require that kind of precision. It's simply the thickness of the taper at that particular point, and AutoCAD defaults to 4-digits. I just didn't bother to adjust the precision before I created that screenshot. Nobody is going to be throwing a caliper (digital or not) on these pieces. Having said that, and since this thread has re-animated, I'll provide a status update. I've finished the tapering step of the piece. As stated above, I milled spacers to the dimensions shown on the drawing, and used them in the jaws of my forge press to ensure I didn't oversquish at those points on the taper. Here are the spacers: This obviously created a stairstep taper, starting at the original stock size of 1/2" and ending at 1/4". I left a chunk of metal at the ends for material to forge a leaf. The next step was to grab a hammer and smooth out the steps. Then go to octagon and finally round-ish. I wanted a rougher finish than the original design I'm copying, so I left some of the octagonal edges in place and then hit the tapers with a belt sander to provide a more hammered look. Here are the three pieces: The next step will be to forge the leaf on the end of each, and then bend the curves for the actual piece. If I haven't mentioned it previously, here is what I'm aiming for:


-
Thanks for your replies, gang. The Essential Craftman's rig is interesting, but I'm not sure I want to devote floor space to this, as my shop isn't very large. Wall space is definitely less valuable at this stage. I spent today thinking over several options in my mind and eventually executed on this method. It's already full, but I can add another layer above, and can also obviously put more on either side as well. I had a scrap piece of 4x4, so it ended up being free, which always makes my wife smile.

-
I'm starting to amass more of these tools than I can easily store. Actually, that's a lie...I haven't even been attempting to store them, they're just laying (and rolling) around on my various workbenches and shelves, getting lost and interfering with my workflow. Please weigh in on how you store your drifts and punches. I saw that John at Black Bear Forge uses a large wooden cabinet with shallow drawers, and I guess that's an option, but I'm not looking for a cabinetry project at this stage. I'm considering building something that hangs on the wall with two layers of 1" chicken wire at this stage. Here's a side view of what I'm thinking, and it would be as wide as I need. I could also add another layer above/below it, if the tilt is correct:

-
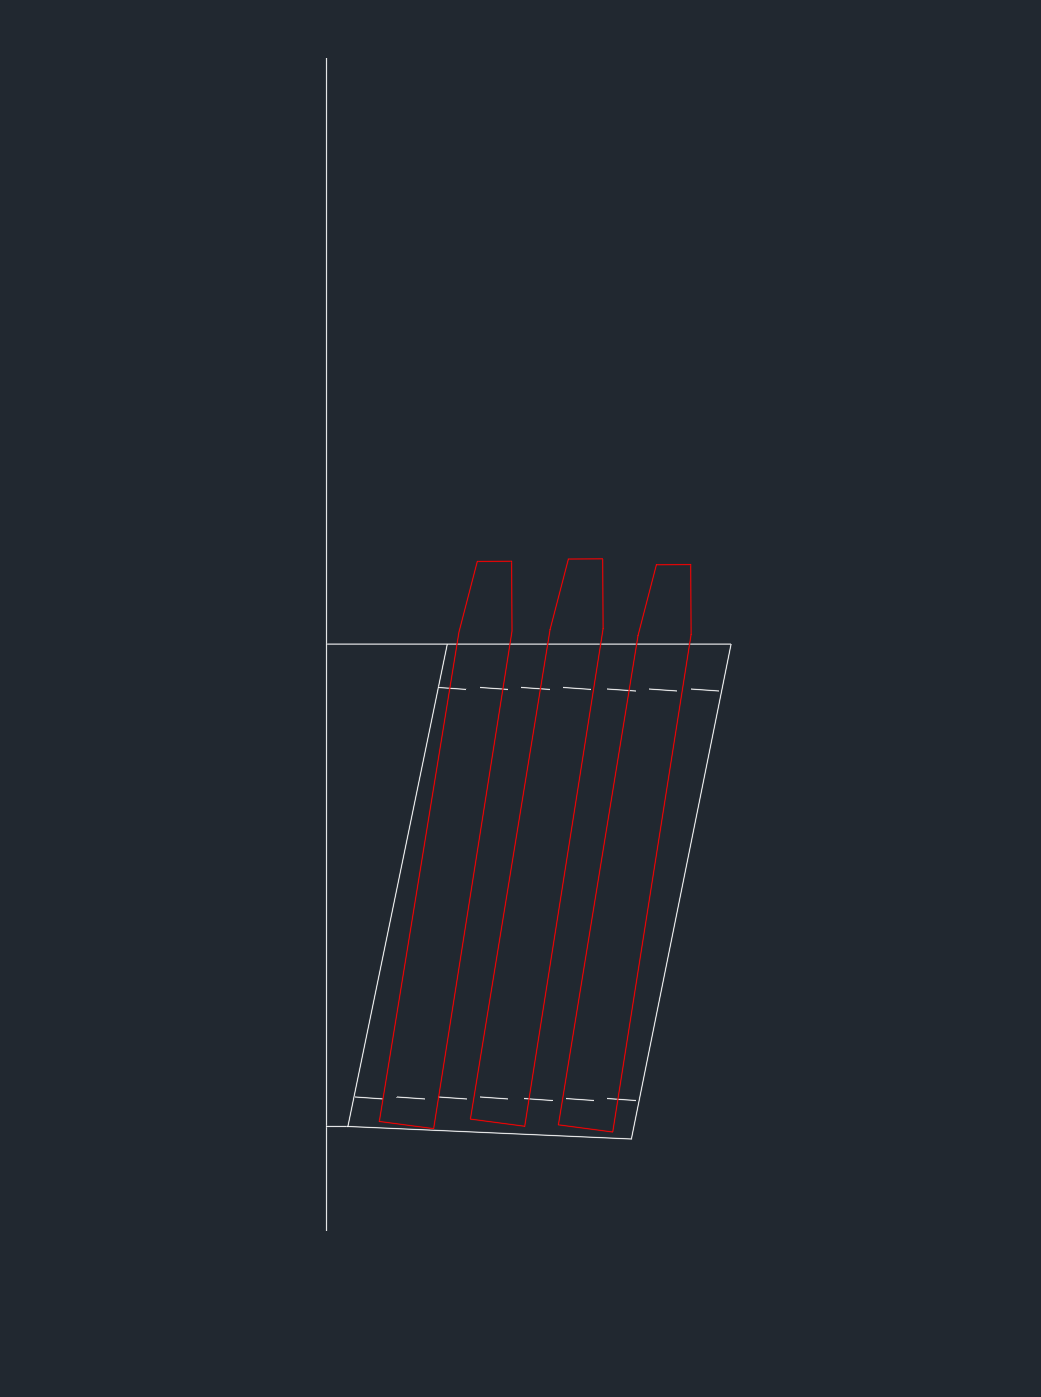
These will be a one-off. Trust me, if I had a lathe, this would already be a done deal. Thank you to everyone that's replied. It's interesting to see the two camps, the "Do the math" guys and the "Grab a hammer and smack it until it's right" guys. I appreciate the math involved in this work, but rarely has it ever worked out correctly for me, which is entirely due to my own mistakes, I'm sure. Here's my plan: I don't have access to a lathe, but I DO have access to a milling machine. And a hydraulic forge press. The press jaws are 3" deep and are obviously parallel. I re-drew my original CAD drawing with 3" long steps, each step reducing in height by the distance required to stay within the taper outline. I measured the height of each step every 3" and will mill a pair of spacers to constrain the press to that thickness. Hopefully, when I'm done I'll have something approaching this drawing. I'll then go back and smooth out the steps. Should this not work, I'll be attempting the BillyBones/Hefty approach, as I finally understand it (after reading it several times).

-
I'm not understanding this statement. Can you explain? FYI, I plan to start with 1/2" square bar, since squaring the round stock would be the first step anyway.
-
Been looking at YT at taper technique, and all say to start from the point and work back. But a 'long' taper on these videos is something like 4". I have a need to make a 30" continuous taper, eventually finishing as round, ending in a leaf. I threw it into CAD to get the numbers and it comes out to about 3/32" of a taper per foot. Suggestions for order of operations would be appreciated.

-
My wife and I were planning to attend this year (first time), and I was looking at the registration and they don't list the cost for members. An ABANA membership costs $90/year, so I'm trying to see if it's worth it to join to get the member discount for the conference. Does anyone know the member price for the conference? Any other comments or advice regarding attending the conference would be appreciated. The only other event we've attended has been SOFA's Quadstate, which we've enjoyed, although it took us several years to realize that if we wanted to actually buy anything, we needed to show up 3 days before the event officially starts or it would all be picked over and gone...
-
Clark had one of these at Quadstate last month and I liked the form factor. Lot of power for such a small footprint. Anyone have any comments on his presses and products in general. Very little presence out there in the internet of things.
-
Thanks, Thomas Powers. That helps a lot. The pricing structure makes sense, but it doesn't help if I show up on Sunday and there's nothing but mostly empty tables with junk nobody wanted sitting there at bargain prices. I'm going to plan to be there by mid-day Thursday.
-
Thanks for the reply. Do a lot of people show up on Wednesday?
-
For the past several years, whenever we've gone to Quadstate and actually shown up Friday, the majority of the stuff for sale has already been picked over and sold. In fact, it's not unusual to see vendors packing up and getting ready to go home Friday night. Can anyone offer any insight into what day would be the best day to show up, for maximum purchasing opportunities? I'm willing to take time off work and go down early, even on Wednesday, if that's what it takes.
-
Obviously living out in the middle of nowhere has its advantages. A coworker is always telling me how much better it is living out in 'the township'. But my wife and I enjoy many of the aspects of suburban/city living as well and wouldn't want to lose them. Unfortunately, having an amazing blacksmith shop and also living the urban life are somewhat mutually exclusive goals, which means a compromise will always be required. And as everyone knows, a good compromise just xxxxxx BOTH parties off.
-
Makes sense. I'm heading down there today...I'm off and they're open, and it's too cold to forge (although maybe later this afternoon). Would you like me to grab you a couple bags? Text me at phone number removed if you want me to pick some up for you.