Goods
-
Posts
1,148 -
Joined
-
Last visited
Content Type
Profiles
Forums
Articles
Gallery
Downloads
Events
Everything posted by Goods
-

What did you do in the shop today?
Goods replied to Mark Ling's topic in Blacksmithing, General Discussion
JLP, the draw knife is another example of excellent forging! Billy, the times on the fork came out great, you’re getting really good at those. I also like how you’ve designed your sign. I got a few hours in the forge tonight and I made progress on the five blacksmith knives: The blades are 5-1/4” to 5-1/2” with a hollow grind (fairly rough grit, mainly for practice) and ready to stamp, heat treat and sharpen. I’m getting closer to having something done! (I probably should have stamped my mark on the knives before I bent the handle to shape. A short cut that will make my life “interesting.”) Keep it fun, David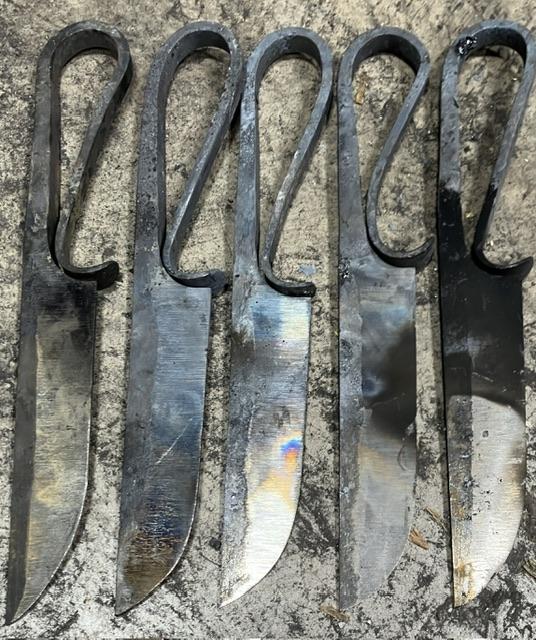
-
That looks pretty slick. Can’t wait to see how it performs. Keep it fun, David
-
I would avoid motor oil all together. With the additives in modern motor oil, the fumes from quenching can be very hazardous. If you have the funds available, actual quenching oil is the best think to use and is formulated with different quenching speeds for different steels. The common alternative is canola oil warmed to about 120F (which reduces the viscosity and increases quench speed). What type of steel are you working with? That make a huge difference in what you use. Many medium carbon steels harden with water and some higher carbon steels are formulated to quench with water also… Keep it fun, David
-
Well, it was my turn for a (minor) medical procedure today. Feeling fine and want to get out in the shop to get some work done, but I’ve gotten a stern warning from my wife not to. I know she’s right, but now I’m home alone, with nothing to do but watch TV or read. I’m going crazy knowing that I have work to do! Keep it fun, David
-
handle for giant iron skillet
Goods replied to Ed Steinkirchner's topic in Blacksmithing, General Discussion
I’m not sure I would gorge myself on big spatulas. Might be a bit hard on the digestive system… Keep it fun, David -
What did you do in the shop today?
Goods replied to Mark Ling's topic in Blacksmithing, General Discussion
Is there any problem running it a more of an orange/yellow heat? That way one could keep the forge at a normal working temperature and get some other projects done rather that just burning through gas for 1-1/2hrs. Keep it fun, David -
What did you do in the shop today?
Goods replied to Mark Ling's topic in Blacksmithing, General Discussion
Tommy, pretty cool. Are you running a coal forge. If so, bring the tips up to a welding heat and let the soak in toward the top of the fire. It’s pretty amazing how much carbon you can pick up that way on small stock. I took a little time tonight, cut out the blank, and drew out the tang/handle on the blacksmith knives: Now to work on the blade, but I have to take two days off for medical stuff… woohoo Keep it fun, David
-
JLP Blacksmith Teaching Center.
Goods replied to jlpservicesinc's topic in Building, Designing a Shop
JLP, it makes me feel good to see you making progress on that! Maybe I can arrange for a class once you have it up and running. Keep it fun, David -
What did you do in the shop today?
Goods replied to Mark Ling's topic in Blacksmithing, General Discussion
JLP, I guess I’m just to picky for my own good! Basically, it’s just my preference. I like the look. I put a mirror finish and blued a couple in the past and they looked great (to me), but I’ve backed off from that level of finish, at least. I’d really like to spend some time and chase or engrave some embellishments on at least one of them (whichever comes out best), but I doubt I have the time. Keep it fun, David -
Well recently I’ve been spending a couple sessions a week in the shop! Recent times aside, we’ve had a challenging year. My wife had surgery back in February and I was off work for a couple weeks doing my best to take care of her and everything else. The surgery didn’t go very well and she’s had a couple follow up surgeries the help resolve the issues. She’s finally starting to feel like she’s getting better, but may never be the same. Honestly, probably just the unlikely 1 out of 100 cases… My older son is now in his senior year in college and has at least one good standing job offer. (So, I guess we didn’t fail with home schooling!). The younger boy is diving into world history, linguistics, and culture. Very different from me or the other boy, we’re both techies and I’m quickly lost in our conversations. (His mother, being an English historian couldn’t be happier.) He also just last week switch scout troops which my wife and I are very please with, but now the meetings are a 1/2hr drive after work. Well worth it to get the results of a strong program. Work has also been keeping me pretty busy. New models, new products and manpower/skill gaps all taking their toll. I love the job, just the same! Sorry, a little long winded, but you asked… Keep it fun, David
-
Very nice place Alexandr. If you were closer I’d love to visit just to look around and see your property in person. From all the pictures you’ve posted, it has a park like feel. (I wouldn’t mind seeing you shop and watching you work as well. I could learn a lot!) Keep it fun, David
-
What did you do in the shop today?
Goods replied to Mark Ling's topic in Blacksmithing, General Discussion
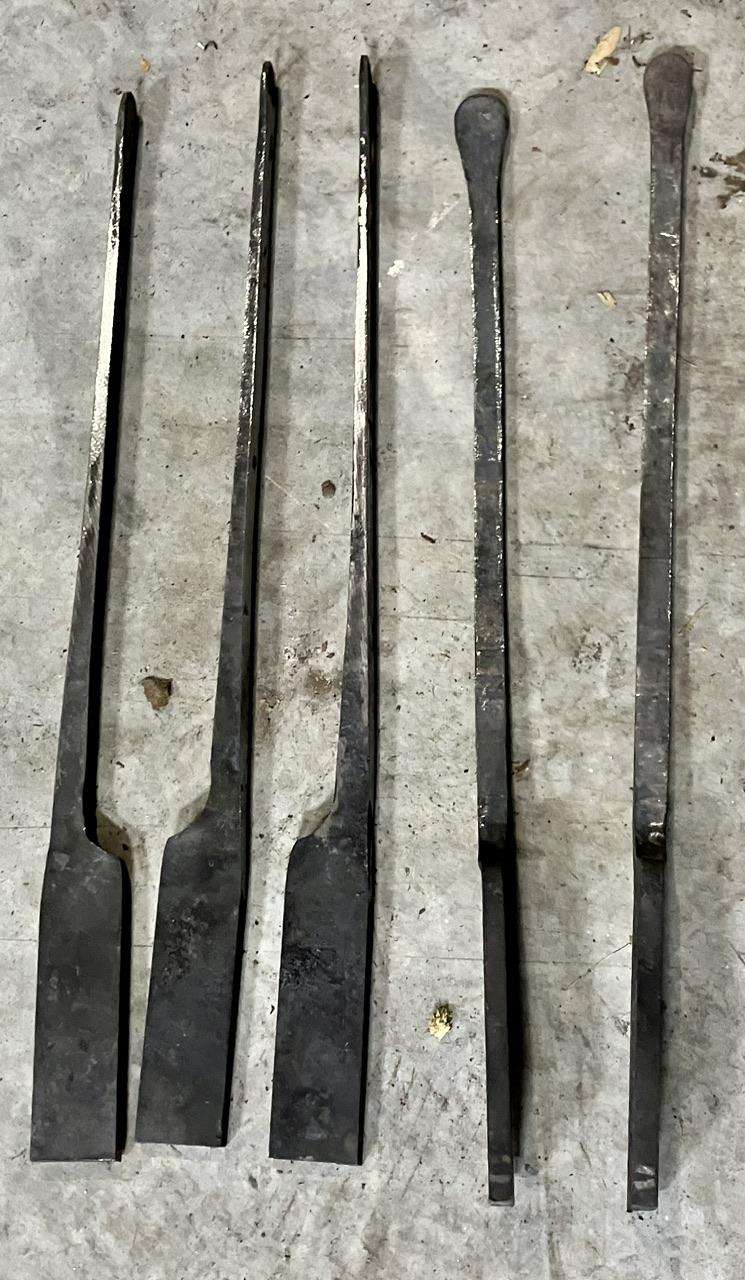
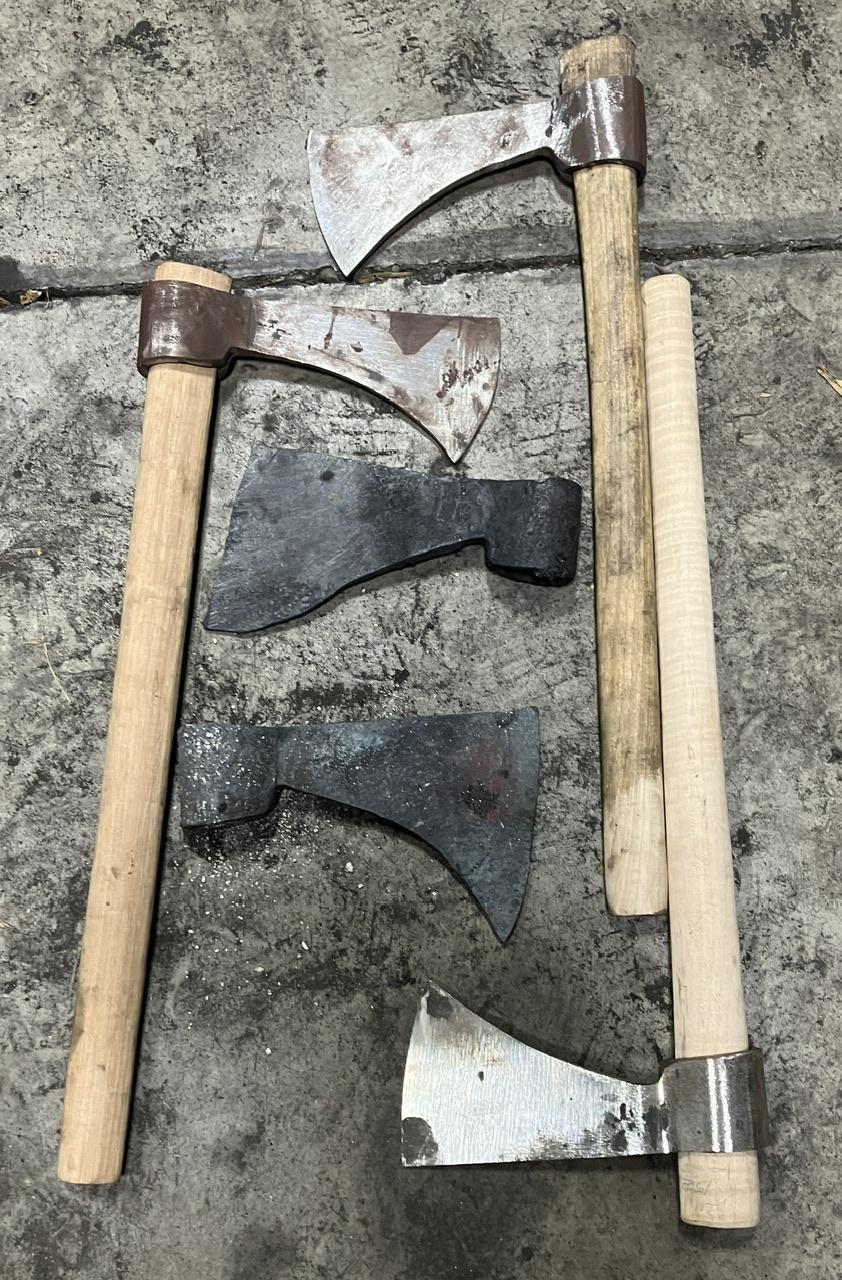
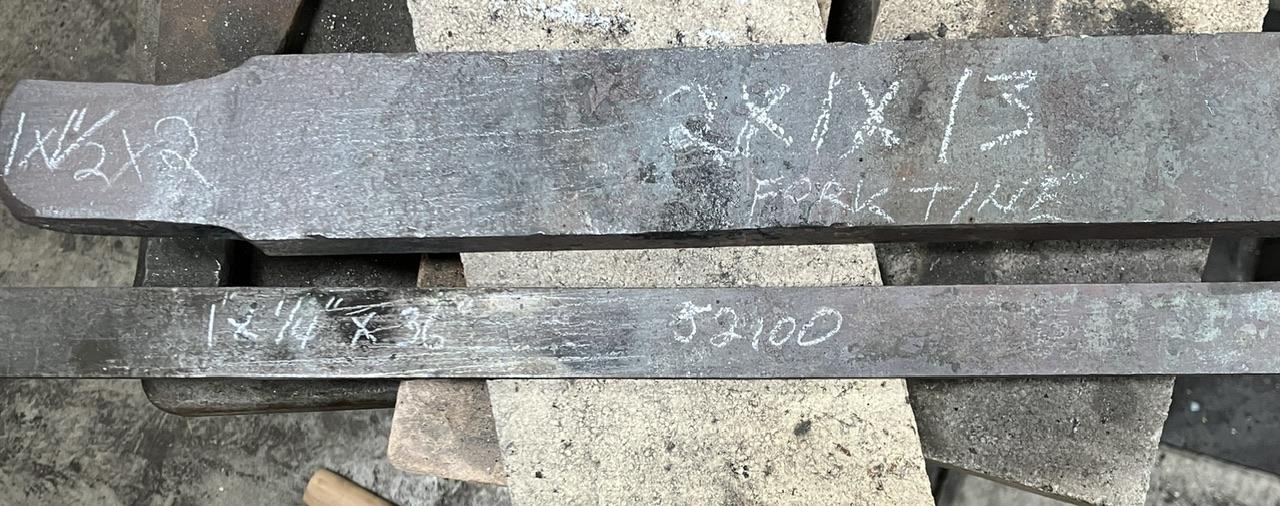
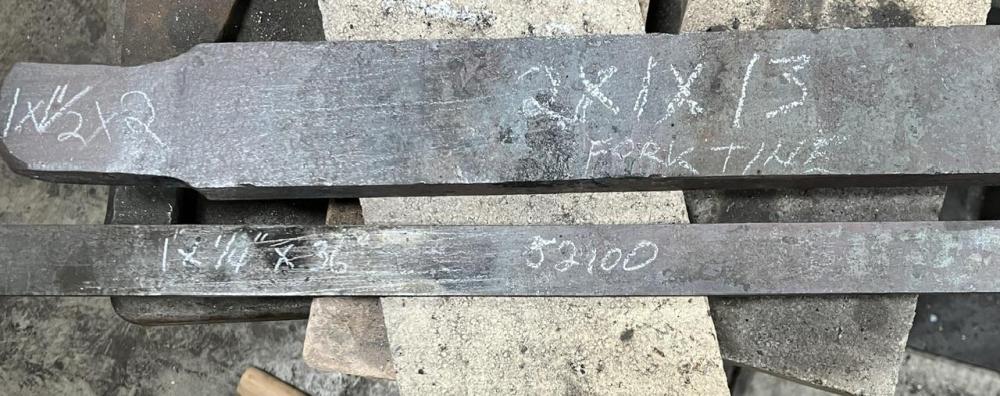
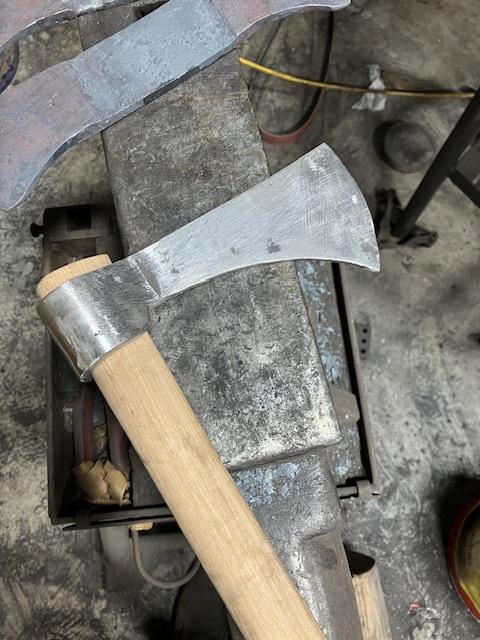
JLP, I don’t know how the judges felt about your work, but I’m impressed. (As always!) Rojo, that’s pretty cool. Will it be part of a bigger piece? Or is it going to be a semi-profile relief? Over the past couple seasons, I’ve made a lot of progress to having inventory for my next demo on the 21st an 22nd. Nothing finished yet (which makes me nervous), but a few items close: Five tomahawks in various stages: 2 filed and ready for heat treatment, one rough ground ready for filing, two just annealed ready for grinding. I also got some material drawn out into blanks: Forklift tine for hatchets. I plan on 5 or 6 total of 3 sizes. Then 52100 for blacksmith knives, should be enough for 5. This is if time and luck holds out. If I can make good progress on these, I should get some smaller items together also… (Again, time and luck! And I have to get more coal!) Keep it fun, David
-
Muffler for Self Contained PH
Goods replied to stickermigtigger's topic in Power Hammers, Treadle Hammers, Olivers
I’ve not used he SayHa self contained hammers, but on my Anyang, you can close the air off completely with you hand while it’s running. It doesn’t seem to affect it at least at idle, but I would not recommend blocking it. If your hammer has the same type of air line lubrication, you should probably look for a mist collector/separator. After running mine for a while, I can see the oil mist in the exhaust and I really need to fix that to keep the shop cleaner, not to mention my lungs! Keep it fun, David -
Guys, consider this a very novice question, but for a given energy output, wouldn’t you need a set mass flow of gas (both fuel and oxidizer) resulting in a set mass flow of output gassed (CO2 and H2O)? Assuming the the forges are getting to the same temperature I would think you have to exhaust the same exhaust flow rate. In my head I see slow speed burns having large areas, but similar mass flow, so as long as a high speed burner creates enough swirl to slow down, should there really be a difference. I’m not a gas forge guy, so I can’t really see past my old engineering classes on this one. Not meaning to stir the pot, but curious on your thoughts.
-
What did you do in the shop today?
Goods replied to Mark Ling's topic in Blacksmithing, General Discussion
Jennifer, I’ve already modified the drift and I’m happy with the results. Maybe it the perfectionist in me, but I want to know that the shape is correct before the forging cools down. All the hawk handles I have are pretty consistent. (I’ve been purchasing them from Dunlap Wood Crafts and I’m really happy with them. Basic hickory to fancy curly wood of different types.) I already have another drift on the way from Holland Anvil. Mine is not in the best condition at this point and the specs on this one look close to the handles I use. (Just in case I really screwed this one up) Plus this one is H13, so it should be much longer lasting. (Honestly, it was a hard decision to purchase one, I’m usually the type to make my own!) I am also forging the final eye size one the drift/mandrel. I just didn’t calculate the length needed correctly the this time around and ended up significantly reducing the eye wall thickness which took a lot of time and effort. I really need to start keeping a note book on my projects so I’m not start from scratch and poor memory every time! It’s funny, I expect to to modify axe and hammer handles, but the hawk handles are beautiful and I can’t bring myself to modify them beyond a little sanding. Chimaera, the first hawk is not too bad, but the eye wall ended up much thinner than I would prefer. On the second one, I used more material for the eye, so that was better, but I decided to fit the eye to my handle better before moving to welding the bit. I let the forging cool, checked the fit up and tried to narrow the eye up cold (I know, dumb mistake) and blew the weld. I’m not sure I’ll be able to get the eye to weld again, but I’ll try later. Right now, I’ve got the crazy idea that I want to weld the eye below the blade set down similar to some Scandinavian traditional axes. I know, even less like a traditional trade axe/hawk, but I just get an idea in my head and obsess over it. So, may end up trying that before I fix these two. I really should just fix these. I have a festival coming up in a few weeks and need to get my inventory built up. I want at least five hawks, hatches, blacksmith and knives maybe even a few throwing knives. They are the hot topics at this festival. (We’re setup right next to the throwing are we’re the competitions are held!) I know this was a bit long winded and full of excuses… but I looked forward to and appreciate the insights and criticisms from everyone here. It helps! I’d really like to be able to sit down with everyone and have some deep forging discussions. (Who am I kidding, we’d be at an anvil discussing stuff!) I’m not going to make it to Quad State either . Maybe next year? Keep it fun, David -
What did you do in the shop today?
Goods replied to Mark Ling's topic in Blacksmithing, General Discussion
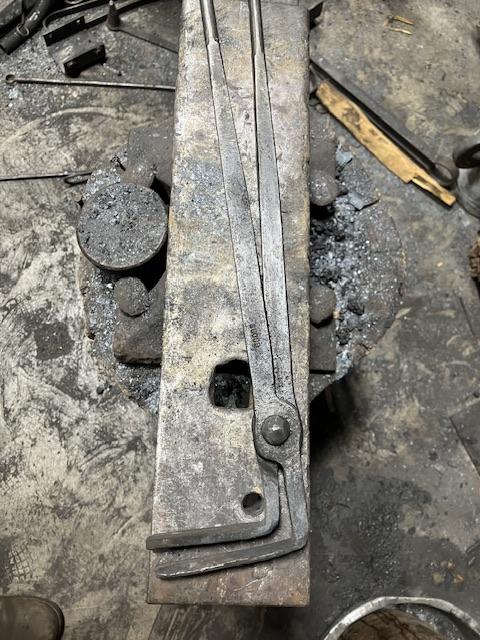
Well, out of the five tomahawks I started, the first two may end up scrap, at least I salvaged one out of the third: The eye got strangely off center. The right hand side by the weld is thin at the top and the left hand side is thin on the bottom. Two more to practice with, before I try salvaging the first two. (I learned my drift doesn’t make the shape of my purchased handle well at all. It was to round. So I started today by grinding the drift to the correct size, and that me a big difference! I also move the set down lengthening the eye material by 1/2”. Also a big help.) Keep it fun, David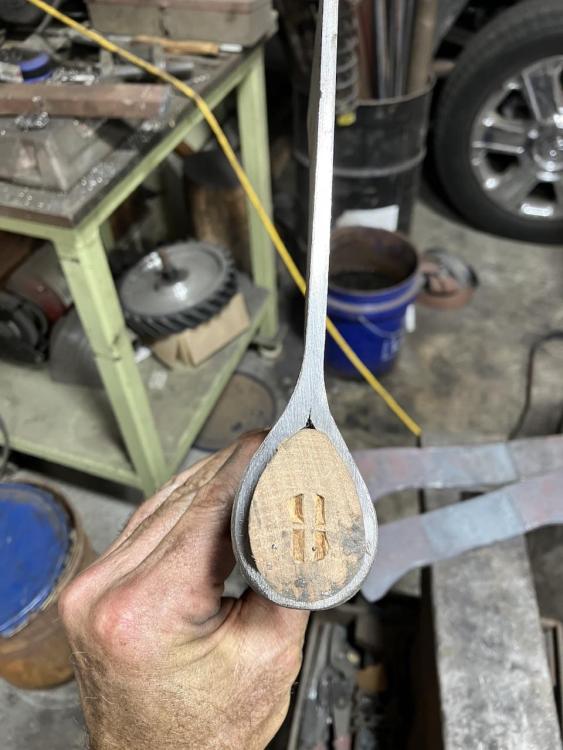
-
Can you make a pair of tong just to hold the tools? Maybe like pick-up tongs with a tong clip. You may feel feed back in you hand if the tong clip is slipping. The other thing that came to mind is to weld a piece of pipe to a handle (bar stock, round stock, fancy basket twist, whatever you like) the drill a hole in the pipe and weld a nut to it for a locking screw. Put the punch in the pipe, tighten the screw and off you go. Just ideas… Keep it fun, David
-
So I want to melt/smelt some brass...
Goods replied to Apocalypse's topic in Smelting, Melting, Foundry, and Casting
If you not attached to the vase itself and if it has a reasonable value, you may be better off selling it as it is to someone who would enjoy it for what it is. Then, use that cash to buy brass in the dimensions that you want to work with. I know that’s lots of “if’s” but that was my first thought when I saw this post. Keep it fun, David -
What did you do in the shop today?
Goods replied to Mark Ling's topic in Blacksmithing, General Discussion
Frosty, the stock used for the tongs was 2” conveyor shaft, good med carbon stock broken down for another project and this was the cutoff. Biggest problem was bending back and forth and the re-forging of the bits. I may just reinforce the bend with a big mig weld fillet. Not the typical thing I like, but functional. The reason I’m considering the ABANA curriculum is to force me to learn new techniques, not to mention forging to spec. I’ve always worked with a “to taste” approach myself, but I’m thinking if I ever want to get into larger projects, I would really benefit for those skill sets. Right now, I’m just in it for fun, but we’ll see where the future leads me… Keep it fun, David -
I’ve not heard of steal bar or round stock made any other way that rolling. Some thin bar stock I s sheared from larger rolls sheets, but drawing dies for high carbon/alloy steal wouldn’t last long. There are a couple guys here who have worked in a steal mill. There input would be interesting! Keep it fun, David
-
What did you do in the shop today?
Goods replied to Mark Ling's topic in Blacksmithing, General Discussion
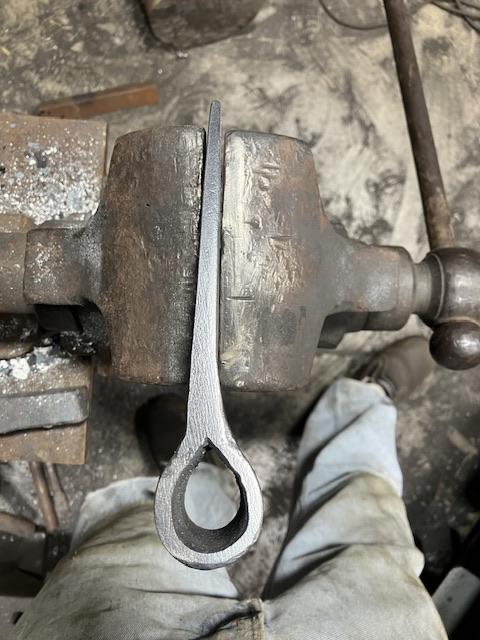
I got the first of the tomahawks welded up and the rough shaping done today: The eye looks awfully small. I may move the set downs on my others. Overall, getting closer to the eye transition I’ve been looking for. Also, I made the hoop tongs: They were much easier to work with. Thanks for the input Jenifer. The bits are fairly weak on these, so let’s just say these are just my practice set. The tongs took me forever. I was just about done with them and was in the process of fitting the bits on a small piece of 1/4” shaped the the radius of the eye when I realized I put the bit radii in backwards. Ended up grinding the rivet off, flattened the bit back out and started over. I got it right the second time! (That’s how the bits ended up wimpy…) Keep it fun, David
-
If those spots are from concentrations of chromium, I don’t think you could really do anything about it. Chromium atoms are very large compared to the iron and carbon atoms. They are not going to migrate much if at all out side of a molten state. Maybe one of the metallurgists one here will give better insight? Keep it fun, David
-
What did you do in the shop today?
Goods replied to Mark Ling's topic in Blacksmithing, General Discussion
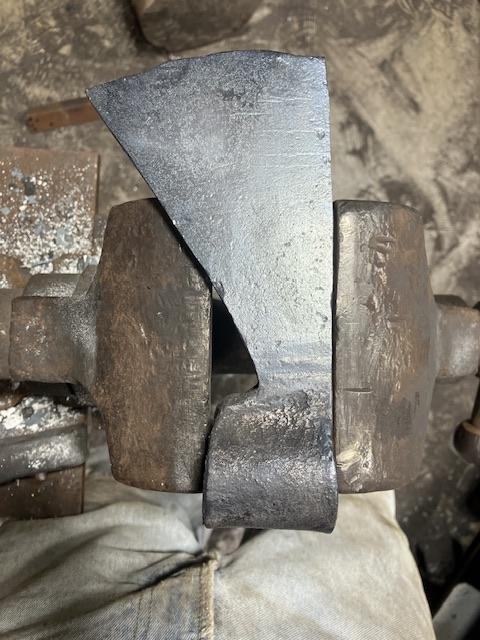
Chimaera, also don’t drift it like you would if you were sizing a hole. Hammer the drift tight, the use the drift as a mandrel to draw the sides of the eye out. This is more similar to opening up the diameter of a bottle opener one the horn, than drifting. If you were doing a slit and drift, that’s a pretty much the same depending how you want the lugs… One trick to use is to set the drift while you have the blade clamped on the weld in a post vise. It’s much harder to damage the weld that way. Are you pre-bending the transition from eye to blade? I typically bend the blade up 45degrees on both side leaving just shy of enough material for the eye. The I bend the eye around and weld. Once I’ve got the weld set I start working on the eye shape. Preform: After weld, before drifting: (Note, this is not the best example. A couple miss hits that thinned up the shape it was going for and the weld is not particularly good… As Jennifer said, this is much more like a Viking axe than a traditional hawk. I’m even pre-forming a little like a traditional axe, just w/I the pole step. I’m going for a thick wedge with a 1/2” radius from the blade to the eye one the outside. I haven’t got it exactly how it want it yet, but I’m stubborn. I’ll get there just for the aesthetic that I want… it makes for a sturdy, but heavy hawk/Viking axe.) Jennifer, I’ll go for the hoop tongs. I think I’ve got enough material in the bit of the blanks. Thanks for the input! Keep it fun, David Shainarue, not sure how I missed your post, but good work. It looks like the ABANA curriculum is serving you well. There is a lot I could learn from following the courses! Keep it fun, David That’s strange, it merged my posts, but wouldn’t let me edit to improve the flow, oh well.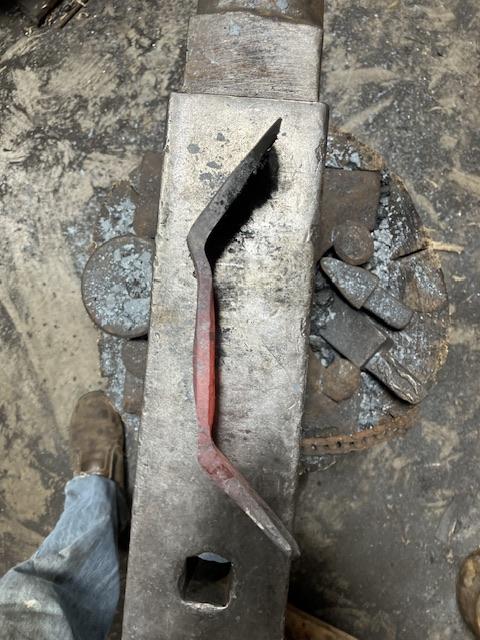

-
What did you do in the shop today?
Goods replied to Mark Ling's topic in Blacksmithing, General Discussion
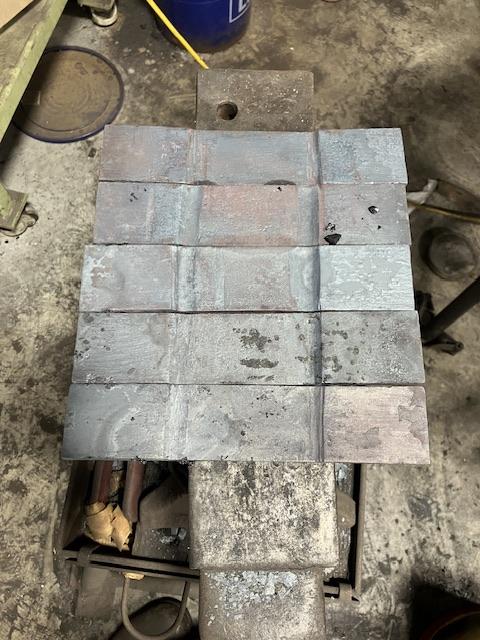
That is fantastic JLP! I wondered what you were doing with the strange scarf! I’m working on some tomahawks myself. Got five started: I let the last on get away from me and burn the pole a bit. Finished it out like the rest hoping to save it. In the end it probably going to get scrapped or repurposed… Body is cold rolled and I’m not sure what I’m going to use for the bits yet, but I’ve got plenty or choices. Next step is to wrap and weld them up. After cleaning them up really good to make sure my welds take. Of course I got some tong blanks made at our last hammer-in, so I make a set of tongs to hold the pole first. You guys think I should make a pick-up style sized to the pole or bent jaw? I’m kind of torn between the two. Bent jaws would probably work better, but the pick-up style could be more versatile. Right now, I still don’t have a very large selection. Keep it fun, David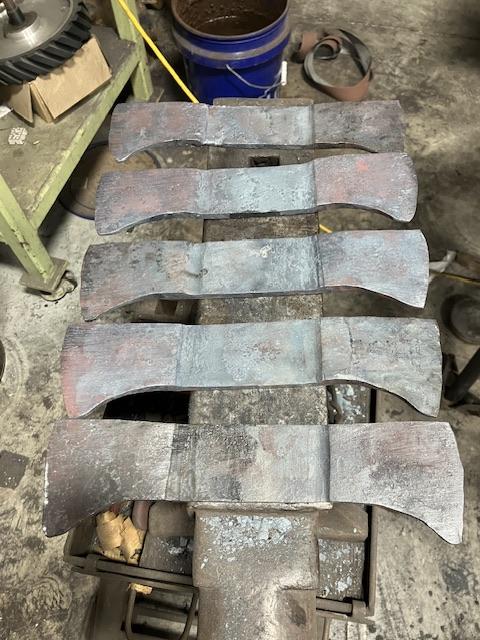
-
From the blacksmith standpoint. I’m not sure I would move to round stock for the chisels. As you’re drawing the tang, with solid blows and dressing, you should be able to gain most of the thickness you need. Obviously, it’s something you have to work out, but in the end it would be a lot less work. Of course, with some precise hammer work, from round stock you would be able to isolate mass for your bolster, and avoid the forge welding. You do seem to have a good handle on the forge welding though! By the way I’ve enjoyed your posts. I enjoy tool making and you making some really nice tools! Currently, all of my heat treatment is done by eye and testing, but I’m not getting results I could with some steels. For example, I’m just not real comfortable with the soaking time need with 52100 (which I have readily available). I’m always worried about overheating and grain growth. Seem like a petty fine line… Keep it fun, David