
Goods
Members
-
Joined
-
Last visited
Everything posted by Goods
-
One of the best resources I’ve found on line is Lee Sauder’s website (leesauder.com). I’ve read answers to most of your questions there, but you may have to dig a bit… If I understand right he is in the north east and held classes on smelting. You could reach out and see if he still holds them. I attended a smelt lead by Andrew Welton, who was mentored by Lee, just a few weeks ago and learned more first hand than I’ve ever read anywhere. Andrew also teaches classes at a school near Pittsburgh, PA. If you interested PM me and I’ll get you the contact info. He’s also on facebook if you want to look him up there. I could answer your questions, but I really don’t have the experience to back them up. Hopefully soon, I’ll gain some! Keep it fun, David
-
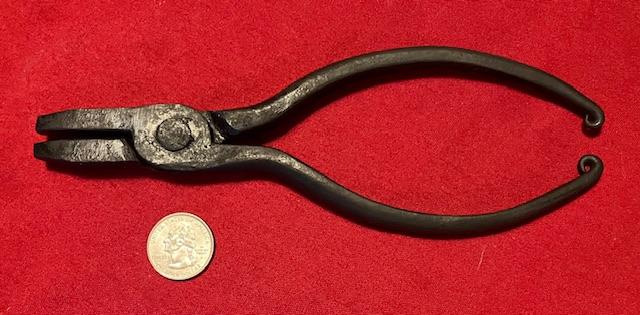
I’ve been working on making Viking crafting plier. I’ve got a pile of failed plier halves laying in the shop, but today I got the first set finished: Forged from a 3/4” diameter coil spring, drawn down to 1/2” square. They’re not quite symmetrical, but I’m still pretty happy with the first finished attempt. Keep it fun, David
-
First, I have to state that I’m not an expert on gas forges, but I’m sure one of them will be along shortly. If the burners are 25mm diameter, then you have probably twice the burners for a forge of that volume. If you can tune the burners down low enough it may work well, but that could be a challenge using naturally aspirated burners on a long narrow forge. Take some time (it will take a lot) and read through the this topic: You can just skim through, but there is extremely valuable information there. If nothing else, it will give you insight on more troubling shooting and more pointed questions. There is a lot of information there from true experts and you can even see some evolution over time. Unfortunately, at least one of the experts is no longer with us Keep it fun, David
-
Yes, that’s me. The four of us rotated striking, running the blower, directing and resting. (I was directing most of the time, but was completely drenched in sweat from earlier consolidating and splitting the bloom with that striker team.) That was my thought with the scale also, but it would have been nice to hear from someone with 50 smelts worth of experience! Keep it fun, David
-
He brought magnetite purchased from Spain in powder form. He purchased from them to have very consistent certified chemical content for demonstration purposes. He also reprocessed the powder into clumps so it wouldn’t blown out of the furnace. I did talk to him about using magnet collected black sand and he said that would work good at the same fuel ratio in this type of furnace. I didn’t think to ask about collecting forge scale to supplement the black sand… Also, I just received this picture of us working on our piece of bloom: Keep it fun, David
-
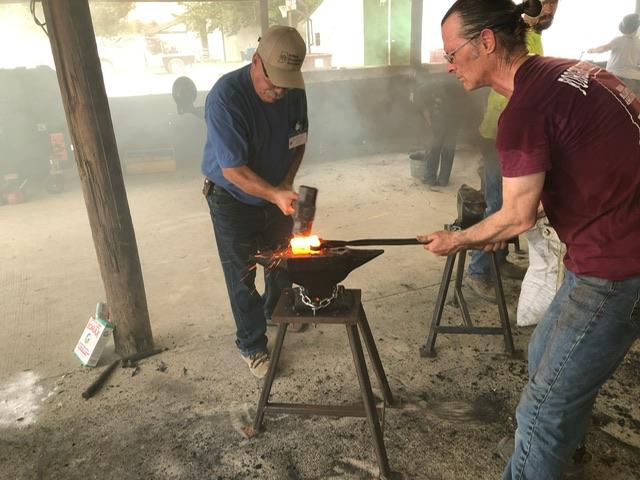
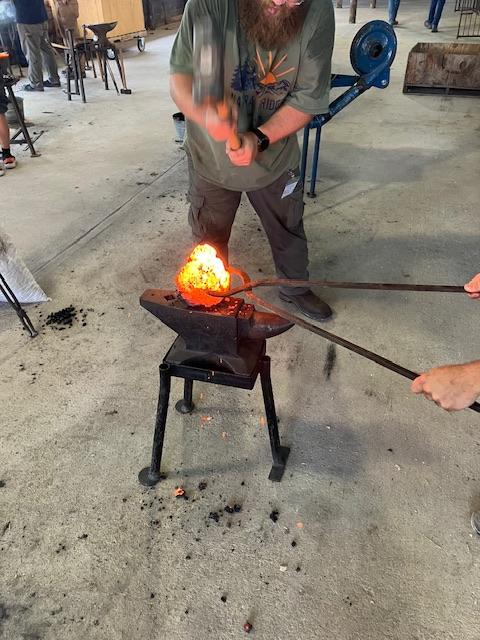
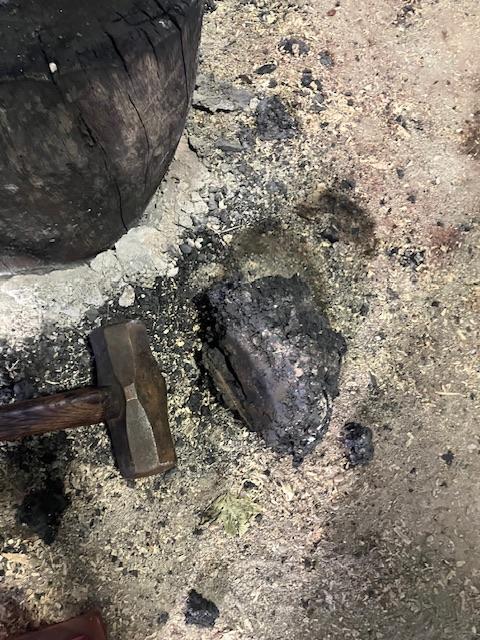
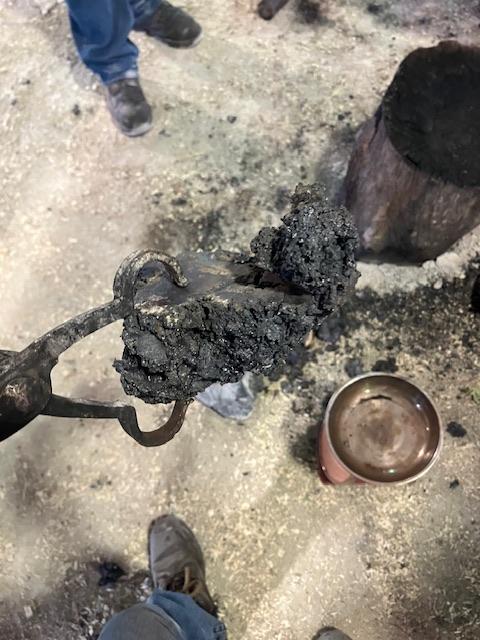
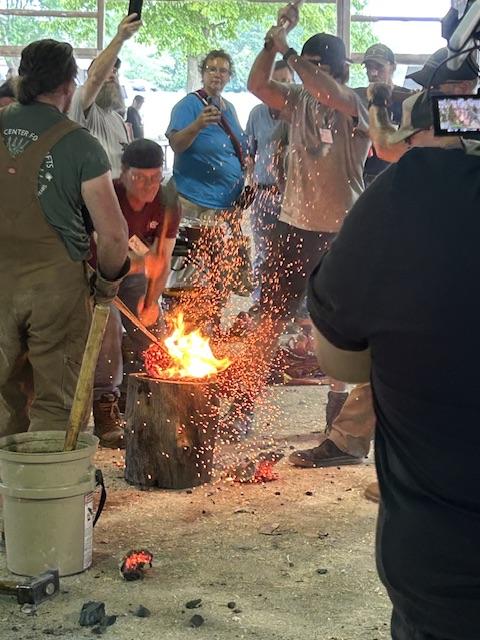
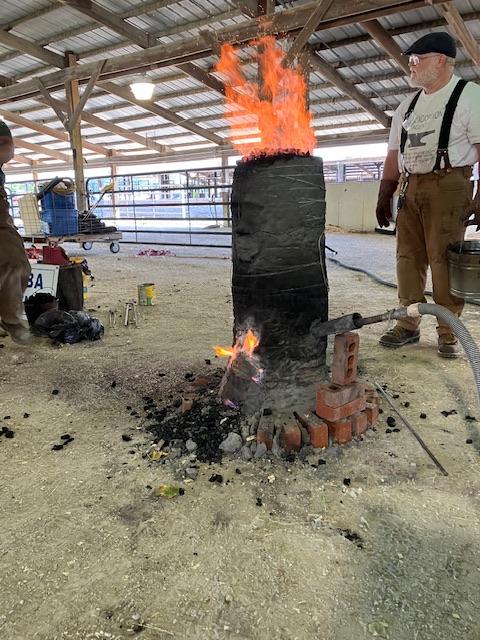
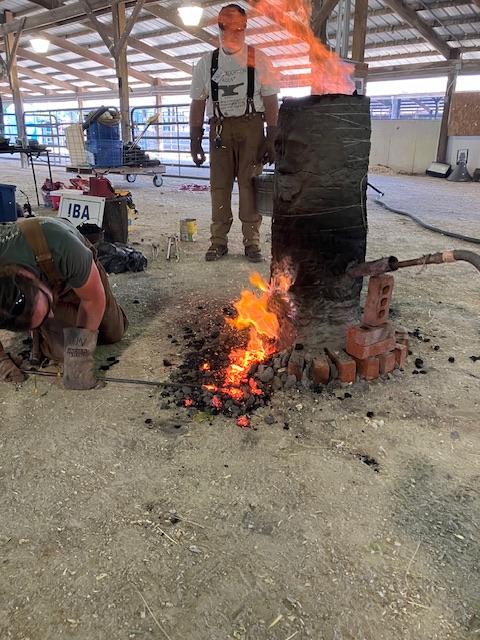
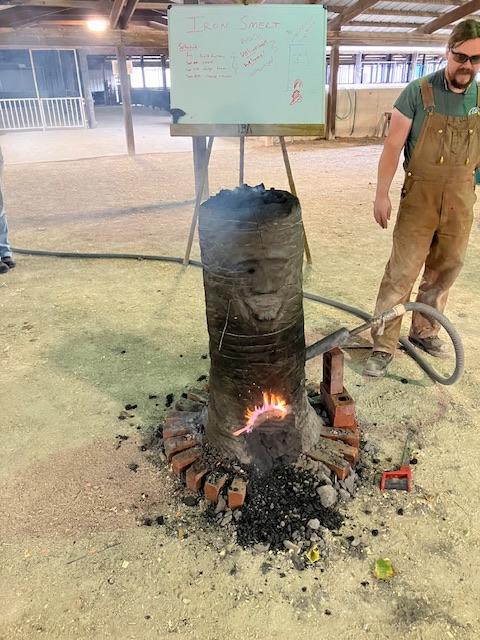
I know probably note the best place for this, but the experience at the IBA state conference Saturday with the smelt demonstration was amazing! Andrew Welton was the demonstrator and he was fantastic! Very knowledgeable and giving of that knowledge. He invited volunteers to help charge the furnace, and work the bloom. I was blessed with the opportunity to do both (a little greedily). When the bloom (22lbs/10kg) was split, I was able to get a group of guys together to forge a piece. Our goal was a small axe. That didn’t happen. This stuff wasn’t low carbon. It forged like 1095 and didn’t was to move under a 10lbs cross pein sledge. We got it consolidated, cut once and forged into a bar that went into the auction. It went for well over $100/lbs, to rich for me unfortunately… Here are some of the pics. Shorty after lighting the furnace: Here it is a while after the frames burst out of the top: Here I’m adding more ore: Taping the furnace to lower the slag pool: Initial consolidation of the bloom (5 strikers and I’m shown in mid blow): Here’s the smallest section cut from the bloom, the one my group forged out: Here’s is the largest piece of the bloom next to a 12lbs sledge: And finally, here’s one of the other groups forging the largest piece: No one got a final item forge from the bloom, but we brought in a lot of funds auctioning the billets! I’m hooked and can see myself doing this again in the not too distant future! Again, I can’t say enough good things about Andrew. I learned an incredible amount from him and hope to work with him again. Keep it fun, David

-
Mat, I had a similar experience yesterday. One of my mentors passed last year and I had wanted to buy his drill mill. It was a piece of equipment I wanted, but it was also a piece of His Shop. I couldn’t bring myself to ask about buying it from him. It made me feel a bit bad, didn’t want him to feel like it was coming to an end… Well yesterday I got a call from one of the smiths in our group who was helping the son clear out the last of Ray’s blacksmith shop and the drill mill was available. I was there in five minutes and after about 2hrs of reminiscing, I brought it home: I now have a piece in my shop that was Ray’s! Next step is to get it setup and tooled up. I just hope I can put it to work as well as he did. Keep it fun, David

-
Yesterday I finished up tongs for the auction tomorrow at the IBA state conference: One is sized for 5/8” square stock, the other is sized for 3/8” square stock. Both made from a 30mm tie rod from a scrapped hydraulic cylinder. I feel a little bad about going to conference this year. I normally have more significant items prepared for the fund raising auction and have items for the show and made-at-home contest. This season has been so busy, I’m just lucky I don’t have a conflict. On a high note, one of the demonstrations is a smelting and they’re saying we can participate. I may even have a chance to forge some of the bloom for an auction item! This is a huge opportunity that has untested me very much. I’m really looking forward to it. Keep it fun, David

-
You forgot: “Get it hot? Where’s the mark? Let it cool. Find the mark. Mark deeper.” Keep it fun, David
-
Holy cow! That is a fantastic price for an anvil of that size and condition. I’d almost be afraid to use it… Keep it fun, David
-
Last night I got the meat fork done. Here’s some process pictures: Tines forged and filed. (Sorry, didn’t think to take in progress pictures until this part was done.) Socket forged and fluxed. Forge welding tines to socket. Forged welding completed and almost cut free of the pipe the socket was forged from. Finished order. Keep it fun, David


-
Shainarue, the pan is for liquidy foods like eggs or biscuit mix. The spiral iron, would be used like a grill surface. Smaller pieces of meet and vegetables. The same person ordered a meat fork also. That is a large two pronged socketed fork with a 36” wood handle for large pieces of meet in place of a split. John, the bowl work you do is fantastic! Keep it fun, David
-
I’ve never heard of horn nails as a replacement for stitches on sheaths. (Honestly though, I’m not that much of a knife person.) Is the construction method something you’ve seen before, or a fresh idea? Either way, it’s very cool and makes for an interesting touch on a beautiful knife. Keep it fun, David
-
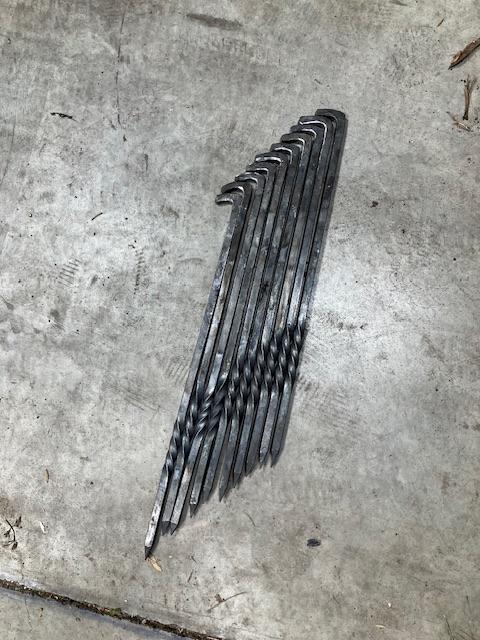
At the Viking event I had several requests for “replica” items. Today I finished up the first two items: A spiral cooking iron and a dish iron. These are not true replicas. There’s pan is 10-1/4” instead of 8” and spiral iron is 8” instead of 4-1/2”. On both the handles are of heavier stock. All by request. Of course, I didn’t use my limited wrought iron supply either. If they requested that I would have, but the cost would have been significantly higher. I also had an order for tent stakes. (Where we were setup there was at least 10” of mulch and most had issues with their stakes holding) These 3/8” square 18” stake will hold much better. I also started these last week: Cheaper ones make from RR spikes. I got maybe 20 of these started. They ended up 3/8” square and ~16” long. Some are already finished and gone… Keep it fun, David


-
Just a guess here, but I bet the “fire pot” was a duck’s nest style built up out of clay. Keep it fun, David
-
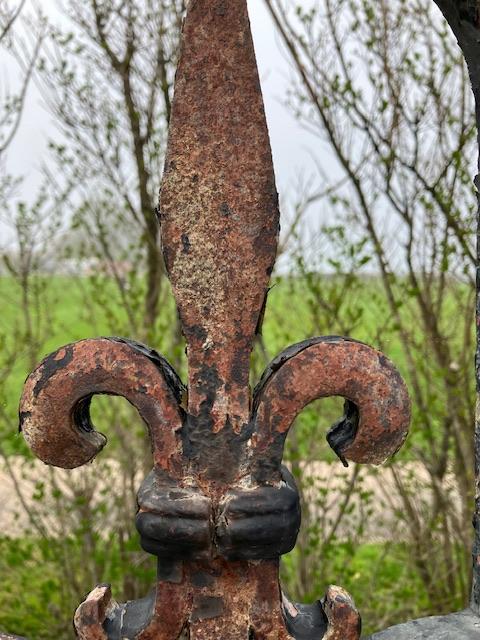
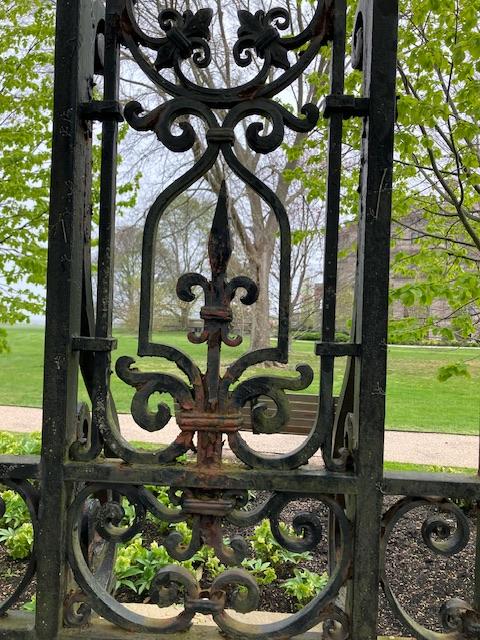
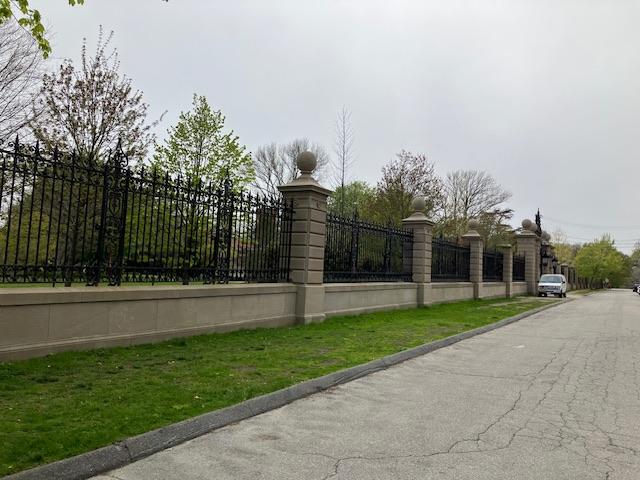
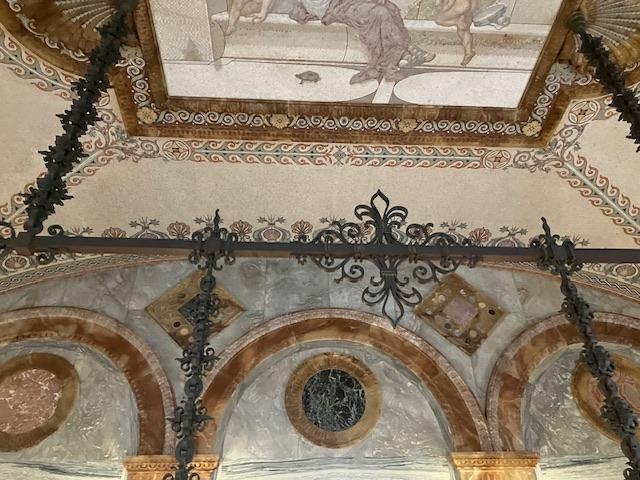
I just got back from a short trip to Newport, Rhode Island, USA and thought you all might like to see some of the pictures I took of a some of the ironwork from the “Cottages.” Here’s the fence around “The Breakers”: (The salt water mist around the back hasn’t been kind to the fence in some places…) (had to get something in the picture for a sense of scale!) Here’s the ironwork above the pool table in the “Marble House”: (Yes, every room is covered in marble!) And finally an interesting fire place set from one of the smaller “Cottages”: (Sorry, I don’t remember the name of this mansion.) If you have never been, these places a breathtakingly gorgeous, and worth a visit and tour. I wish I took more pictures, but there was just so much to see… Keep it Fun, David


-
Not today, but this past weekend (Thursday ~ Sunday) I setup my Viking forge demonstration kit at the Whitestown Viking Festival. I had a fantastic time. Worked on several projects, had one failure with a drop tong weld, made a few need repairs for other reenactors and made a few custom requests on the spot. For more information I put a little more info here: Keep it fun, David
-
The festival went very well for me. The forge performed beautifully. I was able to forge weld up a basket for a handle, but couldn’t pull of the drop tong weld to finish it off. I may need to reconfigure it a little or just get more experience with it. My main struggle with that was the size of the fireball. I couldn’t seem to get both pieces up to temperature without making a really oxidizing fire… I will say I really liked the rhythm of operating the bellow and the sound that came from the woosh of air and flame. Sorry George, no thrall to operate the bellows. Not much for me to do while the pieces were heating anyway. (Although a new film crew did try operating the bellows and I found it so comical that I couldn’t answer there questions. I’m sure I looked rather foolish on live TV…) Working with the stake anvil and bick was a little limiting but didn’t cause any major issues. I was still able to get some good work done, but not necessarily to my liking. As I was afraid, the stump started deteriorating and both anvil and bick loosened up. The stump could also have been more stable. Often I found myself aiming at a moving target. When it was all said and done a had 3 good days forging and talking up the crowd, sold a decent amount considering I had very limited inventory, and was able to hang out this my family and other reenactors after I put everything up. Oh, almost forgot the food we all shared was fantastic. I ate good all weekend! Here are a few pictures of it all: This was the load I took up. The sleeping tent, forge tent, forge equipment and basic needs for one night. My wife came up the next day with another full load of crafting materials, food, and other kit. Basic overview of my setup, with both of my sons hanging out. We had a decent rain on Friday afternoon and the tent (more of a canopy currently, side does fold closed, but I didn’t have enough time to make and attach the end doors) kept everything dry. The rest of the weekend was sunny and the shade was very helpful while forging. (I know, I need to get some wooden buckets and get rid of the plastic ones.) Better view of the forge in action. Better view of the anvil setup (and shabby stump). One thing that I’m sure didn’t help was how soft the ground was. The much was 12” deep! I’m looking forward to our next outing with the Vikings! Keep it fun, David


-
The joinery is rough, but yes quick tear down and reduction of space in the truck bed. Larry, I’ll do my best to get pictures. I’m not very good at taking time at events to do so, but I think it’s important this time. Keep it fun, David
-
Ok, almost ready. I got the forge stand built, and the forge box lined: Now, I’ll just have to get all my stuff packed up tomorrow… (I can’t believe how much I’m going to need to take!) Keep it fun, David

-
I got a little more work done on my Viking demonstration kit. Mounted the stump anvil, bick and forged a wedge clamp for twisting. See the link below if you’ve been along for the ride… Keep it fun, David
-
Well tonight I got the anvil and bick in a log. Not the best log/stump, but I’m out of time and it was available: I also added a make shift twisting clamp with a couple staples and a wedge. It will hold from 1/4” up to 1/2”. I will messed up and drilled the hold down staples 1/2”, forgetting that I used 3/8” for those… For now, I forged large burrs onto the staples, put extra wood carvings, and wood glue in the holes before I drove it down. It’s holding for now, and I think the staples will out last the stump that’s not in the best of shape. Now, all I have left is to finish sewing our tent canvas, finish building the forge stand, and pack up. I’m leaving to setup for the first big 3day event Thursday. (I’m cutting it close!) Keep it fun, David

-
You could get $5 a pound around here (south central IN) if that was in better shape. Age doesn’t really mean much to most smiths till you talking colonial era… and even then most of the smiths I know are looking for collectors items. There’s a pretty active Indiana Blacksmith Association chapter in the Indy area. You may try hooking up with them to gauge interest. Their next hammer-in is on the 25th. Check out the IBA’s website, the April newsletter should have contact information: https://www.indianablacksmithing.org Keep it fun, David
-
Once you in the hundred pound range, you can do quality work efficiently. The extra weight helps if you’re using a big hammer on larger items (like forging hammers from 1-1/2” ~2” stock) and especially if you’re working with a striker. The key thing is to mount it very securely! That way when you work out on the horn or bending over the edge you don’t need the extra mass just to keep it from dancing around. My main shop anvil is 150”, but at demos I either using a 100lb or a 127” anvil. Honestly, I don’t notice much difference when I’m doing demos. (My next demo will be on a 8lb stake anvil with a 5lb stake bick. I’ll let everyone know how that goes. I’m sure it’s going to be “interesting”. Keep it fun? David
-
I’m surprised it etched dark. All bandsaw blades that I have used to date etch bright. I’ll have to be more careful in the future! Keep it fun, David
