Goods
-
Posts
1,164 -
Joined
-
Last visited
Content Type
Profiles
Forums
Articles
Gallery
Downloads
Events
Everything posted by Goods
-

What did you do in the shop today?
Goods replied to Mark Ling's topic in Blacksmithing, General Discussion
Just for reference, in an ideal world (no loss to scale, and perfect geometry…), a 3D taper will grow by 3 times. (Cone, pyramid, but doesn’t work with a square taper on round stock; need to be a constant cross sectional shape.) Mark off 1” with a center punch and work you taper back to the mark. If you keep the taper even from both directions and a fairly sharp point, you’ll be really close to 3”. (Geometry is fun?). If it’s not centered when you get there, light planishing blows with you stock and hammer blows angle correctly should center it with cause too much growth in length. Keep it fun, David -
What did you do in the shop today?
Goods replied to Mark Ling's topic in Blacksmithing, General Discussion
Chimaera, it took me about 3hrs to get to this point. I did use the power hammer (Anyang 106) for the brut force steps: punching, drawing the cheeks, the set down in front of the eye, and some drawing of the blade. I did most of the drawing and shaping with a big ball peen and the planishing with a smaller flatter face ball peen. I find it much easier to get the shape in my head with a hand hammer. (Also used the hammer a couple weeks ago to prepare the 4”x2”x1” of forklift tine.) Keep it fun, David -
What did you do in the shop today?
Goods replied to Mark Ling's topic in Blacksmithing, General Discussion
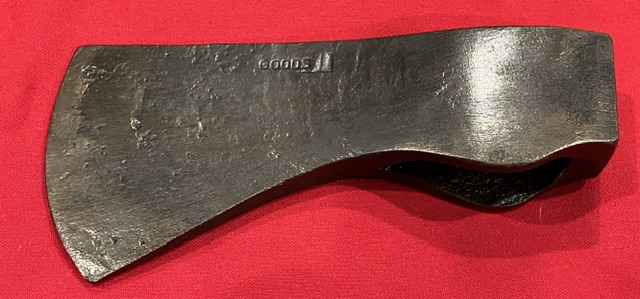
Very cool Chad! (Might be able to get varying temper colors using a propane or map gas torch?) I got some more time in the forge today. Knives hardened and tempered, two half sharpened, and a camp axe forged and normalized: Starting to feel like I’m close to being ready for the demo this weekend! Couple more items to go… Keep it fun, David
-
What did you do in the shop today?
Goods replied to Mark Ling's topic in Blacksmithing, General Discussion
“An authority xtra set of hands always comes in handy.” That was supposed to read “an extra set of hands always comes in handy”. I didn’t catch that “auto correct” -
What did you do in the shop today?
Goods replied to Mark Ling's topic in Blacksmithing, General Discussion
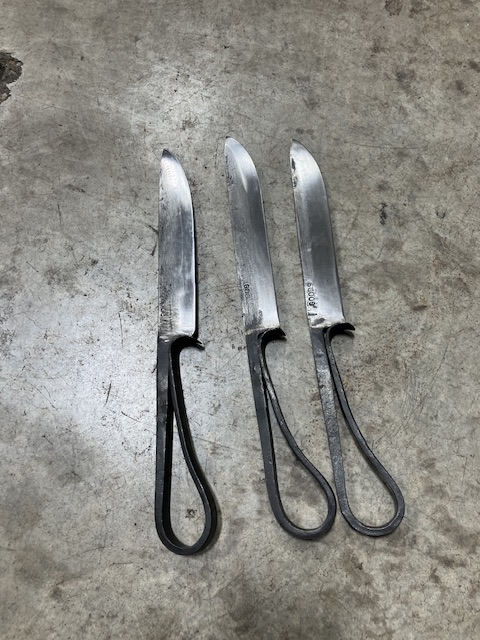
An authority xtra set of hands always comes in handy. I started some blacksmith knives from 1/2” wire coil spring the other night: Felt like good progress for two hours. I got them normalizing now: Ran out of time to harden and temper. Keep it fun, David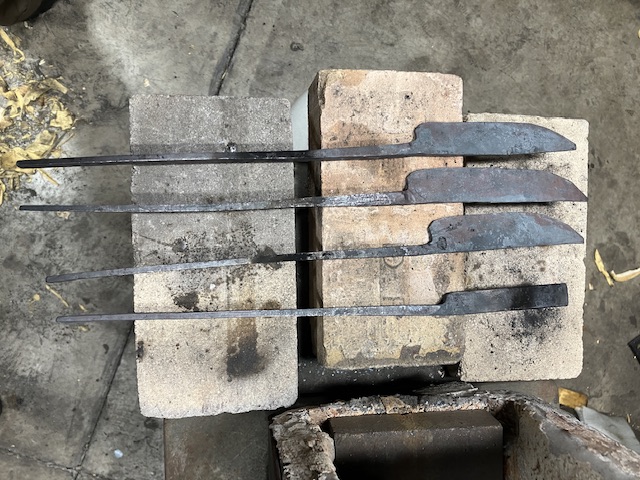
-
Looks like it would indeed be some tough steel! And have enough nickel for a bright layer. Keep it fun, David
-
Looks good. I don’t want to admit how may tongs I’ve mangled… Keep it fun, David
-
What did you do in the shop today?
Goods replied to Mark Ling's topic in Blacksmithing, General Discussion
True… but they draw the stem taper pretty early. One point I also wanted to make was that you don’t need to square a round bar up in this process. Just establish your blunt taper and set your shoulders based on the facets of the taper. Of course, you’re going for the certification, so you may need to work the steps the way they are expecting. Outside of that, ten smiths will probably give you ten different recommendations! Keep it fun, David -
What did you do in the shop today?
Goods replied to Mark Ling's topic in Blacksmithing, General Discussion
I’m a little surprised by this story board. I would not start with a short piece of stock. Especially for beginners. Here’s where I posted the story board I made last year, but I skipped a couple steps. I use it at demonstrations to talk through the process. https://www.iforgeiron.com/topic/66519-what-did-you-do-in-the-shop-today/page/834/#comment-765164 Starting stock on this is a bar of 1/2” square stock, and I usually get through the 1st three steps on one heat, and don’t cut it off the bar until after the 6th step shown. Just my two cents, which may not be worth much… Keep it fun, David -
If you are going to be living on the 2nd floor, be very careful about how well you hood drafts and definitely have a CO detector on that floor! Keep it fun (and safe!), David
-
What did you do in the shop today?
Goods replied to Mark Ling's topic in Blacksmithing, General Discussion
Frosty, upsetting seams like it would take a lot more work. But, maybe not. I started with 12pcs 4” of 1/2” round. The swage forges the ends down just a bit below 3/8” diameter and I’m not good with free forging under the hammer. So I spent a bunch of time trying to get everything just right and over worked a few. Ended up with 9 hooks, two over worked/splintered and one mangled from miss setting in the swage. I’m either going the have to get better or drill out the ends of the swage, so I can use my standard stops and round swage. (I can forge down at the anvil, but the hammer is already running…) Billy, that’s a good idea. I’ll have to remember that concept for future use! Can see a lot of potential there. Keep it fun, David -
Call me the odd ball, but I’m drawn to the simplicity and elegance of the one on the right. Simple and elegant can be very difficult to pull off, but you got it on that one! Keep it fun, David
-
What did you do in the shop today?
Goods replied to Mark Ling's topic in Blacksmithing, General Discussion
JHCC, nothing better that teach eager students! They look pretty happy! Those display rod fit the theme very well, they’ll look good in the shop. Donal, I’d hate to see how much time you have in those pendants. They look pretty small and fiddly. I’m not good with little item… Keep it fun, David -
What did you do in the shop today?
Goods replied to Mark Ling's topic in Blacksmithing, General Discussion
Jennifer, the carving hatchet was surprisingly easy to forge. Forging it flat on one side is a lot lest fiddly than keeping a typical hatchet symmetrical. If/when I make another carving hatchet, I’ll probably forge it with a long beard. It sounds like that gives more technique options for the user, but I’m not a woodcarver… Keep it fun, David -
What did you do in the shop today?
Goods replied to Mark Ling's topic in Blacksmithing, General Discussion
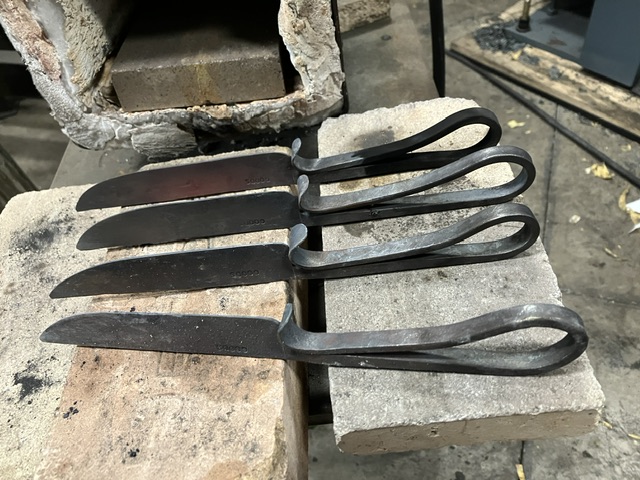
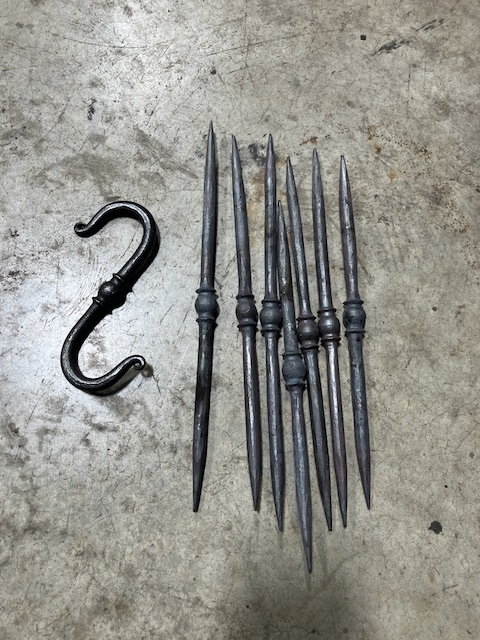
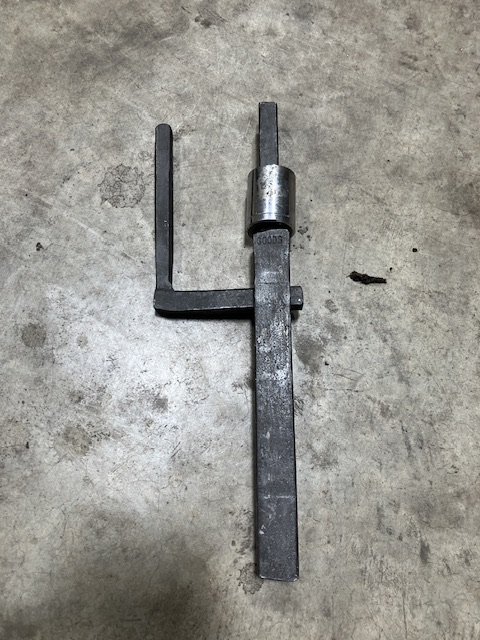
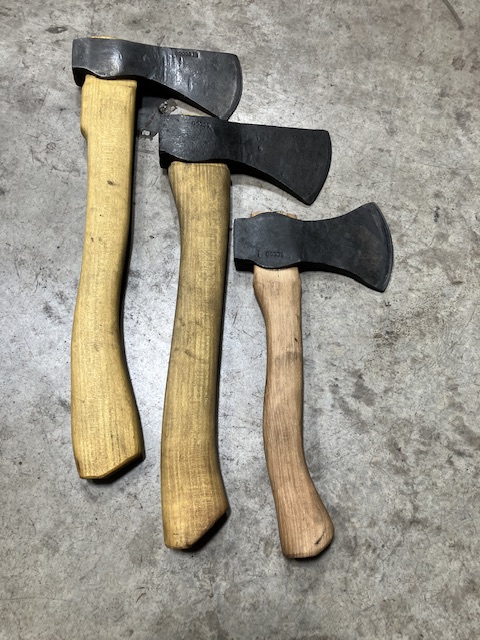
Really nice, Donniev! It’s been a while since I’ve posted, but I’ve had a fair amount of time in the shop the past two weeks trying to gear up for a demo/festival. Here’s what I’ve been up to: hatchets and carving hatchet: s-hooks and almost done s-hook using a swage I won as door prize I at our last local hammer-in: A few black smith knives for 1/2” coil spring: And for tomorrow’s hammer-in, an adjustable bending tool for hardie hole or vise I worked out for this month door prize. (1/2” socket for radius selection and bending arm locked into position using a vise or (preferably) a 1” hardie hole to adjust for stock thickness.) I used 7/8” socket for the hook above: (Our setup is if you win the door prize, you make next month door prize. Last time I made a set hammer, tried to think of something unique for this time.) Keep it fun, David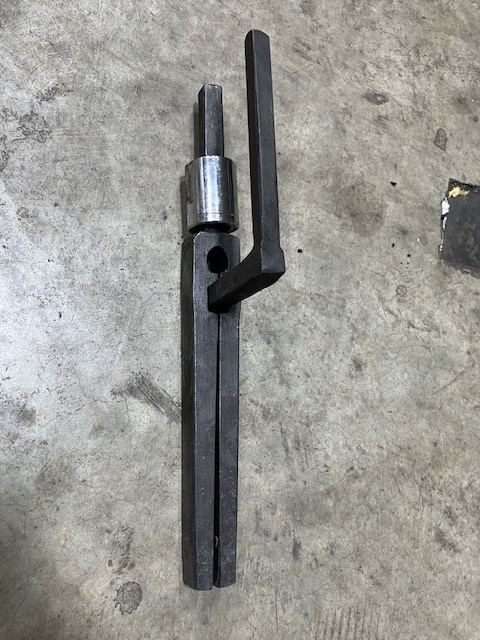
-
You will probably not have any luck stretching the wrench, hot or cold. Even the smallest difference in cross section or temperature, or material defect will cause that section to thin more. Once that starts, it’s all over… If you’re not wanting to add material, I’d make a spring swage with a similar, but much smaller cross section and use that to forge the length out. Also, I guessing that the steel will burn before it hot enough to droop. (Maybe heat it hanging in an induction coil in a chamber filled with argon? I would love to see that! If I only had unlimited funds..) Keep it fun, David
-
I’m using a home gas furnace combustion air blower I got for free from a HVAC guy I know. The furnace was fine, but the homeowner was upgrading… I put a cheap speed controller on it and it works great. Ask around, you never know what places throw away that they’ll pass on, especially if they’re curious about what you’re going to us it for. It’s been my experience that most guys really get into the idea of blacksmith and want to help out! Keep it fun, David
-
All very nicely done MG! Looking forward to seeing the rest. Keep it fun, David
-
Not having knowing the video you are discussing, I can only assume it is rigidizer. Often, food coloring is added to give a visual indicator of coverage. The rigidizer binds the ceramic fibers at their intersections to give it more strength and reduce the potential of airborne fibers. Keep it fun, David
-
What did you do in the shop today?
Goods replied to Mark Ling's topic in Blacksmithing, General Discussion
JLP, take care of yourself and don’t over do it! I understand about making progress on the school. If I didn’t contract out my shop, it would have taken me years to finish and I don’t push myself nearly as hard as you work yourself. I’ve got a bunch of wrought iron I’ve accumulated to make an axes and hammers with and it’s on the list of projects. I’m just saving that for personal use or for someone who would really appreciate it. About the videos, they may not be formatted or “entertaining” enough for the general YouTube audience, but they are very much appreciated by me (and many here on IFI). Honestly, your videos have inspired a lot of the forging I do, not always the items made, but the techniques and philosophies presented! Thanks, David -
What did you do in the shop today?
Goods replied to Mark Ling's topic in Blacksmithing, General Discussion
JLP, yes I saw the video. Was the hatchaxe 4140? While I’m not sure exactly what this is, I treated this material like 1045 or 4140. (Some of the local smiths are convinced it’s 4130.) For all the non-edged tools I’ve made with it, it reacted very well to water quench. How’s the school coming along? Recovery been smooth? I’ve been missing not having new technique videos from you… Keep it fun, David -
What did you do in the shop today?
Goods replied to Mark Ling's topic in Blacksmithing, General Discussion
Thanks JLP. I’ve considered not using a bit in this material, but I haven’t done any testing with it for edge holding. I’ve made tools out it: hammers, swage, power hammer set tools, etc and they’re holding up quit weld, but nothing with an edge… The coil spring I’ve been using, I know will hold up. I guess I need to do more testing in order to make things easier. (The joys of mystery metal.) Keep it fun, David -
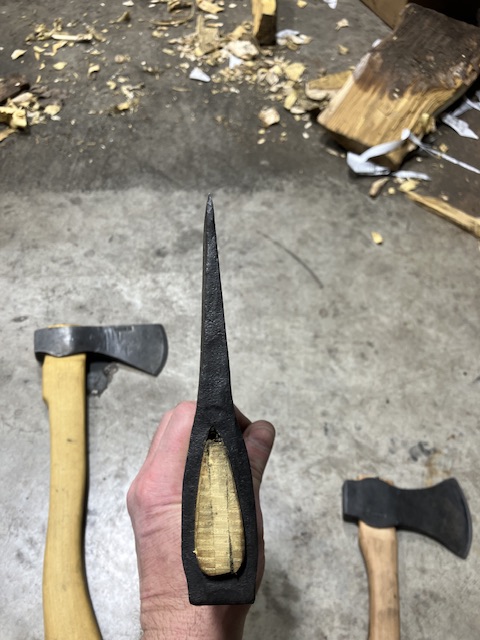
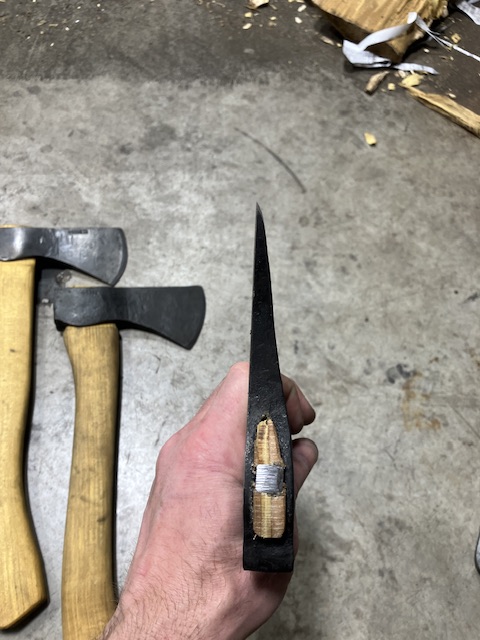
What did you do in the shop today?
Goods replied to Mark Ling's topic in Blacksmithing, General Discussion
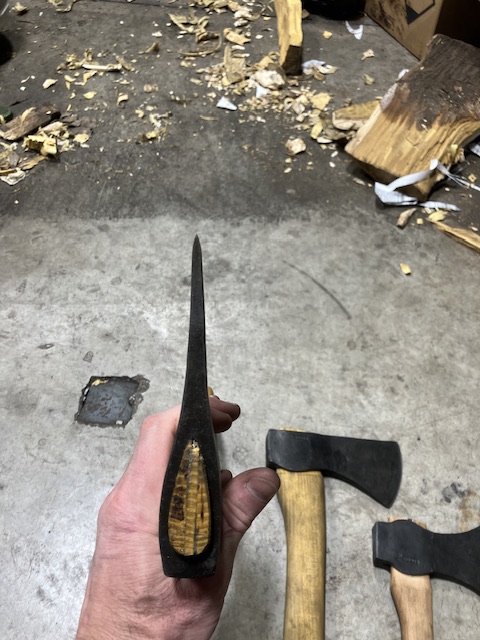
Today, I finally got back to working on the hatchet my wife requested. I wasn’t happy with the last attempt, but this one will do: Made from forklift tine with a coils spring bit. Now to sharpen and haft it. Getting better, this one only took 5hrs from lighting the forge to start of tempering. Keep it fun, David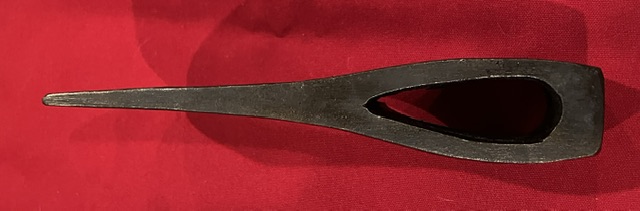
-
For a hot cut I would heat treat it. It will work without the extra hardness, but you’ll spend less time sharpening it if you harden it. Keep it fun, David
-
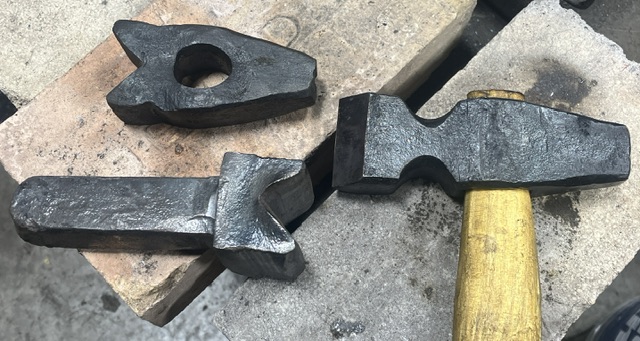
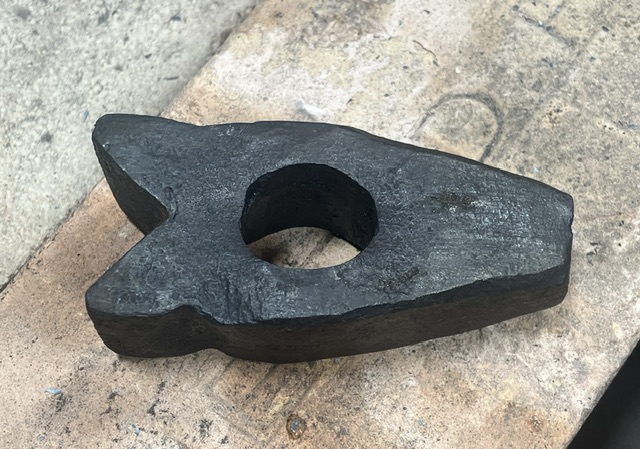
What did you do in the shop today?
Goods replied to Mark Ling's topic in Blacksmithing, General Discussion
Yesterday at our local hammer-in, I finished out a 90degree top swage: After looking at it in my shop, it seems a little crude. Maybe I should spend a bit of time refining it. Of course I could just handle it a finish out this set, and get on with the intended project. After all, they are all a bit rough: Keep it fun, David