

Goods
-
Posts
1,141 -
Joined
-
Last visited
Content Type
Profiles
Forums
Articles
Gallery
Downloads
Events
Everything posted by Goods
-

What did you do in the shop today?
Goods replied to Mark Ling's topic in Blacksmithing, General Discussion
I’m at an automotive plant that employs about 2000. We only worked half shifts due to major concerns over absenteeism and logistics disruptions. It worked out pretty good for everyone, but was costly for the company. Personally, I enjoyed the celestial show from my front yard with the family. My older son was even home from college on spring break. Keep it fun, David -
I agree with Buzz above, but I will add that if you’re planning on using a temp controller with this forge the added thermal mass may help stabilize the temperature making it easier to keep a tight temperature range. Keep it fun, David
-
I saw it as the spine of a large skeleton sculpture myself… Keep it fun, David
-
What did you do in the shop today?
Goods replied to Mark Ling's topic in Blacksmithing, General Discussion
Billy, the mess on your bench? It’s not bad, and I love to see the other bits and pieces of projects, tools and other dodads sitting around other people’s shops. On the other hand, I try to keep my photos in a clean spot if I can find on… So, I understand. I’m confused by the gap on the bottom of the towel holders. They look visually appealing, but any issues with functionality? Keep it fun, David -
What did you do in the shop today?
Goods replied to Mark Ling's topic in Blacksmithing, General Discussion
Spent a few more hours in the forge tonight and wanted to do something different and fun… so I made another necklace: Keep it fun, David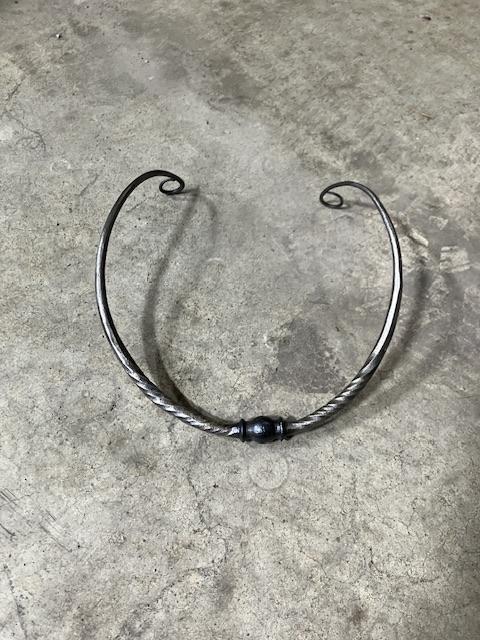
-
What did you do in the shop today?
Goods replied to Mark Ling's topic in Blacksmithing, General Discussion
Billy, yes, it’s curved and chamfered: It not perfect, but the pictures make it look twisted. I guess I need better lighting? Keep it fun, David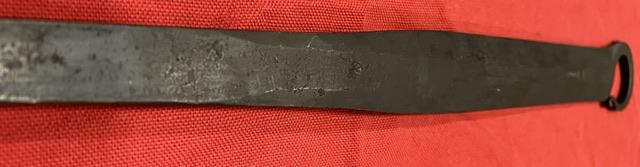

-
What did you do in the shop today?
Goods replied to Mark Ling's topic in Blacksmithing, General Discussion
Billy, the big question is: how did the forge weld go? After that it’s all just moving material around… I finally lit the forge tonight and got to play a little. Make a spatula to go with a BBQ fork from a few months back. Not a perfect match, but it would have been way faster if I wasn’t worried about matching some what close: Made for 1/4” x 1” stock with the spatula end fagot welded to get more mass to work with. Keep it fun, David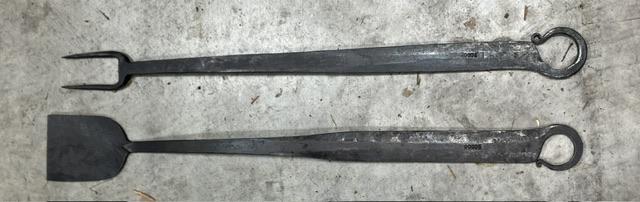
-
If you working with mild steel, you can heat with you forge and selectively cool with a watering can. Keep it fun, David
-
Quite beefy, but well forged good job! Better than my first leaf by far.., keep it fun, David
-
Whenever someone says “shaft” I’m thinking medium carbon good for most types of blacksmith tooling. What diameter are we talking about? Large enough of hammers or hardies? keep it fun, David
-
What did you do in the shop today?
Goods replied to Mark Ling's topic in Blacksmithing, General Discussion
I understand, never seen it done myself and not sure how big of a bone he’s talking about, I’d expect it to be poultry. I’m curious to hear how it works out for him. (I’m honestly not sure if it will get used or if it will be a “show” piece.) I had 80CRV or 8670 for this project, while the 80CRV would have given more visual appeal, the 8670 sounded tougher and easier to heat treat with a basic setup. Hopefully my choice was a good one. (I’m open to hearing others thoughts on this, no offense taken if it was a bad choice…) Keep it fun, David (I thought I already posted this, but at least the system restored the text so I didn’t have to retype it…) genwood, I can’t wait to see that done. I have an image in my mind at to what it is and curious to see the out come. Keep it fun, David -
What did you do in the shop today?
Goods replied to Mark Ling's topic in Blacksmithing, General Discussion
JLP, it’s meant for processing meat. The person who requested it was looking for something like his grandfather has that was use with a baton for cut through bone. The spine is 1/4” thick at the handle down to about 3/16” at the hole. The spine is also drawn back considerably. I met up with him tonight and he’s pretty happy with it. So, maybe a few more hours and I’ll be happy with it and it will be done. I’ve got to get back to some basic forge projects and build some inventory for a festival/demo next month. Keep it fun, David -
My intent wasn’t for you to sketch out simple hooks . I think it would be a way to take on a more complicated item, by breaking it into simple straightforward forging operations. Checking after each step to allow for any corrections. Think of each step as an accomplishment and when the last step it done, you’ll have quite an accomplishment. (I guess my “engineer” is showing and it may not seem very encouraging, but it meant to be ) Keep it fun, David
-
What did you do in the shop today?
Goods replied to Mark Ling's topic in Blacksmithing, General Discussion
I like that bottle opener. It’s not often to see a new (good) idea out there! I’m not done with this yet, but I can’t resist posting a picture of where I’m at with this cleaver. I’m pretty happy with it, I just want to make sure the customer is happy with the handle shape before I finish it out completely. Gomai with the provided Harley Davison drive chain as the outer layers, then 15N20 with 8670 as the core and walnut scales. I didn’t get the dramatic effect of the 15N20 and 8670 core as I expected, but it came out centered. Keep it fun, David
-
Here is a sample of my one of my sketches (I posted one the others day for a hatchet also): I had not made a cleaver before and needed a starting point. The sketch doesn’t have to be artwork, just so you know the direction you’re going and what dimensions you’re aiming for. I really help me make sure I’m not missing something. This was from my first attempt which was a failure, and I modified a couple dimensions for the 2nd which worked out good. For the final project I added a couple steps for forging out the pattern welded billet specific to keep the core material on the edge, but used much simpler notes and got out of order a little. Took a while to correct and it turned out, but I would have been time ahead if I followed more detailed steps… The pictures you posted are not bad results. I’ve seen lower quality from some smiths with a lot more time at the anvil. Me, I’m very picky and take much more time with forging than most. It’s sounds like you’re more in my camp. Take the time you need to get the finish you want, speed will come later. (I’ve been working on this one cleaver since January…) Keep it fun, David
-
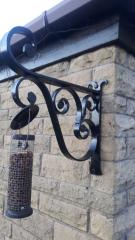 That beautiful bracket makes the feeder look really cheap! Another commission possibly? Keep it fun, David
 -
Try not to look at it this way. Is it a better hook than the last? That should be something to focus on right now. Try to make each piece more refined than the last, then see what you can apply those skills to. Also, plan ahead when you are doing something new. I probably spend as much time planning my step outside the forge at I do at the anvil. New items take time, especially when you’re new. Enjoy the process and focus on quality, everything else will come with time. Don’t be too worried about trying something new. Just take the time to break out the individual steps in the process. Make a sketch of each step to see if you’re step order make sense, then follow the steps. I do this very often and end up doing a lot of volume calculations to make sure the dimensions come out right. It can be tedious at times, but I’ve been doing this for a few years now and still need to measure and calculate to get where it want on projects the require dimensional accuracy. If you steps didn’t work out, review your sketches. What went wrong and why? Things will go wrong, that how we learn. Keep it fun, David
-
Power hammer, hammer eye punch die?
Goods replied to mnidoone's topic in Slitters, Punches, Drifts, etc
I would make the punch completely cone shaped down to the weld. That way you don’t end up going to far with the hammer and end up with an odd shaped hole. Keep it fun, David -
Next steps for my first axe
Goods replied to Will Brouwers's topic in Axes, Hatchets, Hawks, Choppers, etc
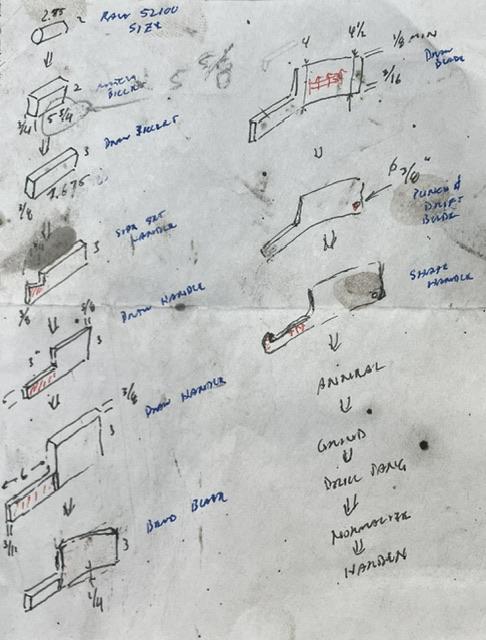
It took me a while to find any notes from making hatchets, but the way this is laid out is my typical approach to forging something I need to think through. Note: this doesn’t include any of the tweaking that needs done just to keep everything in alignment and clean. It’s just the major steps I tried to follow to get where I wanted to go… This plan was written with using my power hammer, and I’ve made several hatchet specific tools over the past couple years. At this point, I need to remake some of the tooling… I hope this proves useful. Keep it fun, David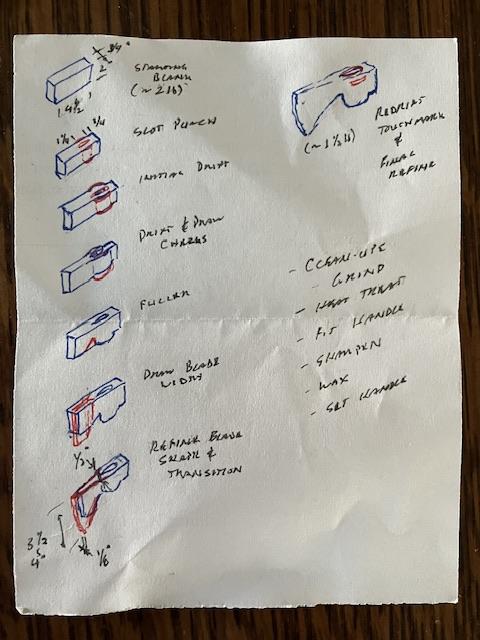
-
If you are wanting to make hammers from this stock, it is not very difficult to forge weld high carbon steel to the face… I’ve got some 2” round stock that I’ve been considering do that with. Keep it fun, David
-
Next steps for my first axe
Goods replied to Will Brouwers's topic in Axes, Hatchets, Hawks, Choppers, etc
Unfortunately, if you going for a typical elongated teardrop eye (especially with the cheeks drawn down into “lugs”) I don’t think there is a reliable way to forge that shape without a drift. They are not hard to make, but I broke down and ordered a new set (hand held & progressive segment set) from Holland Anvil. My 4140 drift didn’t hold up well to the power hammer drawing the lugs… I’m expecting the H13 will hold up considerably longer. I’ve got several blanks forged out, but haven’t had a chance to work on them yet. If I can find my notes from when I was planning my last hatchets, I’ll take a picture and post it here. (Most of the time I will plan my forging steps out on a quartered piece of paper in detail, then refer to those notes when forging. This provides me with target dimensions and keeps me from jumping ahead, but I generally use the notes as a guide, not a rule.) Keep it fun, David -
Next steps for my first axe
Goods replied to Will Brouwers's topic in Axes, Hatchets, Hawks, Choppers, etc
Will, do you have a good hatchet/axe drift. Drifting and drawing the cheeks is basically where I would go next. (I don’t start on the blade until after I’ve done at least the initial drifting.) The punched holes don’t look too big to me, but you may have a hard time straightening the one on the right. For the transition from the eye to the blade, just draw it down to where you want it and if the blade gets too long, just cut it back. Just my thoughts… Keep it fun, David -
To me it looked like the AI lost track of you when you moved to fast across and out of it’s field of view. I did like the effect/feel of the video while it was performing well. Also, the audio at the end (~5min) got pretty low and seemed to stop completely. I’m always impressed how you produce such clean forgings so quickly. Even breaking down/drawing out that 1-1/4” 4140 without even having to dress back any fish mouthing. Could really be miss leading to a new blacksmith, but I know how much work and skill that takes! Keep it fun, David
-
Generally, the three reasons for twisting when going from a square cross section to octagon are: 1) the work piece is not perfect vertical on the corners. 2) not hitting the work piece with the hammer face parallel to to anvil. 3) not hitting with the face of your hammer centered on the stock. (Not as big of an issue as the two above.) These errors will cause the stock to twist as you work the corners in. Just be aware of them and practice. As soon as you notice a twist starting, put it in the vise a straighten it. Things go wrong and correcting issues early will save many forgings. Keep it fun, David
-
JLP Blacksmith Teaching Center.
Goods replied to jlpservicesinc's topic in Building, Designing a Shop
Too bad in pretty far away to make it to justify a trip to an equipment sale… I’ve been watch this build and can’t wait for you to reach the finish line. I imagine it’s exciting! Keep it fun, David