

anvil
-
Posts
3,246 -
Joined
-
Last visited
Content Type
Profiles
Forums
Articles
Gallery
Downloads
Events
Everything posted by anvil
-
Lol, I too have an old Edwards #5 and I have been using it for years. I guess different strokes for different folks.
-
 I was going to post just what Steve said. At best you are normalizing the blade. And using a torch, the blade will not have a consistent heat along it's edge.
 -
dealing with long stock on the anvil
anvil replied to ADHD-forge's topic in Blacksmithing, General Discussion
Adjustable stands. Also, I set my anvil to the height I want. Then when I set up my forge, I set the top edge of the forge, not the cutout, level with my anvil face. Thus my forge acts as a stand and my iron lays flat on my anvil. I use an s-hook and a weight to hold these long pieces firm on my anvil, thus freeing up both hands for tools.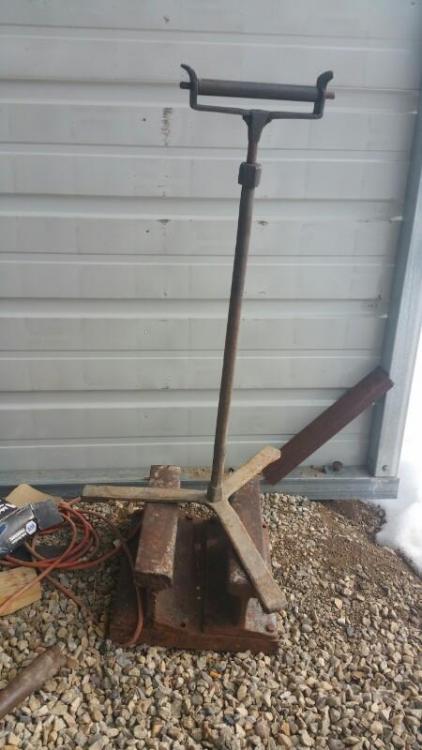
-
How much strength should I expect from a forge weld?
anvil replied to Adam R.'s topic in Blacksmithing, General Discussion
Setup is important. When possible we do a scarf. The scarf is slightly rounded. Start in the middle and slag is forced out towards the sides, thus no slag inclusions. When doing pattern welds this can't be done. So start welding along the centerline and work your way to the edges. -
Beautiful work!
-
Very cool!
-
I believe it is drilled undersized, then drifted hot to final diameter. That's how you can get a minimal "frogs eye" without distorting the whole detail. Also note this piercing is at a transition where the direction of the twist changes. A beautiful detail!
-
Ideas For Forged Items From Horseshoes
anvil replied to CrazyGoatLady's topic in Farriers and Horse stuff
Here's a couple ideas. Hoof picks are always good ones. I made a really cool horse out of horse shoes once. Here's how: It takes 3 horse shoes and a forge weld. Straighten all three around the toe. Leave the two branches on all three with the original curve. Forge weld all three centered around the straightened toe. The one in the middle points up. The other two(the two outside ones) point down. The center welded area is the horses back. The one pointing up is the head and tail. The two pointing down(4 branches) are the legs. Now make a head, pull out the main, detail the tail and finally make the 4 legs balance when it is standing there. You can detail all these extremities anyway you want. And one last one, even if you are not a good welder. I've never done this but I've had a few people buy lots of my old shoes during my farrier daze and tack them together and make rocking chairs. Old leaf springs are the rockers. -
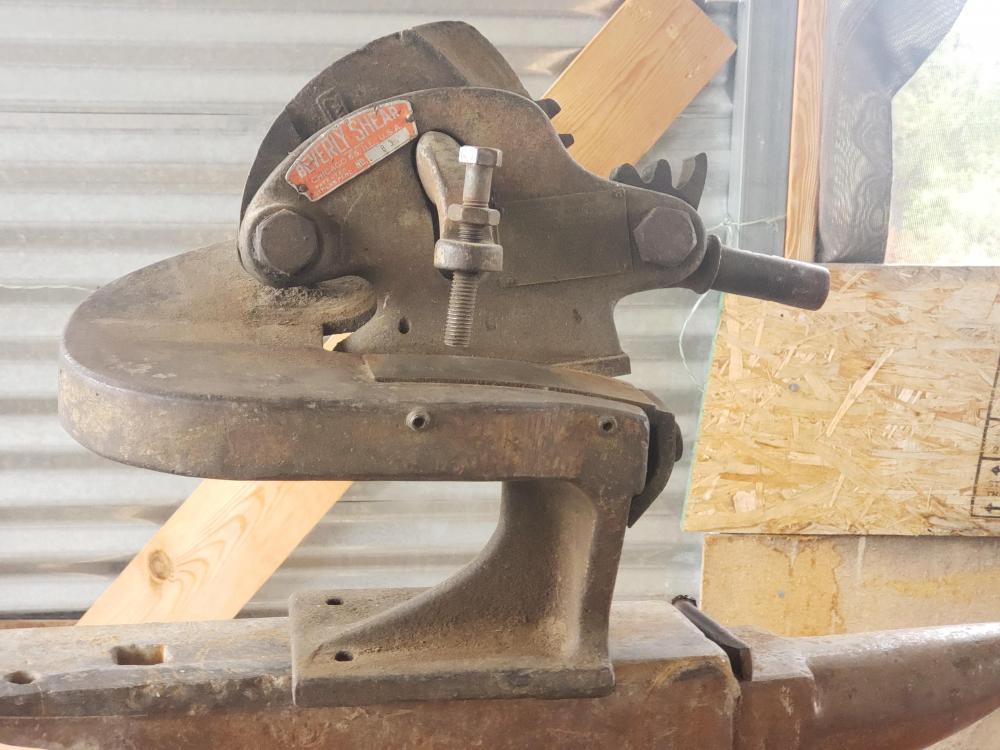
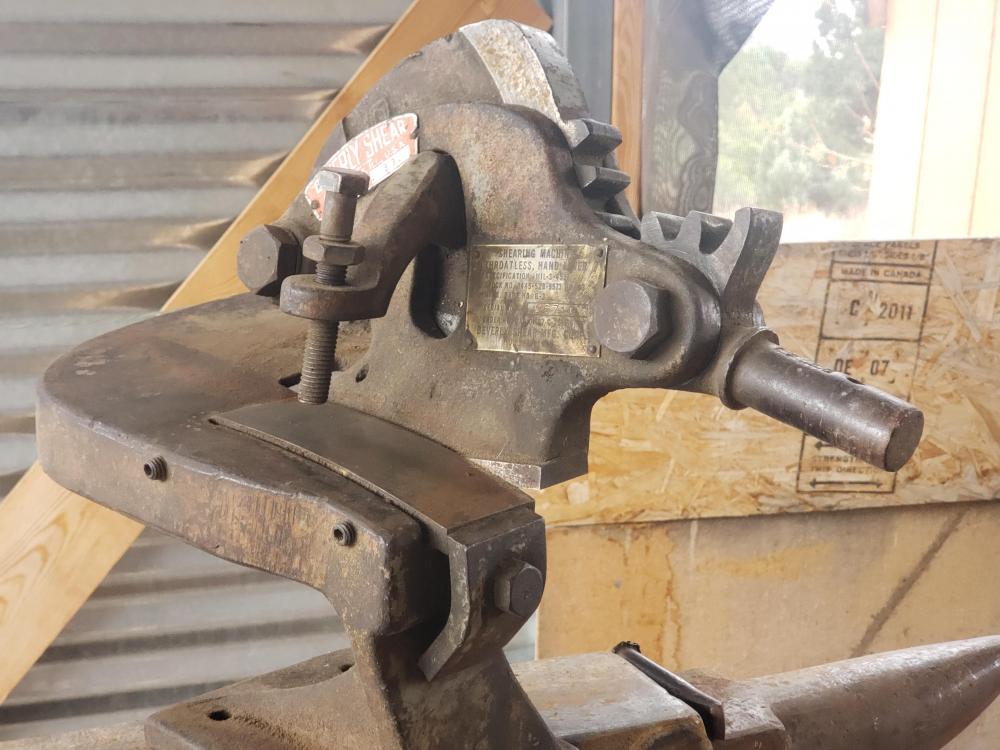
Here's my Beverly #3. I got it from an ABANA member years ago who had rebuilt it and was moving to the Canary Islands to be a blacksmith. I don't remember what I paid for it. Perhaps $300. It will easily cut 1/4" and I've pushed it to 3/8" mild steel. The beauty of a Beverly is it is designed to cut curves as well as straight cuts. It's a great tool to blank out leaves and rosettes.
-
Dang it, Marc, snorted coffee on that one!
-
no matter your time in this craft, you have not named any cheats, nor have you listed any innovations or hacks. What you have done is make a subjective value judgment based on nothing more than your assumptions and experience level. No fact, no definition, and to repeat,,, just your assumptions based on your experience level. For what it's worth, lol, I'm pretty much a traditional smith at every level. and I've made a good living doing it. However to make it clear, the tooling you use has nothing to do with the esthit you want to create. I don't care if you use a torch, welder or side grinder. Tools will attempt to demand a certain usage and this will create it's own esthetic. However if you are able to not get locked into what te tool demands, but use it for whatever your reason and have it enhance your own personal esthetic, then that's the proper tool for the job at hand. contrary to this, if you can't, then don't use the truth. Here's an example. perhaps you have a piece of half square that wont quite fit, it's a bit too big. There are many solutions. Let's look at a side grinder to solve this. you remove a bit of material and remove the beautiful forged finish you have created to match your own esthetic. If you can't restore that forged finish, then that tool is forcing it's own esthetic on you. And it will be an obvious fault. If you can, then that tool is the proper tool for that job and it is NOT a cheat, a shortcut, an innovation or a hack. Now back on topic. End of story.
-
I've ironed 8 wagon wheels as a blacksmith. 4 were rebuilt/restored and 4 were done with a carpenter/wheelwright. All ended up as chandeliers. All were 4' wheels. Here's some very large ones. The main difference between doing these and mine were the amount of people needed and the fork lift! I had no roller, so turned them with bending forks and scrolling wrenches. No tire dogs, but I could handle them by hand and my scrolling wrenches worked well as tire dogs. I forge welded the hub bands and tire to dimension and slightly less than the actual circumference. I heated up all to shrink them on vertically in my forge. I add all this to give you confidence that where their is a will, there is a way, and the challenge was worth it.
-
I don't want to go off topic, so a quick response. this has been debated many times. Some believe like you, some like me. Instead of a long rambling reply and the proverbial 10 pages of arguement, I'm going to suggest that you do the test I suggested. drop your ball bearing, or hammer and measure the rebound. Then bring a piece of half square long enough to hand hold to a good forging heat. I suggest a good yellow. Drop your ball bearing and measure the rebound. It will prolly be close to zero. Do this on as many varied anvils as you can find. The rebound may be different depending on material, but the end results will be the same. End of the test. For what it's worth I'm answering his question. It's always a hard decision to not be encouraging to test your ideas vs indicating that there is no need to reinvent the wheel. Please, no offense meant to anyone. So, let's assume it's a valid experiment and go for it. We need to decide our tools and consider all positives and negatives. Frosty nailed it. What size hammer? A 2-1\2# hammer is a good average weight for a working hammer. What material should be used? 1" gas pipe is seamless and prethreaded. there are threaded caps for this type of pipe. I believe they are cast but may be drop forged, I'm not sure. My hammer measures 1-3\4" on the diamond and about 1-1/2" on the flat. So you can have a very tall skinny diameter or a normal 4" with larger diameter pipe. Next which is best? heavy wall?Thin wall pipe? Threaded ends or welded?What is a good filler? Plenty of good suggestions and I'll add another. I think the canister Damascus guys use powdered iron from the garden stores. This is a good possibility. Being Iron, it has a higher density than what's been measured. I suggest welded not threaded end caps. So now we have a hammer setup. So let's look at potential problems. So far the container is some semblance of mild steel. What's going to happen when we strike a forge weld? Well, there is a reason our hammers are heat treated. Primarily to keep them from distorting. How many blows will it take to screw the threads if threaded? How many hammer blows till the face and or sides become distorted if welded? Not many, I suspect. Now the final question. I stated above that rebound of the hammer is dealt with by learning proper hammer control. Also, hammer control is what keeps the two pieces from springing apart. Quite simply, if you hit it too hard the pieces will spring apart. So, now that our hammer is made and we recognize the possible problems, all that's left is to learn proper hammer control with this new hammer in order to strike our forge weld with the proper force in order to make our weld. This is a must no matter what hammer or what it is made of. Thus, in either case the success of your forge weld boils down to proper hammer control. With all due respect, there are no cheats in our craft, no training wheels. This is not forged in fire or a computer game. Hammer control beats all. And that's why I suggest that you just learn the needed hammer control with your daily driver to make a forge weld. No matter your choice,,, have fun.
-
Well, to me this is a redundant question. Mainly because rebound is only truly a factor when you strike or drop your hammer onto the face of the anvil. Try this. Just let your hammer freely drop onto the face of the anvil and note the rebound. Next do the same onto a cold piece of iron laying on your anvil face, say a hand held piece of half square. Finally bring that piece of half up to forge welding heat and, again, drop your hammer onto it. I think you will find that the latter two have minimal rebound and the third, at a forge welding heat has the less, if any rebound. So you see, rebound is not a factor in your forge weld or for any forging of hot iron on your anvil. Rebound tells you two things, depending on your anvil type. It indicates the hardness of your anvil surface and it indicates the quality of the forge weld holding the tool steel face to the wrought body. Thomas, in the second post nailed it, so to speak, when he said you need a bit of experience with both types of hammers to test this. I suspect that when you have the experience with your daily driver hammer to confidently be able to make a good forge weld, there will be no need to test further. The typical dead blow hammer is a cast hammer out of lead. I wouldn't try this on a forge weld. I have no idea what a steel tube full of bb's would do. Lol, In fact I've not had a use for a dead blow hammer in my shop for a long time. Not that I haven't tried. I've cast lead and copper ones, used brass and wood as well. Their primary use is straightening iron and not leaving any marks, not forging hot iron. I've replaced these long ago with far better, in my opinion,ways of straightening iron. However, give it a try and let us know the results.
-
alas, no. I was unable to make it. My "shop kit", a load of logs, arrived on Friday and needed attending till yesterday.
-
1) Name: Lee 2) Location: under the shadow of the Sleeping Ute. 3) What type blacksmithing do you do, what do you make: Traditional architectural blacksmith. what do I make? Literally anything I can get in my fire. I started off doing crafts fairs and demonstrating at various places. I went to every possible workshop and volunteered to other working Smith's to work for them for room and board on a per job basis. The learning I got doing this as a general smith was intense. I did everything from drilling holes on a fine railing to helping another Smith get out an order for 500 "S" hooks. Not to mention doing a few hundred or so grapes for a grape leaf chandelier. Lol, he insisted I do these to dimension,,, 5/8". After I made about a hundred he said I could go ahead and vary them from 1/2" to 7/8"! He later told me he had gone thru a number of others who could not consistently forge them to 5/8". I guess I passed his test! 4) How and when did you get started in blacksmithing: Lol, I'd like to say "when I was 5 or 6 as this is my first memory of a blacksmith. And it's still strong. My dad took me to a "western town" and I can still see the mind pic of the dummy blacksmith sitting in a rocking chair with tools strewn helter skelter around the shop! I finally got a rocker,,, I'm almost there! My real start came when I was 17 and I became a farrier with the full intent of becoming a reeeel blaaaaksmith, even though I had no true concept of what that meant. Nearly 60 years later I'm still at it and building my "dream shop". 5) What object or thing did you use as your first anvil: RR track 6) Tell us about your first forge, hole in the ground, camp fire, brake drum, stacked bricks: my first forge was the bottom of an old cast water heater, three tee posts, a twyre made from two pieces of 1-1/4" pipe. My blower was a 12 volt car heater. At the same time a friend and I, in my grandfather's garage, built a barely doable dry-layed brick forge and a very fine great bellows that we built. 7) Who assisted you or encouraged you in the craft: Too many to list and the list is still growing. To highlight a few. Frank Turley, Tom Joyce,Francis Whitaker,Russ Sweider,Nick Brumder,Vaclav Jarosh, Jim Selby, Steve Titus. 8) What event changed your attitude about blacksmithing: my time at Turley Forge and the years with Francis Whitaker. 9) What tool has changed or made your life easier in the shop: that's actually a tough one. It's easy to say my 25# lil giant, but that's not the real answer. Getting to the point where a forge weld was easier and quicker to do than using a torch or a welder ranks high. Understanding the concept of a "localized heat" and just how a ox/acetyl torch enhanced this. This was brought home mastering a simple right angle bend, first learned in the forge, then how a local heat made this a truly quick and efficient detail. And last but not the least was learning to forge to dimension and getting to the place where I do this with literally every job I do. 10) What advice would you give those starting out in blacksmithing: blow off the naysayers, they are thick as thieves. This especially includes all those who tell you that in this day and age you can't make a living as a traditional smith. There are many ways to do many things. Never hesitate to learn as many as possible. You will find that some variations are situationally better. However, you will quickly learn that most variations come in second to a few. You will never learn which is what without trying them all. That's called learning. Be efficient. For instance if you find you spend a lot of time walking around your anvil, you are doing something wrong. 11) What advice would you give those already involved in blacksmithing: all the above plus, never forget the 3 "D's". desire, determination, dedication. and "There's plenty of room at the top". thanks to Francis Whitaker for both. 12) What are some of the interesting things that have happened to you in your life as a blacksmith: my journey has taken me from Beverly Hills to Prague.Its brought me in contact with the finest people I could ever imagine, be they customers or other Smith's. Every point on the journey has been significant. Easiest said is I can't imagine any other pathway, for me, being as rewarding, challenging, and ultimately satisfying soul deep!
-
yup, a real pain. Bottom of the line is a check in a stump happens and is normal. Your stump will not suddenly split in half. So, no band is needed.
-
I suggest you try burning just your bituminous coking coal by itself. I suspect you will find you get a better coking fire just using it. Also, if you keep the green coal out of your coke, it won't smoke
-
to add to Jens post, measure with a traveler then cut your stock just undersized so that when you expand it hot it will be able to slide on your stump, then shrink down and put the stump under compression.
-
back to the OP, if you are making hardware, check out Donald Streeter's book, "Professional Smithing". I believe he shows a hand punch or a shear that he used to blank out colonial hardware. The tool works for many things. Also, as an alternative, you might look into a Beverly shear. A B-3 will shear 3/16" mild steel, and is designed to cut curves. Sweet Bev is a fine tool!
-
Excellent info, as usual. Thanks
-
I've not used a box bellows but I have built a great bellows. I agree with Thomas. A great bellows is a joy to use. I used rip stop nylon instead of leather and old pine tongue and groove flooring for the woodwork. I was in a 12'x12' old 1930's garage. I hung it from the ceiling to save space.
-
H13 is a hot work steel. Yes you can forge it to shape
-
Welcome to the "Dance of the unsecured anvil stand". I learned it well during my farrier daze.
-
What do we use coal dust for?
anvil replied to BillyBones's topic in Solid Fuels: Coal, Coke, Charcoal, Wood, etc
Coal fines work well in a forge. They will create the same type of enviroment as anything else. I could get it for free at the mine or for a six-pack to the driver, he would load me up. Here's how to use it I use a 5 gallon bucket to hold the fines. Mix well with water until it is like a good mortar mix/slurry. That's it.


