anvil
-
Posts
3,246 -
Joined
-
Last visited
Content Type
Profiles
Forums
Articles
Gallery
Downloads
Events
Everything posted by anvil
-
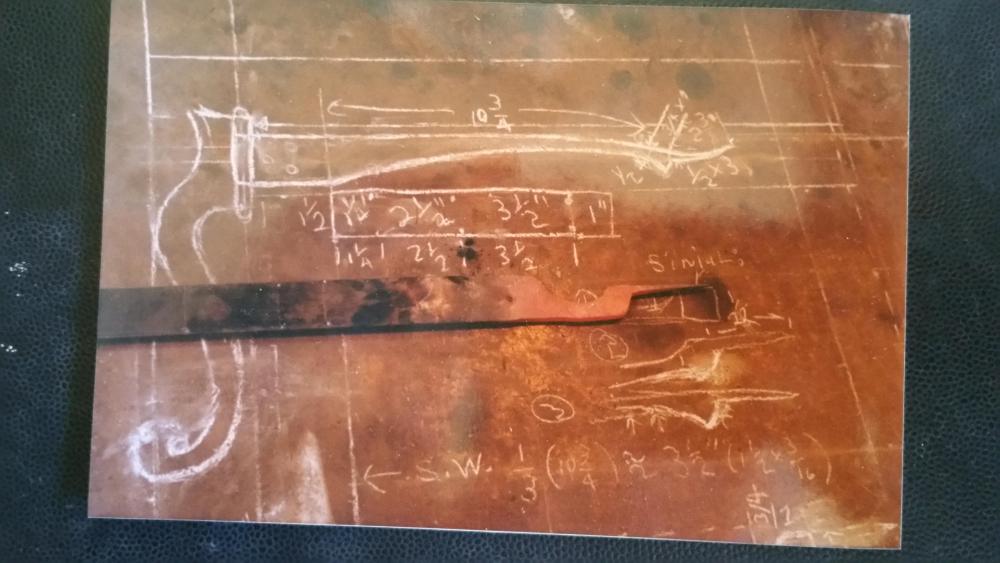
Heres an example. This is not from my notebook, but these are the full scale drawings that go on my table as well as in my notebook. This shows the full scale chalk drawing, all transitions and what happens inbetween them, and a "layout stick" that shows the starting length of parent stock and all transitions centerpunched. This layout stick enables me to forge matching pieces and, with my notes and drawings to be able to reproduce it when needed into the future. Thats why transitions are so important. They tell you where something starts and here something ends. Then you need to know how much material you need to create whatever is inbetween. Then you can forge this to whatever you draw. The beauty of this process is that anything I see in my mind, I can draw in chalk, then break it down by transition, figure needed material, then go to the forge and make it. And, of course, do it again anytime in the future and match it. Heres an explanation for one detail. Look at the top drawing. It says 10-3/4. At the bottom you see "SW" and some numbers. SW is my shorthand for "start with". The 1/3 is how I define a taper. I do it as a ratio. Here it means start with 1 unit of parent stock and draw it out to 3 times its length. Back to the top and the right side of the arrow. The line on the diagonal. You see "1/2". This tells me to take 1-1/2" wide parent stock, draw 3-1/2" of it to 10-3/4" and down to 1/2"wide. And the drawing just below the hinge leaf is the layout stick or parent stock needed and layed out to do the forging. Hope this helps. For what its worth I worked with two furniture makers and a cabinet maker for ~ 10 years. The furniture guys worked out of a gallery, one in Sante Fe, the other in Taos. The cabinet guy worked in our local area in Colorado. It was a good gig for all of us. They did all the legwork, and I just played in my shop!
-
Lol, my note books usually end up being something only the originator could deal with! well worn, cluttered, dogeared etc. If it will help, Ill take a pic of a page and post it. I have not read that Weigers book. Its new to me. I will find it. Thanks. I make no claim to pos/neutral/negative being original to me. I learned of this from a Czech blacksmith Vaclav Jarosh. He explained it and it made sense. Its been a guideline for me ever since. As far as simple/functional I was thinking like a blacksmith, not fab work. Altho both types of work are avalable in our craft as well. Thinking of Pakistani imports here. It boggles my mind that so many smiths dont see the difference and consider these functional imports to be competition. Lol, a critical add on to this is that wise old saying that separates a mastersmith from all others is " If you make a mistake, for god"s sake be consistent!" This statement, btw, is the basis of my definition of applied artist/craftsman. I substitute "to create an emotion" for "visually appealing". An artist is primarily concerned with creating an emotion, not function. When I first meet with my client I let them know what the design process entails, including a full sized representative sample. I let them know that it will be 10% of the final bid. This is paid only if they refuse the job. Otherwise its included. I also make sure that they know that all drawings and samples are mine, not theirs. I feel that the learning I get and the advertising the samples will bring me in the future works out pretty well for me. As a general personal rule, making the sample will take 3-4 times longer than when I get into my " limited production" mode. All things considered, this seems to work out well for me. I also bid my jobs time and material not to exceed "X" dollars. That way, if I happen to make a mistake(see above ) and the mistake beats the detail Im working on, it means I can make this change, no matter if it happens on the first or the last piece of the run. Good business is not always the bottom of the dollar line. A better aesthetic and customer relations often pays dividends in the future. I believe that when doing custom/commission work its critical to have this option.
-
Interesting. I had forgotten this. Thanks for bringing it up. Its true, the eye follows changes such as tapers. And how we do this is important. Some say the journey is all. Heres an addition to that. Where does a taper lead from? What does a taper lead to? It leads from a transition to another transition. And often at the end of the journey we have a finial. A leaf, a flower, a fishtail flair. So when your eye finishes the journey,,, Dont forget to smell the flowers. The message here, to me, is good design is how we do all three parts.
-
True that!
-
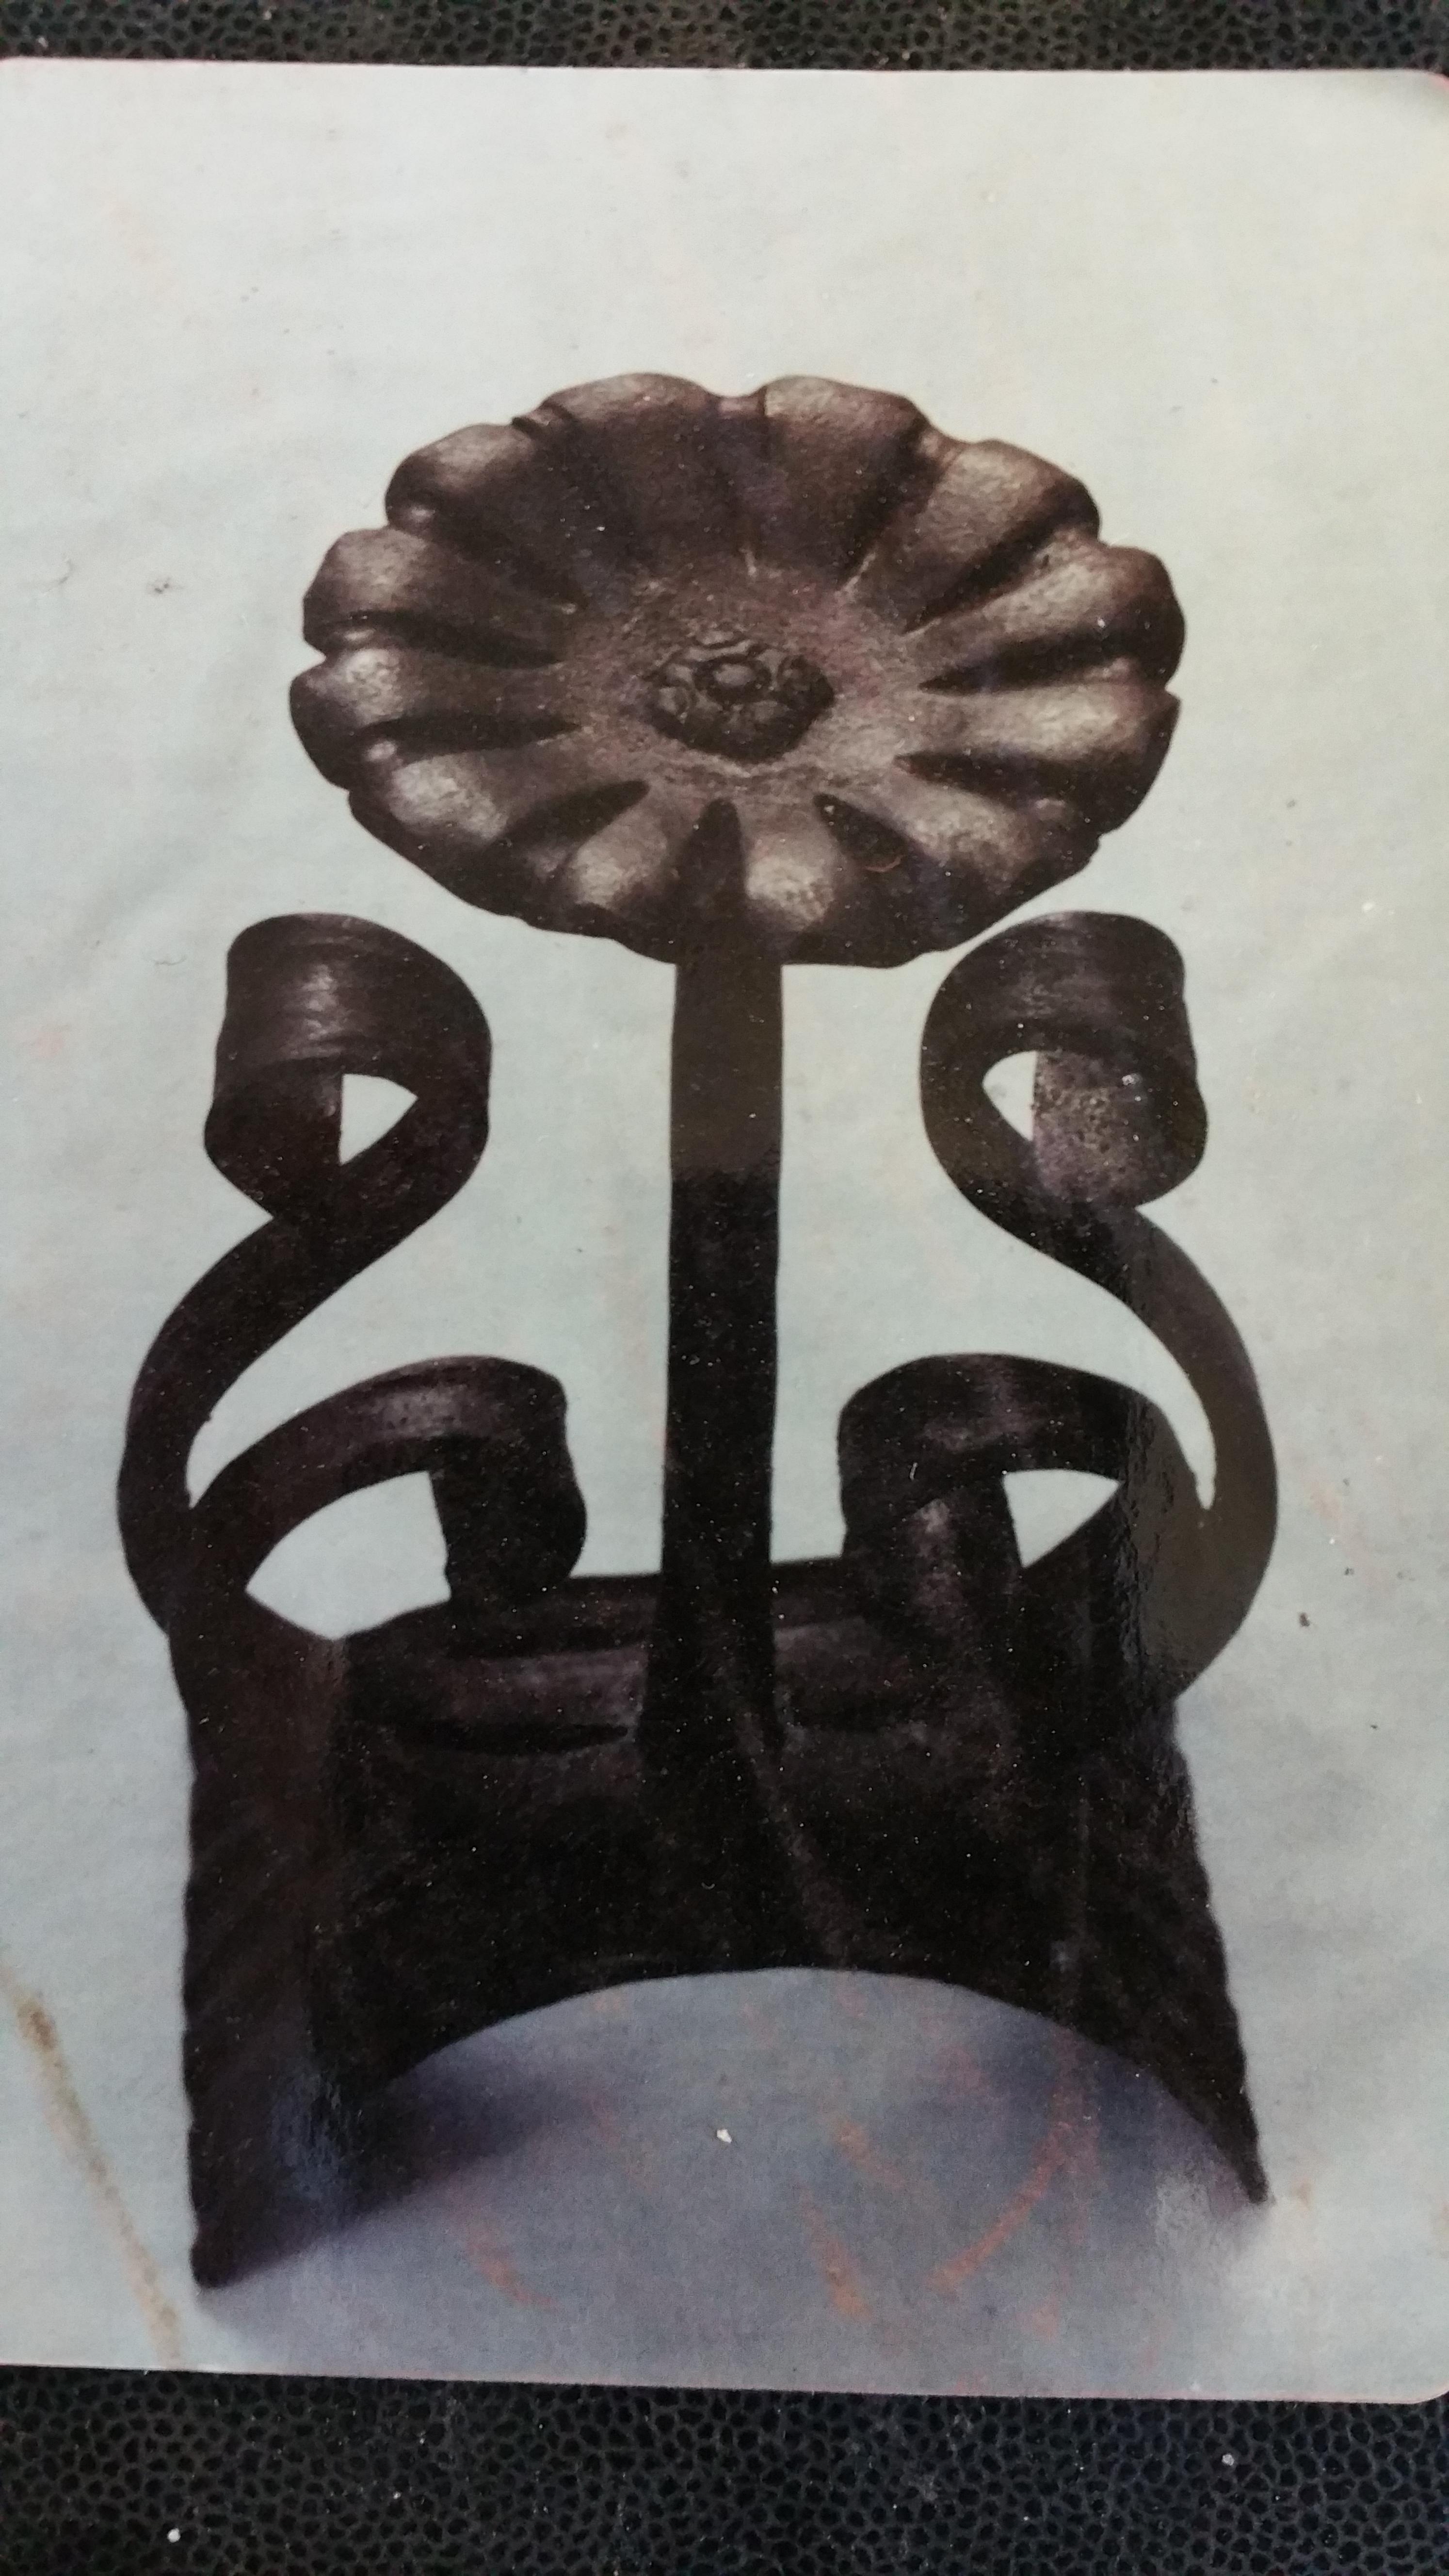
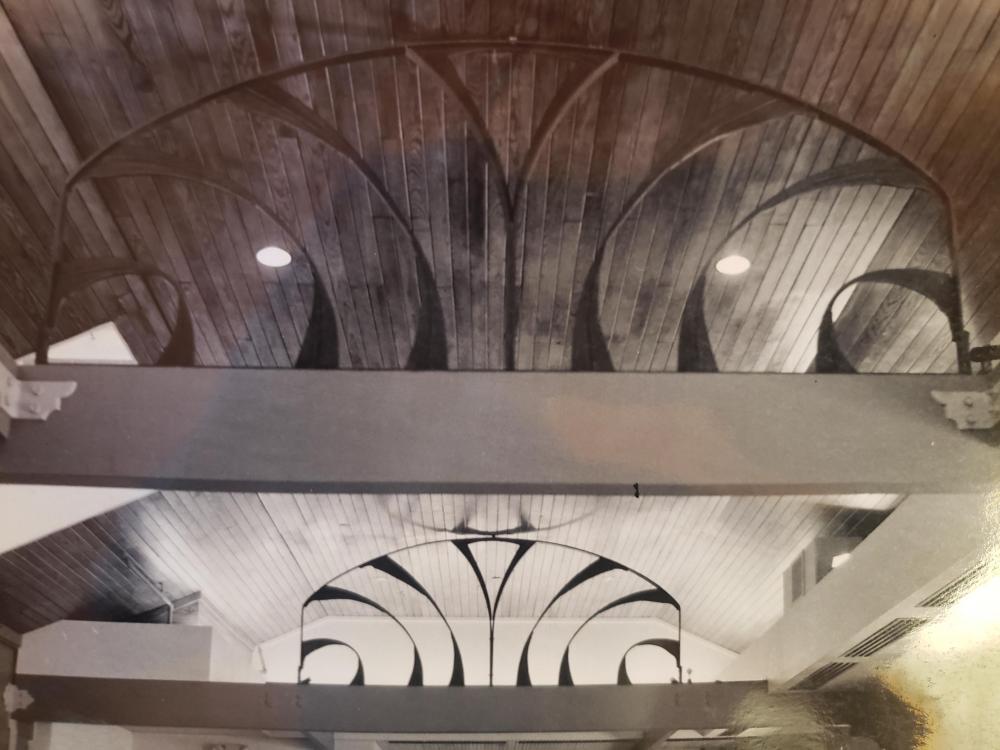
I'll start here. And use a grill or railing as my example If it is going to fit a space, you need a full size drawing and anything you make as a traditional Smith, from the simple to the sublime, requires the skills of a traditional smith. The hardest design to pull off is the concept of "simple". You just don't have room for even the smallest mistake. You can hide quite a lot in the clutter of complex. Most of my work is commission work. Thus I work out design with my clients. Often times they will have an idea as to what they want. That is where I start. If they have no real idea I will ask if they have something they really like that I can incorporate into the design such as a specific type of flower. Next I check out the architectural style of the space the project will go. Is it a Tudor style house, is the theme of the room southwestern, is the door and entryway colonial? Context: I look at 3 design principals to determine context of my piece. I call these positive, neutral, or negative. Positive means my piece is the "centerfold", so to speak. It's the primary detail, designed to grab your attention.Neutral means it is in balance with another, or all other details. This means if your eye picks out detail "A", you also see detail "B". Think of a dark colored door or armoire and dark colored hinges. Negative is, in my opinion, the toughest to do. Think of this as its purpose is to subtlety accent the primary detail, but you don't really notice it. However, if someone removes it, when you return you just "feel" something is missing. Next I take my measurements Now I have my basic parameters. Next comes a scale drawing, usually just of my idea. I don't generally incorporate the setting. Then I show this to my client. I make appropriate changes as necessary. Then I select a particular part of my design, do a full sized drawing, transfer this to my layout table in chalk, and make a sample piece. This usually includes the primary detail. If it's a railing, this is a full size section(8',10',12') of the railing. I then make a full sized detail of the primary detail. If I'm doing a railing, this is wide enough to do the detail plus a pocket on,each side to set the frame. For my own growth and learning I usually attempt to design the included theme detail to be my own personal challenge. This sample is full size and has two primary functions. First is to make sure my client sees absolutely just what they will get. The second is to figure out just how to make the danged thang! Finally this sample gets the approval of the client. All throughout this process I take copious notes both in a notebook and also on a copy of my drawings. And now the real work begins. here's a pic of "simple.
-
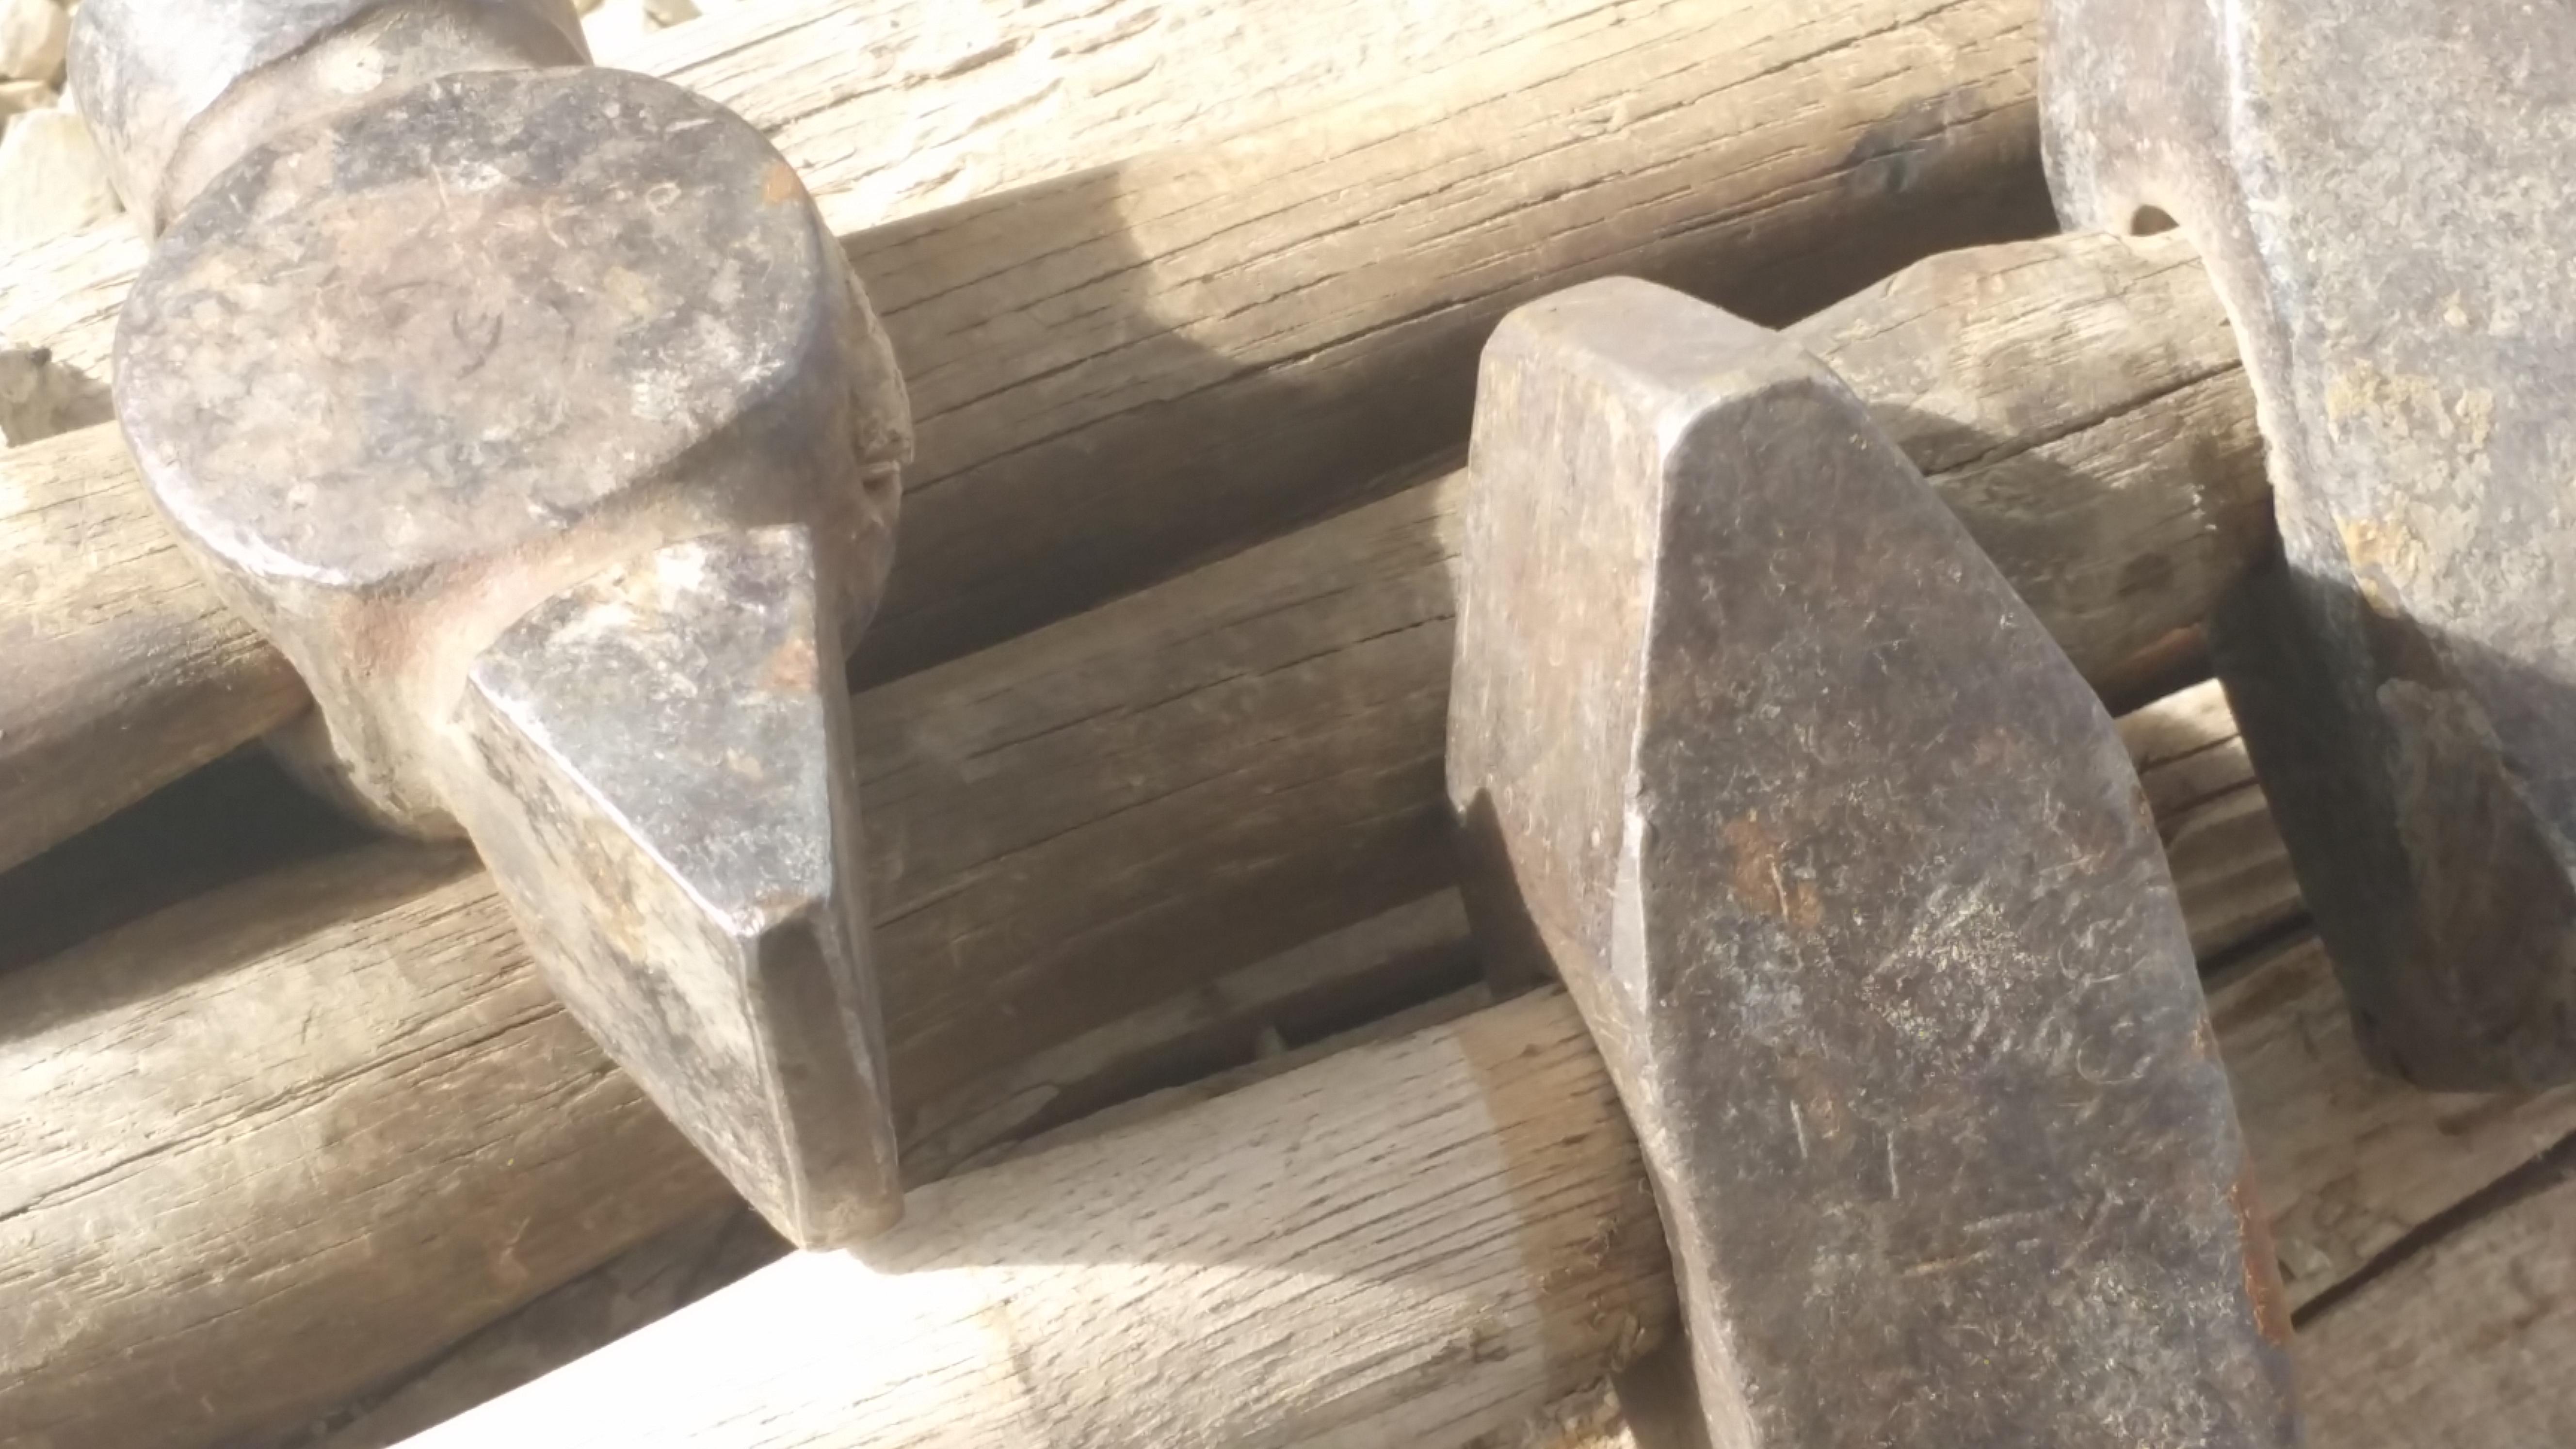
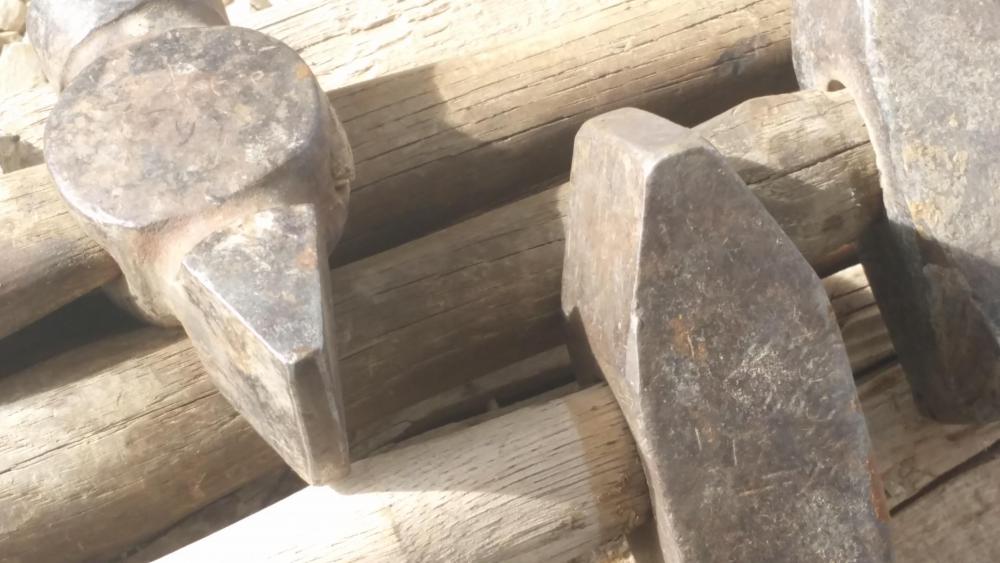
Here you go. The small one is more a special use cross peen. It's too narrow for me to be effective for "daily use". It is about 3/8" wide. The other is about 5/8" wide and basically the other end of my "daily driver" I consider a rounded cross peen a special use tool as well. For me, to move iron in a particular direction, you can't beat that 5/8" width with the edges dressed as you see.
-
You might consider asking your anvils father for permission, or just grab your anvil "by the horn" so to speak, and just ask. Sorry, just couldn't resist.
-

Recommend stock size for wrapped eye tomahawk?
anvil replied to Goods's topic in Axes, Hatchets, Hawks, Choppers, etc
For what it's worth, 1/8"x1" is called flat stock -
Noobie question about normalizing
anvil replied to PhillyAlchemist's topic in Heat Treating Knives, Blades etc
The thing to remember is all these specs and graphs is a means of Predicting what will happen to a specific piece of steel at a given temp and for a specific time. The farther off from these specs, the less likely you are to meet these predictions. -
Oxy Acetylene Torch Holder/Gas Saver Stands
anvil replied to Whiskeymike's topic in Welding Equipment
I wouldn't be without my gas saver. I have no special setup for it. When not in use, all the hose and gas saver are kept on my bottles which have a permanent location. I use them in two locations in my shop. By my 5'x10'x1" layout table and by my post vice. The gas saver is mounted on a 2" angle iron. I clamp this to my table with vice grips. When I'm at my post vice I have an adjustable portable stand that I can clamp the angle iron to. When not in use, all hose is hung by the bottles. For what it's worth ox/actl is a little used but important tool in my shop. Primary use for ox/actl in my shop is setting collars, heading rivits, and adding a localized heat to forged right angle bends and twists. -
He will be missed!
-
What do you mean "probably?". From one who back in the day was a country lovin' boy shoeing horses, a 10 year goat business, hand pumped our water, and heated with wood. All whilst living on the edge of the national Forest. Couldn't have done it without my beautiful wife. She handled the goats, canning, and maintained over a 100 tropical plants at 9000' elevation. I still can smell honeysuckle and orange blossoms blooming mid winter,,, sitting around the ole Fisher papa bear wood burner. Oh, still living in the country and swinging a hammer. No goats, but I still garden and am building my new shop. It's been a grand life. Painting figures and getting into history was what I did sitting around the fire at night. I'm still a history buff.
-
Lest we forget,, when a great blacksmith was asked "how did you do that?" His answer was,,, "6" at a time",,, Also the old addage "too many irons,,," does not mean heat one piece at a time, it means heat as many as your forge and skill level will allow. The meaning of these statements to me is my own one liner. "I've never been fast enough to outwork my coal forge."
-
It also create a concave underside to the nail head. When you set a nail like this, the edges of the head bury into the wood.
-
check the 5th post from the top of this page. I explain the steps there.
-
You need to clean it with alcohol after applying your hot oil finish.
-
Historical miniatures for me, and Western gunfighting skirmish for me.20 sided dice rule. My historical side focused on the time of Frederic the Great. It's brought two great things in my life,,, Badly bent and mostly baroque... Love of baroque ironwork.
-
Lol, the rag I use to clean with alcohol is usually not the most pristine! The best answer is this. If you make a nice towel bar for a fancy bathroom, you can bet that when the lady of the house hangs those luxurious white towels on your fine work,,,,. I'll leave it there. Here's a suggestion to learn this finish. Make something say 2'-3' long from half" square bar. Simply champfer the edges hot. Apply a hot oil finish. Try for consistency of color like in my pic. This will take more than one heat. The problem areas are the transitions from one heat to another. You burn off some of what's done, some beyond that changes color, some will be a brown, some grey, some as above. Do this finish including applying the final paste wax and experiment with bringing out the highlights. It takes a bit of learning even to get a nice consistent finish on something as simple as a straight bar. Oh, and clean it as well with alcohol and notice if you get any grime.
-
Interesting. Thor Heyerdahl(sp) and his two adventures grabbed my interest in this year's ago. It shouldn't have been a surprise that they would be trading with England. With all this early commerce it is all the more puzzling to me just why the Americas did not have a viable iron industry.
-
Beautiful. And a good solution to a problem
-
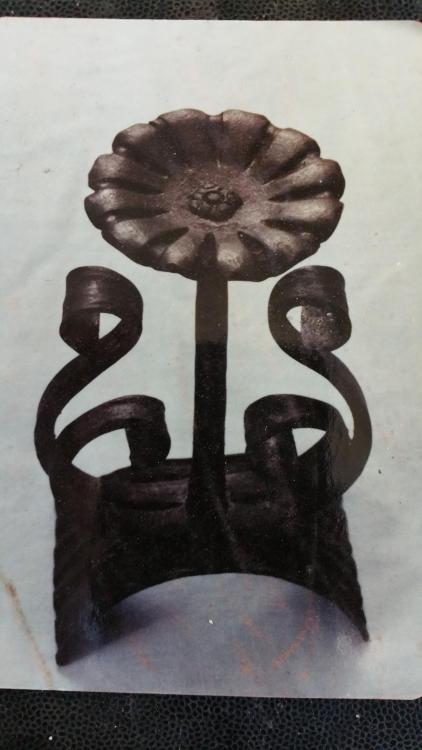
although you have to be careful, I use my coal forge for a situation like yours. I can bring all the petals up to a consistent heat a bit hotter than I need. Then with a rag I can dribble the finish from outside to inside. It will smoke off, but keep applying finish just until it is starting to stay "wet" on the inside, but still at a lower black heat. Then when cool, clean as above. There is a fine temp line between an even finish and a yucky brown when it's just too cool. It takes some learning to get it right. Especially something comex like your rose petals with all the hard to get places.
-
interesting. thanks. it's hard to imagine 2000 years before Christ there were established trade routes between England and the Middle East.
-
beyond the mystery steel aspects, my reason for not using rebar,, ever since my early beginnings,,, is that I just don't want to put all that time making anything,,, and when you are done, it just looks like rebar. Rebar looks really good, no matter where it comes from or how easy to get, inside concrete or on the way to the scrap yard.
-
I'm guessing that your steel is too cold. you should have a "dry" matte black finish if applied at the right temp.
-
I have pics here, but I'm not sure how you find them. Heres one that shows the finish pretty well, but not with the burnished(highlighted) edges. I do believe that the highlights on the lobes of the flower petals are burnished as above. You can see the effect pretty well on the lobes on the lower right,, just right of the stem.