anvil
-
Posts
3,246 -
Joined
-
Last visited
Content Type
Profiles
Forums
Articles
Gallery
Downloads
Events
Everything posted by anvil
-
Chris, If I remember correctly you are new to our craft. This is a daunting first project. However, should you prevail you will have learned a lot. I would not make a hammer in this manner. You are talking of a tough forgeweld using coil spring. If I were to make a hammer from many pieces, I would make it from wrought Iron or mild steel, Then forge weld a high carbon steel face on it and the cross peen. But hey, bottom of the line its jest a lil iron, and experience is priceless. So heres some input. Lets say you want 4" or so long for your hammer. Take a piece of 16 gage wire or string and mark off 16 inches along the centerline of your spring. Cut this off with a side grinder. Now straighten this out. I suggest using a scrolling wrench, bending forks and your post vice. If you dont have these, never fear, use your hammer and anvil. Pack a lunch. Forge this to a square cross section. If your spring is 3/4", it should be ~5/8" or 9/16" square if I remember correctly. Now cut most of the way thru the middle and bend it back on itself and forgeweld this. It should be somewhere around 5/8"x1-1/4"x8". Now cut this nearly in half and fold it on itself and forgeweld her up. You now should have something like 1-1/4"x1-1/4"x4" or so. A nice size for a hammer. Now all ya gots to do is make a hammer. Oh, nearly forgot. plain ole grocery store borax will work as a flux if you cant find the above post. Have fun.
-
Nice!
-
 For what its worth its my experience that if it looks like a coil spring the heat treat process in my post will work. Its at least a quick and dirty place to start if you are new to the craft. Always have the confidence to take anything you learn from someone else and experiment if needed. As for micro fractures. Always realize that these may exist. However ive learnrd that the more experience i got the less of a problem this became. So if you are a new guy, dont be so quick to blame micro fractures when your piece breaks, look more into your technique and work with this cheap and very usable source to gain experience forging and heat treating alloy steels
 -
Stories behind smithy/forge names...
anvil replied to elkdoc's topic in Blacksmithing, General Discussion
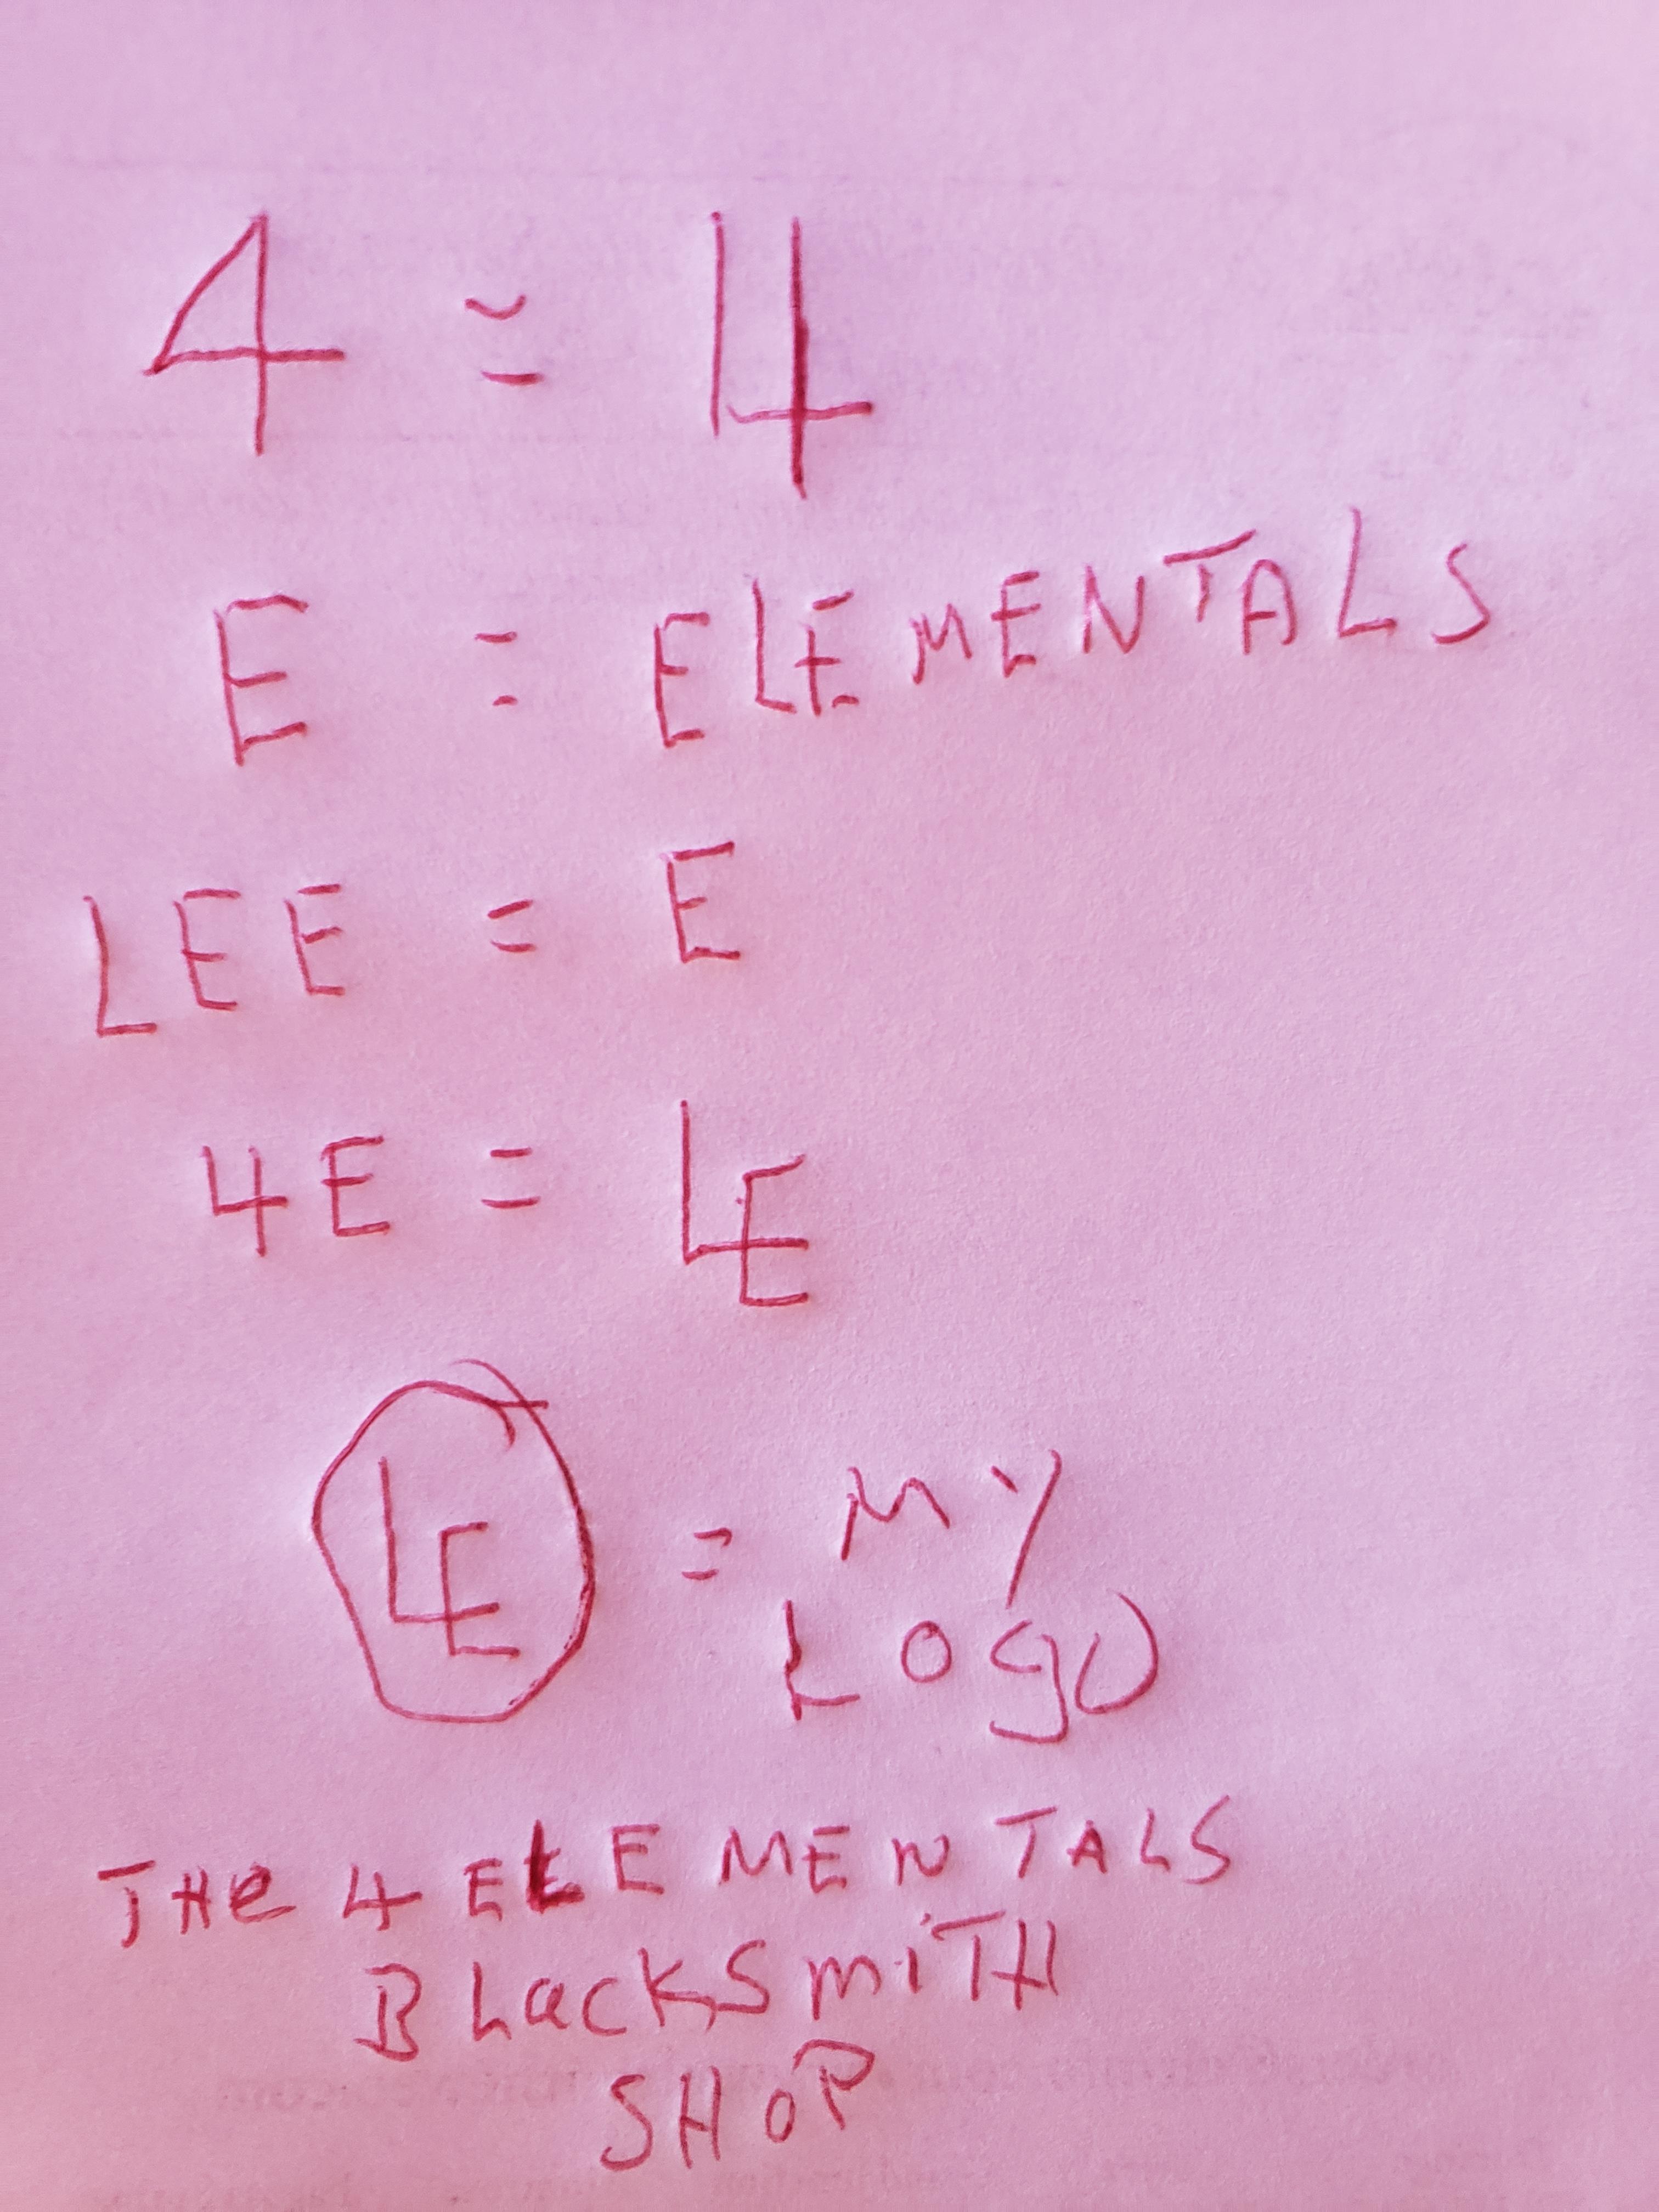
"The 4 Elementals Blacksmith Shop" Small world, but never fear our shop names are different enough to be a problem. Even if they were the same it wouldn't be a problem. I did whatever you need to do when a customer uses my business name on a check so I could cash it around 1980. I picked this because the 4 elements are air, earth, fire and water. All used daily by we blacksmiths. Heres the progression that became my name/logo Thus my logo stands for 4 elementals or the first two letters of my first name.
-
Nice. My preference is for my cross peens to be flat cut, not rounded or narrow. I would dress at least one cross peen about 1/2"- 5/8" wide. Very Slightly rounded face and dressed edges. The black ceoss peen would be my hammer of choice. Have fun
-
This just takes experience. a black heat is actually a rather large heat range. Keep applying early on til dead cool. When its too hot it will smoke off and leave your iron a grey color. When too cold the surface will look tacky. when its "just right" it will be a nice matte black and you will have no "tack". Ask yer grandma. ;). The truth is, it doesnt matter. Most of it will evaporate out before you use up your supply. So, when ever you open it for another job, add another generous pour. Not enough and it wont dry, and "too much" is a product of your pocketbook with "just a pinch" of experience to know how generous you need to be.. Have fun.,
-
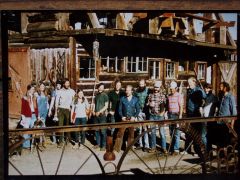 A great and exciting time! Such memories and a flood of water under the bridge. Is the red headed guy maybe Lee Badger?
 -
What did you do in the shop today?
anvil replied to Mark Ling's topic in Blacksmithing, General Discussion
Excellent! -
Sorry to hear that. My thoughts to you and your family!
-
What did you do in the shop today?
anvil replied to Mark Ling's topic in Blacksmithing, General Discussion
nice basket! As for the right angle bend. Well I was in Prague in '87 with Lee. He is an excellent smith. He is very involved an amonst the best in smelting and his artwork is excellent. Having said that I dont agree with his method of making a right angle bend. first, its redundant to forge a 180* bend, then open it to 90*. At the very least the draw on the outside edge is at least twice the draw if you only bend to a 90* You have to put it back somehow. Second he does this to not have to upset the branches, then at ~ 10:19 he does just that. Finally I can see no way to use this method if you are working to dimension. Meaning getting both branches to a specific length or to forge two right angles say 5" inside radius to inside radius. I dont cut and add material. Ive just never tried it, so cant comment on that. Its worth a try if you are confident with your forge welding. To add to Jen below. It is also a major problem doing a rt angle as in the vid. -
Buying coal vs coke
anvil replied to WoodFireMetal's topic in Solid Fuels: Coal, Coke, Charcoal, Wood, etc
https://activerain.com/blogsview/1568833/se-colorado-part-2---coke-ovens-of-cokedale--colorado A large cokeing setup for CF&I Steel out of Pueblo, Co. Garry Colter had Colter Carriage Works here back when I first went full time around '80. I did some of my early forgings for him. Im pretty sure he had bought the whole town! https://en.wikipedia.org/wiki/Redstone_Coke_Oven_Historic_District Beehive coke ovens in the Carbondale/Redstone Colorado area. They coked it here, then shipped it to the CF&I steel mills in Pueblo, Co. Lol, I got excellent met coal here until the mine closed 15+ years ago. Free unless you wanted them to load it, then it cost a 6 pack! They liked blacksmiths. A days trip over 6 fine high mountain passes, unless I spent the night with friends or camped out. Thus the reason i kinda smile when new smiths seem to feel an hour and a half drive for coal is not appropriate. In and around the mines in the Rocky Mountain west today, coal at the mine is ~ $100./ton -
Buying coal vs coke
anvil replied to WoodFireMetal's topic in Solid Fuels: Coal, Coke, Charcoal, Wood, etc
I believe that commercial coke is produced from or a byproduct of oil, not met coal. Thats the reason it is more dense and less porus than coke made from coke in your forge. That also may be the reason it is less expensive than met(metallurgical) coal. Personally for me anthricite is not an option. It takes too much air thus tending to cause an oxidizing fire, it is a pain to maintain because it doesnt do the other thing good coke does and thats to make a nice coke ring that keeps a nice fire intact instead of it continually filling in your sweetspot with unburnt coal. Thus every time you take your iron out of the fire it collapses and must be rebuilt. This type of fire maintance is far too time consuming for me when im working. Lol, when sliding say a 1" square bar out of your coke fire, and when done forging it, just slide it back in the sweet spot vs having no sweet spot, and having to deal with building a cold red fire back to a nice yellow envelop is a very big pita! Finally and most important it is far dirtier forging wise than any other fuel. Why when it may have say a lower % of sulphur than met coal? When you make your coke,,, out of your firepot and in the ring of green coal, for all practical purposes the coke is 100% carbon. The impurities are removed. Every piece of anthracite touching your iron still has all those impurities still there. Thus there is actually far more sulphur etc around your iron when burning anthracite than when burning any kind of coke, no matter the chemical analisys. And thats unacceptable to me. And yup, learning is good. We all have been there done that. In hindsight my first experience with a real smith and his turning me on to some good met coal so I could experience the difference fell on deaf ears, you might say. Took another few years for me to learn that lesson. When I did, well lets just say, anthracite just aint on my list of fuels. Even a days drive or an overnight to the mine to get a ton of good or even good enough met coal for ~$100 makes me feel real fine and gives me an ear to ear grin! -
JLP Blacksmith Teaching Center.
anvil replied to jlpservicesinc's topic in Building, Designing a Shop
Definitely not a cheap project! Keep it up. -
Buying coal vs coke
anvil replied to WoodFireMetal's topic in Solid Fuels: Coal, Coke, Charcoal, Wood, etc
Im not sure if you guys are aware of this, so heres my two cents. Blacksmith coal burns from coal to coke. You have "green" coal around your firepot and this is where the change to coke happens. Also when this happens, all the impurities, ash, moisture and other such things are removed. What you have in your firepot around your work should only be coke. If this is the case, you should not have a smokey fire other than when you first start up. If its smokey, you have green coal mixed with your coke So, what you get when you buy or make coke is a light porus coke that has already been "coked" and the impurities etc are already burned off. It is far lighter than coal by a magnitude. So when you are buying by weight, think of a pound of iron and a pound of feathers. A pound of iron will fit in your hand, a pound of feathers may fill a pillow! Now think of it in terms of volume. The same volume of coal that would fill your firepot may produce enough coke to fill your firepot 3 or 4 times!. Long story short, if you are paying the same per pound for coal vs coke, buy coke! As for buying on line vs driving, ive always found a drive for quantity beats on line buying. As for air, Thomas is correct. I will add that the needed air for a coke fire vs a fire using anthracite are far different. You need a substantial volume to keep anth burning. If not, by the time you are finished forging and your iron is cool, your fire may very well be out. Not so wirh a coke fire. As an example, if you want to take a 2 hour lunch break with a coke fire, just crack your ash dump and poke a little hole thru from the top of the coke. When you return, just add a little air and you are back to work. This applies to all coke, altho commercial coke is more dense than coke made from met coal and is manages a bit different, including air needs, as Thomas referred to. -
Many will say not to heat treat a hot punch or drift because you will lose your temper when you use it. I dont agree with this for 2 reasons. First, it gives you heat treating experience. Second, you may lose temper at the tip, but the rest of the tool is unaffected. Heat treat here means anneal, normalize, harden, temper. I dont always normalize. For coil spring i heat it to a bit hotter than when it loses its magetism. I quench in oil. For punches and drifts i do a differential or"reserve heat" temper method. I'll stick to a hand held hot punch about 14" long. I heat treat most of the taper, but only the bottom gets hardened and tempered. The rest is normalized. I quench about an inch and a half or so of the tip. Dont hold it still. Move it rapidly up and down, not sideways. Quickly polish about an inch with sandpaper or even a hot rasp. Watch the temper colors run. When a straw color covers the end by about a 1/4" or so, put an inch in a can of water and let it cool. Now you have a"normalized" taper and a hardened and differential tempered working end, and some good practice I also usually heat treat the hammered end. I dome it first with a hot rasp, then heat treat as above. Draw your temper to a blue or purple,, or even just normalize it. This will slow down the mushrooming that will happen when you hammer on it. Hope this helps and have fun.
-
I wouldnt go looking for one. Like has been said, One will come your way at a right price. When one adopted me I learned right quick that it was great for making hardy tools. It always freaked me out upsetting and setting the shoulder using the hardy hole on my anvil. It is unsupported and I feared breaking off the heal whilst using a 6# hammer. Since then, Ive found many uses for it. The latest is forgewelding a leaf and tendril combo. One done in a vee groove and another done in the half hex for a variation. Two top tools, one for each, and makes it a simple detail.
-
When i got my first "real" anvil, a 124# PW, it did make me a better smith! Perhaps not skill wise, but certainly psychologically, I knew I was working better. A year or so later I got my second anvil. A brand new 125# Enders farrier pattern anvil. This was my 2od year as a professional farrier and 6 years after I started shoeing. Without a doubt the shape of this anvil is designed for shaping shoes and from the get go my improvement was astronomical. The first 6 or so years my anvil was whatever i came up with. So its situational and without a doubt the psychological boost I got was probably my biggest step forward. So be patient its worth the wait.
-
Lol, thats the best reason of all! I think the hardest lesson to learn is no matter what, its just a piece of "iron" and "iron" is cheap, all things considered.
-
Lol, the longer you keep smithing, the more "stuff" will start gravitating your way.
-
Im a little nervous using h13 for cold work. The "h" means its designed to work best with hot iron. For a "fancy steel, the "s" series is designed for shock. It works well for cold work. Thus S-7 is a good choice. Plain ole coil spring is a good steel for hot or cold work. Its not as good as the above, but its a free steel and easily dressed in your shop as needed. If I remember correctly, I draw it to a blue when I temper it for cold work. Coil spring is a good learner steel. The first learning is figguring out how best to straighten it. One of my first tools was a cold chisel from coil spring. Its still my go to chisel for many things. My other first tool was my center punch. Also from coil spring. Alas, it did not survive my last move. A real loss! A 35 year relationship,, poof gone. Lol, it outlasted my wife and 3 girlfriends!
-
I think 1/8" material has a tendency to cool quickly and work harden when you punch it. I find its far easier to punch light stock cold. You may have to choose a differwnt temper for your punch.
-
Nice hammers! I would dress the cross peens to 3/8'-1/2' -5/8"wide with a flat face and dressed edges. The cross peens are pretty limited when they are so sharp. 3/8" is a little narrow for me, but sometimes it is just what you need. Without looking back, I seem to remember you were trying to punch 1/8" material. Try punching something thicker like 1/4" or 1/2". Its actually easier to punch heavier stock. Sometimes punching 1/8" is a real beeech!
-
How to manage scale problems on complex works
anvil replied to LeMarechal's topic in Blacksmithing, General Discussion
Yup, that works the best, wire brush a lot, and a little water on your brush or anvil face works wonders. I rarely use acids to remove rust, but it is a good alternative. -
I set my forge, anvil, and post vice up in more or less an isosceles triangle with me in the middle about a step or two to each. Im left handed, so I set my anvil to the left when Im facing my forge. I set my post vice up much like Iron Dragon Forge above. My shop is permanent, so both my anvil and post vice stumps are set in the ground
-
I prefer a square cut, flat faced cross peen around 2.5#. Square cut means the hammer shape is square, not round. As Frosty said, slightly rounded edges is a must. I believe this is the most efficient shape for a general forging hammer. There are many "nationality" variations like German, French, Swedish along with the machinist type . Some swear by one over the rest. I think of these differences as preferring a Ford over a Chevy. But any and all will work to move hot iron.