Michael
-
Posts
1,061 -
Joined
-
Last visited
Content Type
Profiles
Forums
Articles
Gallery
Downloads
Events
Everything posted by Michael
-
As a buddy with decades of propane grill experience told me, when I first built a gas forge, "it's a low pressure gas". Reasonable safety paranoia in place of course. I worry more about acetylene hickups than propane
-
You should look into the work done by Marco Terenzi (sp?) http://www.marcoterenzi.com/miniaturework/ Great stuff there PVF, love to see a little vid of the forge fired up.
-
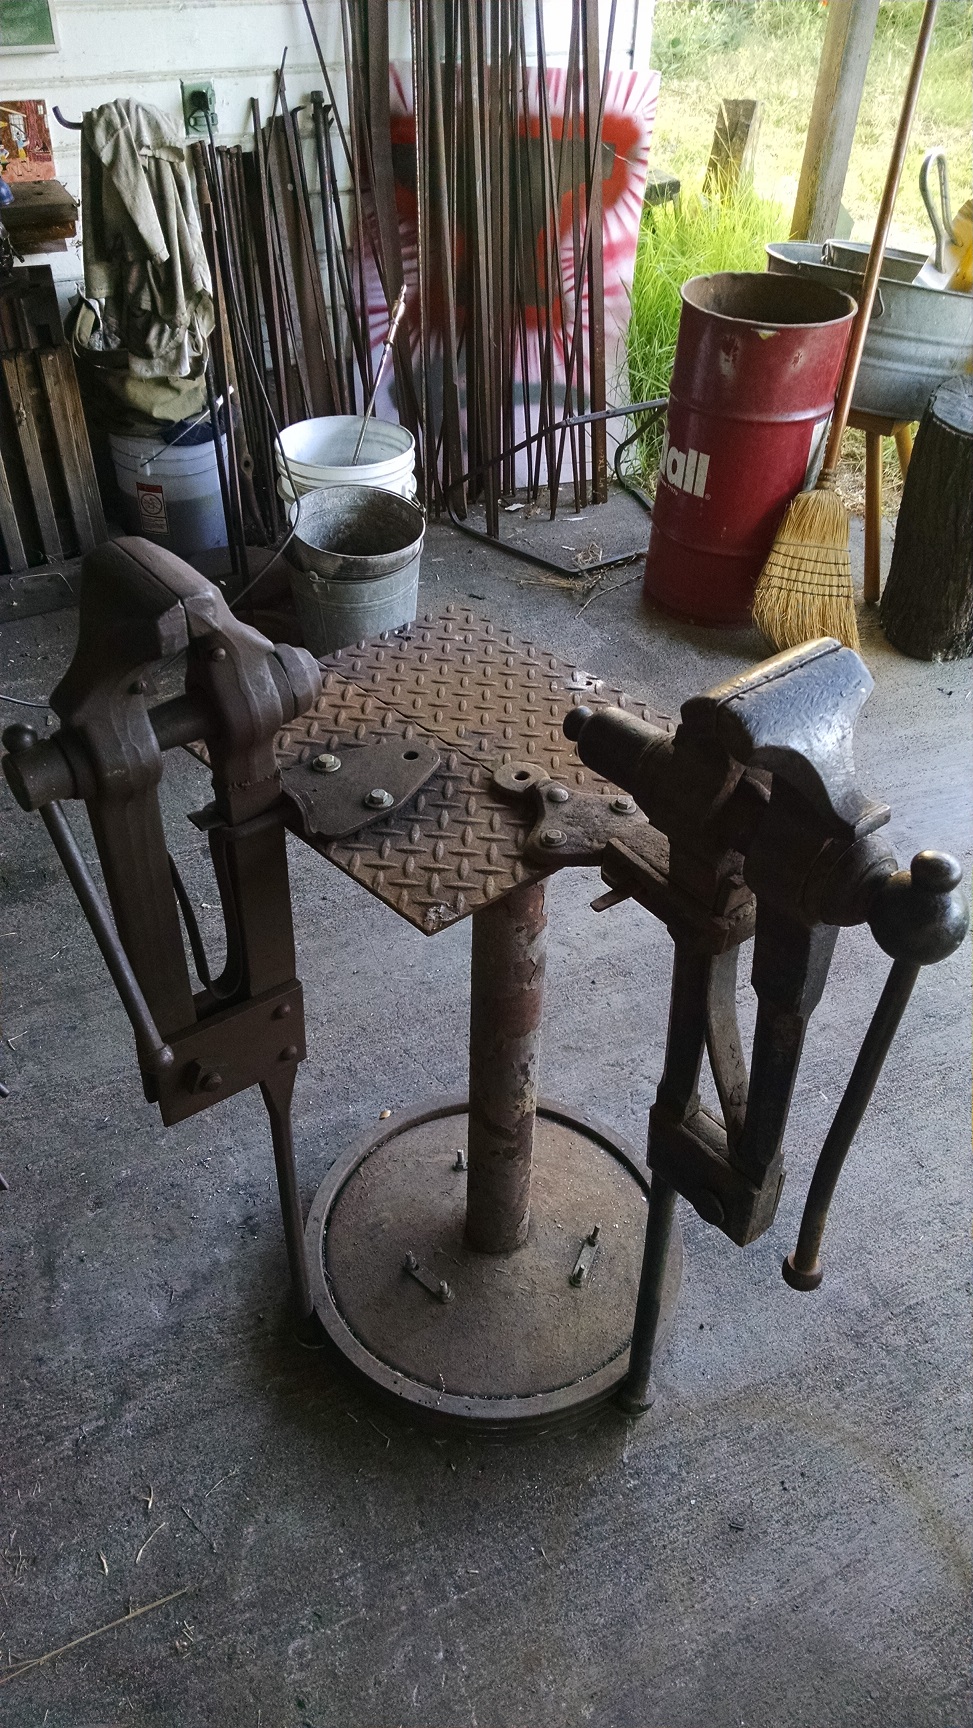
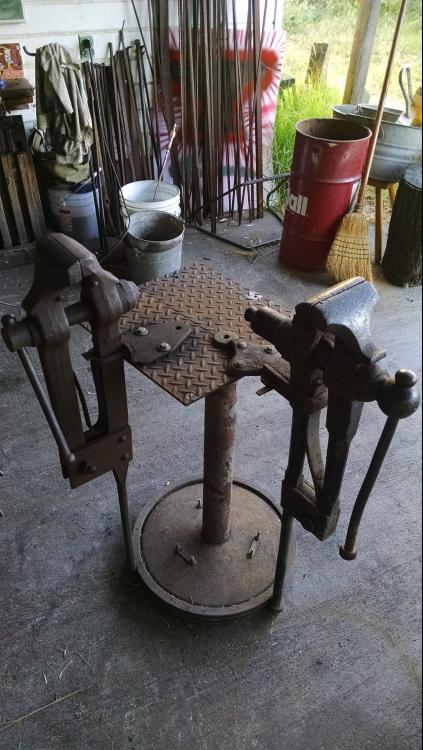
I always wanted to do a vise stand with a base I could stand on, a vise like that never moves, but I've never found the piece of scrap that was right for the base. Here's mine, big cast iron sheave in the bottom, bolted to a cafe table base with a diamond plate table on top of that. Two vises, I'll pile sandbags, freeweights etc on the base to keep it from moving too much. It does roll around pretty well.
-
Making some hinges, material choice
Michael replied to Seek's topic in Blacksmithing, General Discussion
Those came out great! -
Galvanized mop bucket for me, raised up on chunk of Ibeam (my old makeshift anvil) so the top of the bucket is level with the anvil and forge table. I always keep an eye out for metal buckets at the scrap yard and garage sales, those little Mexican beer pails are useful for clinker and ash. Gotta get me an aluminum beer keg now!
-
I found this curly hickory hammer handle at the very back of the rack at my local Ace a long while ago. Been saving it for just the right tool. Then the ash handle on my fave cross peen went. Probably too fancy gor a gorging hammer.

-
I made these spike tongs from nippers early on when I barely knew what I was doing. More grinding that anything, but they work, There's a notch filed across the short jaw that grabs the back of the spike

-
Those look great! How many feet if stock do you figure you have in mind he spiral and handle?
-
A practiced eye to help identify some wrought.
Michael replied to TimeToWaste's topic in Blacksmithing, General Discussion
Some west coast smiths recently rescued a LOT of wrought from a collapsed dam on a river. The plan, if asked, was to say they were 'clearing the river of debris'. Battery powered grinders and pack horses were required, as I understand the tale. -
I just took my firepot apart to secure the clinker breaker which was rotating on the handle. The little hex bolt had roinded off where it pressed on handle rod. The breaker, clearly a replacement, is a section of I'm assuming mild bar, hacksawed and ground triangular. Certainly easier to work than stainless. With the blower going I'd think that whole area of the firepot would be ,...cooler, as cool az its going to be anyway. I saw a couple firepots glowing at a workshop just recently! Green Rot!?! The things you learn when smart people are talking! I'd save the stainless for something else. Find a chunk of anything easy to cut, that will fit the tuyere of your particular forge. There were a couple of water cooled, sideblast forges at the workshop and Octoberfest. Very neat to work with and a little odd at the same time
-
On the Third day of Christmas my true love gave to me. 3 pounds of wrought iron 2 texturing tools and a hammer from Uri Hofeeeeeeeeeee
-
Improvised Anvil Horn
Michael replied to MrDarkNebulah's topic in Anvils, Swage Blocks, and Mandrels
my old improvised anvil (75 lbs of I beam) with the improvised horn, (jackhammer bit C clamped to the center web) probably could have ground the corners off the jackhammer bit. note to self, make a bick out of that bit.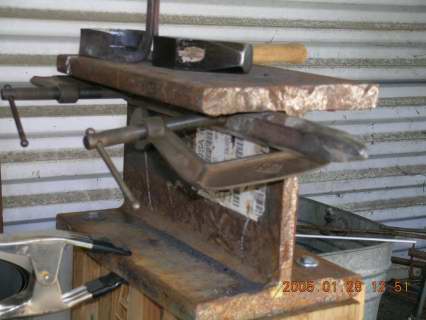
-
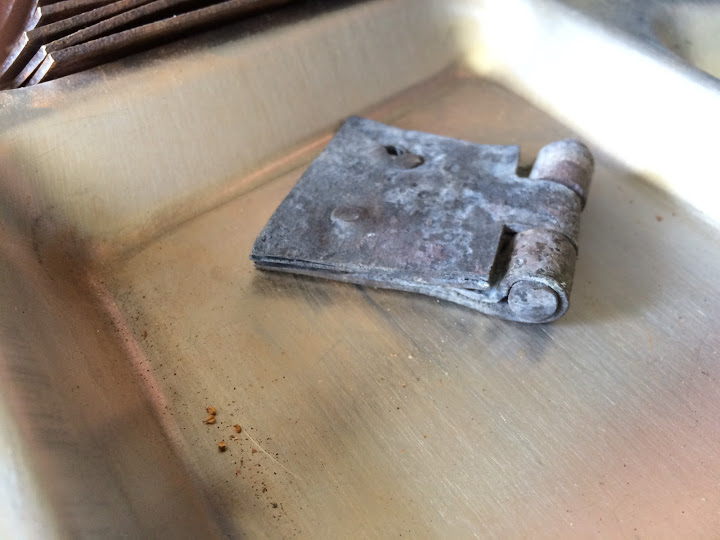
Making some hinges, material choice
Michael replied to Seek's topic in Blacksmithing, General Discussion
Seek, those look great! Nice little weld there on the edge of the hinge leaf. Did you make a jig to wrap the barrels around? the jig I made, a plate of 1/4 inch steel bent over at a very sharp angle, then filed and ground sort of round, was a bit thicker than it needed to be, hence the huge 1/4 inch hinge pins on my hinges. Jig is on the lower right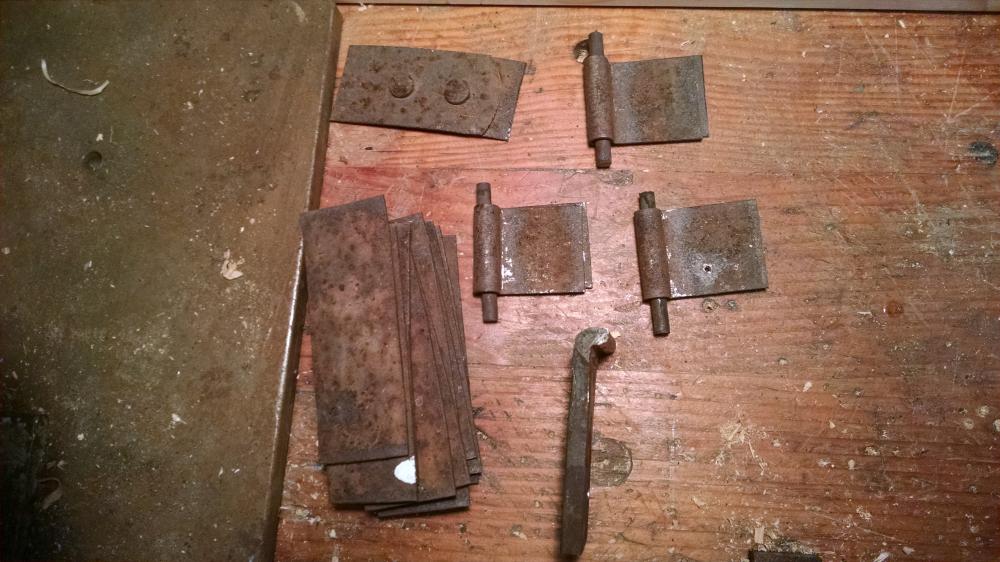
-
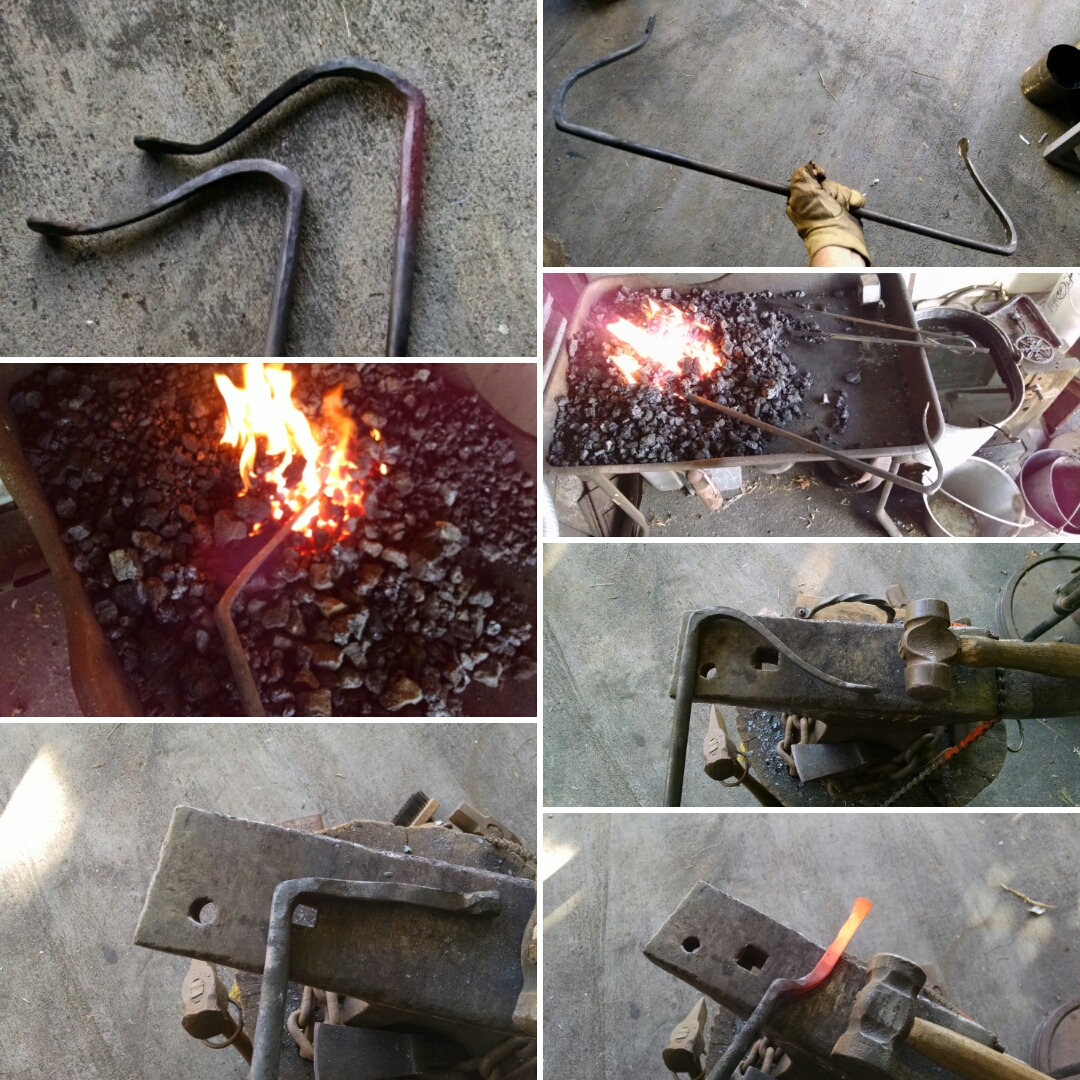
Family life has taken its toll on my smithing of late, but I managed to grab 3 hours the other day. Worked on holdfasts (old timey bench clamps) for a woodworker I drew in a gift exchange this year. 5/8 cold rolled was where I started. Holdfasts are often done from 3/4 round stock, but I couldn't find any 3/4 that wasn't plated and didn't have the time to safely remove the zinc. 5/8 will work and makes for a lighter tool. Isolated a knob at the end for the pad, squared up 4 inches (width of the anvil face) behind the knob and then bent to 90 degrees and inch past that. Square (ish) corner, then sorta straight to draw out the arm, squish the pad out to round (ish) and try for an artful bend. First side came out better than the second, forgot the square corner, so the arm was drawn further that it should have been to upset back into the corner. After cutting the main bar in half, I put a few facets on the shafts to grip the holes they are driven into. A little tweaking on the pad angles and then I like to contact cement a bit of 1/4 inch leather onto the contact surface.

-
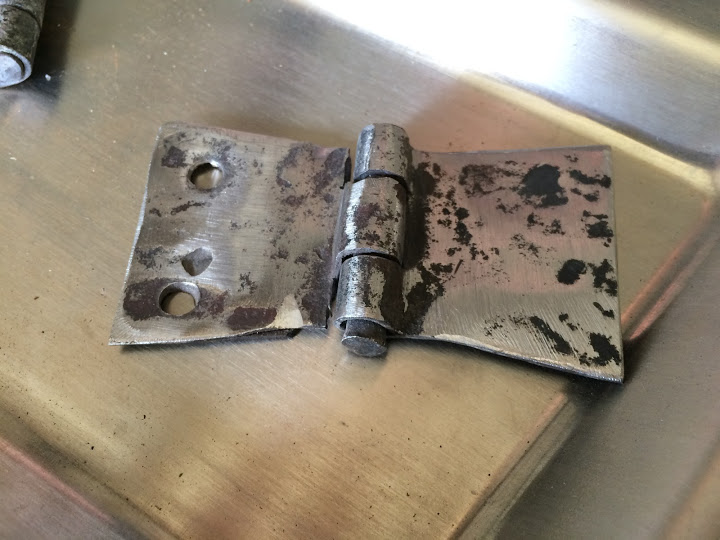
Making some hinges, material choice
Michael replied to Seek's topic in Blacksmithing, General Discussion
Seek, I recently did a demo for a period furniture group on small hinges. Working from the Peter Ross video (well worth the $10 download fee) and I used barrel hoops for the material.Found a half dozen non galvanized hoops at my local building material recycler, I've also struggled with forge welding, but oddly enough, when making the hinges in a coal fire, the wide surface of the hinge leaves (really, only an inch by an inch and a quarter) and the thin material made the welds easy. I was able to see the slick, melted butter surface of the steel as it reached welding heat and the thin material was very easy to get heated all the way through. After the welds were done it was easy to peen the hinge leaf out to the butterfly shape. The techniques in the PR video would be easy to translate to your style of hinge.
-
I'd leave a throwing knife dead soft annealed, you'd rather it bend than break if it hits a rock on the ground. Throwers don't really need an edge, just a point.
-
Isn't drill rod from the hardware store O1? I would get the boy a couple of 3 foot sections of 3/8 or half inch drill rod to play with. Readily available and a straight forward heat treat. He'll get a feel for working higher carbon steel too. Did he get to use the Nazel at the Spring conference? That was one sweet hammer!
-
That looks great! Nice and wide for a cassarole or a meatloaf pan. Where are the welds?
-
Making a Brake Drum Forge More Effecient
Michael replied to GoodThing Factory's topic in Solid Fuel Forges
A couple of fire bricks set around the tuyere will give you a deeper fire. You can knock the corners off the bricks with a masonry blade in an angle grinder, or a brick chisel. Cut corners will fit the round side of the drum. No need to cement anything in place. I did this with my brakedrum forge burning charcoal. Works great, deeper fire and less fuel burned. -
Love the wraps with the viney squiggles. Nice leaf video too. I like the texture you get with the peen. Great work!
-
My neighbor is a car guy, cleaning out his garage to move. Knows I hit hot metal (it pays to pass out bottle openers to neighbors).He left this pile on my doorstep. Great punch stock, and a hammer blank
-
Tv-Tray ~ An adaption of Brian Brazeal's design
Michael replied to Alec.S's topic in Blacksmithing, General Discussion
Yes, please repost the picture, This sounds very interesting to see. -
Сutters for homemade lathe wood
Michael replied to NazarZhuravel's topic in Chisels, Gouges, Scissors, etc
Nice video. Charcoal fire, improvised anvil. Great work. I started smithing by making lathe tools out of files. -
Great interview Frosty. Your description of the T burner was probably the most clear description of a naturally aspirated propane burner I've ever heard. Made perfect sense. You should transcribe that description verbatim when you blueprint the T burner.