

Michael
-
Posts
1,061 -
Joined
-
Last visited
Content Type
Profiles
Forums
Articles
Gallery
Downloads
Events
Everything posted by Michael
-

From the album: Michael-SF
this one went to a neice. -

From the album: Michael-SF
can't quite get the welding on the leaf stems right, ended up riveting it in place. -
From the album: Michael-SF
subsequent roses have been better -

From the album: Michael-SF
leaf key ring that came out pretty well, couple of hooks. -
From the album: Michael-SF
Just like demo 273. Waiting on the KaoWool. -
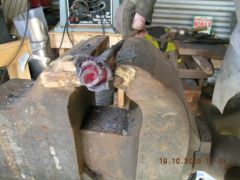
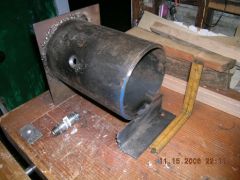
iForge Step-by-step Blacksmith Projects Demo #166, but moved up to the third on the list is the information about Jim PawPaw Wilson with commenatary. When I burned all the zinc off the plumbing fixtures to build my forge, I half filled the BBQ chimney with the Kingsford Briquets, put the pipe fittings in, filled up the rest of the chimney with the briquets, then stood the chimney in a far corner of the yard on a windy day and lit it. took about half an hour and I kept my eye on it from a distance. I live in a windy stretch off the SF Bay so it wasn't a problem, let everything cool down for a couple of hours and hose off the white oxide and I was done. First Photo is the little gas forge I've been building in welding class. I had such fun with the little firebrick forge (2nd Photo), I wanted something a little bigger, but with the MAPP torch functionality. 6 inch ID pipe, stick welded to 1/8 inch plate in the back (sloppy, but functional). Then cut off the angle iron with a gas hatchet (love that term) and while the OA torch was lit, punched the hole for the MAPP gas head to go in, enlarged with a drill bit in the post drill. the angle iron front foot was MIG welded on, and I hope the placement will hold some firebrick forge doors in place. Now I'm just waiting on the Kaowool to come to line the thing and light it up. Hope is to be able to light the forge after work and get some smithing done before it gets too late to hammer in my residential neighborhood. I'm figuring with one inch insulation I'll have a 4 inch wide chamber, about 10 inches deep. too small for making holdfasts, but fine for hooks and forks and pinch dogs. Still have the brake drum forge for bigger stuff, but it takes a good half hour to get it up lit and up to heat and another half hour to shut er down. Michael-frightening the neighbors since the year Four.
-
ASO: Anvil Shaped Objects
Michael replied to primtechsmith's topic in Anvils, Swage Blocks, and Mandrels
my working "anvil" from Thanksgiving '04 thru this past August was a 75 lb chunk of I beam from the scrap yard. I ground a notch in one wing for bending, drilled a half inch hole in the other wing (each about an inch thick) for punching, and c-clamped a heavy jackhammer bit to the web to act as a horn, and did most of my early work on that. No rebound to speak of and you had to keep the hammer blows over the central web to keep the ring down, but it got me started and didn't discourage enough to make me quit. replaced with a 104 lb PW, but I'm sure I'll find some use for that much steel. Michael -
I now have a 104 pound Peter Wright that I picked up a few weeks ago. Local Ebay auction so no shipping charge. What a difference the bounceback makes after using an section of I beam.
-
I've always known them to be called Holdfasts. Roy Underhill of the woodwright's shop uses them. The cast versions from tool stores are junk. A holdfast was my first blacksmithing project and I've done a few more with newbie smithing friends, mostly hand tool using neaderthals, a group in which I proudly include myself. http://www.wdynamic.com/galoots/4images/details.php?image_id=2525 Crude but effective. IIRC there's a smith in Alaska, Koontz I think, who makes a set, a small and large, with the brass brushed leaf end on it, for $80 or $90 for the set. Michael
-
I still don't have a real anvil, but I use a 75 lb piece of I Beam, a good inch think in the web, a little loud if you are out on the wings, so I try and keep the hammering over the center part. 10 lbs of jack hammer bit C clamped to the side as a horn of sorts, another 30 lb block of steel, 3x3x12 inches rests on one of the lower wings. I keep looking for a real anvil but no luck just yet. Michael
-
When I did mine, I improvised a piece of chain and a sash weight, lay the chain across the anvil, anchored on one side and the sash weight hanging down the other, with the gnome under the chain. Holds it well enough for eye punching and mustache cutting. Michael-Scaring the neighbors since 2004
-
What project are you working on????
Michael replied to freebird914's topic in Blacksmithing, General Discussion
Currently I've been doing these little roses. need to make a die to do the veins in one shot, rather than with a chisel. Wife and daughter love them, and want me to do a while screen door full. Michael -
Fuel survey... Please participate.
Michael replied to elkdoc's topic in Blacksmithing, General Discussion
I use charcoal, neighbors within 30 feet on every side of the house, I can pass it off as a high powered grill. There's a neighbor who heats with wood and I can "hide" my smoke making under cover of his fireplace keeps the firemarshall off my back. I like coal, but restrict the use to the wintertime, when the wind is blowing off the bay and the neighbors windows are closed. Michael-San Francisco -
Here's mine, a 75 lb chunk of I beam from the scrap yard. Rings a lot when you hit out on the wings, but very solid over the center web. Have to figure out a better horn though. That Jackhammer bit c-clamped to the side doesn't work that well Michael-Scaring the neighbors since Thanksgiving 2004