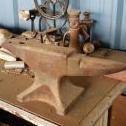
July 21, 20178 yr Found this little guy under 300# of forging coke in an old Blacksmith shop. It's a pretty clean break! After wire wheeling, it looks like it started life as a 176#......maybe Arm & Hammer? Rough forging under horn/heel, the shape, and what's left of the logo made me think A&H....I'm sure the experts will chime in soon =)
July 21, 20178 yr DC, nice anvil you have there, no kidding. It can be repaired. See this thread for discussion on welding wrought. Figure out what the base of this anvil is made of and weld the thing back together. Easy Pesy. you.
July 21, 20178 yr Author I'm hoping/planning to fix it. I've got the equipment, supplies, and just enough knowledge to be dangerous =)...I'll post progress pics for critique
July 21, 20178 yr Yes, A&H. Thanks for the pics, not sure I can see the full serial number. 2420? I think that may be it from that logo stamp style
July 21, 20178 yr Author That's the whole serial number. 2420. I couldn't remember if you were doing just Trenton or A&H as well, Black Frog. Any idea of a manufacturing date? I set the two halves together, wire wheeled the crud off the face, and did a 5/8 ball bearing drop from 3'.... 90% or better. As good as my 148# Soderfors, and that's been the benchmark for my previous tests. This is the first anvil to match it. Now the debate is whether to put in a small spacer between the halves so I can start in the middle and do a full penetration weld....or grind like crazy to v out enough for full penetration. I like the 1/2" spacer and minimal v grinding idea better.
July 21, 20178 yr If you can get just as good a weld i'd go with the spacer. Just to keep as much of the original beast as possible!
July 21, 20178 yr That would be a *LOT* of grinding to V it enough to get a full penetration weld. The spacer idea sounds like a better way to go, IMO. Also, be mindful of the temper on the anvil face during welding. I would put the anvil upside down (face down) onto a heat sink. Any chunk of steel large enough to hold the anvil, and thick enough to soak up a lot of heat should work fairly well. Take your time when welding it as well. Let the anvil cool off a bit between welds.
July 21, 20178 yr Nice score, your serial number dates this anvil as a 1900, first year A&H. Information from Mr Postmans A.I.A. When I first saw your post, I (jokingly) though, great idea for a portable anvil. Enjoy N.N.F. Beautiful, Manchester, Michigan. USA
July 21, 20178 yr Hi DC, that is a nice anvil. I would repair it but not like you suggest for these reasons: Both Trenton and Arm & Hammer brands were electric welded at the waist beginning in the 1940,s by just chamfering or scarfing a 1/2-inch to 3/4-inch V around the perimeter then welding with one pass. They did this to stay competitive as it saves time and $. There are thousands of them still in use, I own my share. I have been welding and repairing everything from heavy equipment to delicate cast iron for over 40 years and have repaired a Trenton by method described, no problems. Trying to space the halves and then weld is a lot of work for little to no gain. There is potential for lots of slag inclusions, minimal penetration to the anvil and Lots of heat generated never mind extra time and $. If you have a copy of AIA look in the Trenton section there are descriptions and a picture of and anvil being welded at the waist. I have a beautiful Trenton just the upper half I found in a scrap pile while picking at a farm, never found the base. I started to weld up a base out of plate but put it aside for 10 years as I did not have time. I retired a month ago and may complete the job at some point, I will never get my money back if I consider the time it will take! Yours should be easy and there is nothing you will do in your use to make it fail. Good luck, have fun and enjoy the anvil!
July 21, 20178 yr Author I had thought about that method, though I didn't realize the welds were so shallow! I have a good older dc pipeline welder (powered by a flathead willys engine) that lays down beautiful welds...and despite the risk of slag inclusion, that is at least a smaller void than leaving the the whole center of the waist. You are right, it will work, it will be faster, it will be cheaper, and it won't significantly reduce its ability. It's just hard not to think of it as a band aid fix
July 21, 20178 yr Score.. Nice find.. What does the top of the base look like and the botton of the anvil without being put back together now?
July 21, 20178 yr You do not need a full penetration weld at the waist of that anvil. A shallow weld is fine. How shallow? Estimate the compressed column as the area of the weld times the thickness of the remaining gap, and use that in conjunction with the Young's modulus and the compressive force of a hammer's blow. Compare this to the energy of the hammer. If it is less than 1%, it is negligible. It turns out that even one square inch of weld is sufficient. The reason is that at the waist, the primary means of energy storage is compressive and not flexural.
July 22, 20178 yr Author So here's a pic of the face. ..the "spots" are from the sprinkler, not pits. It's shockingly good for being face down on a dirt floor. Thankfully Wyoming is VERY dry. Spotted this while messing with it today. I can't tell if that's original or added. Doesn't match the name of any of the smiths who owned the shop. BLACK FROG, have you ever seen this on an A&H? JLP, here's the joint. It's hard to get in the pic, but it looks like someone tried to weld under the heel, but that could just be an odd shape in the way it cracked.
July 26, 20178 yr I don't think they use full penetration to ansemble the parts on the modern Peddinghauses either.
July 26, 20178 yr Hi there That anvil is in good condiion and worth fixing, you could bolt the two pieces thogether and the break would key the whole thing locked together the center of the anvil probably wont be hard and use a coarse thread like UNC, whitworth or metric coarse. you could even put a small amount of weld prep after bolting and weld as well if you felt the need though welding is not always the answer Cheers Beaver
July 27, 20178 yr What an outstanding challenge! BeaverNZ has an interesting idea. EVfreek has explained it beautifully. If I knew a good procedure, I would attempt it myself. I suspect E7018 from a fresh can would be a good bet. Good luck!
July 27, 20178 yr Too complicated for a poor joint. 3/8" sq. mild or A36. One long piece and two short ones. The long one about 1" short of lengthwise the two pieces about 1" short of the width. Clean the faces and tack the 3/8" to the top half, centered in the break to make a I. Carefully position it on the base, align and tack it. Keeping the slag chipped out weld it together. 120 amps 5/32" 7018 will penetrate the 3/8" 100%. The purpose of the sq. bar is to prevent the welds from pulling the halves out of position. Start the process with 1" long beads that wet both halves of the anvil and skip them around. Once heavily tacked with cold beads to prevent pulling, have at it. One caveate I do NOT know what rod will provide the best weld but doing it is a heavy section welding 101 exercise. Buy a new can of rod. Frosty The Lucky.
August 12, 20178 yr Author Frosty, that is an EXCELLENT description of what I hope to do. It has the advantage of not having to grind away at the joint, and tying the halves together completely. Thanks for the tip on weld depth penetration. I burn many, MANY pounds of 7018...but usually no bigger than 1/8. Looks like my old Hobart is going to get a workout! So Mel, I guess there's my decision. It's not to say that any of the other options are wrong or wouldn't work. I have truly appreciated the input. For me, I would rather put in the extra work now. So that 10 years down the road I do not have to wonder if I could have done a better repair. To me, it's just spending a little bit of money/time for peace of mind ☺
August 12, 20178 yr You're welcome D.C. glad to help. You do know what a job of work you're getting yourself into. Yes? Frosty The Lucky.
Join the conversation
You can post now and register later. If you have an account, sign in now to post with your account.