Goods
-
Posts
1,164 -
Joined
-
Last visited
Content Type
Profiles
Forums
Articles
Gallery
Downloads
Events
Everything posted by Goods
-

What did you do in the shop today?
Goods replied to Mark Ling's topic in Blacksmithing, General Discussion
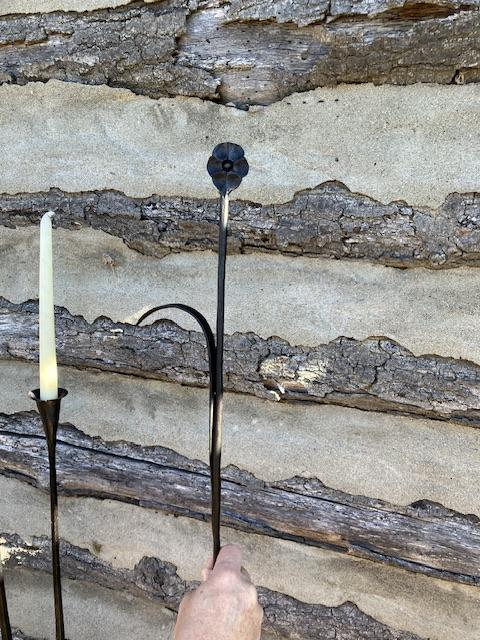
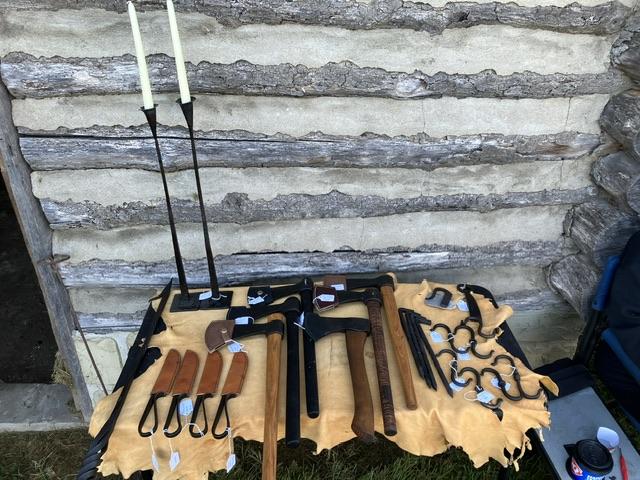
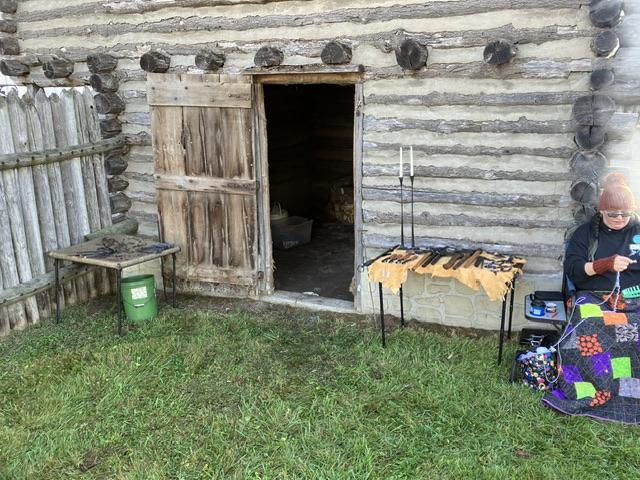
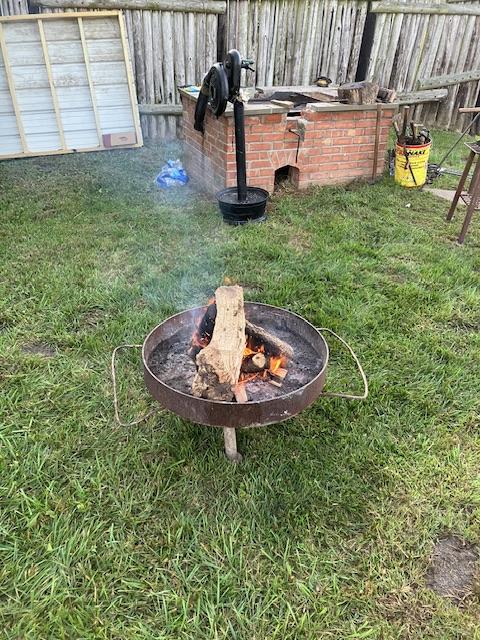
The demo went well this weekend. I haven’t taken many pictures before, but I got a couple this time around. Basic pictures of the setup (not the best pictures…): Here are a couple of the items made while demonstrating: BBQ fork and spatula as well as the a few leaf key chains and pendants. This flower was going to be just a key chain. It just kept growing, with the aid of a few forge welds. Overall, the crowds weren’t as big as last year, but a lot of people seemed interested and the weather was good. It is a completely open air forge, so it would have been a lot easier if it was cloudy all day. Two full days of forging and interacting with the crowd made for a pretty good weekend! I’ll try to get better pictures of the setup next time. Keep it fun, David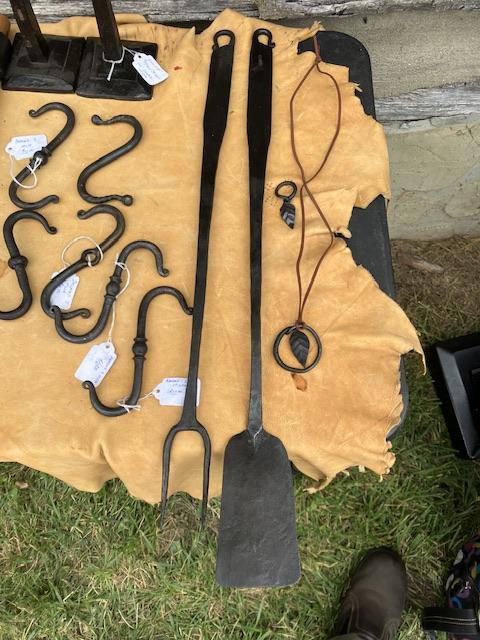
-
Will the joint on the hood rotate? If so that should give you a vertical connection. If not, I would cut that off square and put a 45 elbow on it. You may even be able to get a straight adapter to replace the 45 degree adapter that is on it now. Keep it fun, David
-
Forging a mushroom/toadstool fire poker
Goods replied to Johnnyh98's topic in Blacksmithing, General Discussion
Here is another example, but not really suited to the end of a bar: Keep it fun, David -
What did you do in the shop today?
Goods replied to Mark Ling's topic in Blacksmithing, General Discussion
JLP, no I haven’t started a journal, but I need to. I’ve got one in the shop for that purpose, particularly for keeping track of steps/sequences and dimensions that work out good for me. I just get rolling and don’t take the time to write things down. It comes back to bite me when I try to make the same item a year later… (I would be a little scared to see how much time I have in some of these items.) Chad, I like your scoop! Doing these in batches makes consistency a little easier. The side profile is pretty close on these, but the top profile, eye transition and blade thickness/taper, varies considerably. Most of that was me trying to get the process down for the eye transition I want. Still not quite there yet. (Another reason I should be using that journal!) The knives I pretty much have the process down, but I also work these through step by step in batches. (Cut all the blanks the same, marked the set down at one time, drew all the handles out… they’re small, so not really wasting residual heat between steps. I’m not sure I would have the same efficiency on something larger like hatchets.) Keep it fun, David -
For my large quench tank (basically 5gallon steel bucket with about 4gallons of oil), I just heat up an old sash weight to a red heat and that usually gets me pretty close to 120F. For my small quench tank (3” Square tube about 15” tall filled to 12”) I just heat it up with a propane torch. Both methods don’t take much time or effort…) Keep it fun, David
-
What did you do in the shop today?
Goods replied to Mark Ling's topic in Blacksmithing, General Discussion
All the forging, heat treating and sharpening is done: (Tomahawk at the bottom has a little bit of delamination that showed up at the quench , but it’s not too bad. It may end up as my target hawk…) Now on to leather work… 3 days till the festival! Keep it fun, David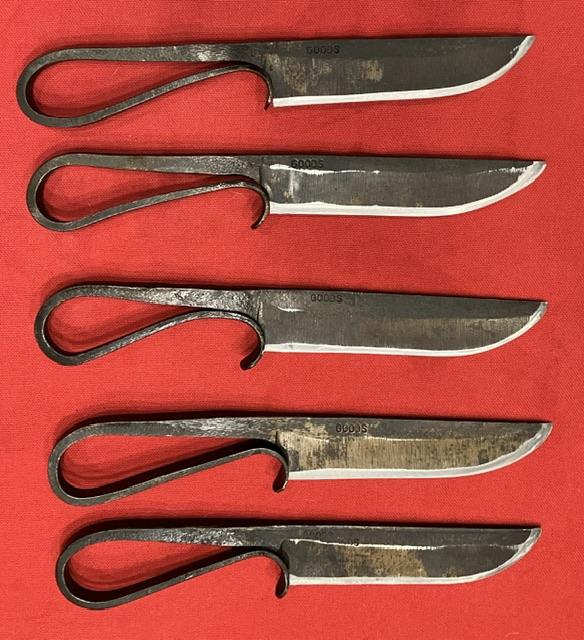

-
Hydraulic cylinder for air hammer
Goods replied to rowdyripley's topic in Power Hammers, Treadle Hammers, Olivers
I watched a YouTube video of the guys at Coal Iron Works talking about the effort that has gone into the self contained hammer and at the quad state they did an introduction/unveiling of it looking for feedback. Even with serious engineering work, it needs a lot of fine tuning. (I should have made it to quad state to hang out with them. I would have love to see Kurt putting it through a work out… Keep it fun, David -
8” double wall may not fit inside a 10” vent pipe. Might want to check before committing… Keep it fun, David
-
The other thing to remember is that most of the modern ceramic belts need fairly high pressure to stay sharp. As the ceramic dulls, the high pressure causes fractures creating new sharp edges to cut with. If the pictured grinder was available for $50, that would probably be a good starting point. Not as flexible as the “modern” knife maker type grinders, but you could get a lot of work/learning done with it. Keep it fun, David
-
Do you have an image of the grizzly 2x75? They have a couple different styles listed on their site. One or two of them look like they would work, but may be under powered. The others I wouldn’t mess with… They also listed the belt size as adjustable from 2x72 to 2x79, on at least one model. Keep it fun, David
-
George, we absolutely love this house. I drove past it every day going back and forth to work for ten years. Then it went up for auction in the last recession and we got it for a very good price. We’ve put a lot of time and money into over the past 15+ years, but it has been well worth it. I could go on and on about the property… (It was a good place to be stuck during the height of the pandemic! I can’t imagine how people living in apartments/condos survived that time period.) Keep it fun, David
-
This is extent of my Halloween decorations: Ive always thought it would be neat to fabricate arms with claw like fingers, but I’m afraid the effort to get the effect I want would take the fun out of it… Keep it fun, David
-
So, what realistically, is your budget? You can get a reasonably good grinder on Amazon for under $700~$1200. Mine is on the bottom end without out a VFD and it does fine. I would love to have one with a VFD and more attachment options, but this does what I need for the time being. What you need to what out for is the cost of belts, they are consumable items… Keep it fun, David
-
Don’t run you mixing tube larger. That will lower the velocity, and increase the chances of the flame front moving into the mixing tube. The flame front has a fixed velocity, if you lower the fuel/air velocity, you could run into problems. (Even if it works, that will reduce your turn down capacity, you may not want to run it at full heat all the time.) Better to reduce the bell size, but I will definitely defer to Frosty! Keep it fun, David
-
I’m not a gas forge guru, but I’m guessing that the bell reducers you’re using as nozzles are too large of diameter change from the mixing tubes. This will cause the flame to settle in at the change in diameter, heating the bell significantly. Try using pipe coupler, or thread protectors (Frosty’s favorite), or just form you nozzle in the refractory of the forge. (You do have the ceramic blanket covered with a refactory right?) Frosty, Mikey, what are your thoughts. Keep it fun, David
-
What did you do in the shop today?
Goods replied to Mark Ling's topic in Blacksmithing, General Discussion
No, I was out of town with family all day Saturday. I heard about Josh’s demo, but nothing not John’s. I bet John’s was interesting! (He was doing inflatable’s…) Keep it fun, David -
What did you do in the shop today?
Goods replied to Mark Ling's topic in Blacksmithing, General Discussion
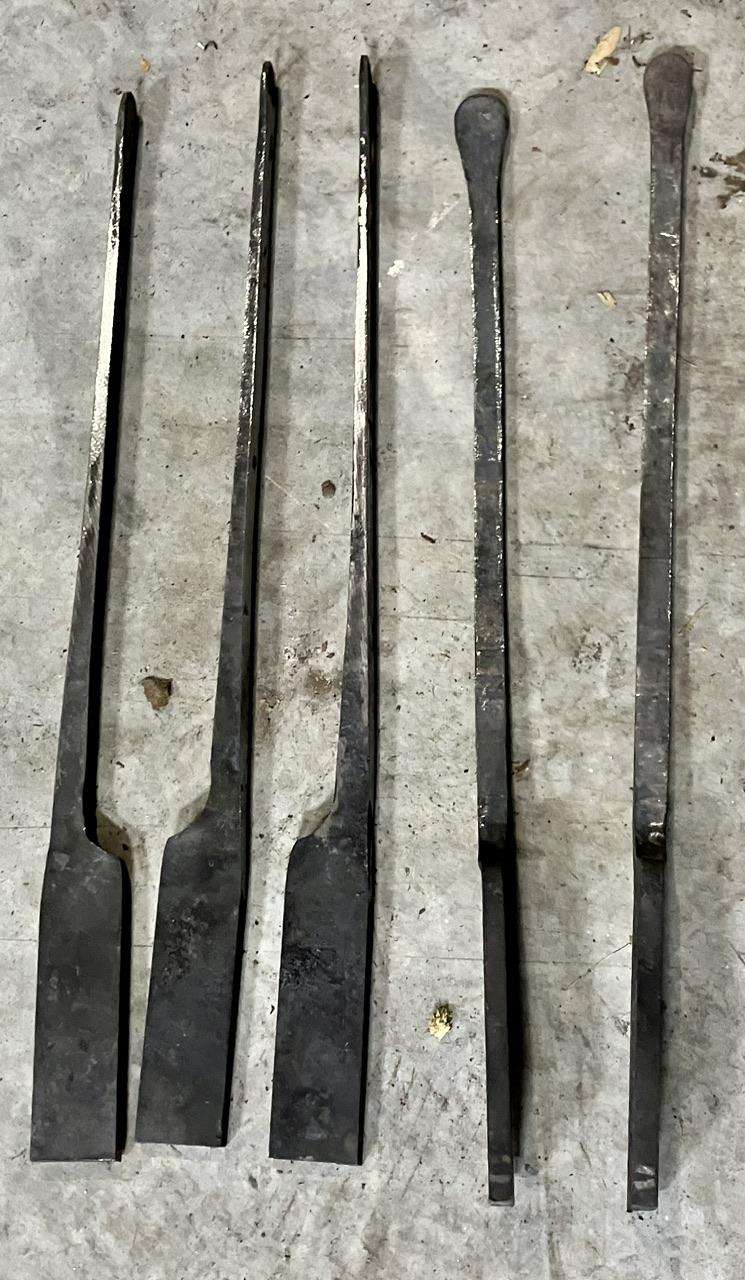
JLP, the draw knife is another example of excellent forging! Billy, the times on the fork came out great, you’re getting really good at those. I also like how you’ve designed your sign. I got a few hours in the forge tonight and I made progress on the five blacksmith knives: The blades are 5-1/4” to 5-1/2” with a hollow grind (fairly rough grit, mainly for practice) and ready to stamp, heat treat and sharpen. I’m getting closer to having something done! (I probably should have stamped my mark on the knives before I bent the handle to shape. A short cut that will make my life “interesting.”) Keep it fun, David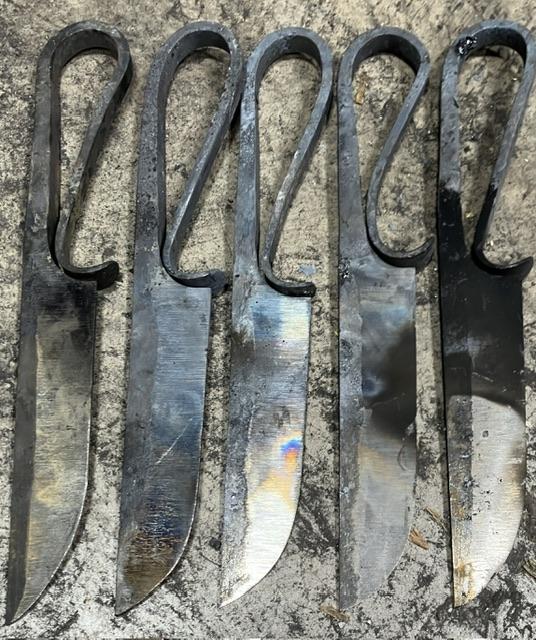
-
That looks pretty slick. Can’t wait to see how it performs. Keep it fun, David
-
I would avoid motor oil all together. With the additives in modern motor oil, the fumes from quenching can be very hazardous. If you have the funds available, actual quenching oil is the best think to use and is formulated with different quenching speeds for different steels. The common alternative is canola oil warmed to about 120F (which reduces the viscosity and increases quench speed). What type of steel are you working with? That make a huge difference in what you use. Many medium carbon steels harden with water and some higher carbon steels are formulated to quench with water also… Keep it fun, David
-
Well, it was my turn for a (minor) medical procedure today. Feeling fine and want to get out in the shop to get some work done, but I’ve gotten a stern warning from my wife not to. I know she’s right, but now I’m home alone, with nothing to do but watch TV or read. I’m going crazy knowing that I have work to do! Keep it fun, David
-
handle for giant iron skillet
Goods replied to Ed Steinkirchner's topic in Blacksmithing, General Discussion
I’m not sure I would gorge myself on big spatulas. Might be a bit hard on the digestive system… Keep it fun, David -
What did you do in the shop today?
Goods replied to Mark Ling's topic in Blacksmithing, General Discussion
Is there any problem running it a more of an orange/yellow heat? That way one could keep the forge at a normal working temperature and get some other projects done rather that just burning through gas for 1-1/2hrs. Keep it fun, David -
What did you do in the shop today?
Goods replied to Mark Ling's topic in Blacksmithing, General Discussion
Tommy, pretty cool. Are you running a coal forge. If so, bring the tips up to a welding heat and let the soak in toward the top of the fire. It’s pretty amazing how much carbon you can pick up that way on small stock. I took a little time tonight, cut out the blank, and drew out the tang/handle on the blacksmith knives: Now to work on the blade, but I have to take two days off for medical stuff… woohoo Keep it fun, David
-
JLP Blacksmith Teaching Center.
Goods replied to jlpservicesinc's topic in Building, Designing a Shop
JLP, it makes me feel good to see you making progress on that! Maybe I can arrange for a class once you have it up and running. Keep it fun, David -
What did you do in the shop today?
Goods replied to Mark Ling's topic in Blacksmithing, General Discussion
JLP, I guess I’m just to picky for my own good! Basically, it’s just my preference. I like the look. I put a mirror finish and blued a couple in the past and they looked great (to me), but I’ve backed off from that level of finish, at least. I’d really like to spend some time and chase or engrave some embellishments on at least one of them (whichever comes out best), but I doubt I have the time. Keep it fun, David