7A749
-
Posts
184 -
Joined
-
Last visited
Content Type
Profiles
Forums
Articles
Gallery
Downloads
Events
Everything posted by 7A749
-
That's excellent. Really innovative and simple! Great stuff!
-
I was gonna say that too, but you're a braver man than I Mr Powers
-
That's beautiful Theo.
-
Well, unfortunately social justice warriors with their virtue shaming and blatant hypocrisy are offended by practically anything and everything these days. They sit in their comfy armchairs passing judgement on their fellow peers in a entirely self motivated effort to elevate themselves above others. Sad really. Youll never please them. They will always have something to complain about. Best response is to simply ignore them and refuse to apologize. Your work is very nice and the person who paid for it is happy. The way I've always seen it is just like when you get alarmist trolls on message boards who seem to never have anything good to say about much of anything, and heavily judge and criticize others... Ignore them and as soon as the next juicy bone plops down in front of them, they'll forget you exist as they begin to devour it. Of course, you can always tell them off, but most live for that kind of stuff and will beat you to death with their extensive experience being an idiot. I won't lower myself to their level. Its a super nice piece man. That's all that's important. IMHO of course
-
Forging Stainless For The First Time.
7A749 replied to 7A749's topic in Blacksmithing, General Discussion
Sure will. Thanks for the advice arftist. -
That's sweet man.
-
Cody Lundien carries a knife around his neck. I wouldn't try and take it from him It looks fantastic. Especially for a first time. I could probably do a better job of making a much, much worse example Nice job! I can imagine that scholarship is quite awesome too.
-
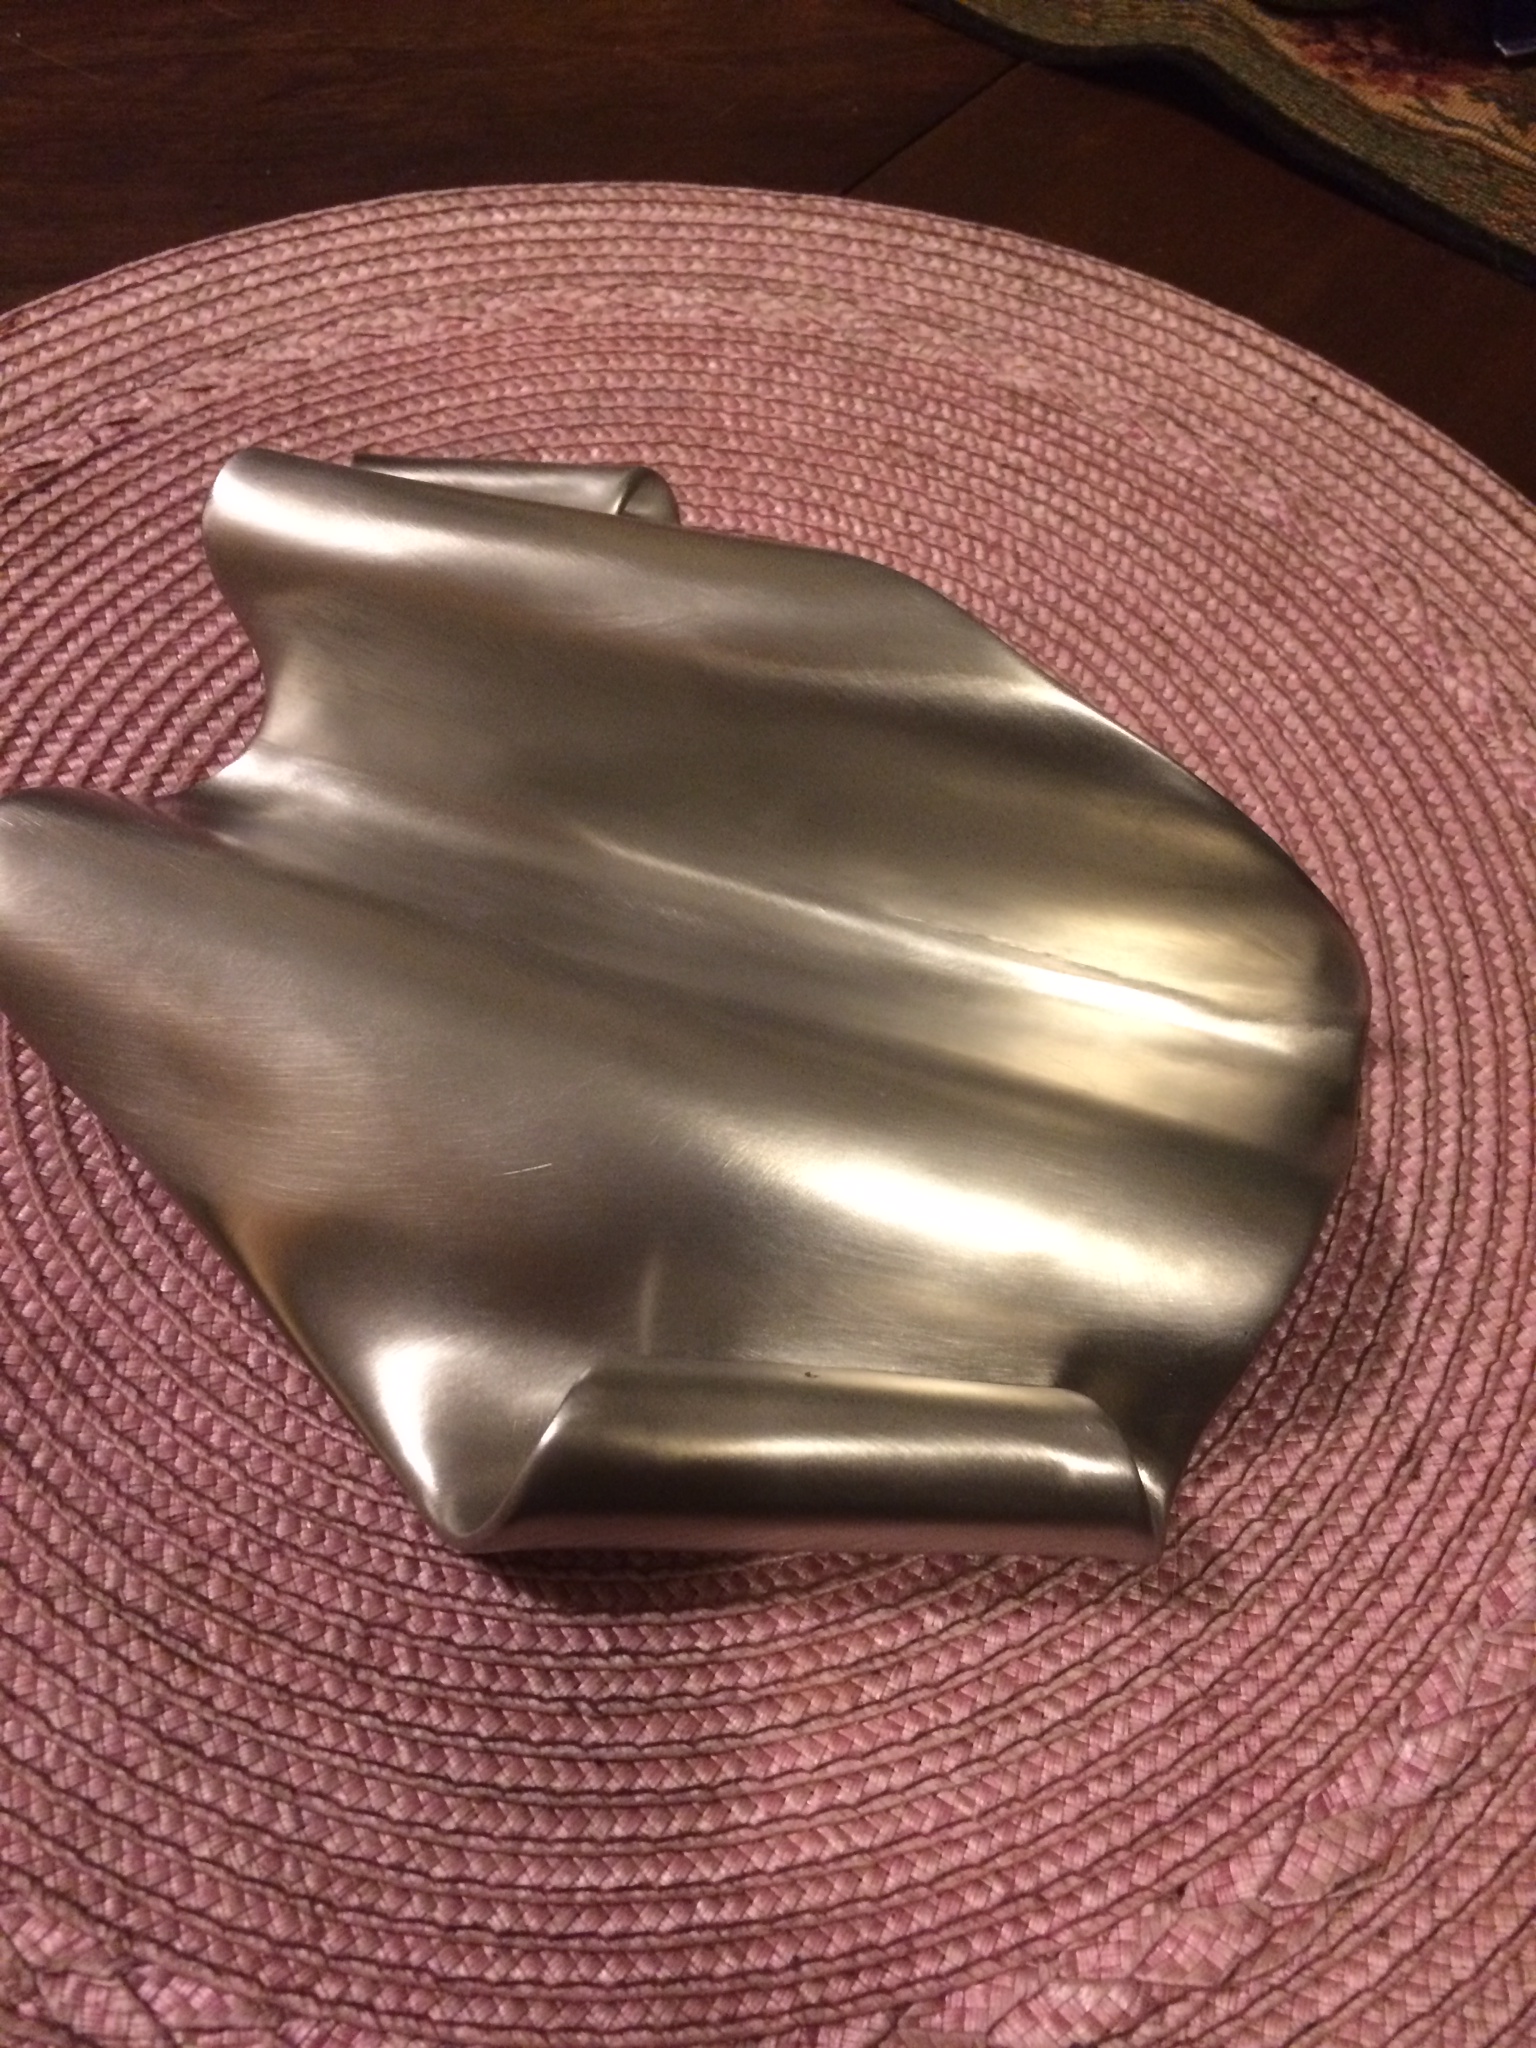
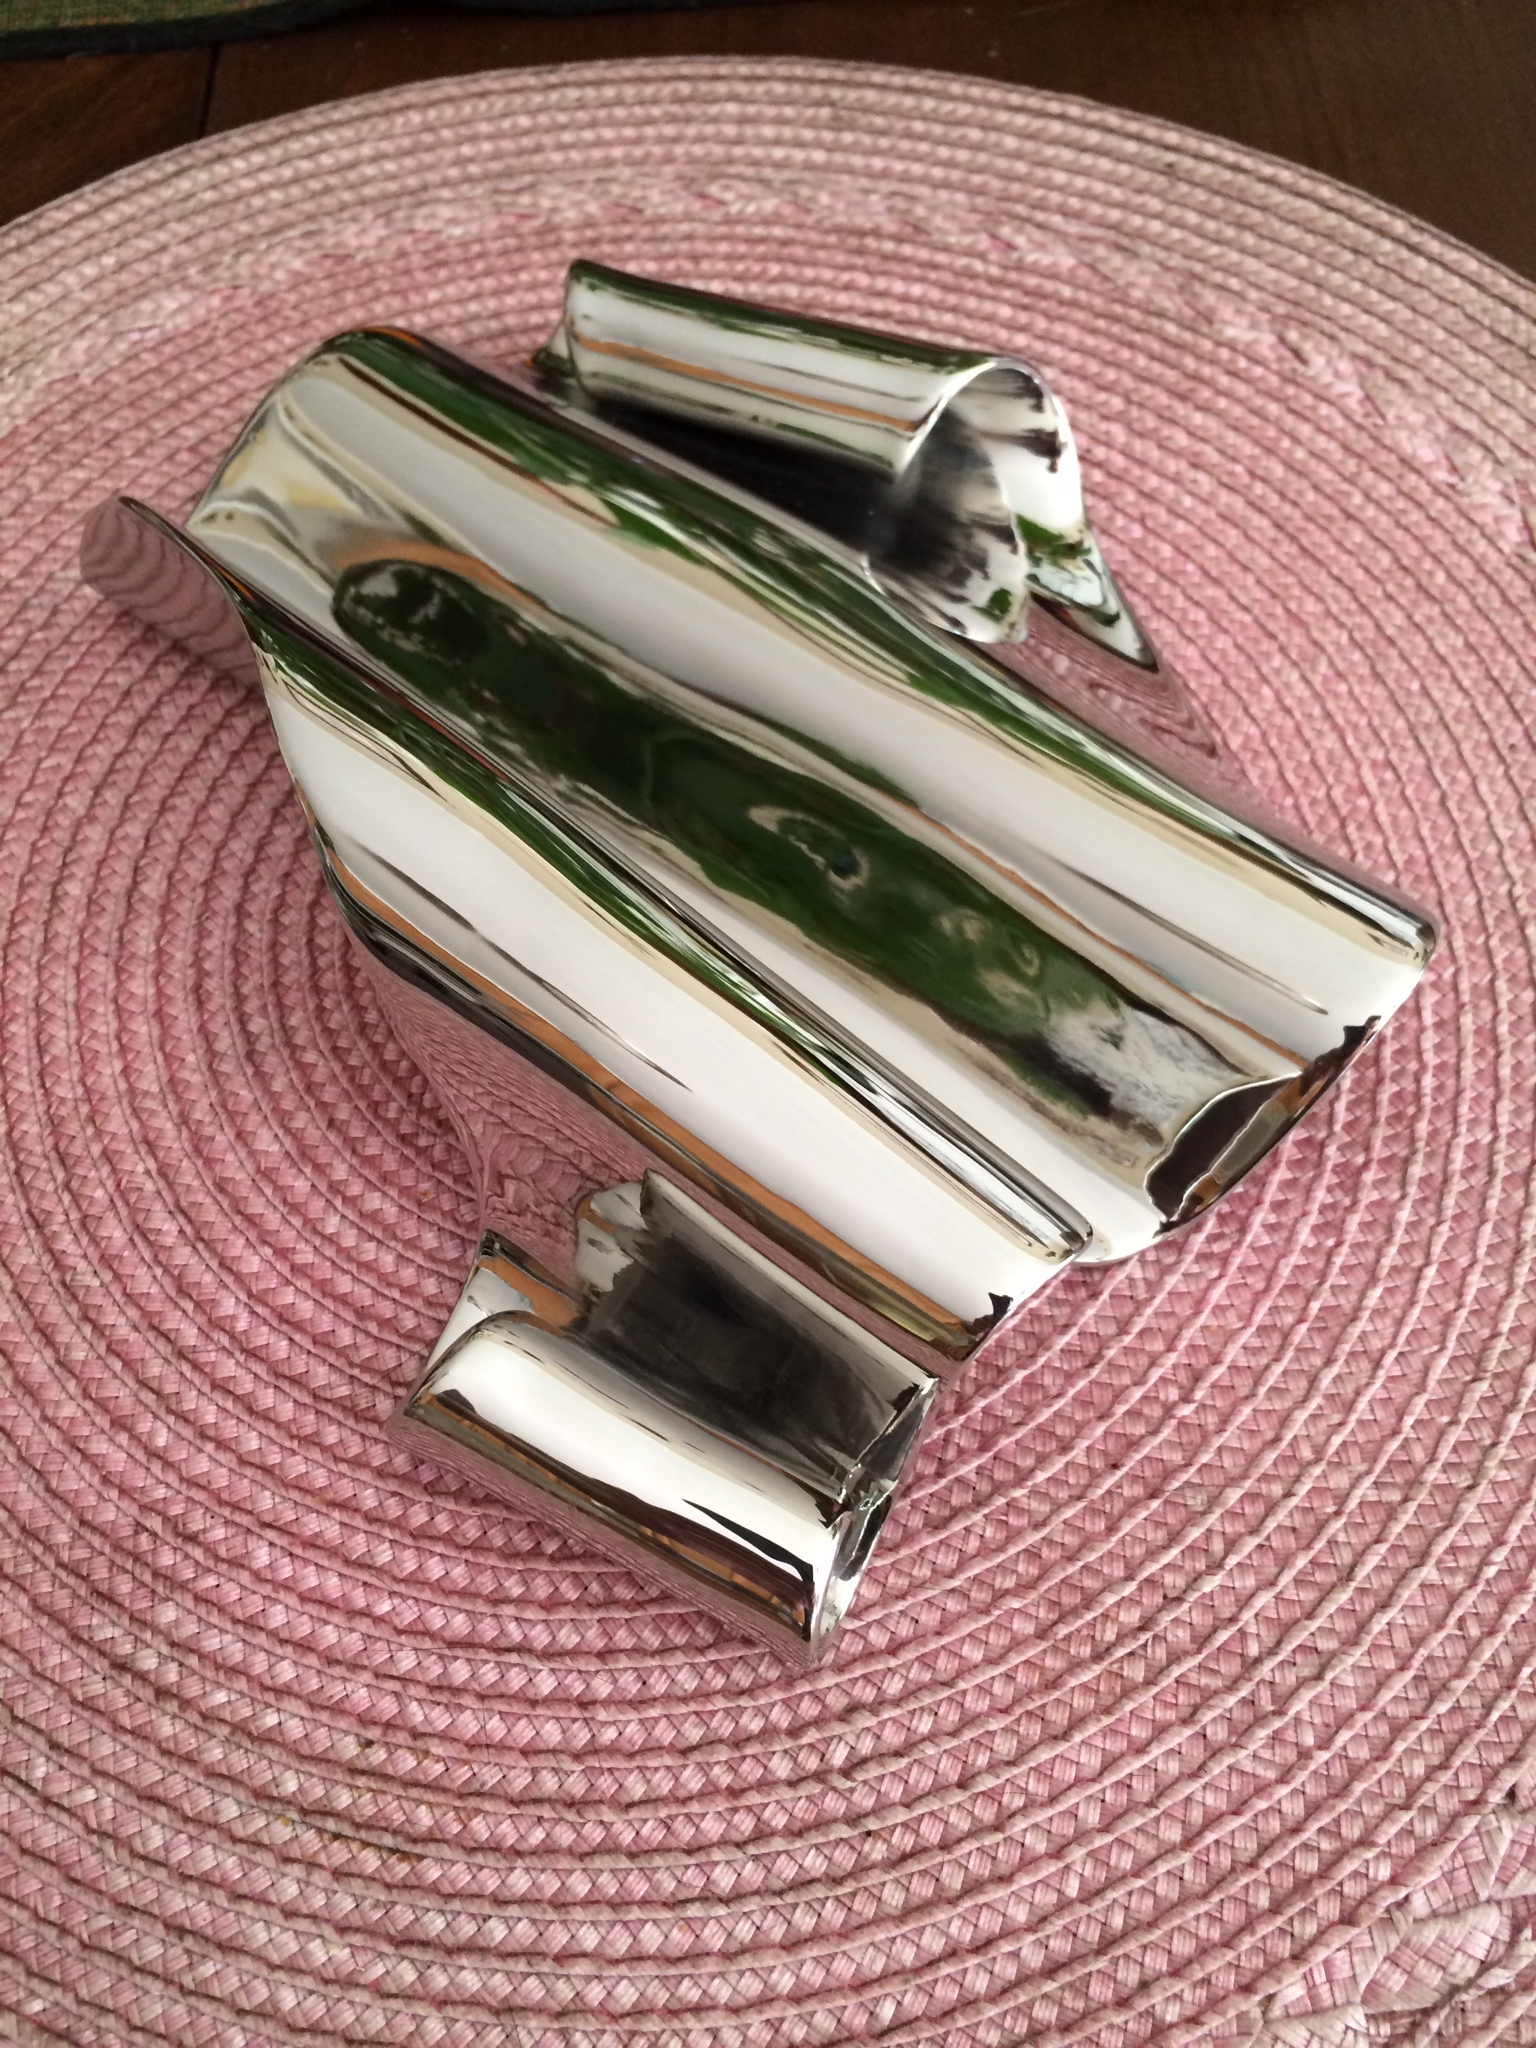
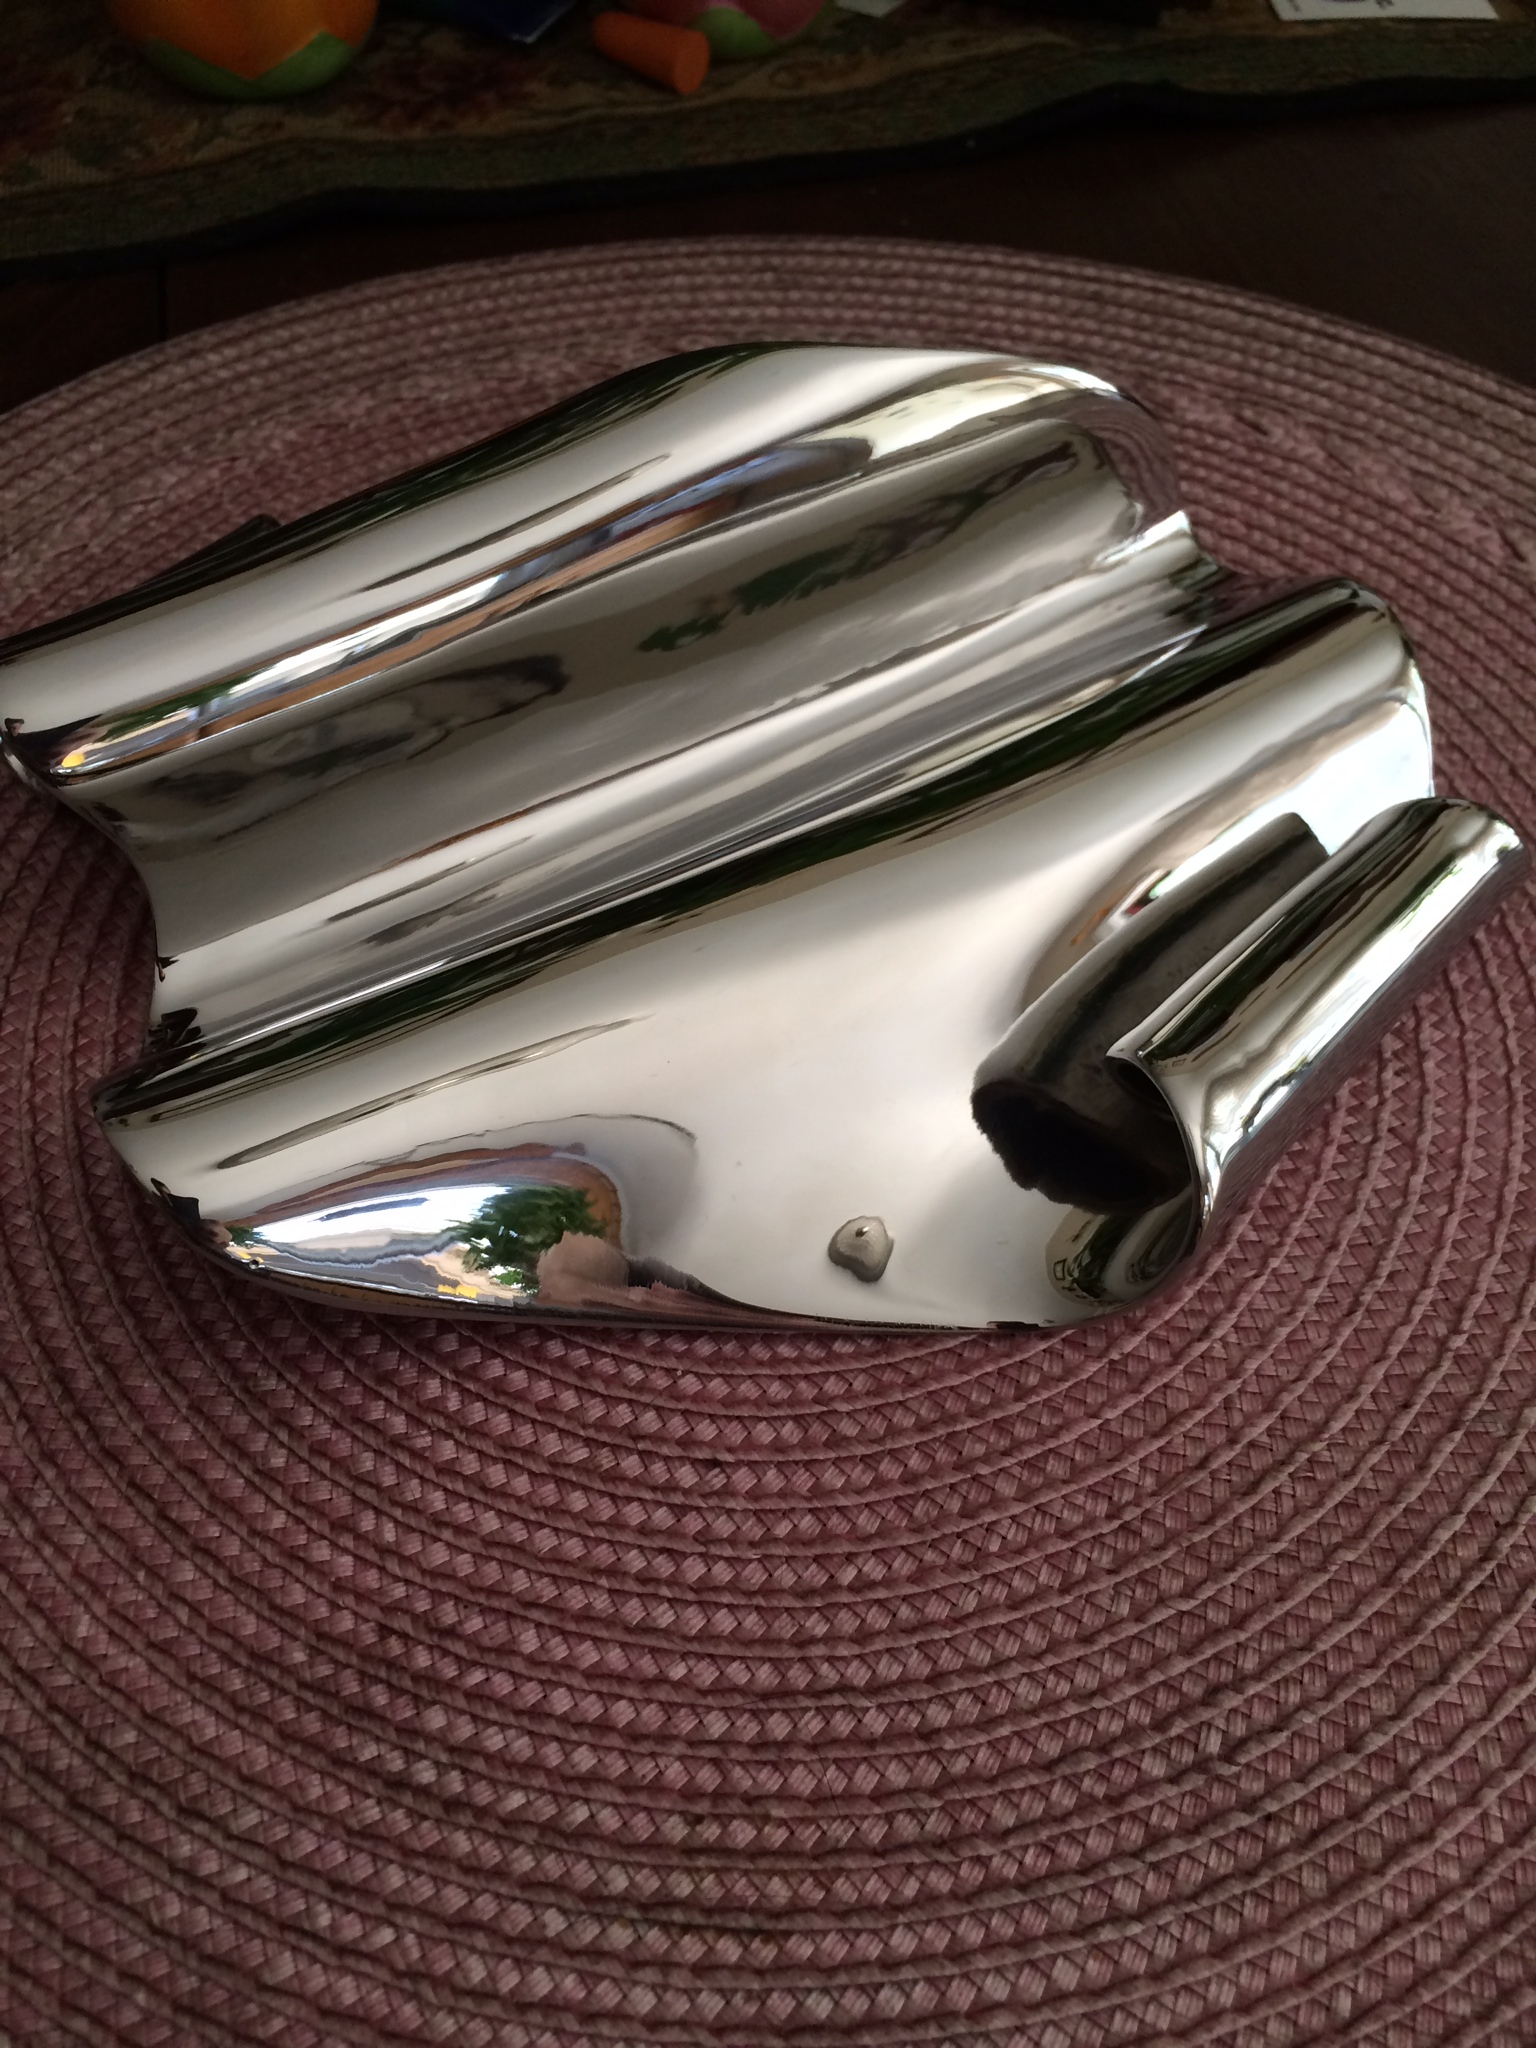
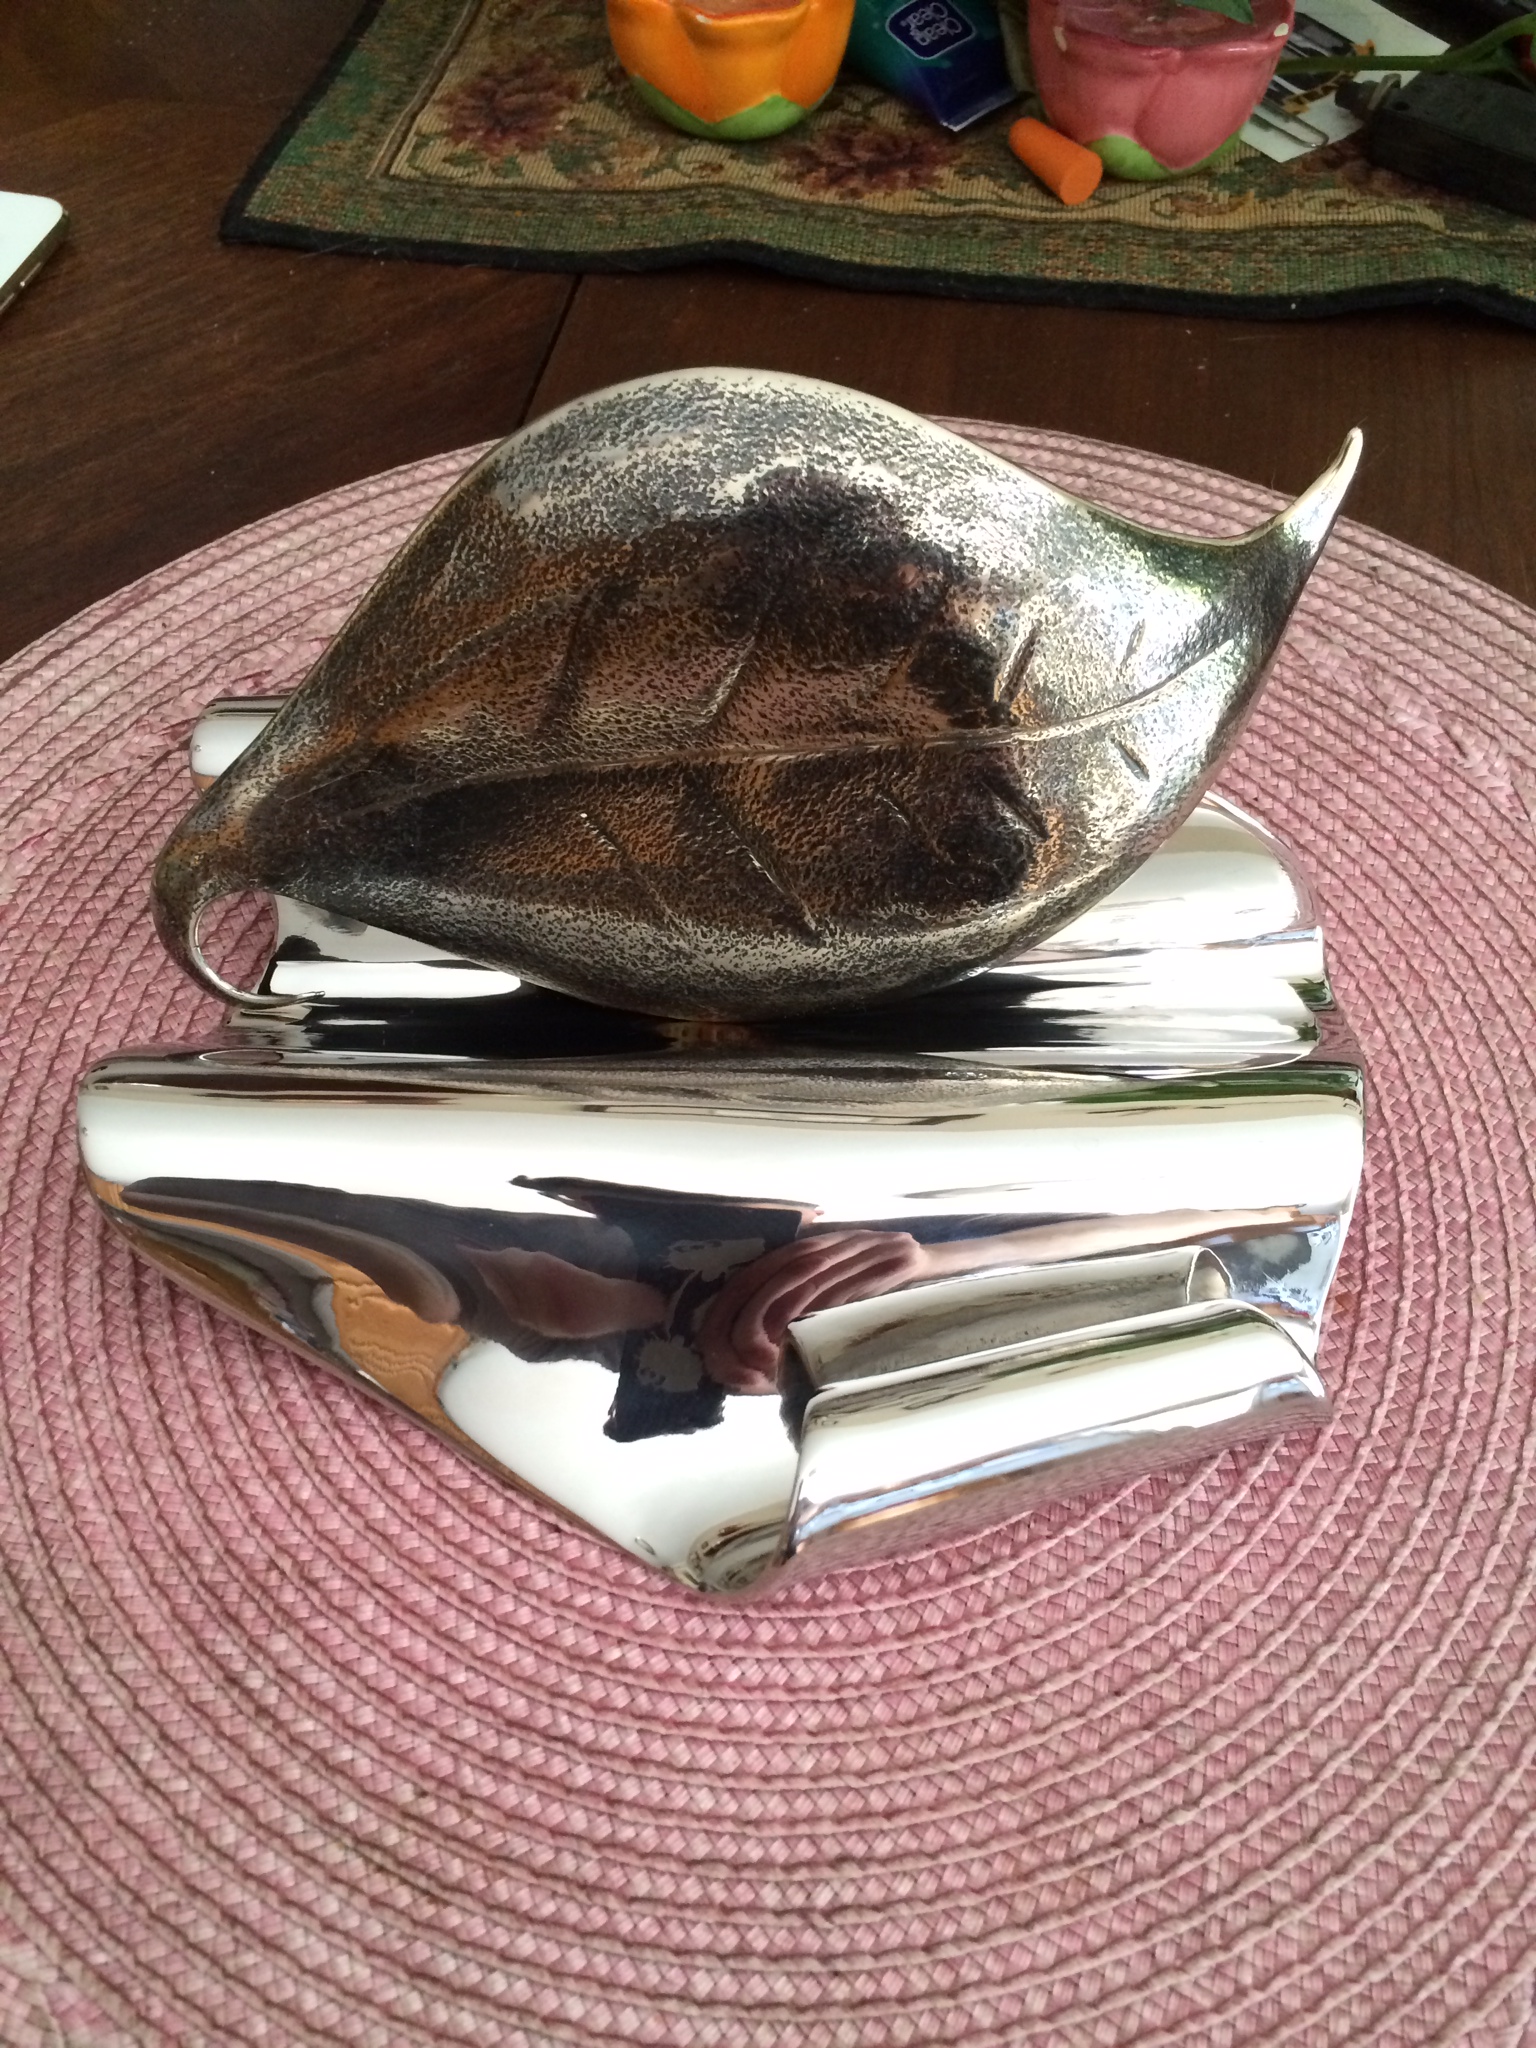
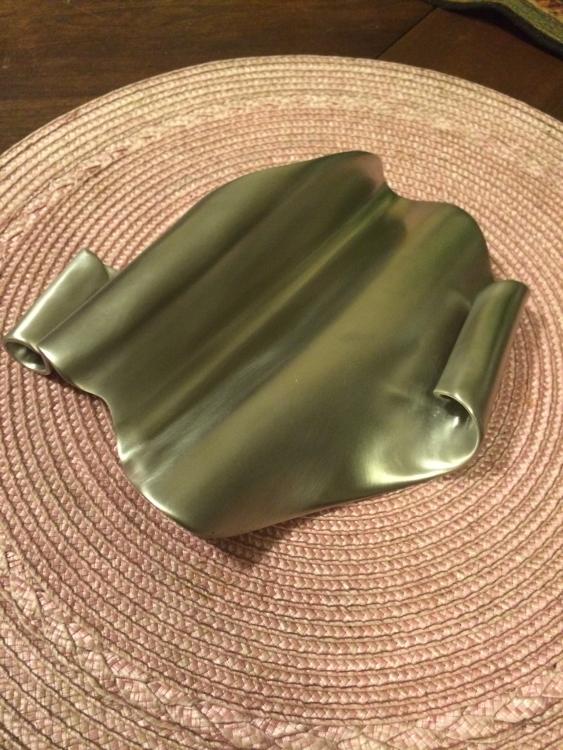
I can easily achieve a number one finish with these wheels. Of course bench work prior to polishing is crucial for removing deep scratches and other imperfections on the material. Still, I can cut a large number of stages normally done with sandpaper using the sisal wheel alone. In some cases, such as a flat surface with well defined edges, a buffing wheel is not the best tool for the job. Then, more bench work is needed to get the material to a suitable finish do it takes a polish without doing a lot of material removal with the wheel. After a quick buff up, I went back to the bench and did some stone work on the inside of the scrolls as well as some clean up in the center depression. Here the piece is pictured with a preliminary buff and then finished with the non woven abrasive (scotchbrite) wheel. The leaf has a subtle luster for comparison. After doing the burnishing with the scotchbrite wheels, I go back for a final buff out, first with the sisal wheel and black compound, then with the loose muslin buff and green for finish. It's still not perfect, but is plenty acceptable for this job. I drilled a small hole in the back of the base where a screw goes thru and into a tapped hole in the frame to hold it all together. Here it is, all done. Sorry for the length of the text, but I wanted to try and walk the reader thru it step by step. Thanks for viewing


-
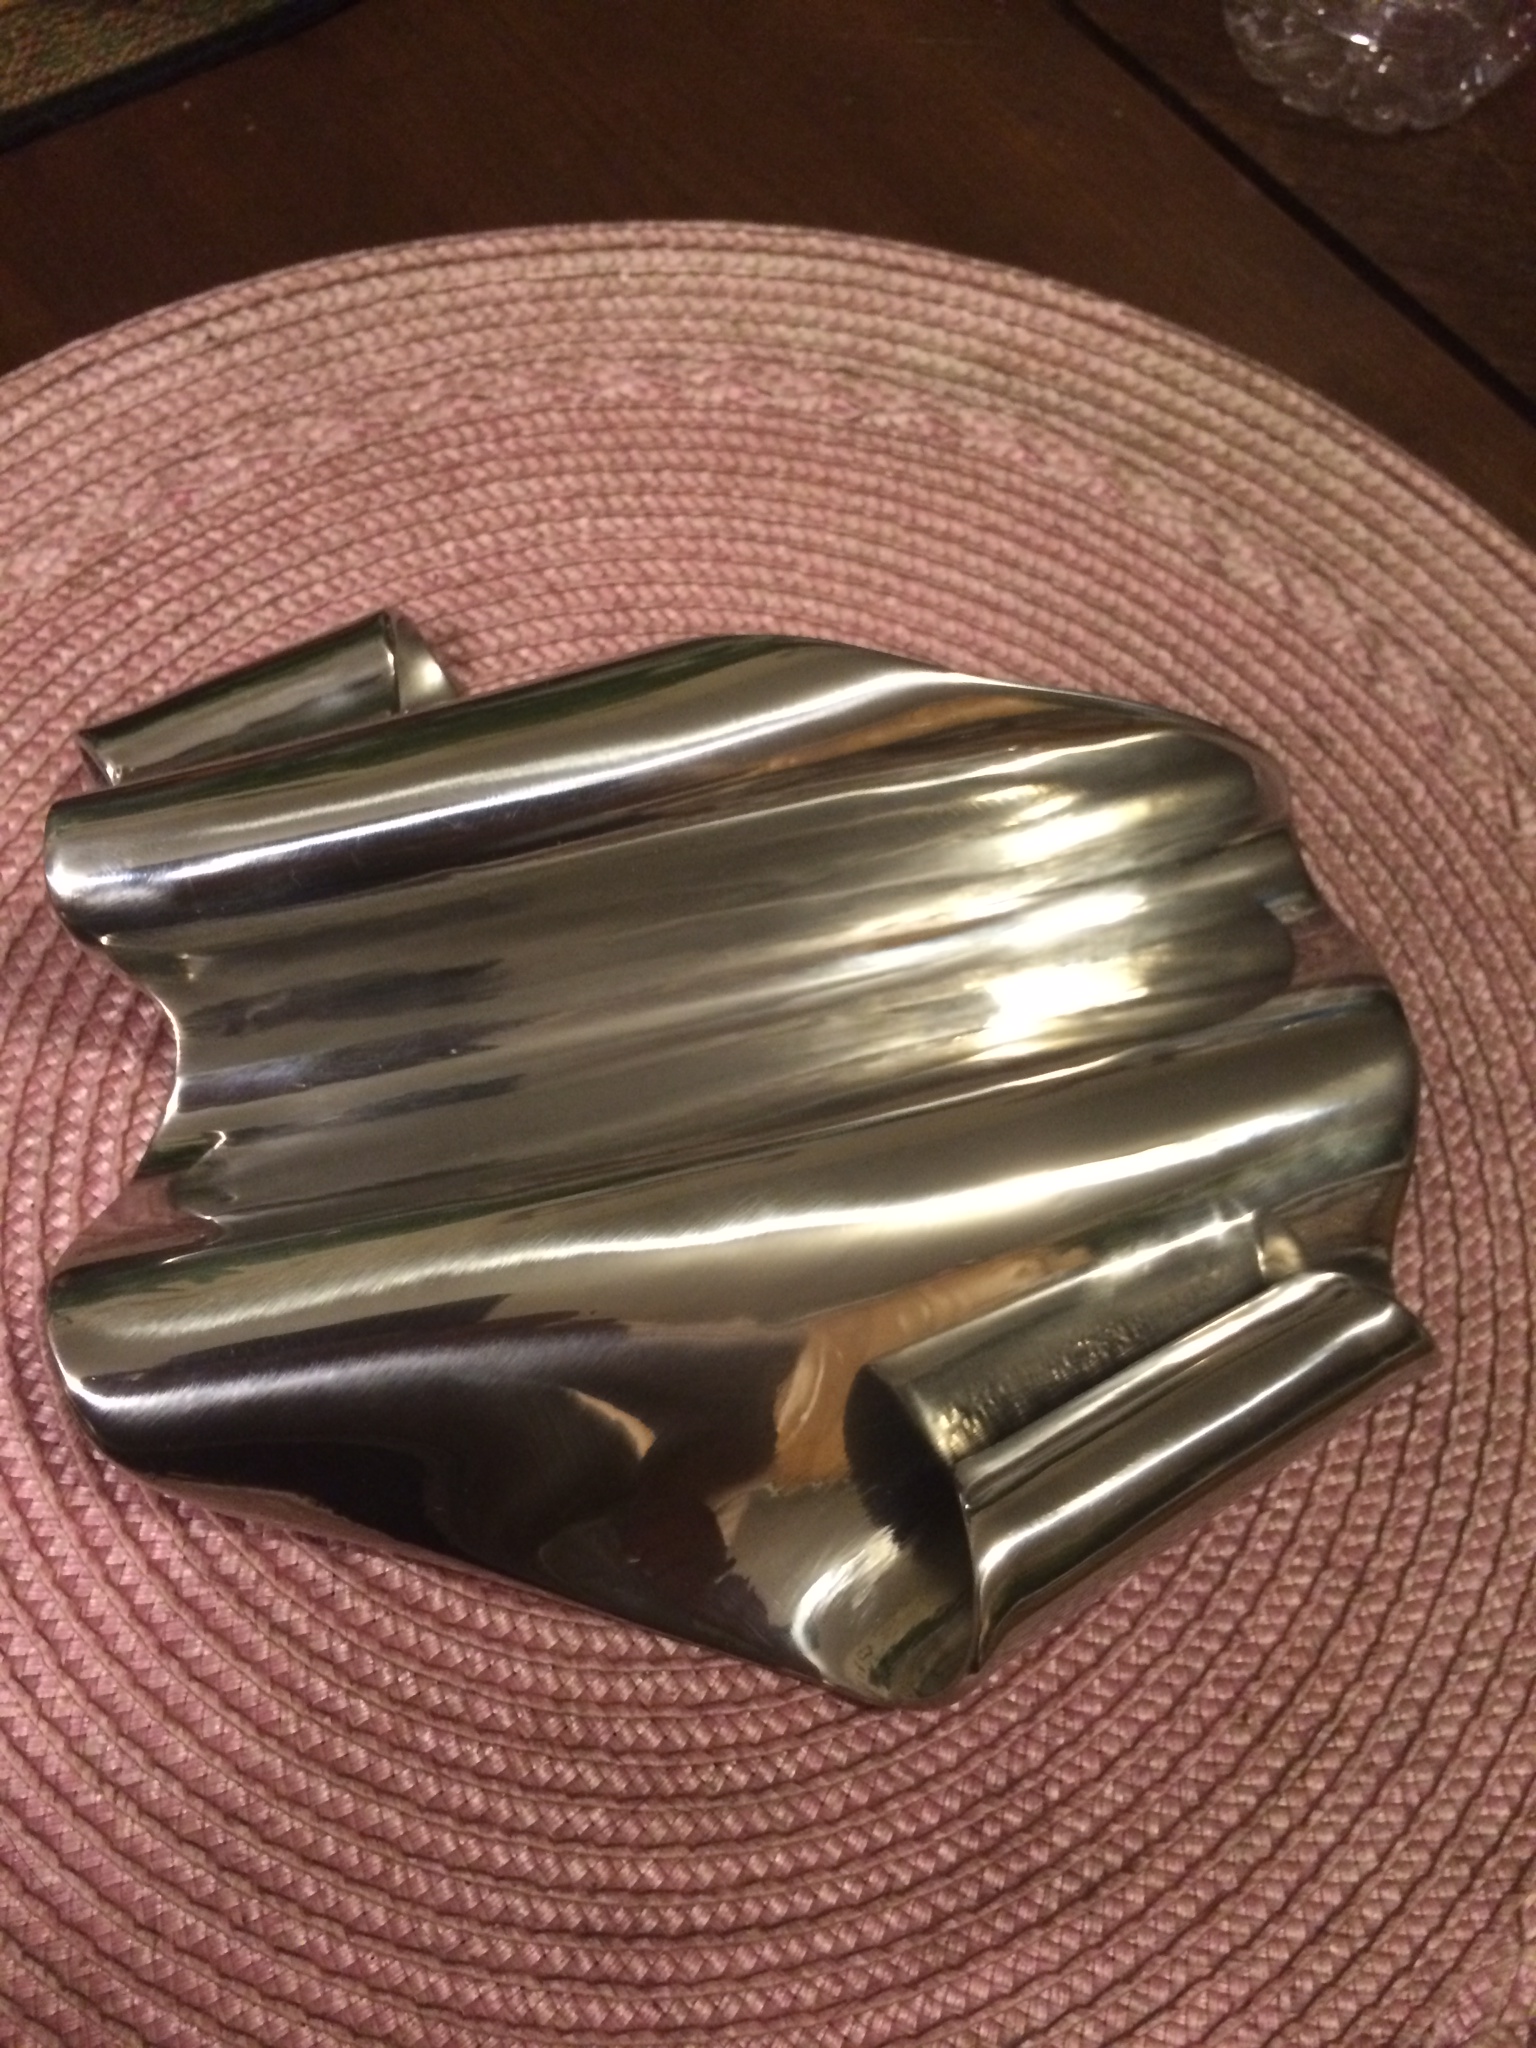
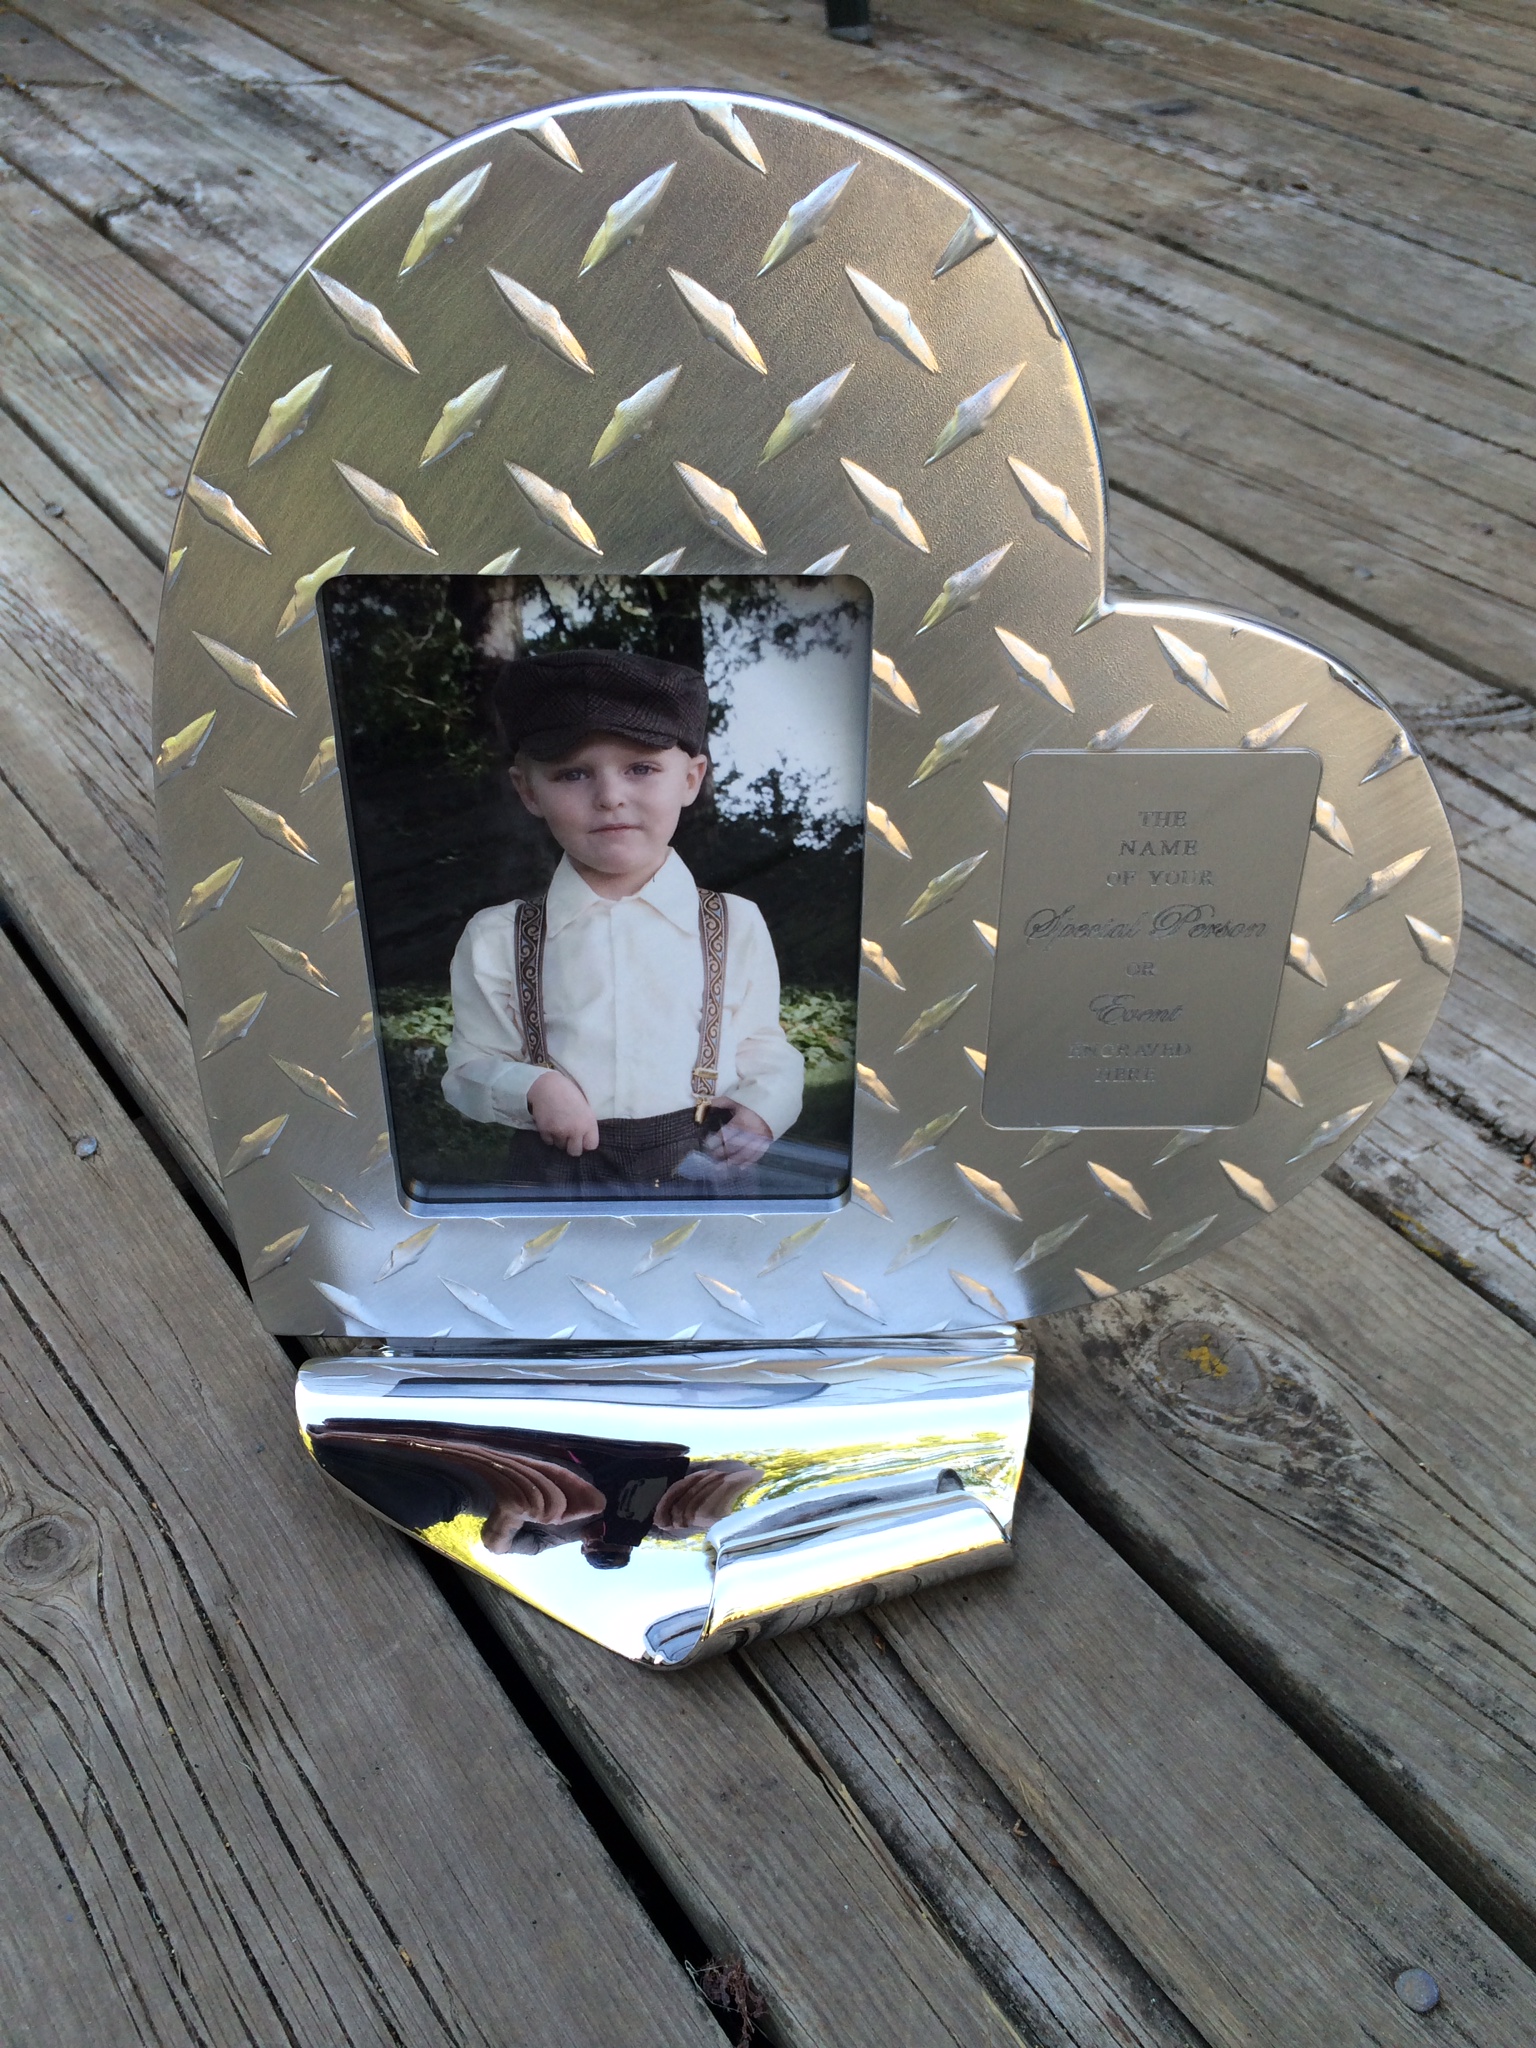
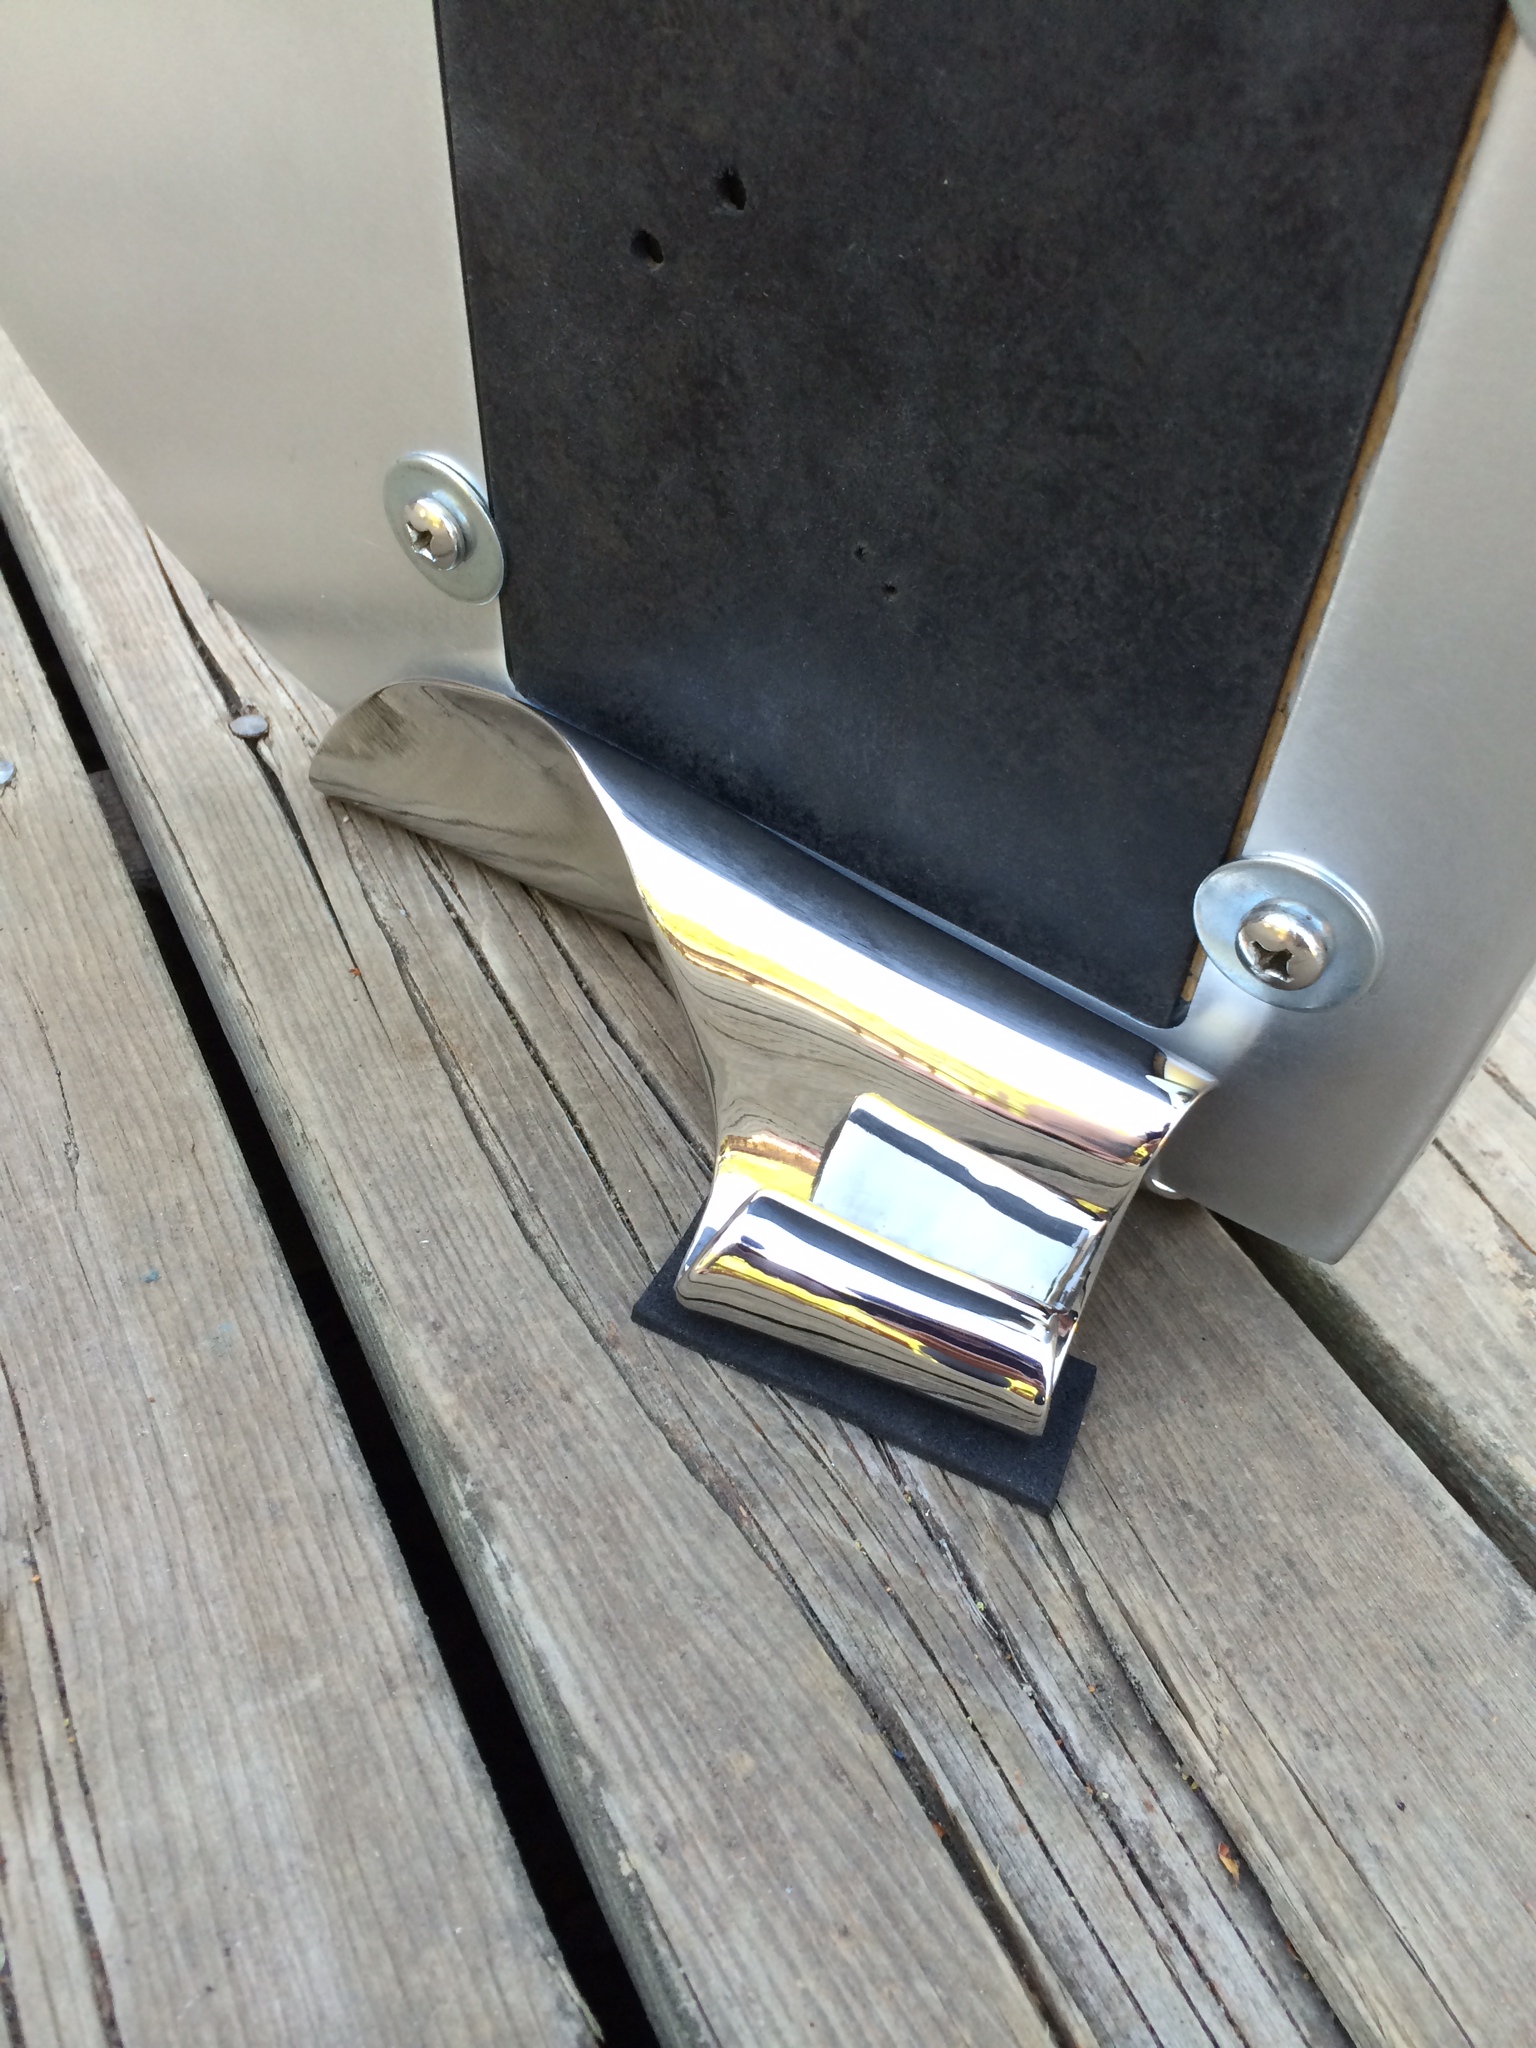
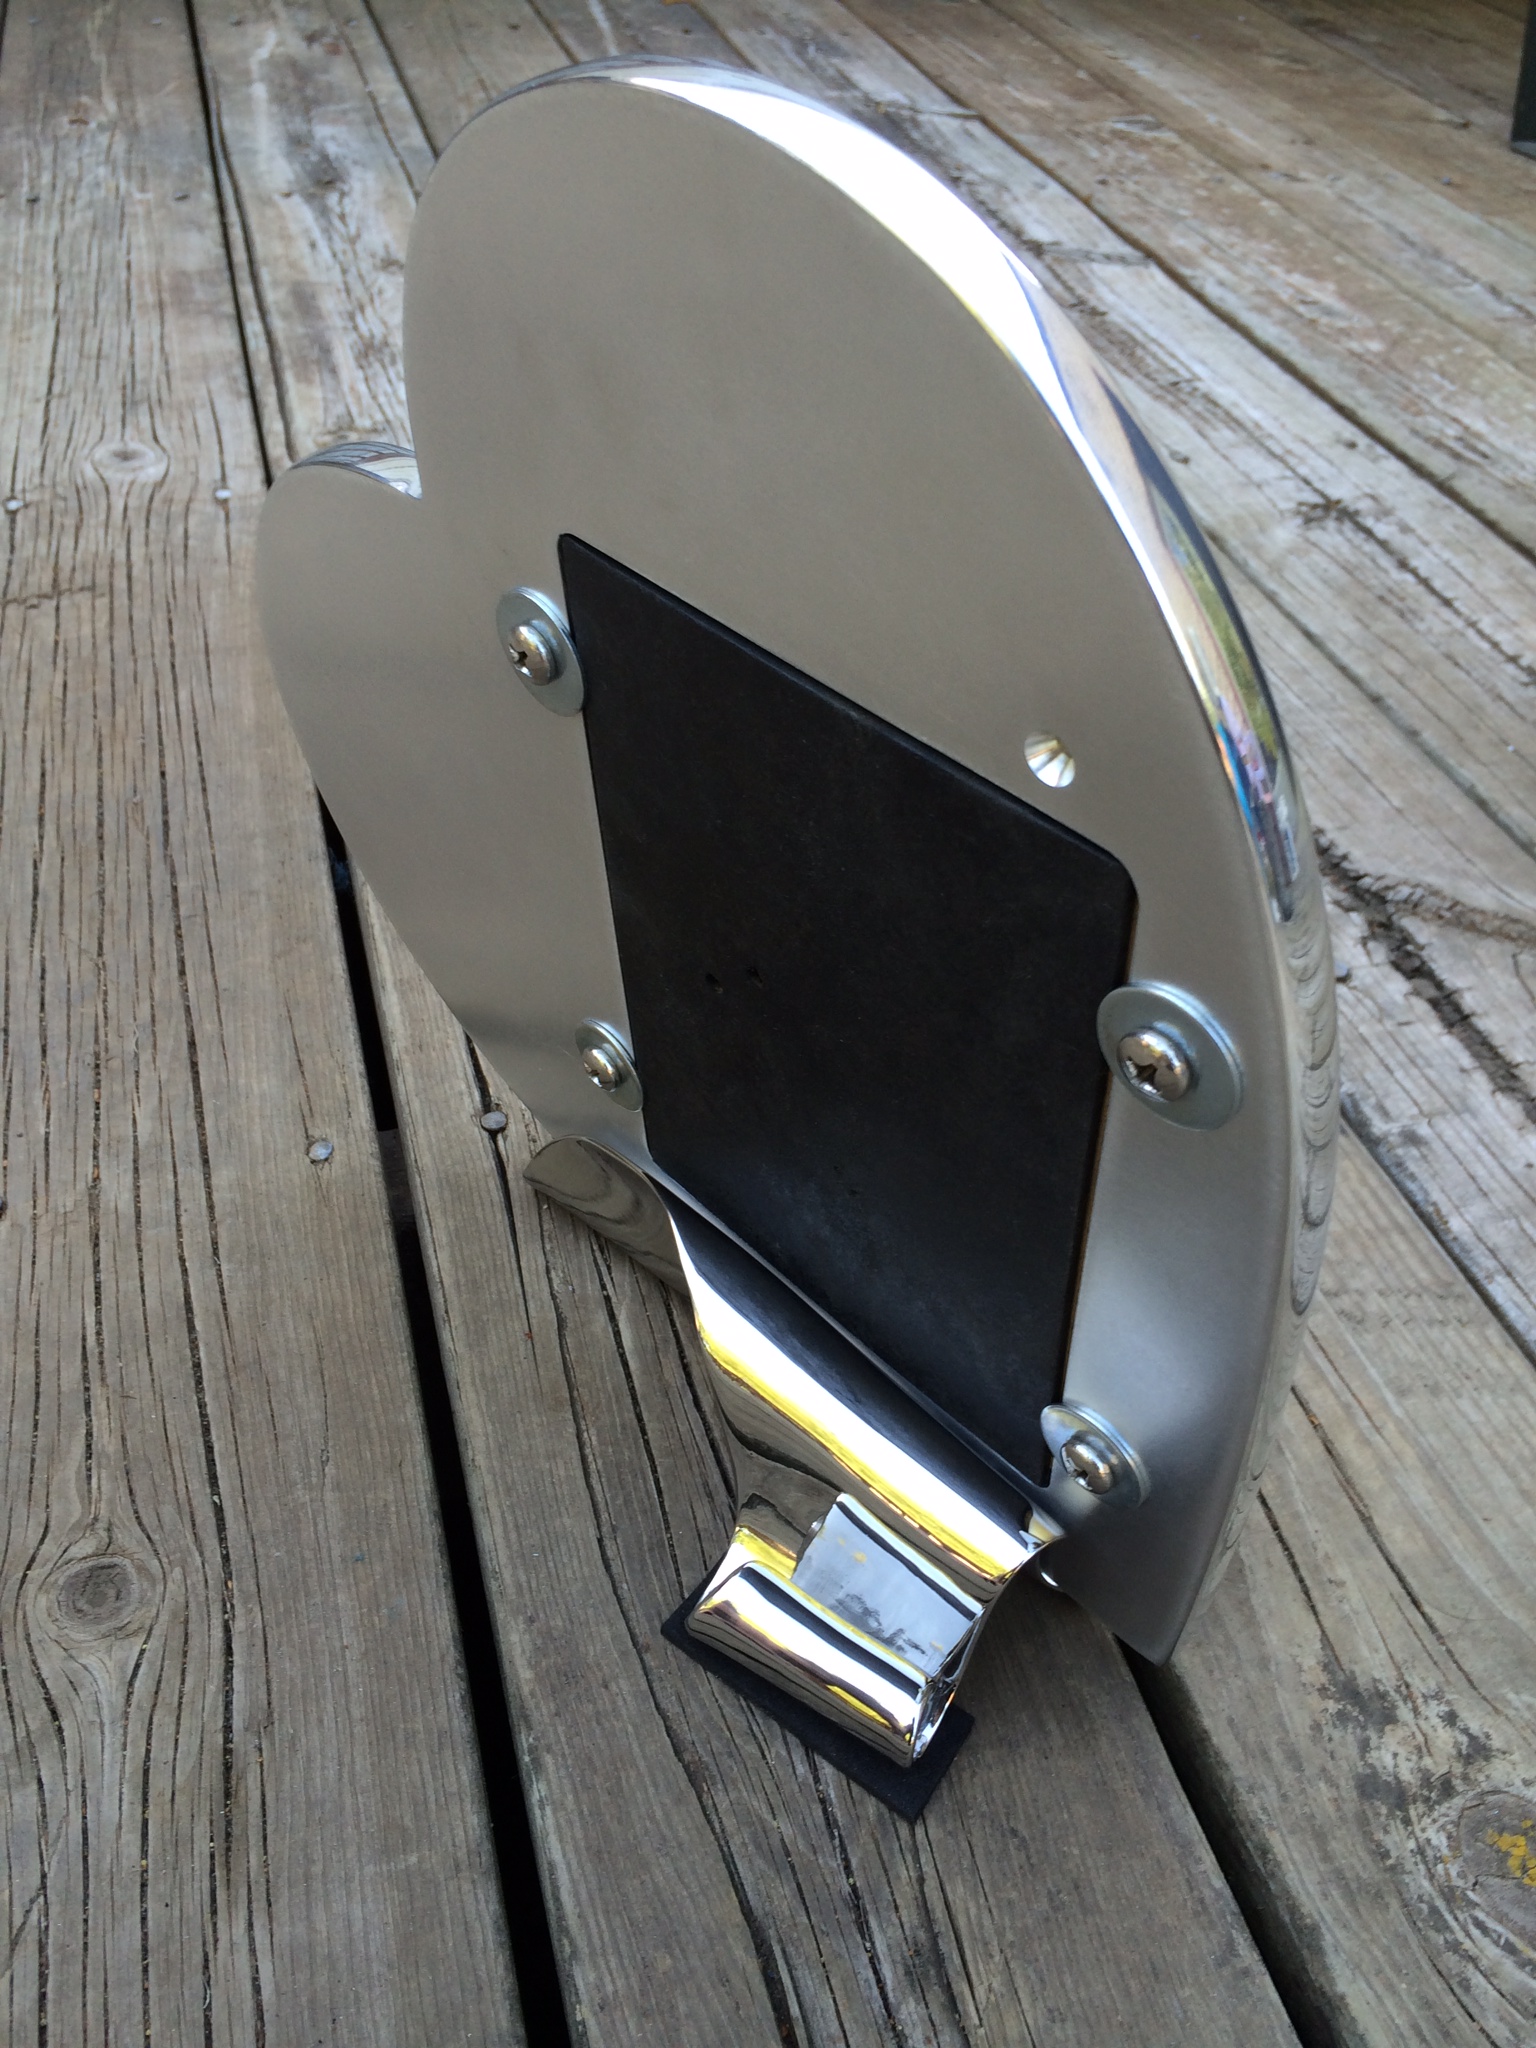
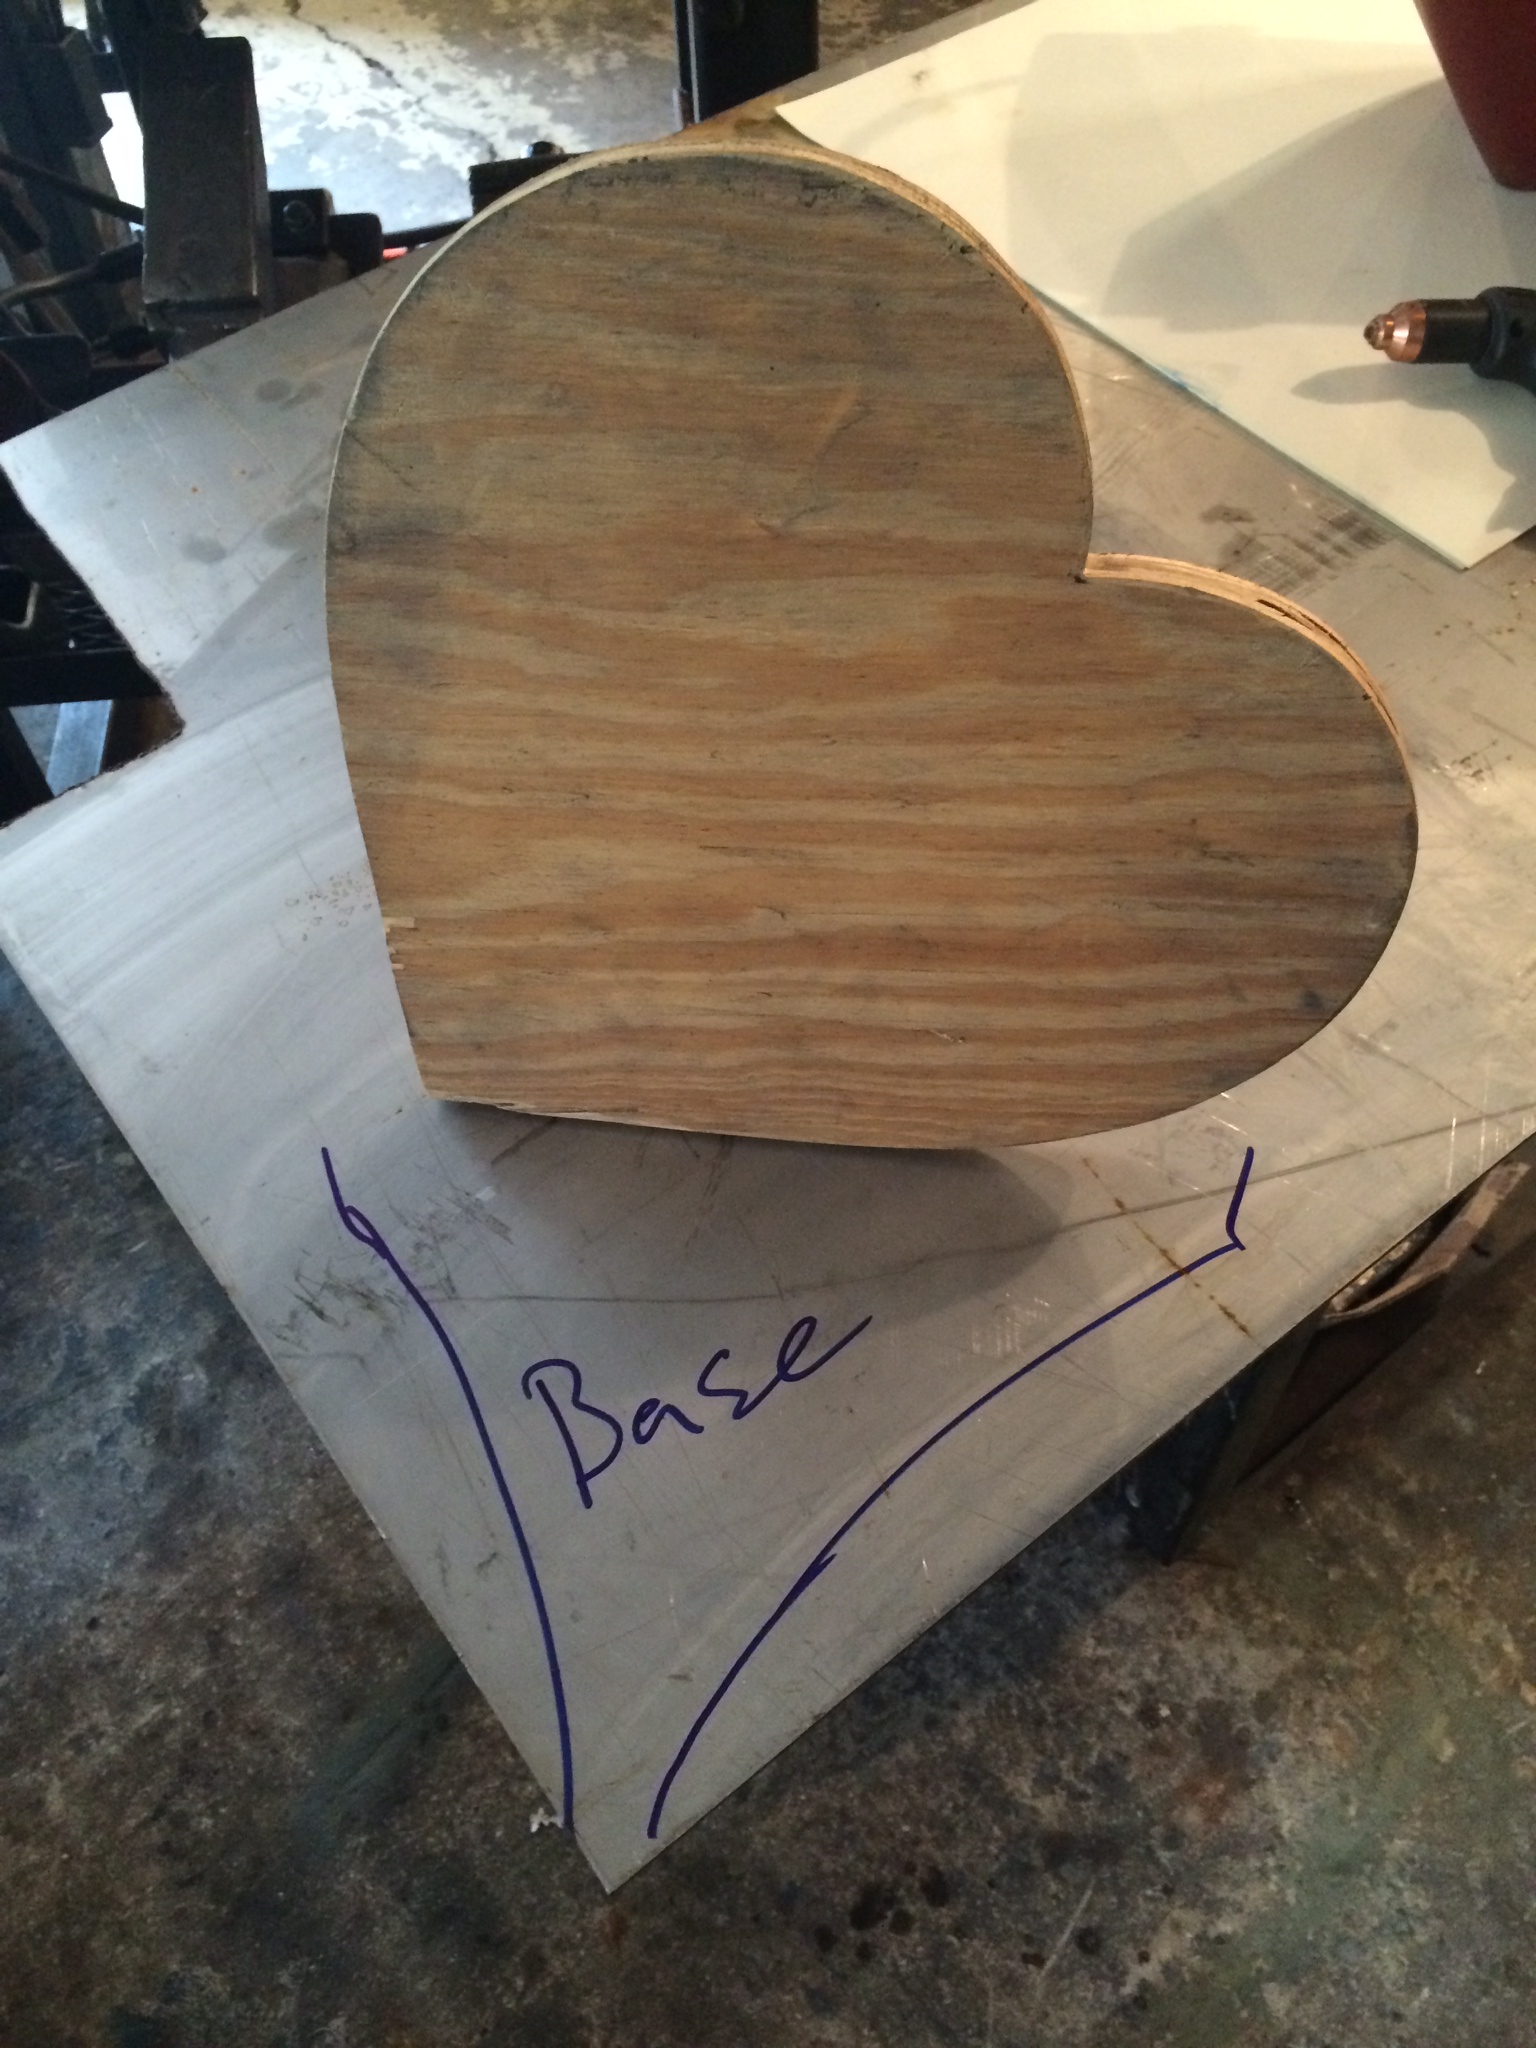
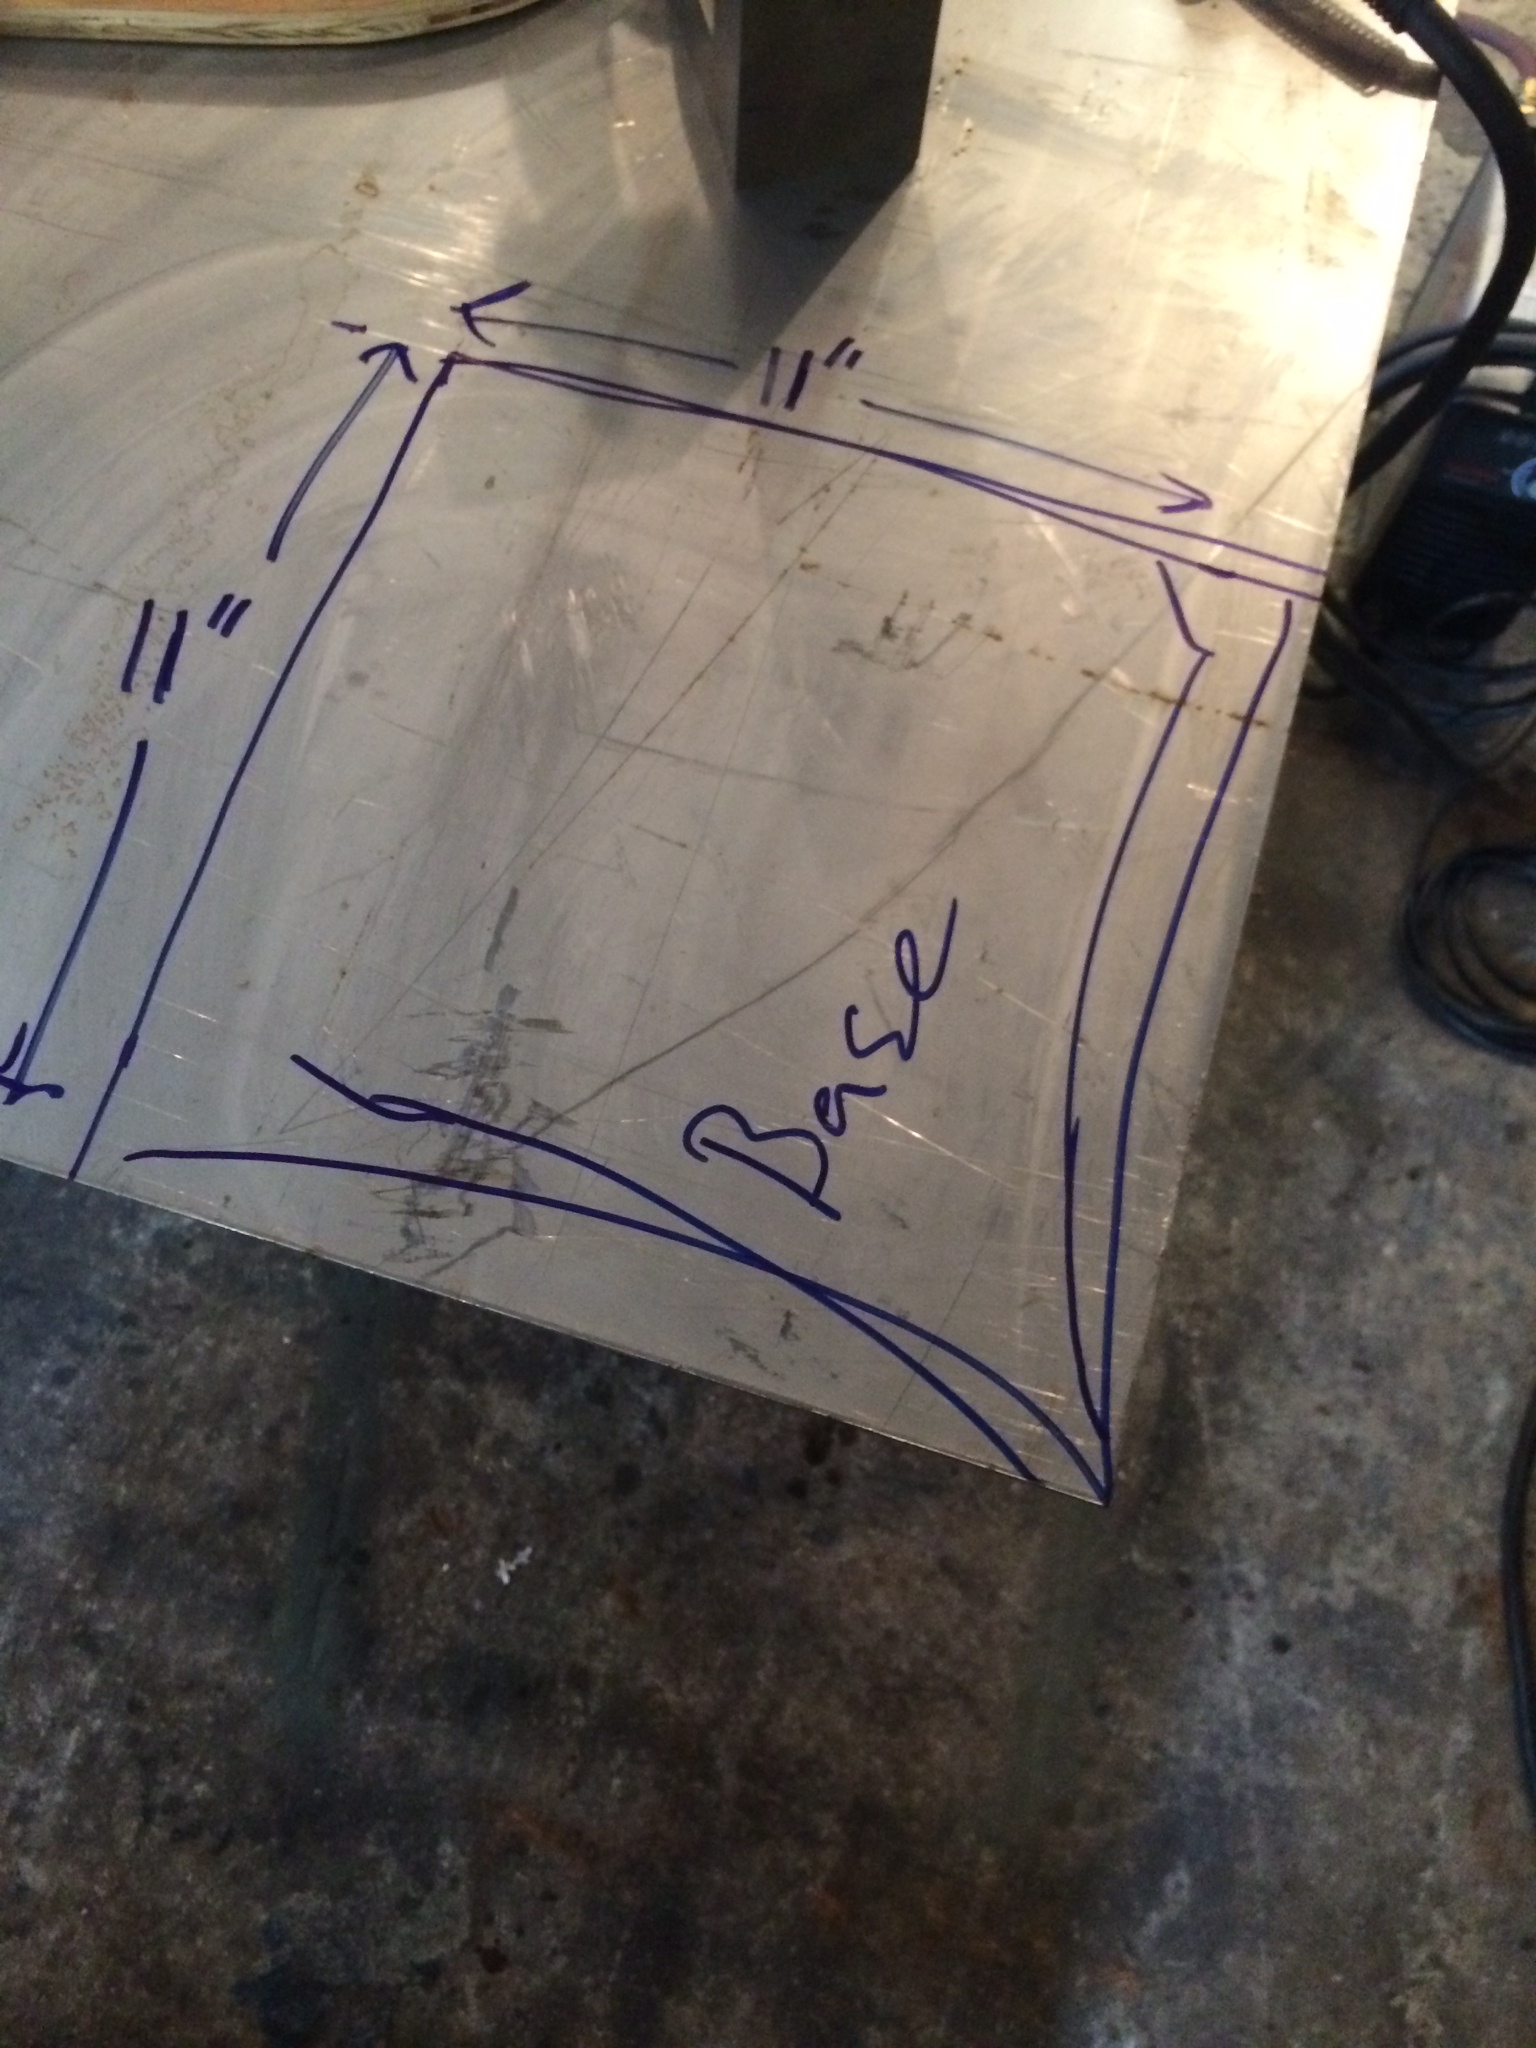
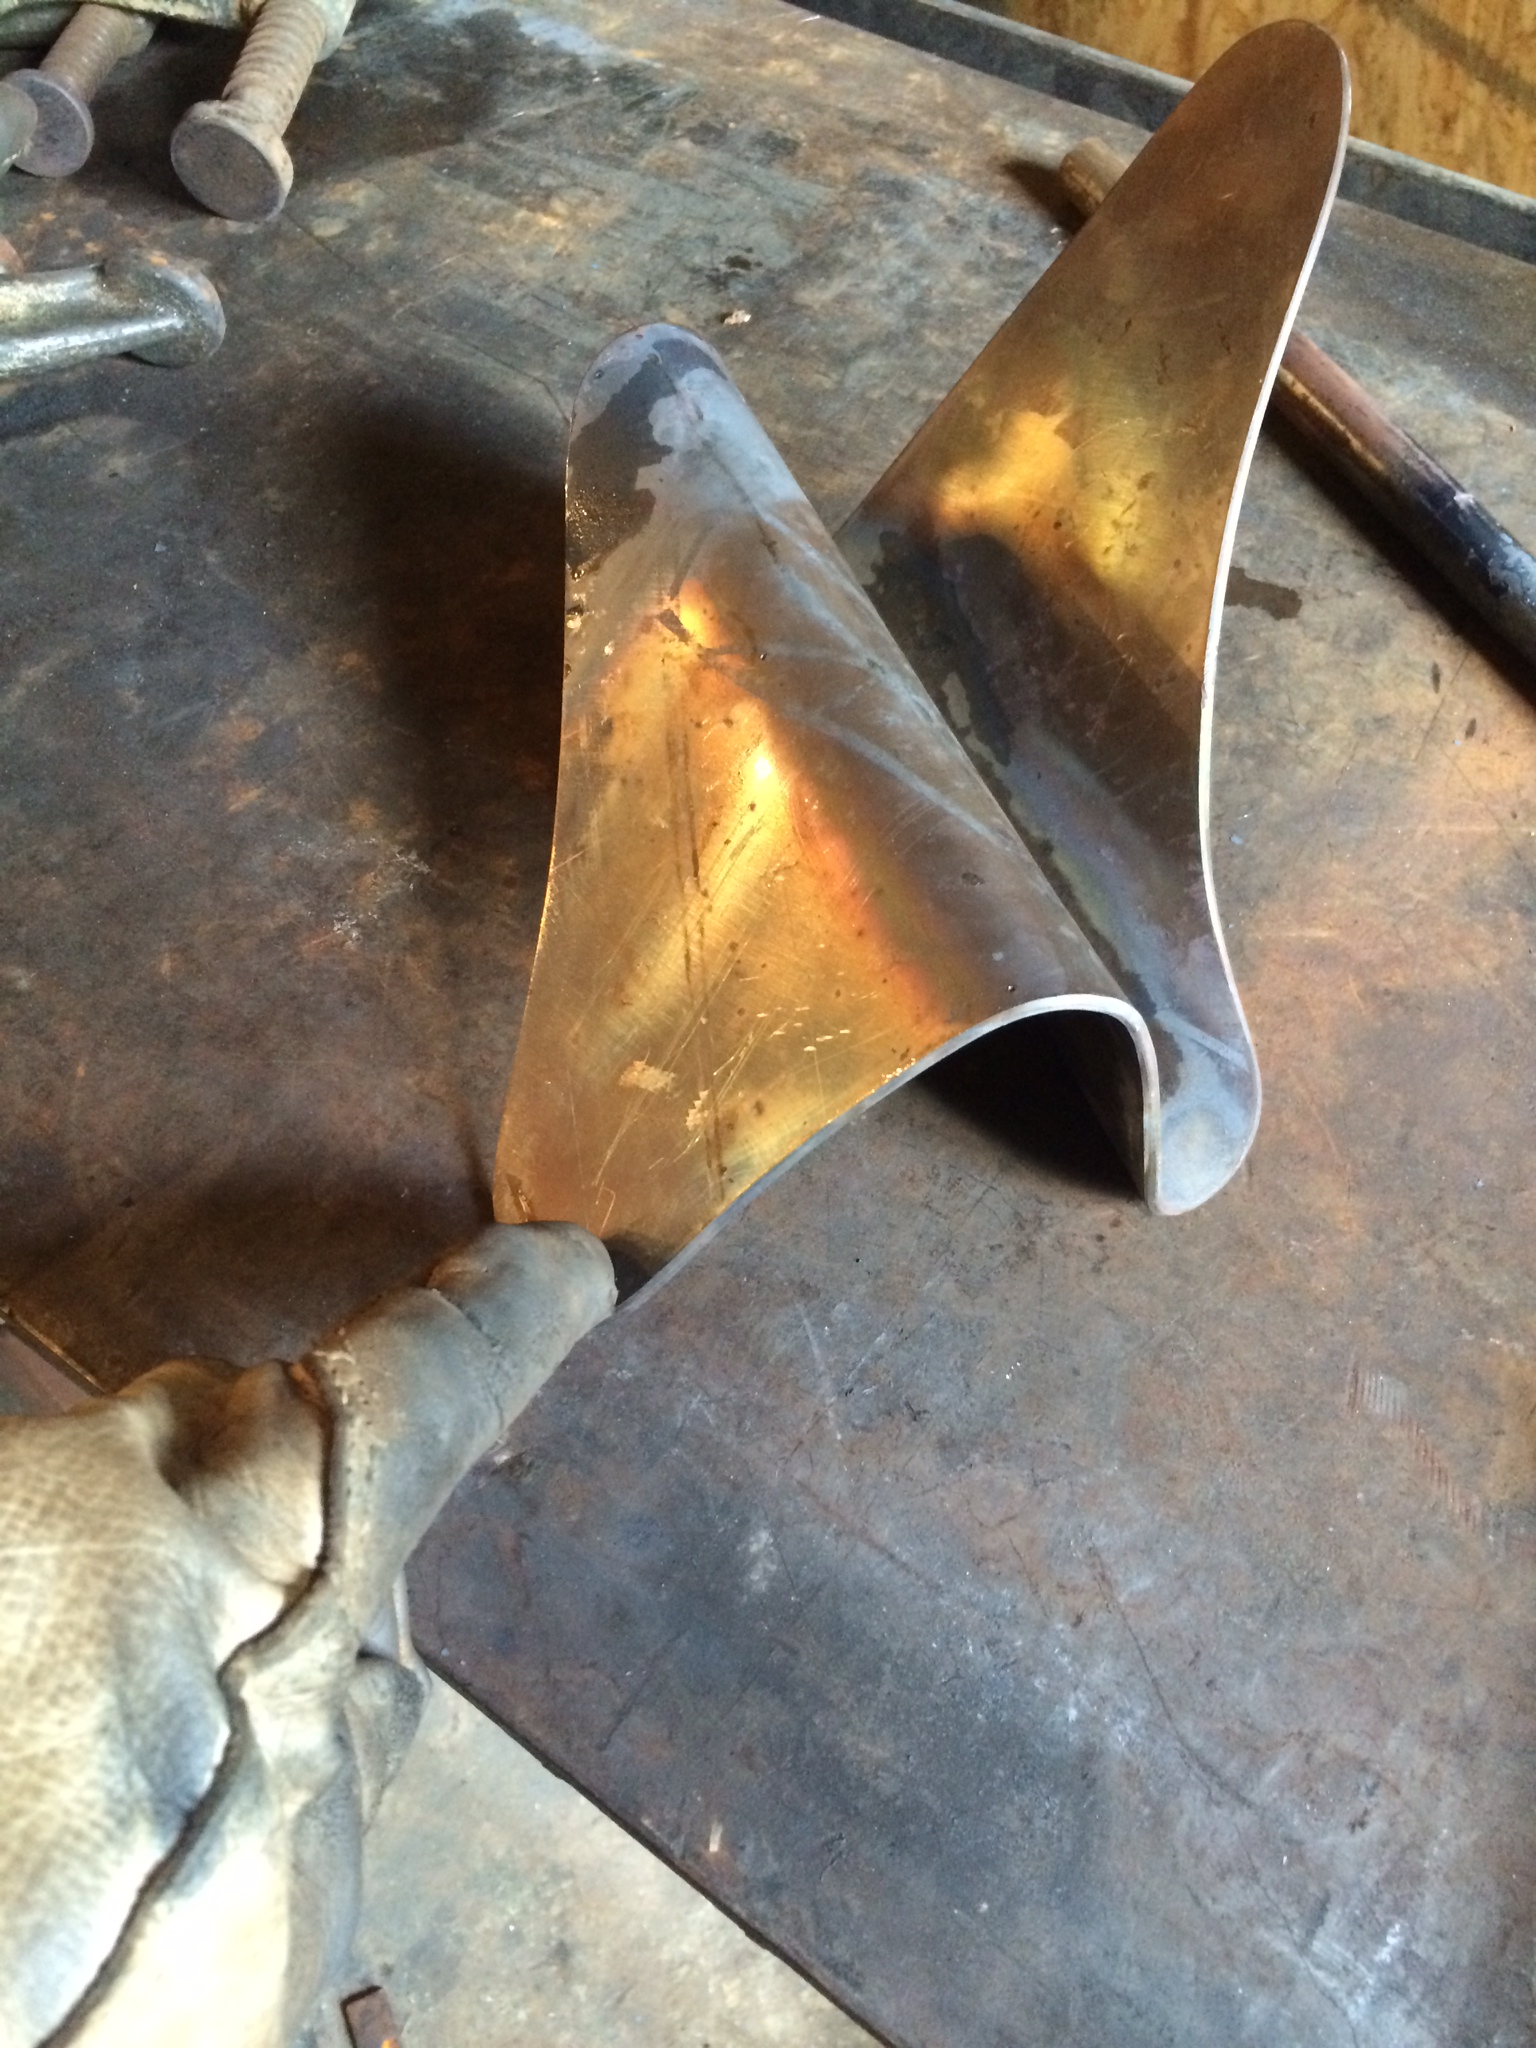
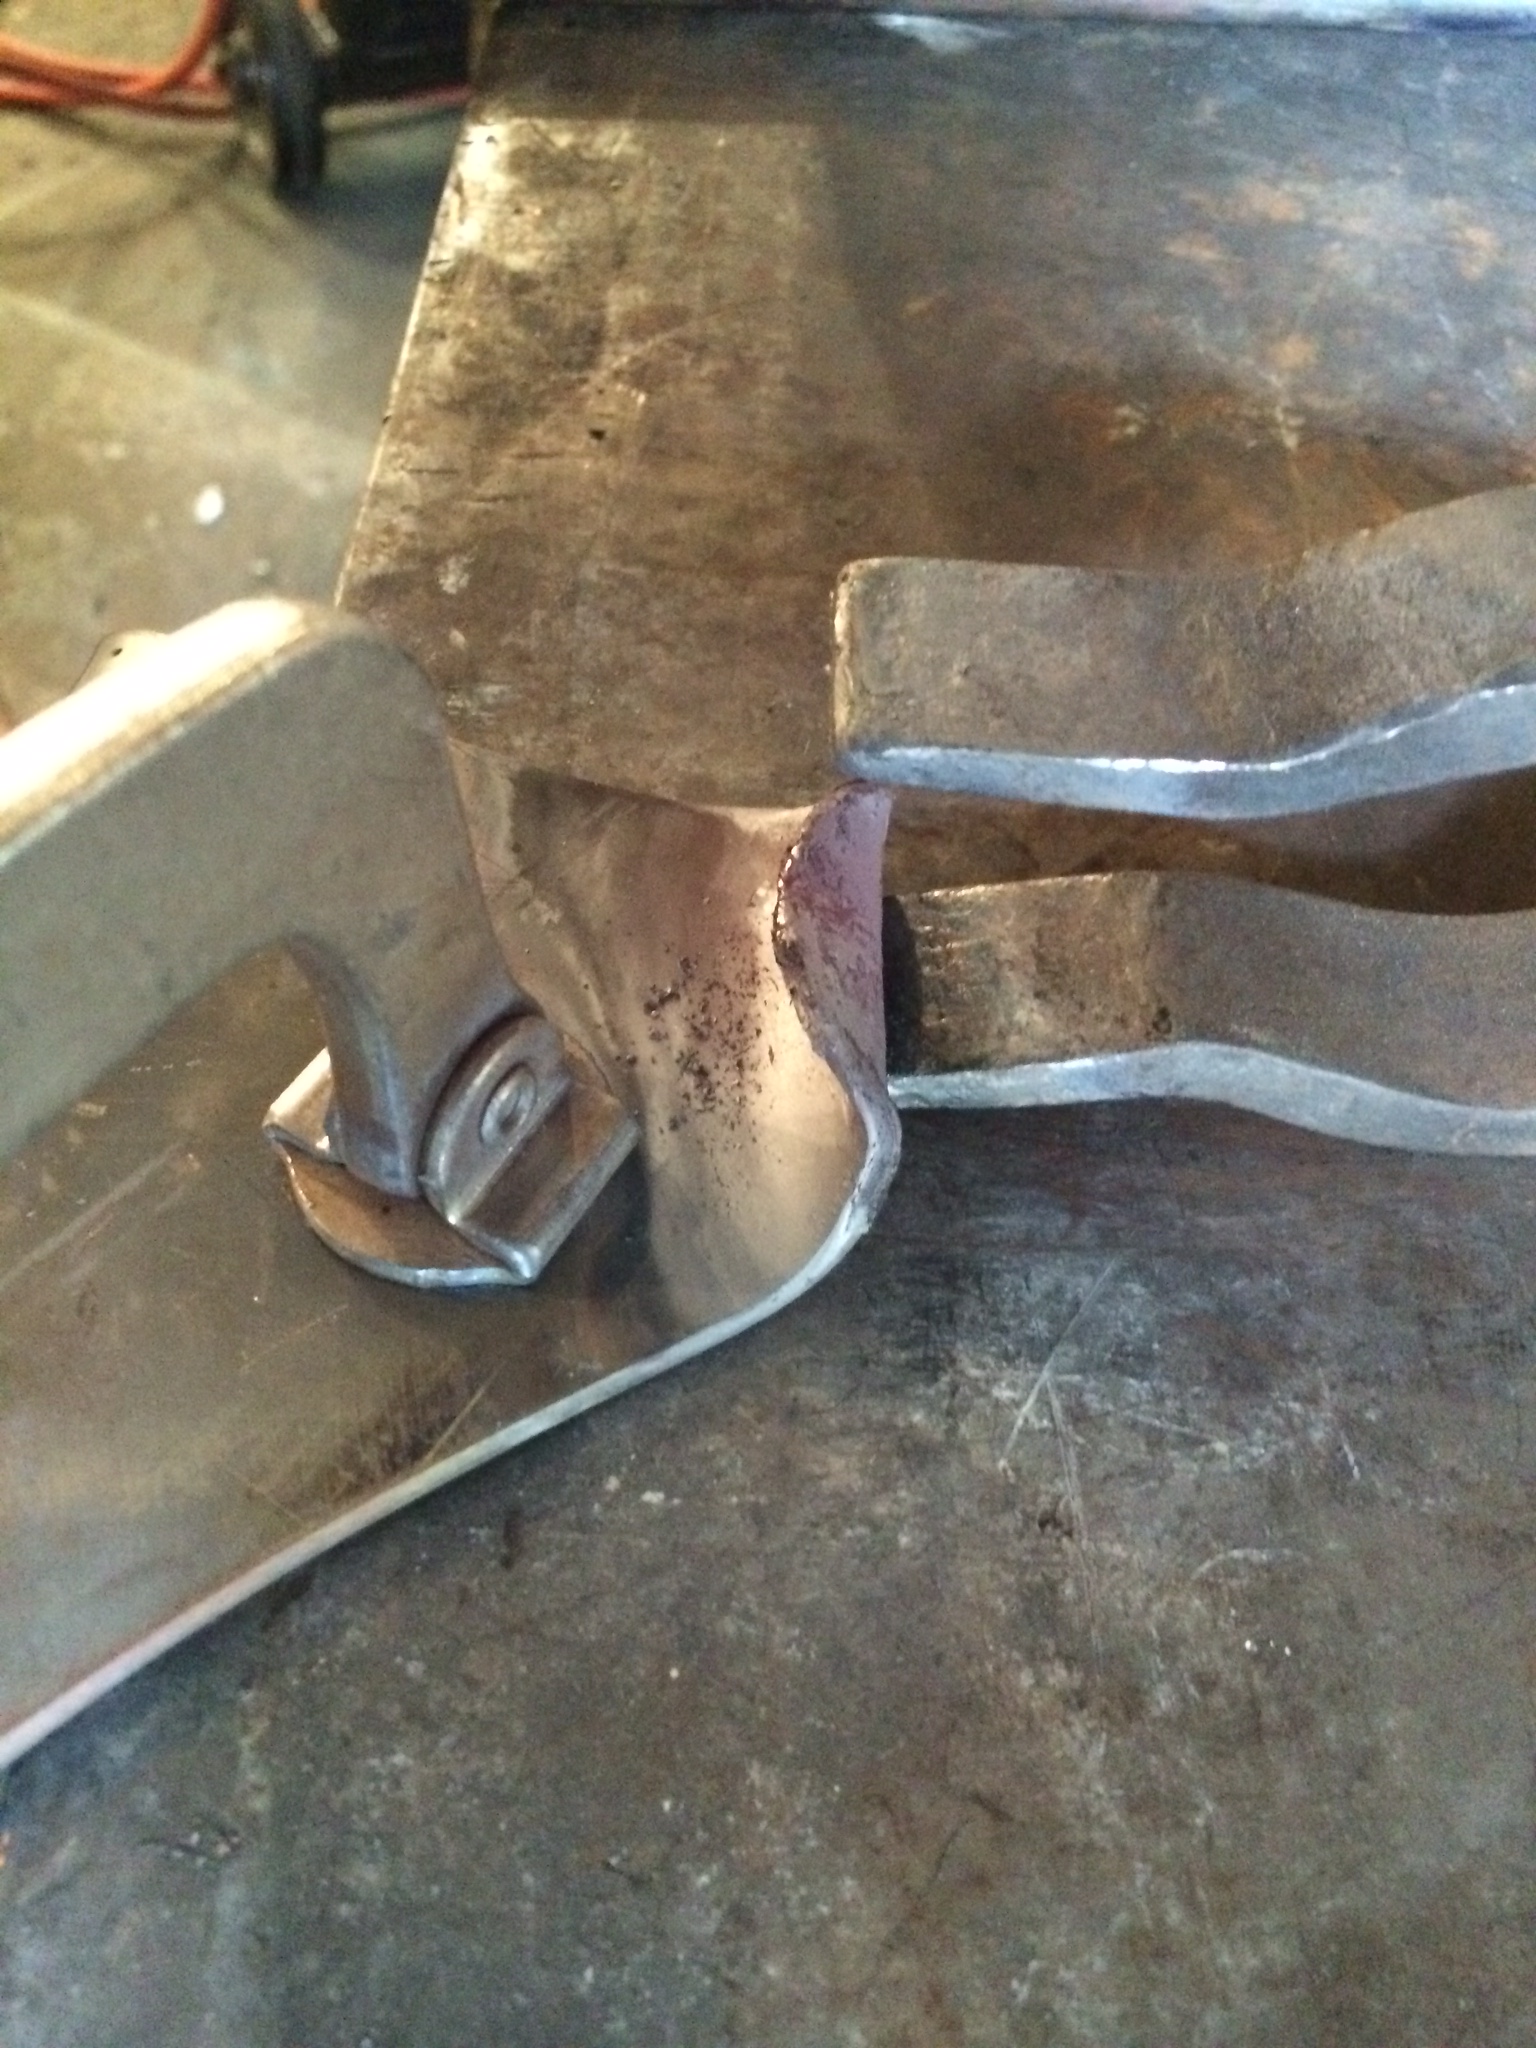
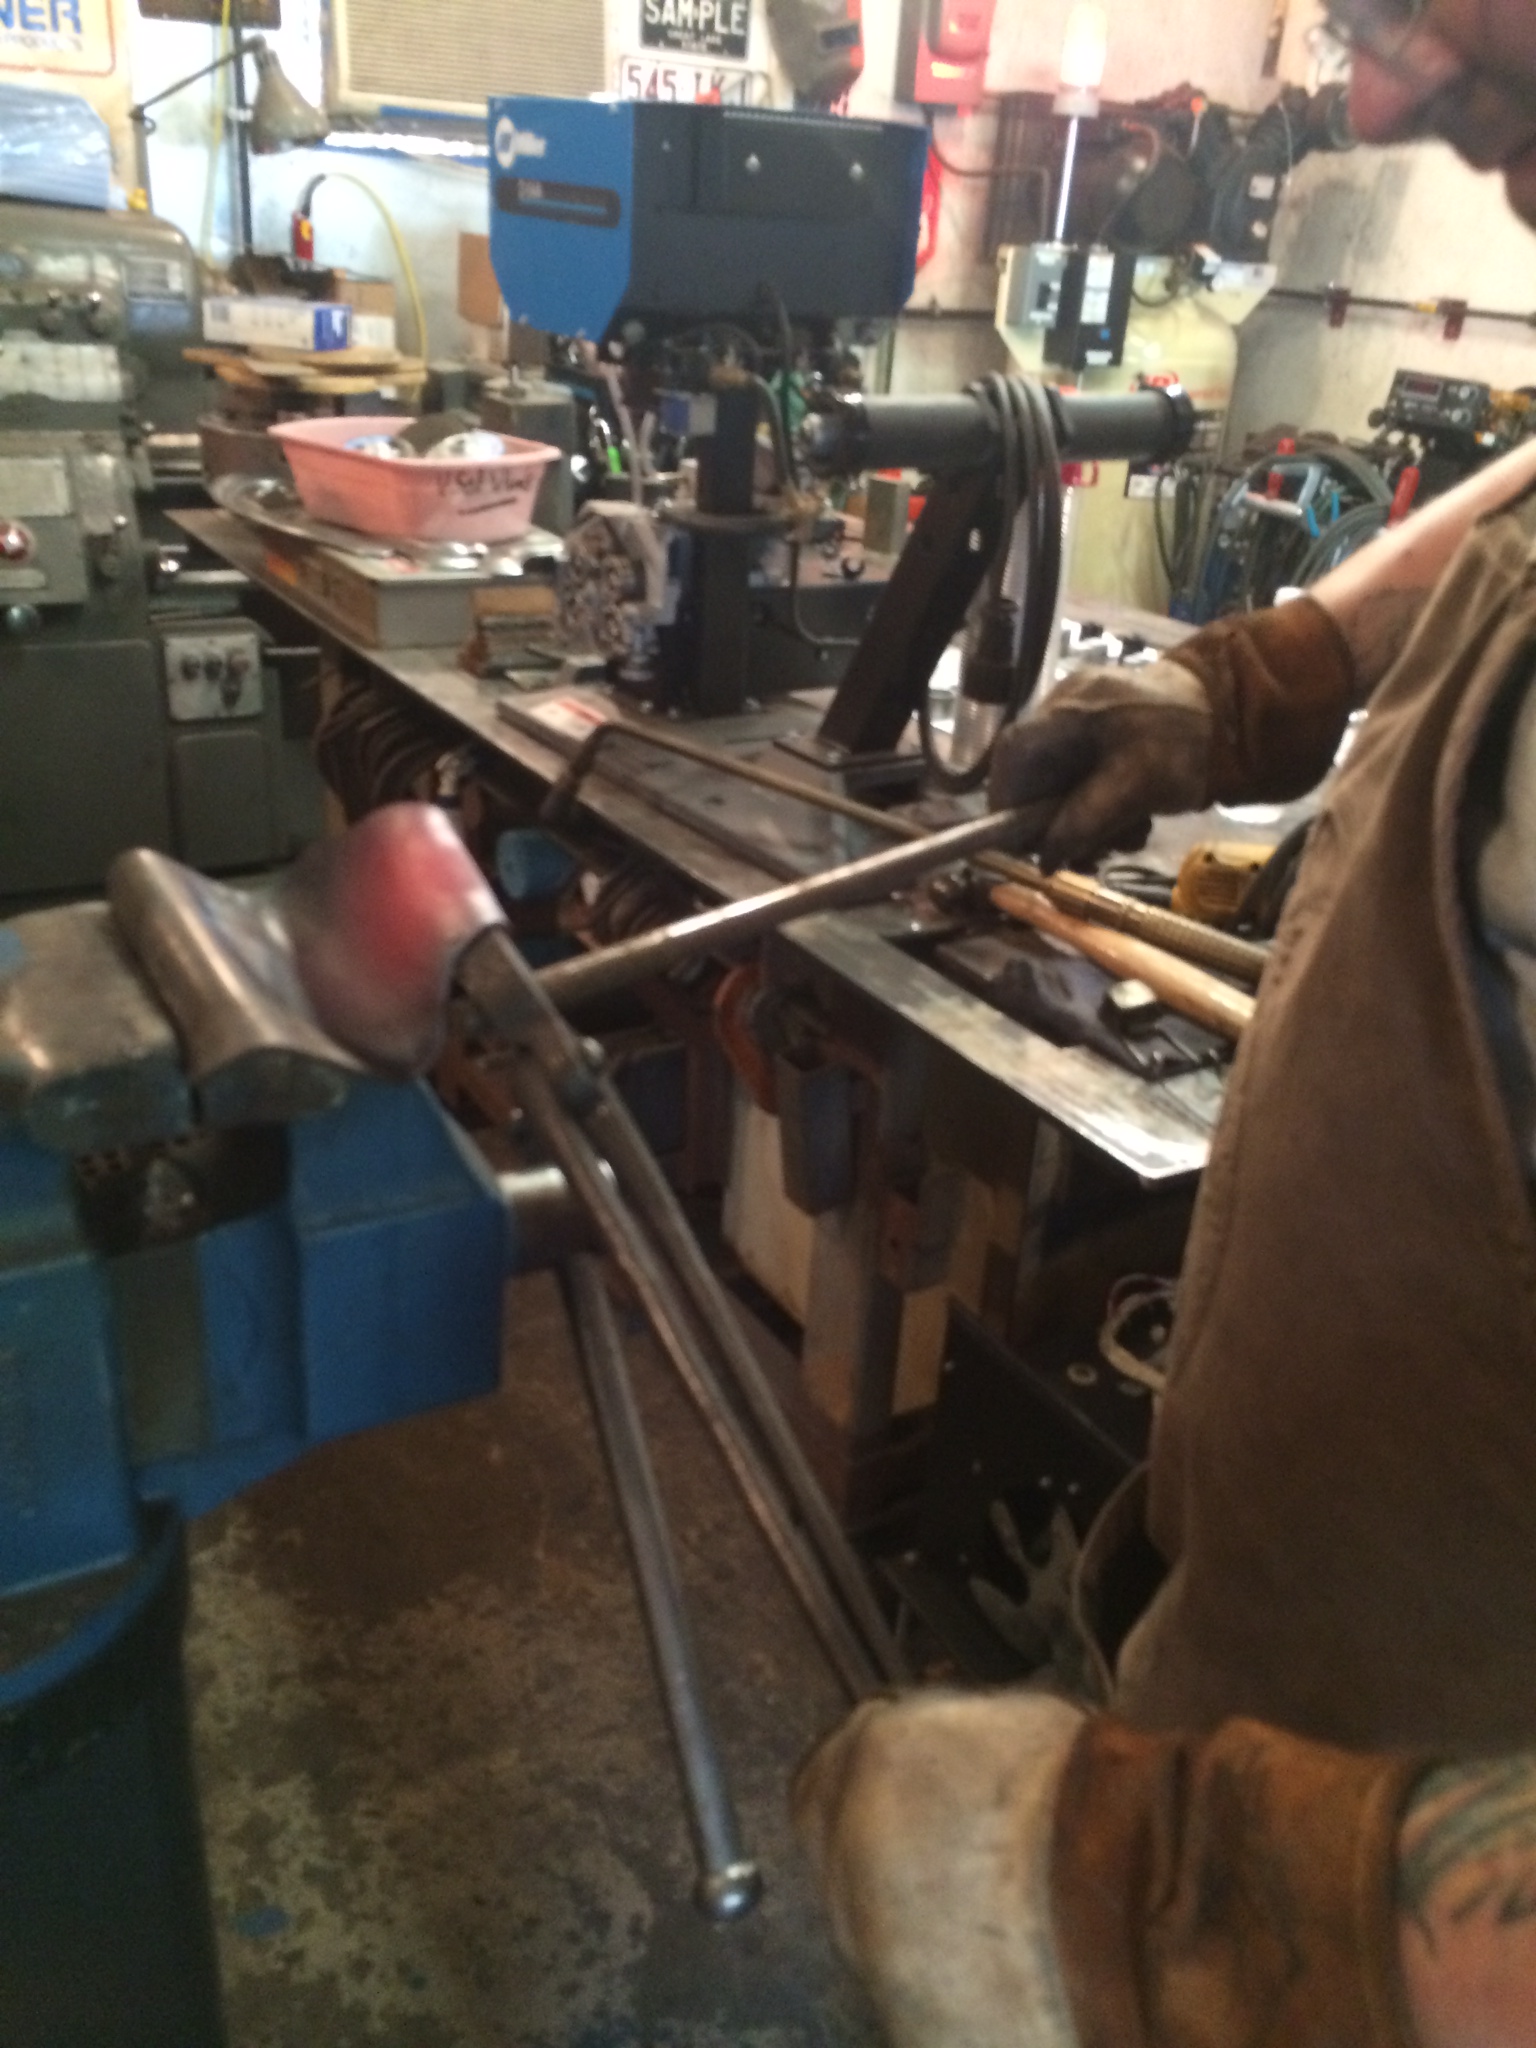
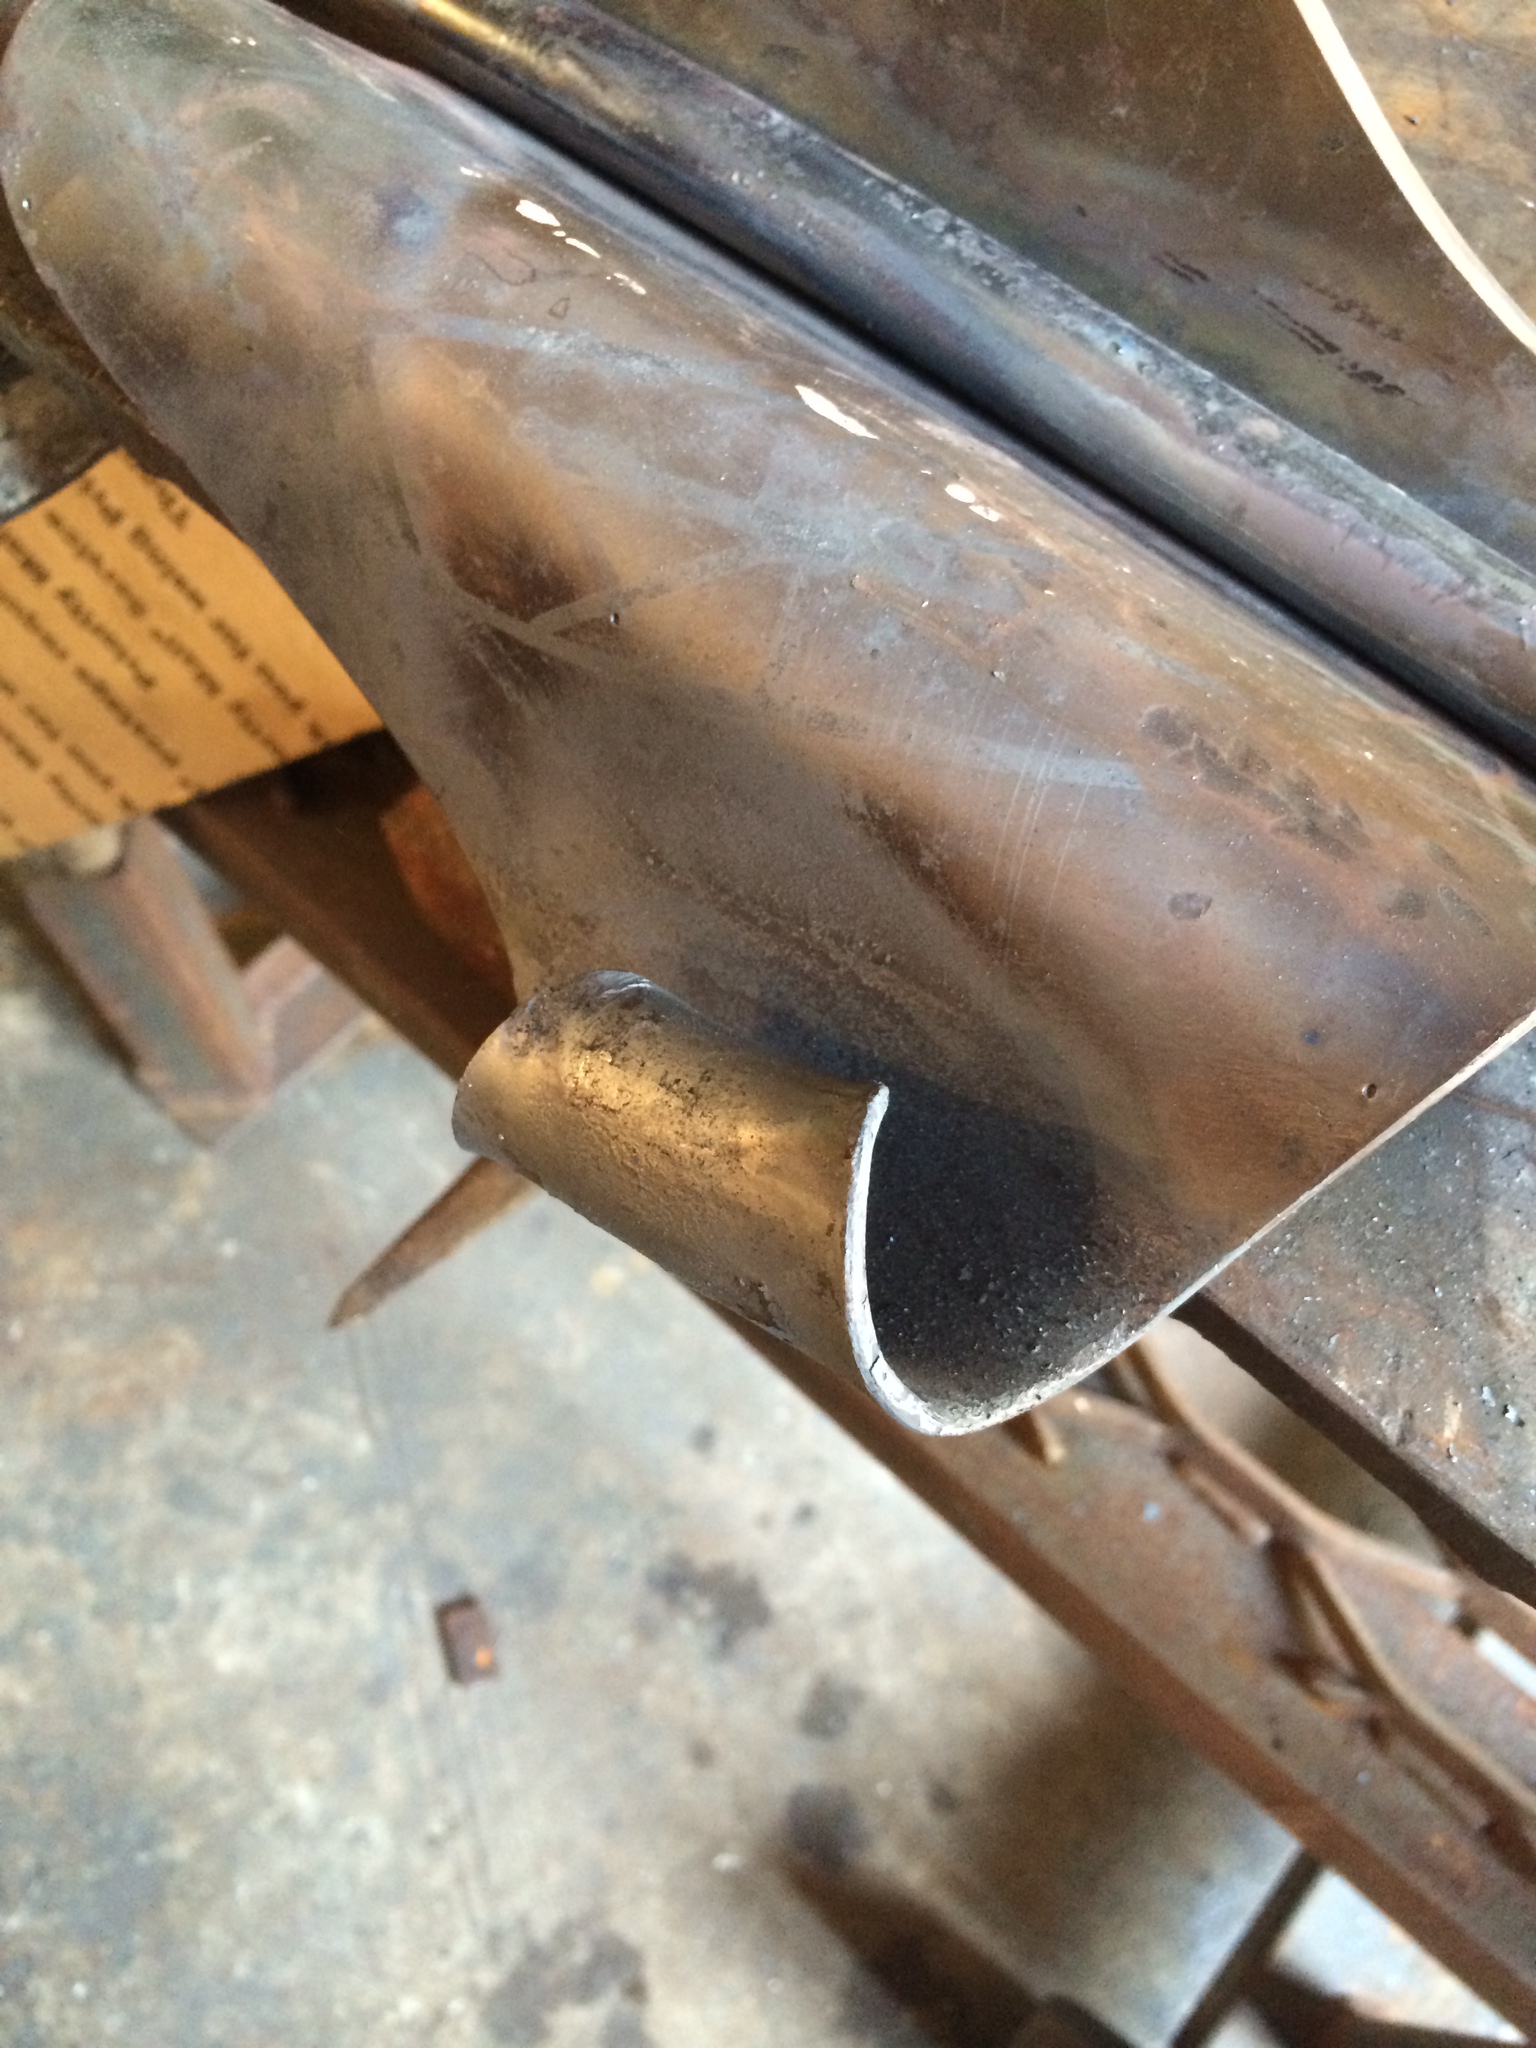
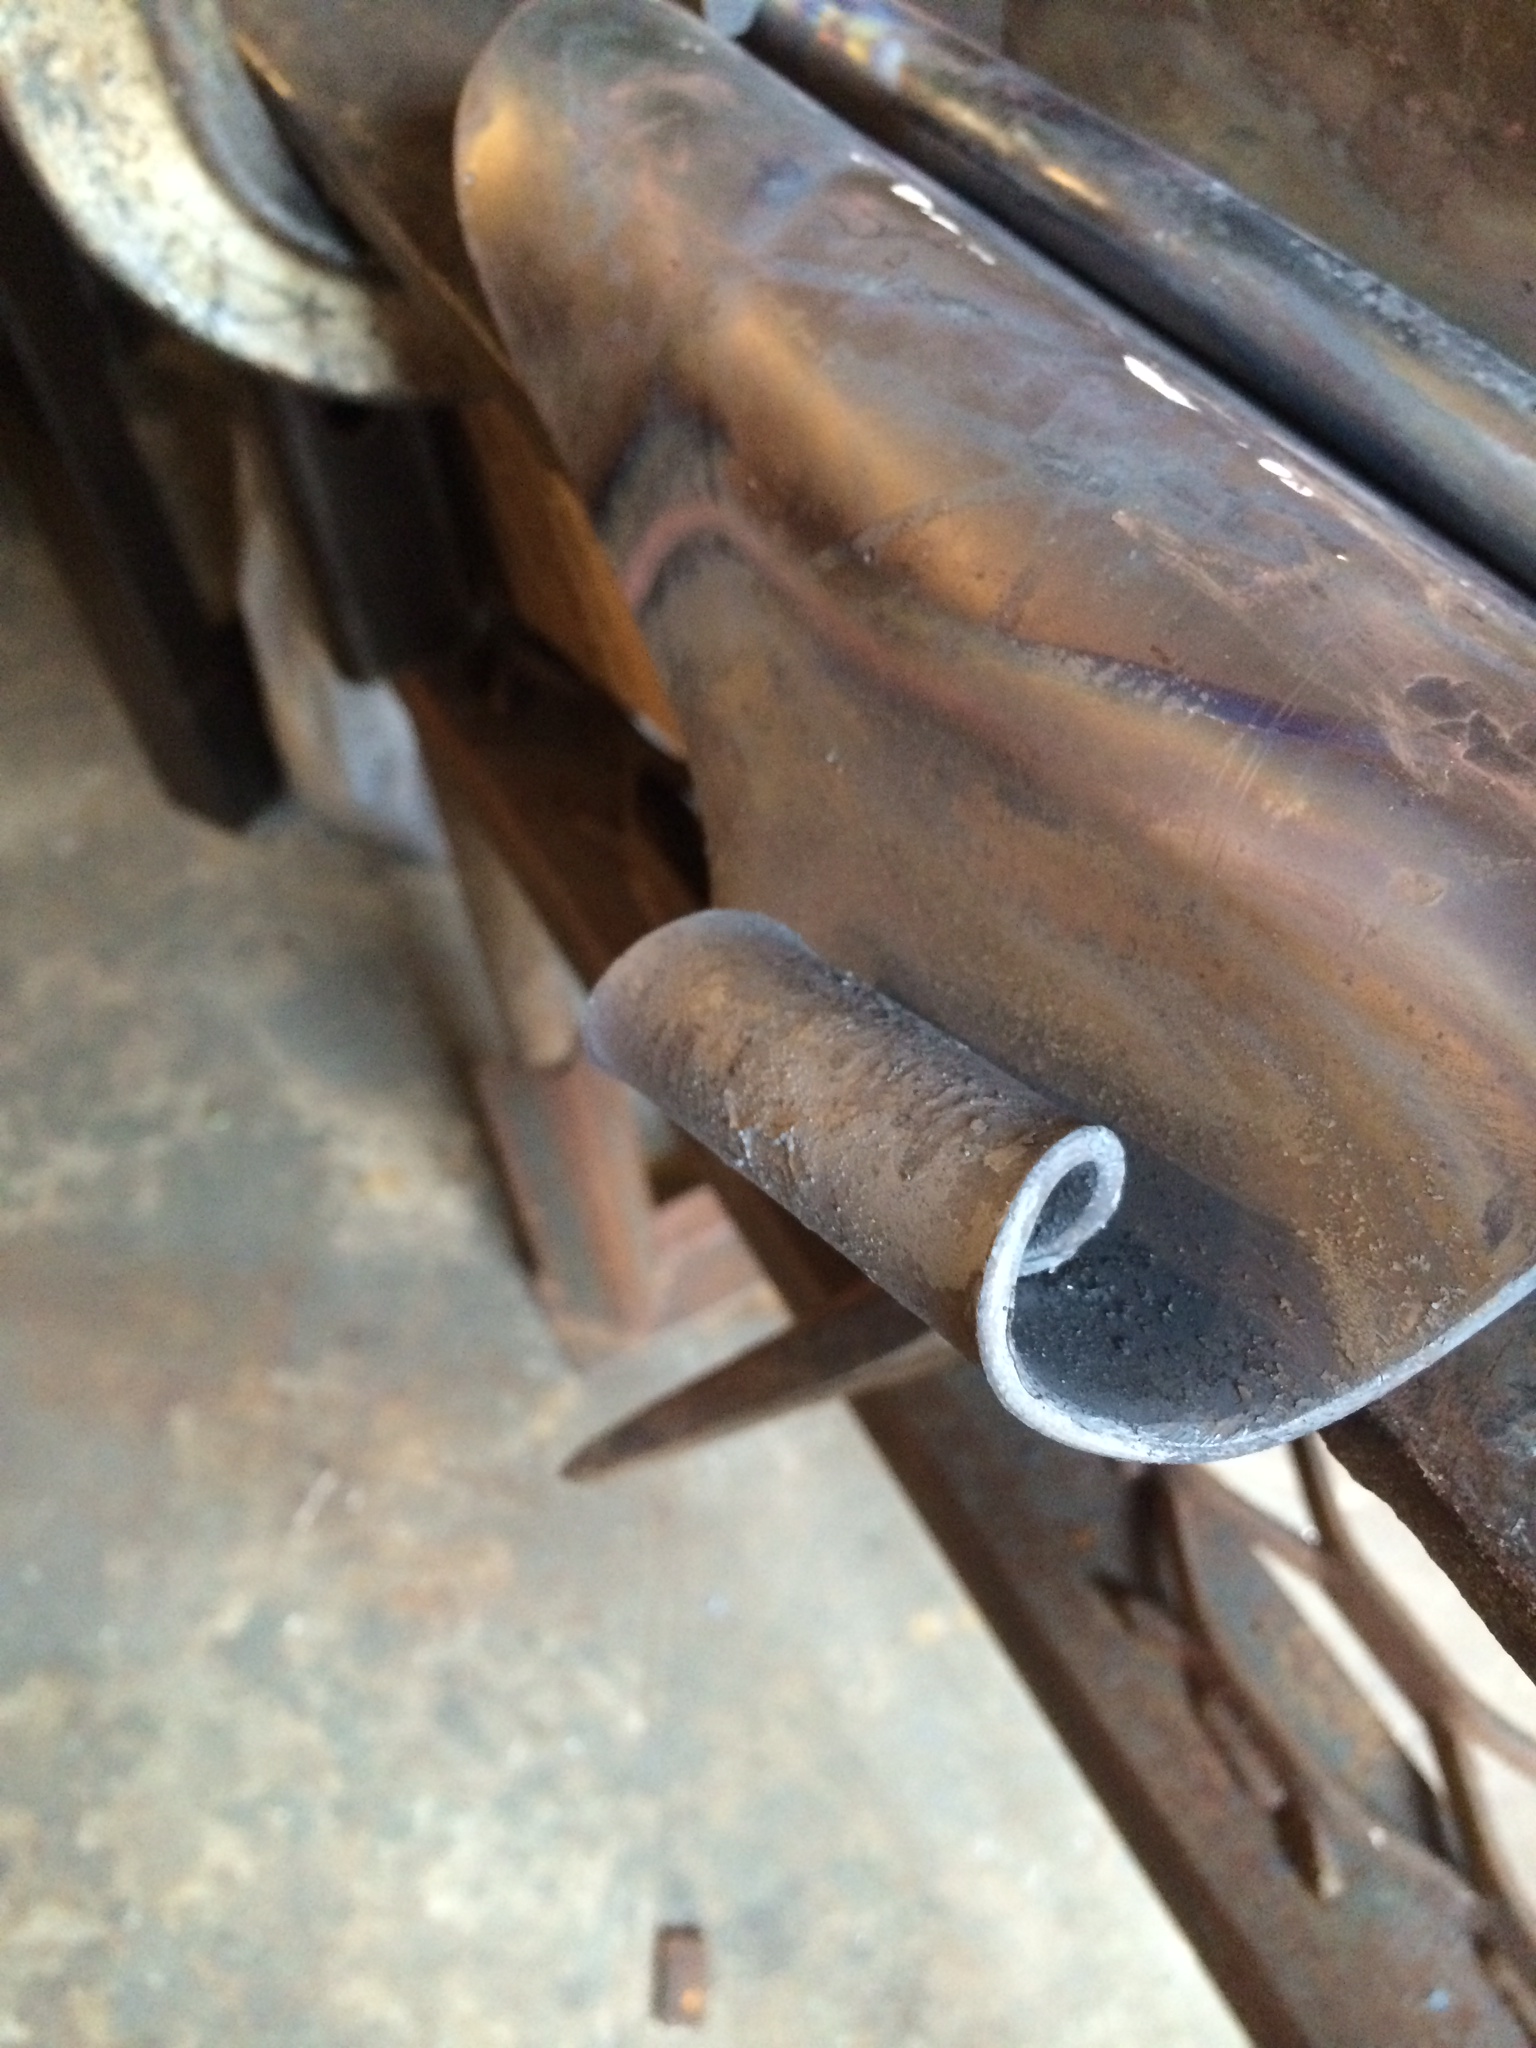
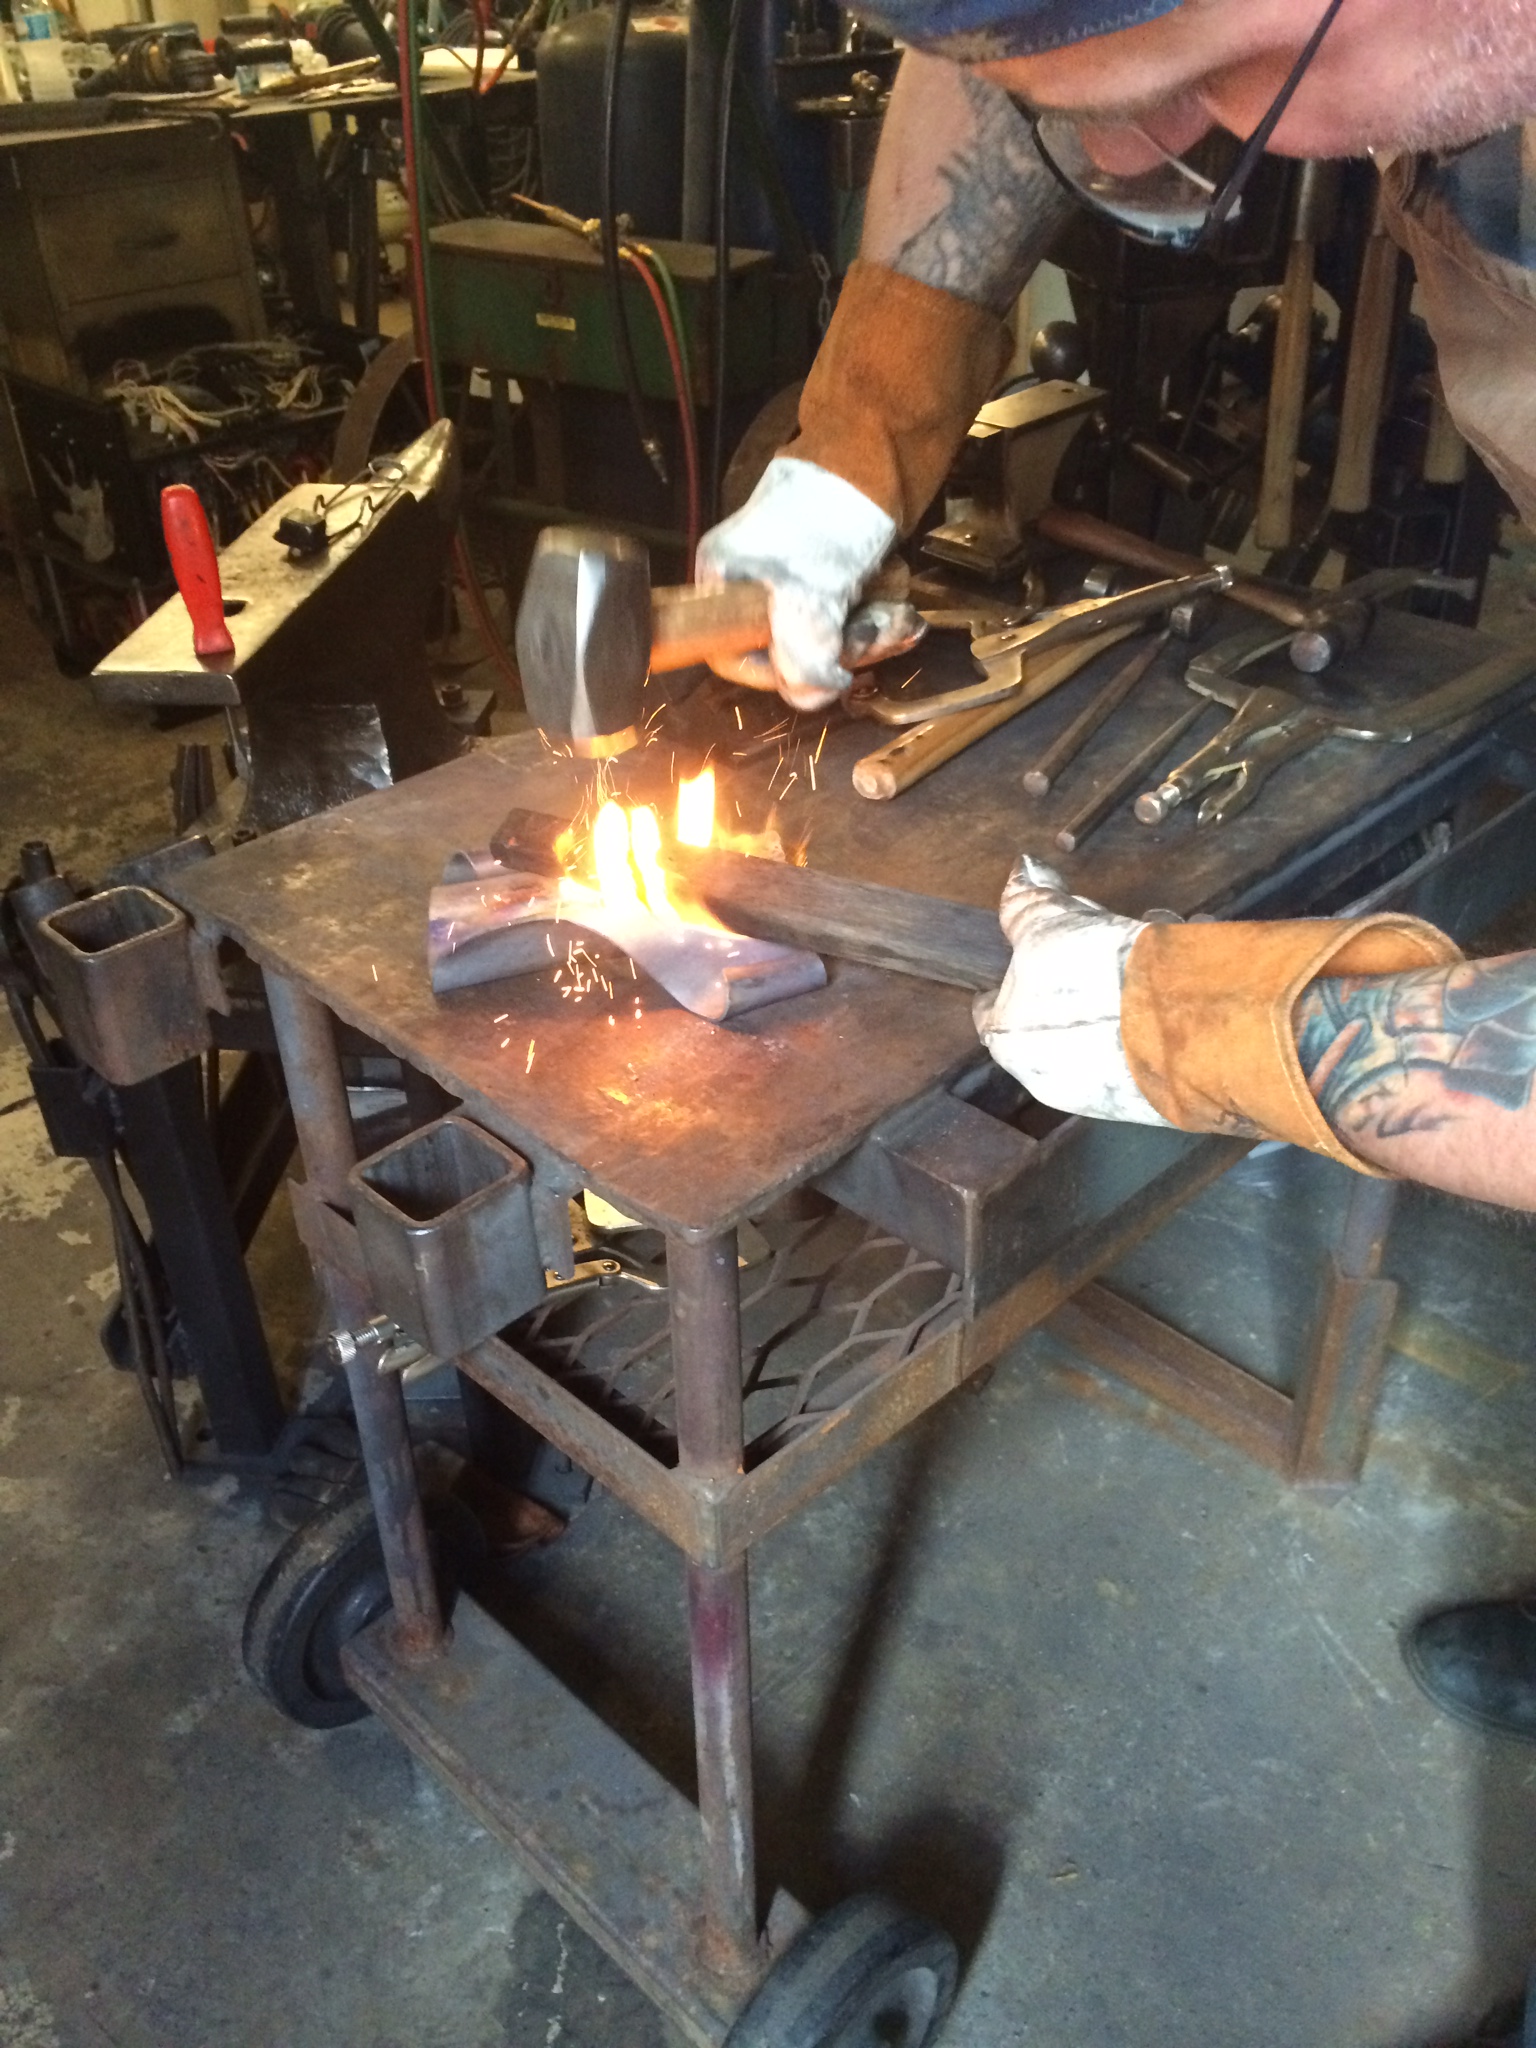
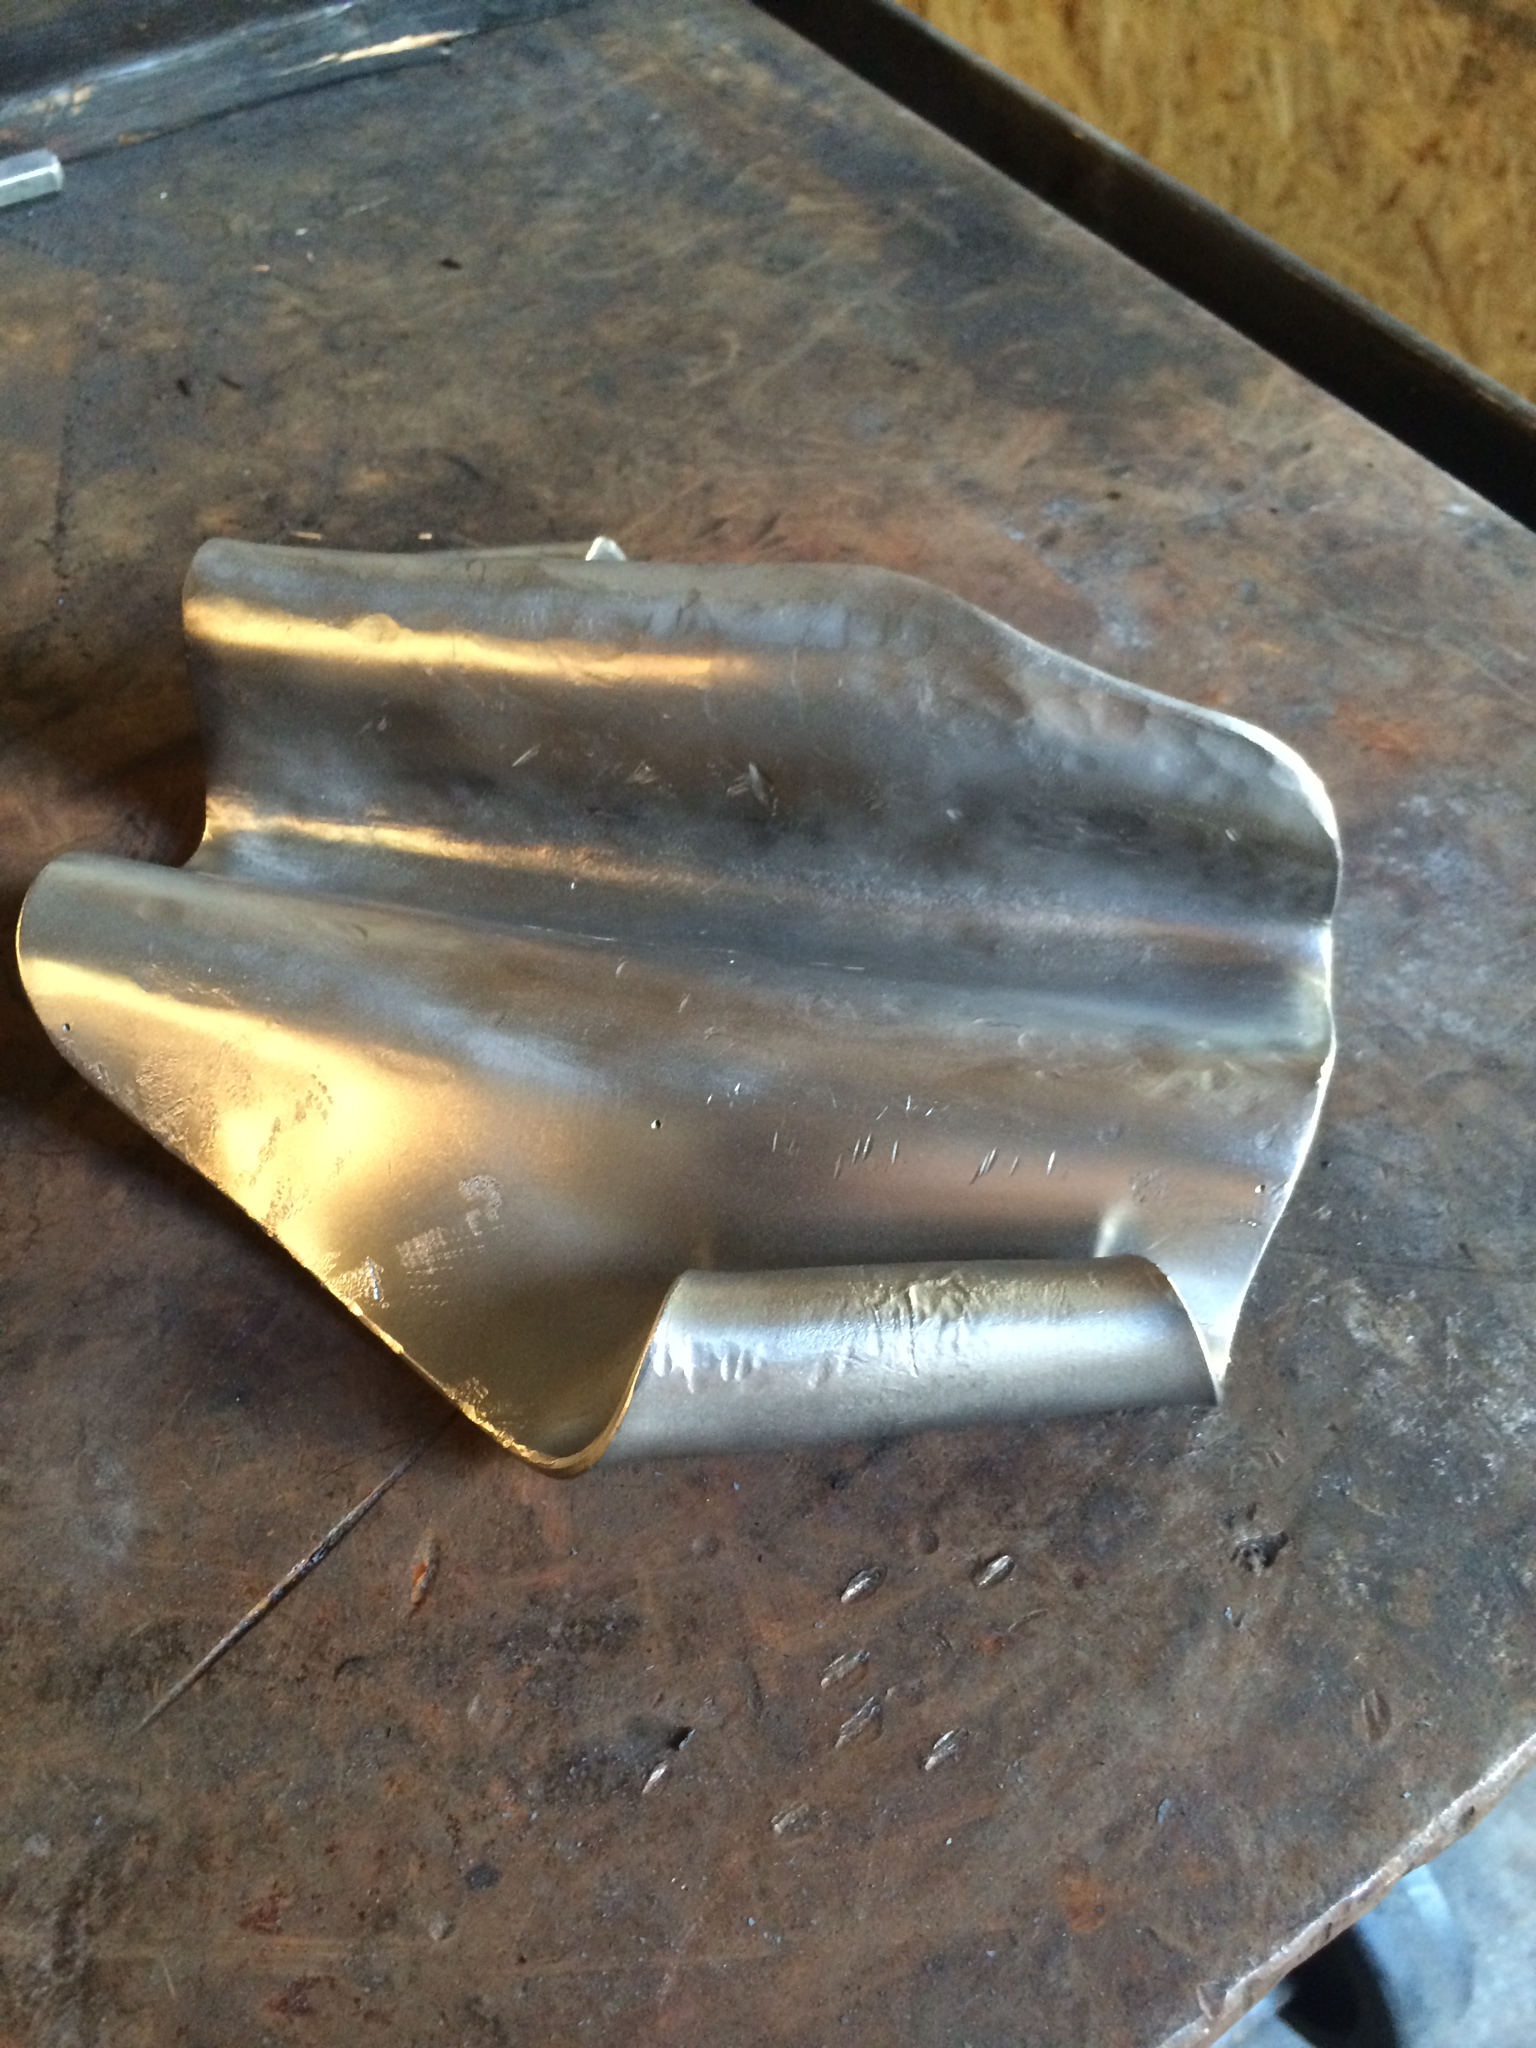
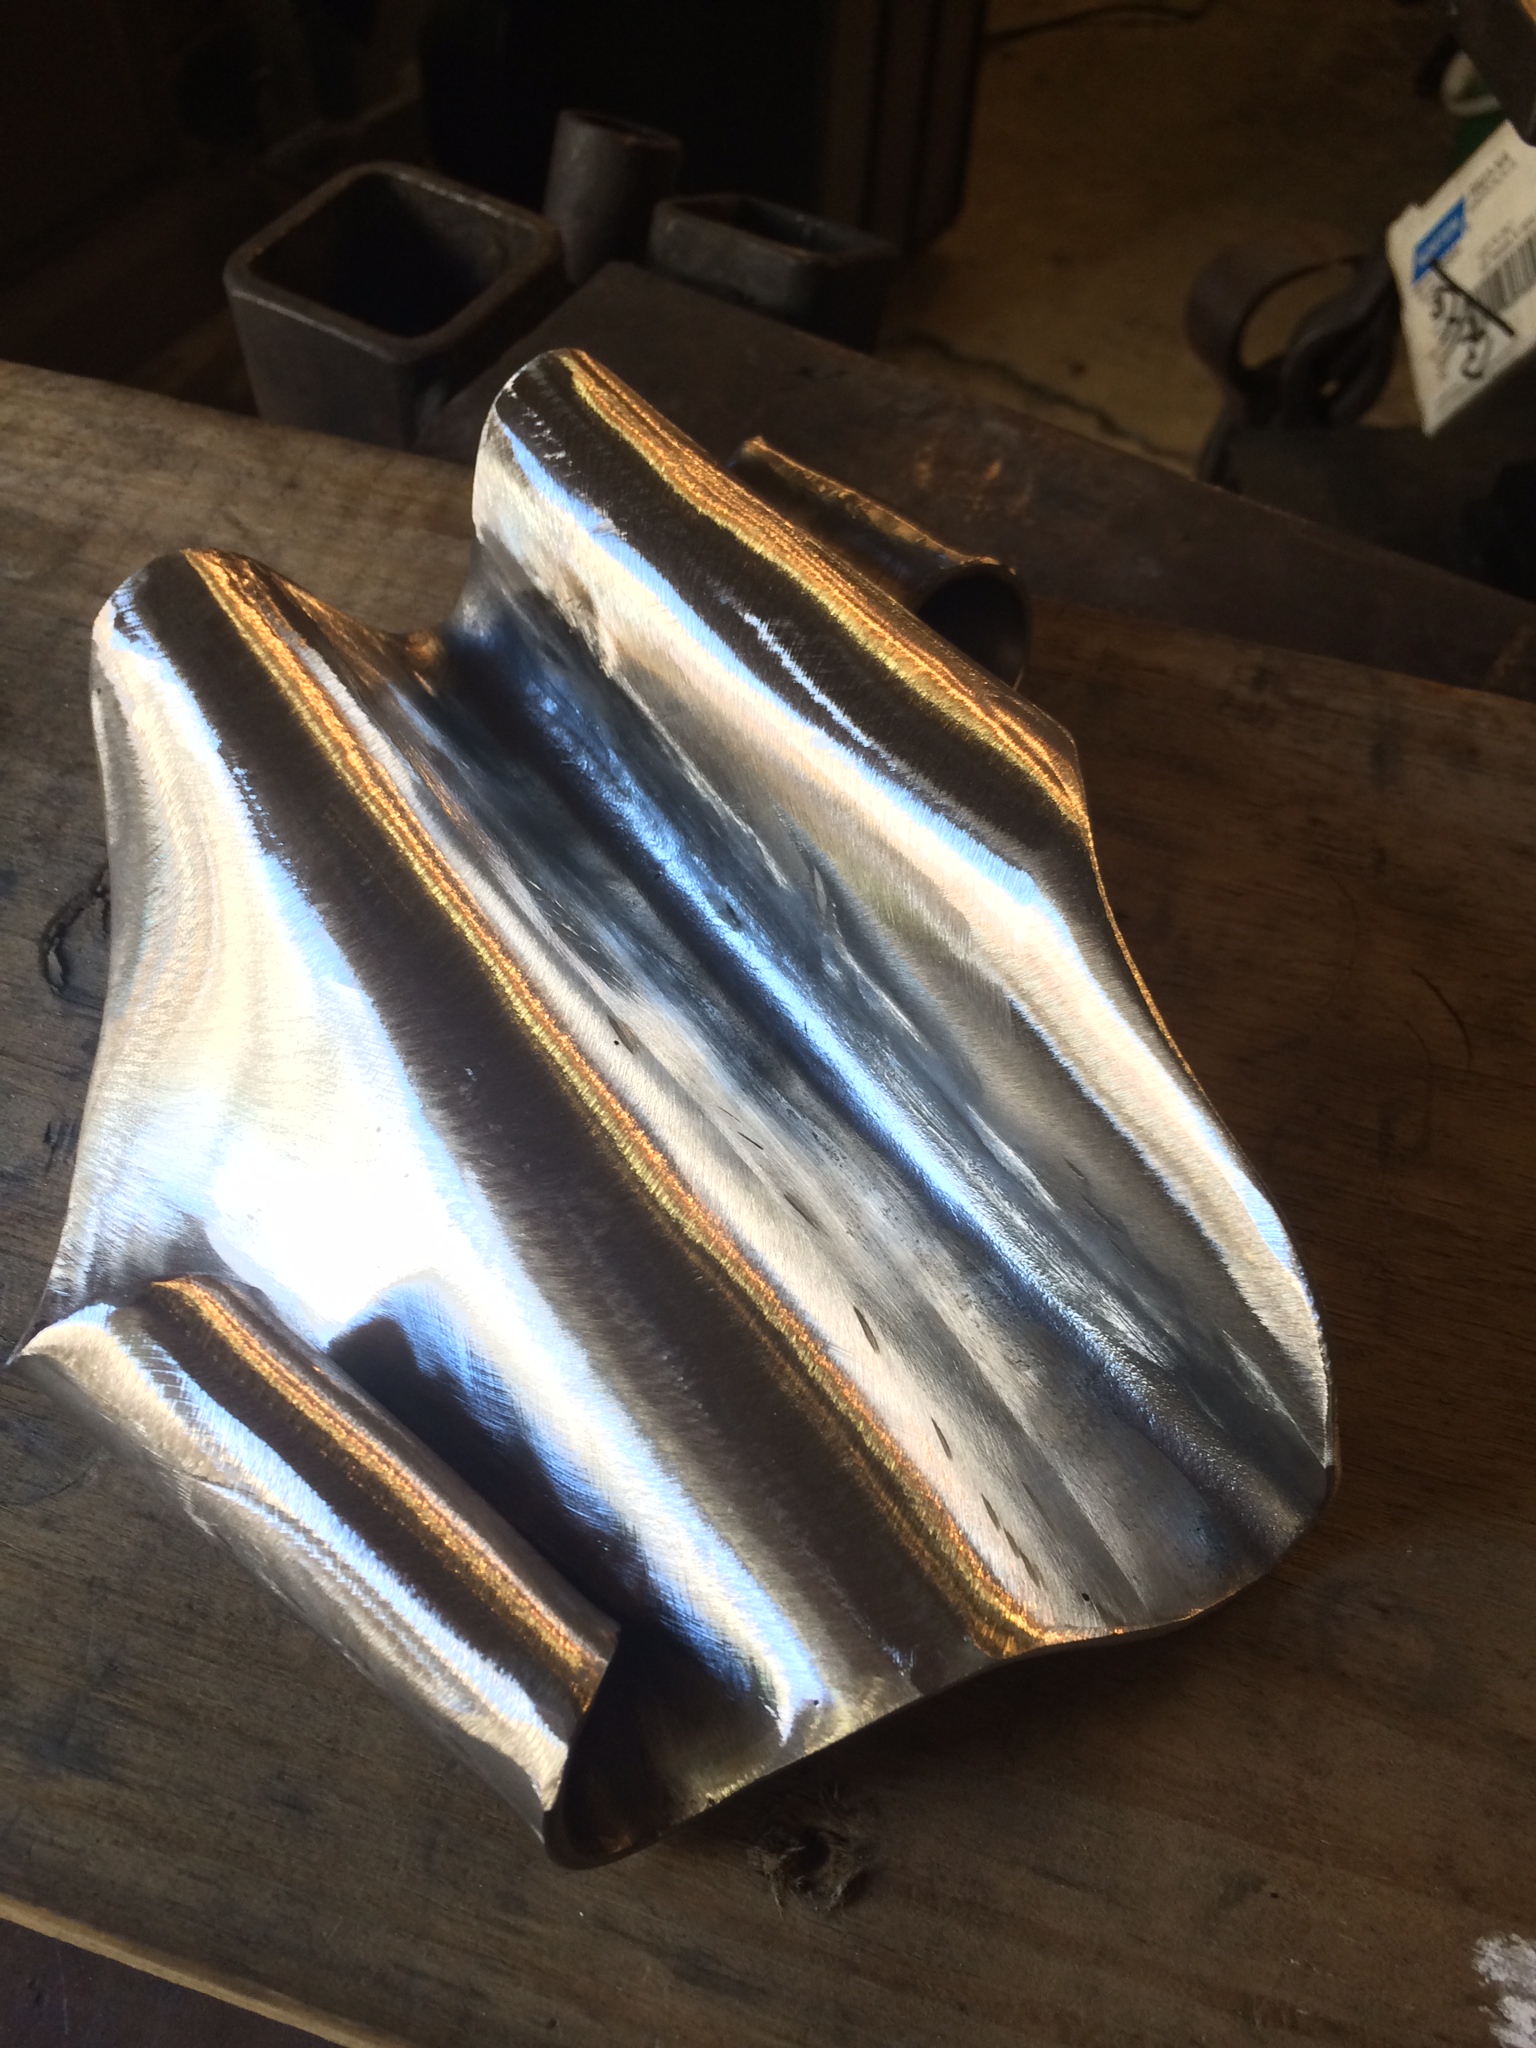
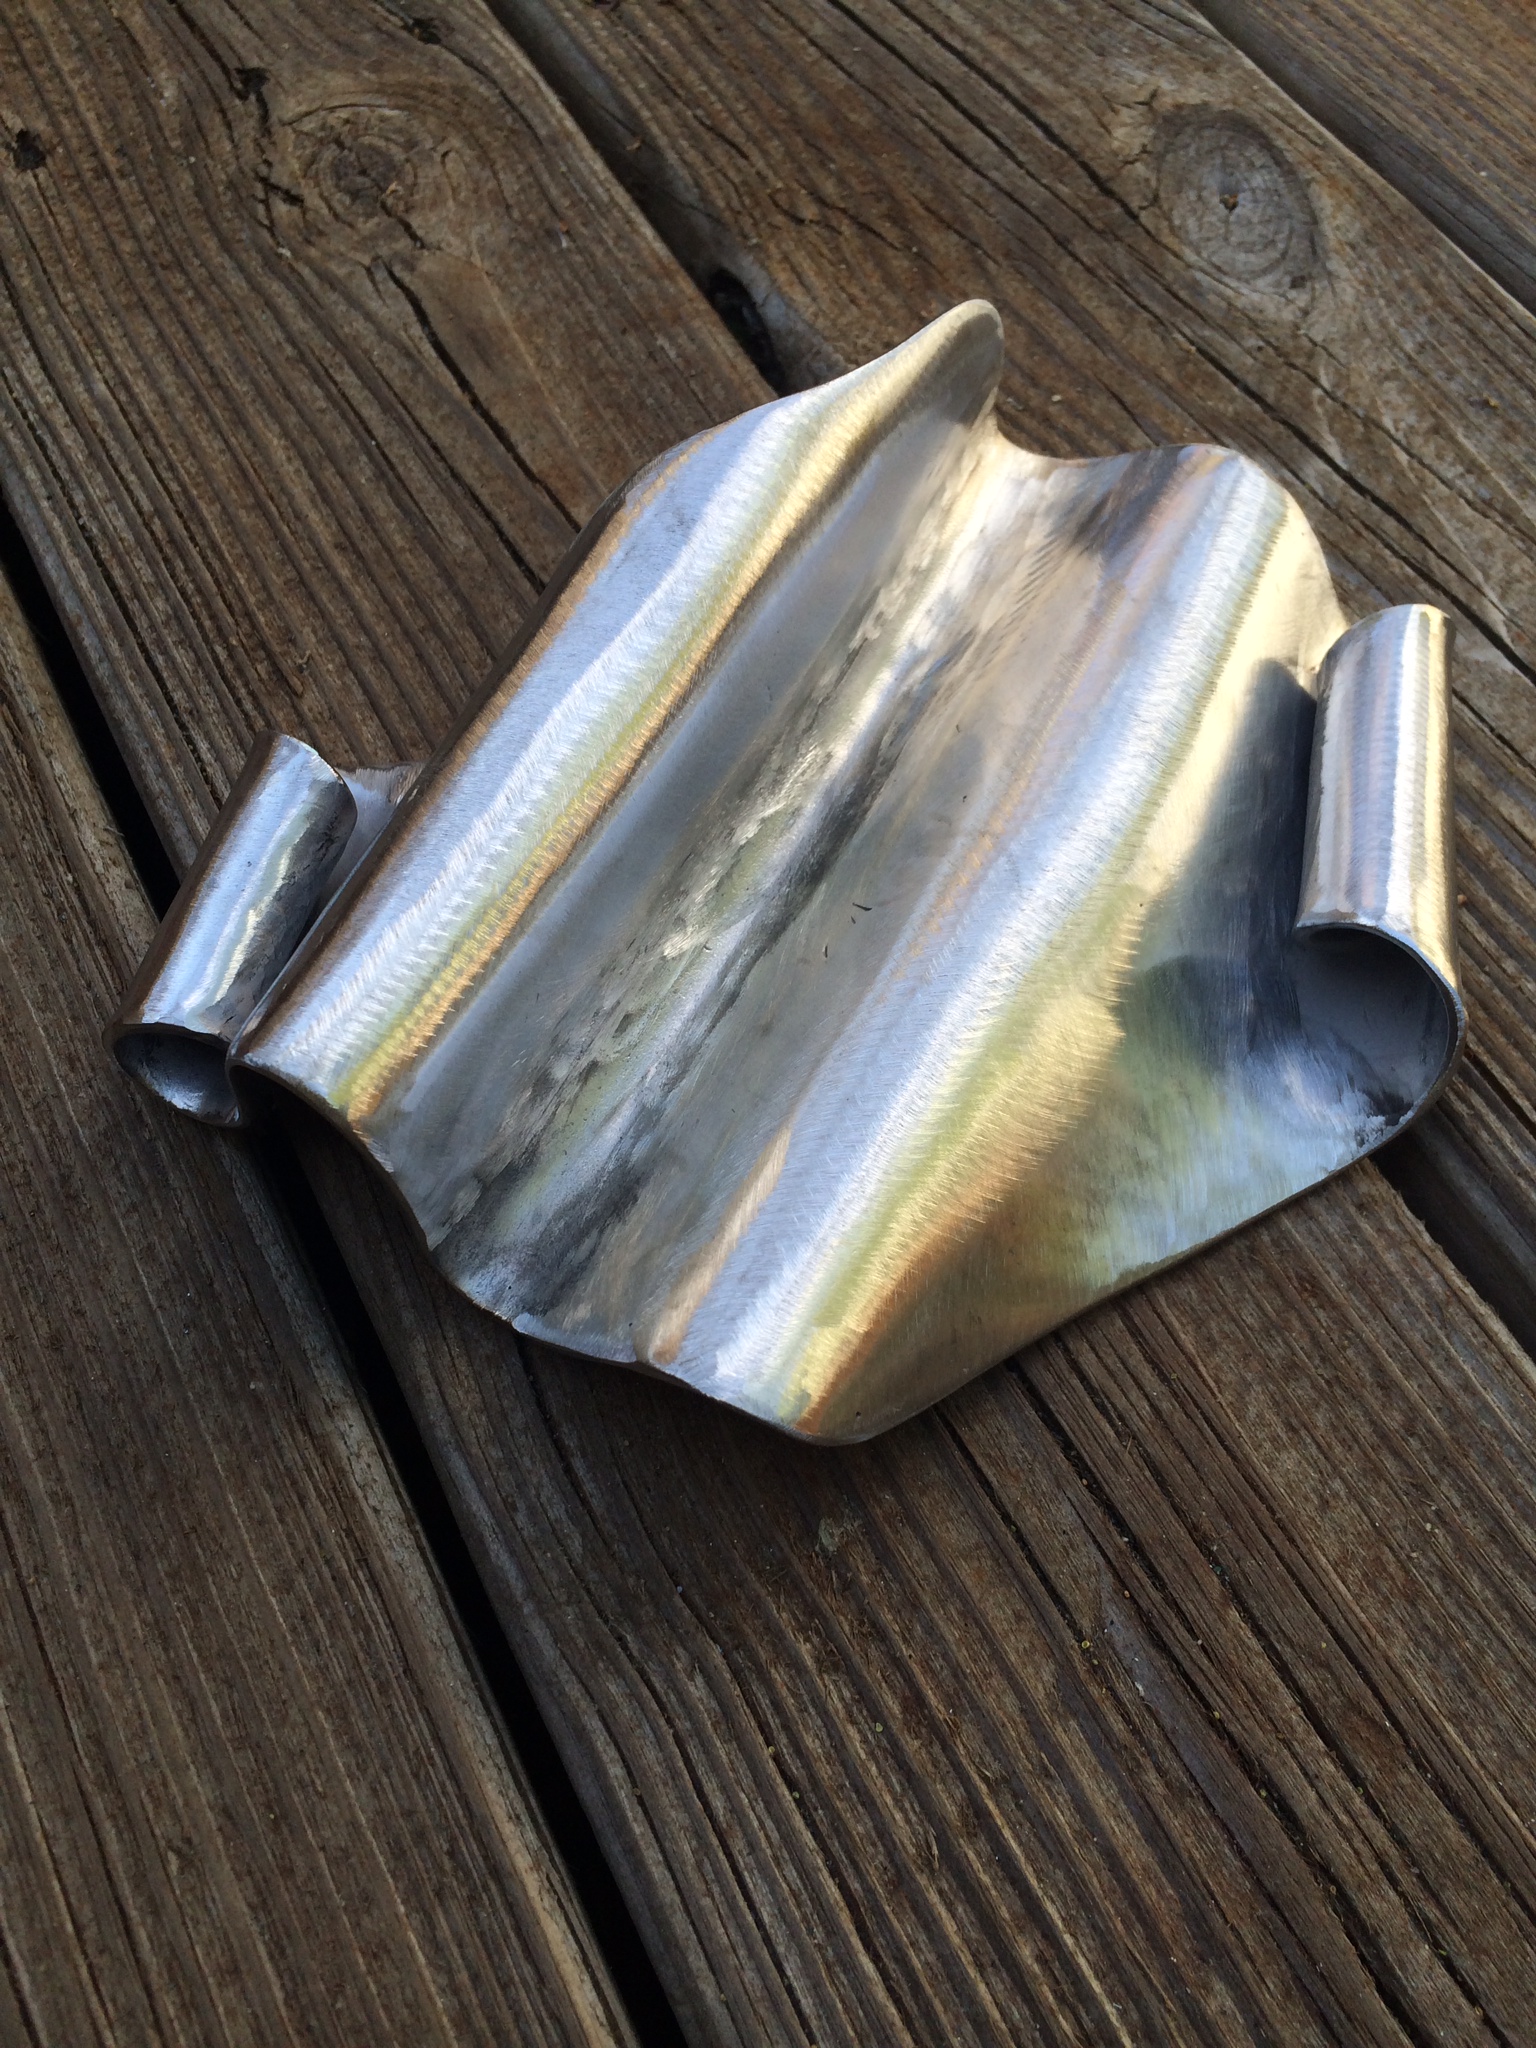
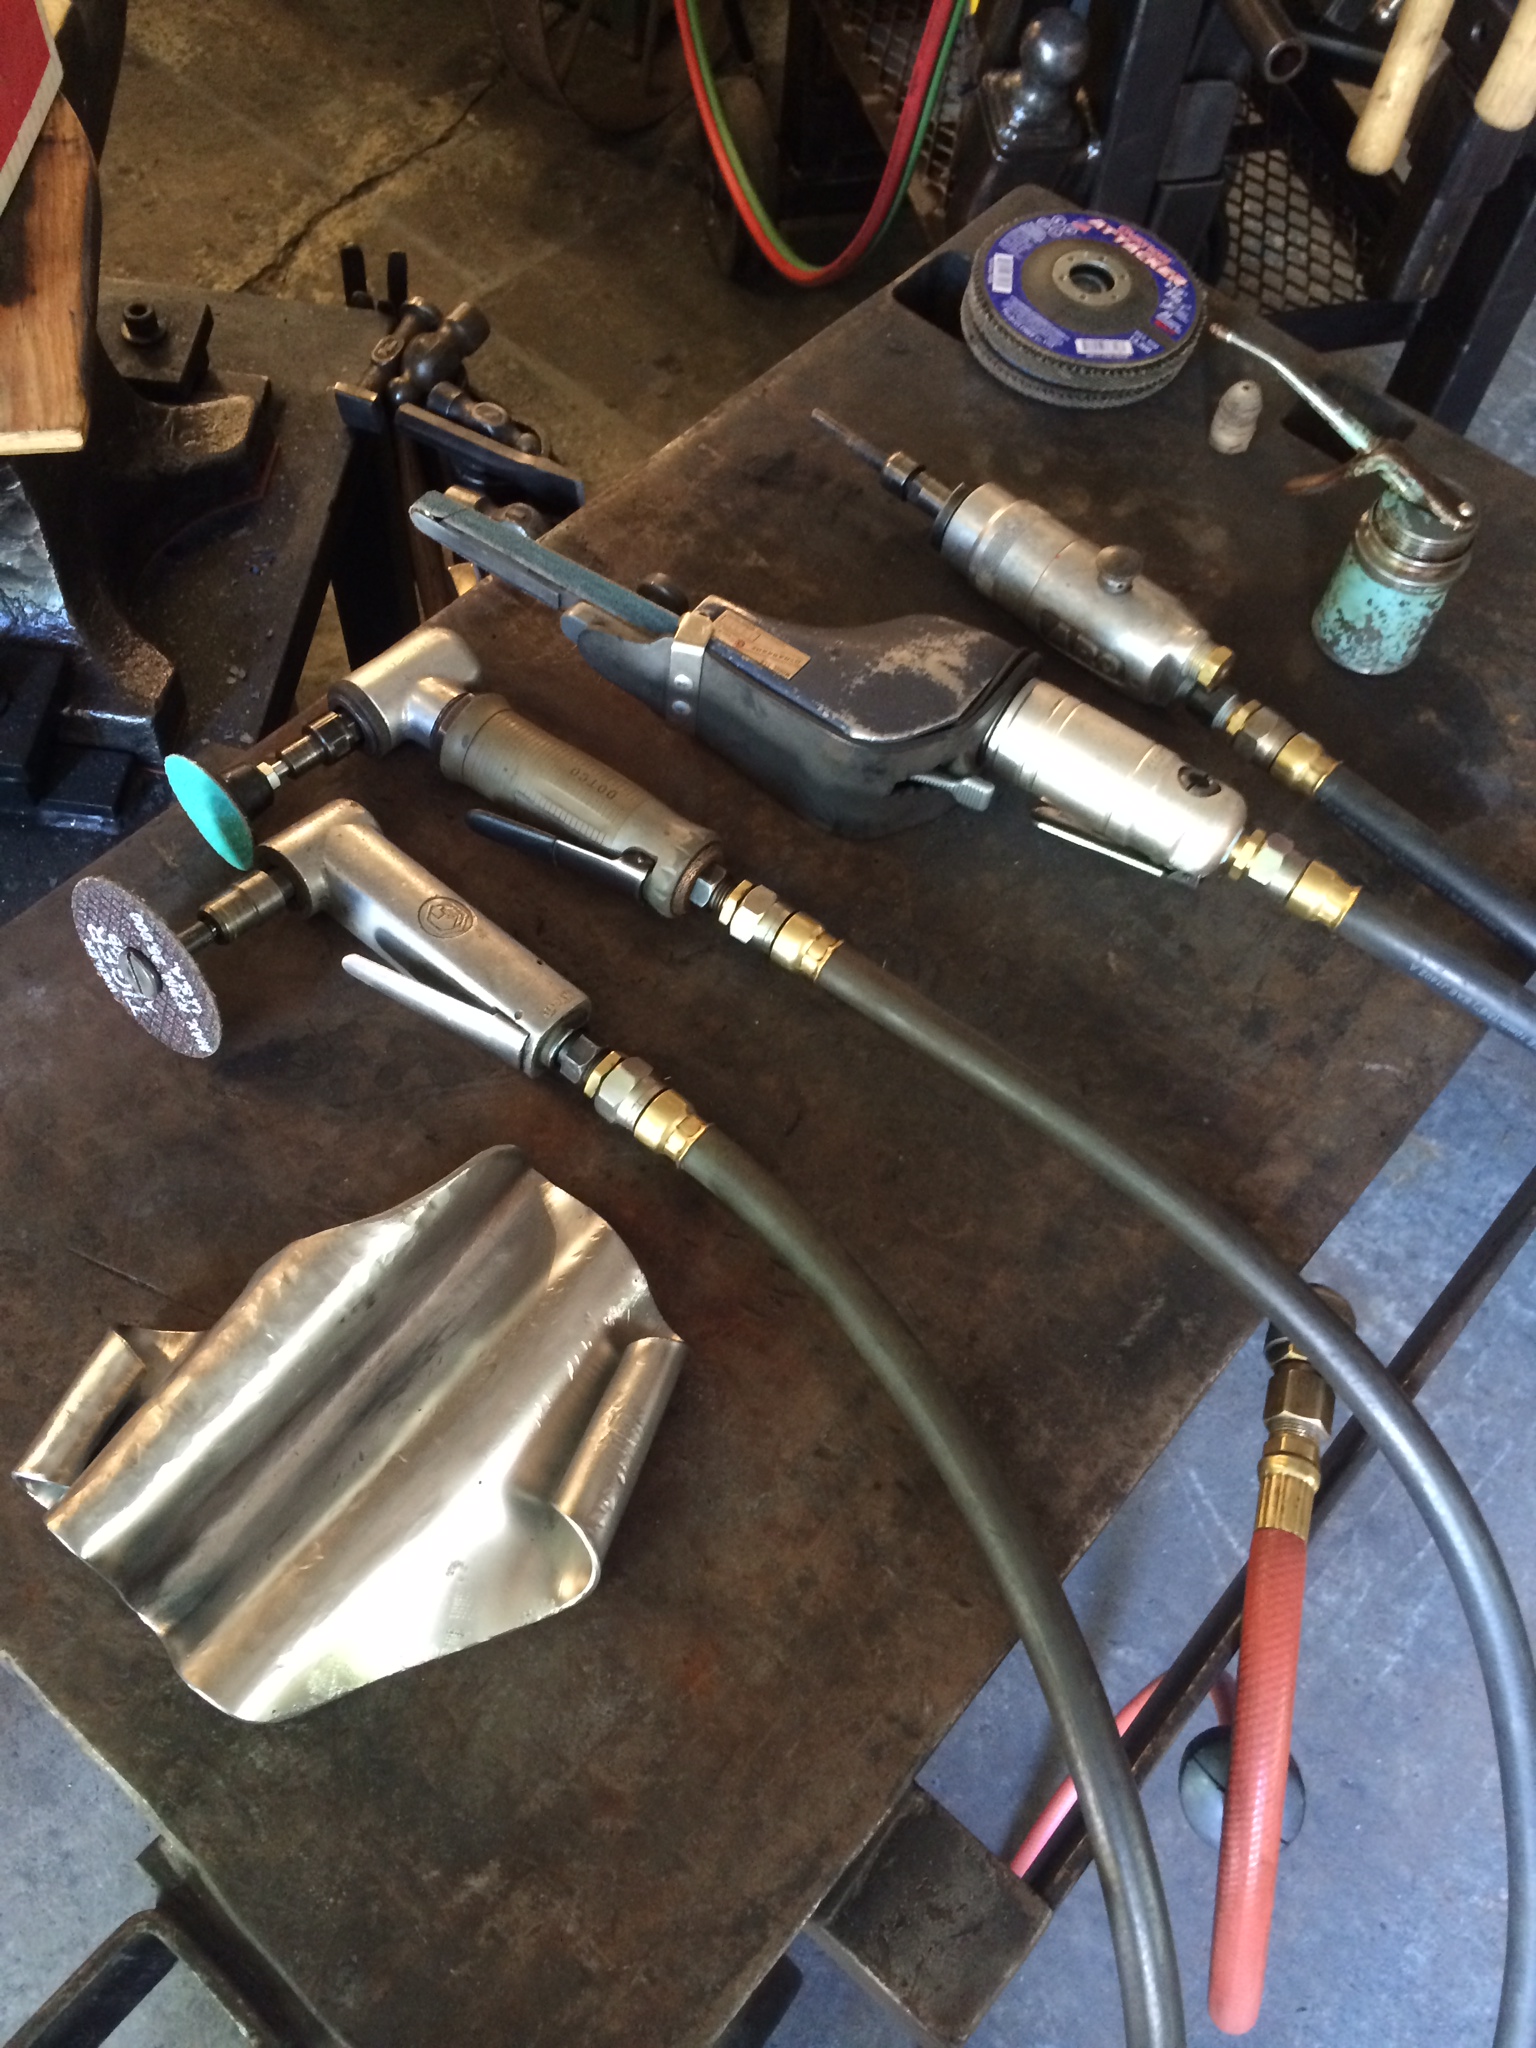
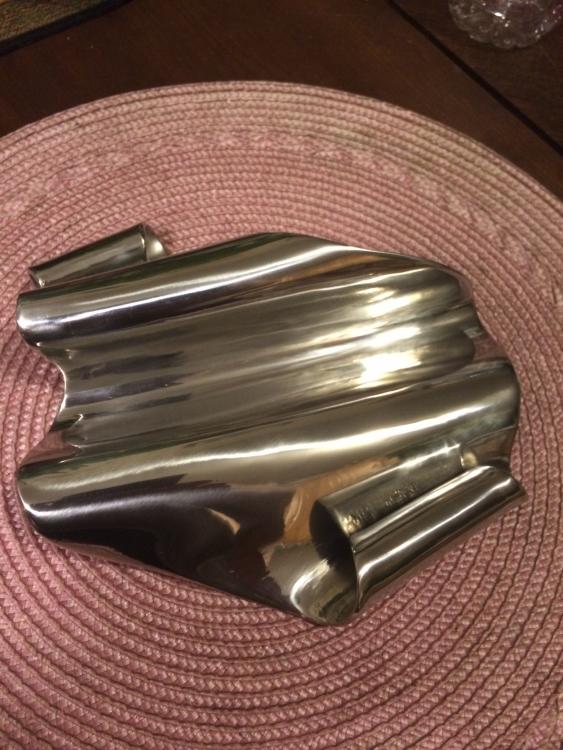
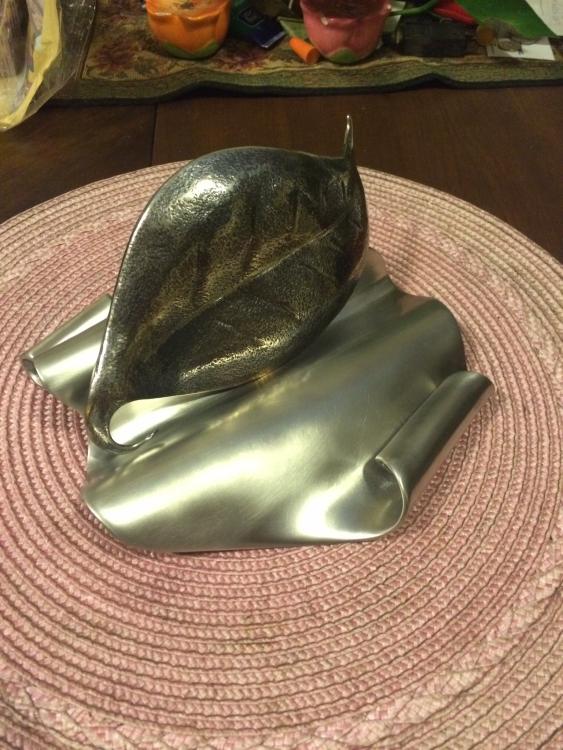
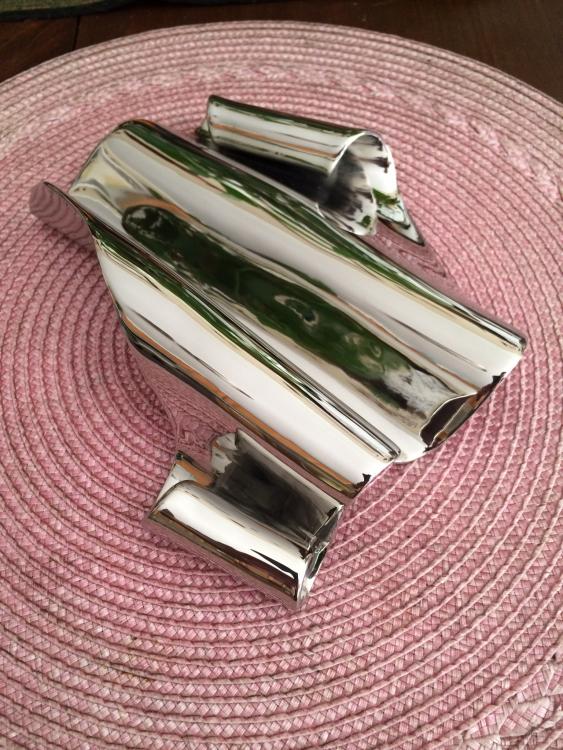
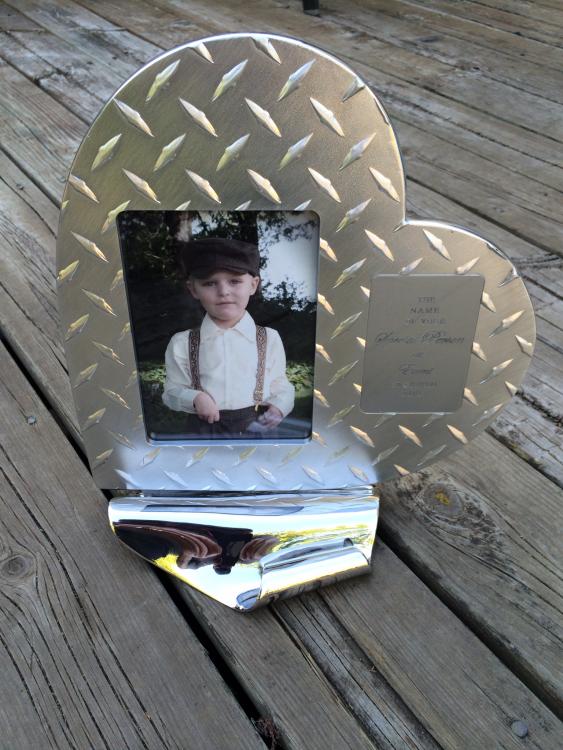
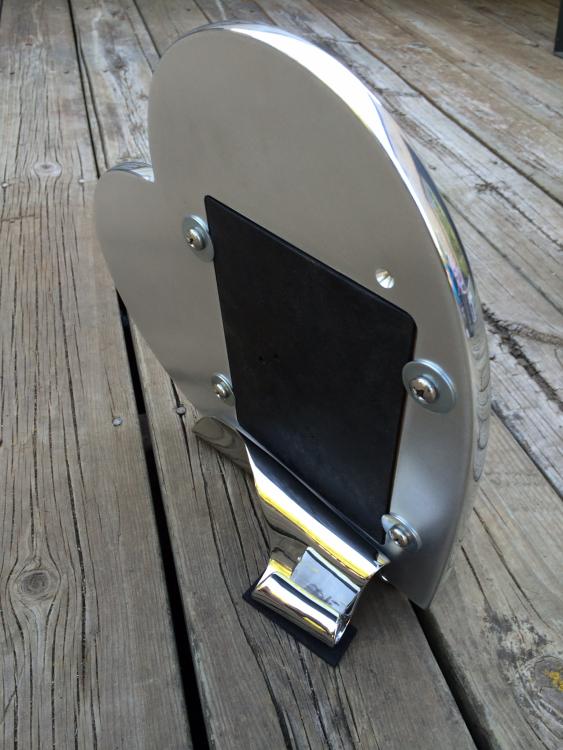
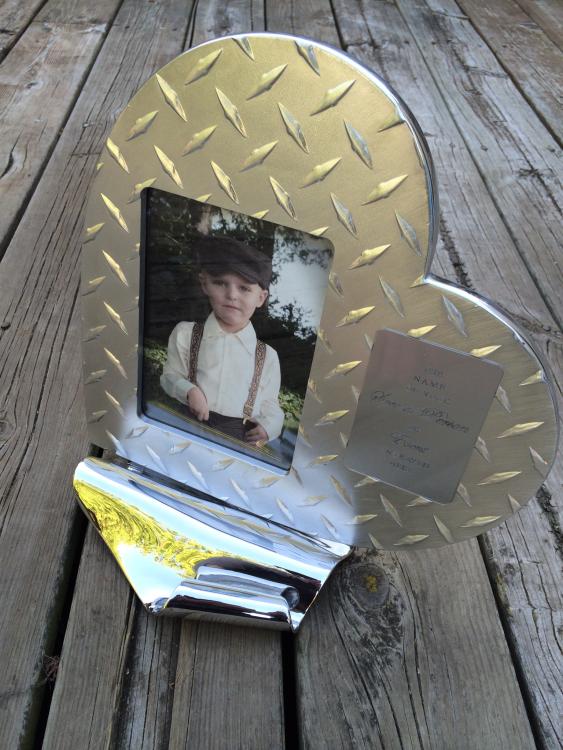
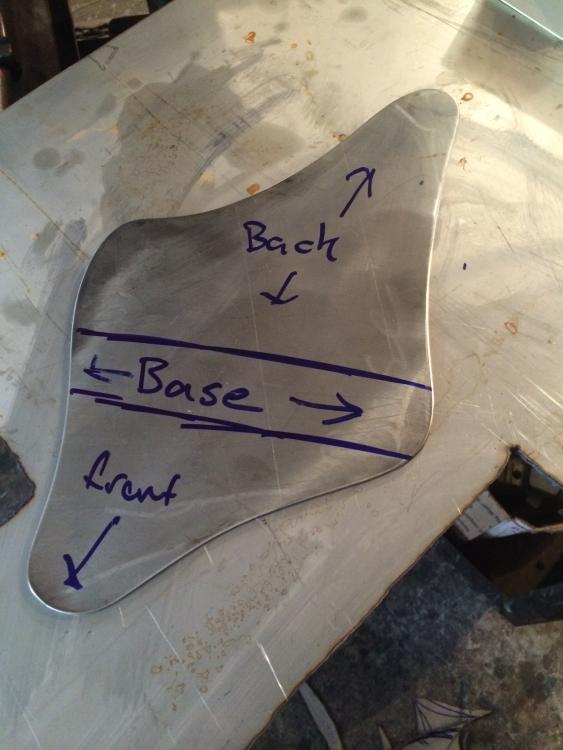
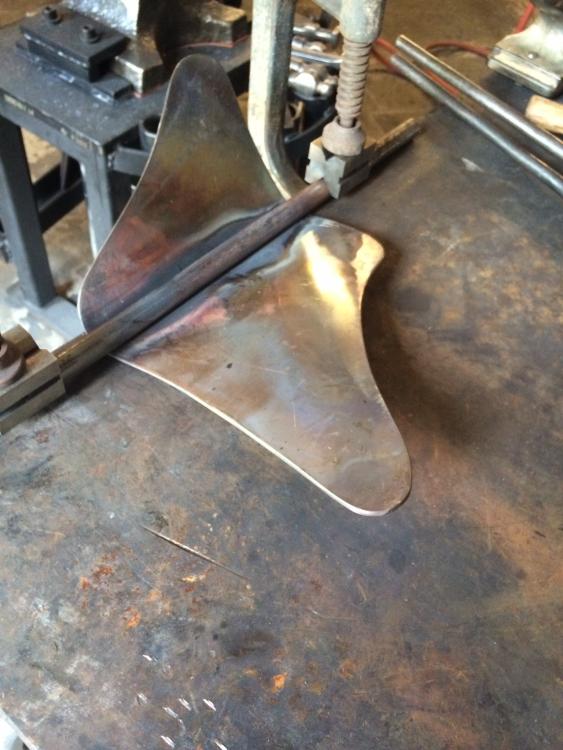
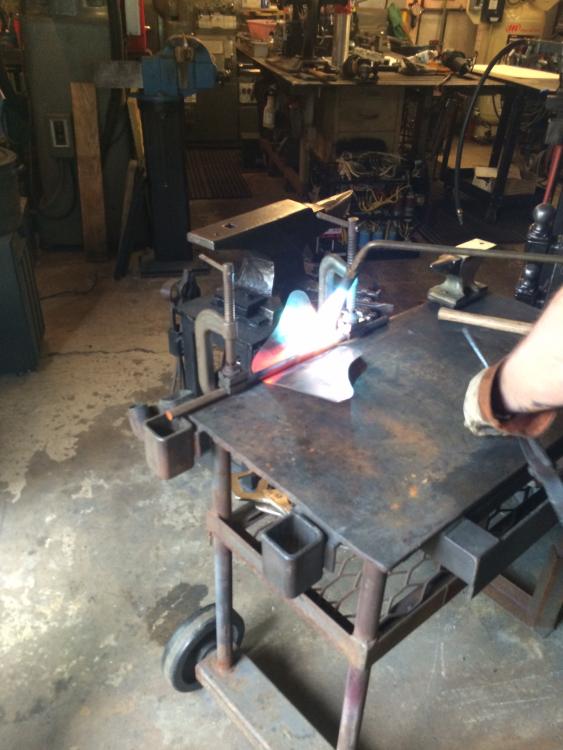
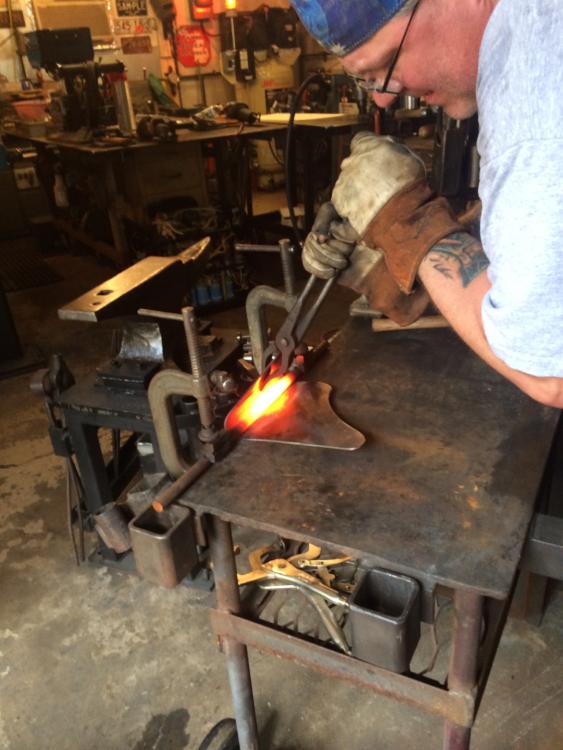
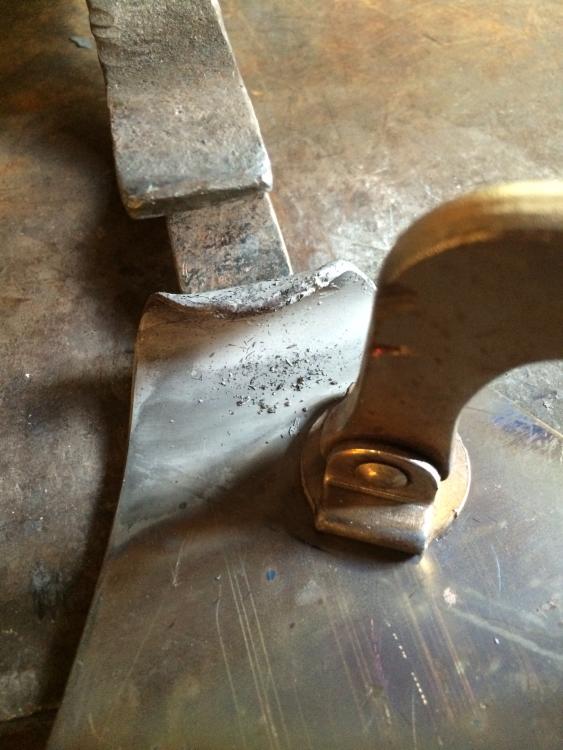
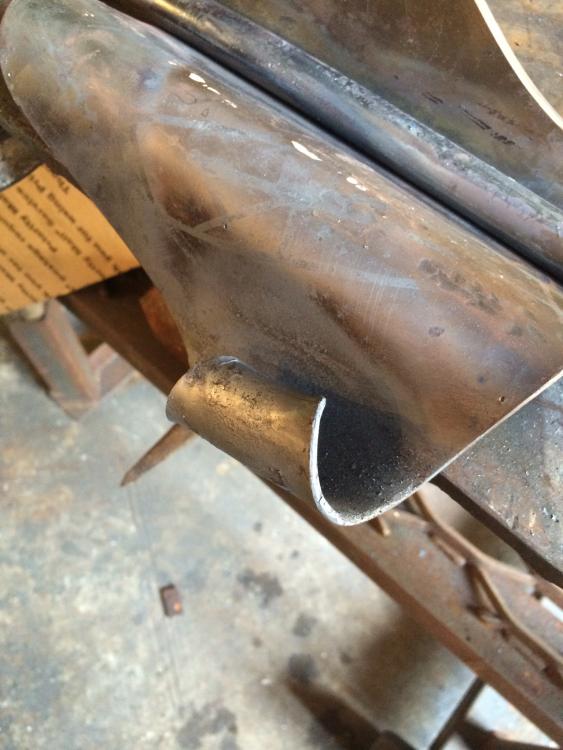
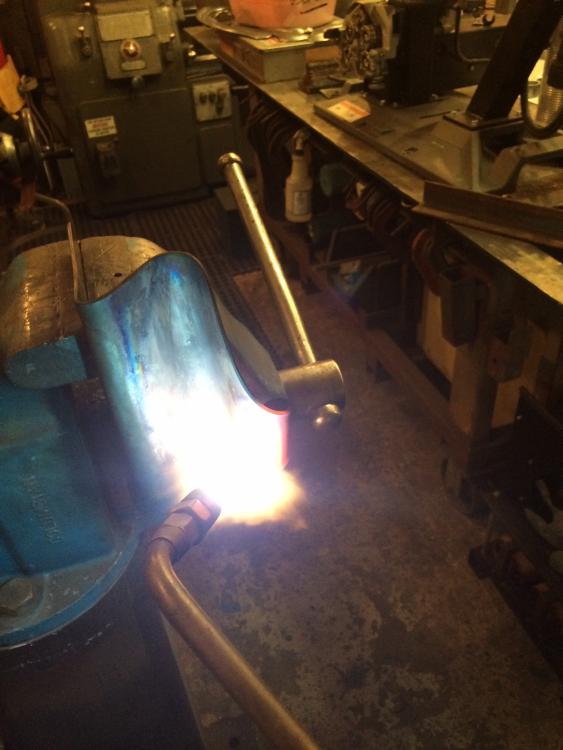
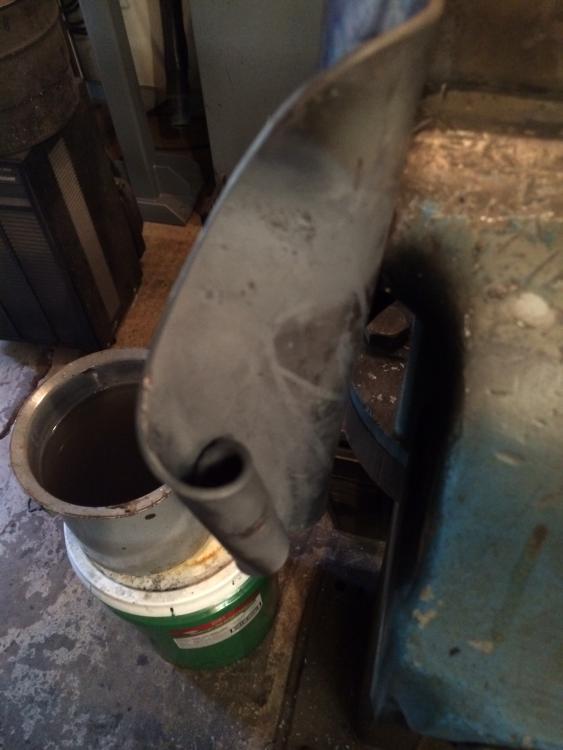
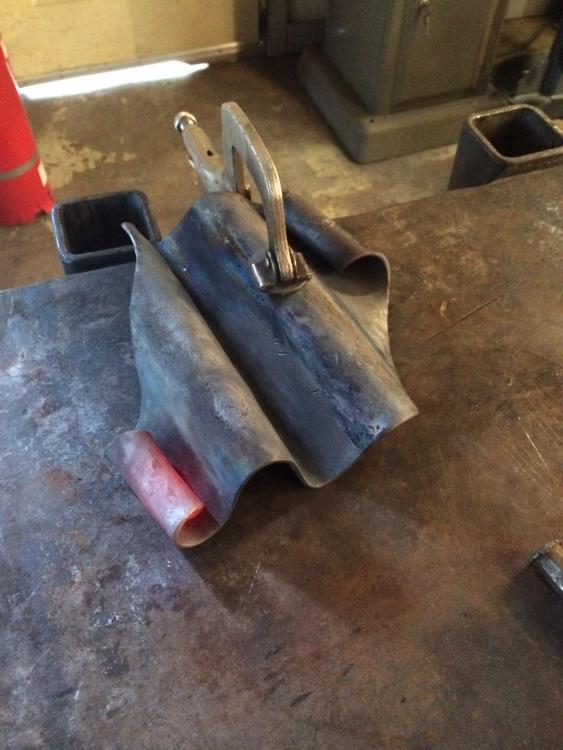
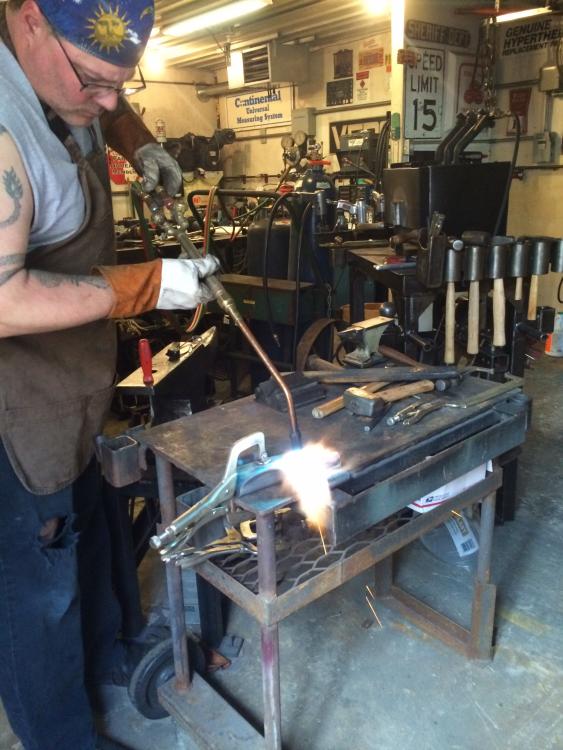
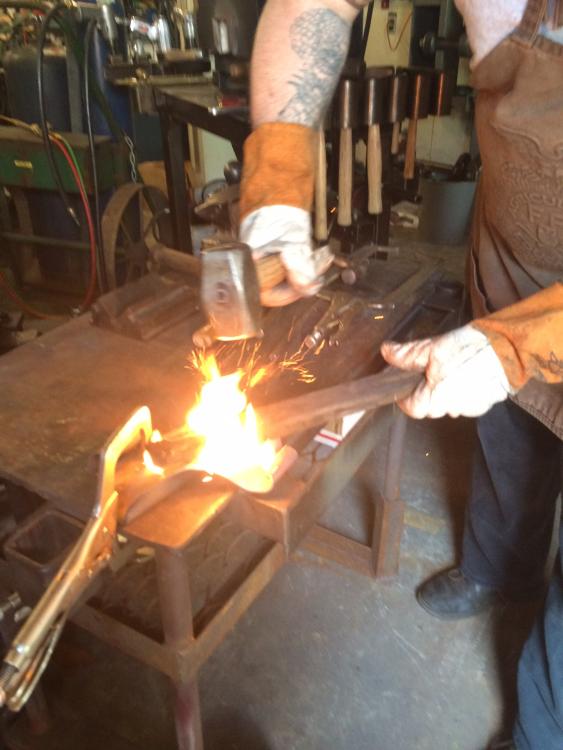
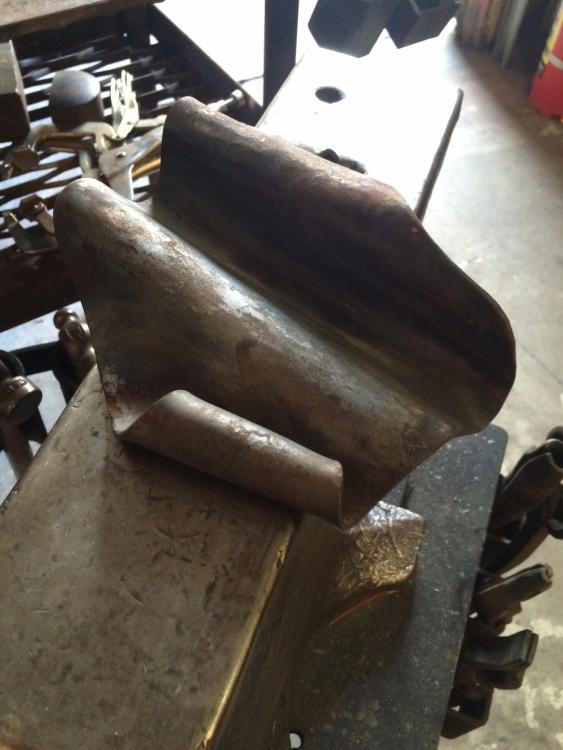
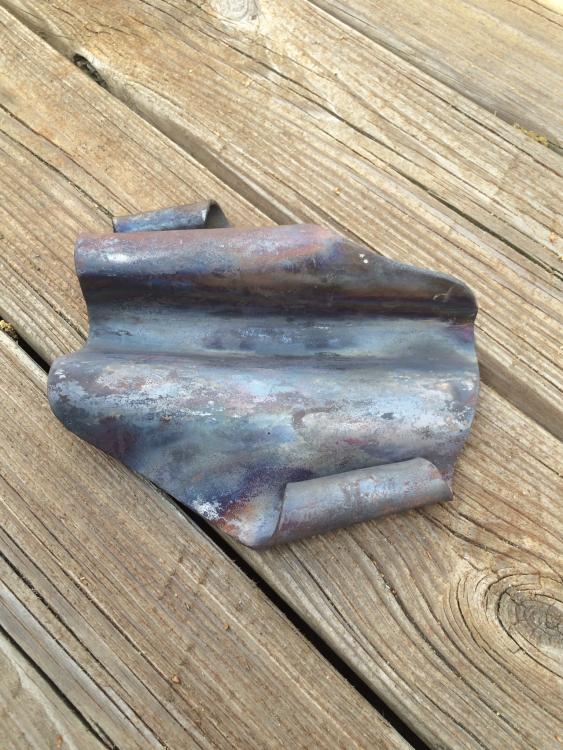
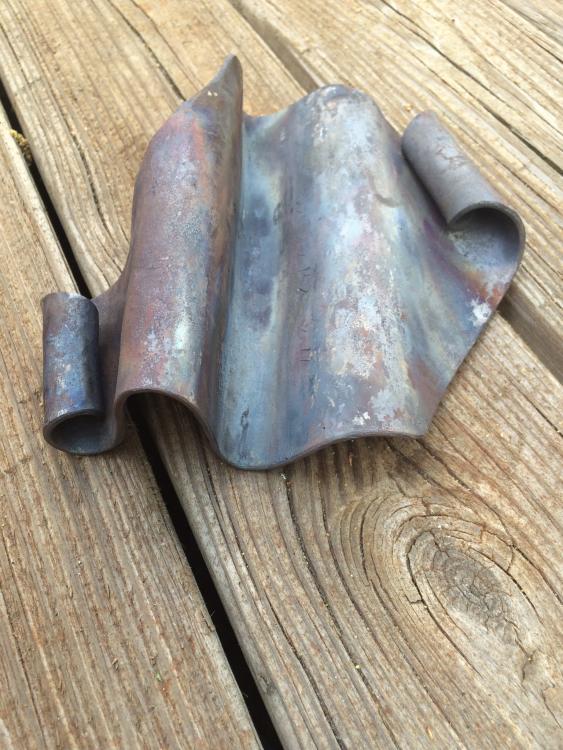
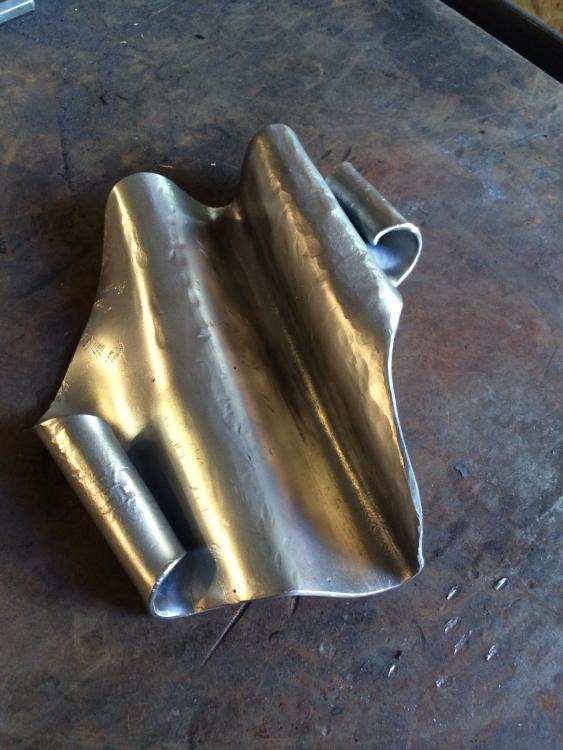
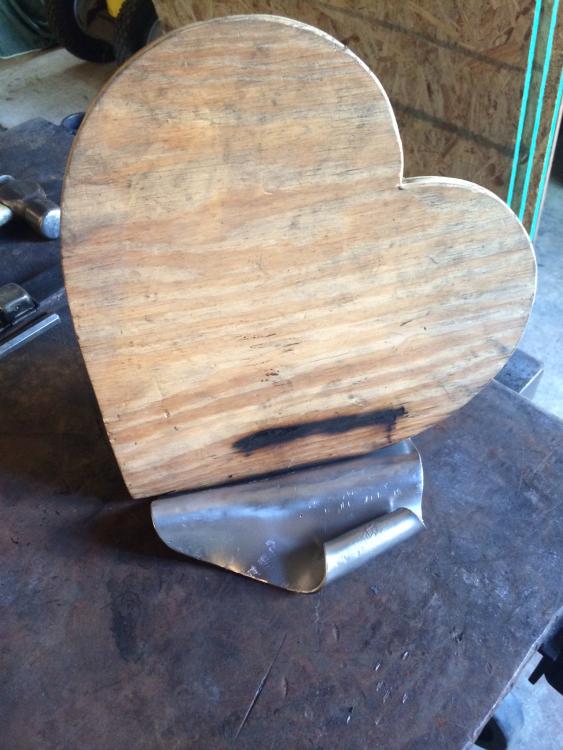
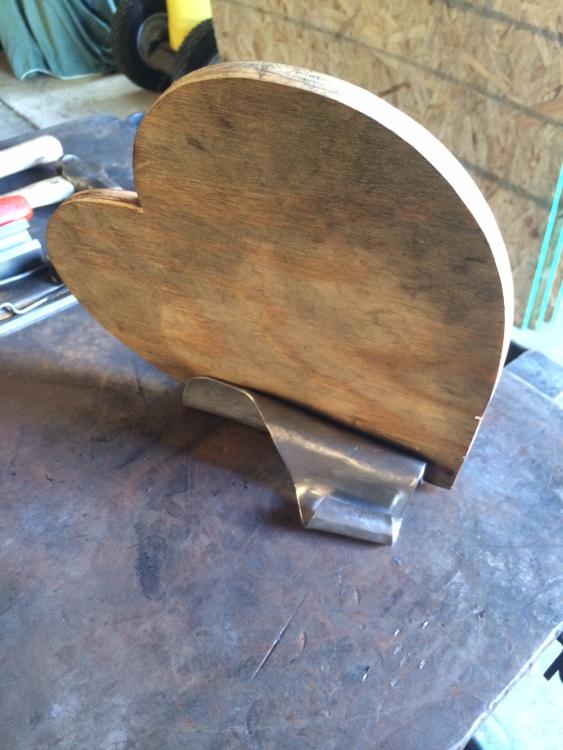
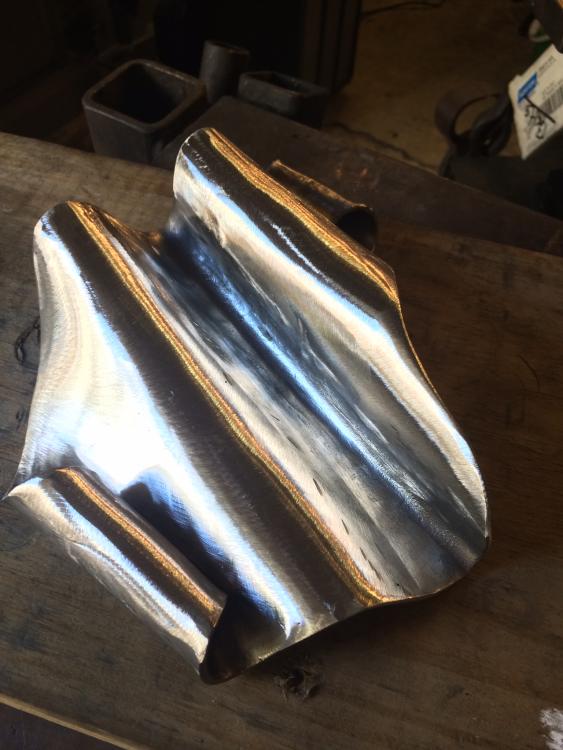
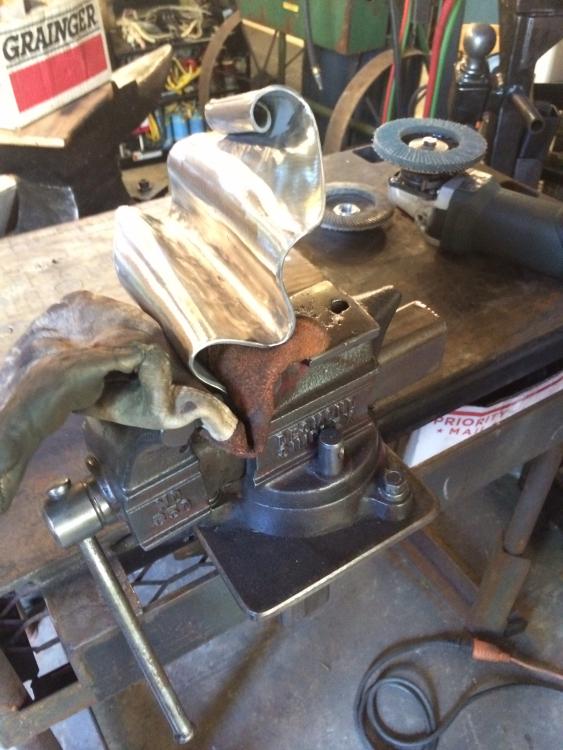
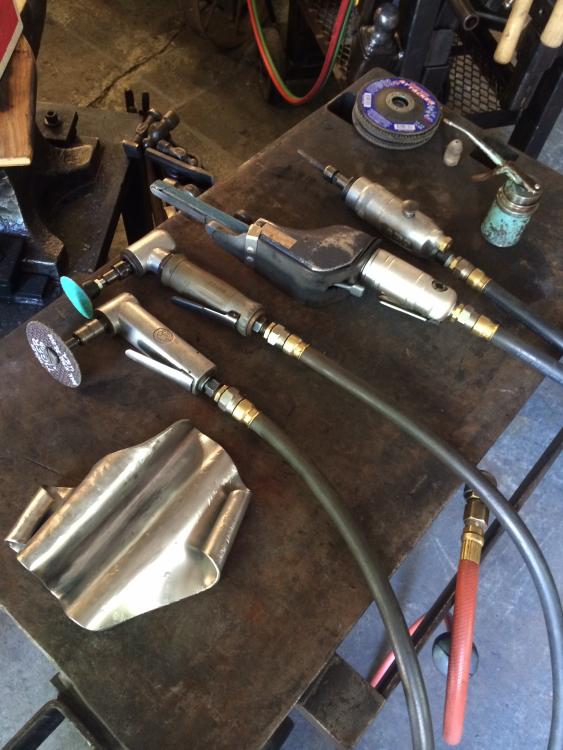
After my experimentation with the stainless steel leaf, I decided to make my first real project out of stainless. As with just about everything laying around here, there's a story attached to it. In order not bore anyone to death with unnecessary details or get too far off track, I'll cut to the chase. I made a picture frame out of 6061 1/2" aluminum diamond plate in the shape of a heart about 12 years ago for a photography display a friend did at a wedding show. Plans changed, they found out it couldn't go in the display so it never ended up getting completely finished, and it's sat in my closet ever since. Perfect opportunity to use the stainless I recently bought to make a base for it. I have made several frames and bases using this same method, and like to create scrolls where the edges of the piece meet the surface they will sit on. I will turn these scrolls "the hard way" or into the finish side of the work. This means more metal finishing since if you do them "the easy way" where they turn into the back side, you can get away with a lot less. For anyone interested in the specifics- the stainless is best of my knowledge possibly 304 (lots of other stainless they had in the same area was so I'll assume it is) Aprox 11 ga. The process I used to do the hot work I like to call torch forging. I've made bases like this before, and prefer using a torch so I can focus the heat in one place. Anyways, to get started I used my plasma cutter to cut out a basic blank which I will make the base from. All contouring prior to heating I do with an angle grinder and belt sander. Being there are three main bends, most of the work will be done on a table using mild steel rod as a mandrel to bend the blank over, or in my large vise where I will turn the scrolls on the front and back. I'll also use a few different mandrels in the vise to hot forge on to get the desired contour. Very little anvil work with these. "Right" or "wrong", it's just the way I like to work when doing hot work on sheet metal. The wooden heart is the template I used when I made the original frame. I make the first main bend by clamping a 5/8" piece of steel rod to the table over the blank where the bend will be. I heat to a bright orange heat and do this the entire width of the bend. Using a pair of flat bill tongs, I create the first bend over the mandrel. The bend isn't 90 deg, I just want enough of a contour to allow for shaping on the larger mandrel set up in the vise. After the first bend and contouring is made, I make the second and third ones the same way. Now, you can see the basic shape and flow of the piece, less the scrolls. Turning the scrolls was a bit tricky. I normally use needle nose vise grip pliers and an adjustable wrench for turning them. This material is thicker than what I do in mild steel so I used a combination of pinching and rolling with the flat bill tongs, then used a pair of small round stock holding tongs and a 5/8" bar to turn them. I'll eventually either make or modify a set specifically for thicker stuff. A few more of the other scroll After the scrolls are done, I had to flatten the center out and tweak the front and back so they all touch the table. Most of this was done by clamping the base to the table with vise grips and heating with the torch, then using a small piece of wood hit with a hammer. After a few adjustments it sits flat and is done as far as forging goes. The piece after the final detail forging is complete. I put the wooden heart template in to demonstrate how the frame will sit in the base. Now, I move to the metal finish portion. I decided to put a number one finish on it that would contrast the brushed finish of the frame. First, I do a complete grind down with a 50 grit flap wheel and remove most of the hammer marks and surface imperfections. I used my straight grinder to do this, and did a little with an angle grinder too. No, I don't use a guard on it for this type of work because it gets in the way too much. I do wear an apron, gloves and goggles when I'm doing work on the grinder like this. I DO NOT advocate using grinders without guards, but in some cases, it's just the nature of the beast. Besides that, you'll find a guard on every grinder I own except the one I use with a sand disc and a wire cup wheel. Since I'll be using the buffer to finish this, it won't need to get much better than around a 240-320 finish. After rough grind, I use a die grinder with a 120 grit disc on it to remove deeper scratches left by the flap wheel. After the 120, I switch to a straight die grinder with sanding rolls to do the inside of the scrolls. I use a felt bob with compound to polish the inside pieces after they're finished. At this point, I use an orbital sander and 240 grit sanding discs to prepare the surface for conditioning with a coarse non woven abrasive polishing wheel. This wheel skips from 240 to around 600 grit finish. It blends any deeper gouges left over after sanding. Now, I go to the buffer to do a quick buff on it to see how it looks taking a bit of a shine. I only use two wheels and two compounds for all wheel work I do. I learned the trade polishing guns back in the early 90s, and did a large number of them, along with knives and other accessories over the next several years. I use a woven sisal wheel and black emery for cut and rough color, then a loose muslin buff with green compound for finish. I use a die grinder with a 3" sisal wheel for doing inside contours where the big wheel won't reach.


-
Need some help with appraisel of small shop
7A749 replied to Michael Gendron's topic in Anvils, Swage Blocks, and Mandrels
Good luck with it Michael. -
Need some help with appraisel of small shop
7A749 replied to Michael Gendron's topic in Anvils, Swage Blocks, and Mandrels
Know nothing specific about blacksmithing tools, but the guys asking price looks pretty fair indeed. Hard to say what's dupes in the pix, but from what others are saying on hammer pricing alone it sounds pretty darn good to me. And, at what eBay prices are the deal is exceptional. I don't think you would lose any money paying the asking price. Not at all. If you really want the stuff, just go buy it. Offer $1600 but be prepared to give him the cash. Prolly be best to just grab the stuff before someone else does. I'm all for keeping what you want and offing the rest to recoup your investment. Oh, I'll add that although I'm not into blacksmith tools, I've been in the buy and sell business collectively 15+ years. Ten of which have been professionally as a major or sole source of income. Do the math alone on the bigger speciality hammers and bottom dies. You could sell a good lot of that off by itself and recoup a major part of your investment. You play it right and sell enough, you may walk away with a free anvil, forge and more than enough stuff to get started, or maybe even make a profit depending on how fast you wanted to unload it. Of course, eBay pricing is not always a super reliable indicator for market value, but it does give you enough of an idea what something is nominally worth. Seems blacksmithing stuff is in high demand by the looks of it and what I read here (and I read quite a bit) IMHO of course -
Great to hear that. I'm all the way across the country from you, but it's always nice to hear when a place like this stays open despite adversity. Hope you stay open for many more years to come! Steve
-
Forging Stainless For The First Time.
7A749 replied to 7A749's topic in Blacksmithing, General Discussion
Will do. Thanks. -
My 15 Hp converter collectively cost about a third of the cost of that motor (less shipping of course) and the flexibility of the converter provides value far beyond the use of a single machine. At least it does for my uses. One big machine tool often leads to more. Once you buy or build the converter, you got it. Biggest advantage for me is it powers three phase welding machines. Again, for my uses this is a huge value and advantage. Mostly a matter of what you plan to do and what you want to spend. IMHO of course
-
That's really cool. Looks useful for a number of tasks beyond blacksmithing.
-
After abortive attempts at overthinking, we settle on a nice rivet forge
7A749 replied to JHCC's topic in Solid Fuel Forges
Seen that first hand in scouts back in the day. First time it happens, it'll scare the living heck out of you. A clean your drawers out type of experience for sure.. Cool forge. A real coal job is next on the list. -
That's pretty neat. Next thing you know, she will want the rest of him. Full size, of course
-
Tennis Elbow taught me proper hammer technique
7A749 replied to intrex's topic in Blacksmithing, General Discussion
Just be careful and don't be afraid to get a hand brace for your hammer hand if you think you need it. I really need to start wearing mine again. -
Forging Stainless For The First Time.
7A749 replied to 7A749's topic in Blacksmithing, General Discussion
Thanks so much for the input Doug. Yeah, I've discovered that it's a bit more work and it doesn't seem to "stay hot" as long. Most all my work is in sheet metal. I hope to expand into more actual "blacksmithing" techniques (like forge welding, shaping stock on the anvil, etc) at some point. I need to hook up with some ppl that have experience so I can learn. Everything I've done is self taught. I dunno what kind of scaler(s) you have, I have four. I picked up an older but very nice Michigan Pneumatic Jet Chisel (they "borrowed" the name from Nitto Kohki) with fine needles that works very well. It has a lot of power, but doesn't tear the work up. Besides that one, I use a cheapie Harbor Freight slip on for an air hammer and it does a real nice job distressing but not too aggressively. The other two are Jet repops by HF and will tear thin stuff up. I use them more for cleaning welding slag than anything else. I've posted some other stuff here and used a scaler to distress the surface. Mainly a mirror frame and a simple leaf similar to this one but with less detail. I would love to see some of your work Doug. Have you ever worked in Monel? I've done some reading about it here and it sounds like a nightmare. I've done some welding on it and machining it is a real bear. Just wondered if you had any experience with it. Thanks again. Steve -
Forging Stainless For The First Time.
7A749 replied to 7A749's topic in Blacksmithing, General Discussion
Thanks Bob. For a first time, it came out ok. It looks better in person, the photo doesn't show the gold contrast. I tried several times to capture it but it either looked too gold or not enough lol. I'm working on something else right now, hopefully I'll have it mostly done today. More stainless to come.. -
Dude, that straight up rocked. Very cool.
-
Forging Stainless For The First Time.
7A749 replied to 7A749's topic in Blacksmithing, General Discussion
Nothing special, but I took a pic of it inside. You can really see the gold tint the metal took on after heating and quenching.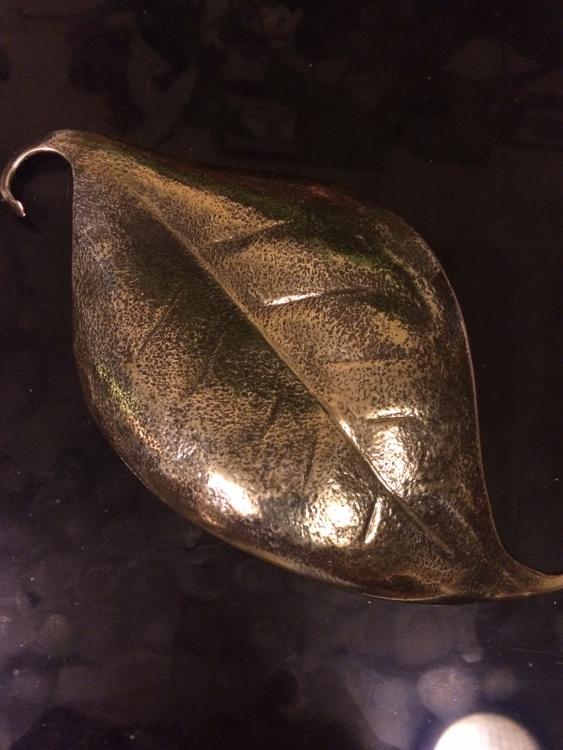
-
I know exactly who he is on eBay now. Always has excellent pics and is extremely knowledgeable. I had forgotten he was in MI.
-
Never seen anything quite like that. I don't use a coal forge tho and don't get out much Its pretty cool tho. It's nice not having to worry about stuff like winter and snow
-
Finding a single phase motor that size used is going to be difficult and expensive. Get up into the ten Hp plus range and prices get stupid ridiculous and options are limited. Buy new you're easily in the $1200 and up range for 10 HP. Didn't even see a 15 HP listed on baldors site but didn't look real hard just now. You'll need some serious power to run it too. You can get away with much less running a converter since either the VFD or capacitor bank absorbs the starting load, or in the case of VFDs they can soft start Thats why most ppl go the VFD or rotary converter route to power three phase equipment in smaller shops. Been my experience anyways.