7A749
-
Posts
184 -
Joined
-
Last visited
Content Type
Profiles
Forums
Articles
Gallery
Downloads
Events
Everything posted by 7A749
-
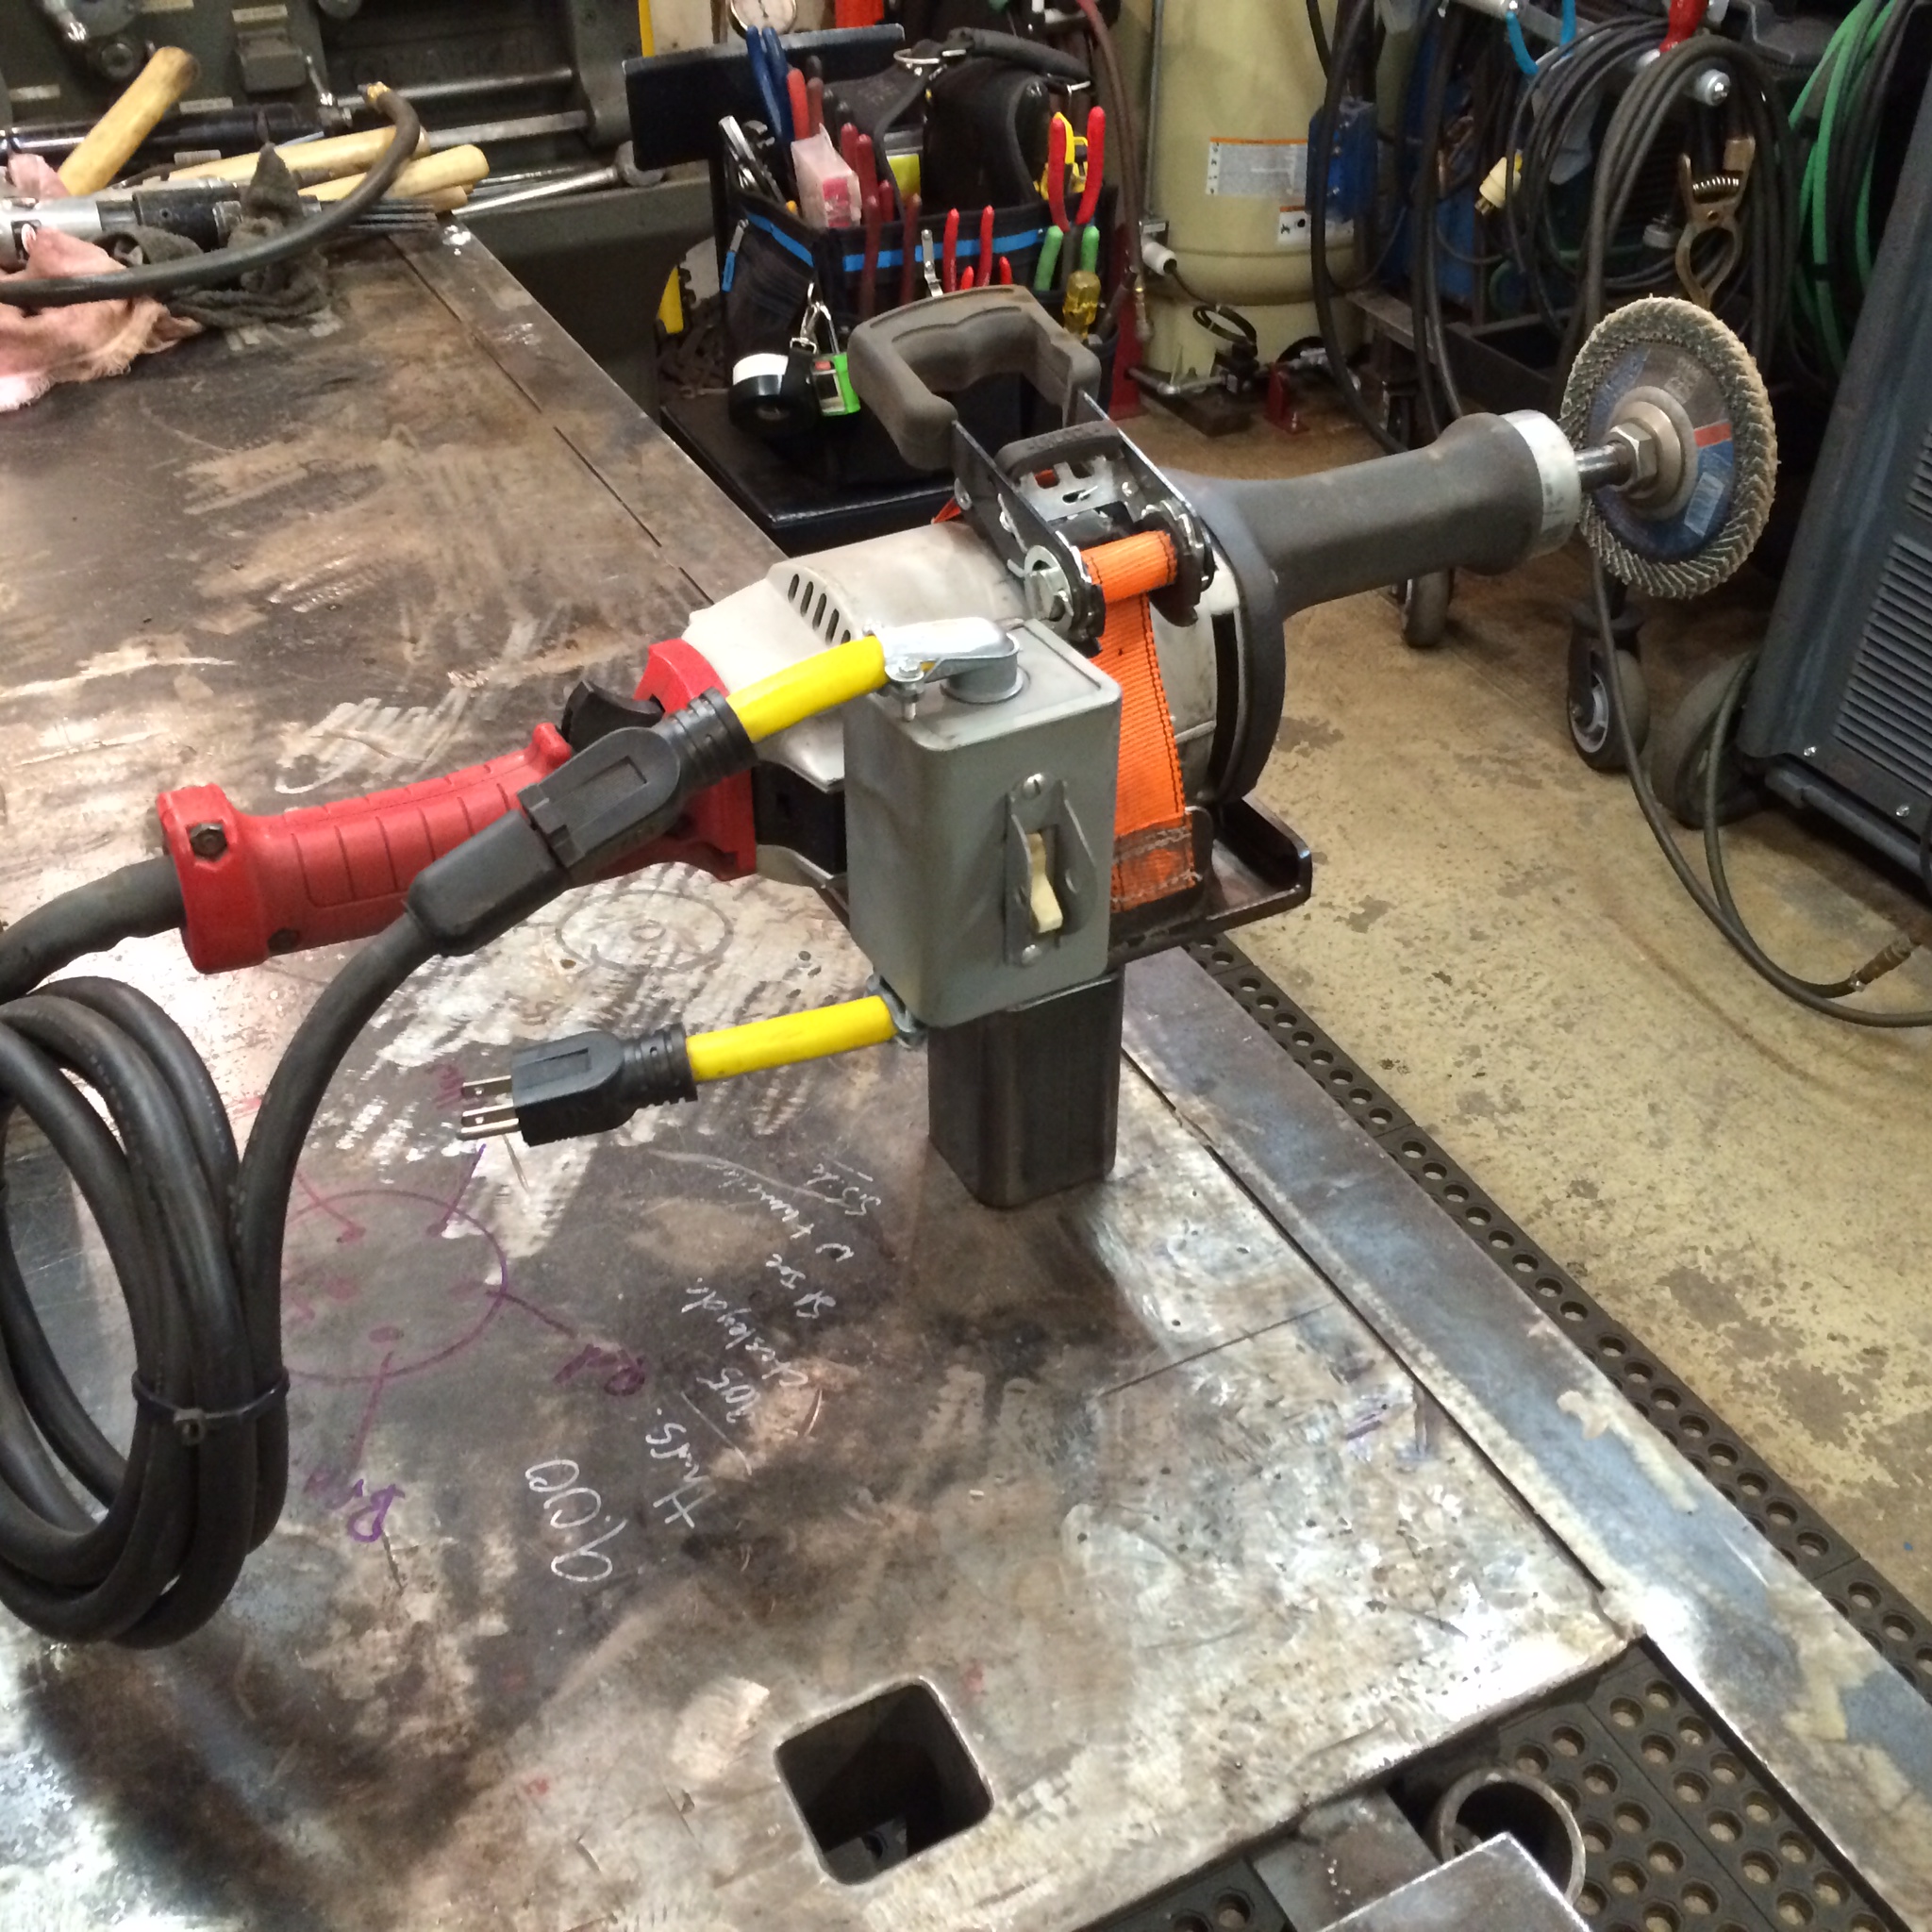
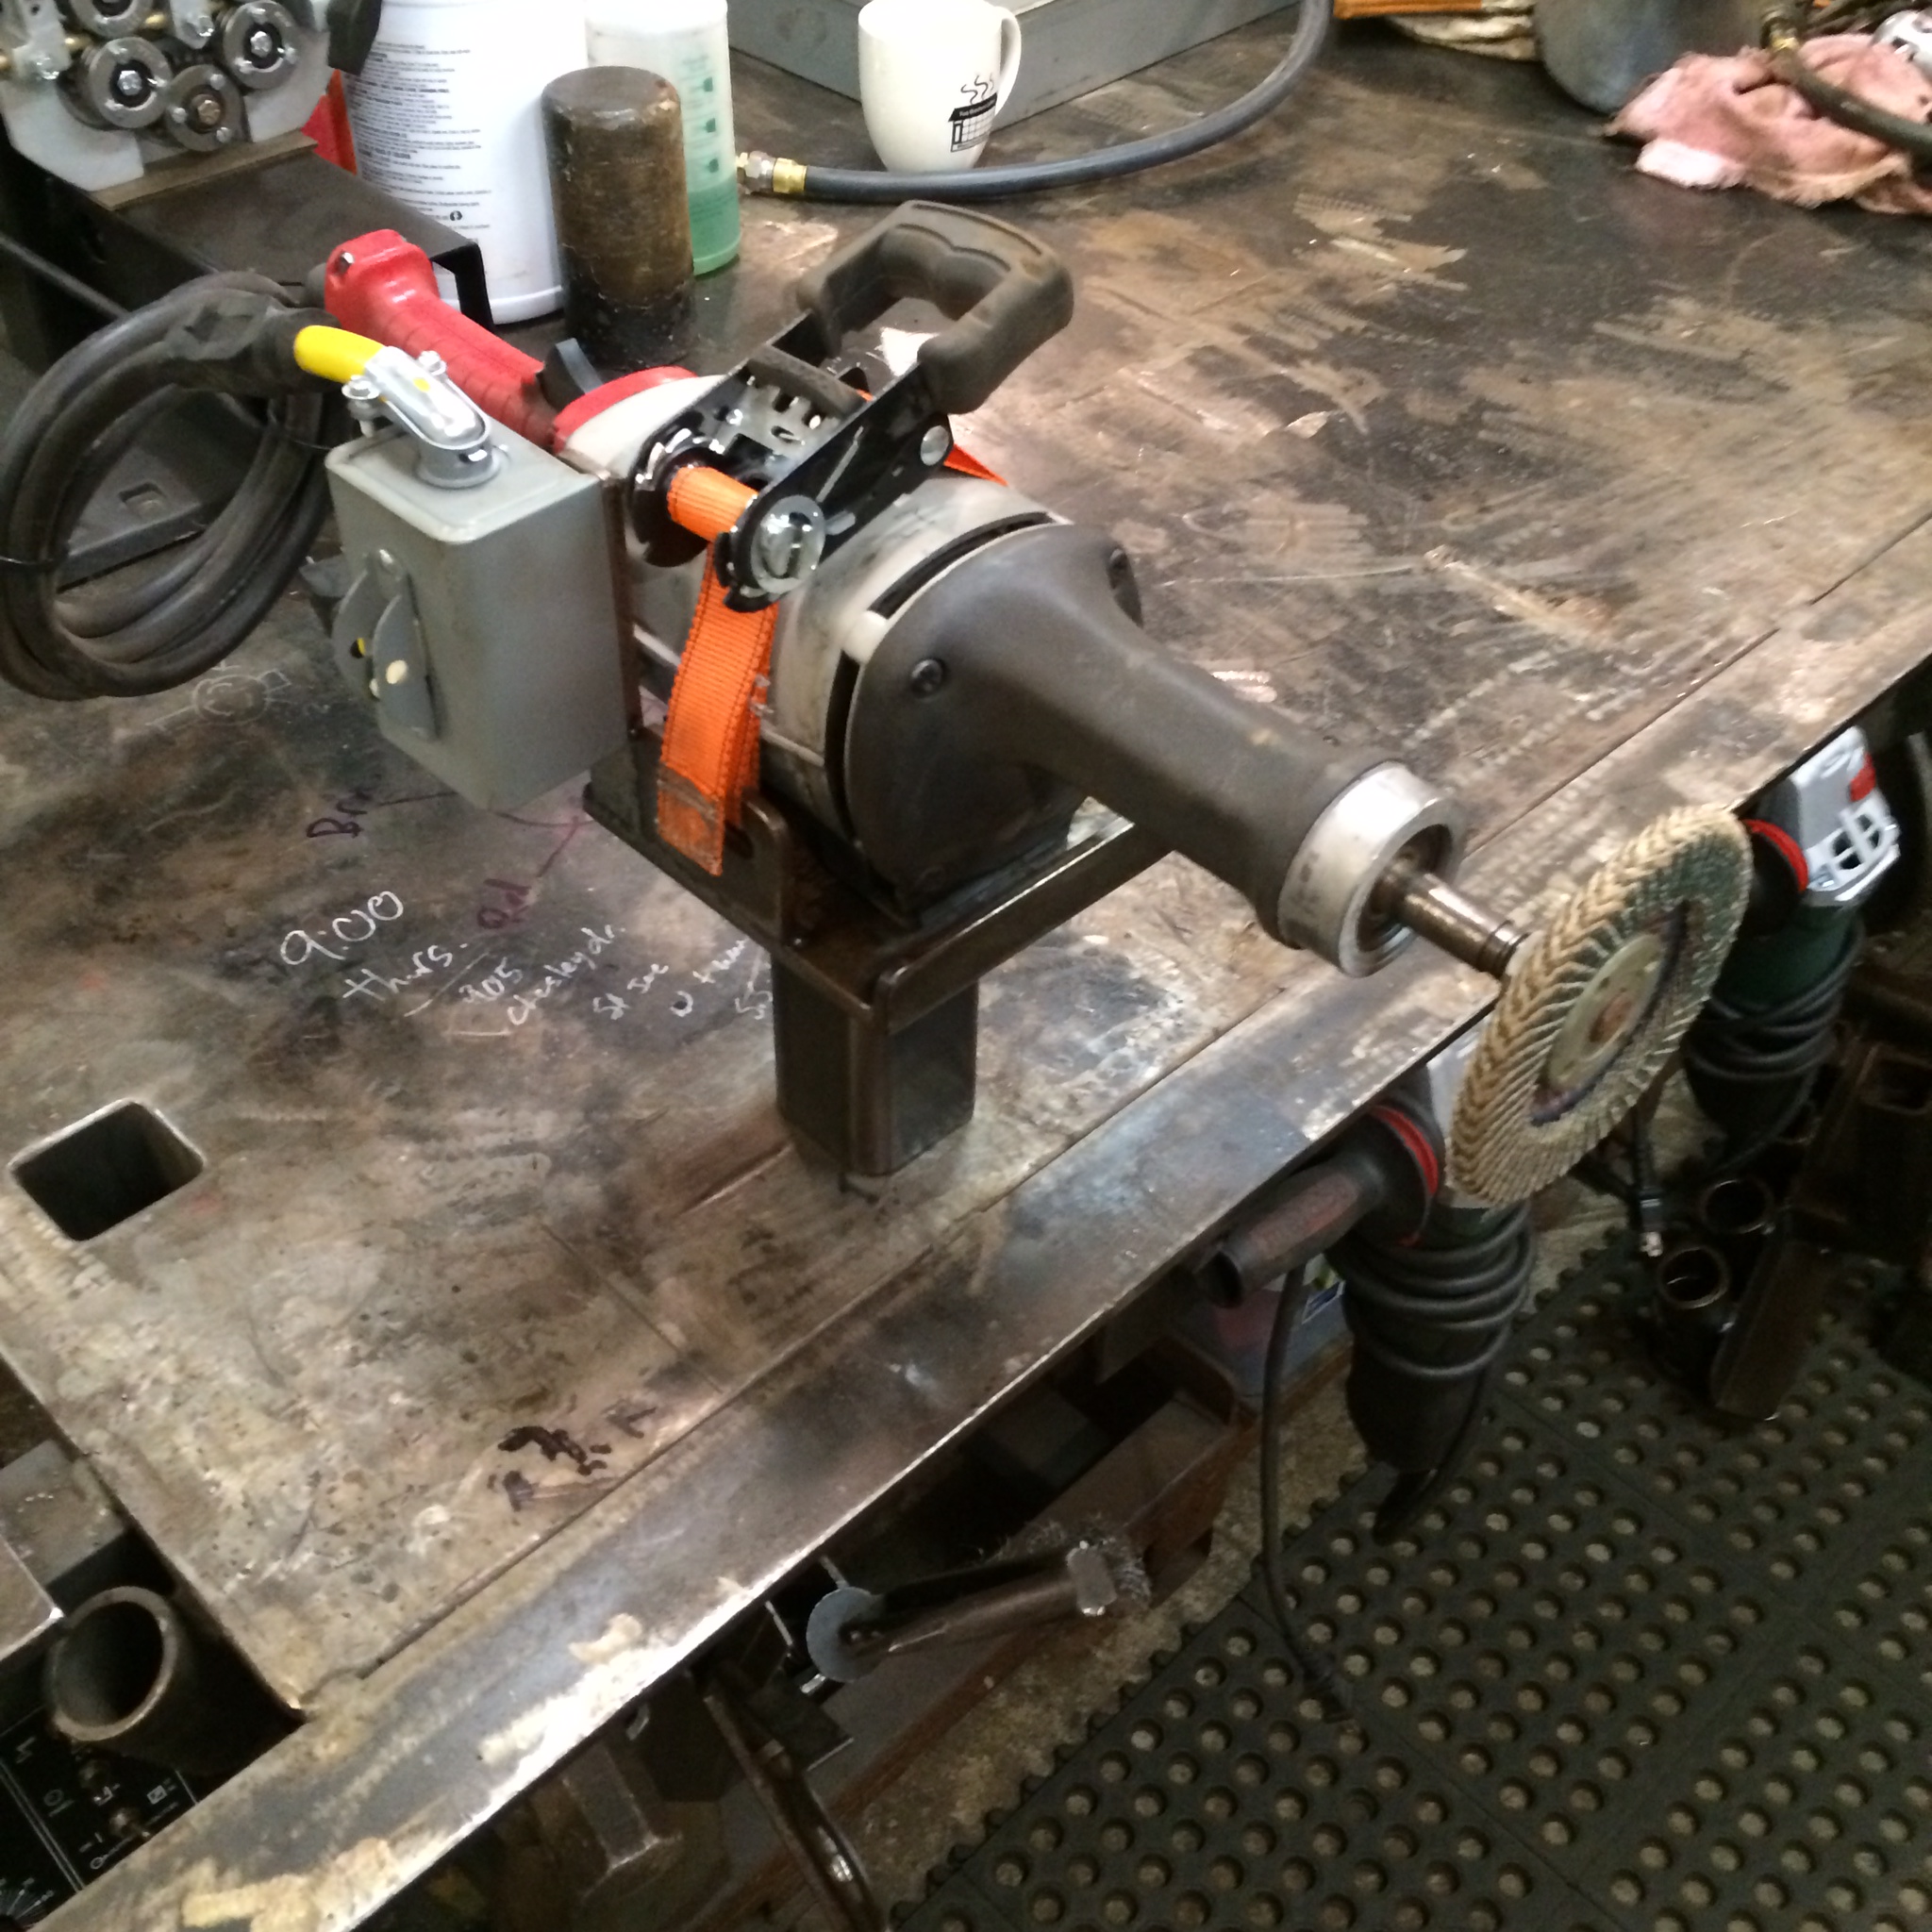
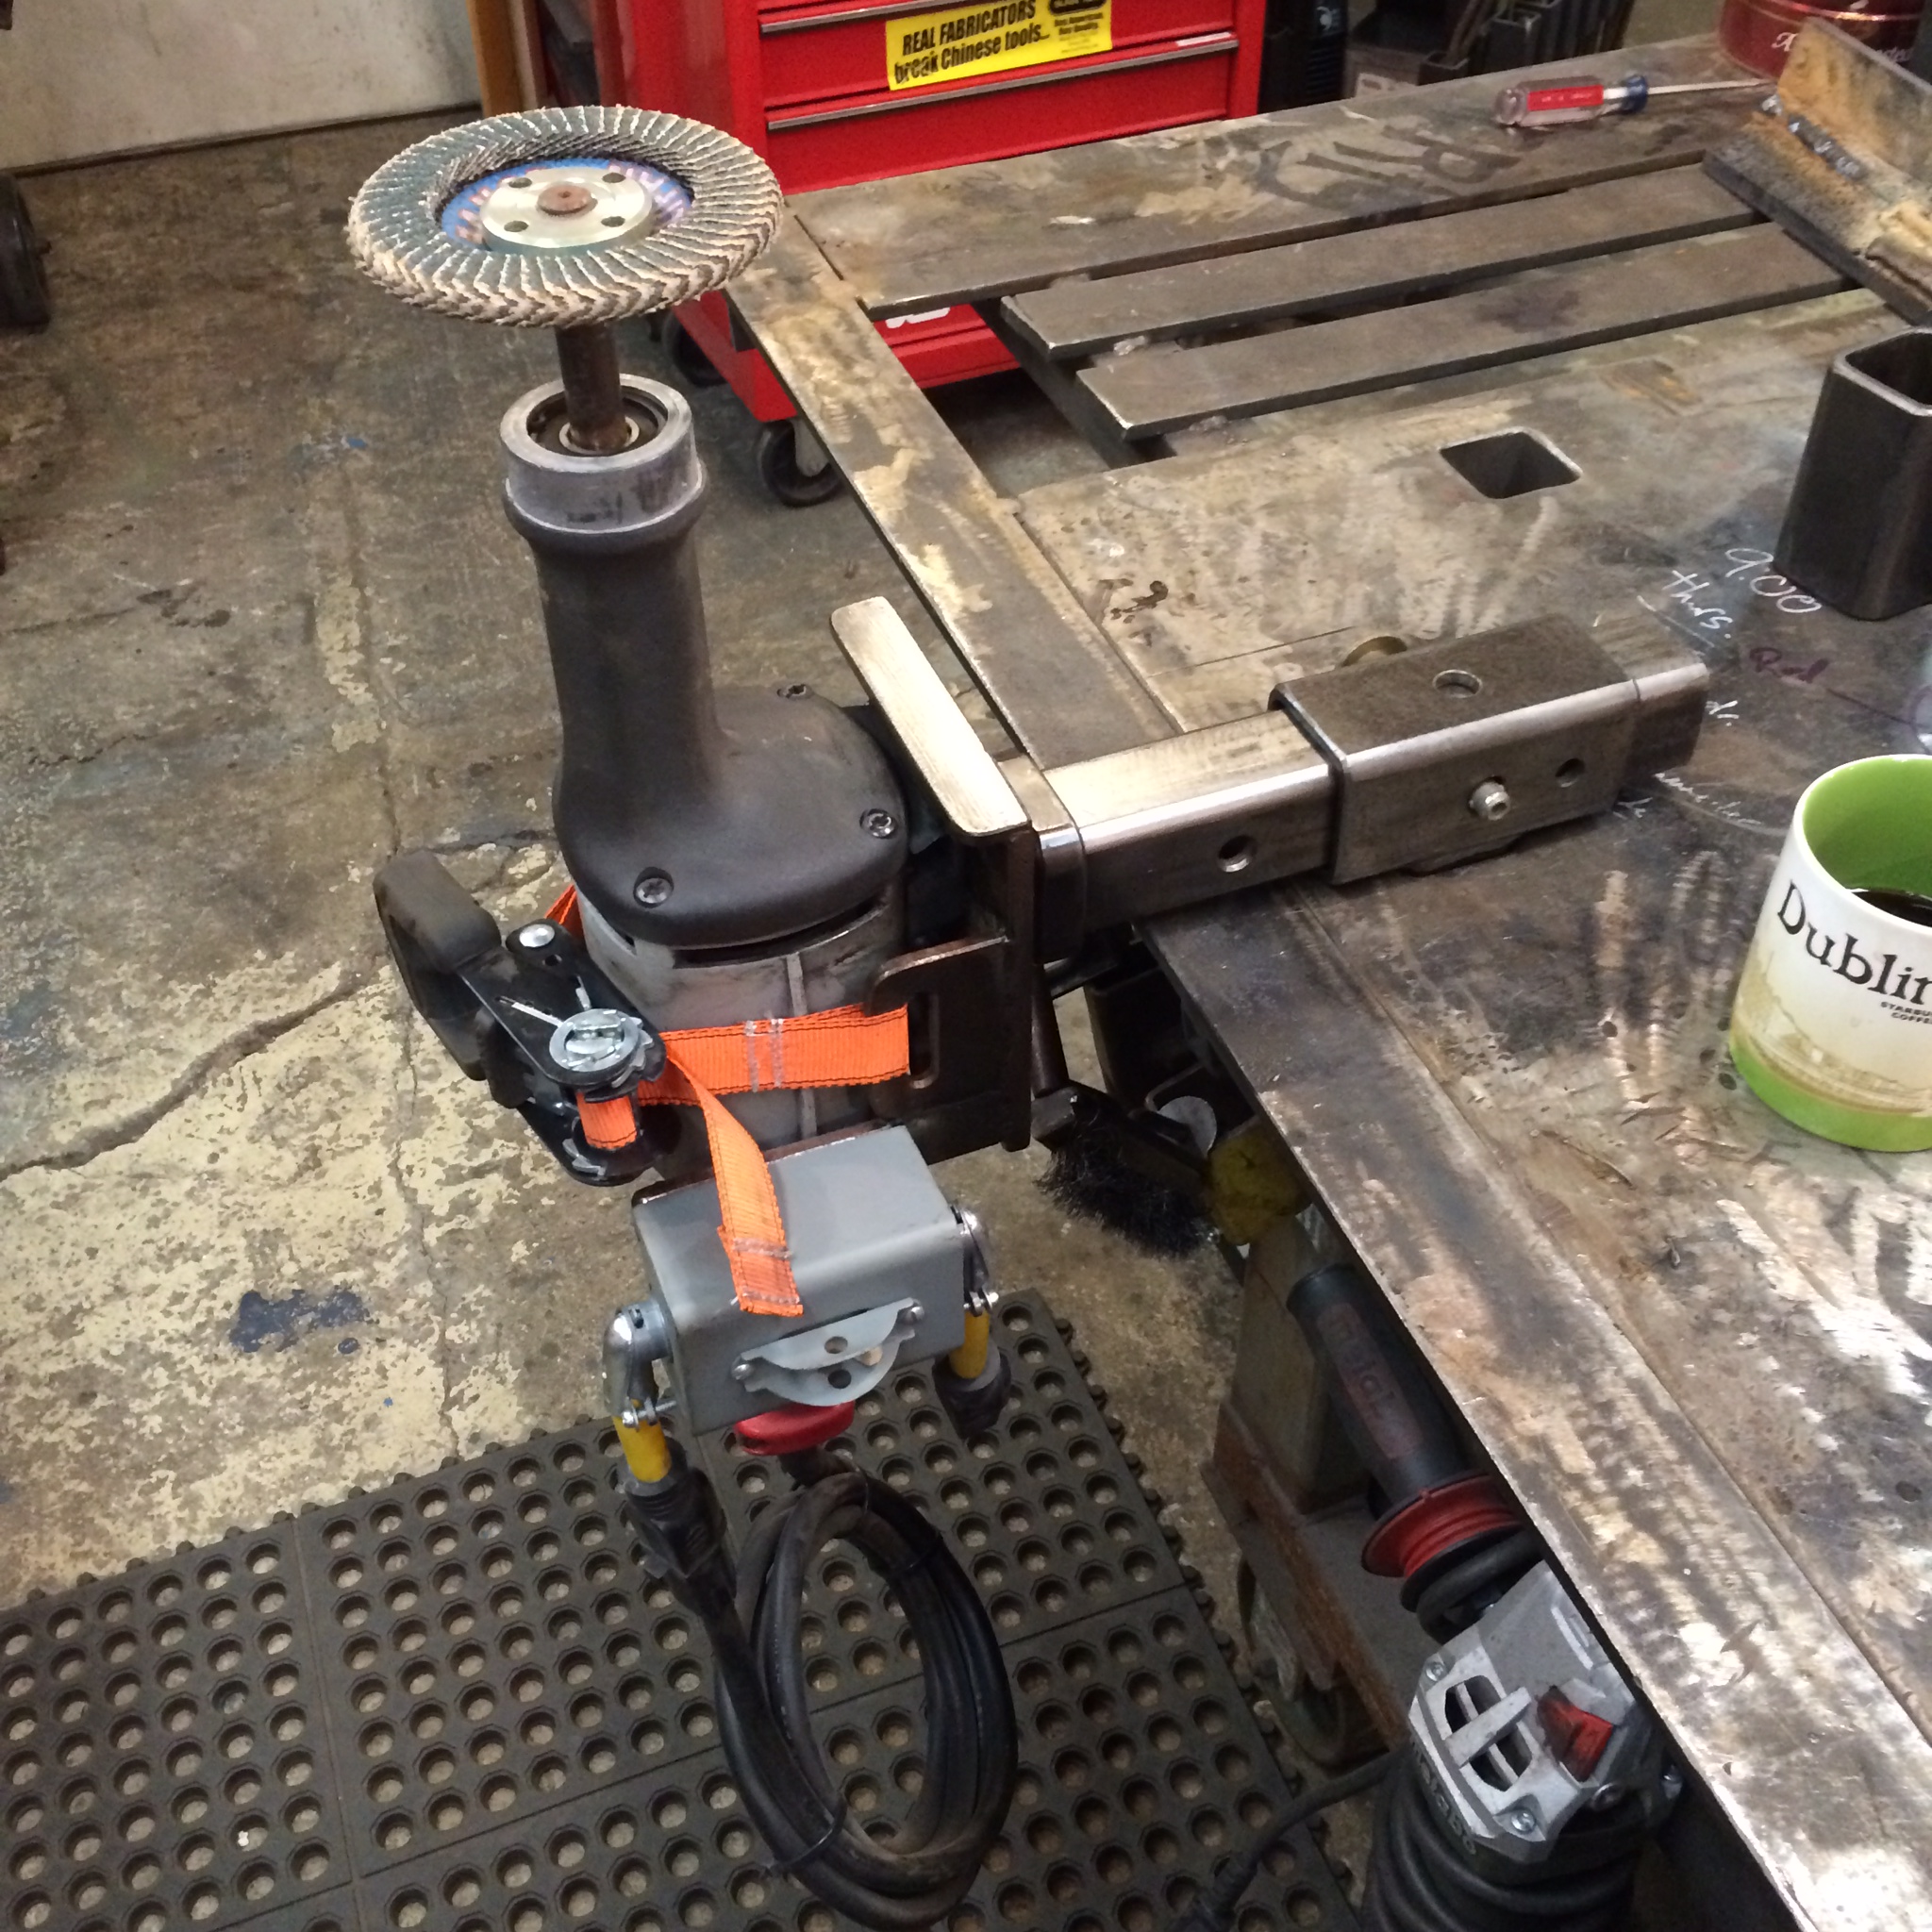
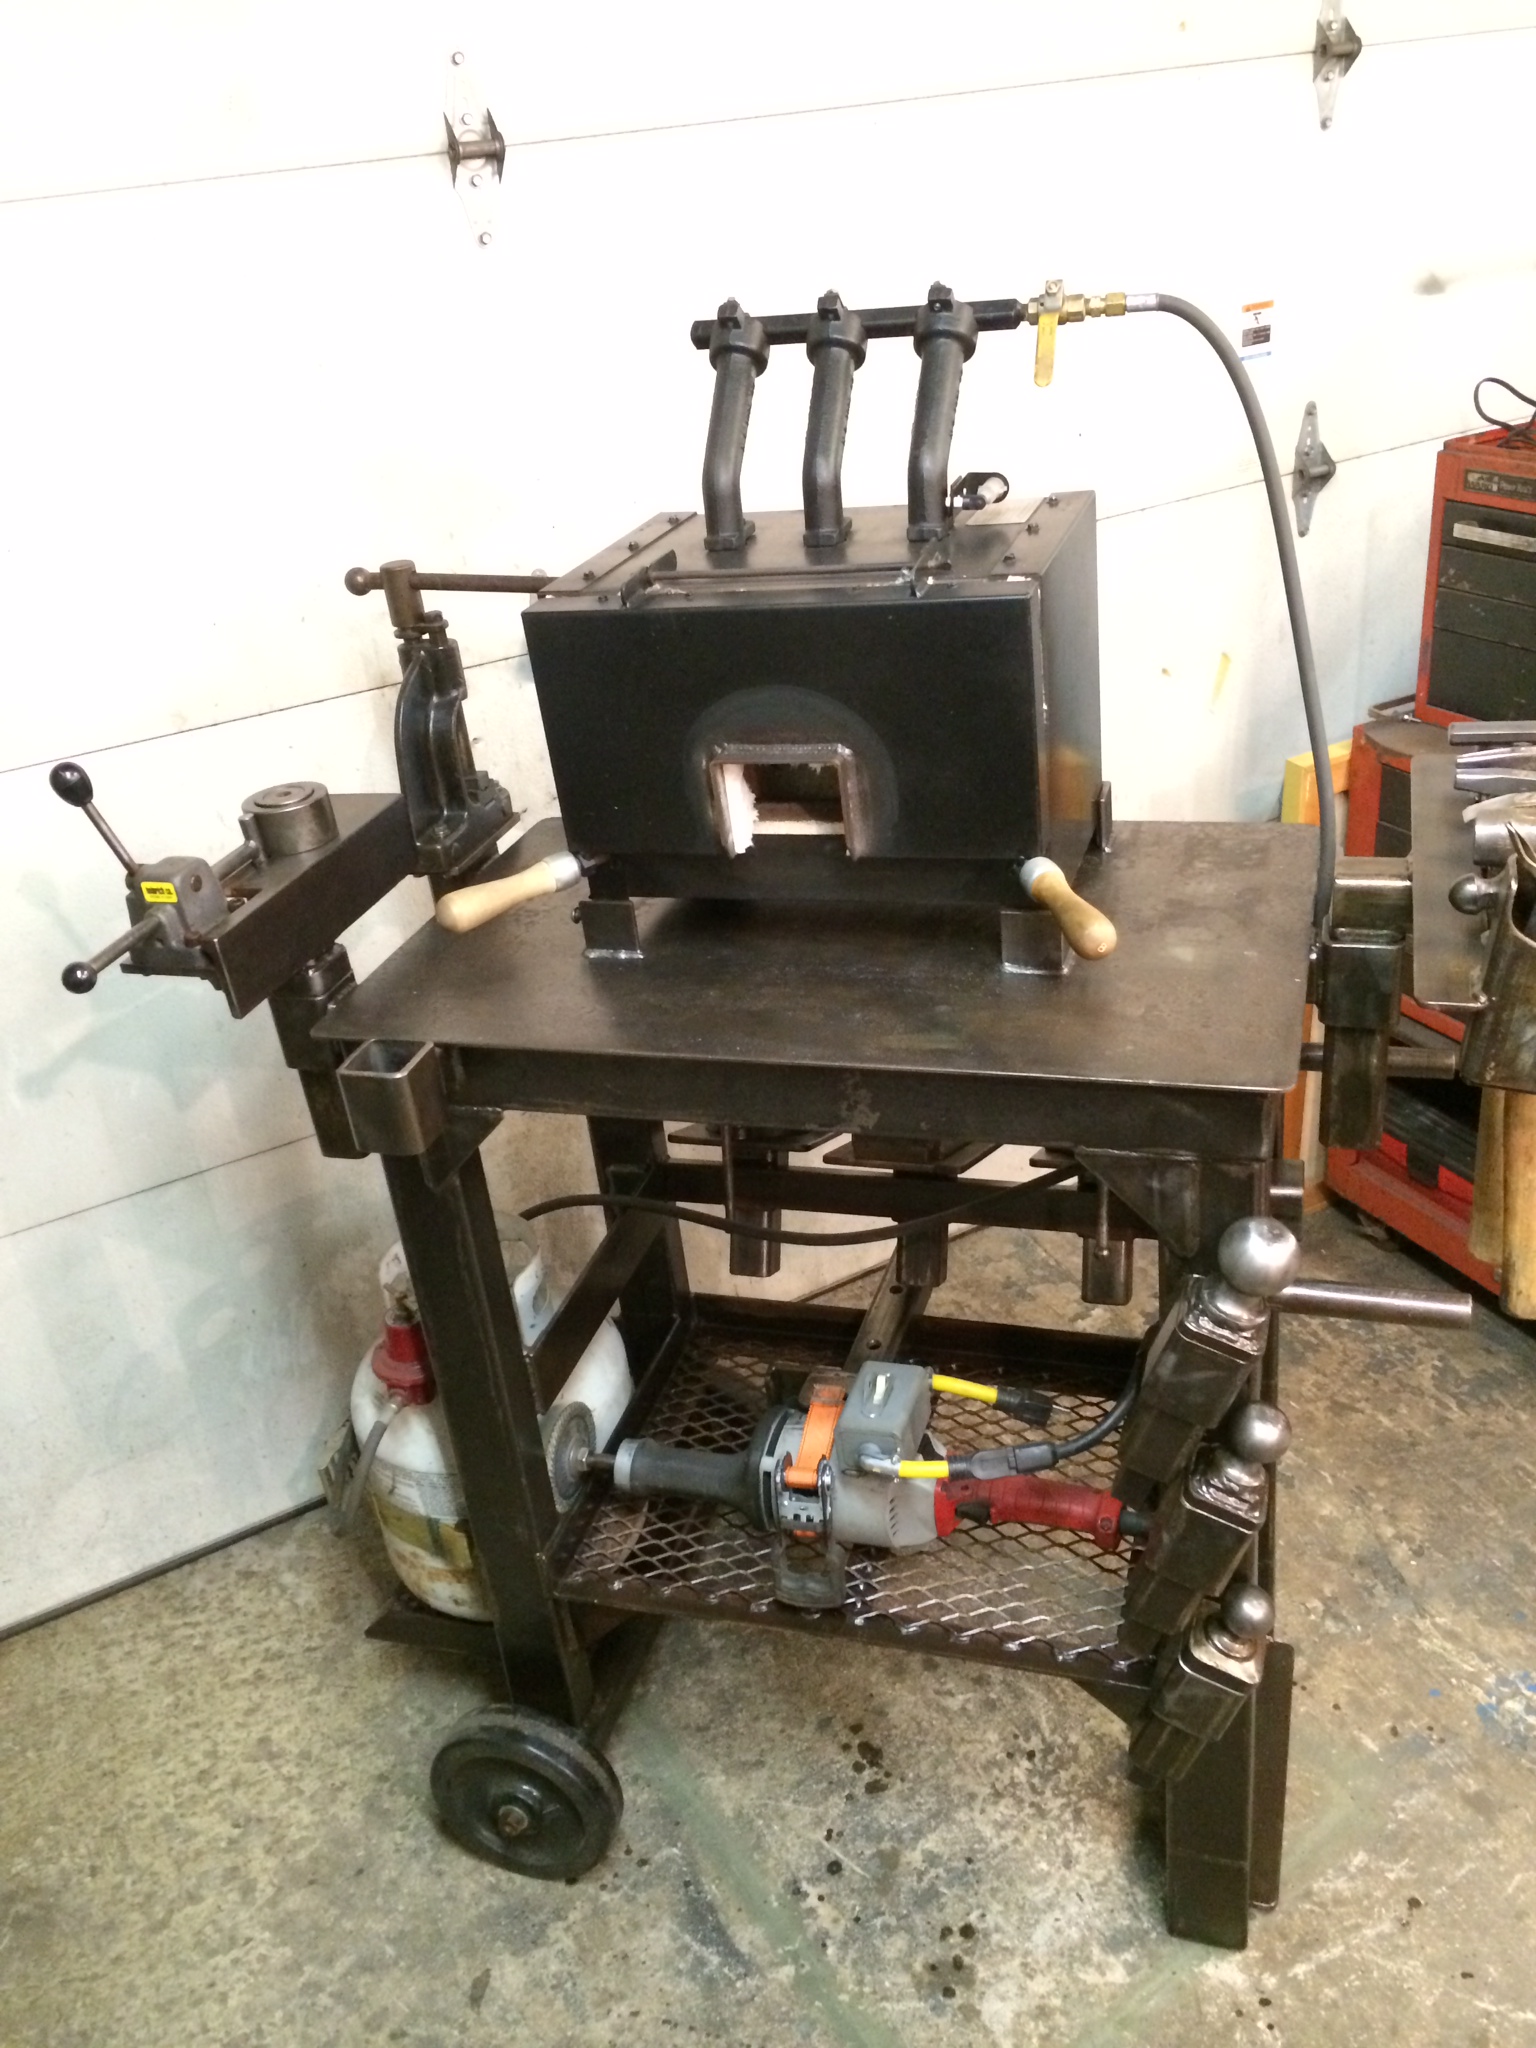
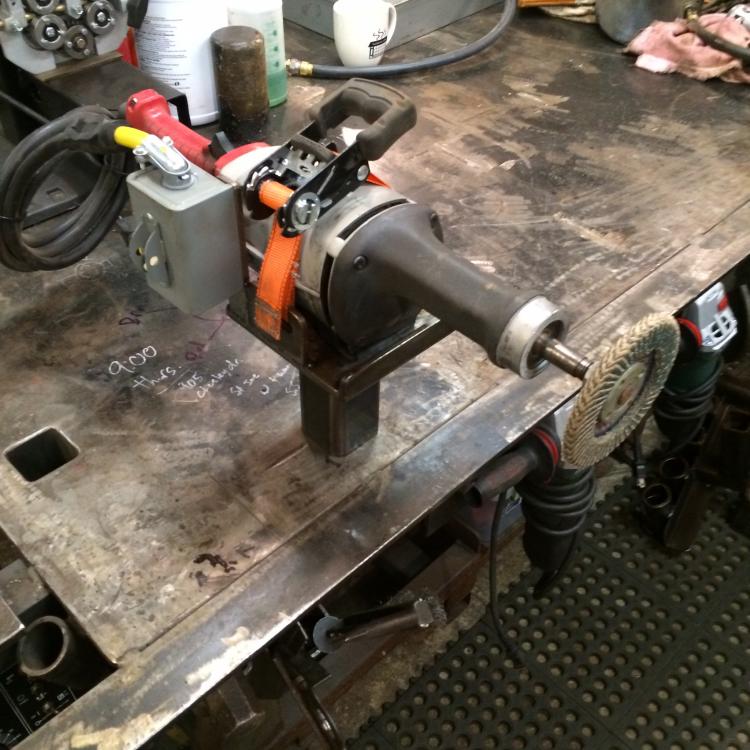
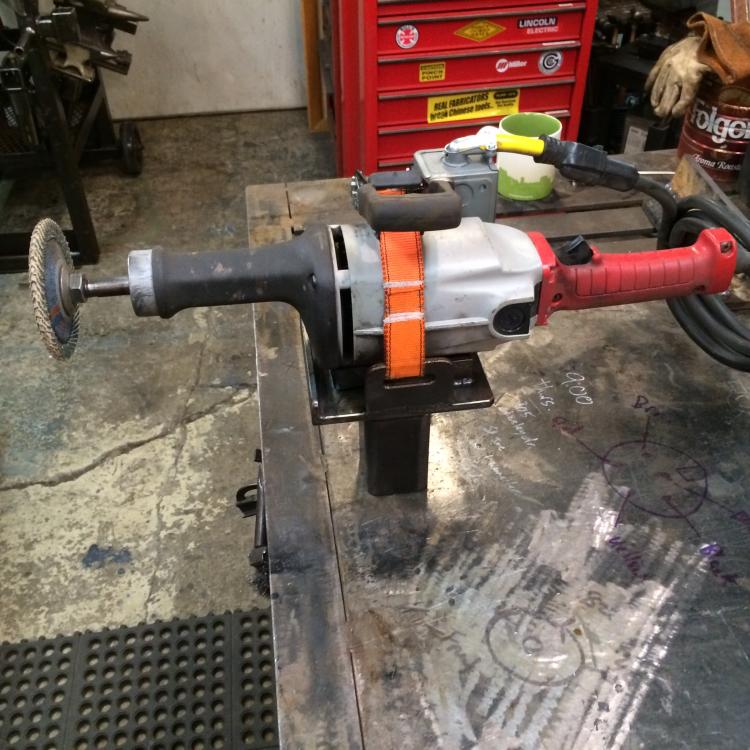
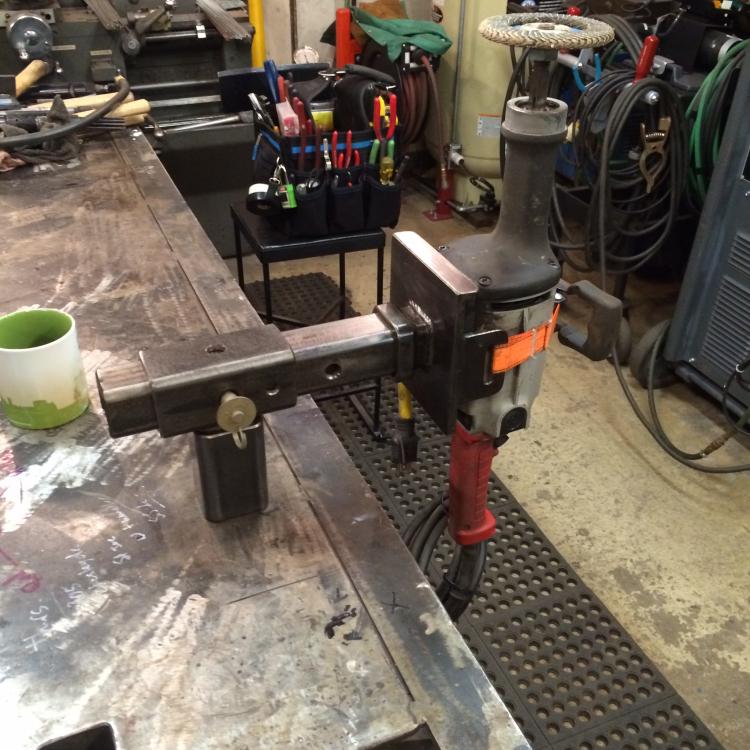
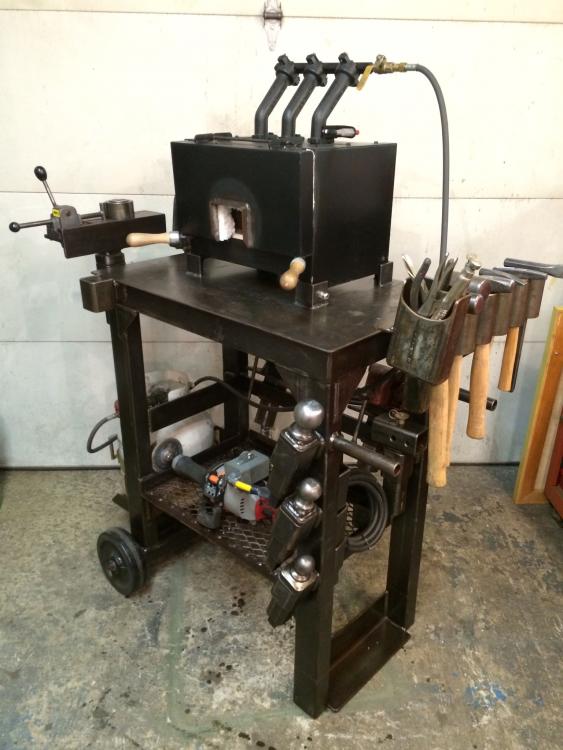
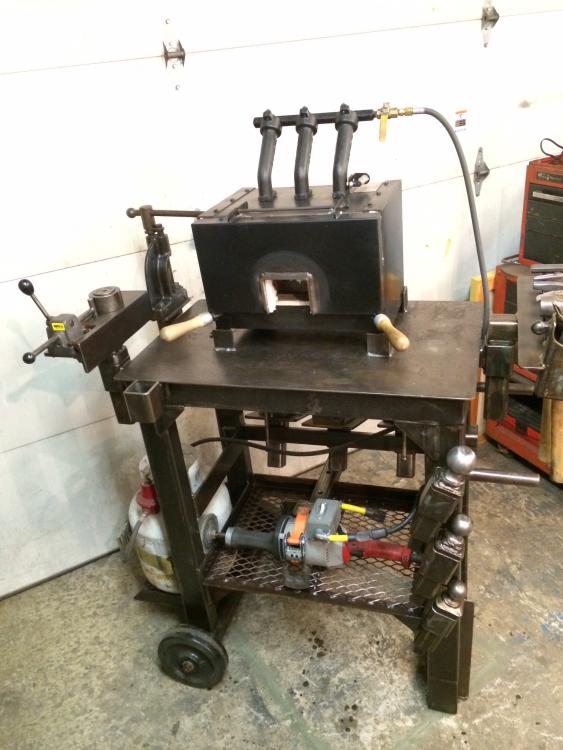
Last but certainly not least, I made a fixture to hold my large Milwaukee straight grinder for doing tight space work hands free. I used some cord adapters I bought at harbor freight and a heavy duty light switch box. I just plug the grinder into the switch and plug an extension cord into the other end. Lock the trigger and let 'er rip. For all the safety hounds out there YES, I DO HAVE A GUARD FOR IT!! I had to do some close grinding with it last time I used it and removed it to do the work. It can also be mounted in the T fixture and be used in a vertical position if needed. Finally, the cart all loaded up. Any size propane cylinder can be used, I just have a small one on it for portability. Well, that's about the long and short of it. I apologize for the length of the post. Thanks for viewing!


-
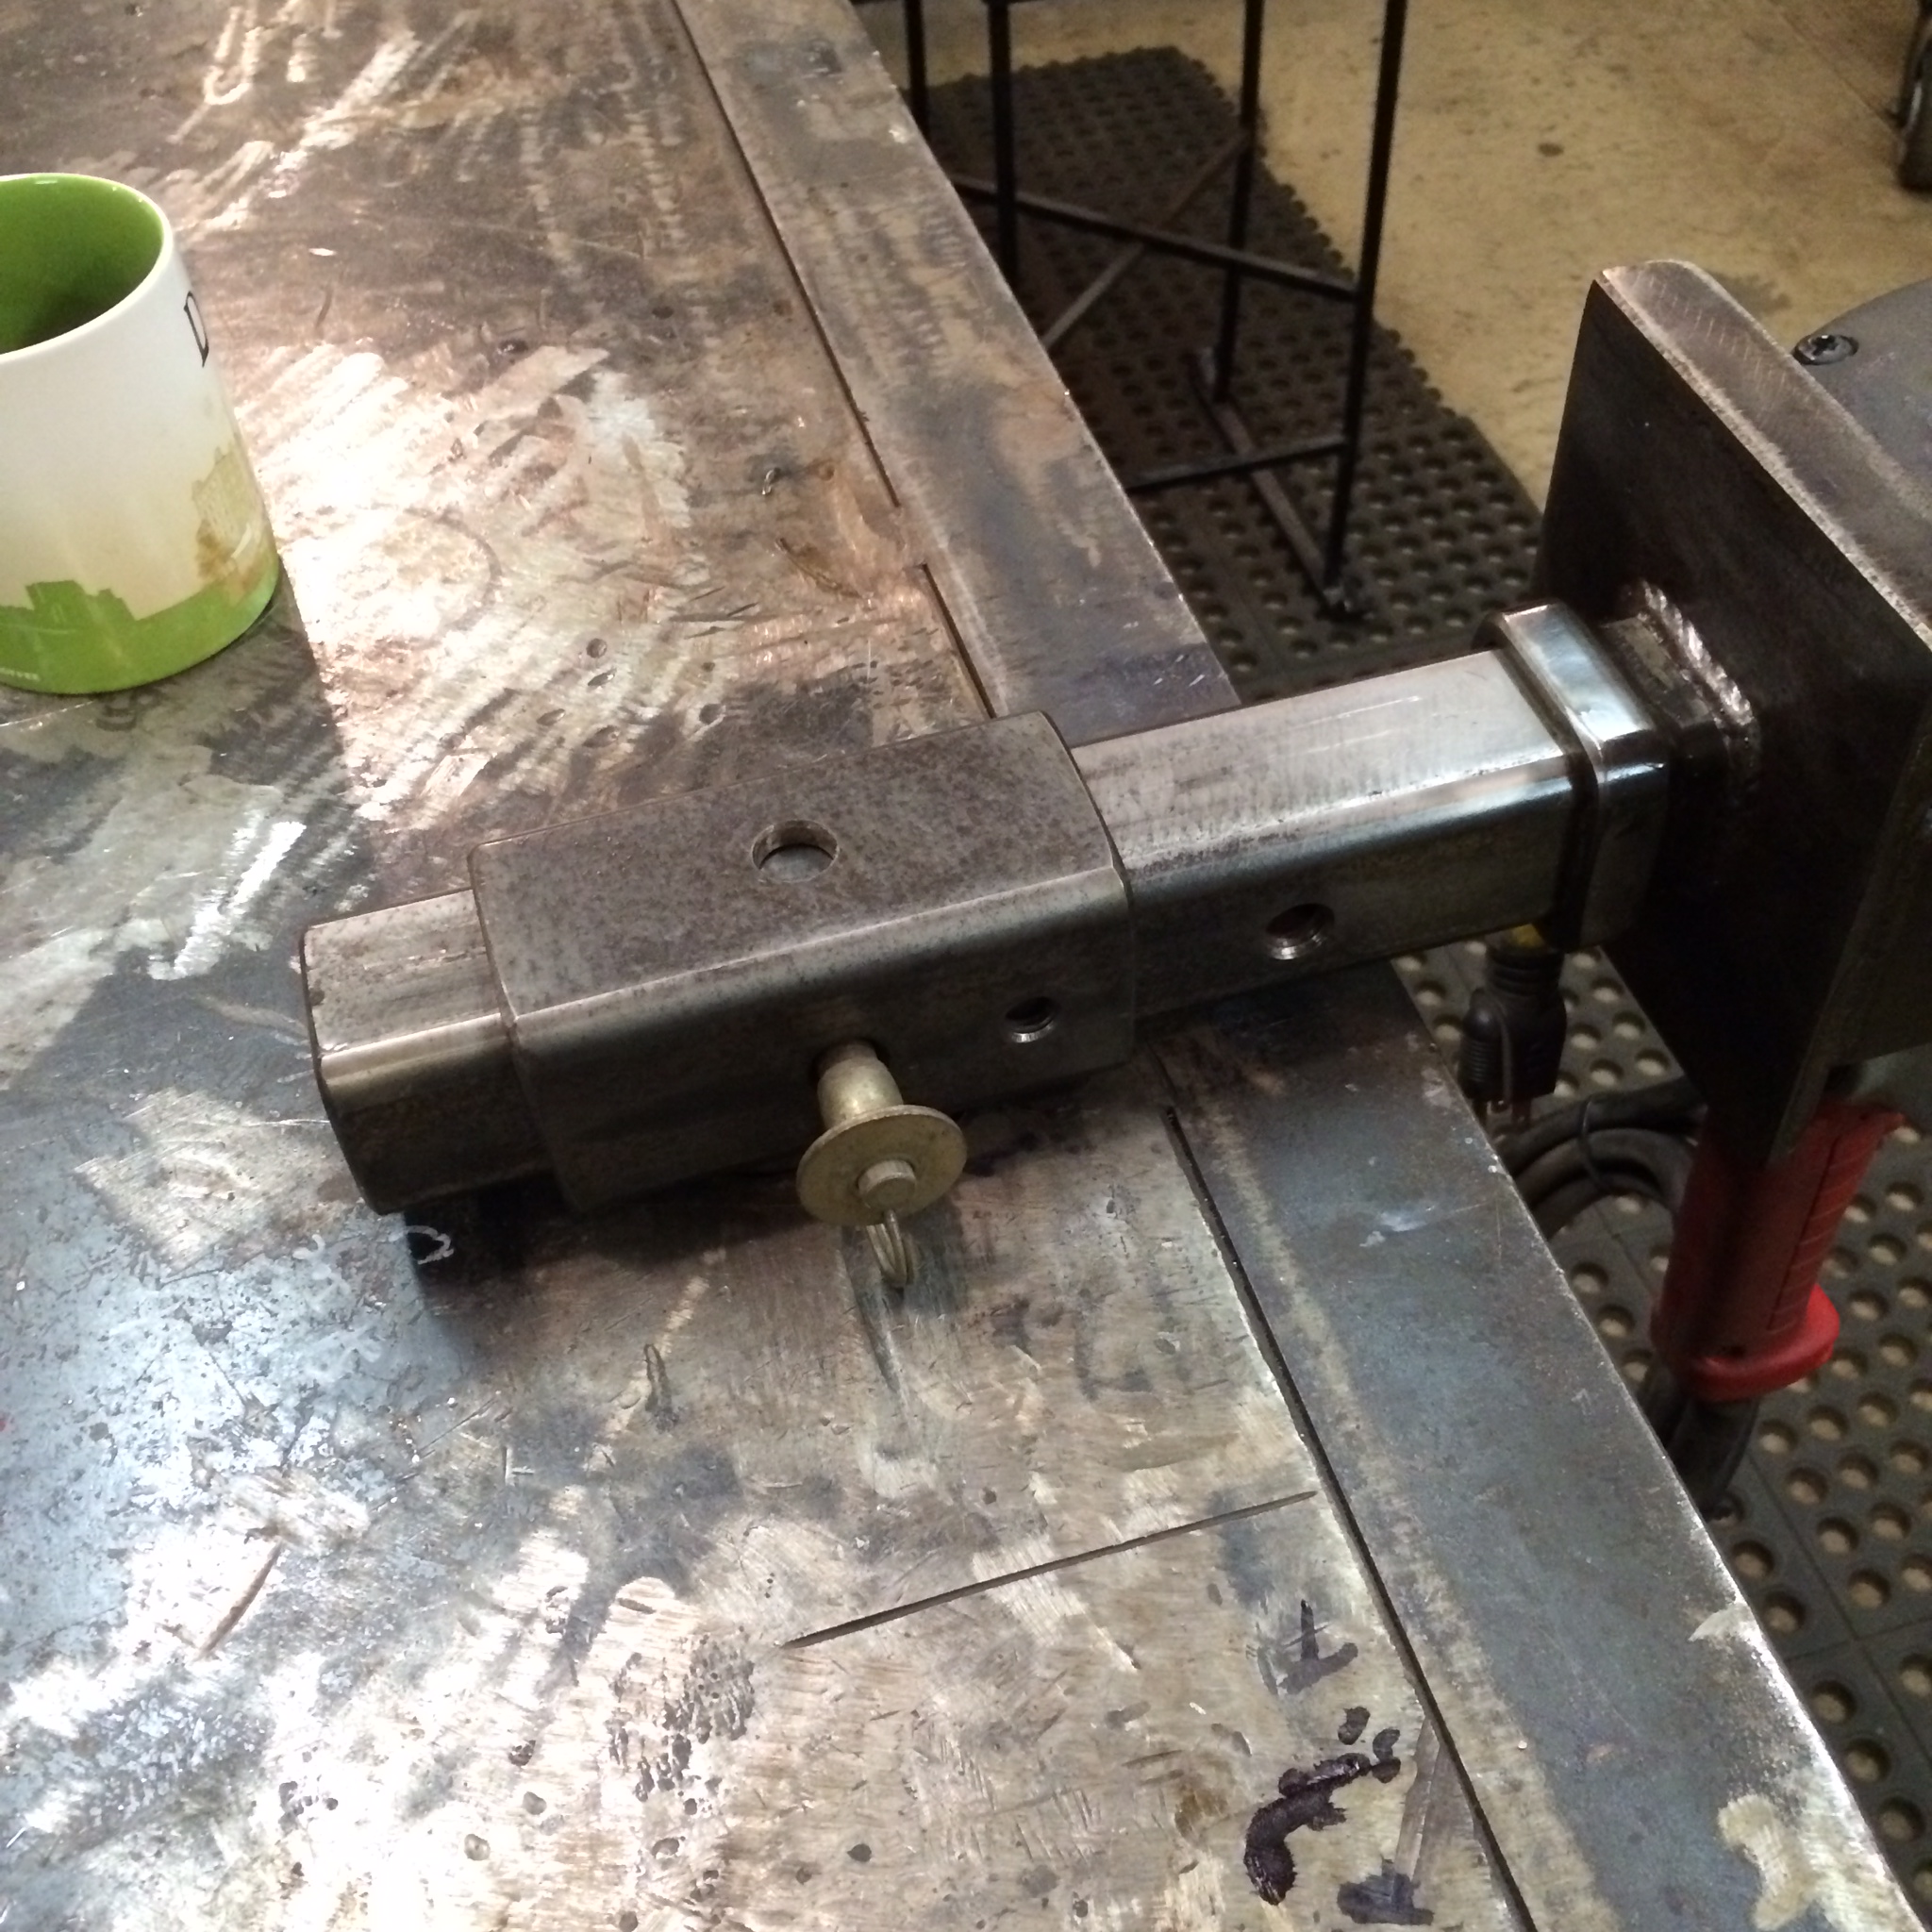
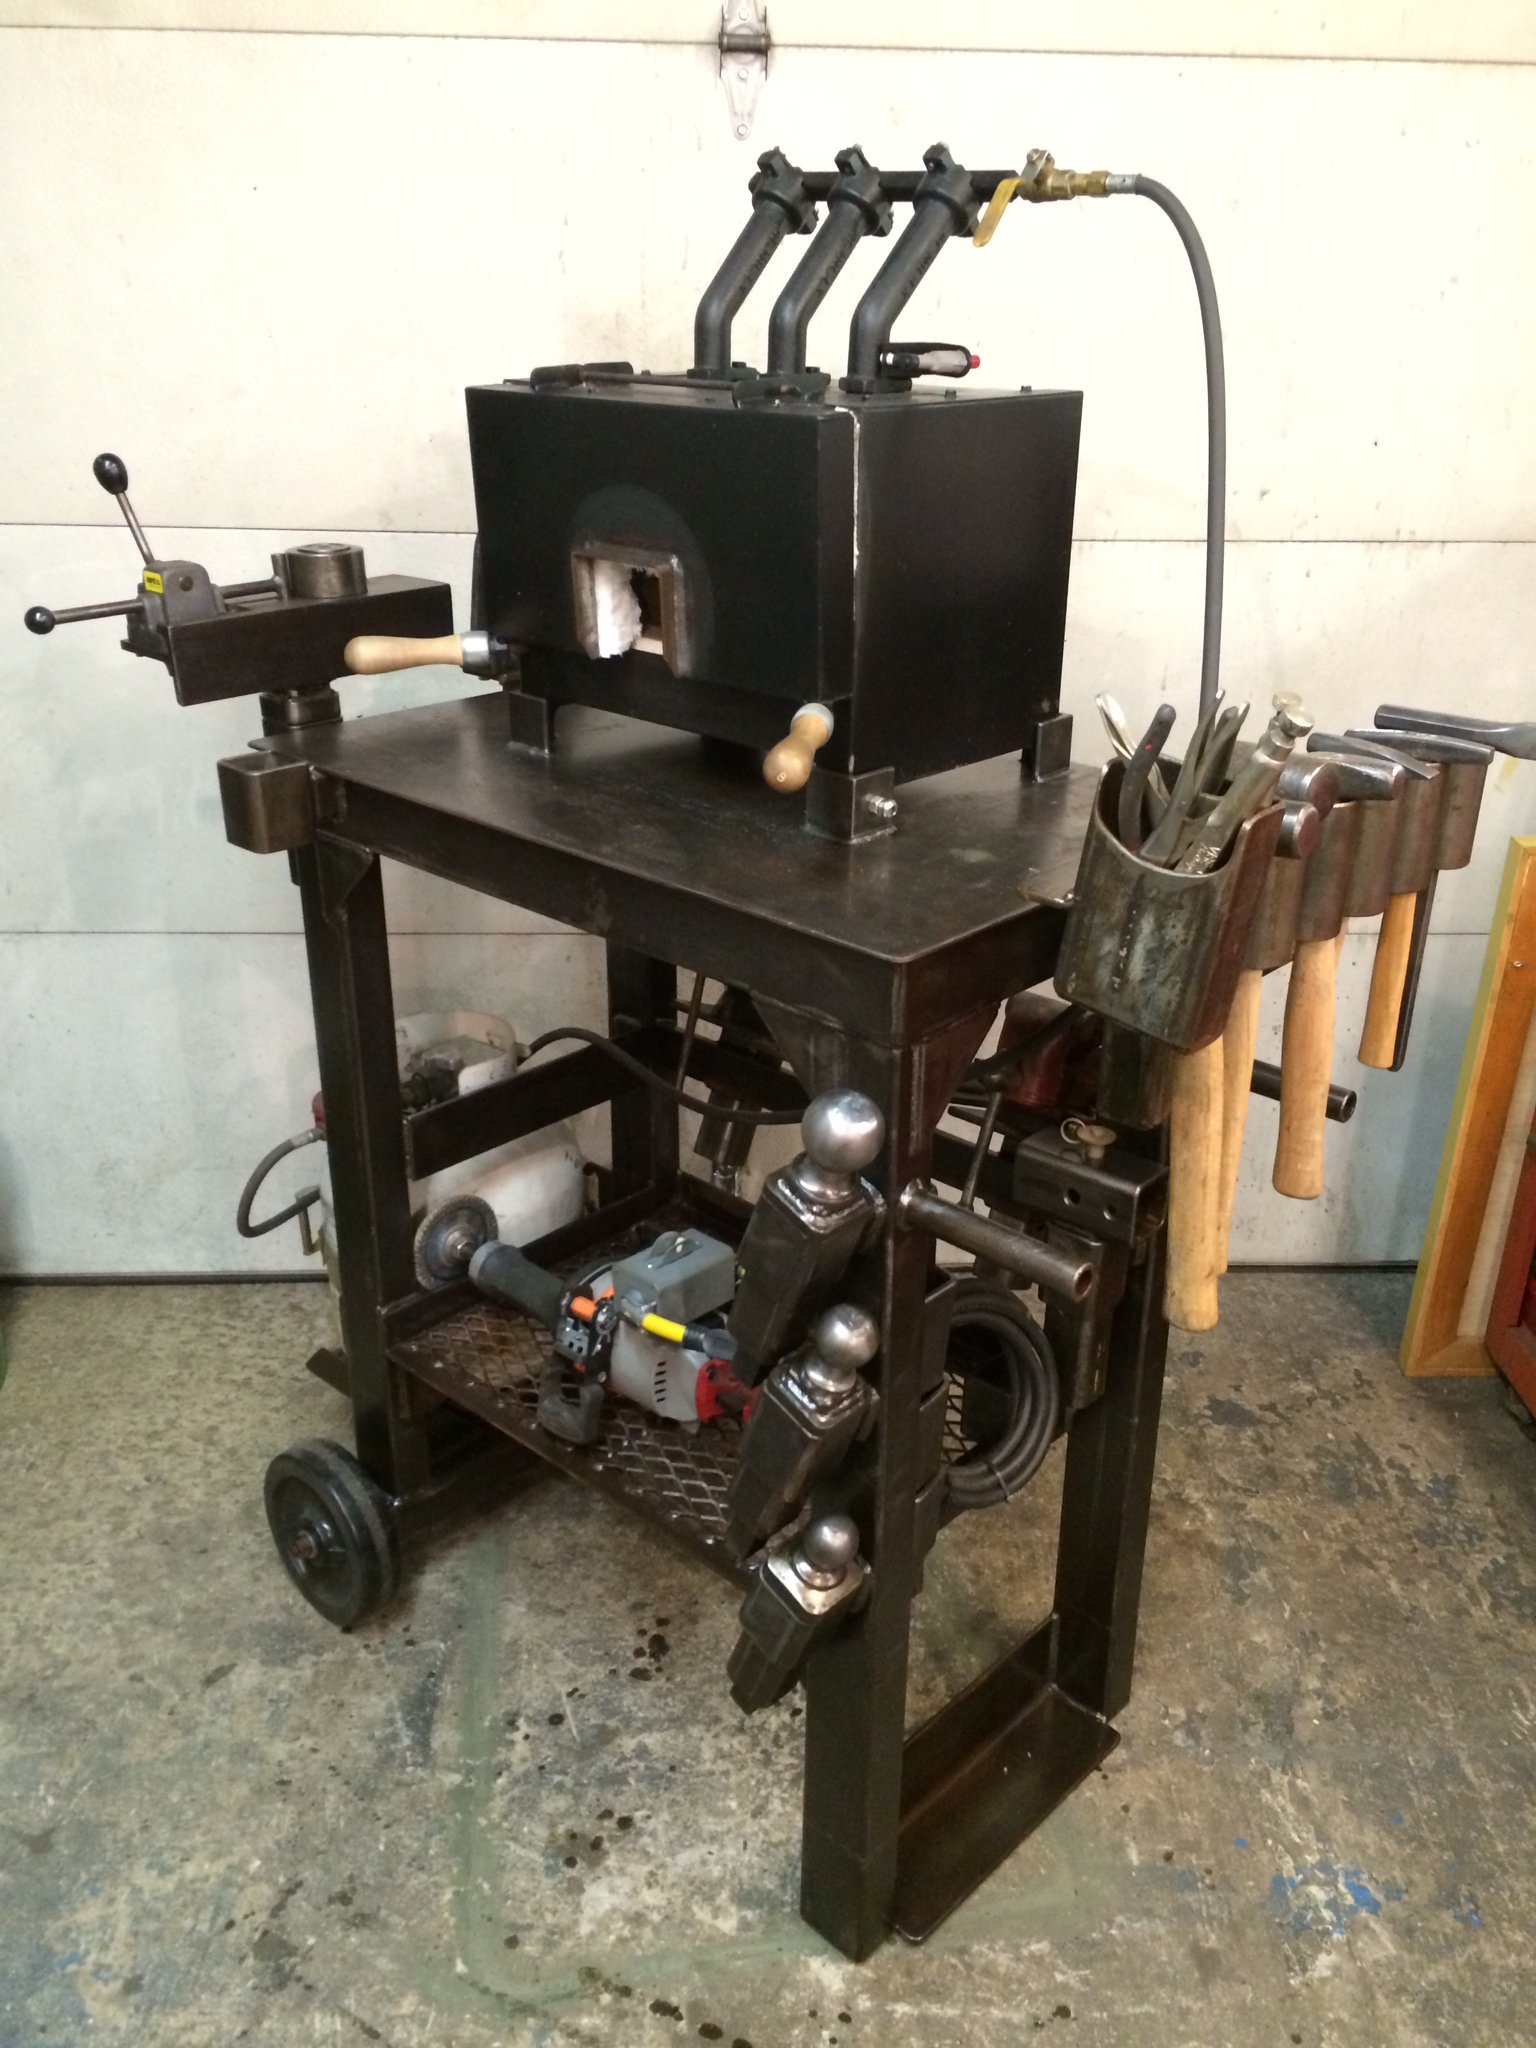
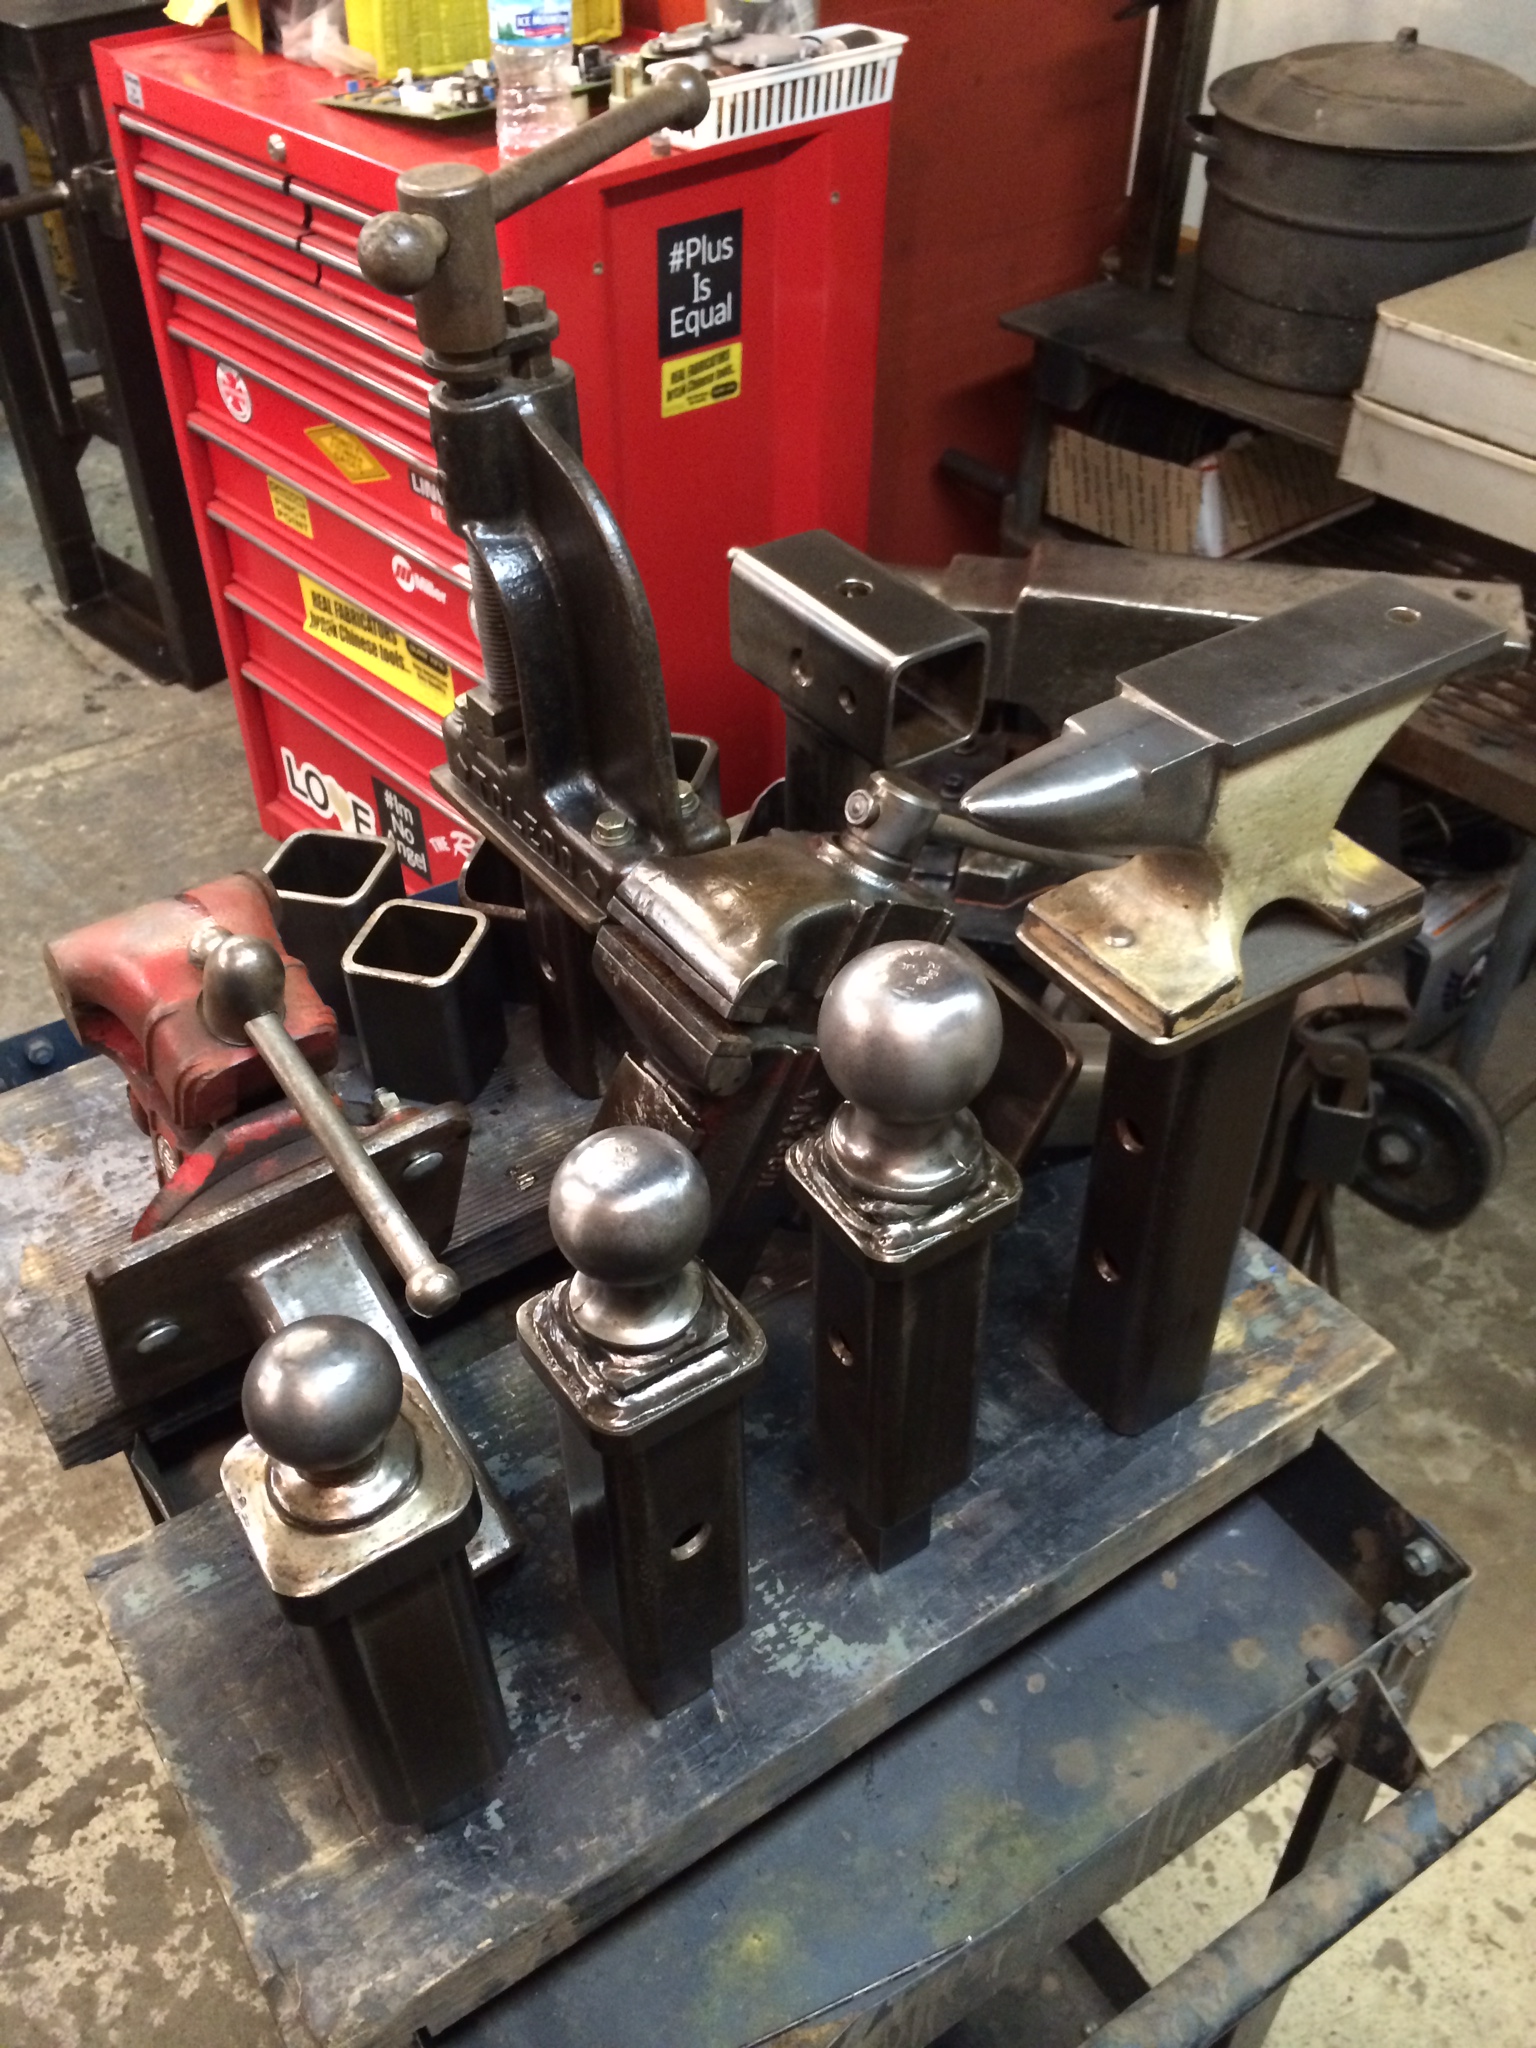
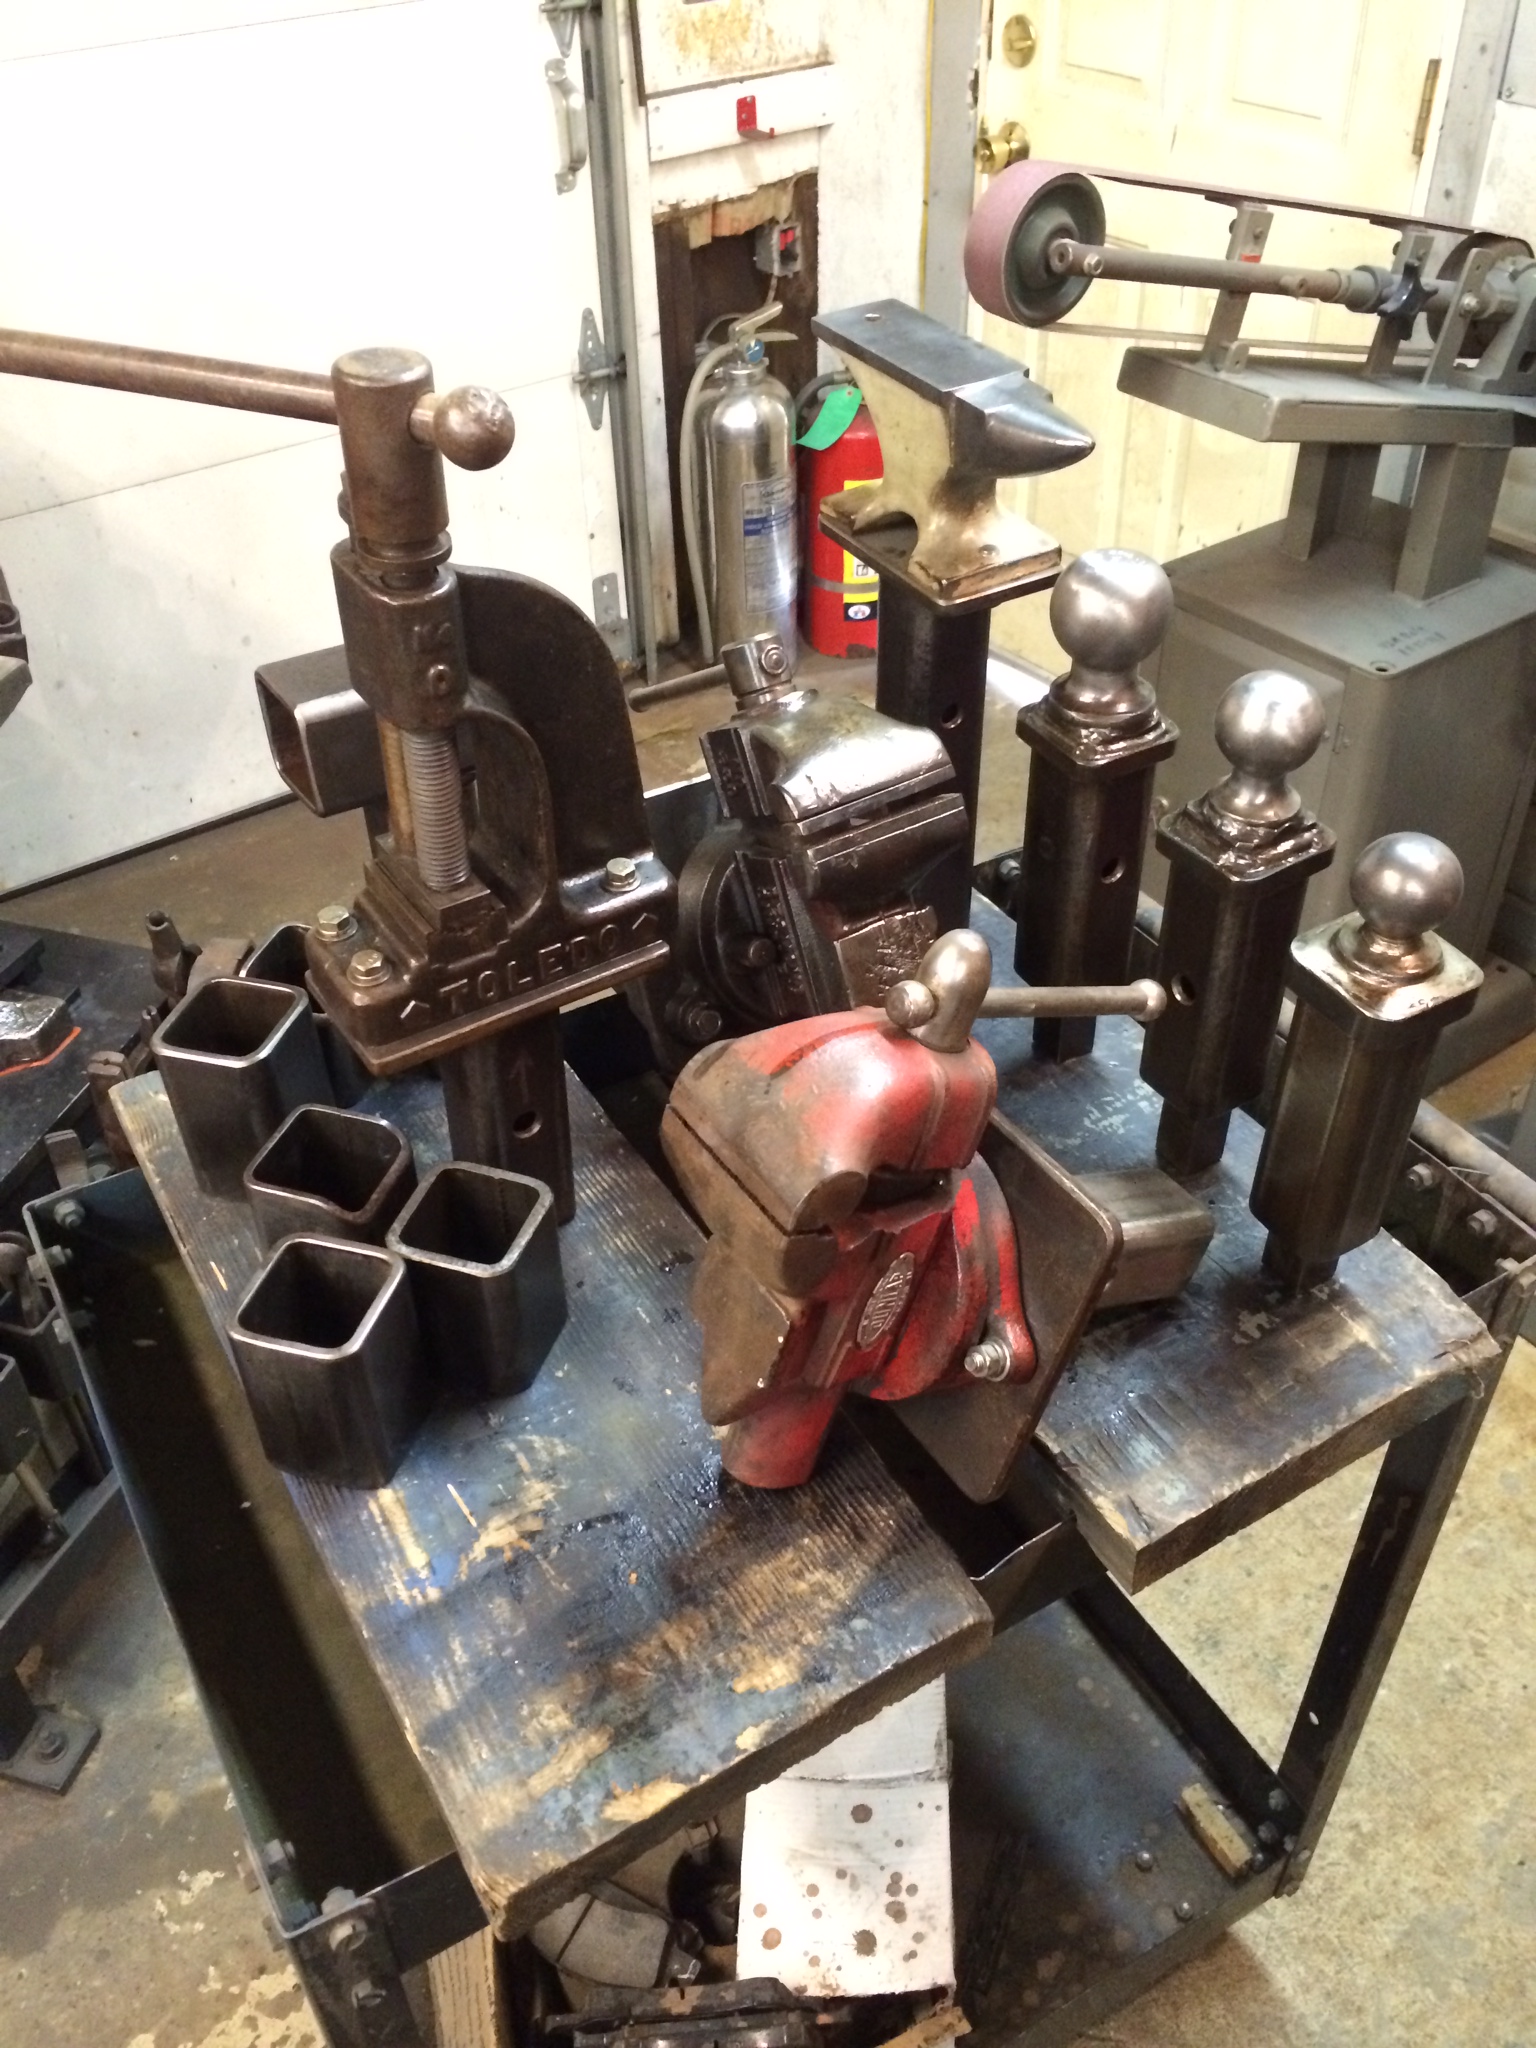
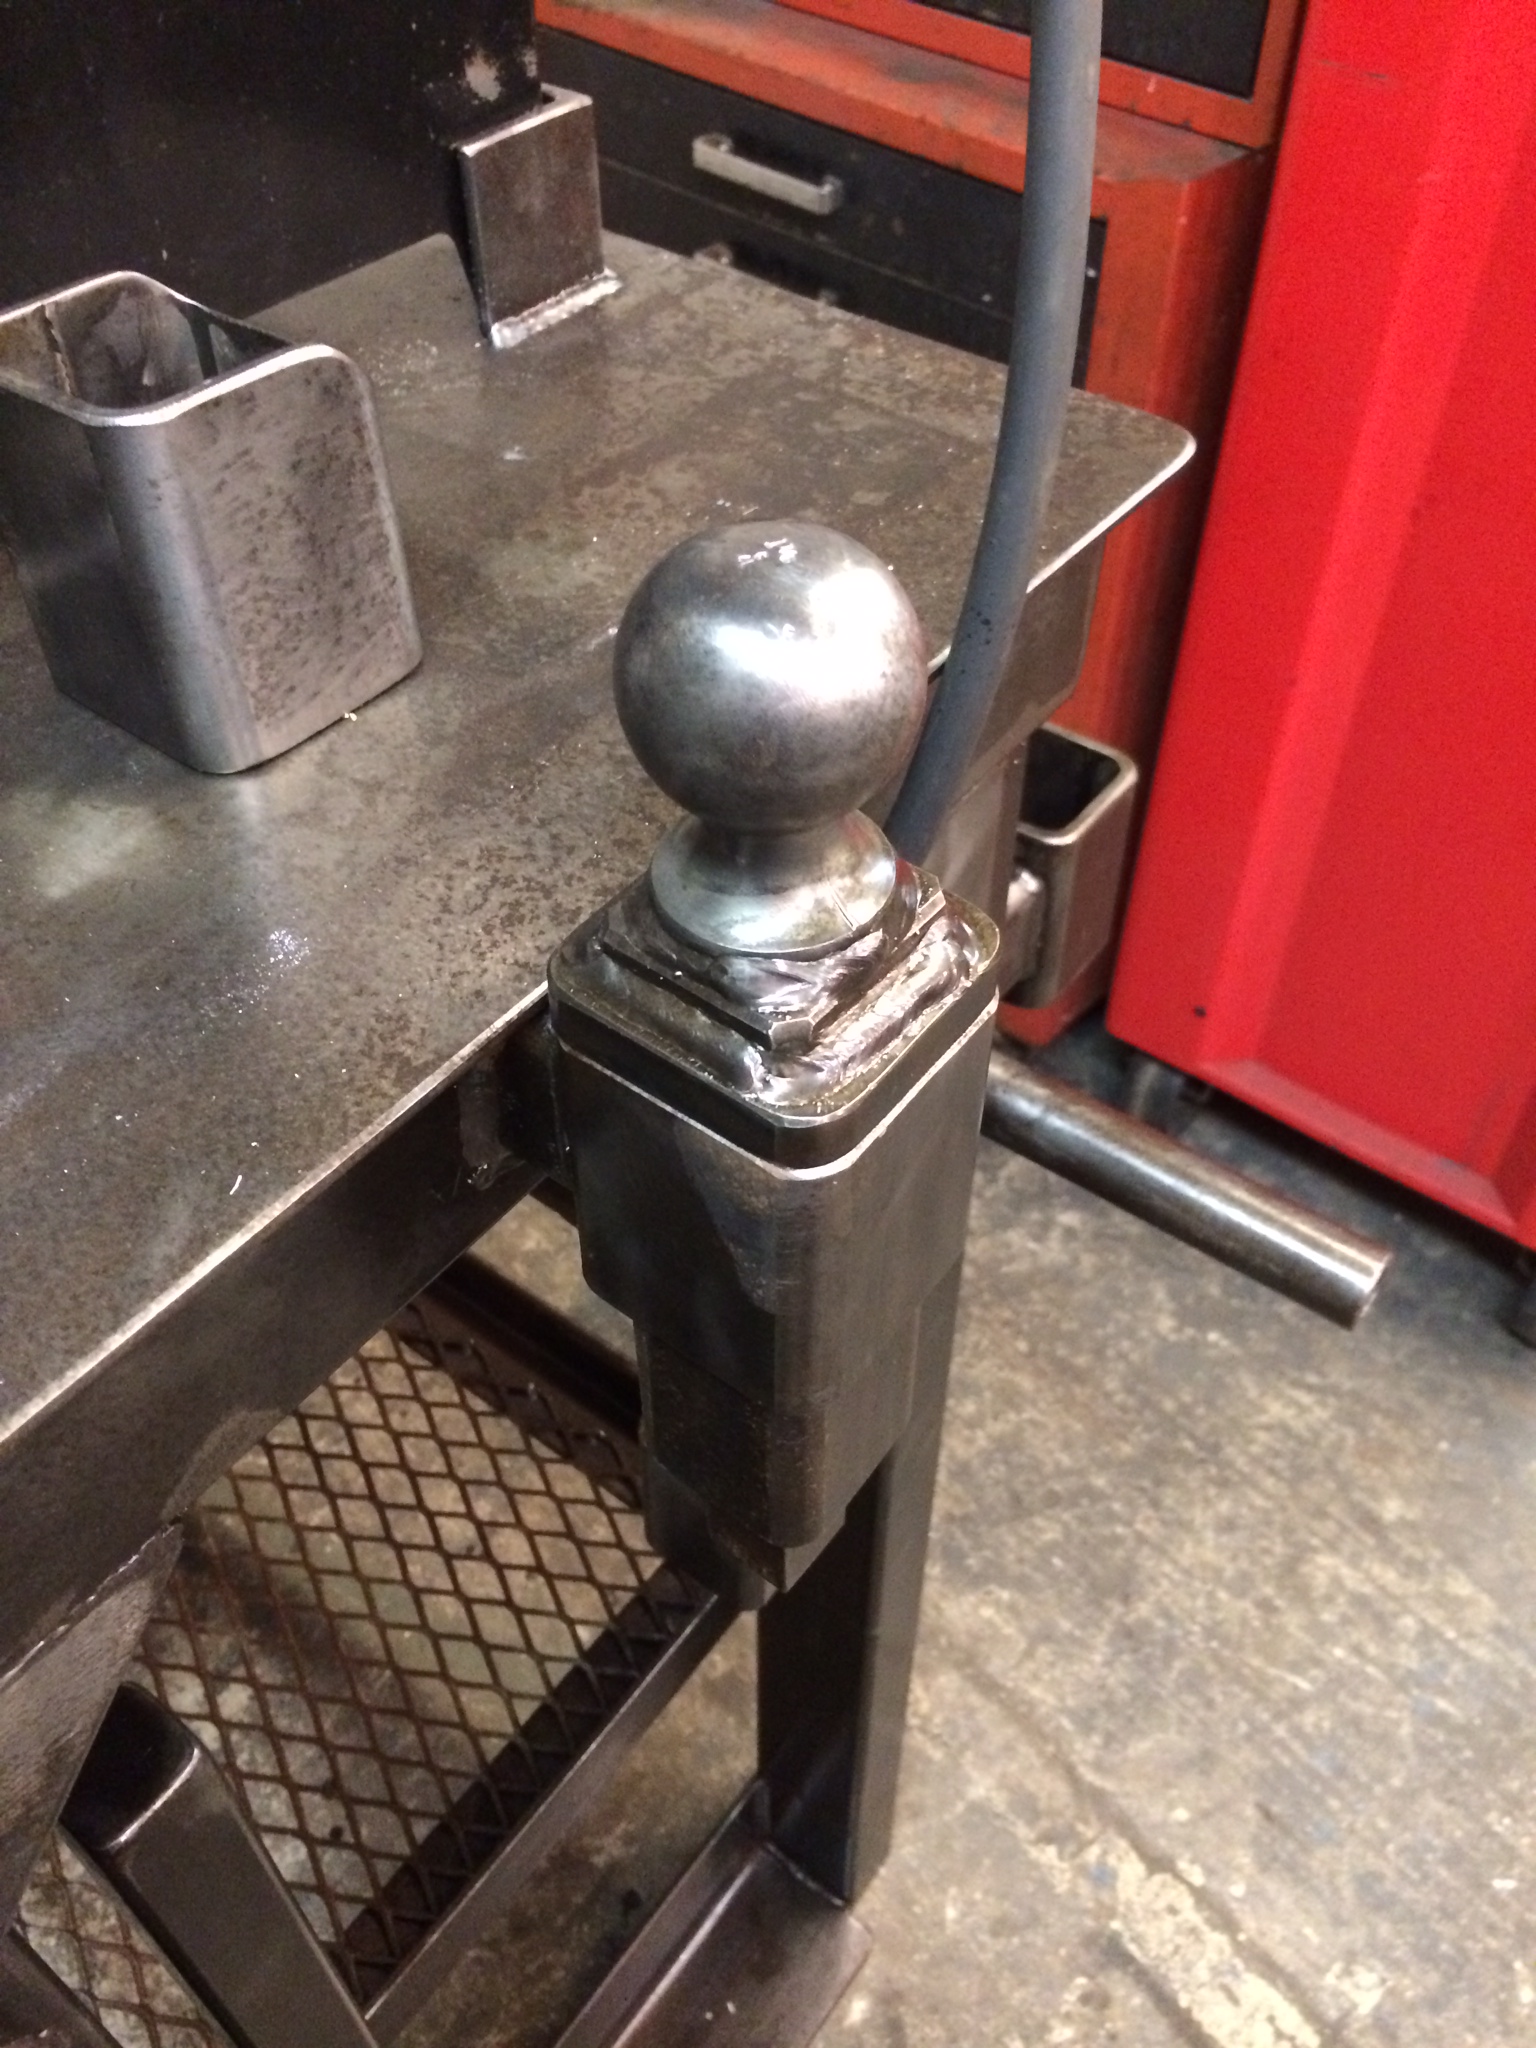
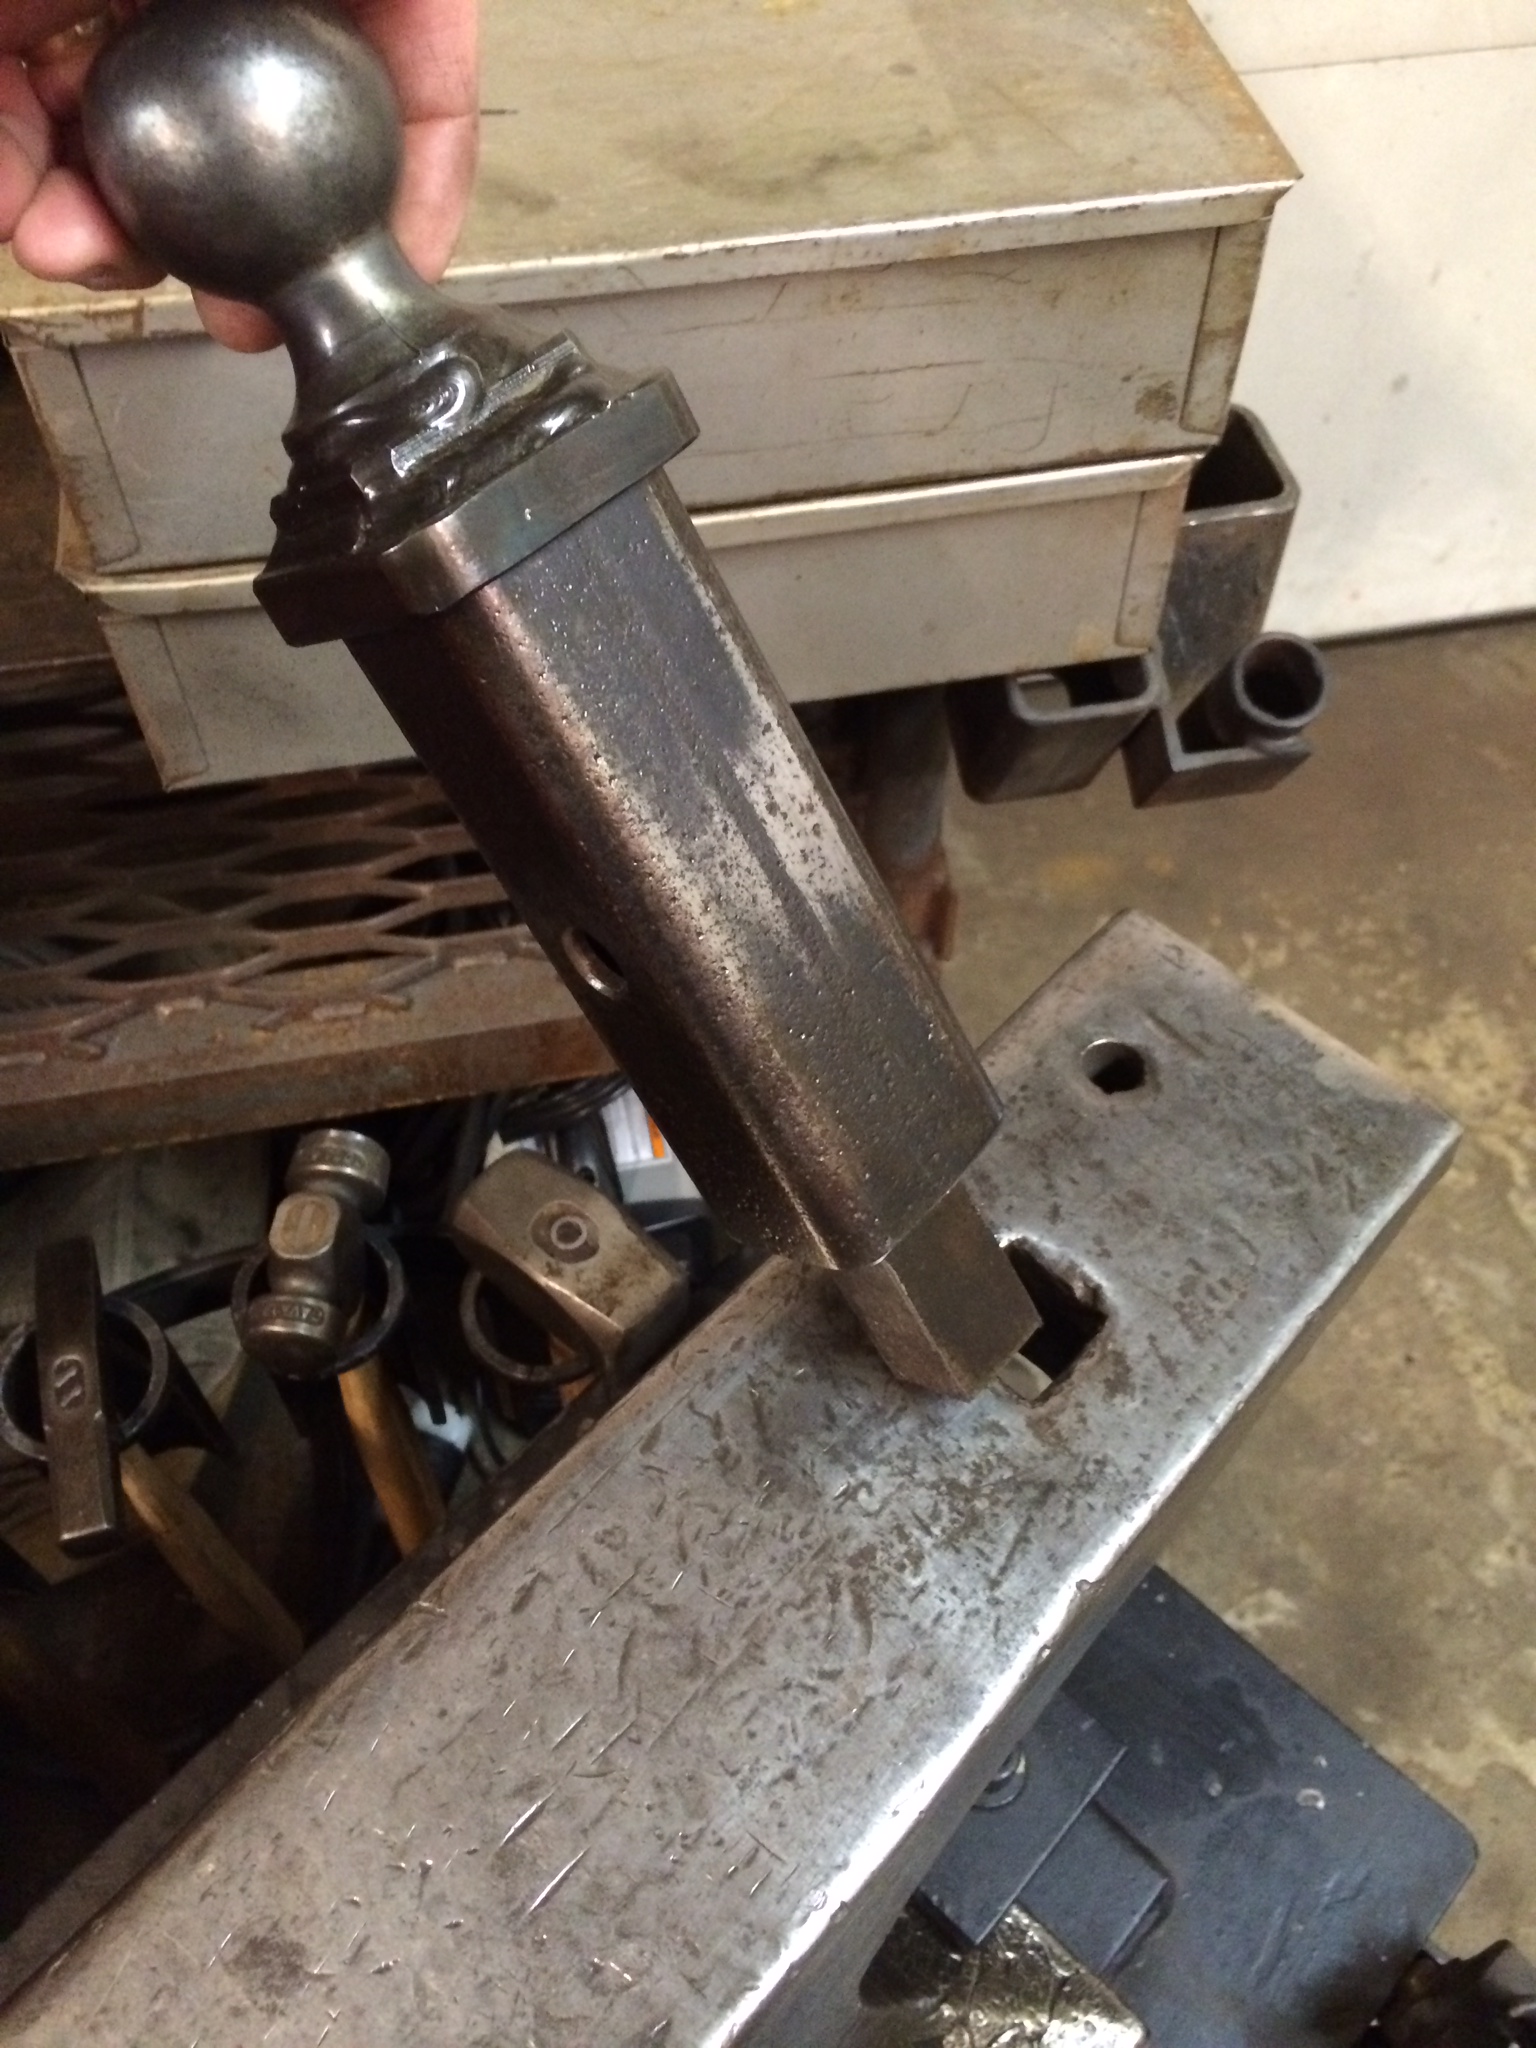
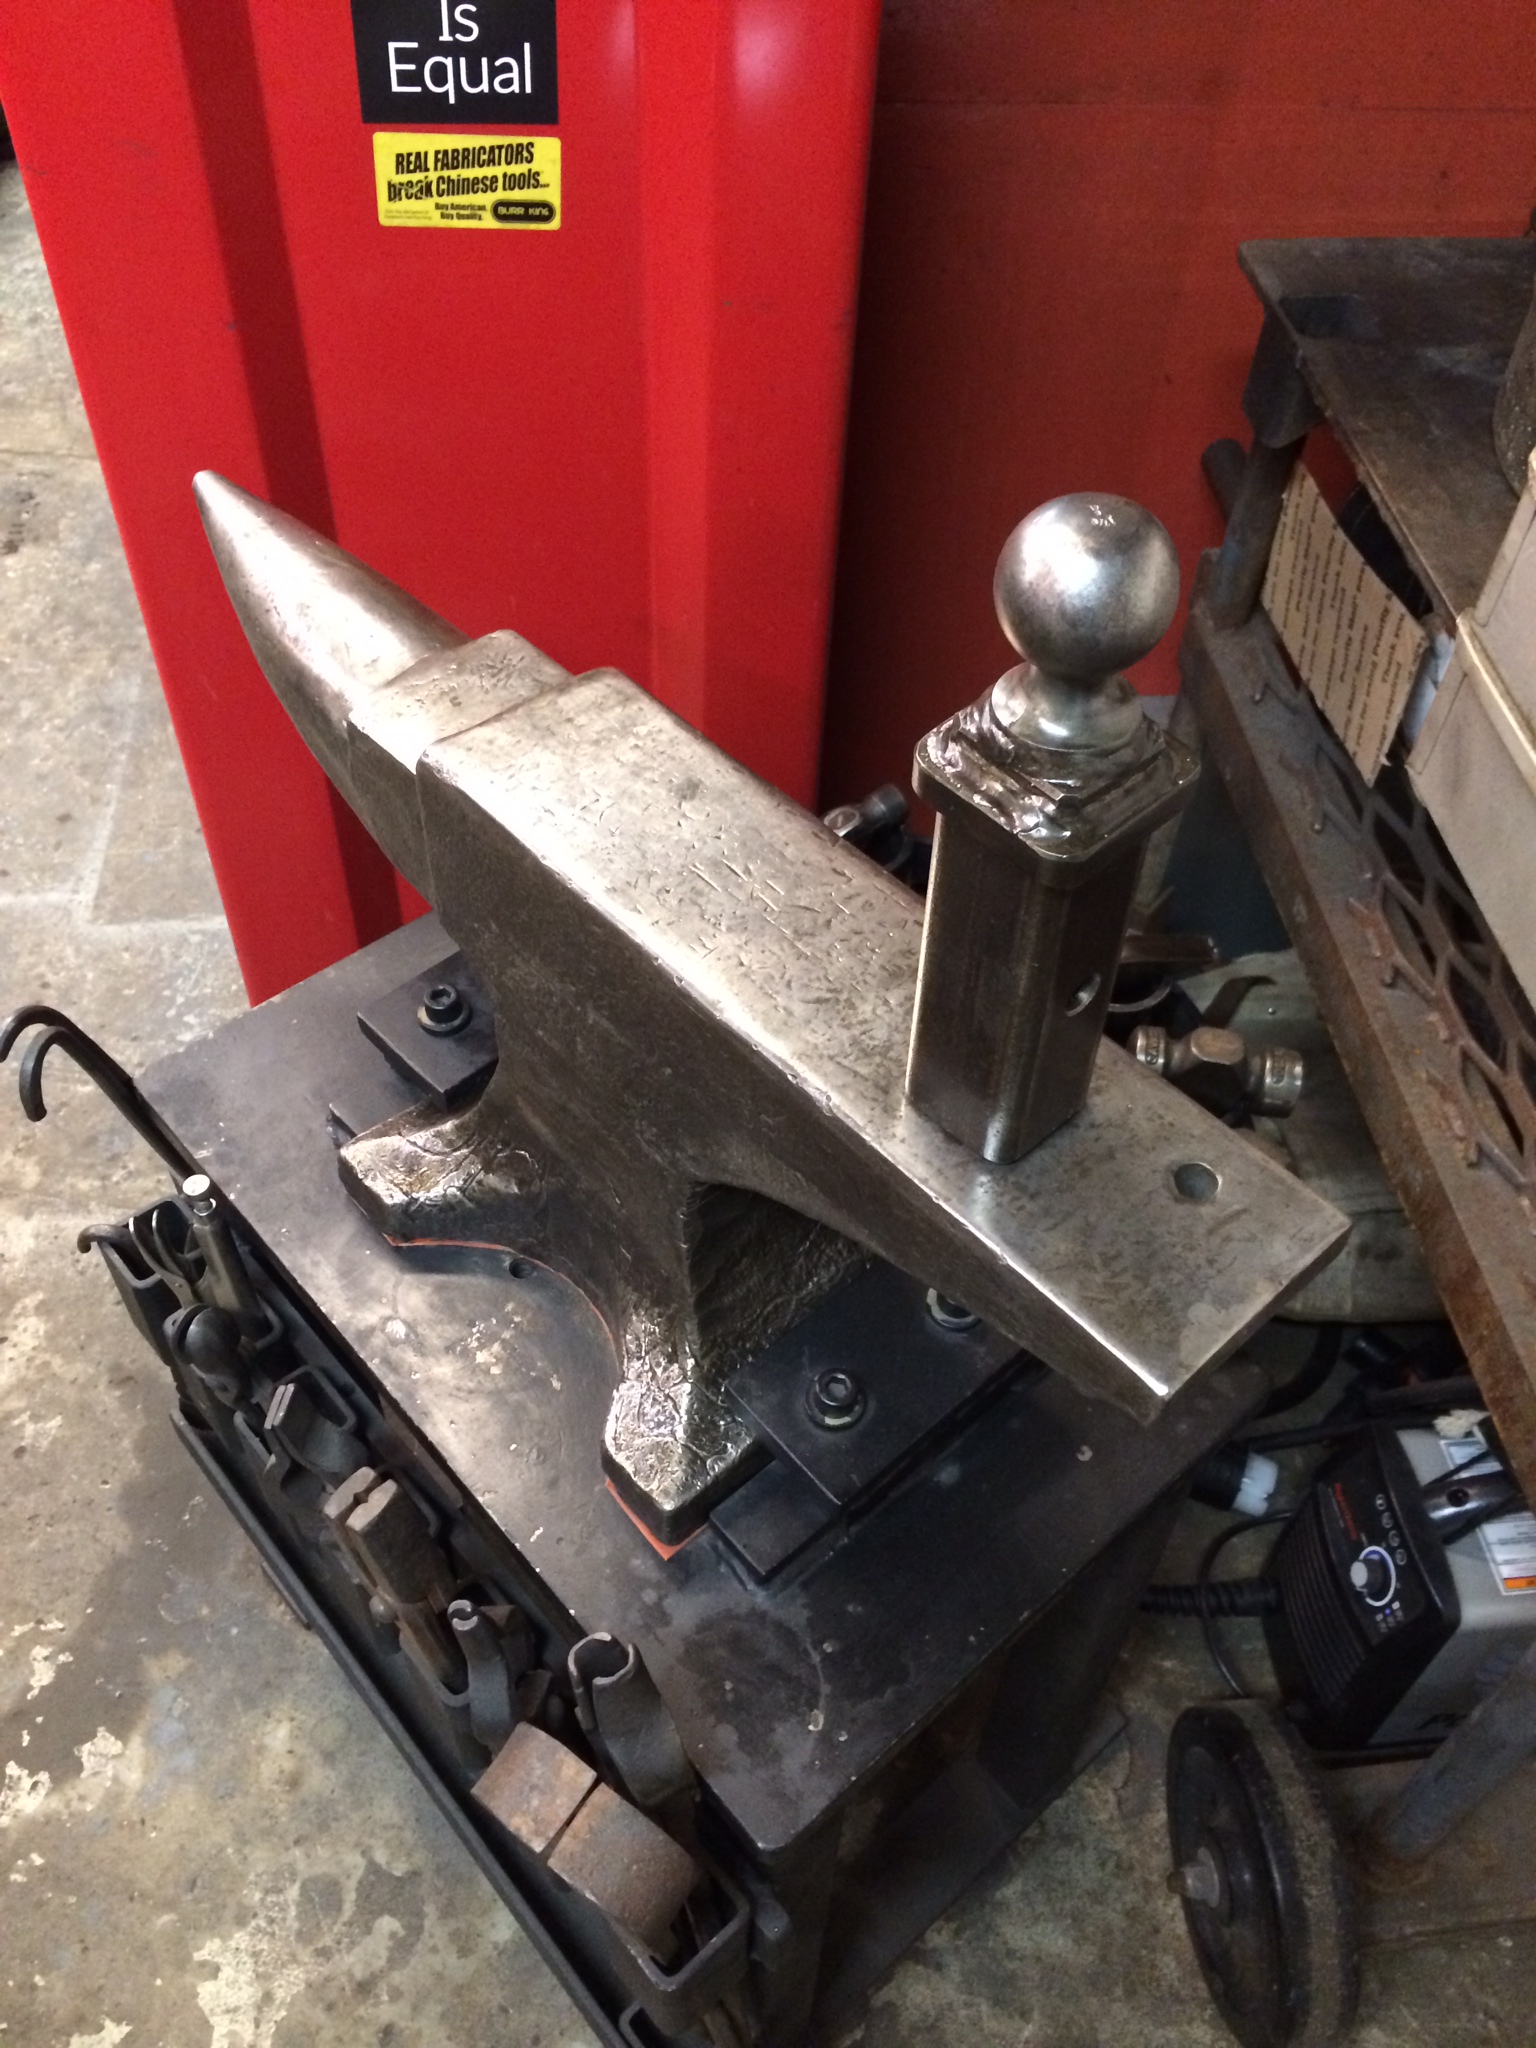
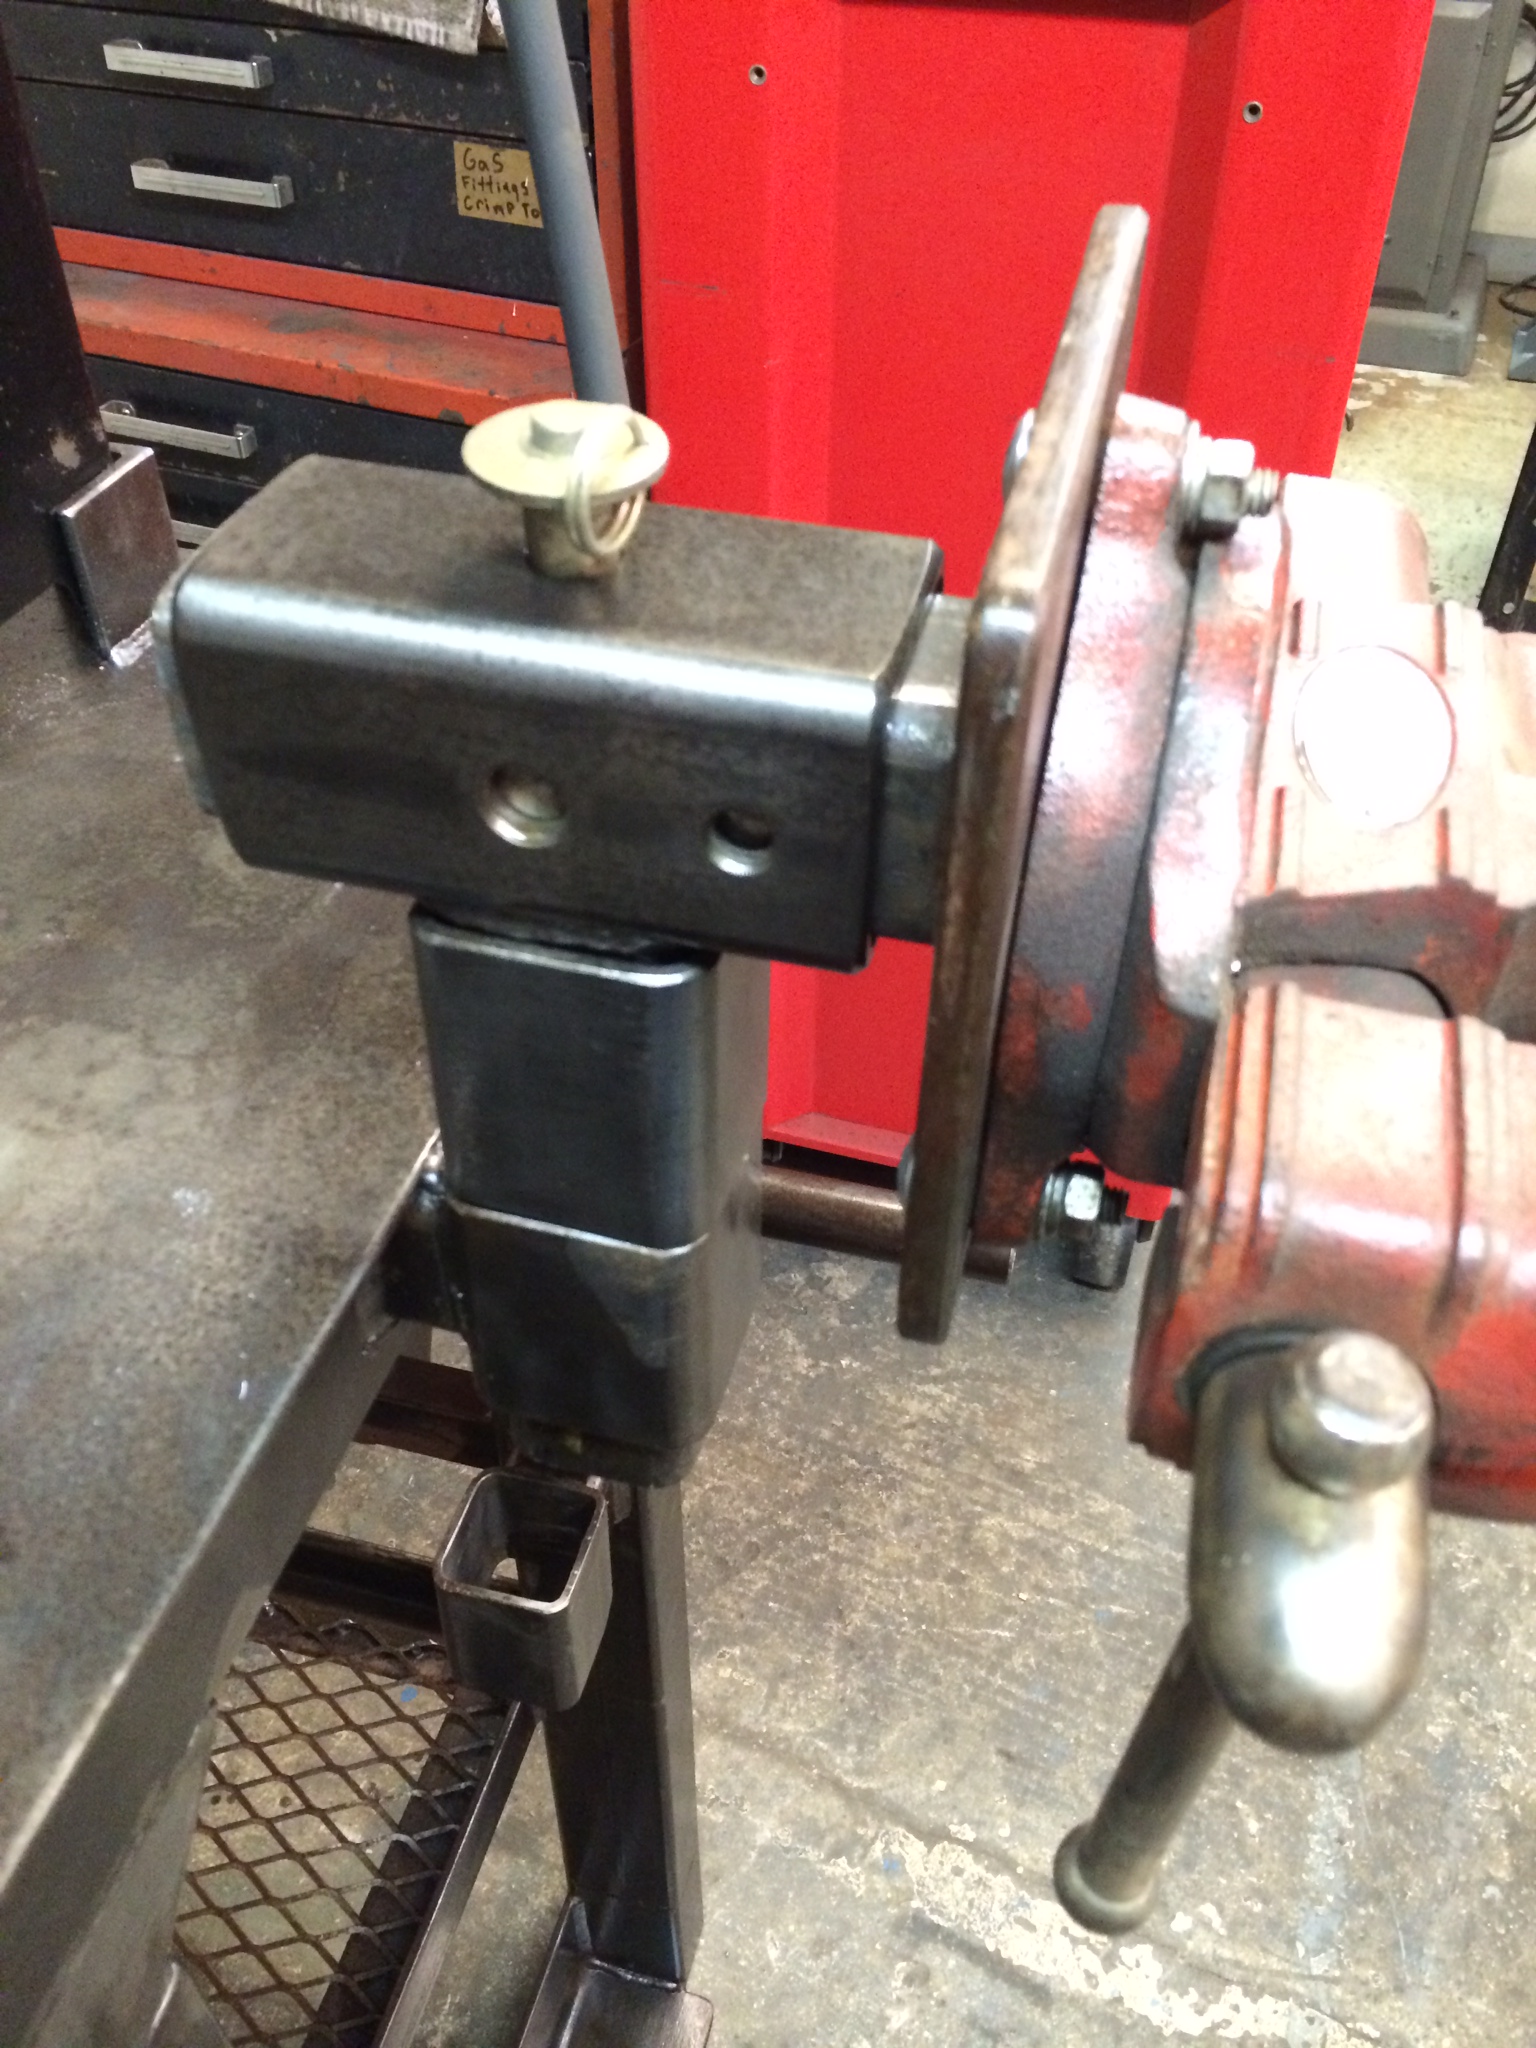
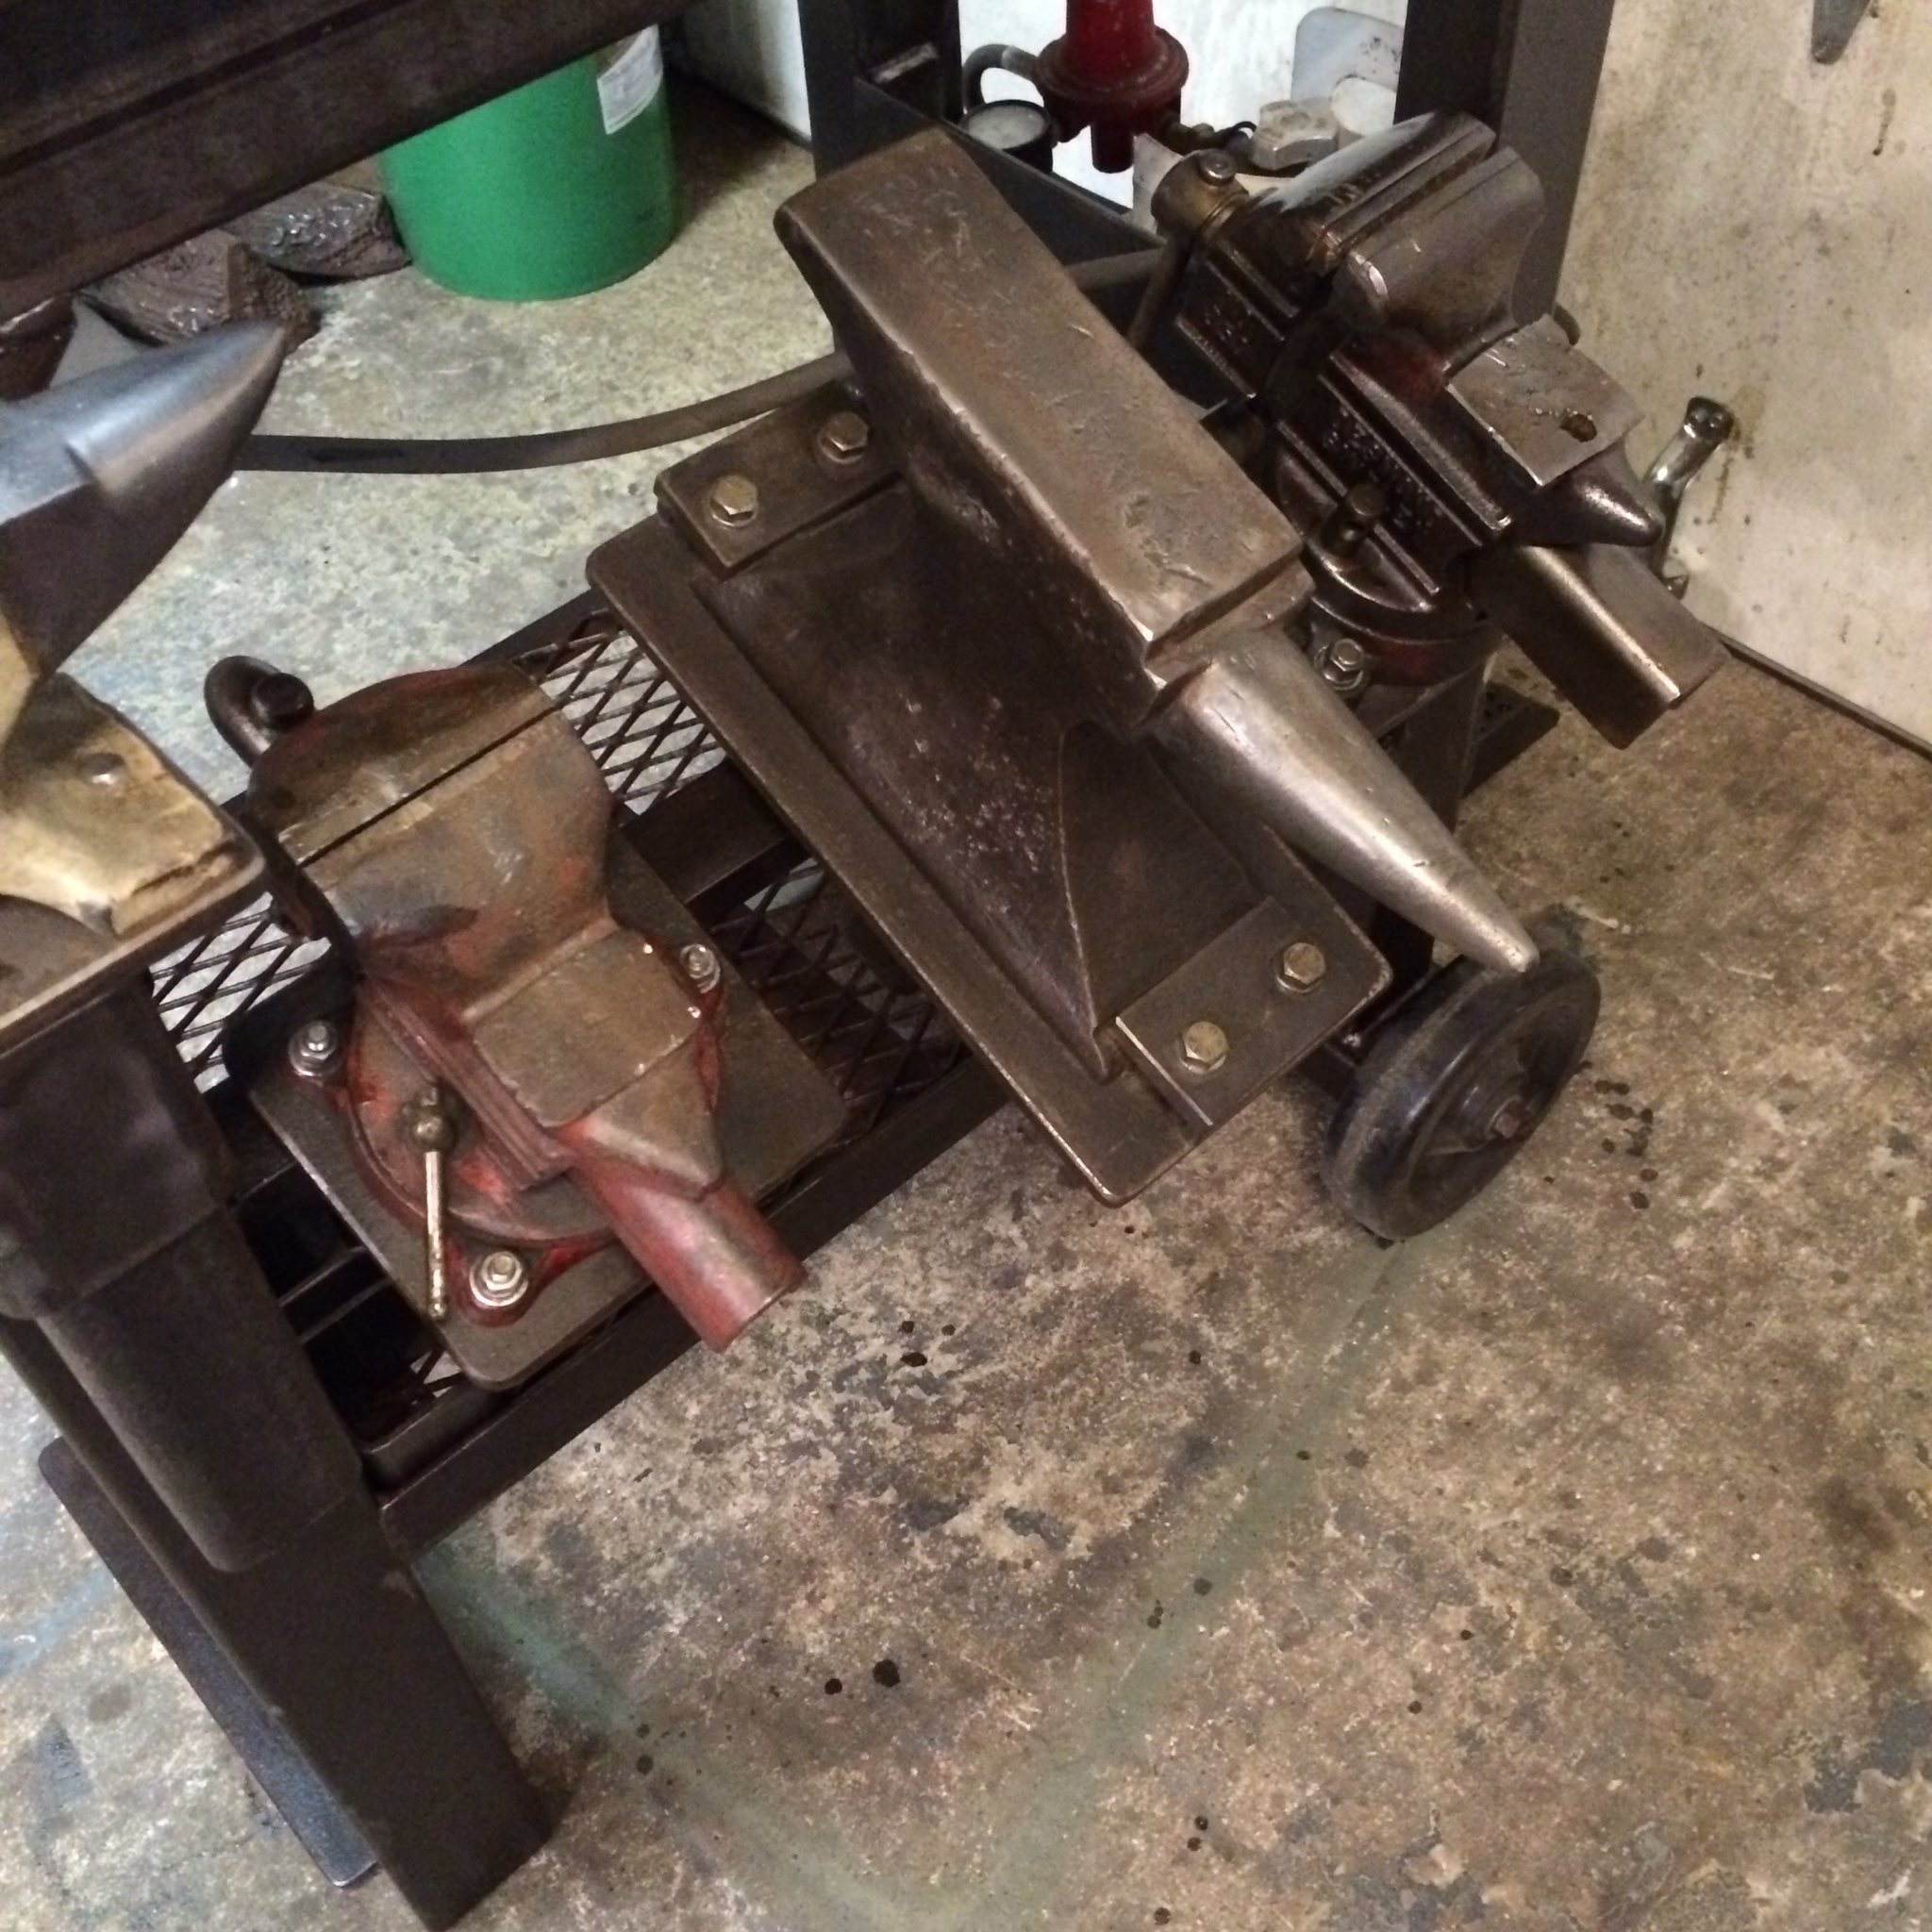
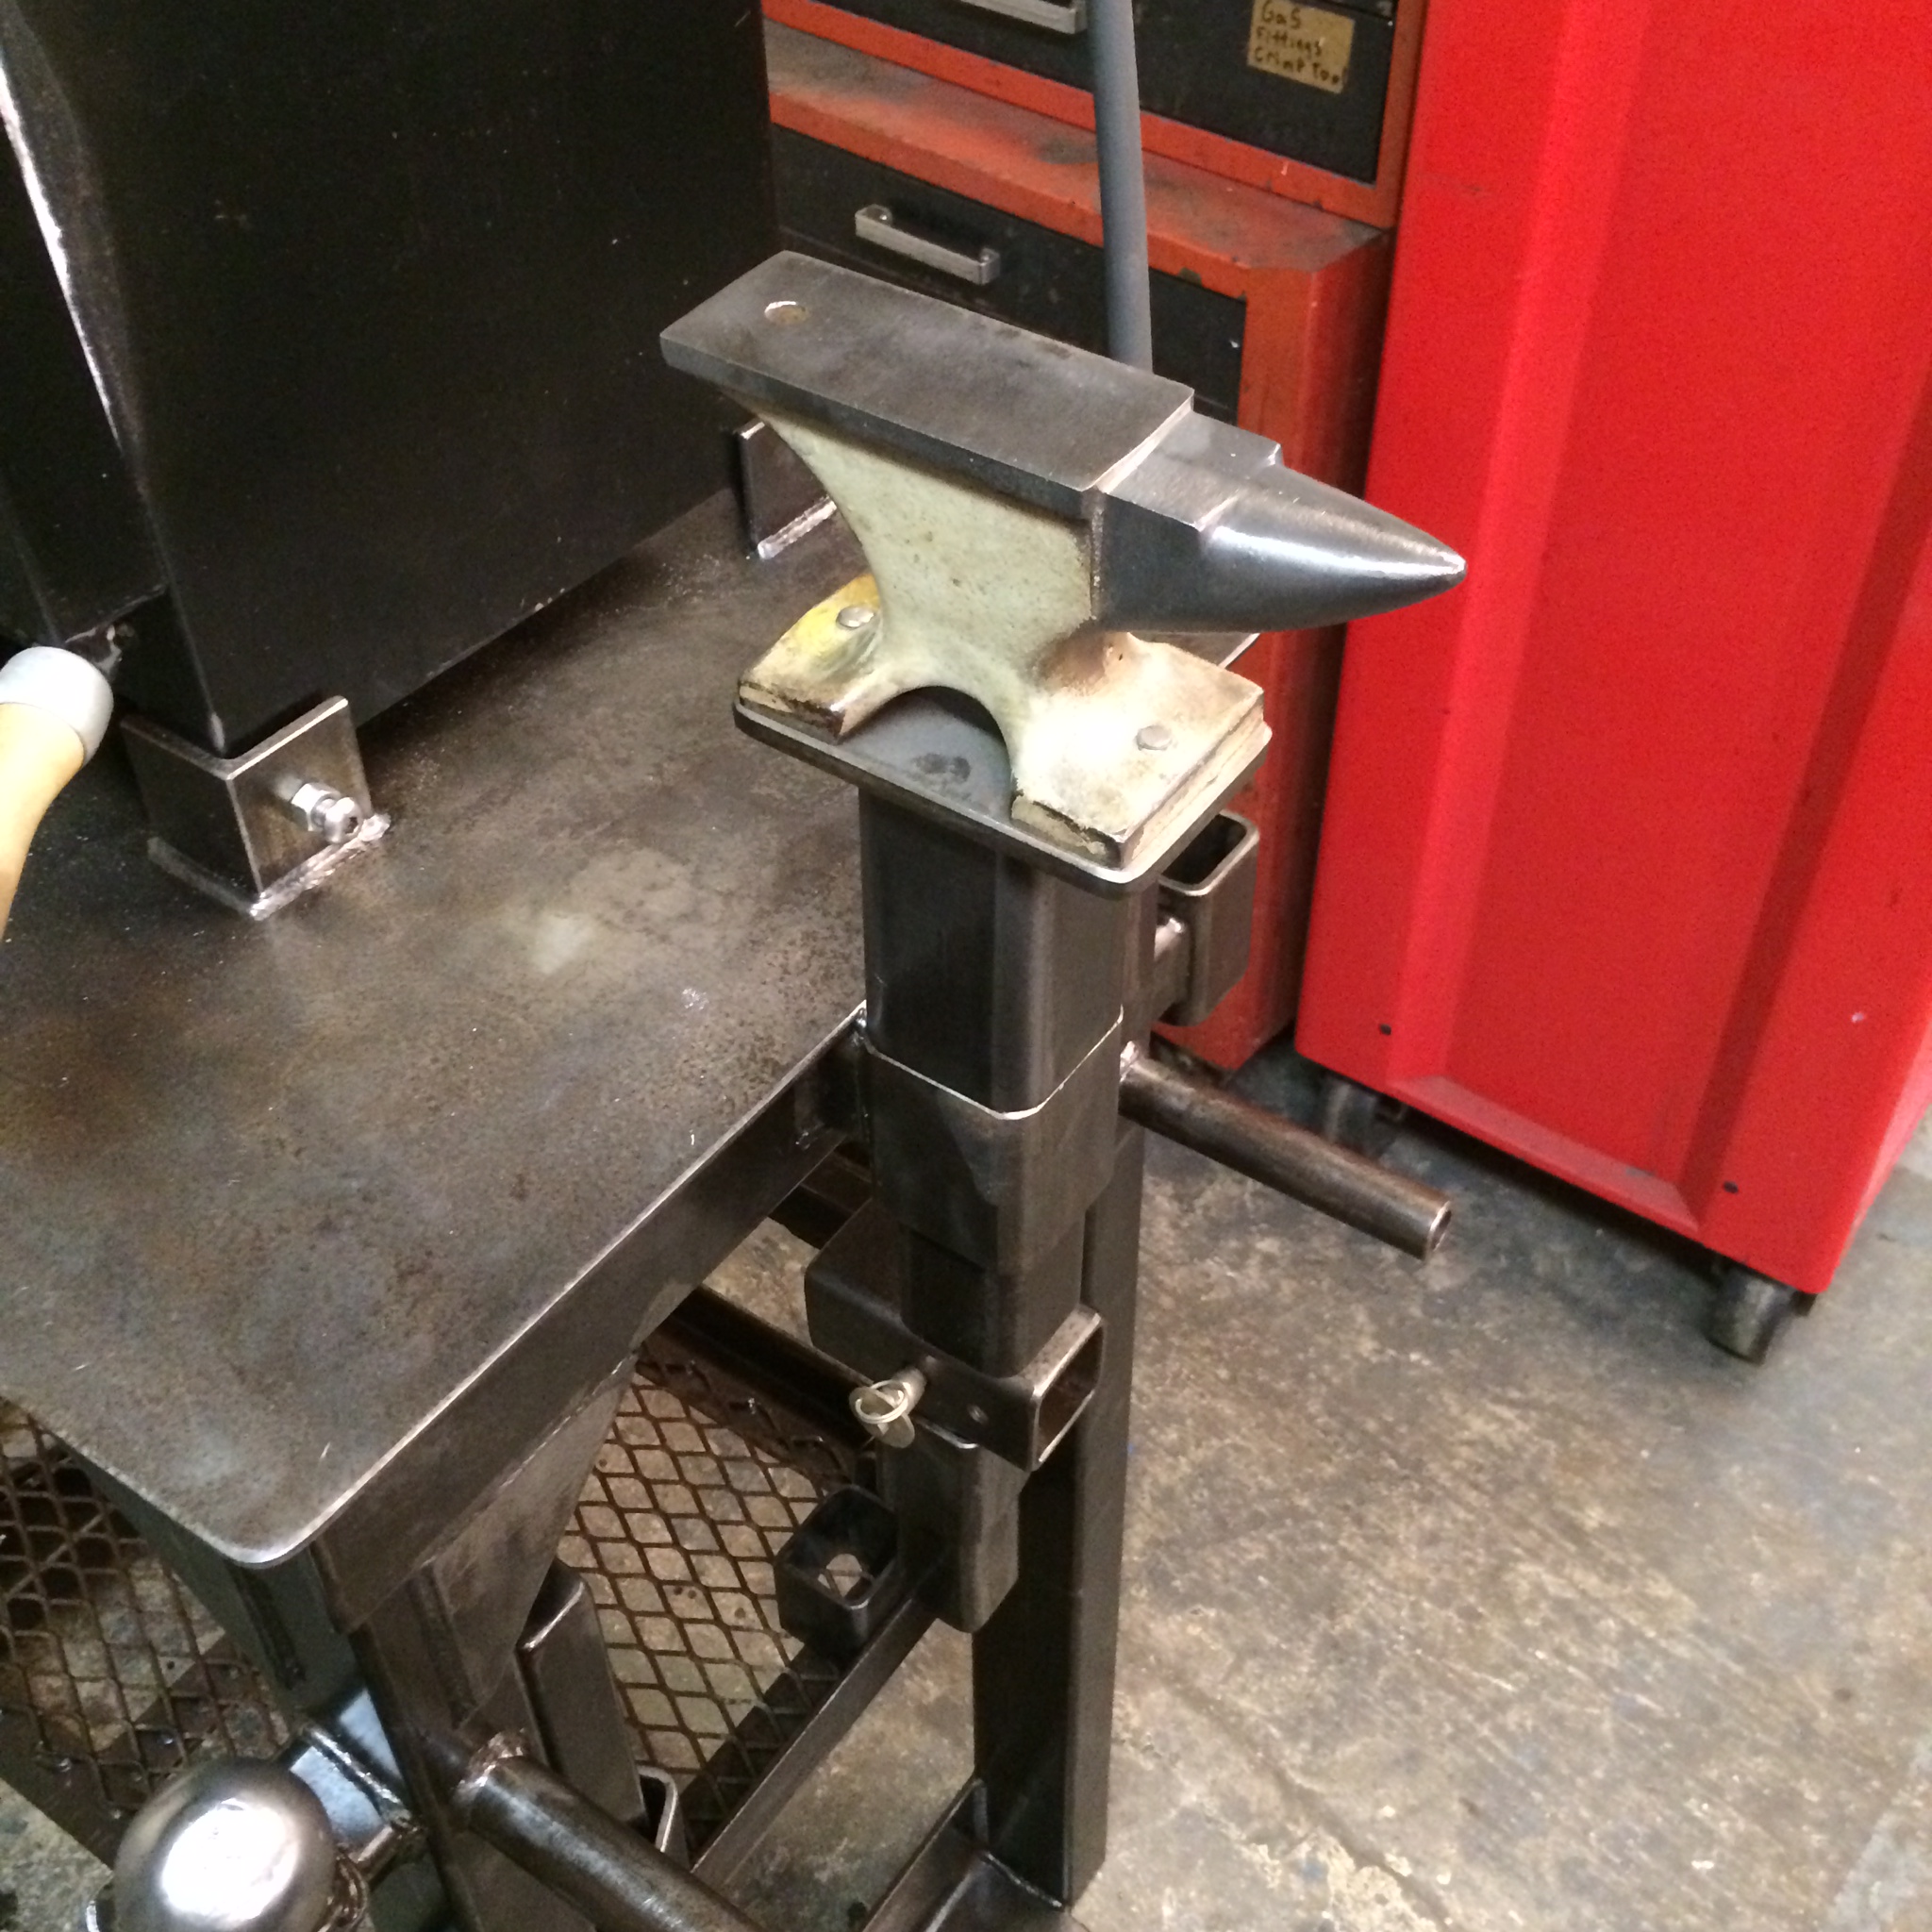
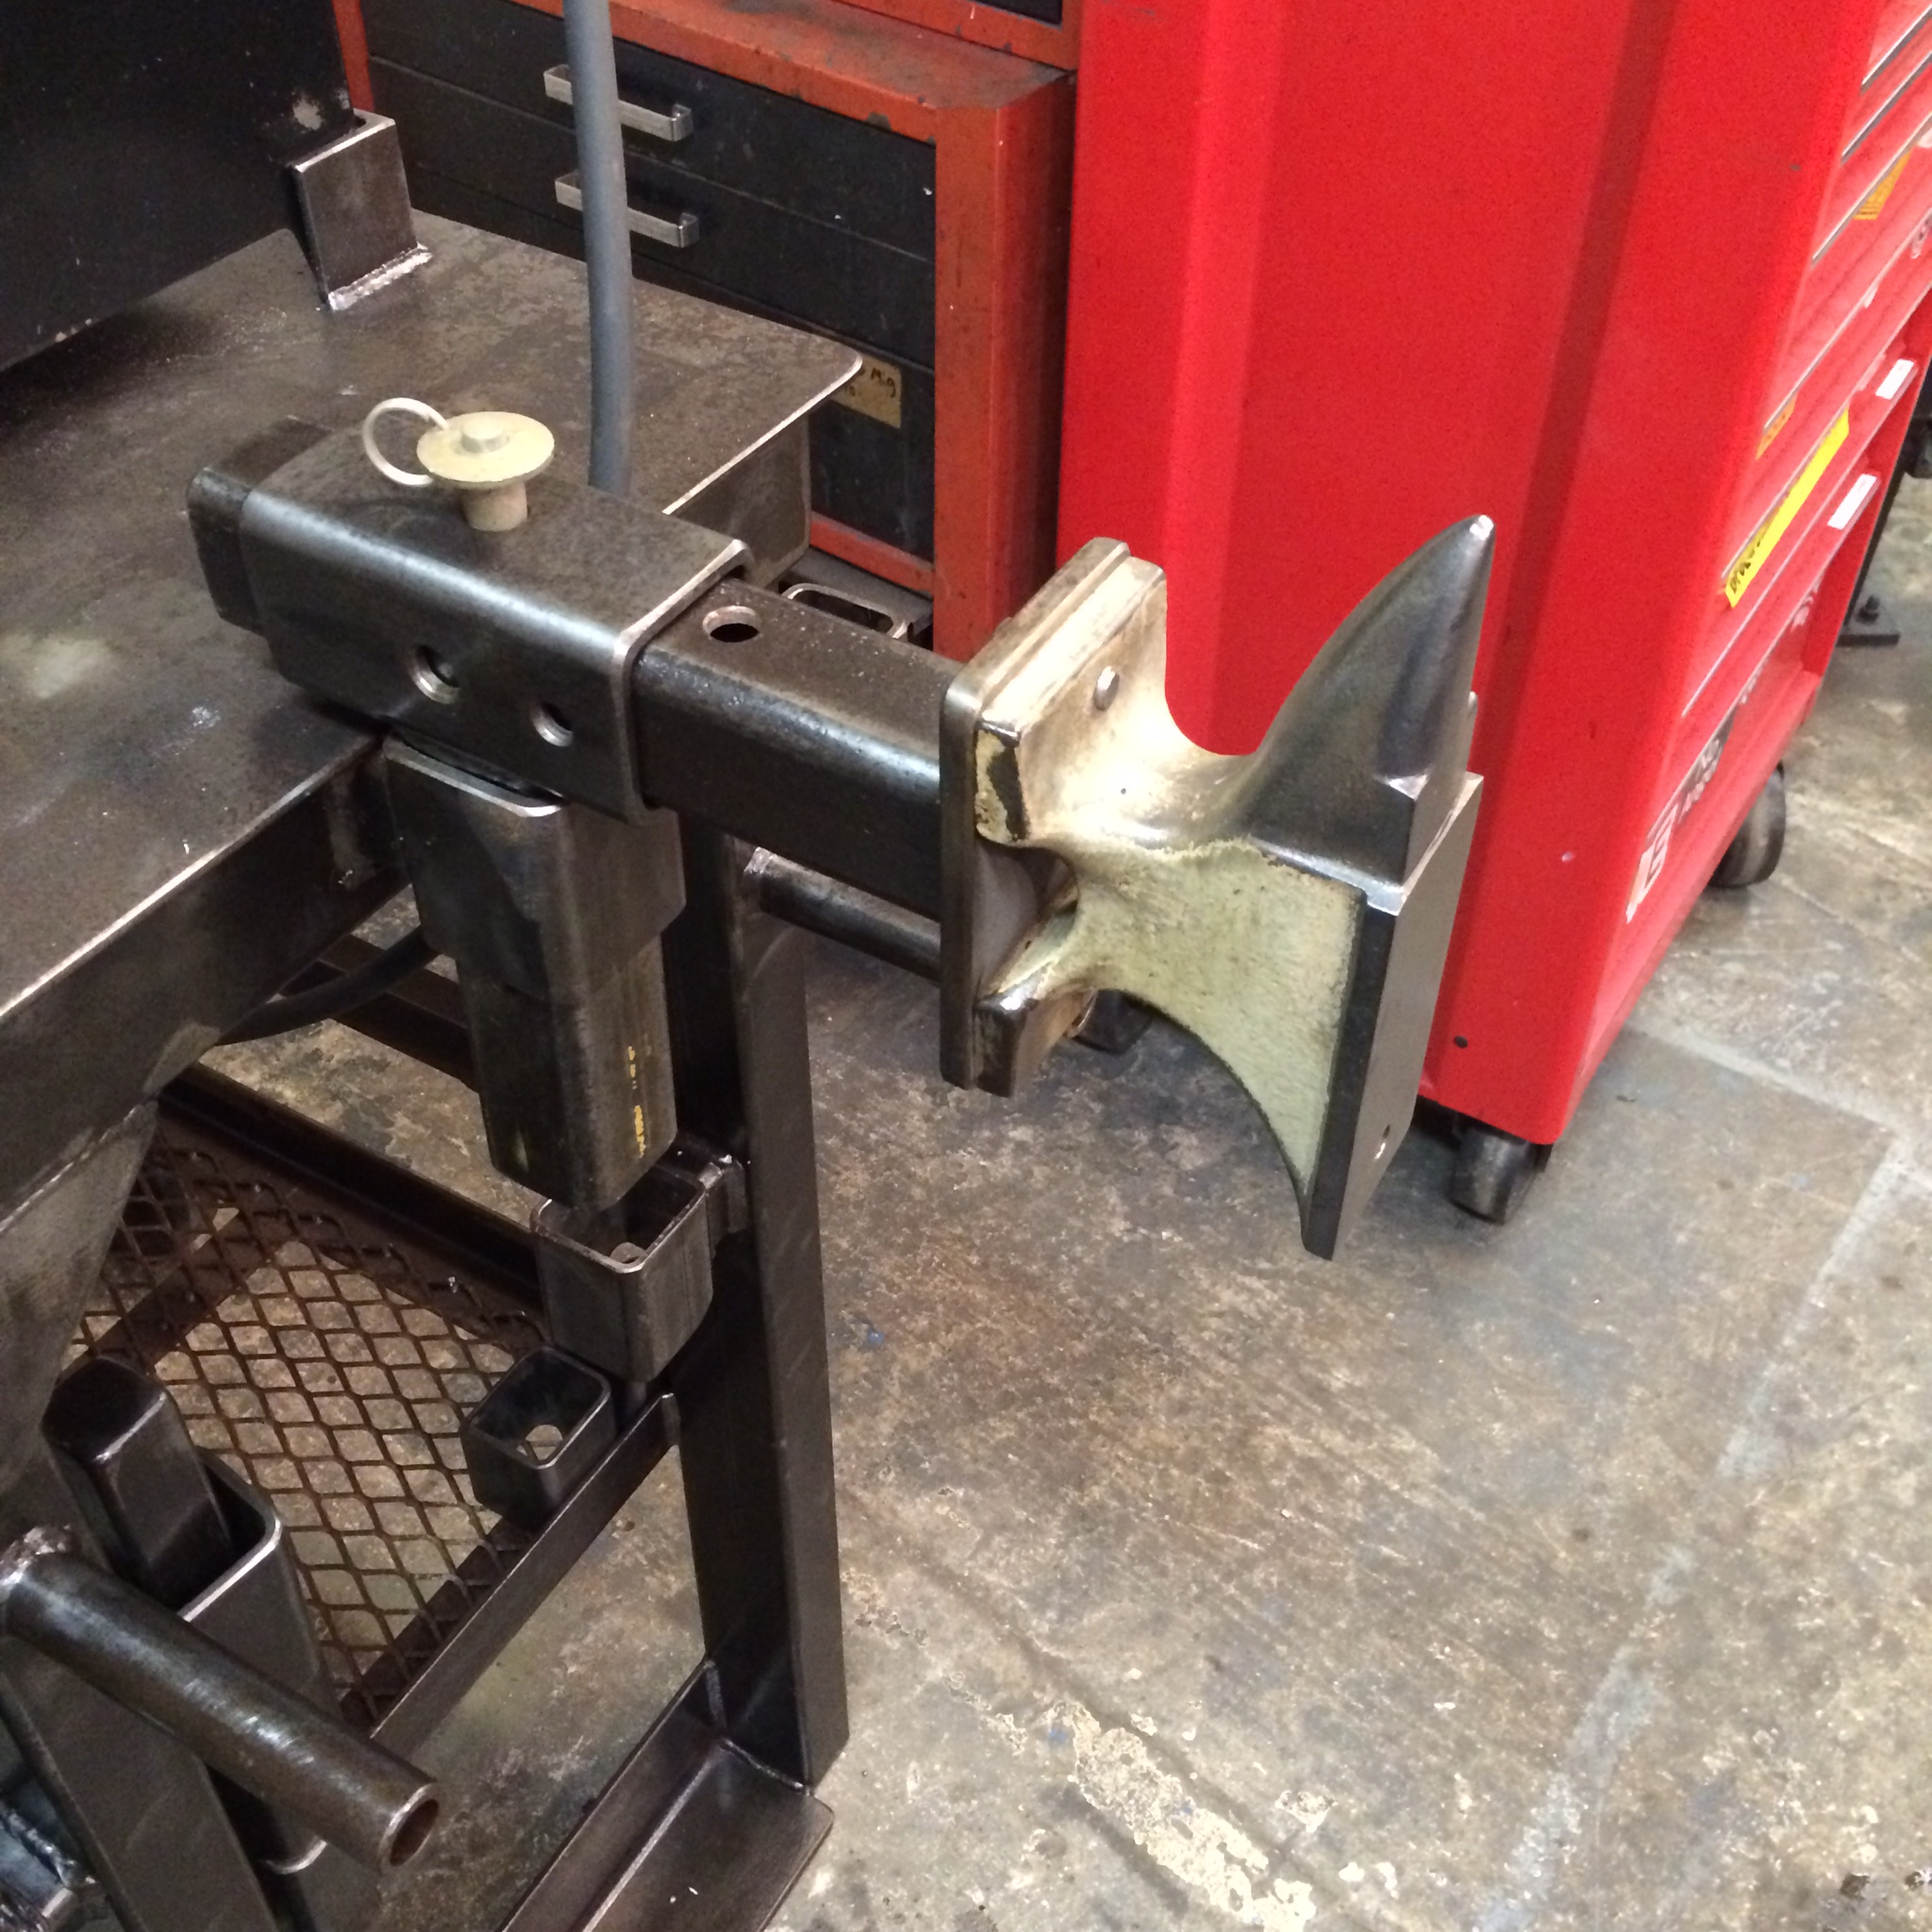
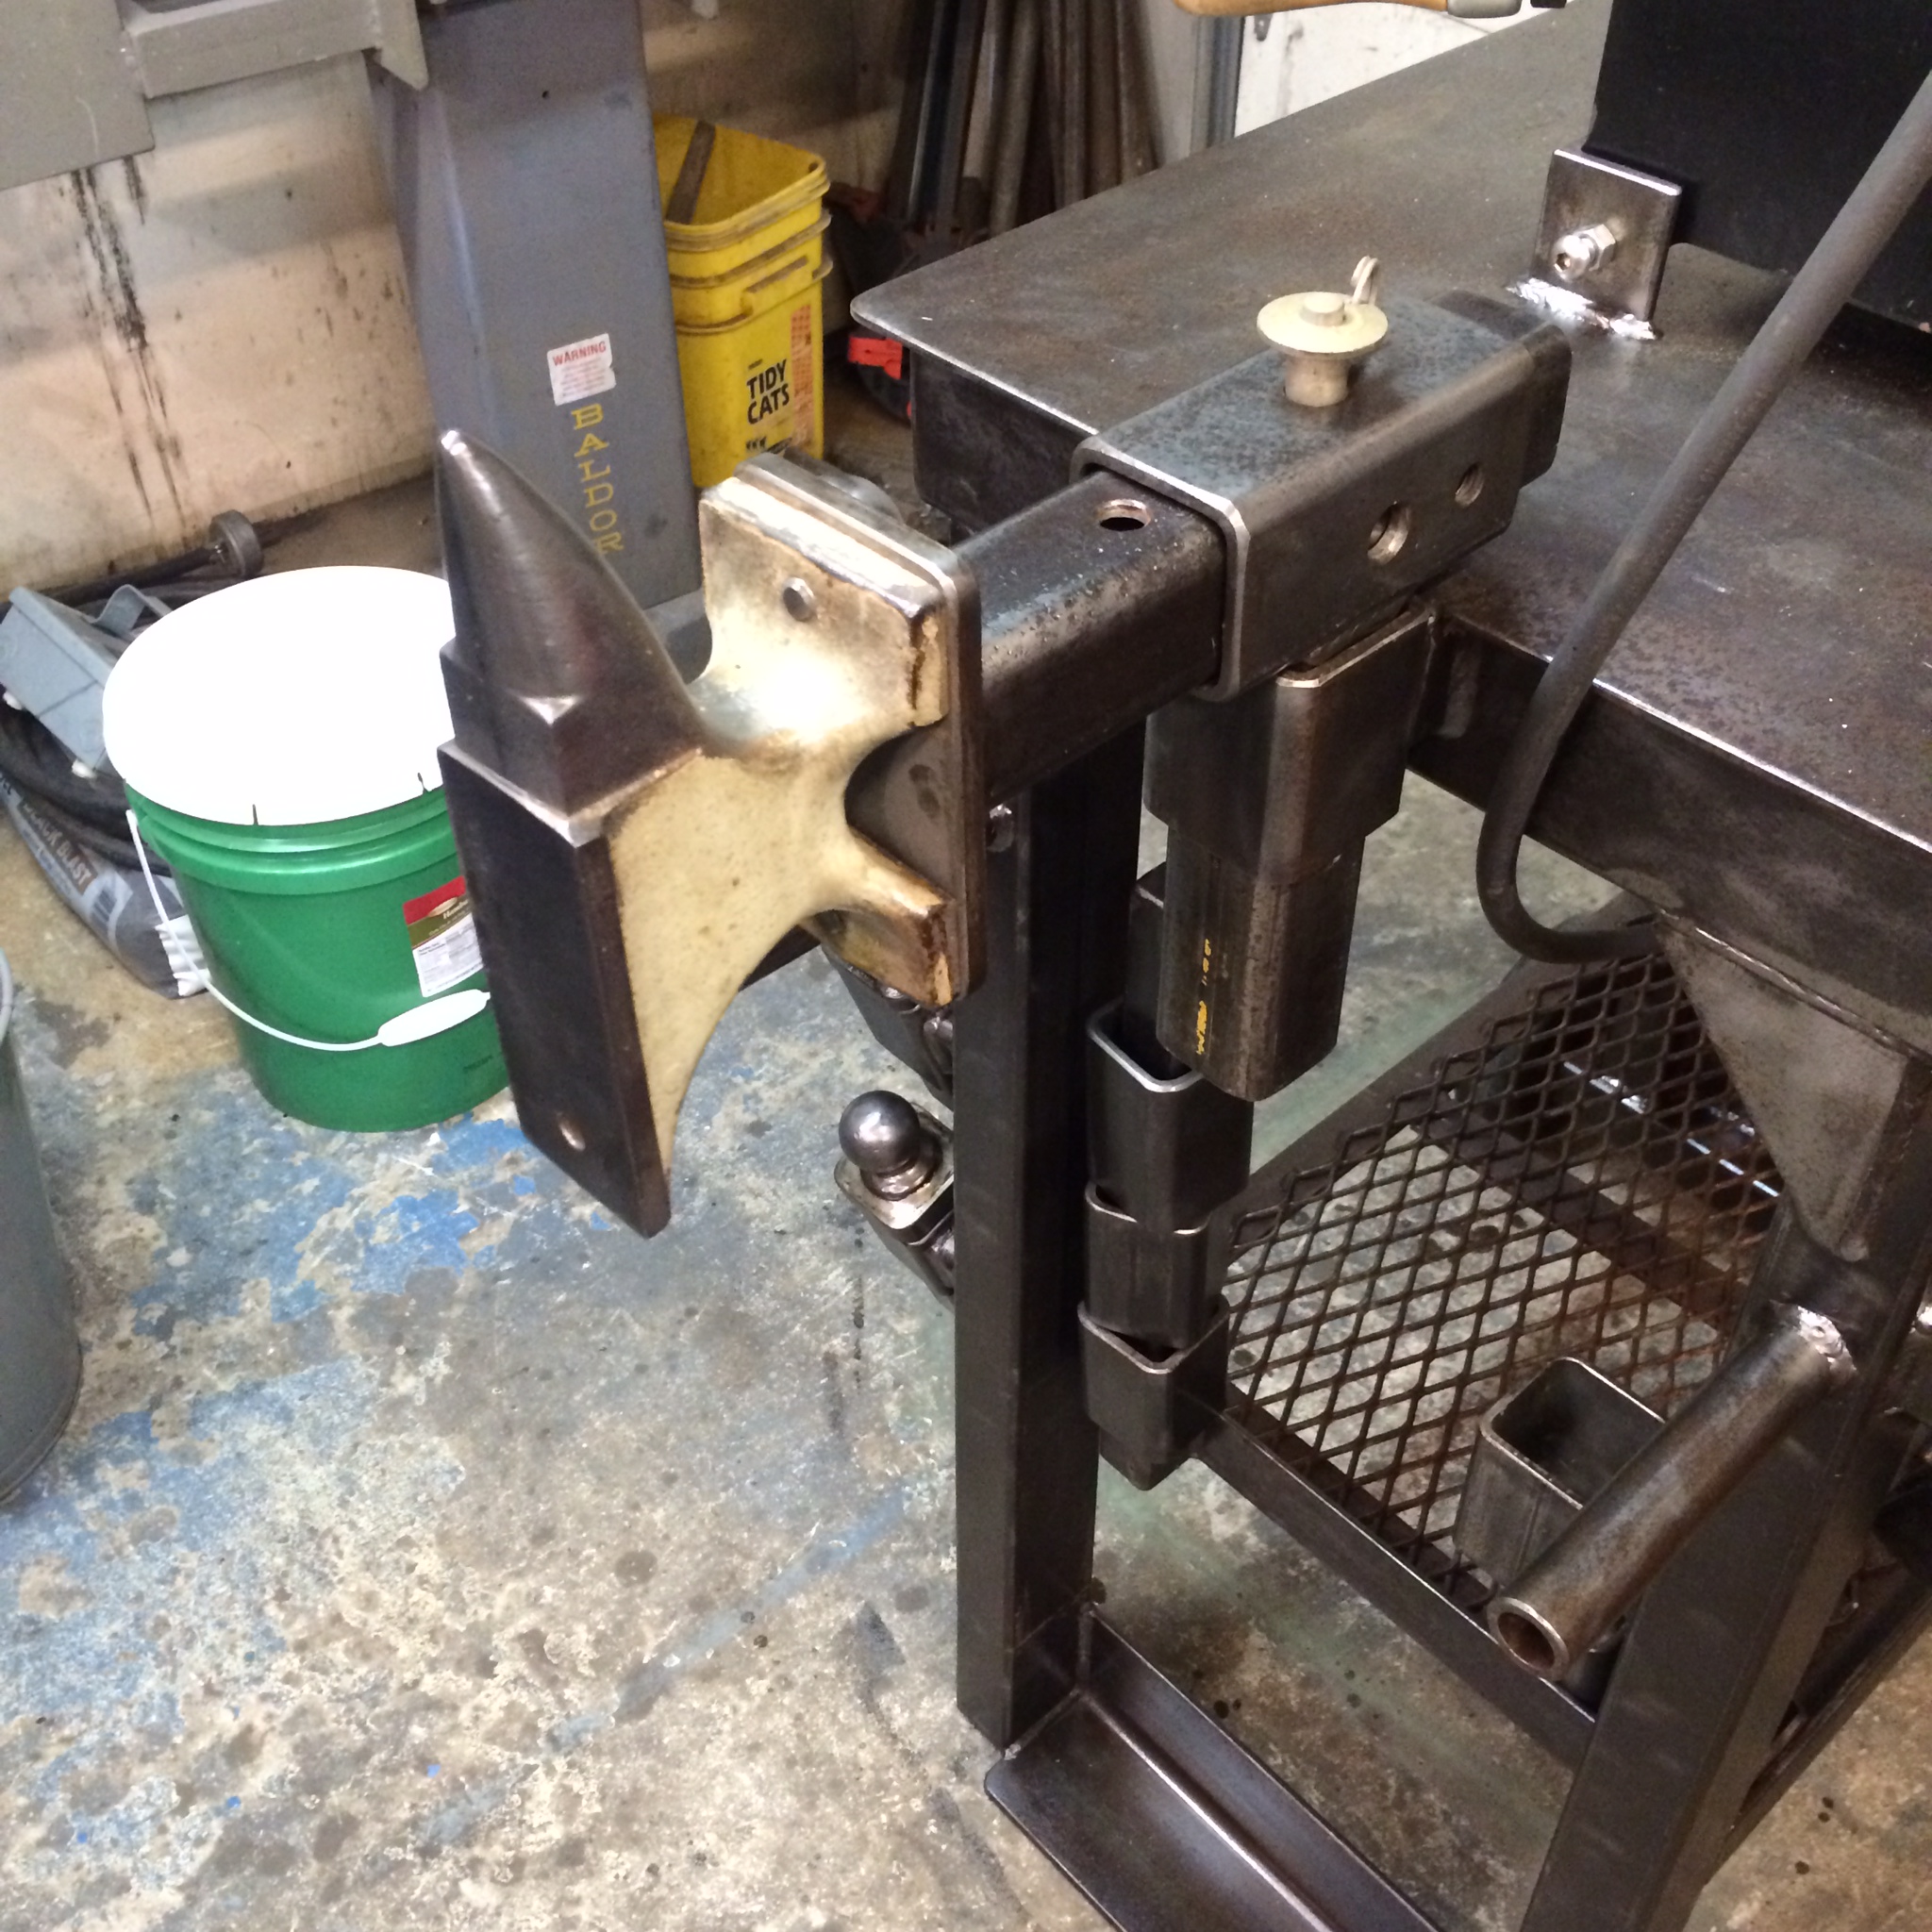
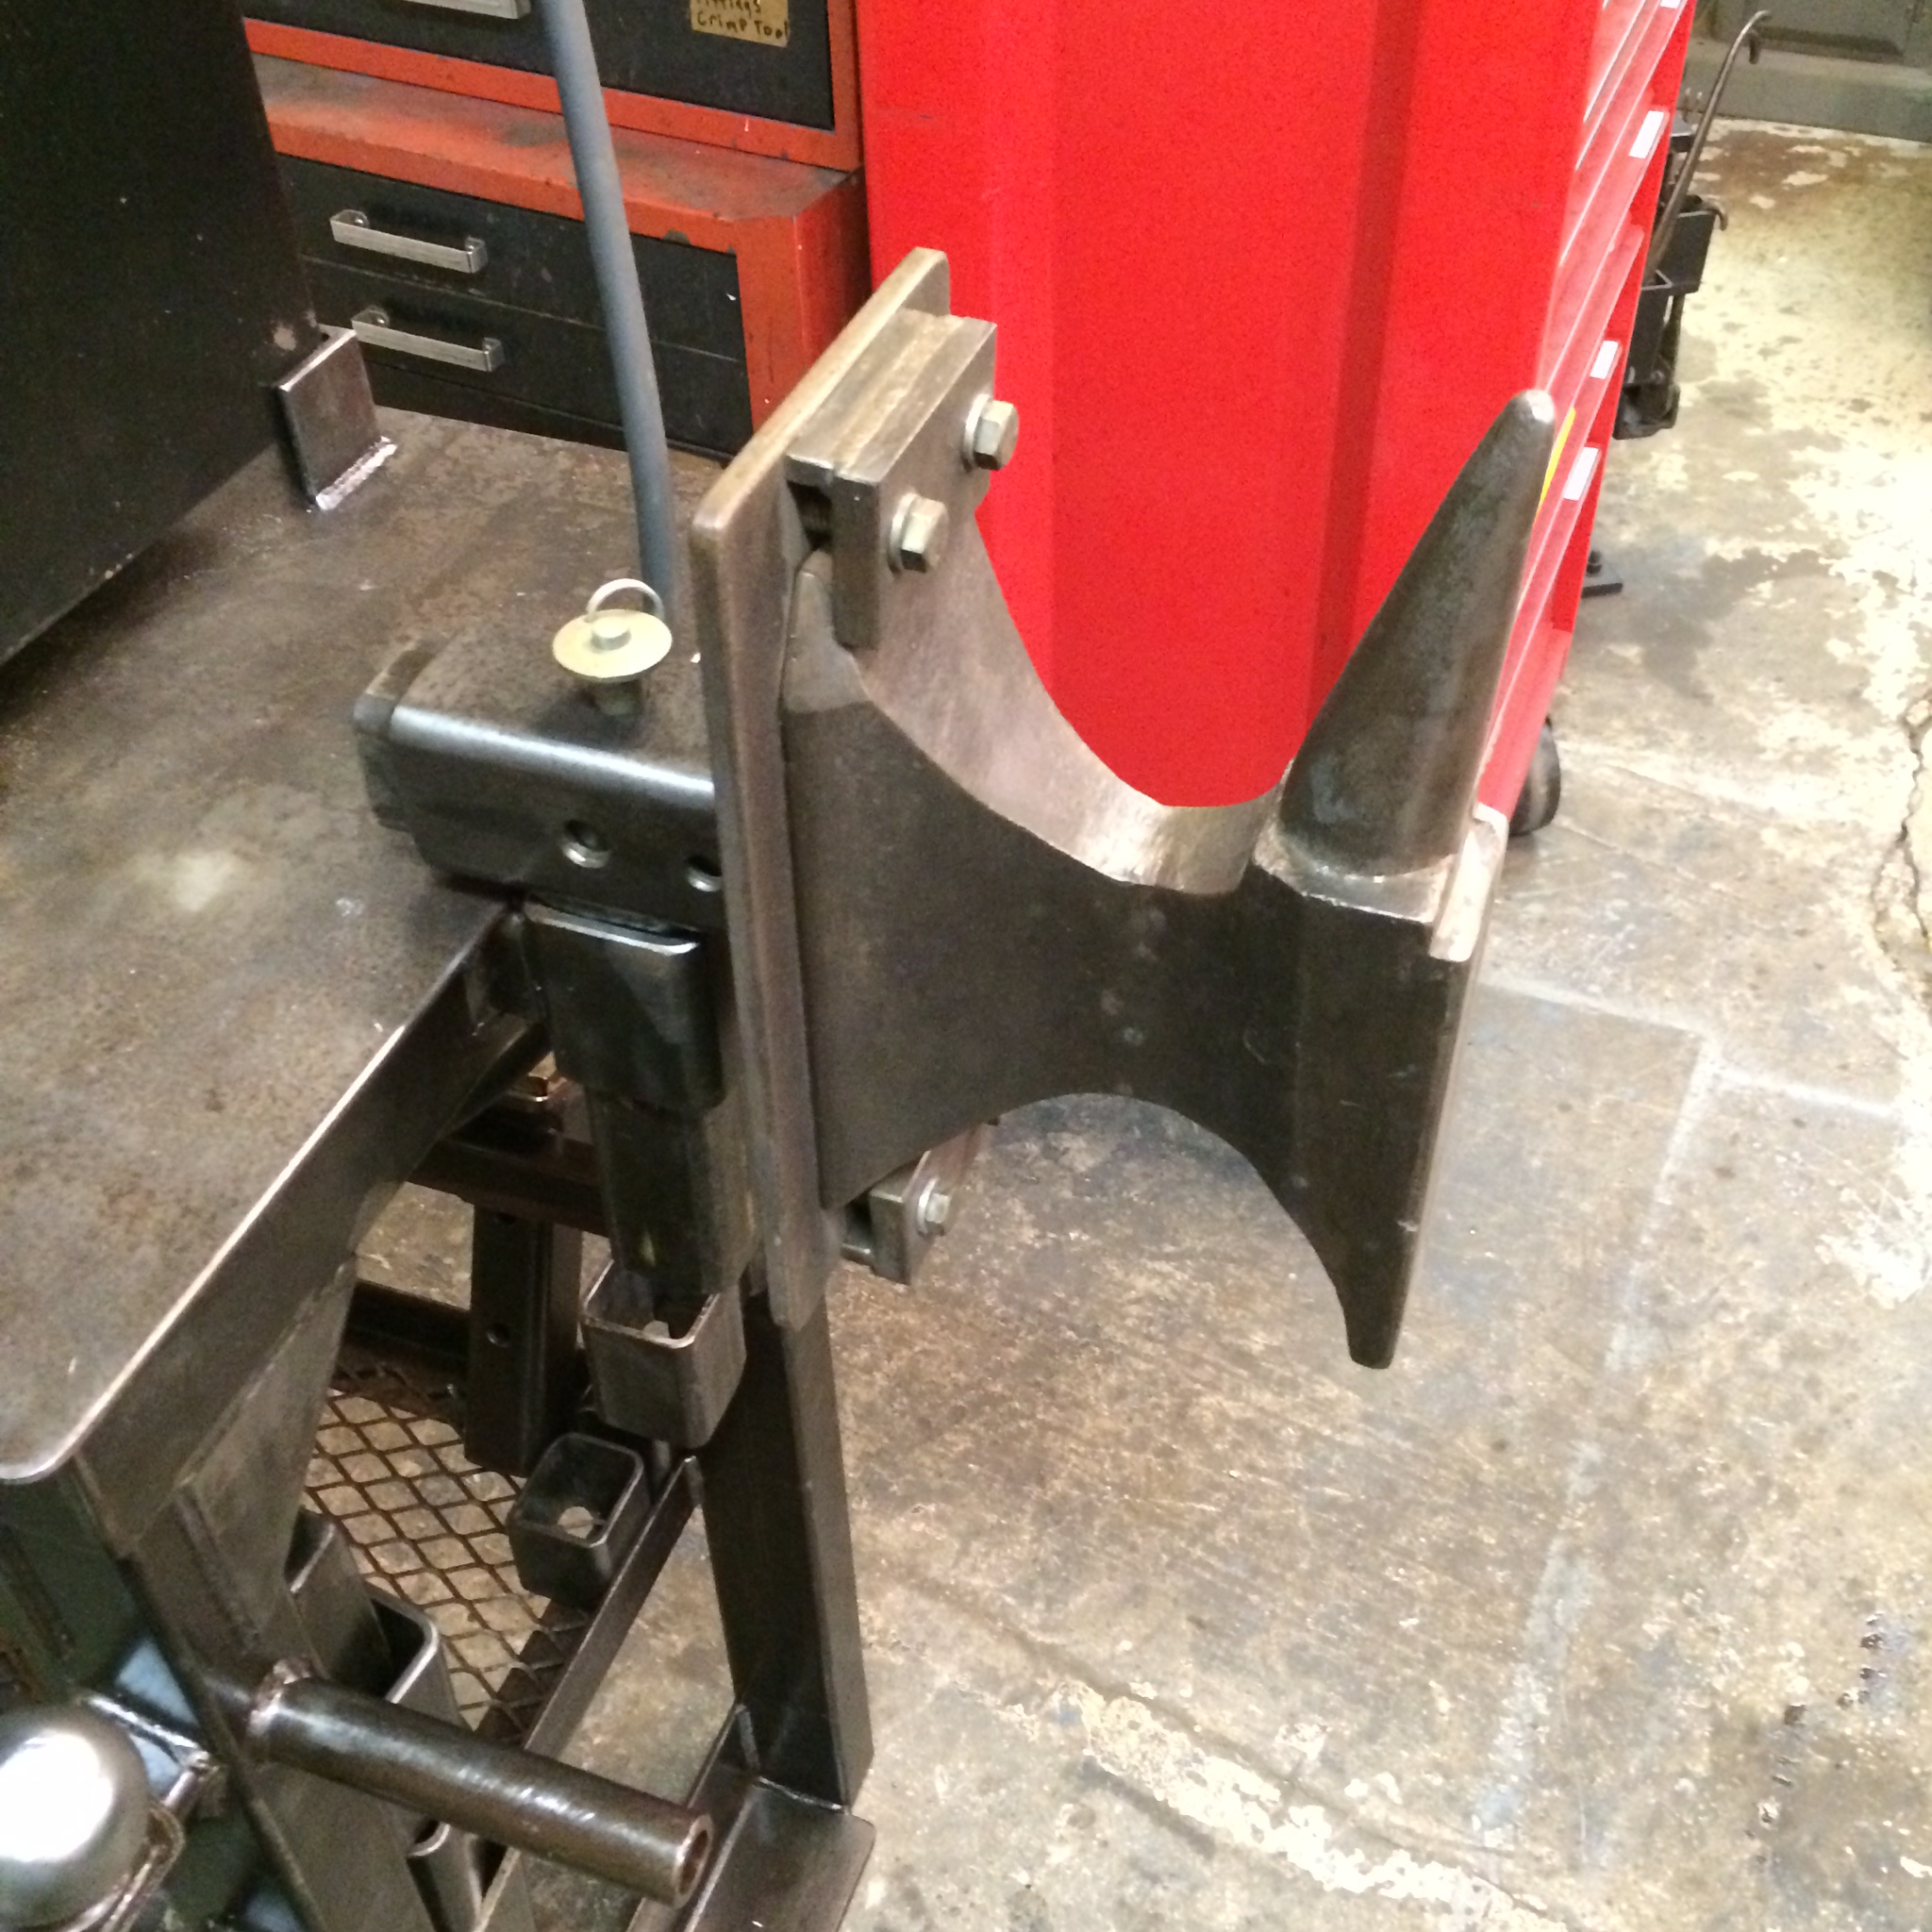
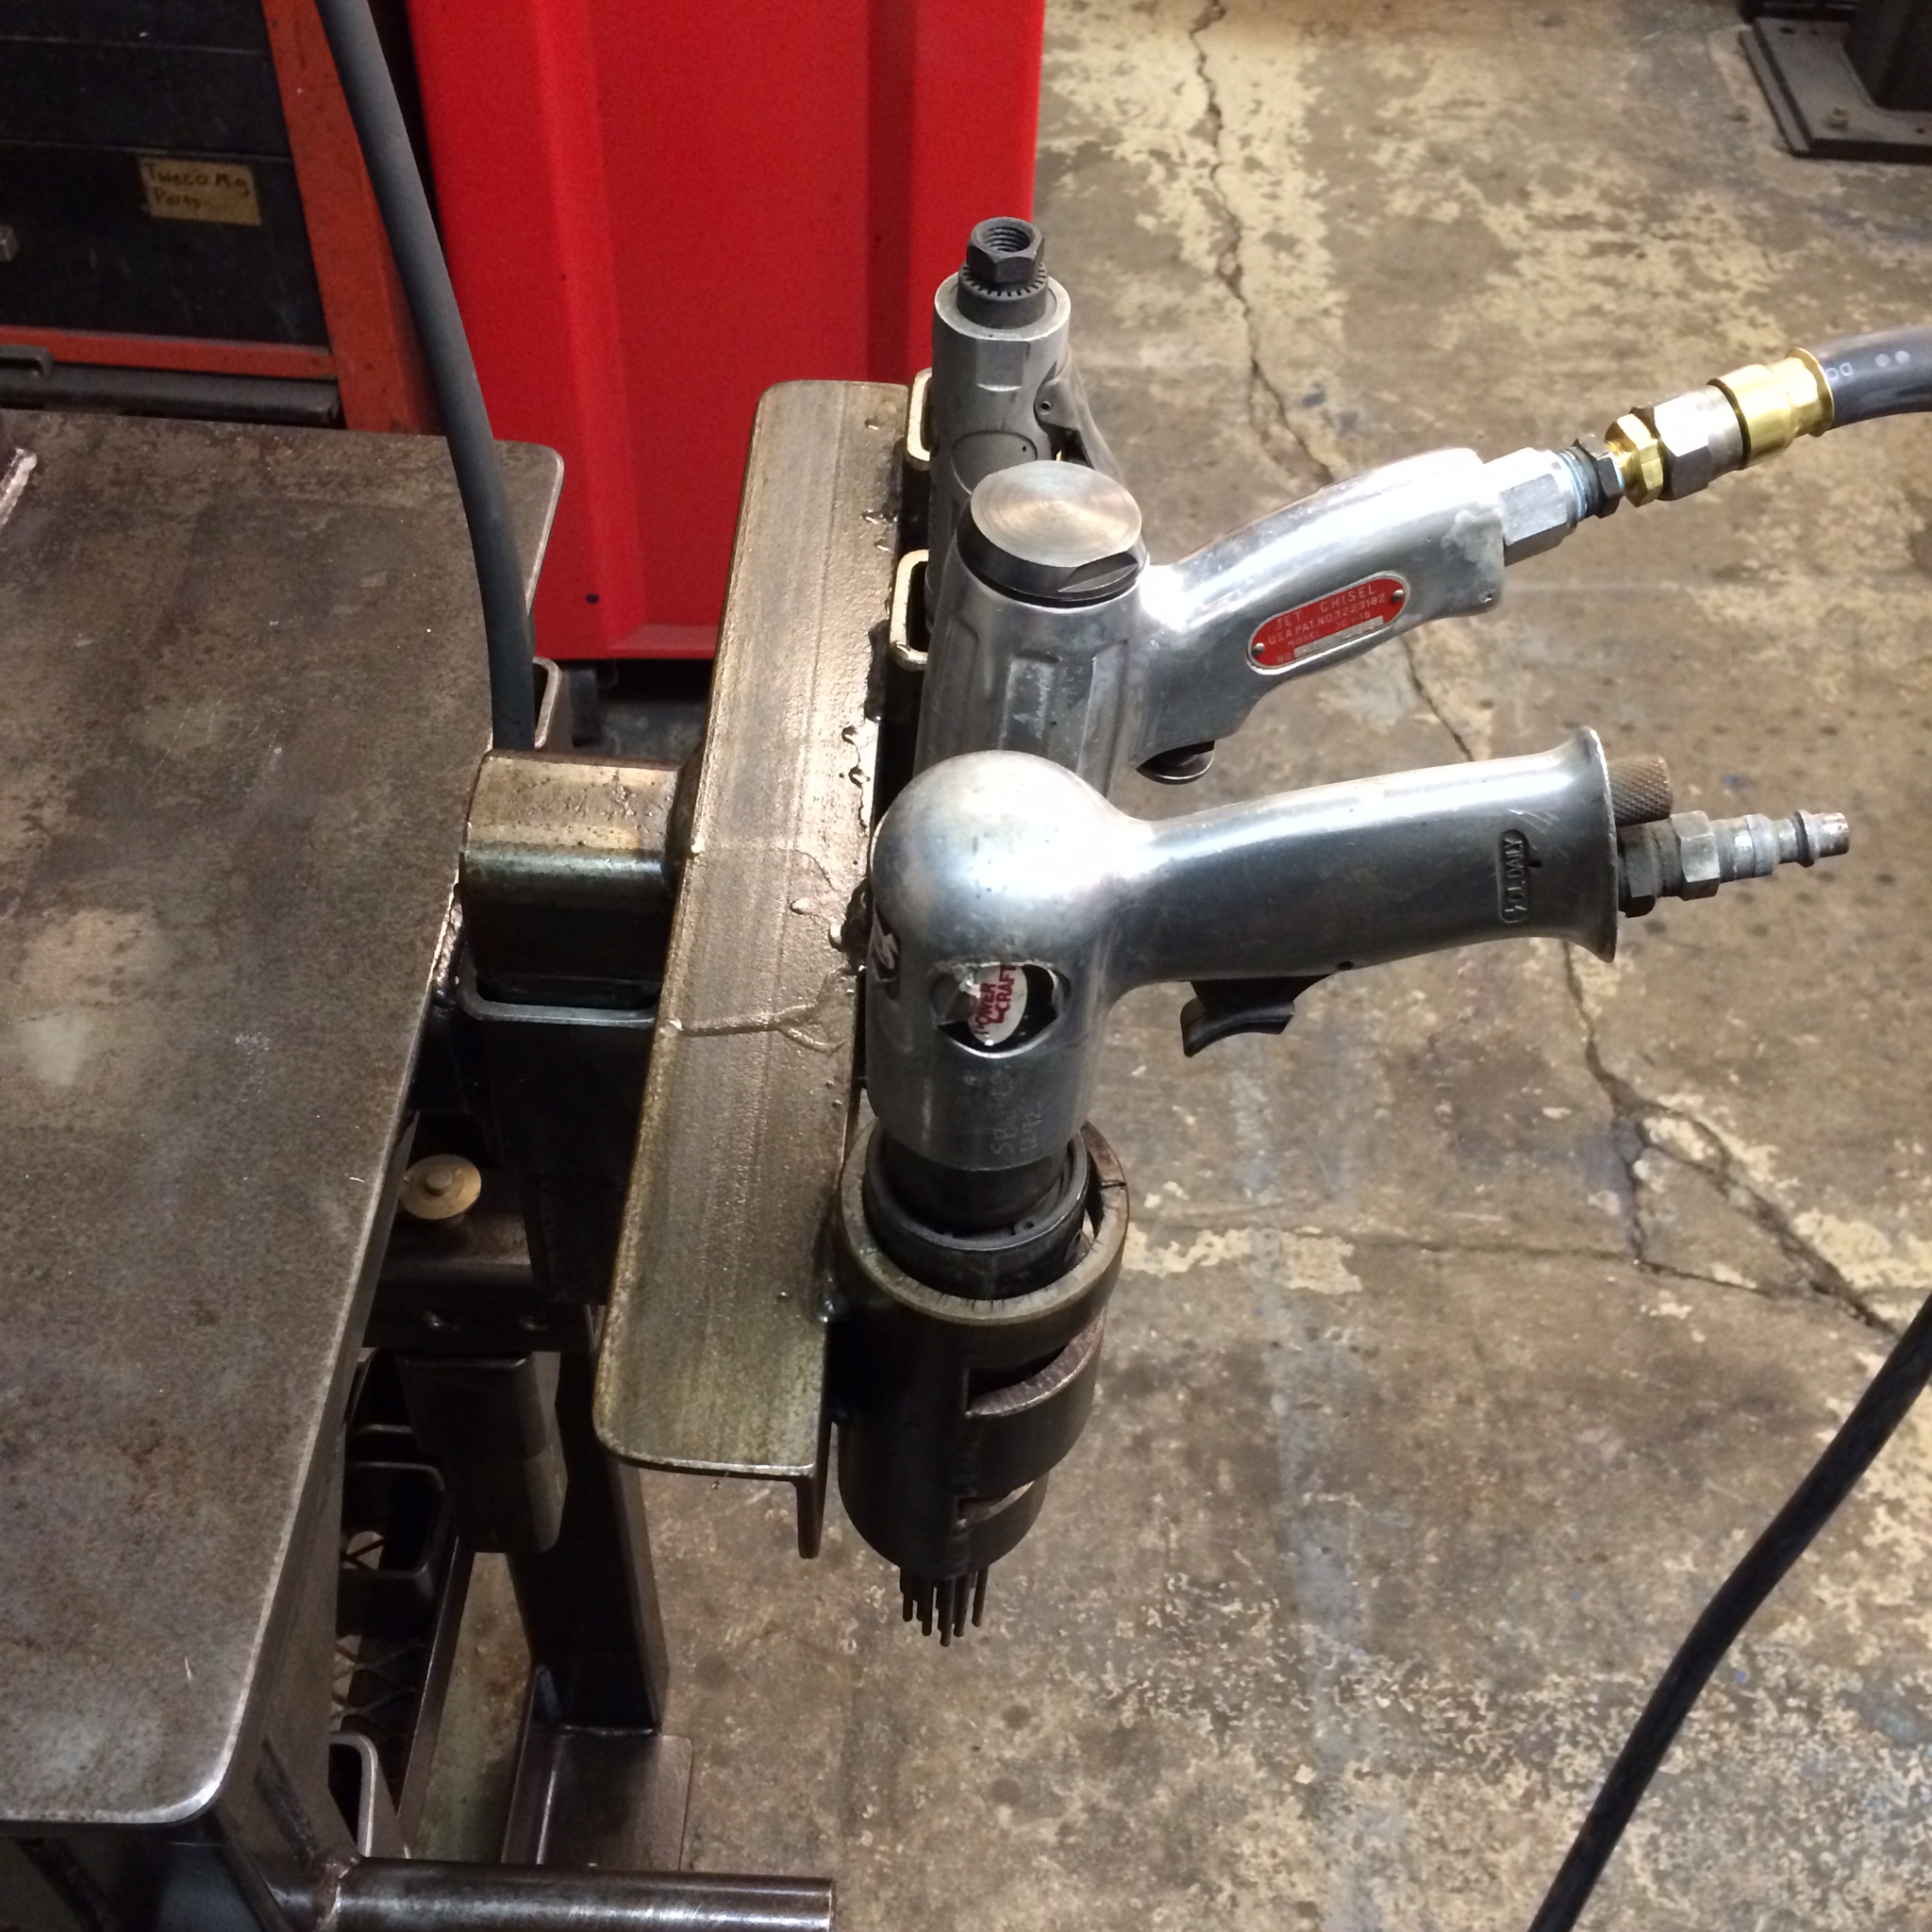
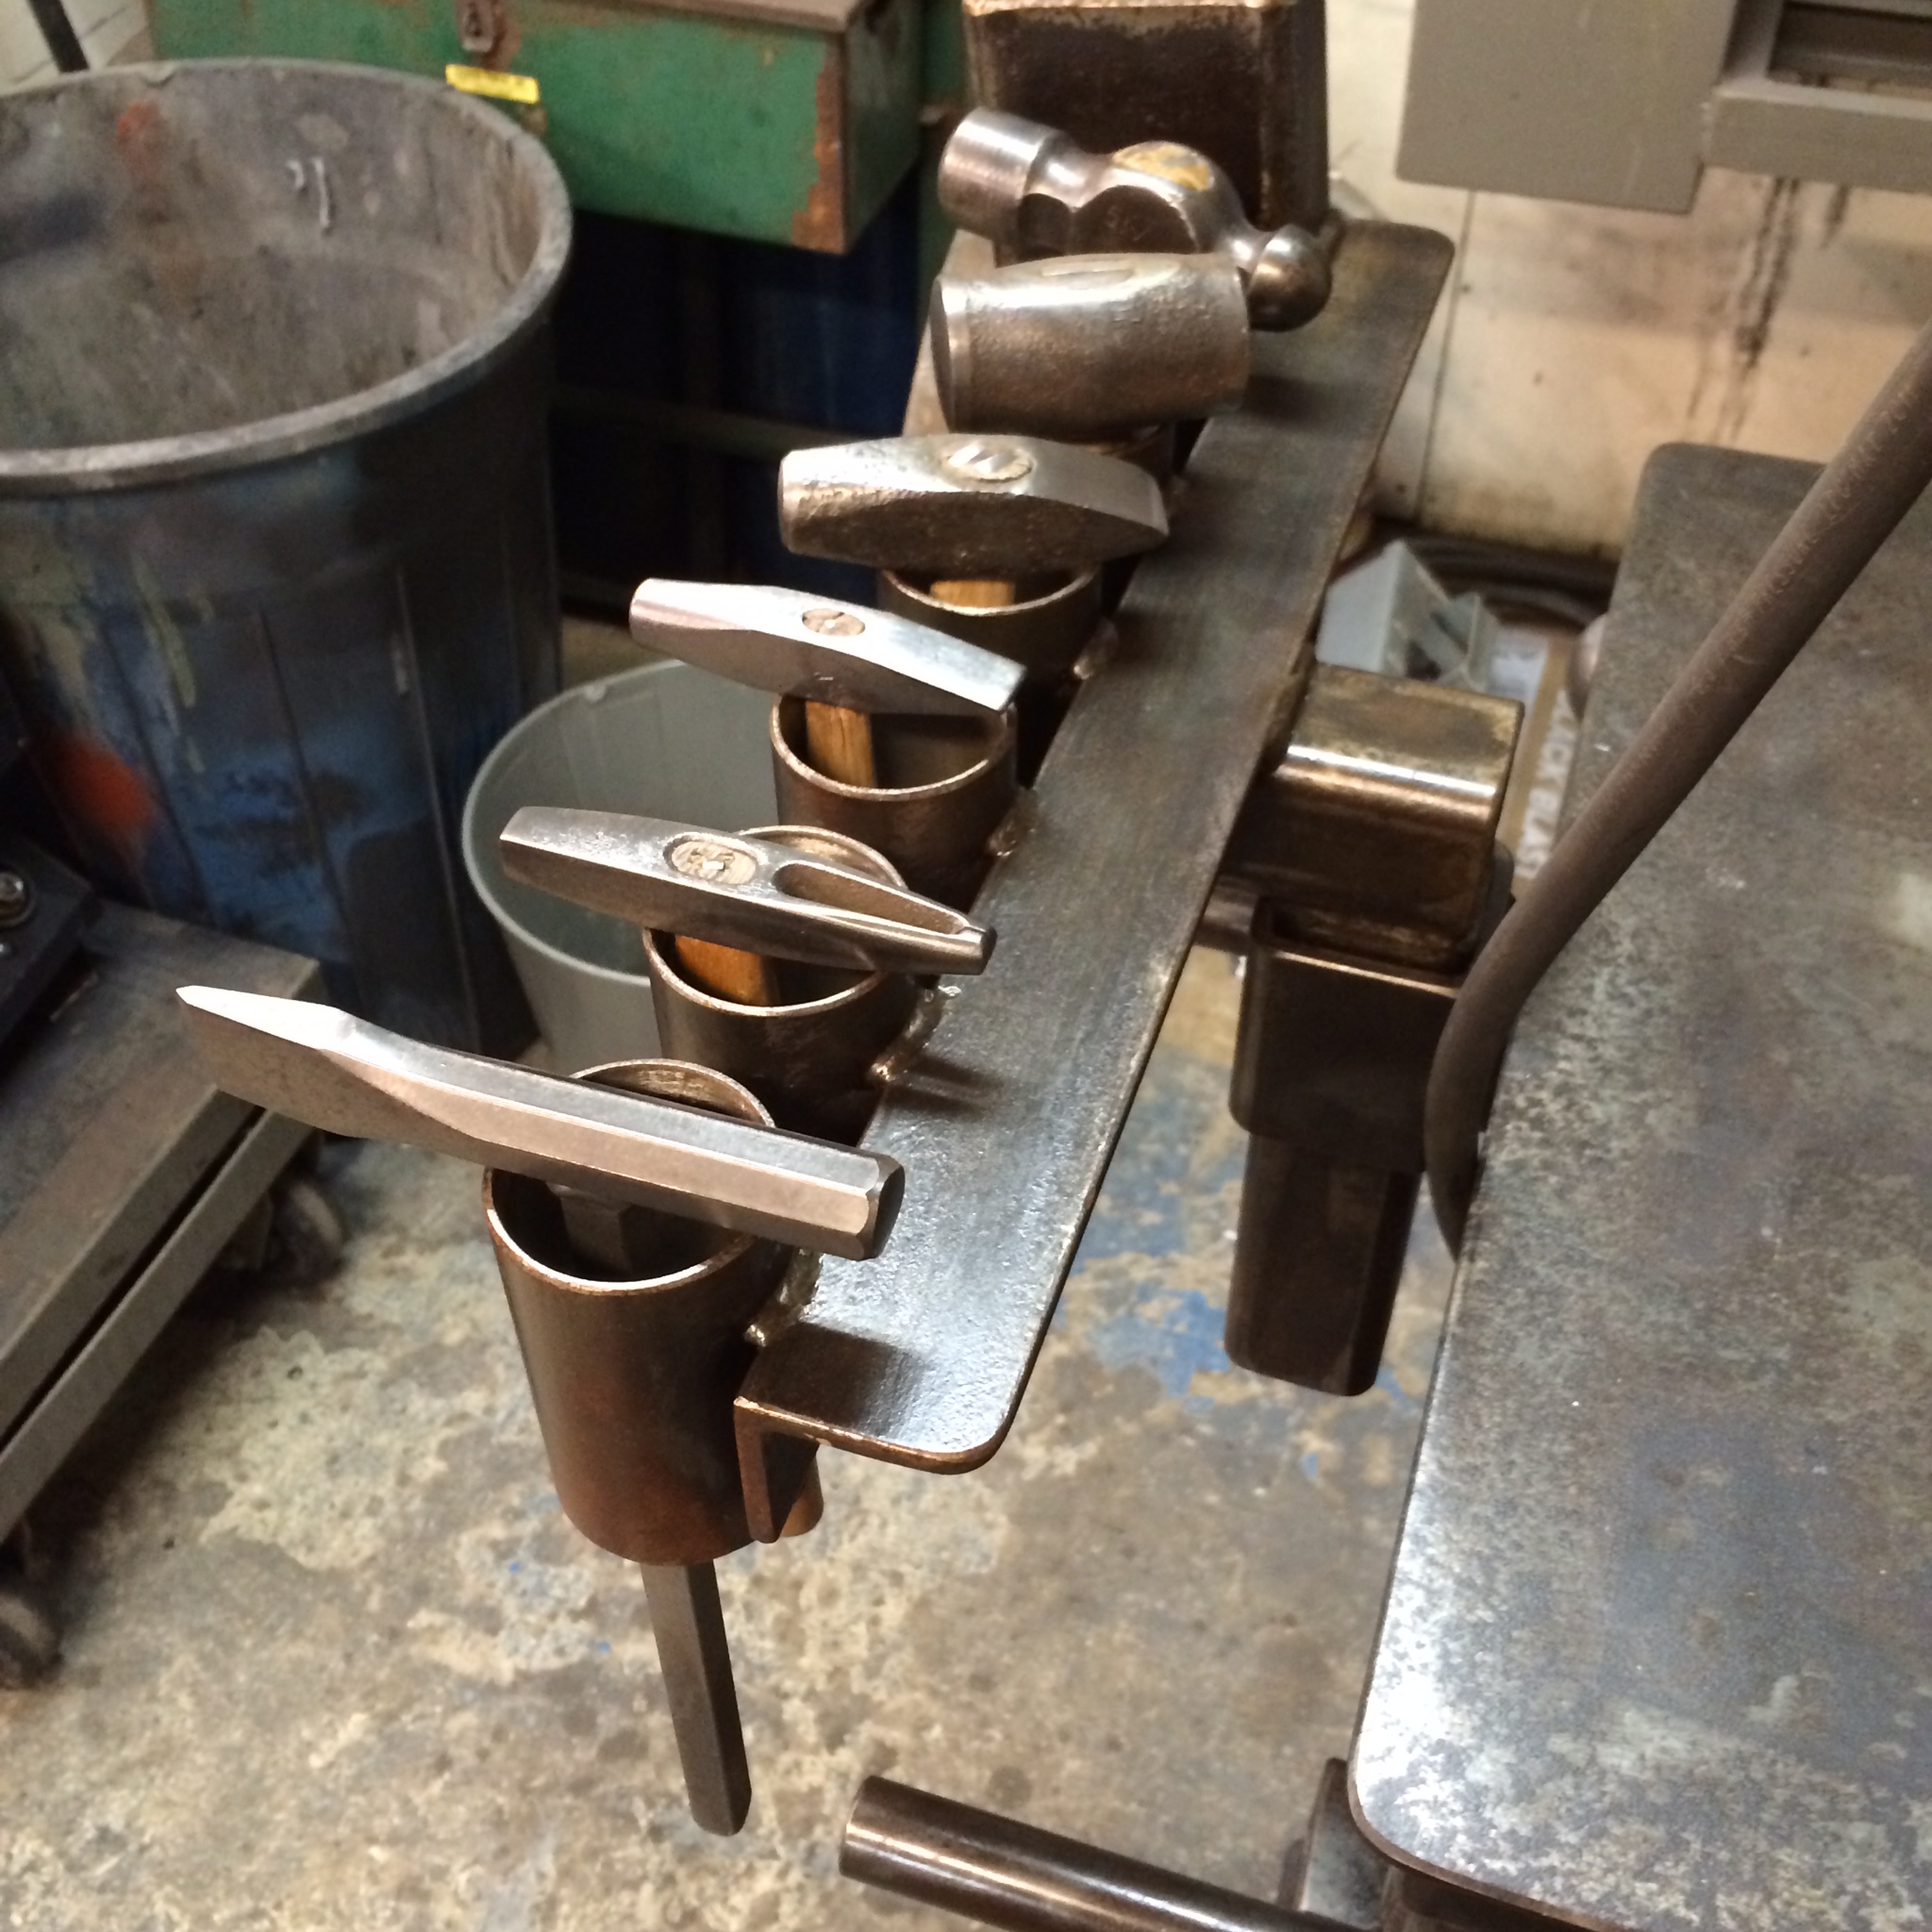
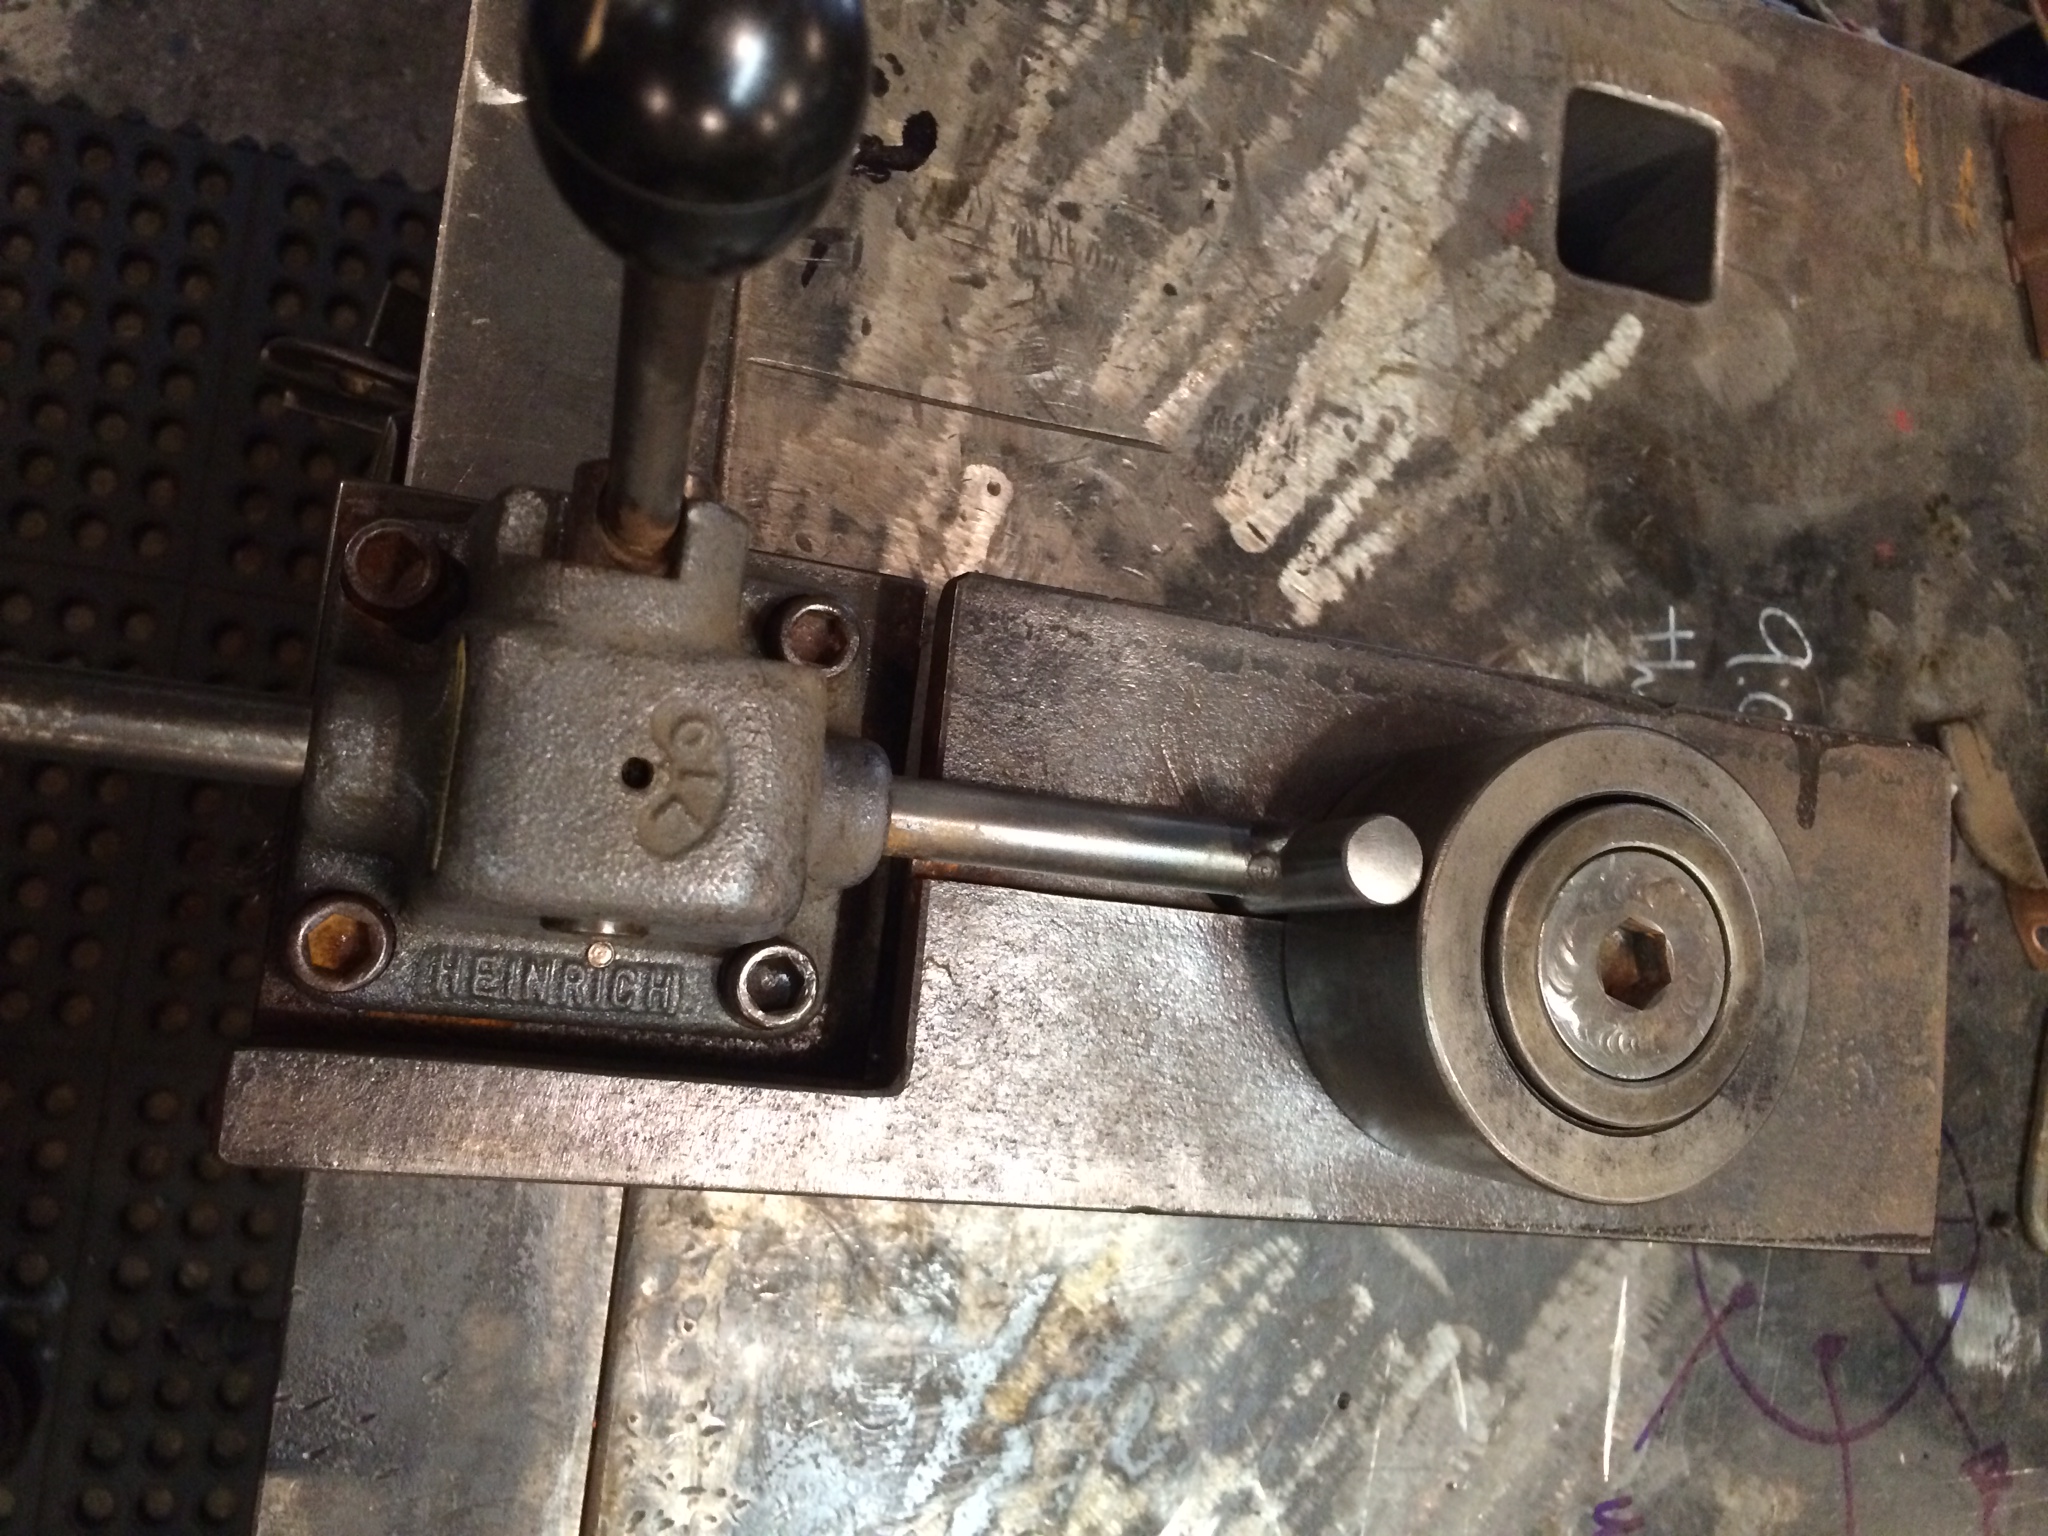
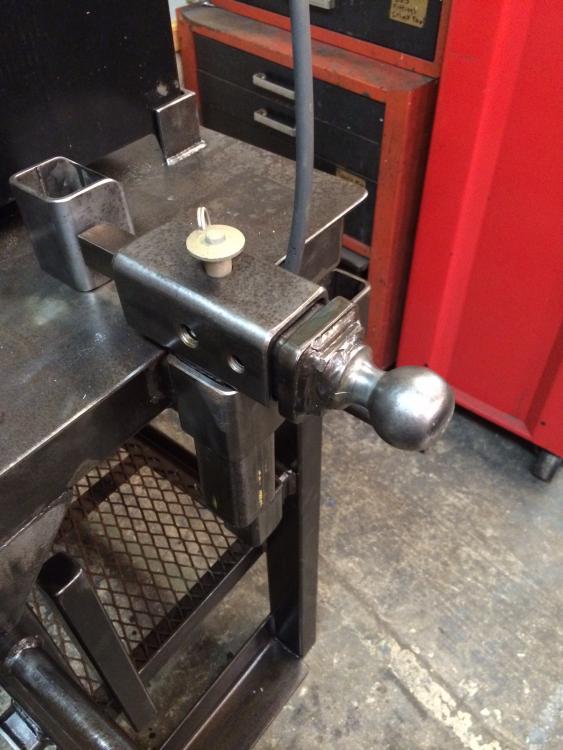
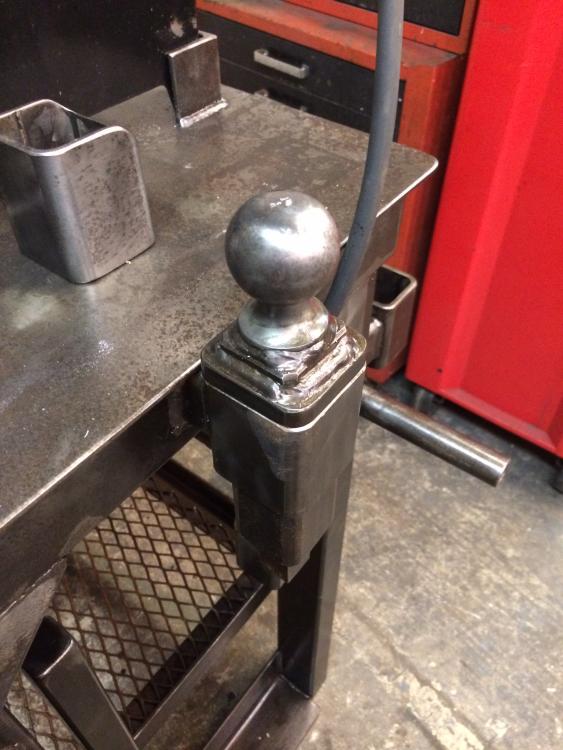
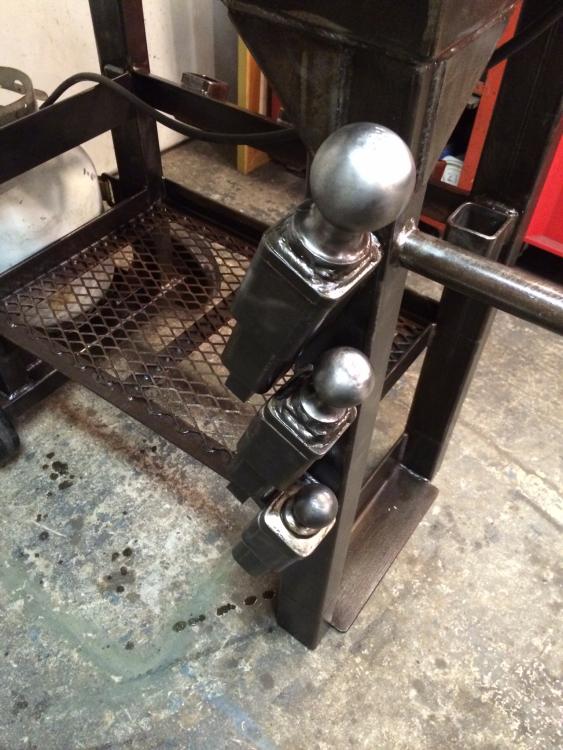
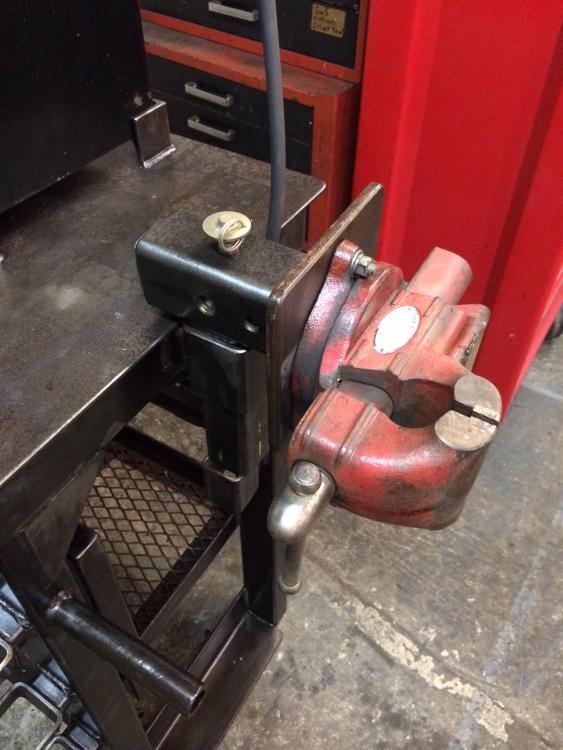
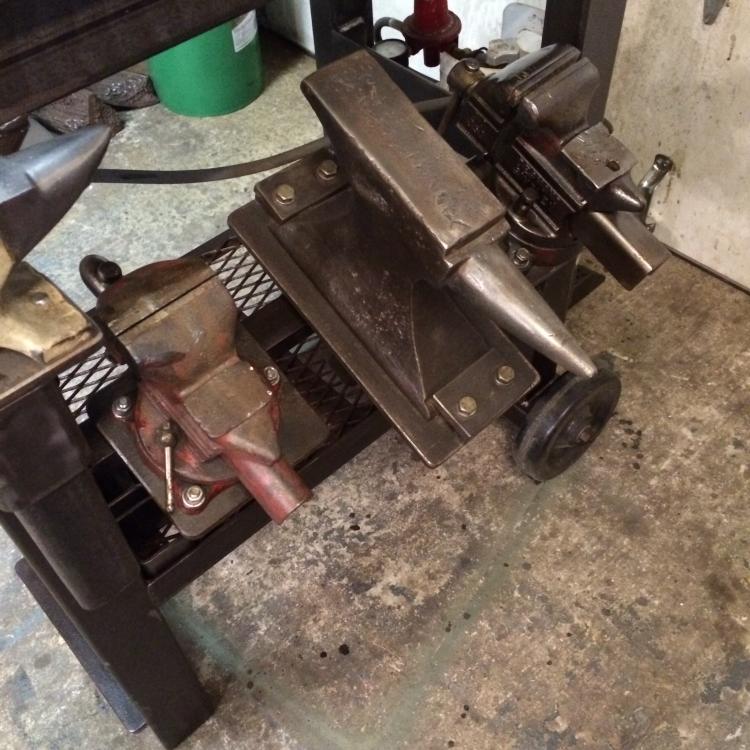
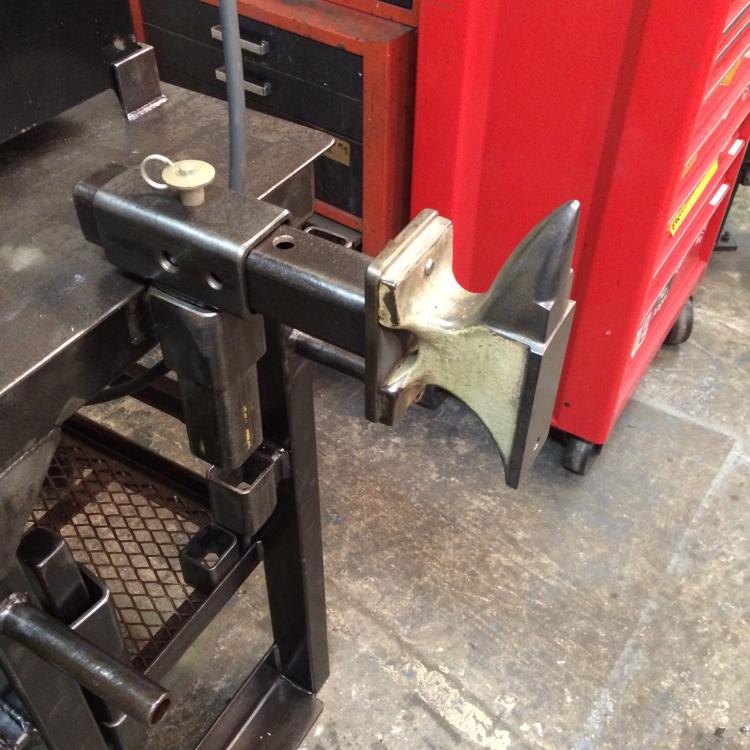
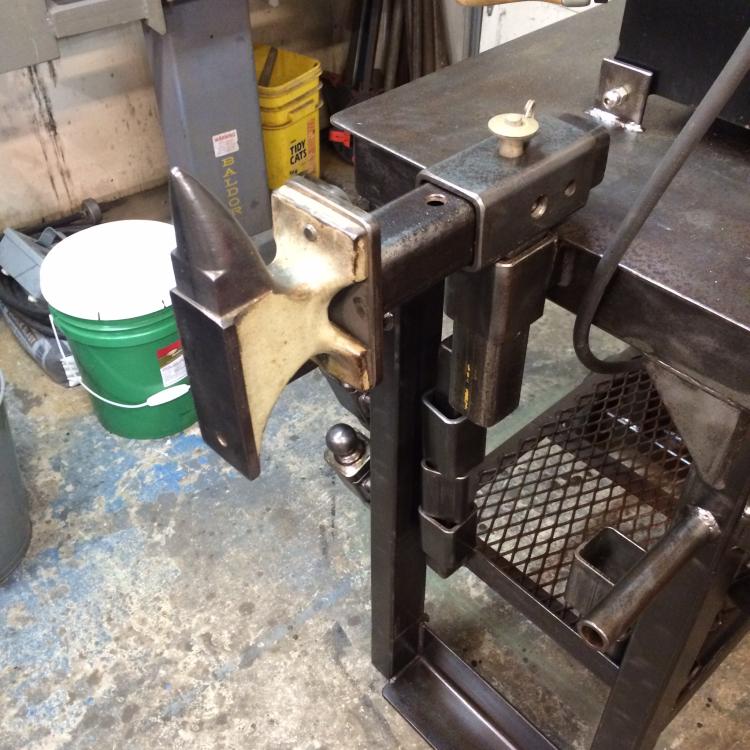
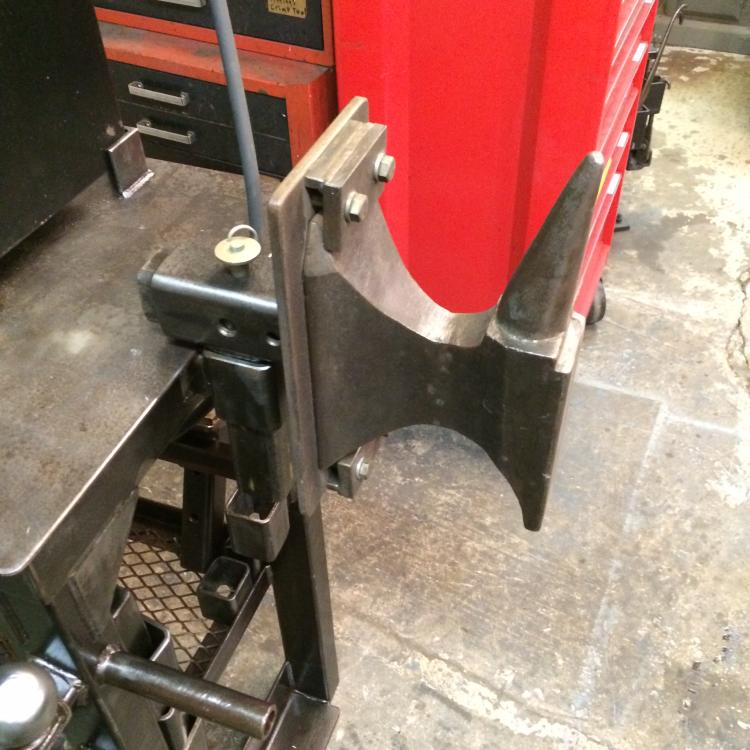
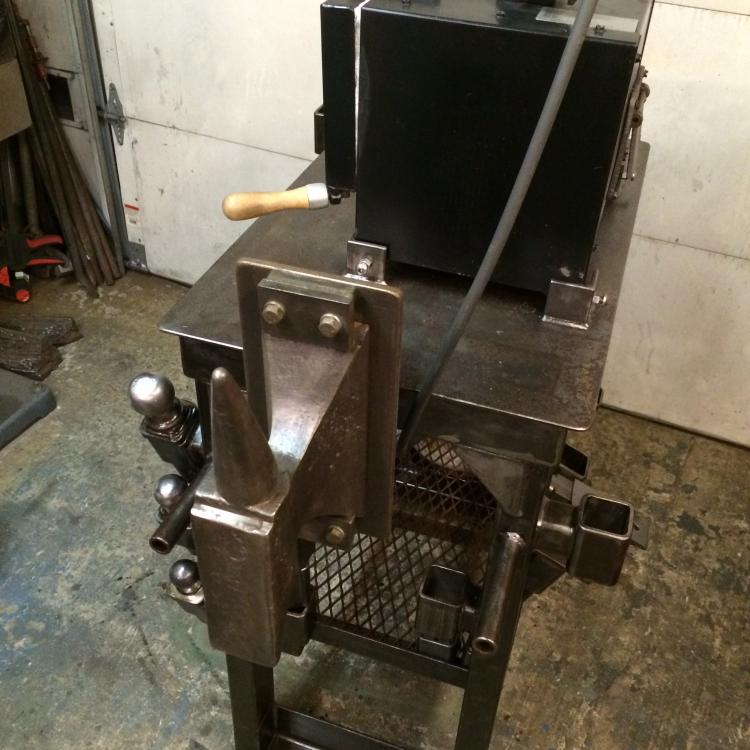
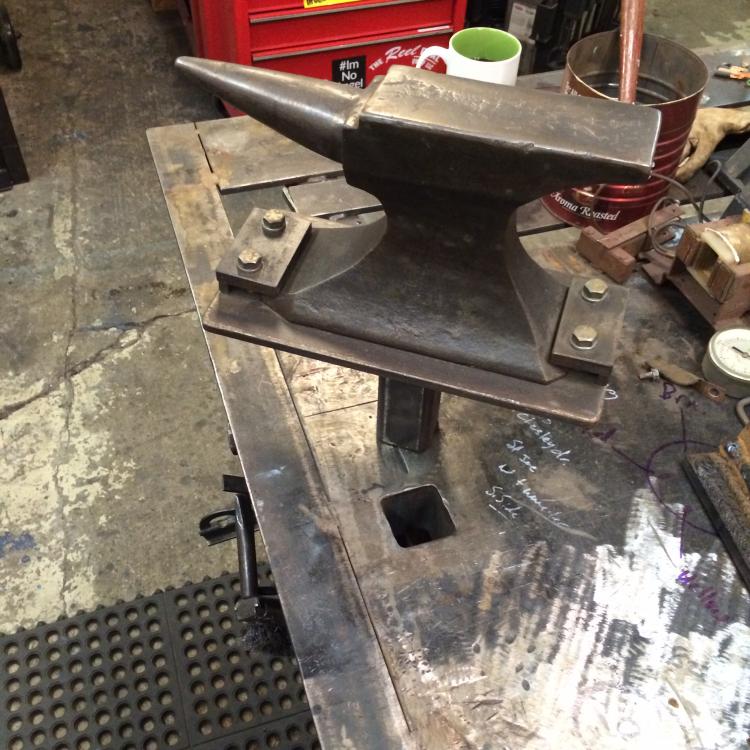
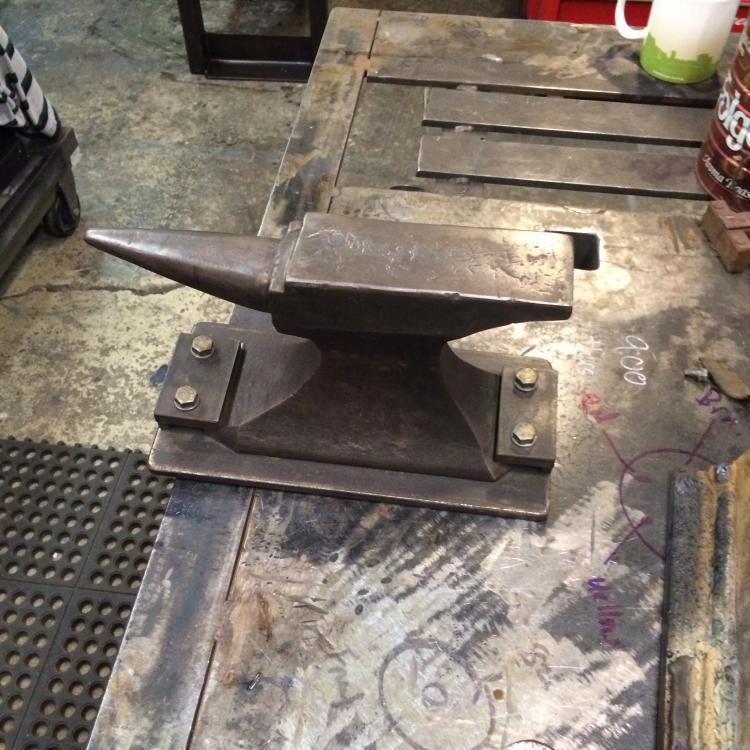
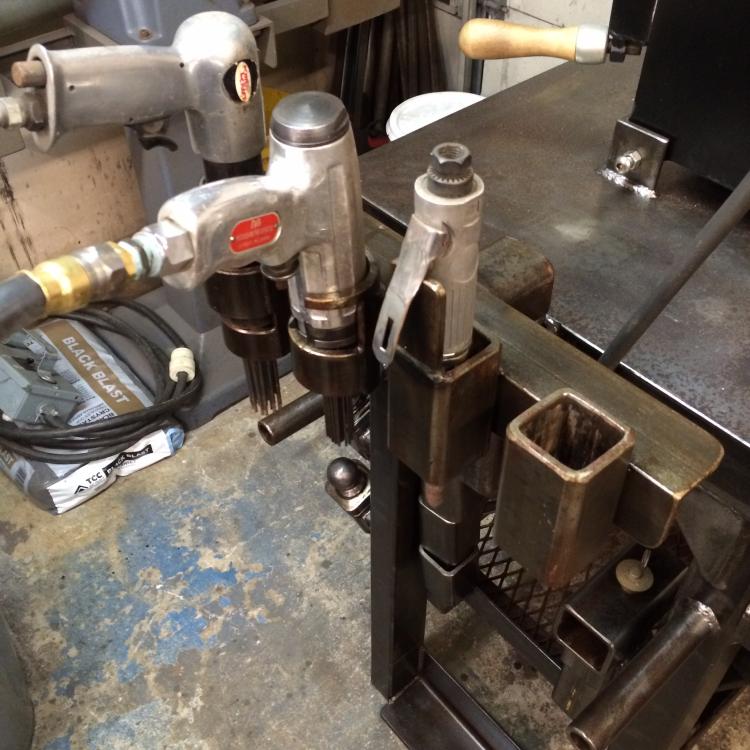
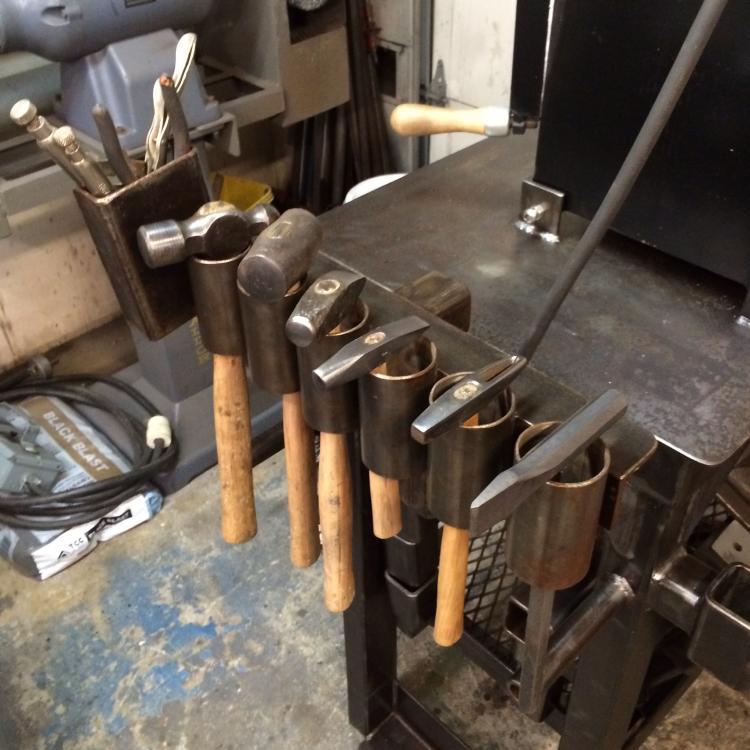
Doug requested I post a thread about my setup over here, hopefully it may give other some ideas, as well as if anyone has any ideas to contribute I'm always open to a different way to try things. About five years ago, I had expressed an interest to get into doing some forging to my mother and that I wanted to buy a propane forge from NC Tool on the recommendation of a good friend. I was going thru a separation and divorce at the time and was pretty low on cash. She handed me her credit card and told me to buy the one I wanted and that it was a "divorce gift" No argument there. After I got the forge, I built a rolling stand for it and decided to build some modular tooling to go with it. As I've already mentioned, I'm not a blacksmith. I don't do metal forming in a traditional sense, but more forming of sheet metal then joining it together to create an object as opposed to forming the entire thing out of one piece of material. The set of modular tools I've put together have served me well for what I do with them, and I also am allowed a very flexible system I can quickly change and modify on the fly with almost no tools needed to disassemble anything. Everything with this system is mounted to 2" square tubing that's mounted into the inside of 2.5" 1/4" wall tubing similar to a trailer hitch receiver. I have a number of these ports in my main welding table, the forge cart itself and a work table which also has wheels for easy movement. I'm really tight on space, so everything has to be able to be stowed and rolled out of the way if need be. I have a lot of pictures, I think they will best explain the system better than a lengthy description will. First up, is a shot of my portable vises, trailer ball strikers and a small anvil with a T fixture and lengths of standoff tubes to raise the components off the workspace they're placed on. This is the forge. A Whisper Daddy from NC Tool. Been very happy with it for what I do with it. Some pix of most of the components.. In these pix, I have three trailer ball striking anvils in three different sizes. These can be mounted in either the square holes on my tables, into the T fixture or into the hardie hole in my anvil. As you can see in the pics, I use a detent ball pin to hold components in place when in the T fixture, which places it on a horizontal plane. In these pics, I demonstrate one of my two small bench vises in the modular setup both vertically and horizontally. I also have a really cool Toledo pipe vise for holding round or square stock for twisting, or whatever else is needed. All of these vises store on the forge cart in dedicated holders made for them. Next up, I have a couple small anvils I use for detail work. The smaller of the two isn't what you would call a "real" anvil, but with the long post base on it, it works quite well for detail work and can be mounted on a vertical plane with the T fixture if the pointed end of the horn is needed. You can see on of the spacer tubes being used to increase the height of the small anvil in the fixture. The bigger of the two is a cast anvil of unknown origin. It has a fantastic rebound for what it is and is also quite useful for certain tasks, or when I want an anvil on my work table in addition to using the Hay Budden. I also made up a couple portable tool and hammer holding racks which can be positioned anywhere on my tables or carts with the square ports. I can put a variety of air tools and other items in them for easy access during a job. I have several needle scalers and a number of air hammers I use during forging, I can load the holder up and just connect the air hose when I need the tool. I run two 50' reels and can connect to two tools at once. I have a stock bender I made from angle and a Heinrich friction vise. It looks pretty cool, but doesn't work all that good. It needs some tweaking to better hold stock while it's being bent by hand. One of those built on the fly ideas that sounded a lot better than it actually is : D I have the torch holder tree, as I covered in its own thread. It can also be moved anywhere in my shop where there's a square hole to put it in. I have a couple other things not pictured which include a work light holder and post for a Foredom tool.


-
Yeah, I've considered switching to oxy propane but I dunno if there will really be any big savings by the time I purchase appropriate hose and tips for my heating torches. Plus the increased oxygen consumption is a factor. Acetylene works very well, but it's not cheap. My bigger heating heads can drain a 300 CF cylinder pretty fast if I'm doing anything serious. Ill have to look into coal at some point once I get some more space and time.
-
It sure is easy on the eyes whatever the case Mr Evans!
-
That's some beautiful work Alan.
-
Indeed. Nice score for sure! The hammer is icing on the cake!!
-
Adjustable torch holding tree for modular table systems
7A749 replied to 7A749's topic in Tools, general discussion
Thanks guys. I spent a few hours cleaning last night and got my forge and other modular tools out. I'll post a thread on it and include pix of this in it. This is almost a stand alone deal since it could be utilized by a number of different operators. That and it was the only thing I had access to two days ago @TwistedCustoms Once I get a good pile together, I'll usually find another reason to keep it and just move it someplace else -
I've never used a coal forge at all. IFI member Heap of Jeep has graciously invited me to see his forge sometime this summer. I plan on bearing gifts when I go Itll be interesting to see how yours works out. I know a young man here in town who uses a very simple charcoal forge with a hair dryer and says it works pretty nice. I don't think getting coal here would a problem, but I don't have the room for a true coal setup at the moment. Not to say I might not try and make room in the future. Propane and oxy fuel have worked ok so far.
-
Hey Mike. Glad to see you here. I just joined too. The forge is coming along nicely. That blower you made looked quite capable of providing enough thrust to get to the moon. Looks like the grinder motor will work just fine tho. Just got my little forge out and cleaned up today. Hope to bang on some metal soon.
-
I see. Thanks for clarifying that.
-
Well, I'll take a stab at this (no pun intended, honestly ) First off, I am not a blacksmith. I bang on sheet metal and make artwork and light fixtures, etc. I am however, in the buy and sell business and have been for awhile. I primarily restore and repair welding machinery. I can appreciate up front that making a knife is a little different than fixing a welder, but at the same time the principle behind what to charge is the same. I do work out of my garage, but I've also had a full on industrial shop and know all about overhead and the bills that come with it. Being the OP, as well as several others aren't in such a situation and have a shop at home it can slightly affect the hourly rate, or final cost of a product. That said however, your time is YOUR time. No matter the overhead or initial investment. While I can't tell anyone what to charge for their work, I can say that as you improve and become more proficient, then the price goes up. I cut my teeth doing buy and sell almost 16 years ago doing garage sales and working part time for an auctioneer. I learned the basics, got some chops and figured out dos and donts. I will say up front that the transition period between being a learning hobbyist and competent professional can be a painful learning experience. Back when I really got into the buy and sell seriously, (which was about ten years ago) I went thru that stage where I let unappreciative customers push me around on stuff and I took my lumps and learned from it. Everyone goes thru this in one way or another. With me it was with machinery, with guys here it's with smithing. Im new to this board and don't wanna seem like I got all the answers, which I don't. But I do have an extensive amount of experience buying and selling high dollar, complex welding equipment and can tell you right now that once you have reached that threshold where you are turning quality work out of your shop and you feel good about it, THEN YOU CHARGE THE CUSTOMER ACCORDINGLY! One thing I am absolutely dead set on is my pricing. Now that's not to say that there aren't times where I'm flexible on some stuff, or throw in a couple freebies to seal a deal. But when it comes to the terms of business, I CALL THE SHOTS. Period. I never, ever allow a customer to dictate the terms of business to me, nor do I allow them to beat me up on a price. Again, there's some industrial customers I have that I make some minor exceptions with, but mainly because purchase and payment has to be done thru a number of channels and signed off on before any money can be paid out. My terms are generally 100%payment up front on any custom built machinery or special order stuff I have to build from the ground up. If the customer doesn't like my terms of business, I simply wish them well and suggest they look elsewhere for what they are seeking. My terms are primarily to protect ME. My terms also spell everything out in black and white right up front. I'm a what you see is what you get kinda guy. I don't play games and don't jerk customers around. At the same time, I'll be darned if they're gonna do it to me. I think self respect comes into play in any situations like this. I've had to learn everything I know about that the hard way, but no one, ever will take it from me. Whatever the case, think about what you put into the project you're selling and where you feel you are at as far as skill level goes and try to price accordingly. Take a look at others pricing, find the cross section and try to fall somewhere in the middle and base your price on your relative skill and ability. Go from there. I'm not the most expensive game in town, but I'm nowhere near a hack that peddles junk on Craigslist either. I will often tell a prospective customer that the level of perfection I shoot for is usually relative to the size of their wallet. I'm at a stage where I can give them about whatever they want, but I dictate terms and price. I know some won't agree with me, but the customer is NOT always right, and if I don't think they are, I have no problem telling them so. Above all things, make sure YOU feel good about the deal you're doing, and that YOU feel you have been fairly compensated for your work. Own your decisions and your terms of business. From there, it's all about gaining experience and continuous improvement. As the skill level improves, adjust your pricing. Best of luck with it. IMHO of course
-
Very nice. You do some excellent work. The touch mark you have is sweet too.
-
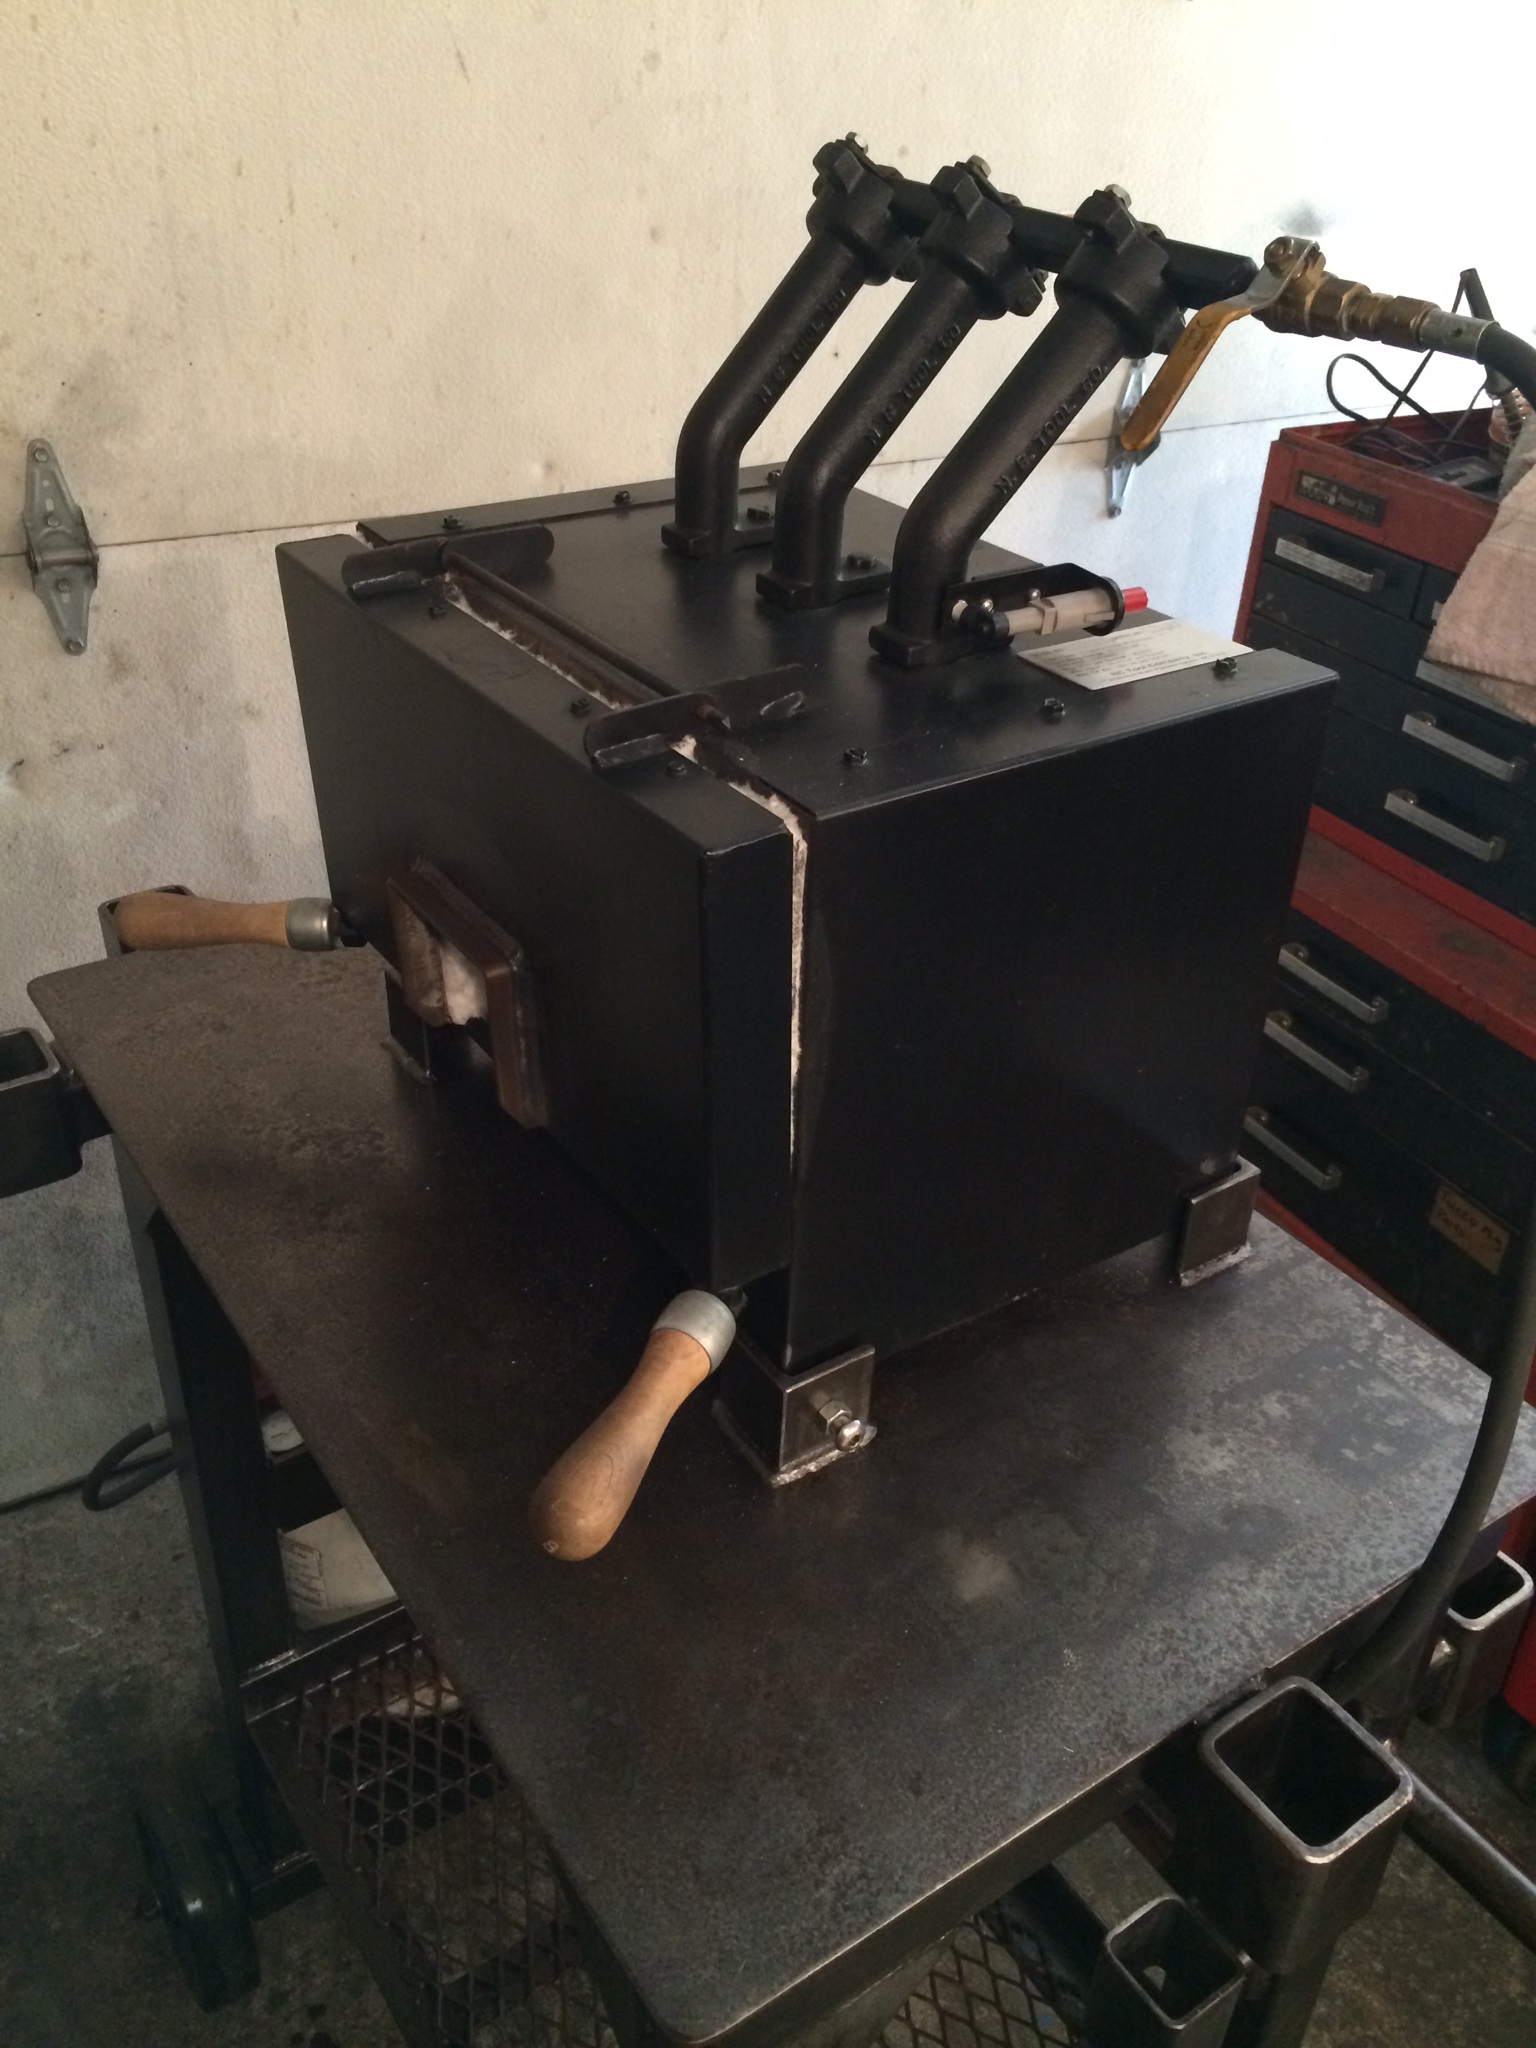
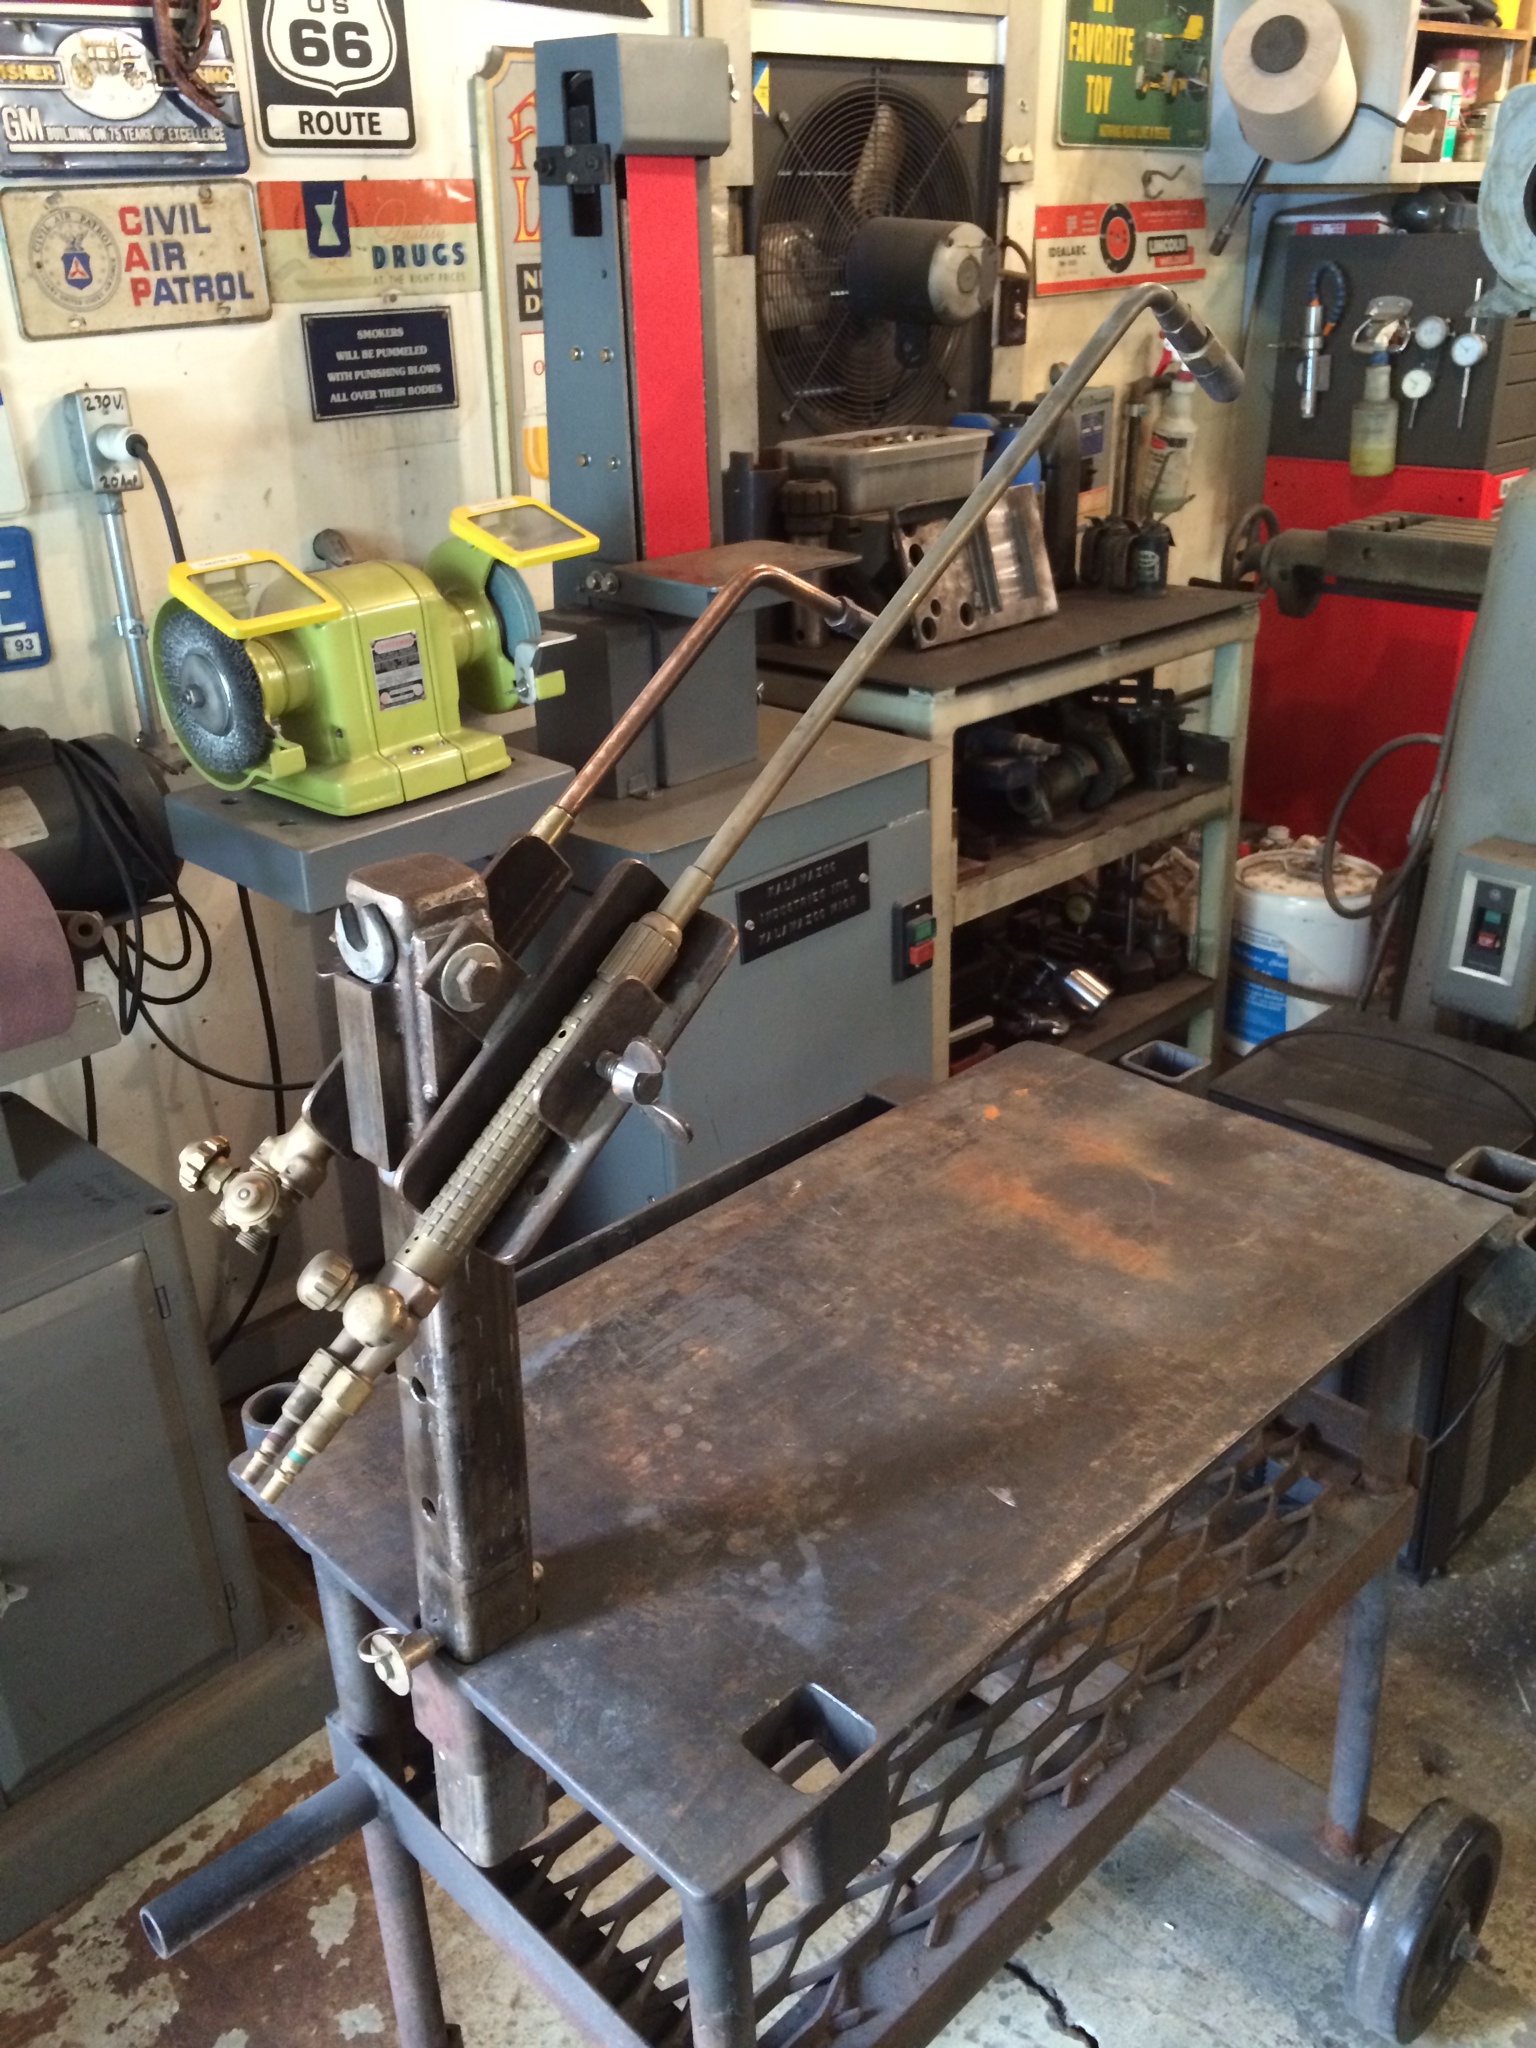
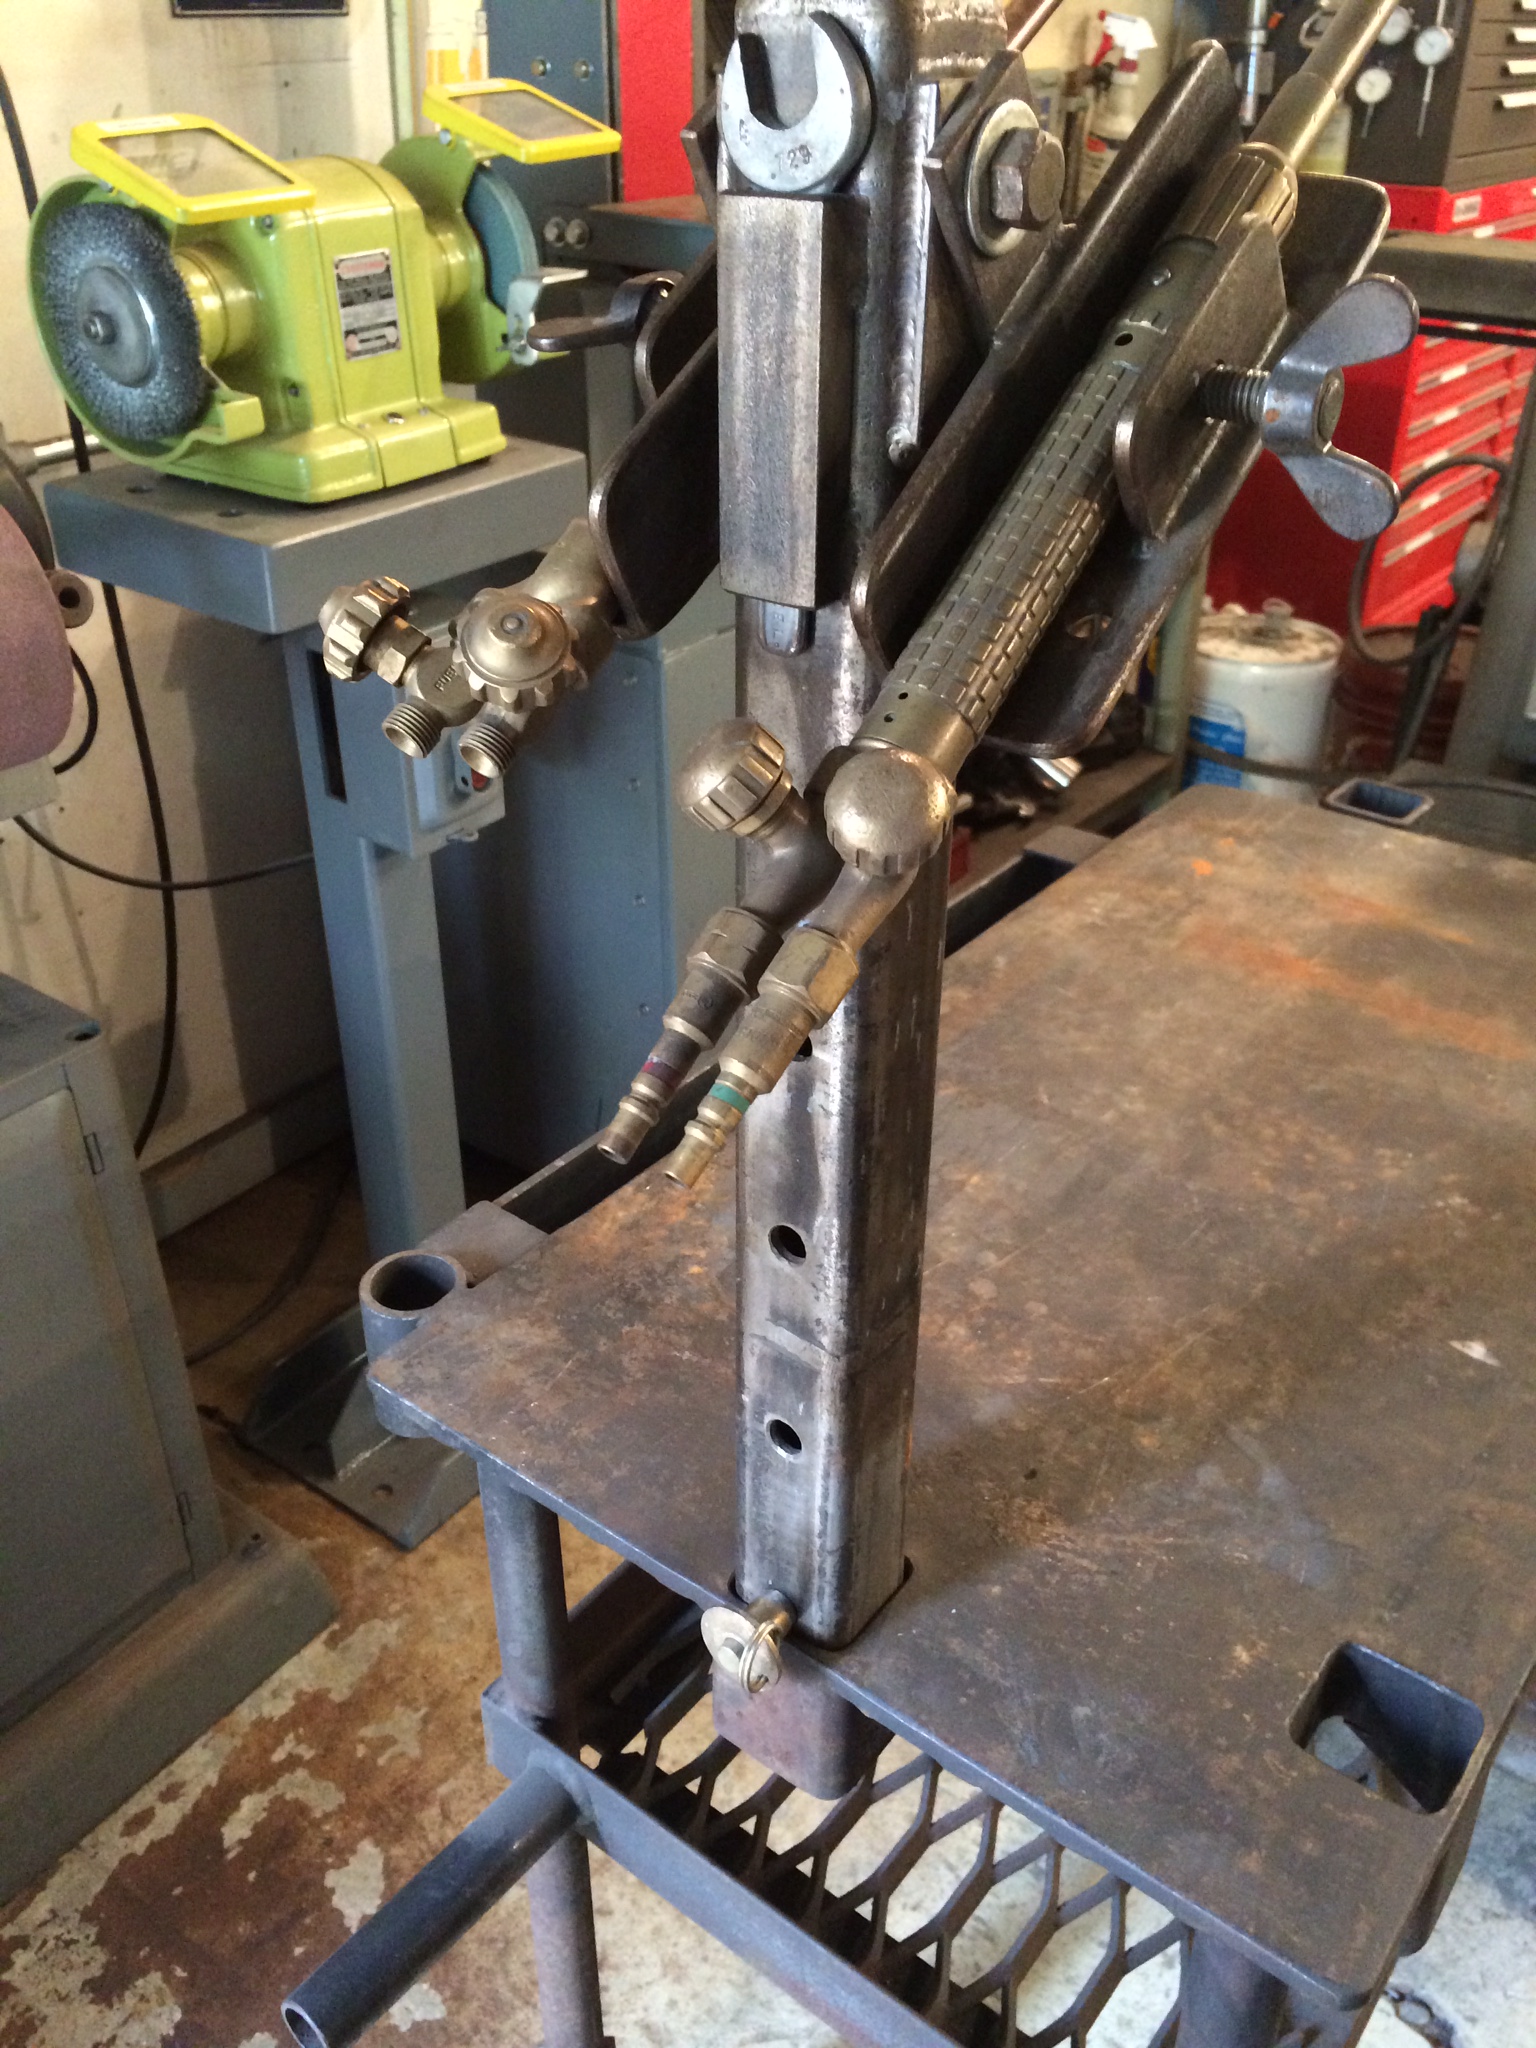
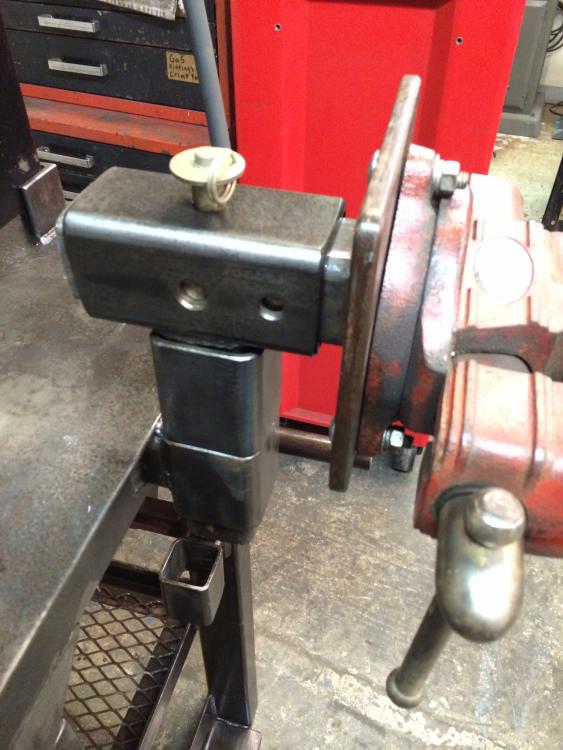
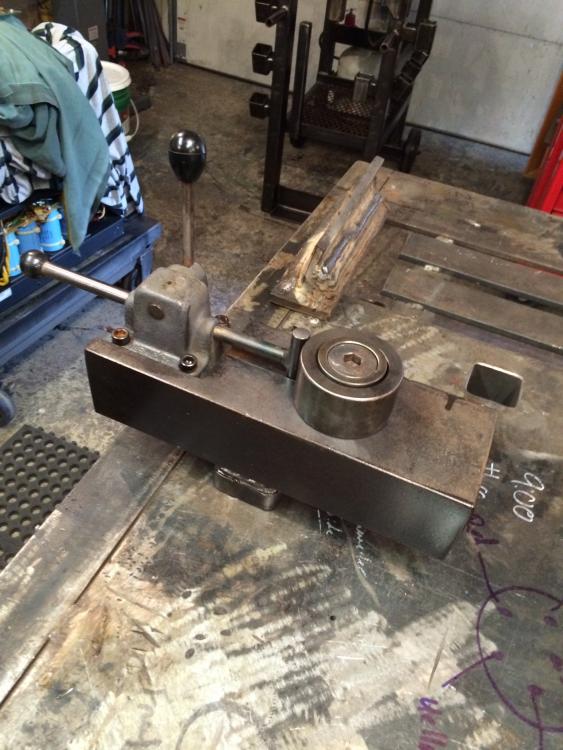
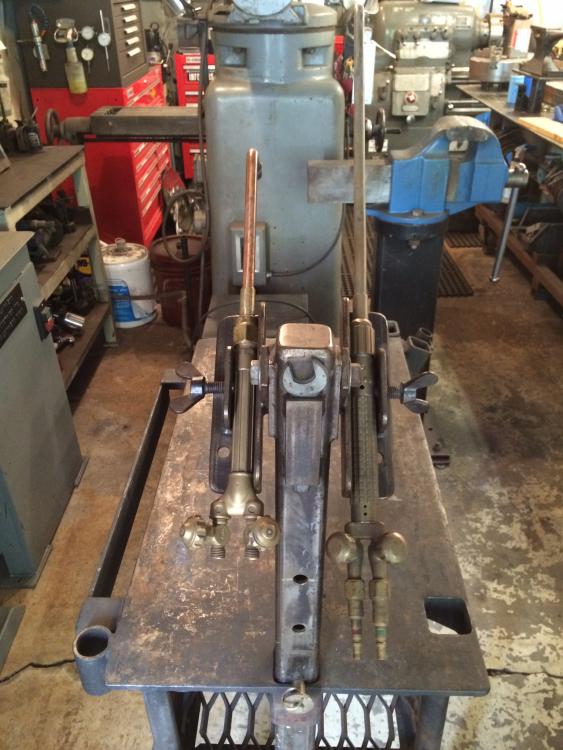
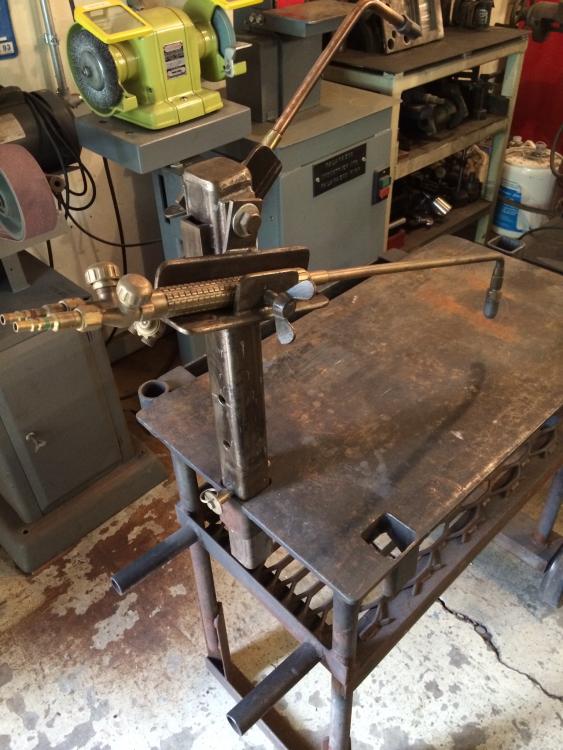
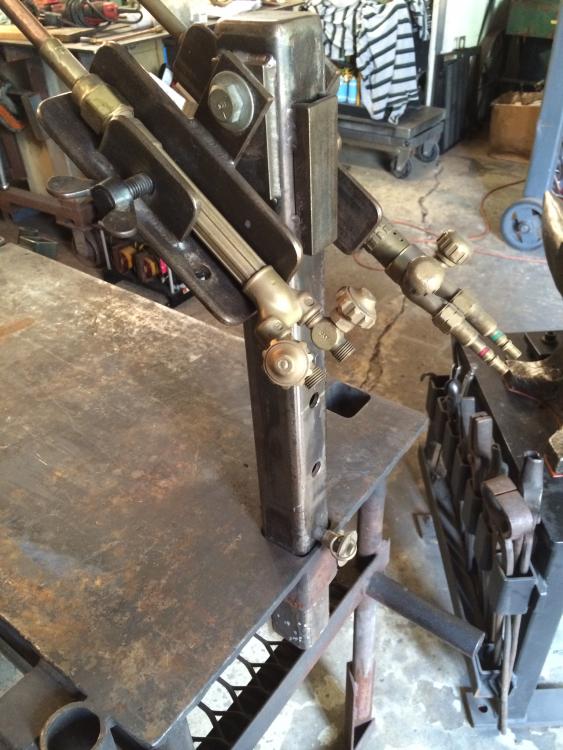
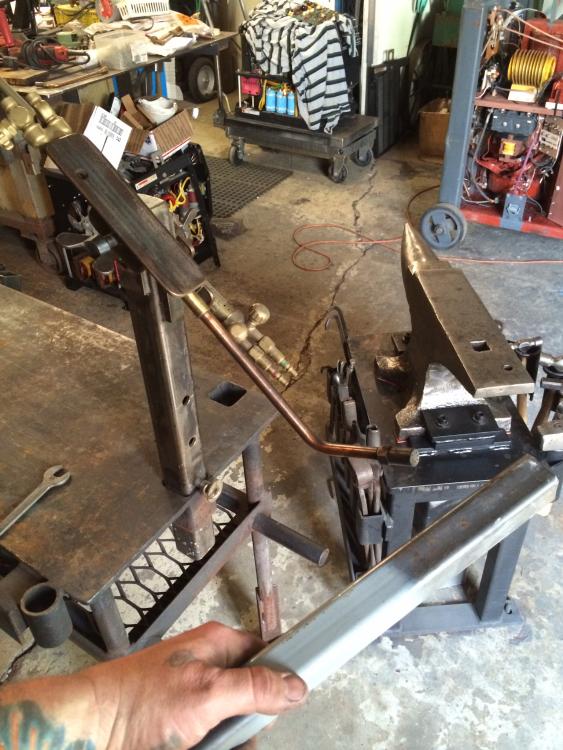
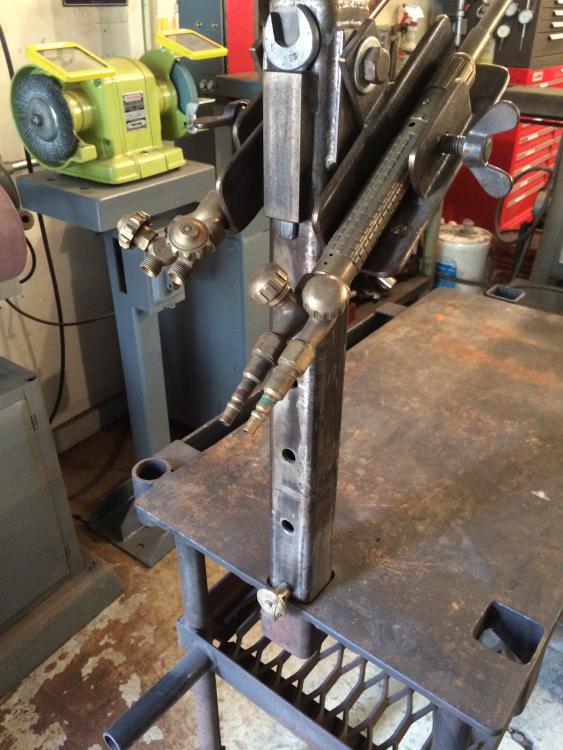
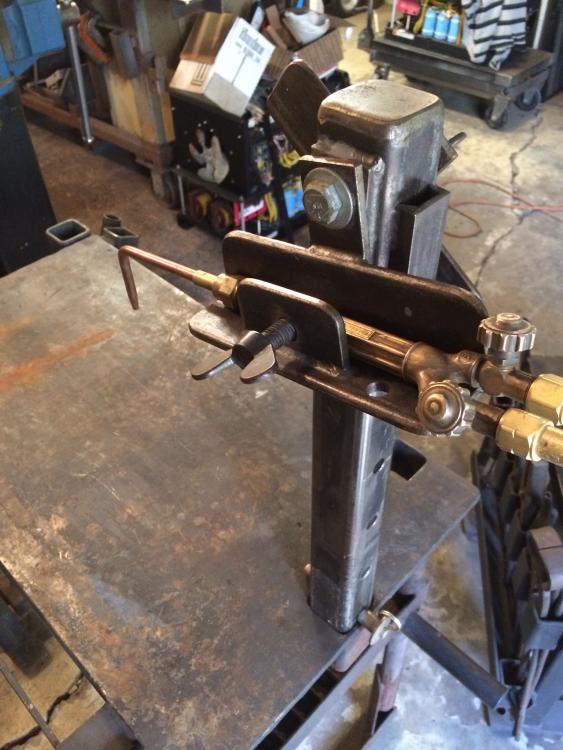
I suppose you can call this a "tool" I really can't call it a "project" since I use it regularly and it's been finished for awhile. I'll eventually post some pix of the rest of my modular system as I dig it all out. I had pix on another device but they're long gone. I got a small propane forge about five years ago (divorce gift from Mom lol) and outfitted it on a rolling table. Being I don't have a lot of room, and work full time out of my garage, I need modular type setups that allow me to set a job up and tear it back down to be stored when I'm not doing any forging. I also wanted flexibility and the ability to make fast changes to setups as the job might dictate. One of the first things I made was this. It is a fully adjustable torch tree for placing and securing torch bodies for hands free operation. Some work I do will not fit in my forge, so I heat it with oxy fuel. Having this torch tree allows me to position a torch in a specific place so I can place the work under the head when I want to heat it, or position a torch head where I can heat a hand held object directly before the anvil. I can also set a torch into either of the holders for a moment without having to turn it off as well. I believe there's three or four holes in the upright for different height setups. The pin is a ball detent and can be removed on the fly with one hand. It has two fully articulating holders with extra large wing nuts welded to 3/8' bolts to lightly secure the torch bodies when setting in the holders. One specifically for my large body Airco combo torch (I call it The Big Gun lol) and the other one for medium and small body torch sets which are all Victor. I have a number of tables with the same 2" square holes in them for use with a large number of modular tool setups I've made. I can move this torch tree anywhere in my shop where I have a hole for it. I'll post up some of the other stuff I have, which includes small anvils, vises, angle fixtures, trailer ball strikers and even a Milwaukee straight grinder. This isn't new technology by any stretch of the imagination, but I've taken ideas I've seen and added tweaks of my own to suit my needs. For those interested, the construction was from some scrap 2" square tubing, and 2" (I think) angle which I TIG welded the holding blocks on to. I drilled and tapped a set of 1/4" blocks which I fit on the top of the tube where the holders are and welded them on. I found the wing nuts at the scrap yard and welded them to 3/8' SHCS about 1.5" long. The pin came from eBay and the little wrench for tightening to loosening the bolts holding the holders ca,e from the local pawn shop. Think that's about it.. My garage is sort of a wreck right now. I have several welding machines I've been working on that need to go, and I've been needing to do a good thorough spring cleaning since it got warm. Just ignore the junk in the background Hope some find this useful. I've already seen a number of neat things here on this site I plan to implement at some point in the near future.

-
I prefer Sait abrasives myself. The local weld supply sells them so it's easy and convienent, but I've been very happy with their Pipline 1/8' wheel and their Z-Tech .045 cutoff wheels. Both in 6" diameter. I've found them to be affordable and offer long life. Im not a big fan of the cheap stuff, but I'm not one of those guys who has to have the best of everything either. I definitely stay away from cheap sanding discs tho. Zirconia or ceramic. They outperform aluminum oxide two to one easy. Been my experience anyways.
-
I'm wondering how it's mounted. Is the round base partially hollow? Most bicks I've seen fit in a hardie hole in an anvil or work table/block. Never seen anything quite like that one.
-
Have no idea on manufacturer or origin, but it sure looks useful for a number of things I specifically do.
-
Yeah, it's never 100% on recoat stuff, but if you want it absolutely right then of course, you start over. The reference made was to recoated items in a general sense. Obviously, if you're doing a high end job for a high end customer, you do not cut corners. That's just common sense and good business. I also stated that the best results are obtained when the piece is sandblasted prior to Powdercoat. I would hold that to be entirely true, except for the exclusion of thin aluminum sheet metal. Unless of course, it is blasted with a very fine grit media at low pressures to avoid warping. It's really just a matter of what you're doing and who it's for. A welding machine, or set of simple security gates is quite different from a one off custom forged piece with a lot of detail and intricacy. Such things the customer is paying for and expects to be delivered. I totally get your point on that. When your name is on the line, it has to be right. Period. Ive sent stuff in on off welding machines 20 years old that was exposed to harsh environments for recoat that came out fine. Also had it look not so hot. The point of my comments were not to create an exhaustive narrative regarding re power coating items, but more so to point out that some individuals will perpetuate information that is simply not correct to put a few more bux in their pockets. That is not the way I do business, but unfortunately there are a lot of ppl out there who do. IMHO of course
-
In some cases, the powdercoater or blasting outfit would like you to believe that a piece must be entirely stripped prior to recoating. I had it happen to me when I very first started using powder coat, and was taking everything to a local guy that did sandblasting. He sure had me convinced of that until I started preparing all my own stuff and dealing with the powder coating place directly. I dunno if you were aware of it Glenn, but a lot of power coating can actually be recoated right over the original. Of course, the sandblasting guy doesn't want you to know that you can coat over because he's making money off you. Now, that's not to say that it's a completely foolproof, sure fire thing. Sometimes when you recoat it doesn't turn out perfect, but my experience with it has been overall positive. Prolly 80% of it came out fine, the rest was because of either mistaking paint for Powdercoat (which will always lift when they bake it) or because of the use of harsh chemicals to clean the piece prior to taking it in. I only clean with Mean Green now, which doesn't leave a residue, or break down the original finish of sending something in for recoat. I built about 12 custom gas solenoid controls for a large industrial customer I have. I used prefab Hoffman electrical enclosure boxes I put the holes in for the components I mounted inside them. They all come stock with a gray powder coat finish on them. I simply hit the outsides with 150 grit sandpaper on my palm sander, and sent them in. They came out very nice. I have done boxes for them twice, in two different colors at two different times too. Both instances the finish came out very nice. One other thing as mentioned above that can lead to problems recoating is if any heavy solvents or cleaners have been used on the original powder coating prior to sending it in for recoat. It chemically changes the component of the original finish and will almost always lift when they bake it, or shortly after it cools. I make a lot of the sheet metal panels I use on welding machines I refurbish, and I've spent a lot of time talking to the guy I use about product application and prep. His insight and assistance has saved me collectively thousands of dollars and dozens of hours on the finish work. Sandblasting in most cases provides the best surface for the powder to adhere to, but if working with bare metal, sanding with an orbital is plenty sufficient in most cases. Mill scale presents challenges too, but a LOT of places having big fabricated weldments powder coated will opt to leave the scale on since removing it is very costly. I've done it both ways since I sandblast and metal finish all my own stuff. The catch with leaving the scale on is the powder doesn't always adhere as well as it does to a properly prepared surface. The coating can also chip off and lift if in an outdoor application. I have had some stuff done in a clear powder coat and it came out very nice. I'm planning on doing it on some future projects instead of using automotive acrylic enamel. I rarely paint anything anymore, since when I bring stuff to the powder coater fully prepped and clean, it's very reasonably priced and is almost always cheaper than paint in the grand scheme of things. As was mentioned above, finding a GOOD powder coating outfit is the key to having positive experiences. With a good outfit using quality products, it's almost impossible to beat the value and quality of finish. Glenn, you are the top dude around here, so PLEASE be assured I'm not trying to step on your toes!! I'm just sharing what I've learned from direct experience with powder coating over the last few years. The place I use is run by a father and son who are both extremely nice and they have shared a great deal of their knowledge with me. There's places out there that perpetuate incorrect information to make money, or some out of genuine ignorance. As said in the outset, recoating is never a completely sure fire deal, but most of the time it turns out fine providing the surfaces have been lightly sanded and are properly clean. In my experience, powder coating has proven to be a far superior finish compared to paint and none of the mess or expense on materials and equipment. That's not to say there aren't some excellent epoxy coatings out there, but they're usually expensive and take some skill to apply well. IMHO of course
-
That's a pretty cool little grinder. I like the repurposing of the table and materials. I'm all into that whenever I can How is the motor working out for you? I put a 1.5 HP on the 2" X 72" Kalamazoo I "built" (well, heavily modified) and it does pretty well, but I can stall it out if I really lean into it. My bigger Kalamazoo, I put a 230 volt 3 HP (pretty sure on the HP anyways) from Harbor Freight in it and it runs like a raped ape. The VFD powered motor setups are real nice, but not necessary especially if you're on a tight budget. Im excited to get that Ryman up and running. It needs some TLC but I paid $180 for it so I can't really complain. Sounds like the company you got the wheels from is top notch. That's great. If you got recent photos, post them up. You got a nice machine, plus the satisfaction of knowing you built it yourself
-
That's really cool man. I know what you mean about limited space. I work out of a 20' X 22' garage full time as a sole source of income, and it's packed. If you have pix of your forge, please point me to them. I have a propane forge I got from NC Tool about 5 years ago. It was a "divorce gift" from my mom lol. Not real big, but it does the job for most of the work I do. I have some pretty serious oxy fuel rosebuds for stuff that won't fit in it. I would like to experiment with coal at some point, but lack of space and time mostly will prohibit this. My setup is on wheels too, but it's pretty heavy so I don't move it much. I'm not a blacksmith anyway tho, just a hack that mostly fixes welders and bangs on a little metal. Ive been metal finishing for all told about 22 years, so I can appreciate what you say about trying to get the best possible finish before taking anything to a sander or grinding machine. I did a lot of buffing when I first started out. I used to do a lot of gun work and learned from a real sharp dude back in the early 90s. I'm set up pretty well in that department with a 12" Baldor machine now. I'll definitely be asking some questions about doing Damascus-ish stuff, but mainly for the look to use on some light fixtures I have planned. I'm the type that tries to research best I can before asking questions on an Internet forum. I'm not the smartest guy around either tho, so I may miss things in my searches If I can offer any assistance as far as the metal finishing end of things goes, please don't hesitate to ask. I'm by far not a master at it but I got a little experience. You mentioned you built your own grinder, I would like to see that too. I'm still navigating the site and reading a lot, so if it's posted someplace, I haven't seen it yet. I recently acquired an older Ryman brand industrial belt grinder from HGR down in Cleveland for a reasonable price. I'm going to rebuild it and likely put a VFD on it to control speed. I have two other belt machines I more or less built from existing Kalamazoo brand machines that came out pretty good. I'll post up a thread about the Ryman when I get to it and have some free time to make a new base for it, etc. It's too bad that stuff got lost in that update (going on what I've gleaned from reading). I've looked at a lot of really interesting threads, but the pix won't open. I'm an admin on a welding forum and accidentally banned myself last year with the spam decimator program we use and wiped out over 11K of my posts and pics going back to the mid 2000s. I know what a heartbreak it is for sure. I feel for Glenn and everyone else affected. I truly know how that feels. That's life on the Internet tho, you just gotta move on. I sincerely appreciate the invitation and extend one myself likewise. I'm on the north side of Lansing, just off Old 27 and I 69. I actually will PM you about some stuff I have you may be able to use (some decent wood) No cost, I got a lot of it. If it can help open some doors where I can help someone out and learn a few things, I'm all for that. Hope to meet you this summer. You have been most kind. Steve
-
I've been looking at your knife work and man is it nice. For saying you haven't been doing it a "long time" you sure fooled me. If you are ever doing any demos this summer, or plan to be at one I would love to check it out and say hello. I take it you are doing like a wax finish on these? Just wondered as far as rust goes. As you know here in MI, even plastic can rust under the right conditions (driving our road system in winter ) Excellent stuff!
-
It'll turn out good if you take your time. I kinda got on a tear, I kept thinking of stuff to add to the original post.
-
Unless you know somebody, having it ground at a shop will be expensive. Especially if they have to take a lot off. A Blanchard grinding operation will take more material off than standard surface grinding with the narrow part of the wheel. One thing to keep in mind is that the grinding process usually employs a magnet to hold the stock. They will need a solid way to hold it before they will even attempt to try and grind it. If the narrow sides are tapered, they may need to use additional clamping methods to hold it securely. That could cost more money and take more time. Crash a wheel on one of those machines and it's BIG money. They won't chance it if they don't think they can hold it good enough. I've seen a 96" travel Mattison grinder with a 18" wheel spit stainless steel slugs friction blocked on the table across the shop. Wake you up in a big hurry. Just sayin if you were to go that route. Usually, the part is machined to within a thousandth before traditional precision grinding, but if it's already been hardened, good luck with that. Back in the late 90s I worked at Dart Container for about three years in the tool room as a mold polisher. I did a good amount of precision grinding when I was there, but mostly with manual machines. If you wanna flatten it out on the narrow striking edge, layout a line on the high side parallel with the low side, get a good square and have at it with an angle grinder and abrasive wheel. Use the biggest, most powerful one you have available for the hogging. When you start getting close, switch to a smaller grinder you can easily control. I own a few 6" Metabo grinders and would never be without one. Make sure the layout line is all the way around the high parts so you have a visual gauge. Start taking off the high side and keep checking with your square against the low side to keep track of how much you take off. Don't go nuts, it'll take a little while. Once you get it down to as flat as you can get, then use a sanding disc to finish it out. 60 grit will likely be just fine. It's not the space shuttle. A smaller cupped style abrasive wheel (NOT a stone wheel) will clean up flat surfaces nicely, you just have to pay attention to what your doing. This would be the last step. You can get it very close using this method, but it's time consuming. You can even use straight scrap metal clamped to the opposite side and ends so you can clearly see your edges too. Just depends how much time you wanna spend on it. Checking against the parallel and perpendicular axis at regular intervals will insure you're not taking too much off. I would probably use a dykem die when I started to get close so you don't end up grinding the low end by mistake. A framing square would be ideal for this, a smaller one anyways. I've finished a little metal in my time and it's definitely doable. Sorry for adding to this. I usually need a few times around to get it all out of my head on to the page lol. Good luck with it. IMHO of course
-
Your knives are incredible man. Really excellent work.
-
Thanks a lot Jim. I really need to make some simple videos. I don't even have a YouTube account, or know much about making and posting them to be entirely honest with you. I have to figure out a hanging method for the frame yet. As you mentioned, it will have to hang flat. I was thinking of finding the center point of balance at the top and using an offset tab with a ring, or something to that effect. The felt spacers sound like a good idea. I went kinda gangbusters on a lot of this stuff I've posted like five years ago, then it all took a back seat to paying work. Hopefully I can get it finished this summer. I have a lot more projects I wanna start on and finally have made a hole in my schedule to do them. I keep reading here and am so impressed with the diversity of different stuff as well as all the knowledge. The warm welcome has been great too.