

Buzzkill
-
Posts
2,049 -
Joined
-
Last visited
Content Type
Profiles
Forums
Articles
Gallery
Downloads
Events
Everything posted by Buzzkill
-
Sounds like you have it figured out. I have a couple questions though. Would you be so kind as to post some pictures, either WIP or when you get finished? I'd like to see what you end up with here. I'm also curious about what you intend to create with that forge. Again, we love pics so don't be shy about sharing the forge and/or what comes out of it. BTW, I don't think anyone was saying it wouldn't/couldn't work. I believe the comments were directed more at fuel consumption and the long term costs of it. If you have way more forge than you need you effectively waste fuel which costs you a lot of money over the life of the forge. In that vein I guess I do have one more question. How are you going to feed this beast? I hope you have a couple 100 pound or larger propane tanks you can link together, or that you can use the natural gas from your house. I can tell you that one or two BBQ size propane tanks will not be sufficient for that. One or two small tanks like that will freeze up in a short period of use. One way you can kind of have your cake and eat it too is to create baffles out of refractory material that you can slide into place to decrease the volume of your forge when/if you desire, but remove them when you need the full volume. Of course your burner(s) placement will affect where these barriers can be placed inside the forge.
-
Good steels for swords and the perfect grinds
Buzzkill replied to Northwoodsman's topic in Swordsmithing
Well, if he has a good enough temper that he can be flexible without getting bent out of shape there's hope. Right now he seems to be the center of percussion in this discussion. -
Good steels for swords and the perfect grinds
Buzzkill replied to Northwoodsman's topic in Swordsmithing
I don't think he's in the groove just yet. -
Beginner with questions and pictures
Buzzkill replied to beard's topic in Anvils, Swage Blocks, and Mandrels
Ghostrider. Crash needs a buddy, Das, -
Good steels for swords and the perfect grinds
Buzzkill replied to Northwoodsman's topic in Swordsmithing
If I may ask, what do you intend to do with this sword? The appropriate steel may be different depending on whether it will hang on a wall, be used in medieval reenactment, chopping down small trees, etc. The steel selection is important, but equally or more important is the heat treatment to give the characteristics you want. Then there's blade and edge geometry, vibration nodes, and other fun things to keep in mind if it is to be a quality functional blade. In short it's not a beginner project and it's a lot more than just a big knife. If you haven't even made a good knife yet then you are getting pretty far ahead of yourself - assuming you want to end up with something that isn't likely to fail in use. -
Good steels for swords and the perfect grinds
Buzzkill replied to Northwoodsman's topic in Swordsmithing
A reference to your affection for bovine ivory perhaps? As always your work makes me alternate between being inspired and pondering whether my meager attempts at creating something of similar beauty and quality are futile. I know you put in the time and effort to get there, but still.... Either way I'm looking forward to the next book. -
Very nice! That one would be staying in my personal collection if I had made it.
-
I think this one has a little more to it though. In many states it's not legal to hunt anything bigger than a coyote with a 5.56/.223 round because it's not considered powerful enough to deliver a clean kill with a single shot. It's not humane enough for killing animals - think about that for a second. When I was handed my first M-16A1 I was really disappointed. I couldn't believe they would want us to go to war with that weapon. It has a forward assist because of known issues due to carbon fouling, the cheap plastic grips were originally made by the Mattel toy company, and the round it fires is at the lower end of the "high power" rounds as far as stopping power goes. Compared to the .30-06 and .308 rifles I was used to it seemed like a bad joke. We were told that the rifling twist was designed to barely keep the bullet stable in flight and cause/allow tumbling as soon as it hit anything solid, ostensibly to cause extra tissue damage. Whether true or not, the 300 meter targets we shot had a fair number of holes where it was clear the bullet went through almost sideways rather than point first. I didn't see it that much on the closer targets though. In addition, the .458 SOCOM was developed specifically due to complaints that the 5.56 round was requiring multiple shots to neutralize enemies. Whether or not the M16 and 5.56mm ammunition were specifically designed to wound rather than kill I do not know. Even though fatal shots can be achieved with far less, it's pretty obvious that the 5.56 round did not have "one shot one kill" as the highest priority in production. Cheap and lightweight appear to have been far more pertinent to the production and adaptation of that round and rifle. As for zombies, well my understanding is they prefer brains. My plan is to herd them towards Washington D.C. where they will inevitably starve into non-existence. Barring that I'd prefer something that shoots the 5.56 round over anything that requires me to get within arm's reach, but I'd probably choose a shotgun/buckshot combination over that. Are we really even sure precisely which areas of a zombie render them completely immobile? There doesn't seem to be a good consensus among all the zombie shows and movies these days. One good thing about a zombie bone crusher though - it doesn't run out of ammo.
-
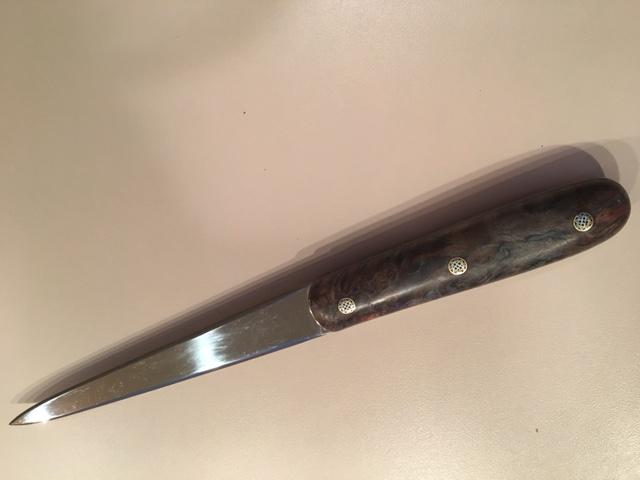
Probably not what you had in mind, but this is the one I made for my mother's birthday last month. She has arthritis, so a larger handle is better for her grip. I really like those longhorn and ram heads though. Good stuff.
-
Since not all chainsaw chains are the same I believe you want to treat this like "mystery steel." In other words forge a small piece out to roughly the thickness and shape of your desired project, then run it through some heat treating tests. Bring it up to non-magnetic and quench in oil. See if a file skips off it or bites in. If it's hard then run a temper cycle or two on it. The temperature will depend on what you want to make. For a knife blade I'd try 350 degrees F then put it in a vice and see how it bends before snapping. If you like the results then stick with that program. If it doesn't flex enough before breaking then give what remains a cycle at 400 degrees and repeat. Keep raising the temper temperature a little at a time until you like the results. If it didn't harden in the oil quench then you may want to increase the pre-quench temperature a little and try again. If it still doesn't harden then you'll want to try a water or brine quench and go through the same process of temper and test until you like the results - if it hardened. Take notes about what you're doing and what worked or didn't work so you don't have to repeat that the next time you use that same brand of chainsaw chain (assuming the manufacturer doesn't change steels on you). If it didn't harden in the water/brine quench then you probably don't have anything suitable for a blade by itself, but could be used as outer layers in san mai or for other decorative purposes. I believe the forge welding process and subsequent forging will create enough carbon migration that even though you may have several different types of steel involved, in the end the carbon content should be fairly consistent through your billet, assuming you got it to weld up well.
-
1st-Timer Forge Build Fun ( or 'Hey look, still not blowed up')
Buzzkill replied to Hoenirson's topic in Gas Forges
Just a short word of caution on this. If you go with this feature make sure you have some way to fasten it up or remove it when working with long stock. If you just allow the stock to push the flap open you will probably find that the flap binds on the steel when you try to pull it back out, and that gets frustrating quickly. Guess how I know. -
It ain't over until the portly woman breaks out in song. I haven't heard her yet.
-
1st-Timer Forge Build Fun ( or 'Hey look, still not blowed up')
Buzzkill replied to Hoenirson's topic in Gas Forges
Yes and no. Firebrick does handle the things you listed fairly well. The main drawback is it's a large heat sink, so it can reduce the efficiency of your forge a bit. The simplest way to put this is that there are better materials to use which can still hold up to the things you listed, but don't suck as much heat out of the system. Kiln shelf or castable/rammable refractories seem to be the generally accepted favorites at the moment. FWIW if I were doing that general design I think I'd go with the clamshell option so that you could lift one side a bit to get odd shaped pieces in the heat if needed. I'd still stick with the flat floor and the oval or "D" shape, but having more configuration options is not a bad thing. -
Blacksmithing gems and pearls
Buzzkill replied to Glenn's topic in Blacksmithing, General Discussion
"A man with experience is never at the mercy of a man with an opinion." Anon -
Heat time for custom built forge
Buzzkill replied to Deep Forest Tinker's topic in Solid Fuel Forges
5160 is pretty forgiving in forging and heat treat, and the 10xx series are good for blades where the xx's are in the 70's to 90's. If you're making hammers you probably want to look at something like 4140. Specific steel choice will depend on what you want to make and what characteristics you want it to have. In general, the higher the carbon content the harder the steel after quenching, but that also means its more subject to breaking or cracking rather than bending. If you want it to flex more before breaking then lower carbon content and higher temper temperatures after hardening are what you are after, but for a blade that would mean less edge retention. It's a balancing act of sorts, but with information and experience you can put the balance point between tough and hard where you want it. -
Heat time for custom built forge
Buzzkill replied to Deep Forest Tinker's topic in Solid Fuel Forges
As Thomas said yellow heat is too much for O1. It may fall apart or "cottage cheese" on you there. Orange is better. It's not super hard to work with, but I wouldn't call it beginner steel. It certainly doesn't move as well under the hammer as mild steel and has a less forgiving forging range. I destroyed a few pieces of O1 in a coal forge before I decided propane was my better option, but I'm nowhere near an expert smith or an expert with coal. At my level I'm guessing around 5 or 6 heats to get a foot of 5/8" O1 drill rod down to about 1/4" thick, reasonably straight and flat. O1 has a couple other "quirks." It will air harden some in thin pieces, and if you try to forge it cooler than recommended there is a very high chance of cracking it. I've cracked a couple pieces just "tweaking" them a little at a low red. That wasn't even forging or really moving the metal, just bending. They were small/thin pieces though. Also make sure you take a good look at the heat treatment specifications given by the manufacturer. It's not a super complicated steel to treat, but it's not the same as a simple steel either. -
Another choice is a flexible backed sandpaper. That stuff stretches and allows you to sand corners and contours very well without ripping the backing for the abrasive material or creating folds. At the lower grits (60 or lower) you can remove material pretty quickly, but once you get into the 200 - 300 grit range it's more about cleaning up and taking out small imperfections so you're not losing a lot of material. At that point you are just refining your shapes a little and smoothing out the surface nicely. After that it's just about the finish you want on the handle. One thing I do for blades with no bolster or guard, like the one you show, is tape my two scale pieces together like they will go on the blade and then work the blade end of the scales together. Usually that amounts to simply rounding the ends of the scales and then sanding that portion to the desired finish so it's done before gluing and pinning them in place. It's pretty hard to do a good job of shaping or refining that part of the scales without damaging the finish on the steel once they are permanently in place. Other parts of the scales are accessible for sanding and finishing after that.
-
Heat time for custom built forge
Buzzkill replied to Deep Forest Tinker's topic in Solid Fuel Forges
This is one of those questions that sounds really specific, but there are so many variables to take into account that it's hard to give it an accurate answer. What steel are we talking about? High carbon or stainless tend to not move as well under the hammer as mild steel and can have significantly different forging temperatures. What hammer are you using? An 8 oz. ball pein hammer is generally going to take longer than a 3 lb. drilling hammer. How is your hammer control? Are you able to consistently hit where you want to hit on the rod? What temperature (color) are you forging at? Most steels are going to move significantly different at a yellow heat compared to a dull red. All of these things (and possibly a few others) can impact how many heats it takes to get the steel into the shape you want it. If at all possible for you I'd recommend getting involved with a person or organization that can help you. This is where you can learn more in an afternoon with someone else than you can in several weeks of trial and error on your own. Both ways work. One is just a whole lot faster and a lot less frustration. -
started on my new forge today. Thanks Wayne Coe
Buzzkill replied to Tom Chitwood's topic in Gas Forges
Tom, neither the burner tubes nor the mounting tubes should be in the chamber at all. For the sake of discussion if you have 2 inches of kaowool and 1/2 inch of kastolite that's a total of 2.5 inches past the shell. The end of the mounting tubes or burner tubes should end only about 1/2 inch inside the shell, but still about 2 inches back from the chamber. This is approximate and a little bit one way or the other isn't a huge deal. A burner or mounting tube down in the forge chamber will reach the same temperature as anything else in the forge. The result will be that your flame could start burning inside the tube rather than at the end of it (which can give less than ideal results), and the tubes will also deteriorate more quickly due to repeated extreme heating then cooling cycles. -
What type of mould and crucible for iron?
Buzzkill replied to Alathlind's topic in Smelting, Melting, Foundry, and Casting
Northwoodsman, You don't seem to be getting the picture here. You have several people with experience in doing what you want to do or something very similar offering you free advice. What you want to do is ambitious and cool, but you keep telling us you have limited funds. Doing it the way you want to do it WILL cost you more money - period. There is no if or but here. Even if you do it as safely and as efficiently as possible (and you won't until you get some experience), you have plenty of free time to do it, and you can make or get your fuel for free you will still end up with more sunk into this adventure than the alternative. You've also told us you have a pile of scrap. Sell the scrap and buy relatively inexpensive steel of known quality and composition. You will be well ahead of the game that way. Unless you know the carbon content of everything you would dump in a crucible and can accurately guesstimate how much carbon you will lose in all the processes from molten steel to finished product there is no good way for you to ensure that your crucible steel would even have carbon content that is suitable for sword making. Of course you could have analysis run on your steel, but that costs money too. You have an idea and a passion. That's good. What you don't have is experience or enough information about what you want to do yet. People on here are trying their best to impart some of that information based on their personal experience. Please understand that we love it when people are passionate about working with metal and encourage that. We also like to see them succeed and survive. When we see someone who is starting down a road that is likely to get them hurt or has a high probability of failure we warn them. -
The sputtering/whistling sound in the first video is typical when the flame is burning inside the burner tube rather than at the end of it. Burner/forge combinations do have a "personality" in the sense that we are not usually making either one of them with enough degree of accuracy to give exactly the same results repeatedly. In addition to that, things like elevation, barometric pressure, ambient temperature, and even relative humidity can have a small impact on how the burner performs from one day to the next. Frosty or Mikey can explain about flame fronts and that sort of thing, but if your burner is tuned right and performing well for a period of time and then you get the results in your first video then you are probably operating close to the bottom of the functional range of your burner in that forge. If you are using a small (BBQ size) propane tank or if your tank is nearly empty there may be a small decrease in pressure as the tank cools which could be enough to take you below the functional threshold for your setup. Bumping the pressure up just a little usually solves that problem for me anyway. If a cold tank is your problem, then an easy way to avoid that is a shallow water bath to set your tank in. You just need enough water to make good contact with the bottom of the tank. It's best to avoid a deep bath so that the tank doesn't begin to float and then tip over as it gets close to being empty. Another solution is to link 2 tanks together.
-
Pretty good for a first knife. Can you tell us anything about the steel you used or the heat treatment you did? Does the tang go all the way through the handle? Is the handle just glued in place or do you have another method of holding it on the tang? Looks like your forge did what you needed it to do. Congrats!
-
-
Warning! Warning! Warning!!! Thermite
Buzzkill replied to WayneCoeArtistBlacksmith's topic in Safety discussions
You wouldn't even come close to creating thermite with that combination. -
Polishing the blade will be a lot easier without the guard or handle attached. Soldering the guard is always best without the handle installed. Typically I heat from the tang side and apply solder from the blade side to help make sure I don't overheat the blade and change the temper. It's not the only way to do it though.