Buzzkill
-
Posts
2,049 -
Joined
-
Last visited
Content Type
Profiles
Forums
Articles
Gallery
Downloads
Events
Everything posted by Buzzkill
-
It looks like you didn't get crazy with the grinder, so probably no real damage done other than making a lot of people wince at the thought. The bottom line is if you are happy with it then it doesn't matter what I or anyone else thinks you should have done or not done. That old girl has a lot of life in her yet and should provide you with years of service. Looking forward to seeing what you do with it.
-
From what I can see in the picture I wouldn't have dreamed of taking a grinder to it unless the grinder had a wire wheel on it. To me it looks like it's in pretty good shape and I wouldn't risk messing up the hardened plate on top.
-
You probably already know this, but that mix will soak up a lot of heat and transfer it to the outside of the can. Not only will you burn significantly more fuel, you may have trouble reaching forging temperatures unless you have a really hot torch. If you were dead set on using that mix you should have added something to introduce air pockets to help with insulating properties. Perlite is very cheap and would fit the bill. Even sawdust would help as it would burn after firing and create air pockets in your lining. As Thomas pointed out, wood ashes with a clay coating would also have given you a lot better insulation to hold the heat in your forge. Anyway, good luck and I hope it works out for you.
-
Are there pins in your bending form that give a snug fit to your screw holes? Without seeing your form it's hard (for me at least) to make a good suggestion. Assuming your holes are consistent in distance between them and diameter it shouldn't be too hard to make something where you slip the holes over the pins and maybe even make a quick clamp device from a piece of pipe the right diameter cut lengthwise to hold it securely in place (think vice grips for round stock with one part fastened to the form) while you make the bends.
-
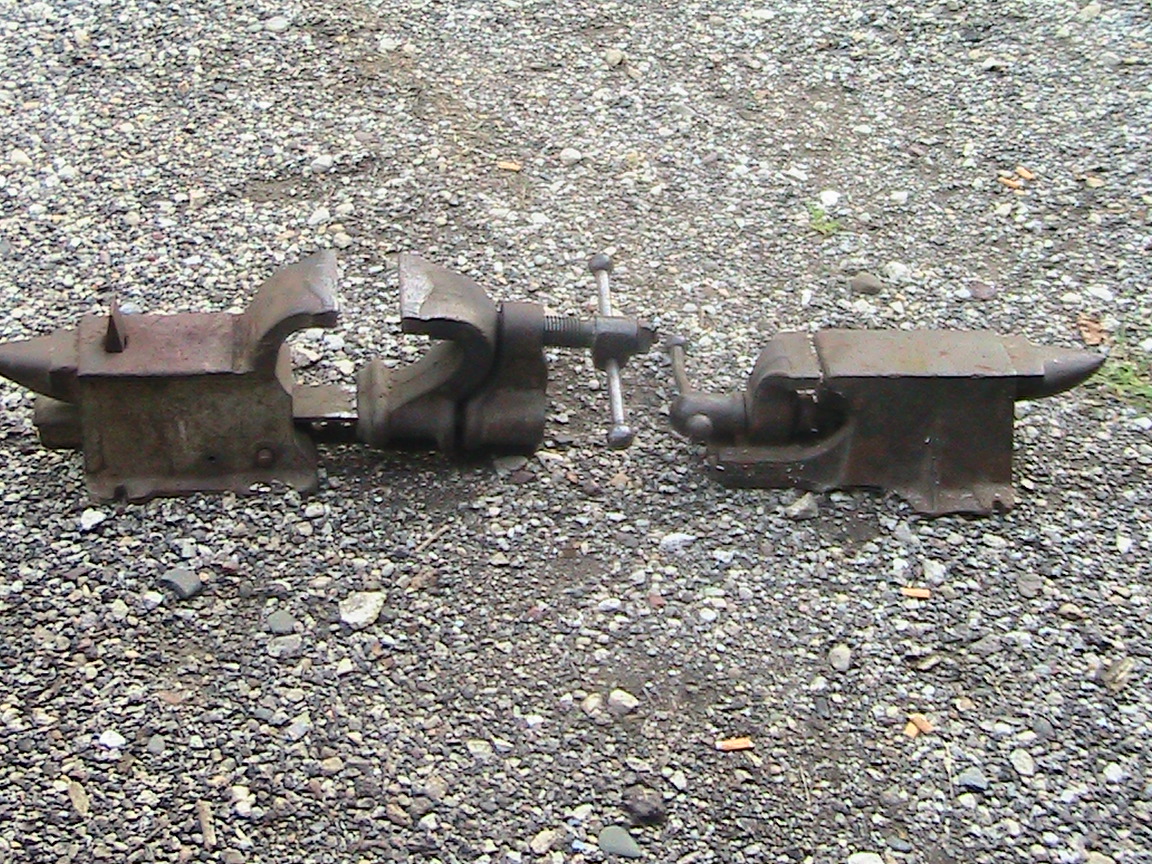
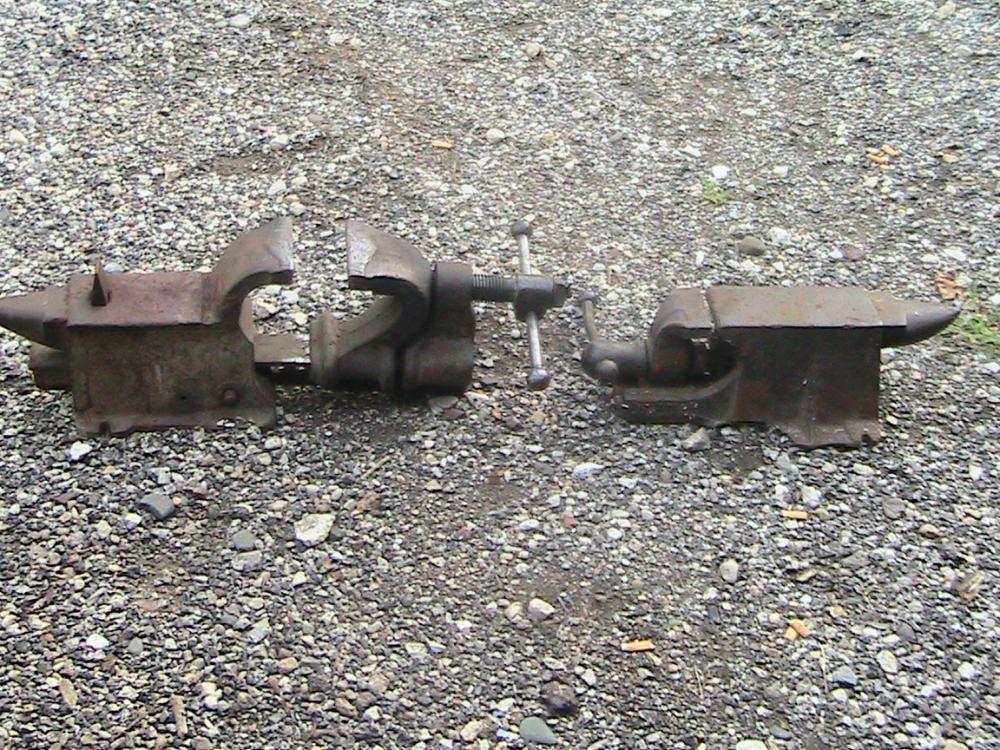
Picked up this vice at an auction almost 2 years ago and still haven't gotten around to mounting it on anything. I believe it opens 4 inches and I paid $65 for it. When closed the jaws are about a quarter inch out of line with each other, but they appear to close evenly side to side. Might as well throw these in as well. I've used these, but not given them a permanent mount anywhere yet. Got these at a different auction. Don't remember what I paid, but I don't think it was over 20 bucks for either of em.

-
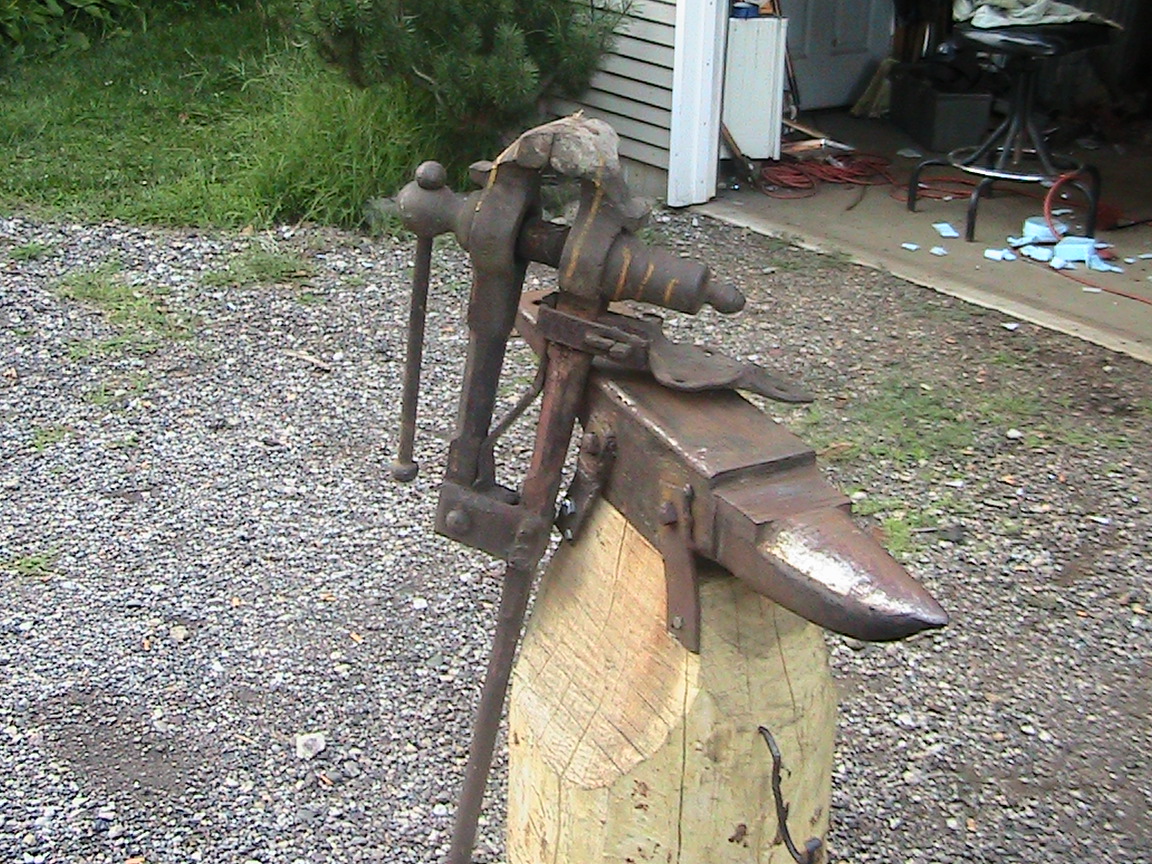
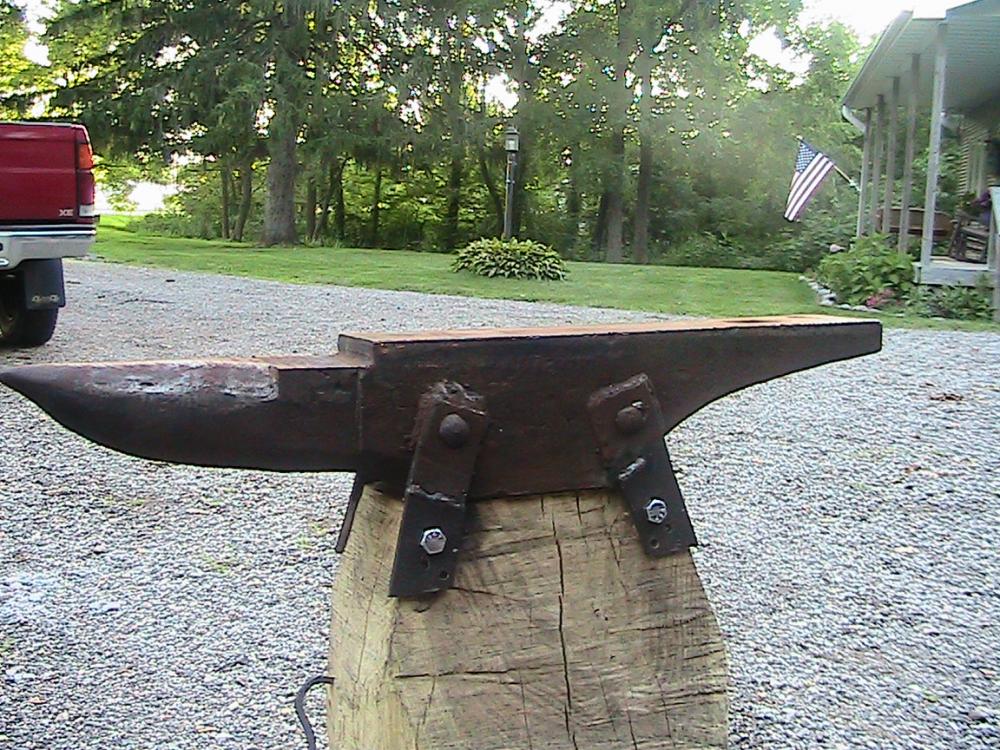
First the disclaimer. I was not the one who welded on this girl, but I did cut the angle iron legs off and mount it the way it is now. One thing I can be sure of is that I did not overpay for it. It only cost me a little effort to get it off the truck. In all the pics I've seen here or elsewhere I've still not seen another like this. It appears to have been manufactured without a base. Anyone know why?
-
A beginner looking for some knowledge
Buzzkill replied to Kinighteth's topic in Blacksmithing, General Discussion
Kinighteth, The regulars on here definitely want you to do your homework before they offer much help, and in theory much of what you want/need to know is available on this website. Unfortunately this forum has been plagued with a number of bugs which make it difficult to navigate lately. Also you'll probably find that a bunch of pictures don't show up, which makes it tough to see what the authors are talking about in a lot of cases - like Steve Sells knife making classes (at least for me). Often times links in a post will open a new page to exactly the same post when I click on them. Attempting to go to the next page of topics can result in a screen which claims it's loading, but never does. On top of that I believe the blueprint pages are still unusable and the search they keep asking you to use doesn't seem to produce the expected results. What I'm trying to say is that the help is here for just about any blacksmithing topic you can think of, but it may be difficult and frustrating to find what you're looking for right now. The bugs have also (from my observations anyway) influenced some of the regular responders to be a bit more brusque than normal. It's quite frustrating to type out a detailed response and then be forbidden from posting that response, which may be lost completely if it wasn't copied before attempting to post. -
As I've been typing I've been thinking about getting a piece of threaded rod the right size and creating a longer cage bolt. That would make the hydraulic press unnecessary if the rod was long enough so the nut could be backed off until the spring was relaxed. I guess the bottom line like so many things is you can get seriously hurt if you don't understand what you're working with, but if you do understand it then there's more than one safe way to get the job done.
-
Right now I don't have the right equipment to record and post a video for this. Just so I'm clear on this though: The cage bolt that comes with the brake chamber is NOT long enough to safely back off and allow the spring to go to its relaxed state after removing the pot/can from the aluminum piece it is banded to. There would still be a lot of spring tension when the nut came loose from the cage bolt and that would send the cage bolt and the disk it seats in (and possibly the spring itself) flying out at a high rate of speed.
-
No problem. I took 3 of these apart a few days ago. I ended up caging the chamber, cutting the pot band all the way around to remove the pot and spring, then put the caged spring & pot in a press (spring side up). Once I pressed enough to take the tension off the caging bolt I removed the nut and let the press open up slowly. Worked like a charm. Just FYI, the spring in its relaxed position is about twice the depth of the pot, which is about 3 inches or so longer than the caging bolt. Now I have aluminum for casting and spring steel for a number of uses. It's a bit of work, but it's a win-win for me as long as I can get them for free.
-
DSW, the caging bolts that come with air brake chambers are too short to relieve the tension in the springs if you cut the pot loose from the aluminum piece in the middle. Someone could get seriously hurt if they tried to cage the spring, cut the pot loose, then remove the nut from the caging bolt. There will still be a LOT of spring pressure in the system when you run out of threads, which will create a dangerous projectile situation.
-
I'm going to be melting the aluminum down for other projects anyway, but the press does sound like a much safer way to go as long as I can keep it from bending in the middle while decompressing the springs. SmoothBore, great idea. I think I'll fab one of those up and give it a try. That should be a little bit easier to use than the horn of the anvil. Pat, right now this is a weekend hobby for me and the family budget doesn't tolerate much additional expense for it. I can get these springs for free and in general I like to use what I already have or can get for free rather than buy new stuff. But you're right of course. It's a lot less work to purchase what you need or close to it. On the other hand we could also purchase a lot of the things we make, but where's the fun in that?
-
Thanks for all the info. I really appreciate it. Charles R. Stevens - quick question. What do you do to get the springs out safely? I was thinking about placing them on the forge to heat the pot and springs up to red hot to relieve the tension. The spring was broken in the one I took apart so far, but I'd really rather not injure myself getting at the rest of those springs.
-
I think I have the idea now. Thanks for the speedy replies. Hopefully I'll be able to give it another shot this weekend and get the desired results.
-
Right, but I'm trying to maximize width expansion while minimizing length expansion. The volume remains constant, but I'm trying to find out how to move the metal into the shape I want in the most effective way. I believe what I have already done reshapes the steel in a way that produces roughly the same amount of length expansion as it does width expansion. I think patrick understood what I was asking and was steering me in the right direction. I just wanted to be sure that I was clear about his advice.
-
Please forgive my ignorance, but I could use a little more explanation. If I understood what you are saying then a 0.5 inch diameter rod could theoretically produce flat stock a little over 1.3" wide at 0.15" thickness. Obviously that would be impossible to produce, but that's the limit according to the math. I did use a flat faced hammer for this. If I were to switch to a cross (or straight) peen hammer then I think what you are saying is strike so that the peen is parallel to steel on contact and work side to side to get greater width than length expansion. Did I understand that correctly?
-
I'm sure my question will make it obvious that I am a novice, but here it is anyway: Is there a good or specific hammer technique that will result in growing the width of steel faster than the length? I have access to a fair amount of round coiled half inch spring steel used in the brake chambers on semi-tractors and trailers. After straightening and pounding a length flat I ended up with about 0.9" width at about 0.15" thickness. I had really hoped I would be able to achieve a little over 1 inch width at that same thickness. For short pieces I'm guessing I could upset the steel to some degree before pounding it flat, but hopefully one of you veterans has some tricks of the trade that can help me get more width from those springs without folding the flat pieces back on themselves and forge welding. Please let me know if you can shed some light on this for me.
-
I'm just getting into blacksmithing/forging and the cheap (free) cost of waste oil has me working in that direction. My first attempt at a waste oil forge worked to some extent, but I determined I did not have a thick enough refractory lining. I also located the burner input centrally, which created a cool spot where the fuel was being injected into the forge -- which is precisely where you don't want a cool spot. The chamber dimensions of this forge were 8 inches diameter, 9 inches in length with the work opening of 4x4 inches centered in the tube. I'm using a siphon nozzle setup which pushes compressed air through a .023" mig tip and a 5/64" hole in the plug which is the burner tip. The design of the burner is based on this: http://www.youtube.com/watch?v=E-l21wQ6X-E&feature=youtu.be The blower I use is one I removed from a power vent water heater. I ran the first forge on kerosene initially, but to get the heat I needed from it I ended up with a flame roughly 2 feet long shooting out of the forge. I never switched over to waste oil due to the design flaws in the forge. What I'm trying to do with the current design is keep most of the flames inside the forge, be able to burn waste oil, and reach forge welding temperature. The design I'm working with now still has an 8 inch diameter tube, but I've increased it to about 11.5 inches in length and I've got enough room for a full 3 inches of refractory in all directions. The burner will be located at the rear of the tube to avoid a cool spot in the center. What I'm wondering about is the appropriate opening size and location for inserting billets for heating. The opening I have planned now is 4 inches wide by 3 inches tall and located near the bottom of the tube (which is horizontal). I plan to completely seal off the back end. Is it better to have a small opening like I have planned to help with heat loss or will that potentially create combustion problems at that size? Sorry, but I have no pics at this time.