DSW
-
Posts
2,161 -
Joined
-
Last visited
Content Type
Profiles
Forums
Articles
Gallery
Downloads
Events
Everything posted by DSW
-
Gotta Newbie ? For the Experienced Smiths
DSW replied to 3DistinctKnocks's topic in Solid Fuel Forges
I vaguely remember seeing an old article from Popular Mechanics around 1941 that showed building a forge from an old iron sink. http://igor.chudov.com/manuals/shop-forge.pdf -
Nice display. Presentation is everything. Having something like this is much better than simply piling them on a table or just laying out a few samples with more in the box behind the table. Going vertical on the table helps increase your presence visually from a distance as well as allowing you to maximize the space available. Hanging items or tall displays allow people at a distance to see what you are selling without having to walk right up, especially if you have a bunch of people crowding around looking at your stuff. A backdrop behind you can help keep hanging items from blending into the background and can often be another place to display things like picture frames or plant hangers. Even if these sorts of things don't sell, they act as a big sign to bring people over to see what they might like. A friend of mine who does demos has an old bead board barn door as his table top for things like this. It fits in well with the old wrought iron work and gives his stuff the "antique" feel. The door is just about like he found it with faded flat paint and dings and scratches. It's clean and neat, but still has "character". Another thought right now is on pricing and money. For flea markets and sales, nice round numbers helps you out. If you sell something for $9 vs say $10, you have to plan on having a ton of ones to make change with. Same goes with coinage. I'd rather price something at $2 than say $1,50 and have to deal with a ton of coins. I've also found many people carry larger bills like $20's these days. You can blow thru a ton of change in a short time with cheap $2-5 items. Plan accordingly and bring plenty of change. You'll often find most other venders aren't willing to part with the change they have for similar reasons, so don't expect to be able to break those $20's with another vender if you get in a bind. I've seen people walk away from decent sales because you can't make change for what they have, and they don't want to buy more to use up the rest of the bill. One thing that is great is that you can get free apps and card readers that will let you take plastic these days using a smart phone. You usually just pay a percentage on the transaction, like 3%, and they don't care if you do 2 or 3 sales or 50. Much better than the old style where you had to open a merchant services account and pay not only a percentage, but a monthly fee if you were under so many sales dollars. My buddy had dropped taking plastic a few years back because he didn't have enough sales to make it cost effective the old way. With the reader and his smart phone he doesn't need to worry about that sort of thing any more and he's found it can simplify his life at markets. You do "loose" some money for the transaction fee, but it's not a huge amount and he finds that on average the convenience outweighs the small extra cost. Now if he can't make change he can always ask if they'd rather use their card. Most don't bat an eye and whip it out, often buying more since now they don't have to worry about using up all their free cash in one spot. Also be sure to have some cards available with contact information. I don't like to put out a ton at one time since people tend to pick them up and then throw them away. I leave out a few, but keep the rest in the back to hand out if asked and to refill the holder every so often. Keep a pad and pen handy as well to note down their contact information and make sketches if someone wants a custom piece made up.
-
Must be one of his older business cards. I thought it was "Super Genius" :P
-
Tire Hammer - Welding Advice
DSW replied to danguite's topic in Power Hammers, Treadle Hammers, Olivers
Again, I'm unfamiliar with the actual instructions on this unit. I assume from your comment you are supposed to fill the ram and counterweight with concrete thinking back to the one I did read the instructions for awhile back. I can give you some pointers on concrete having worked with it for years. Excess water in concrete mixes tends to promote shrinkage and weaken the mix past a certain point. Typical bag mixes like you buy at Home Depot/Lowes have a few unique properties that batched concrete from ready mix companies usually don't exhibit. They load up the bag mixes with chemicals that are referred to as water reducers. This tends to make bag mixes behave "strangely". You want to mix them up on the dry side. Then the more you "work" or vibrate the mix, the wetter it becomes. If I have to pour this stuff, I mix it up just to the point it gets damp, but no more on average. Then when I consolidate the concrete, it will "flow". I can usually tell if I'm mixing in a wheelbarrow by taking my trowel and slapping the surface 10 or 12 times and trying to "pump" the water to the surface. If it doesn't behave the way I like, I add just a touch more water, say less than a quart at at time until it acts the way I need it to. You will find these mixes even mixed almost to the point of being dry and crumbly, will "bleed" water like crazy after you place and vibrate them. Off the top of my head I want to say I use about 1-2 gallons of water per bag. I usually have a 1 gallon bucket and some quart gatorade containers and measure out the 1st bag or so until I get the mix right. Then I know exactly how much to dump in for each bag exactly. To consolidate the concrete when it seams to be too "dry", there are several things you can do. I'll assume you don't have or have access to a concrete vibrator, but if you do, that would be my 1st choice. 2nd choice would be a length of rebar the length of your column plus 12 to 18". You "rod" the concrete. This means you stick the rod in the crete and pump it up and down like a butter churn, moving around the column. This wets the mix and gets rid of air pockets. You can also tap on the outside of the column with a hammer to help, and a palm sander held against the outside will also vibrate the exterior. We'd frequently use the hammer and sander "trick" on step forms to get really stiff crete to wet out and flow better to fill out complicated bullnose forms. If you mix your own, go with the largest aggregate you reasonably can. It's more of a pain to consolidate, but the concrete gets a majority of it's strength from the aggregate. If you think of it this way, if you take a jar of big rocks, a jar or small rocks and a jar or sand, you can fit the most in when you start out with the jar or big rocks and fill the small spaces in with small rocks, followed by filling those spaces with sand. Here you will have to use more water than with premixed bag crete. Again I'd manage water similar to how I described the bag mix above to keep water down. After rodding you will have a "soup" that comes up to the surface. This will be the weakest part of the mix because it doesn't have aggregate and the water to cement ratio is super high. one "trick is to leave some room and add a bit of dry mix on top and use the excess water up that way. You need to make sure it wets out 100% though. 2nd option is to pull out all that "cream" and keep putting in more solid crete. I doubt you will order ready mix for this, so I'll leave out tricks for ordering this for the most part. If you do order, you can order it with a "tight" slump, like a 2-3, and have them add Super P on site. This wets up the crete like you added a ton of water, but the "wetness" only lasts 30 minutes or so and then it "snaps" back to it's original stiffness. We used to use this regularly to allow us to place the crete easily, and yet not have it "soupy" when we'd go to stamp it. It works great for getting nice almost self leveling floors. One down side of crete is it always shrinks. However they do make high strength nonshrink grouts that are often used under steel columns for support. These grouts are somewhat similar to bag mixes in that the more you work them, the "wetter" they get even though you didn't add any more water. You can take a batch that is so dry it almost crumbles in your hand and turn it to soup just by moving it around with a trowel a lot. These grouts are super strong, but fairly expensive. I'd only think about them if you are talking about 1 or 2 5gallon buckets full. A 5 gal bucket used to run about $100 off the top of my head for the good stuff we'd get from our supplier. -
Good thoughts so far. I'd be tempted to want to try simply casting "concrete" out of refractory, but then that's the medium I used to work with. A friend on mine who I used to work with, did a fabulous thin shell "concrete" dome for one of our architectural structures projects in college. Poured less than 3/4" thick at the thickest point, it still supported almost 800 lbs ( we ran out of weights that would fit on his project at that point) Total weight was still under the 15 lb limit for the project.
-
What do ya make from RR Spikes?
DSW replied to windancer's topic in Blacksmithing, General Discussion
ac39b2dcd6a01a104c27da11c1071927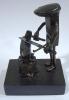
-
Interesting. Stoody makes some good rods, but I've never run that one. I would have liked to have seen a few before picts to get an idea of the damaged areas. Charcoal preheat wouldn't have really occurred to me. Usually when I've seen the need to preheat something, it's done with big propane weed burners, often with some sort of "shield" and blankets to help hold in the heat. With heavily damaged areas requiring buildup, especially with very fluid rods like many hard facing rods are, we usually tacked up a backing "dam" on the side to help hold in the material and then gouged or ground off the backing strip when done. If need be the backing was set back some so that after cleanup you didn't have much if any dilution of the weld material from the backer.
-
That looks like it should do what you want.
-
If you want the doors to swing back down the sides of the building, take a look at the hinges on dumpsters and barn door type dump trucks. The pins are usually set out farther than on most hinges so the doors will swing back along the sides. Not the best picture, but it sort of shows what I'm thinking. Of course you'd want to alter it so that it looks appropriate for the structure.
-
Newbie's ideas for good woodworking chisels...am I way off base?
DSW replied to Medic82's topic in Knife Making
Tang type chisels rather than the more traditional socket style will be easier to start out with most likely. I'd agree about starting out learning the basics 1st. Get some mild steel that is cheap and see if you can't 1st get the shape you want before dealing with things like heat treating and so on. Have your father in law come by and work with you some to help you get the basic shaping down. -
Plenty of incidents of places that used to spray down roads with oil to control dust having major issues now. Some companies used PCB oils from old transformers, some mixed the oil with other types of chemical waste. Just one example of many... http://en.wikipedia.org/wiki/Times_Beach,_Missouri
-
I picked up this little pump forge from the guy I was helping with a demo last week. I was wondering if anyone here can help identify it and give me an idea of it's age. I couldn't find any obvious name on the unit. It's got a decent sized crack that's been repaired, but I think it's worth the $50 I paid for it. Thoughts on lining the pan with refractory to help keep this in decent shape for demos?
-
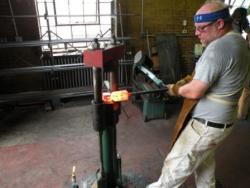
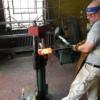
My flatter and set hammer I made from 4140 in July when I took my most recent blacksmithing class. I hadn't planned on making one, but the shop just got the power hammer and big screw press and the instructor mentioned he had some material if anyone wanted to try and make their own hammer. I had to make most of the tooling for the power hammer and screw press as well as the hammer eye drift to do these. We heat treated them after forging. Picts show punching the hammer eye under the KA 75 and fullering the 2 1/2" 4140 in the screw press for the flatter.
-
I constantly browse yard sales, flea markets, used tool stores and so on for cheap tooling. I've also found a few deals at antique stores even though for many things these places are over priced. Lots of blacksmithing tools can be made yourself once you gain some basic skills. I'd also budget yourself some money for some good books on forging. There are any number of good basic books that cover the subject. Make a list and let the family know you'd like one or more for Christmas or your birthday. Also look into what local clubs might be in your area. You might look in to the New Jersey Blacksmiths Association or similar groups near were you are located.
-
Hello. It helps to take a minute and update your profile so your location always shows and people know where you are from at a glance. With only a $40-50 budget, you are probably looking at building your own coal forge. You can find quite a few here if you look a bit. A basic ball peen hammer will get you going or a small sledge. Decent flea market finds should run you $2-10. A pair of water pump pliers will do in a pinch to get you going. Look up twist tongs on ABANA's web site. I just helped a young man make his 1st set of tongs this way this weekend at a demo. Toughest thing to stay on budget will be some sort of anvil. There are all sorts of options for make shift anvils that would allow you to remain within your budget, but it will depend on your skills at scrounging parts etc. Finding "real" anvil in the $50 range is possible, but not very common. A couple nice used files, a hacksaw, a few chisels and some sort of bench vise would round out your basic tools.
-
I like the surface texture. Thanks for the info on how it's done. I'll have to take one of my "scrap" yard sale hammers and play with it some and see if I can't get similar results.
-
You are seeing wheel slippage I believe. Engine sat there fore some reason and just spun it's wheels. Like the bearing in your car that is spun dry, friction causes wear and heat.
-
Tire Hammer - Welding Advice
DSW replied to danguite's topic in Power Hammers, Treadle Hammers, Olivers
I haven't looked over the plans, but my guess is chances are most of the welds can be done with just about any rod as long as you can do decent quality welds. Saying that, my 1st recommendation would be the to use the rod you are most comfortable with and can do the best job. I wouldn't recommend using an unfamiliar rod if you can make decent welds with something else. Having said that my personal 1st choice would be to use a fresh container of 7018AC. 7018 is a medium strength rod with good ductility under shock. It's one of the reasons it's usually the minimum suggested for "code" based welding applications like bridges and so on. However 7018 does have some issues. Many have problem running 7018 if the rods are old or have gotten "damp" from absorbing moisture from the air due to poor storage conditions. Also not all 7018 is created equal. AC stick welders don't always run "standard" 7018 well. 7018Ac is designed to run better on AC based stick machines. 7014 would be my 2nd choice. It's not quite as strong and ductile as 7018, but it doesn't have the storage and moisture issues 7018 does. It's a very good choice for newer welders because it's a drag rod and it's easy to make decent welds with it. Like 7018, it will usually tell you when you have the settings and all correct because the slag just peals up or falls off behind you. If you are beating the welds to remove slag, chances are your welds need work and you need to tweak your settings etc. 7024 is an even easier rod to use, but it isn't always available, and it's a flat or horizontal fillet rod only, so you can't do vertical or overhead welds with it. Next choice would be 6013. It's not as strong or ductile as 7014 though. Also while it's a drag rod, many people have issues with slag inclusions running this rod. I'm personally not a huge fan of it, but if you can do good welds, it would certainly do the job if you do your part. I know one welder in the UK who does pressure quality pipe welds using 6013. 6011. Probably the last on the list. Penetration is great and it will weld thru rust and paint better than any of the others, but strength and ductility are lowest on the list. Also many people have trouble doing decent welds using 6011. They often have issues like cold lap and undercutting with it. Chances are with code quality welds, this rod would still do an adequate jobs. Amperage ( not voltage, you can't set the voltage on an AC stick machine), would be determined by rod type and size chosen. My guess is this project can be done with either 3/32" or 1/8" rods. Again I'd base my choice on skill level more than anything else. Many times I find newer welders have a slightly easier time using smaller electrodes. This allows them a bit more control than with larger electrodes because they aren't laying down as much material in one shot. Most packages of rods list the amp range for the given size. I'd suggest using the middle setting, or higher. Most new welders tend to want to weld too cold. I'd rather see a fair weld with too much heat than a fair weld with not enough heat. We usually have our new students run 1/8" 7018 and 7014 at around 125 amps in flat. For out of position welds, it's somewhat up to how the welder likes to run things. Some tend to better with more amps, some better with a few less. Rough numbers off my head for 3/32" 7018/7014 would be around 85-95 amps. Note that different rods from different companies often my run at different amps. Lincoln sells about 8 to 10 different "flavors of 7018, and the suggested amp ranges changes slightly from one to another, so be sure to check and see what the manufacturer suggests. Warpage is a "science" all it's own. Keep in mind steel will always pull towards the weld when warping. Plan you welds accordingly. Also keep weld order in mind. If you have to weld around a 45 deg angle with square tube, if you weld one side, then the other, the 90 deg angle may stay straight, but the tube will want to twist to the side. If you weld the inside corner 1st, the tube will want to pull in so the angle is less than 90, and if you weld the outside corner, the corner will want to open out past 90 deg. Clamping things tight or using temporary restraints can help limit warping, but it will not eliminate it. Adding a bit of positive "lean" can be used so that when things warp, the warpage pulls them straight again. Also if you gap slightly, that gap will often allow you to force things back to straight, so you can weld the opposite joint and lock things in straight. How much correction you need is based on the material, amount of weld laid down, and experience. Guys that have done a lot of this sort of get a "feel" how much "out of wack" to make things so they pull straight when done. Hope this held some, Doug. -
Very nice. Much better than my 1st few ones. I hear you on the cracking, I had a lot of those issues with my 1st few.
-
Rule of thumb is "If there is slag, you drag". The arc pushes the slag back away from the puddle instead of in front of it where you can run over it and bury it in the weld. There are exceptions to this, but on average you want the rod or gun if doing FC wire, pointed back towards the weld you have already laid down. When doing stick, I like to set the work on a slight angle. Since I'm right handed, I like to start in close to me on the left, and then mover to the right and away as I rotate my arms. The angle usually ends up being roughly 30 deg from parallel.This is usually the way I show students to start welding. Once you gain experience, it's much easier to do things like weld "backwards", where I start on the right and weld to the left even though I'm right handed. Not something I'd recommend to someone just starting out learning.
-
It's almost impossible to get full penetration on 1" material without some sort of a bevel. That said not all welds need full penetration for strength. A fillet weld gains it's strength from the material that is deposited on each "leg" A "leg" being the distance up each piece the weld flows onto. The down side is that that material interferes with things like having the anvil block sit flush in this application. Grind off the majority of the filet weld, and you have removed the majority of the strength. A simple way to determine how much penetration you are really getting with a fillet weld is to weld up a T joint and then cut the joint perpendicular to the weld. You should have fusion along all the sides and down in the corner. If you polish the weld and acid etch it with muriatic acid, you will actually see where the line of fusion is in the base metal. A bit of heat from a heat gun can help pull up the pattern easier. As far as rod angle having to do with arc length, think about it this way. The arc comes from the "center" of the rod. The flux holds the center away from the material. If you hold the rod vertical, the arc can get close to the material with no issue. As you tilt the rod over farther and farther, the distance from the center of the rod to the work in a straight line with the rod increases. This causes a longer arc between the work and the rod. I'm over simplifying this, but it's the best description I can think of to explain this this evening. I'm not sure if the site rules allow me to post up links to other sites or not. I'll have to check with one of the Mods or Admin, or did out my original picts on the subject and repost a thread I did a while back else where on the subject of arc length. The sunken in rod is typical of what are typically referred to as "drag" rods. 7018 can be a drag rod, and does exhibit this on occasion. However 7018 often just gets a glassy slag on the end of the rod that makes restarts a PITA on occasion. You often have to break off that glassy tip to get easy restarts. 7014 does exactly what you describe all the time. That "tube" of flux is what allows you to "drag" the rod. The rod rides on that tube of flux as the rod burns and makes it easy to maintain a constant arc length. As far as avoiding melting the corners, a good bit of that is simply practice I'm afraid. Part of this is due to having a long arc. Part is that you are coming up to a "thin" edge and need to correct for this as you weld. I'll really have to check on posting that link or redoing the thread so it makes sense to you.One thing that can help is welding around a corner. Start on one side, and wrap around and end on the second side. That's not that easy on very short welds. Oh here is an example of an etched weld. Thanks goes out to Rick V for posting this on another site. You can clearly see how much the weld blended into the base metal. It's not the greatest weld, but the pict clearly shows the line where the weld fused with the base material.
-
Tig brazing is quite common with metals like brass where you have to watch that you don't overheat the material and boil out the zinc. The lower temp allows you to join the material without damage to the base metal. Bronze can lend itself either to tig welding or brazing depending on the exact alloy. Your comment about having a previous "weld" melt made me pretty sure that you were probably brazing. In an art application it probably doesn't matter much other than trying to get a good color match.
-
If you are talking simple oil storage, there shouldn't be major issues with your hollow frame design. However getting leak tight welds with oil usually requires a fair amount of skill. Mig welds are notorious for cold starts and often will "weep" oil even if the welds will hold water. Stick is often even worse if you aren't skilled. Tig is often the preferred method of getting leak tight welds on diesel tanks, or they go back over the mig welds and spot patch any issues with tig. You mention trying to keep the oil supply close to the cylinder and reducing hoses. Do NOT use hollow sections in place of HP lines. If you are concerned about hose damage, use rigid hydraulic lines ( which you could route thru hollow sections). You need a great deal of skill to pull of pressure rated welds, and square tube is a poor choice at best for a pressure vessel. Even standard "pipe" is usually only rated to 250 PSI or so vs the 2K some hydraulic systems can be rated for. Any good hydraulic shop can hook you up. There are all sorts of options available. They make braided steel and stainless lines that would take a small to moderate amount of hot contact. They also sell steel spring like covers for lines that hav eto flex, but take abuse on equipment. They can also hook you up with the proper rigid tube and fittings for pressure applications. I usually deal with my local Parker Hydraulics shop, but the NAPA near me as well as all the heavy equipment dealers like CAT, JD , CASE etc will have what you need.
-
Your pot is most likely cast. I would NOT weld it unless you really know what you are doing to prevent cracking that really nice pot. This would also make it easier to break down the forge if need be. You can probably make the table fairly light, say out of some thing as thin as 14 ga, if you make sure there is enough support to hold up the pot. If you are short on metal working equipment and experience, a simple 1/4" plate would support it without a lot of extra bracing I'd imagine. You might even be able to get by using 3/16" or 1/8" if the sides were made of angle bolted to the top and stiffened the whole thing.
-
That should work well despite the ugly welds. Small short welds like that can be a real PITA to do well. There isn't much to see with those welds, but from your general description of lots of spatter, your arc length might have been too long, or your rod angle was way off. I don't see the signs of the amperage being excessively high which would also give you a ton of spatter. I'd need more information and longer welds with picts to give you much more help right now.