DSW
Members
-
Joined
-
Last visited
Everything posted by DSW
-
A few generic thoughts for others who might want to do this in the future from someone who spent quite a few years doing concrete for a living. You can significantly reduce the dust by using just a small amount of water while cutting. Granted if this was open and outside, I'd use the hose connection on the saw, but for interior work where we needed to keep down both the dust and mess, A small tank sprayer applied around the blade will significantly reduce both dust and mess. You can shield the wall with sheet plastic or plywood. A squeegee and wet vac will deal with the slop. Next I'll mention anchors and leave wire until last. I'm not a huge fan of wet setting anchors unless you have an exact template on hand to use to set your bolts. I'd guess 85-90% of the time I've seen at least one wet set anchor that needed to be redone. When it's only off by 1/2" it makes setting a new one almost impossible and greatly reduces the load that anchor can take. By "template" I mean an exact duplicate of the piece to be anchored, usually made of plywood, that exactly locates the bolts. We'd double nut the anchors above and below the plywood so they would remain straight and exact. Better solutions are drilled and epoxied anchors. Most structural epoxies for this use will almost match wet set anchors assuming you correctly follow the directions. Wet setting a steel plate with anchors and then welding your item to it would also be one solution. Usually used for columns you can get an exact set and level in all directions this way, then weld the base plate to the set plate. Hammer studs or anchor or lead shields and lags work well for lesser items as do threaded tapcons and concrete "bolts" Now The next part is a partial pet peeve of mine, so ignore me if I rant a bit. Steel in concrete is a good idea that has been so over used by those that have no clue as to make it absolutely worthless almost 99% of the time except in cases where it's actually designed by a structural engineer. As far as that little wire in the crete shown, it will help as much as if you put it in the trash can. There is a huge common misconception about wire/steel in concrete. Wire in a slab almost never stops cracking. If anything it simply holds things together after it cracks. Bar in structural concrete is a different matter. However to be of any value, it needs to be located where it will do some good, or it has zero use. The point of steel in concrete is to take the tensile forces of bending and help transfer these loads to compression loads the crete can take since crete is very weak in tension. On a simple bending structure where a "beam" is supported on both ends and a load is applied in the center or uniformly loaded, the top of the beam is in compression, and the bottom is in tension. The center is neutral with compression canceling tension. ( this is the idea behind the shape of an I beam as well). You want the steel in the lower part of the beam, and as far from neutral as possible, while still maintaining a safe level of crete to absorb the forces generated by the steel ( steel tries to stretch and the ridges on the steel put the concrete in compression around the rod) You also need enough crete to protect the steel from moisture and corrosion. Save minimum is usually 2" of crete. Problem is in a 2" floor, you are in the neutral part of the slab at that point and the steel is useless. Most times wire in a slab is never where it needs to be to be structural unless the crete is more than 6" thick. The next issue is that floors are seldom "simple" beams. "Complex" beams with multiple supports and loads get all "wavy" when you look at a loading diagram. Now you end up with some spots where the top is in tension and others where the bottom is in tension. Now you need steel in both places depending on where the loads and supports end up. In a huge short length, block mass like that footing, chances it will "bend" is very slim. Thus wire/steel isn't of much structural value. The exception might be if you have very heavy loads on very small contact points, usually found where big columns hit small footings. In this case the issue usually isn't that the footing will bend, it's that the compressive load on one small area will "crush" the concrete. Then the steel acts to spread that load out over a larger area so the whole mass of the footing will load equally. Most of this that I've typed is vastly over simplified as far as an engineering/structural point is concerned, but it may help some better understand a bit of this. I'm looking forward to seeing your hammer installed. You did a nice job on keeping things neat and clean other than the dust issue which is almost impossible to do without specialized tooling with dust evacuation..
-
Impressive. I know the kids at the 4-H archery class I help teach would love to see you forge some of those. I'm still working on getting sockets down small enough consistently. I wouldn't even begin to try and do broad heads like that.
-
That's usually the typical mind set that gets people into trouble. They don't really track costs, so it looks like they are "making" money, when in reality they are loosing money. You build your widget and the material you buy cost you $5 and you sell it for $10 and you made money right? What's the big deal? The thing is you didn't add in the cost of that grinding disk you used, sand paper and paint etc that was sitting on the shelf. You "made" $5, but in reality your costs were actually higher. Next time you tell someone it's $10 for that widget, but you find out you are out of paint... No biggie, you run out and buy a can for $4.50. Opps, your profit just dropped to 50 cents and you still are on the same sand paper and grinding disk. Two or three weeks later you realize you need some sand paper and grinding stuff while at the store so you pick some up because they are on sale. But there's no project attached to these, so the costs get forgotten. Now you have to fill that propane tank or buy more coal...Was that figured in? Small work like this is a good way to off set costs for a hobby. You know you are in the hole right from the start, and any thing sold is "found" money that you can put back in for more practice. It's sort of like paying to go to the movies and then finding out when you are there that they are giving a discount for that particular show. You planned to pay that money anyways, but you just didn't have to pay as much as you thought.. Small sales like this are a poor way to actually make a profit. To make money you need to know exactly what things cost and track them. Those screws you tossed in with the hook probably cost you something even if we are talking pennies compared to the price of a 25 lb box of bulk screws. That box of screws isn't cheap though when you go to replace it. Trust me I burn tons of drywall screws for all sorts of misc jobs and hardly think about them when I grab a handful. I do sit up and pay attention when I have to go and replace that 25 lb box however since they can go up to almost $75 or even more for the exterior ones. Glup! That wasn't figured in the price... I make a point of tacking on at least $5-25 in "misc costs" now to all jobs even small ones just to help off set these small things that are hard to track consistently.
-
I usually do what you do. Insert a bar the diameter I want the ring and then start twisting. Biggest thing I've found with twists is to have a nice even heat or the twist doesn't turn out the way I'd like. One option might be to 1st fold the bar over 180 then drop down a bit and use a twisting wrench to twist 1st. Then reheat and drift your ring to size after the twist is done. You'd need to work out how much material to leave above the twist to get a nice even ring.
-
Hahaha... Yeah most guys don't have a clue how much some stuff weighs. Good news is that most 1/2 and 3/4 "ton" pickups have actual load ratings well above the number values. Last time I looked even a small Ranger had a 2000 lb payload rating. You don't even want to know how much I've had loaded in the "small" 3/4 ton truck before we redid the suspension. I sort of ignore that sort of stuff since I bought the F550 work truck. You know your suspension is heavy duty when the guy at the roofing supply puts in 3 ton of shingles and then asks you what the suspension on the truck is, because the truck didn't even move when he sat it down. :P Rough gestimate. I can get about 13, 5 gallon buckets of coal in a 55 gallon drum. Rough weight on a 5 gallon bucket is between 45-60 lbs. So figure a 55 gal drum weighs in at 600 to 800 lbs. 3 to 4 drums roughs out at about a ton. A 55 gal drum is about 7.3 cf so the math roughly works out right. From a chart I found: Anthracite coal : 1536 lb / cu yard. .76 ton per yd. Bituminous Coal : 1275 lb / cu yard. .64 ton per yd. Coke: 837 lb / cu yard. .42 ton per yd. Typical skid steer bucket is between 1/3 to 1/2 yard heaped. A typical backhoe bucket is between 1 yd to 2 yards. This site has some good rough numbers for bulk materials for those who aren't familiar with stuff like this. I'm often amazed at the kind of loads homeowners put on small trailers. I've seen loads of dirt on 7K and smaller trailers that would have gotten us red tagged by the DOT with the 6 wheel Mack. http://www.harmonysandgravel.com/charts.htm
-
Hello and welcome. How did you manage to get someone else to pay for your toys, or is this just a loan?
-
Small 90-100 amp 110v stick welders like you can buy at Harbor freight don't generally work well for material much thicker than 14 ga to 1/8" if you are lucky. The heavy stuff will definitely want the bigger machine. I agree the bracing under the firepot is probably overkill. My table for my forge in the link above was done out of 14 ga at best and it supports my 1/2" firepot with all the heavy pipe tuyre, ash dump etc with no issues. The table is even split at one side of the fire pot and pieced together because I didn't have a full sheet large enough to do it all in one shot. The only small change I might make would be to make the grate removable. That's the part you are most likely to destroy 1st. Trying to reweld to burned material will be a giant PITA. Do yourself a favor and plan in advance to be able to replace it when it burns.
-
I've seen a lot of guys mount a 2" receiver or piece of 2" ID tube under the bench and build a removable vise mount just like pulling a hitch out of a truck receiver. When you need a clear top, pull the pin and remove vise. This also allows you to mount other tools to the table and remover them for storage. Grinders, benders, belt sanders etc. I've also seen some guys mount the 2" vertically in the top for similar use. Last use of these receivers is to lengthen your work area. You can slide a work support into the tube and support longer pieces if you do a bit of preplanning. I once saw a guy who had done this to his big fab table. You could extend the sides or ends out more than 3' by adding extension tubes in the receivers.
-
Springs have a bad tendency to snap in the heat affected zone after welding. Heating a larger area will help to combat this, but on the other hand it also takes the temper out of the spring and can make it loose it's "spring". I've seen guys have mixed results trying to weld coil springs for things like DIY park rocking horses. The "fails" have run from the springs snapping and dumping the kid, to ones that just bent and didn't return. Some worked fine with no issues. I haven't really seen a great process that gave consistent results, probably because most times there wasn't enough consistency or tracking of the exact weld process to determine any useful data.
-
I wasn't really thinking about changing the price for now. More thinking about what to tell them for the future. I know it's tough to change once you've done something for someone at X in the past. But on the other hand I also don't want to sell myself short in the future. I've eaten plenty of costs for customers over the years. Usually I make a point of telling them costs were higher than expected, but that I'll stick with my original estimate for this one only. Any future work will have to be higher. Most are understanding, but sometimes I've had to just walk away when people are XXXX's. They expect if you were willing to loose money on this one, you are willing to loose money on others. Of course they are the first ones to want to get extra after the fact.
-
For those of you who do demo's, I was wondering what the going rate might be. I know obviously guys with big names can demand premium prices. I'm thinking more about the average small time guy or hobbyist who does local fairs, and events. Reason I ask, I found out last month that the local parks department was looking for a blacksmith demonstrator for the local park day. At the time when I read about it in the PABA newsletter, I was committed to a job near Chicago that weekend and didn't think anything of it. Well recently they called and pushed back the job so I was free next weekend. I finally managed to track down who to contact at the park and they said they'd already spent almost all thier budget, but asked for my contact info for next year. They also asked what I wanted to do the demo. Caught me a bit flat footed at the time because I hadn't really stopped to think about it. I mentioned I'd like to at least cover my expenses. I figure about $20 in coal and maybe $80 in steel, so I said maybe $100. They said they could cover that and if I wanted to come I was welcome. Thinking a bit more about steel, I might be a bit low depending on what I use, so after I go and pick up materials tomorrow I may tell them I need to push it up a bit because of the cost of steel. Maybe to $150. I told them I'd have to work some things out and get back to them tomorrow with what I needed as far as facilities, power etc. ( Mostly I'm looking for a nice shady sopt so I don't have to pack the big tent for the day and someplace I can park the truck in close proximity if I need to grab something out of the truck. Available electric would be a bonus so I could bring the forge with the electric blower if I want. Any how, originally I was thinking of this more as a chance to get exposure for my general contracting business, you know leave a few cards out on the table ect, and maybe pick up a few new customers who need small fix it type jobs. I also figured I'd bring a few of the horse shoe coat hooks etc that I've made. If I'd had more time in advance, I'd have made more stuff to try and sell.
-
Biggest issue I see with guys who want to start any business has to do with the business end of things. I've seen quite a few businesses fail, not because the person can't do the work, or even that they don't do excellent work, it's the fact they can't "run" the business end of things. I know it's the hardest part of my business. Many guys just want to look at the cash coming in. They forget about all the cash that also has to go out. Big things are easy to keep track of. It's all the tiny ones that add up to big money and sink you. Example: a client wants you to build say a pot rack for them. You know materials should run you $100. You figure it will take you say 4 hours to build, and you'd like to make $25 an hour, so you [price it out at $200... That's often how people typically price things. Problem is you didn't allow for your insurance, accounting fees, phone, business cards/advertizing, taxes/business license fees, electric, shop rental, heat, any tooling, fuel, consumable items like sand paper, grinding disks, Oxy Acet, finishing products etc. All of a sudden because you didn't buy these things at the time of the project and forgot to add them in, you end you paying to do the job rather than making money. It's even worse if something breaks on the job, say you burn up your grinder or you power hammer splits a die. Then you are in the hole super big really quick. Small guys often have a hard time breaking even especially if they are doing things part time. It's tough to add in all your true expenses and keep prices reasonable if you don't have a ton of work flowing thru. If your average expense per month is as little as say $200, It takes a lot of small jobs to absorb those costs. If that pot rack above is only one of two projects that month, you'd have to add at least another $100+ to the cost to break even. Lets say misc items like fuel/grinding disks etc added up to an additional $25. Now instead of your rack costing $200, all of a sudden it's up to $325. That might be too much for your customer to accept, and you loose the work. I know a lot of guys who work full time in this economy that are willing to take in work even if they just break even simply so they can absorb some of those fixed costs per month. They don't put penny one in their pocket, but at least they aren't in the hole for all those bills like electric and insurance that don't stop coming in simply because you don't have work. My average expenses per month easily add up to $1000 when you figure in all my insurance both for the business and the work vehicles, phone, maintenance and fuel for the trucks to get to jobs and pick up materials. That doesn't even include rent, electric, heat etc. General misc stuff like sand paper, grinding disks etc can easily run me $500 even if I'm slow. Add in tool repairs, or replacements and such and I generally figure I need to have at least $2K every month plus materials just to break even. Then maybe I will get paid... That's assuming I don't come up short the month before, or maybe the month or two later. I'm not trying to discourage you. I just want you to go into this with your eyes open and looking for all those hidden expenses. Like I say I've sen plenty of guys who think "side work" is a great way to make "free money" only to realize 6 months down the road that they are actually farther in the hole then they were before they started doing this. Good luck.
-
What you mocked up was very much like how I made mine. I chose to go with 1/2" over 3/8" since the extra cost was minimal and the time in labor was going to be extensive. I documented most of the build on Weldingweb, and you might find some of it useful to look at. http://weldingweb.com/showthread.php?t=146321 .
-
Many of us who work with metal regularly deal with cylinders of 100% O2. Oil and O2 do not play well together at all. It takes almost nothing to get oil to ignite when in contact with 100% O2. You don't need an "ignition" source in the tradition sence. Simply the gas slamming int the oil can lite things up and things go from bad to worse from there. Reference the tank pictured above as a good example. I see a lot of guys with O2 gear all covered in grease and oil. It wouldn't take much to get a small bit of that inside a vale when changing cylinders. Also never use paste to seal O2 connections. Even telfon tape is questionable at best ( they do make O2 "safe" teflon tape) Never check for O2 leaks with anything petroleum based. They make O2 safe leak solutions. If nothing else, a tiny drop of Dawn in a container of clean water will work with minimal safety issues. You just need enough to get it to suds and no more. Never attempt to rebuild an O2 reg yourself. Even the oils from your fingers or a small piece of lint from a clean cloth can cause ignition if it's on the HP gas side of the reg. There are specialized procedures for cleaning O2 regs. Leave it to the pros. Most welding supply places can send regs and torch gear out for rebuild. If not there are a couple places online that offer these services. It's a whole lot cheaper than dead to get this done. One other thing. Never use glycerine filled gauges on O2 systems. All gauges should be clearly marked "for O2 service". I know one guy who had an O2 based reg fire when the LP glycerine filled gauge he used leaked. He was extremely lucky it was on the LP side and not the HP side. He ended up with a small blowtorch, but was still able to shut down the cylinder. If it was on the Hp side, like the woman in Floria, he'd have never knew what hit him when the cylinder exploded.
-
Just a good warning to all of you who deal with O2 regularly. I see a lot of people who are very cavalier about handling O2. 100% O2 is not to be taken lightly. It's more dangerous than Acet in many cases. Everything burns in the presence of HP 100% O2. Thought I'd post these picts and let you all see what happened to me back in July of 2004. For the record I am trained in O2 cleaning for Hp O2 service and special procedures for gas mixing so I knew what I was doing at the time. Several years ago I worked part time for a dive shop. We frequently tranfilled O2 using the booster pump in the photos. I was mixing gas for our bank system. Hook up a new bottle of O2 to the inlet and slowly dump of into the bank to be filled until they equalize. Then turn on the booster, slowly sucking the O2 bottle down and pumping up the bank. Once the O2 bottle was depleted ( pressure in tank would vary depending on level being boosted to) unhook the O2 bottle and repeat until desired pressure in bank was reached, top with air to achieve final mix. On this day I had already emptied 3 280cf bottles of O2 and had hooked up the 4th one. Bank equalized at around 1300 psi and I slowly started the booster. I generally monitor how the system was running by checking the temp on the output line. If the line became very warm to the touch, not as hot as hot water from a tap, I would slow the unit down or switch O2 bottles. BTW I was the [Picky] one about mixing at the shop. If I had been any of the other guys, I'd have turned on the booster and walked away and ignored it for a while, returning later to turn it off and change bottles. I've seen guys get things so hot you can't touch the tank being filled, and it's sitting in water. But NO I had to be the responsible one and stand there and monitor it. I had just checked the line and it was slightly warm when this happened. As you can see from the photos something went wrong. I wish I could find my before picts. If you look at the bottom of the booster you will see 2 loose lines. That’s what is left of the outlet lines. The 1/2"SS HP fitting that went into the booster, 5 of the SS 1/4" tube to 1/4" npt swageloc fittings that attached the 2 SS HP Tees, and the interconnecting 1/4" SS HP tubing is GONE, vaporized in an instant. If you look closely you can see the remaining half of the 6th adapter to the first tee in the bottom of the picts. The 2 tees survived but looked like someone burned all the threads out with a torch. My guess from the damage is that the fireball had to be about 24-30” in dia. in order to get all of my arm. The yellow circles show where there were several 1/4" 316 HP tubing adapters and 1/4" 316 HP T's. That along with 20 some inches of HP SS tubing that flash burned. Note the fittings and tube just don't exist anymore. Poof gone in an instant. Not melted or blown off, vaporized. The event happened so fast I don't even remember it. The fire went out because there was insufficient O2 to maintain it, but the stainless steel WAS the fuel. I wish I could have gotten the picts they took of my arm at the burn ward. They wouldn't give them to me, guess they thought I wanted to sue. My hand was just about where you see that partial fitting. 3rd degree burns on my right hand from finger tips to elbow, about 85-90% of my lower arm. Lucky for me the heavy calluses on my hand from doing concrete ( my primary job) protected my hand and fingers. Basically turned the palm of my hand into shoe leather. Flash charred all the other skin but was over so fast there was little depth to the burns. One week in the burn ward and lite duty for the next couple of months, you can hardly see the scars. Small amounts pin point amounts of SS spatter on my upper arm, chest and face. Thank god for glasses! Burns stopped where my skin was protected by my cotton t shirt. I'd have been in real trouble if I'd been wearing polyester as it would have likely fused to my arm and chest. Somehow I managed to shut off everything except the incoming O2. I don't remember anything for the next few minutes, but I had to have done it. The only reason the O2 wasn't turned off was that I would have done that with my right hand while my left hand was shutting off the other valves. Shut valves on left with left hand, shut valves on right with right hand. Talk about muscle memory! Now what happened. Possible causes, 1) Foreign matter into system from valve (spider web perhaps) 2) Foreign matter from system ( piece of brass from valves due to poor maintenance) 3) Oil contamination from air system (due to poor maintenance) 4) Adiabatic compression ( heat simply caused by gas compressing itself in a system at a bend or restriction.) 5) Check valve failure on output of booster. 6) Operator error (unlikely due to the fact I was watching the pressure going in and it couldn’t do that if a valve was closed.) We talked to the mfg of the booster and sent it to them for analysis. They were unable to determine the cause because most of the lower piston and valve assembly was vaporized in the flash. However they say this is not an uncommon occurrence in the airline industry where they use these boosters to fill O2 bottles for the flight crew. Their solution put the unit in a blast cabinet and LET IT BLOW UP! Go figure. Our sister companies compressor techs believe check valve failure due to similar failures on HP compressors. When the valve fails hot discharge gas flows back into the piston and is recompressed raising the temp. only a few cycles would have been needed to severely raise the output temps. One other thing, the day after I got out of the hospital a woman with whom I was familiar died in an O2 explosion in a shop in Florida. Most likely cause was oil contaminated dirt that entered the valve when the customer dropped the tank in the parking lot. Tank exploded when she hooked up the partially filled tank. Tank valve open, fill valve closed. Valve disappeared, tank ruptured, she was killed, 4 other injured seriously, roof torn off and the shop trashed. Last pict shows the cylinder she was filling after the accident.
-
I was going to mention the Salt fork cone, but couldn't find the link on this computer when I posted up earlier. I've been real tempted to get that and one of their swage blocks. If you go that route, let me know what shipping runs for you.
-
Biggest issues I see with new mig students is that they try and hold the gun too far away from the material and go too fast. Holding the gun too far away often comes from not using the gun well. With gas mig generally you want to push the weld, with the gun pointing in the direction of travel. This means you need to lean out in front of the gun slightly so you can "look down the barrel" and weld towards you slightly. You can't sit behind the gun and try to see thru the nozzle. If you are doing FC wire, you drag instead. You still need to lean out in front of the nozzle though so you can see down the barrel and see what's happening. You don't need to lean out quite as far though using FC. With mig the closer to the work you hold the gun, the "hotter" the weld is. The farther away, the colder the weld is. You can have all the settings on Wire feed and volts correct and still have a lousy weld if you hold the gun back to far and have too much "stickout". 1/4" to 3/8" distance is usually pretty good distance for newer welders. As you crank up the amps with bigger machines the distance can be increased a bit more as you go into spray mode.
-
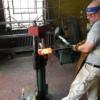
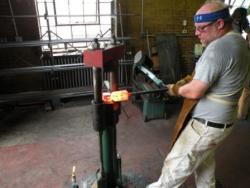
Sorry to hear it cracked. You really need to know what you are doing to weld cast iron. There are a bunch of different ways to go about doing it. Not all work all the time. Biggest issue with cast is that it doesn't take high temp swings well without cracking. Many times guys do a welded repair only to have it crack right next to the weld as the weld cools. Best way usually involves preheating the piece to be repaired, then welding it up usually with a high nickle alloy, then slow cooling the piece over several hours. The longer the cool down usually the better. I've done a bit of cast iron repairs using a variety of methods, but the small cast iron pump forge I bought with a crack will probably stay just the way it is when I bought it. Fixed with fish plates and bolts. If for some reason that original repair fails miserably, I'll probably either give up on it, or send it to a guy I know from another site who does nothing but specialized cast iron repairs and let a "pro" do it, even though I probably have almost all the tools and equipment except possibly a big enough oven to pre/post heat it in. You can sort of see the plates and bolts used to repair my forge in this pict. Guy I bought the forge from thinks it cracked because the grate that goes in the center ( not shown) wasn't symetrical. He said he put the grate in one day and fired it up and it quickly cracked. He thinks the grate expanded and was tight in one spot, so as it expanded from the heat of the fire, it cracked the still cold cast iron. He says he did not drop cold water on the hot cast and cause it to crack.
-
Danny, Check your PM's. I'm glad it helped. I was shown that years ago and it works great. Oh one other thing, At some point you need to make time and drive down to Joseph Fazzio's place in Glassboro Nj. They sell steel and alloys by the foot at reasonable prices. Their "new" store has a huge selection of new tools and construction supplies. However it's their "old" store next door that's the real treat. They have all sorts of used and surplus tools, parts and materials. ( they also have a large assortment of sizes of Anvil shaped objects if you can't find anything else.) They have several other locations as well. I've only been to the "main" store in Glassboro and their store in Newcastle De. The New Castle store doesn't have near the quantity of used tools the main one does, but since most of it is all stuff bought when places go out of business and at auctions, the selection is completely different. It's worth a stop if you are in the area. I can spend hours rooting thru bins of parts, tools and surplus stuff at the main store. http://www.shopjfi.com/ .
-
I end up doing it all the time at work since I'm sort of a "Jack of all trades" doing home repairs. This year so far it's been learn how to replace slate roof shingles. I still need to do a similar repair on old diamond asbestos shingles on the same house. I'll probably end up forging a shorter slate ripper to do those as the full size one is too long to fit between the ground and the lower shingles, so that will be another "new" project, forging the ripper.. I have a feeling this week or next the same customer will want me to do spray on insulation at the house. Fully rewired a small summer house this year. I've done small rewires, but nothing this big before. A friend who's an electrician said it passed inspection when the inspector came by so I guess I did it all right. Taught myself how to do positive/negative molds out of pourable plastics and urethane rubber to make concrete stamps a number of years ago. Most of that stuff was all new at the time, so most of the specialized stuff that's out now wasn't available. You sort of had to develop it and try it out to see what did or didn't work. For that reason I did a lot of 1st's when we were doing stamp work, especially forms, specialized tools and a variety of "new" ways to do different color and textures. For a while my nickname was "damage control" since I'd always end up being the one who got asked, "Well how do you think we can fix this...", or "What do you think you can make so we can do that..."
-
Yep. A nice cone is on my list as well. I'll be curious to see what ones you come up with as options.
-
Thanks for serving and stay safe. From what I think you are describing, a torch to do localized heating seems to be the best way I can think of. Since you can't post picts ( probably for security reasons I assume), can you post a link to something similar? That might give guys a better idea if need be.
-
I've never done it that way, but then I've only blued a few pieces with a friend years ago who was into gunsmithing. This Brownells link pretty much explains how we did it. Brownells is usually fairly helpful as far as giving out info on their products as many are often geared towards "hobby" gunsmiths. You might give then a call and see how they'd suggest masking off an area that you don't want blued. I'm betting they know how or can make some suggestions. http://www.brownells.com/aspx/learn/learndetail.aspx?lid=11044
-
Hello Danny and welcome. Keeping your eyes open on CL as one option. If I'm serious about locating something, I like to use Searchtempest to widen my CL search. I see stuff pop up from time to time, but you have to be quick usually in this area. Know what you are looking for and what going rates are. You can find some real deals on CL, but some people want crazy money for anything "old". Flea markets and yard sales are always good spots. I try and stop in the ones I see regularly. Antique shops are a mixed resource. Sometimes you can find some really good deals ... and other times they want stupid money for just plain junk. Auctions and estate sales are also possibilities. Used tool shops, are another possibility. Being near NY, you might look at what used industrial tool suppliers there are. Many times guys like that buy up old businesses that are closing up and they may have deals on things like old belt driven drill presses, lathes etc..
-
You list Camp Lejuene, NC as your location. Are you perhaps stationed there? If so I'm betting you can find someone on base that can help you with a torch. Facilities maintenance, motor pool etc. They may even have one available at rec facilities depending on what they have available. The sub base near where we were stationed had a full auto shop as part of the rec facility's available and it had an OA torch available. I mentioned to someone here the other day that often you can get access to other facilities if you know who to ask, and ask nicely. A few cold ones doesn't hurt either. Even if one place says "no" you might find a torch at another at a different shop. Oxy fuel torches aren't super expensive and can be quite useful for a number of projects. I see them with cylinders regularly on CL for roughly $250-300. Torches with out cylinders often run $100-150. You can use either Acetylene or propane for heating, but you'll have to make some minor changes to run propane from most OA rigs unless they already set it up for propane. Try Searchtempest.com to expand your CL possibilities.