mike-hr
Members
-
Joined
-
Last visited
Everything posted by mike-hr
-
Another picture of the horn
-
My buddy Mark spied this anvil sitting in the dirt under the drip line of a barn roof. He struck a deal and brought it home. We're both curious to it's approximate age and origin. I spent a lot of time with a wire brush in different light conditions, any stamps or markings are long gone. The horn has 2 parallel lines that have aged in. I'm suspecting the manufacturers had laid in a strip of tool steel along the top of the horn, and it resisted wear more than the wrought base? It's cracked where the horn base connects to the waist, but still workable for light duty. Somebody had bushed the hardy hole with a piece of pipe. It's going to soak for a week before we try and remove it. We'd love to hear any clues to where and when it was born. thanks, mike
-
This is an old fuel tank, 3 ft dia x 4 ft long. The hand wheel on the end runs an interior spool and cable system to raise and lower the cooking surface. A spring loaded pin holds the wheel in place. Thanks to Dick Fedder for working with me on the 'unfolded angle iron' that is used on the hand wheel spokes and sun rays. Tom Laman did the copper repousse piece, and did a fine job. I used thick automotive gasket material to isolate the copper from the steel surround, to minimize bi-metallic corrosion. Forged ball and stick levers on the air chokes. The door handle is 5/8 square, with punched and drifted holes 1/2 inch up to 7/8 inch diameter. The fire grill and cooking surface is made from 3/8 inch round bar, each made in 2 piece frames to fit in the door. I had a great time building this, and the customer is really pleased with it. Photos by Gina Janelli Thanks for looking, mike
-
I can't help either, but love the craftsmanship. My grandfather immigrated from Ireland in the 1920's, to the high desert oregon country around lakeview. One of his jobs as a teenager was to ride horseback to all the sheep camps in a 100 mile radius, and take orders for groceries, vet supplies, etc. The freight wagon would come the week after with the supplies. He talked often about learning to trust his horse to navigation during heavy snowstorms, dark, or fog. The horse didn't want to walk off the edge of a rimrock any more than grampa did. Thanks for the memories. I remember playing in several of these as a child, retired from service, but put to pasture out back on many local farms.
-
When I first started making these, I was using 2 london pattern anvils. Then came along the euro pattern peddinhaus. I made a block out of a chunk of 1 inch thick stock, cut wider than the biggest hole in the dial-a-hole. Drill a pritchell sized hole in the center of the block, and put it in the leg vise, so that the holes are still supported by the vise jaws. I do lots of slit and drifted holes this way, and also use it for clouting hand made rivets, and re-heading hex bolts into square bolts with a clouted head. It works great in the vise.
-
Awesome subject. I consider myself un-employable. I make a project, maybe spend a month developing it, get it to a salable state, and then quit making it, and go to the next challenge. Probably the worst business plan known to humankind. The journey is the destination. I'm not alone here. I don't care if it's for sale or not, if a new person comes in to the shop for a simple welding job, and see's all the niftty wall hangers laying around, I can sell them on an idea, and they are happy to have met me by the end of the job. I've had two mentors pass away in front of my eyes. All the bros got together and we had an appropriate send off. The neat thing about this trade is, you got to sweat it up to make, well , anything. The country where I come from says if you busted your butt to make something pretty, I'll drink a bottle at your wake. I know smiths from literally all walks of life. We all leave our current views of life on the sidewalk, get together, and make great stuff. The smithy is a hallowed place.
-
Beauty! I worked very hard to get some good chops gathered at plastic deformation at a good heat. Once I found the CBA, the world blew apart. I kept getting better, and the fuel bill for attending events was getting significant. So,, I got some friends together, showed them what I was aiming for, they all bit the hook, and I created my own micro-chasm of smithing buddies in my own community. I'm sort of proud of that. Carry on, bros, and keep in mind, you can contact me, or Phil, who lives close, if you reach stumbling blocks. Keep going 'till you hear glass break!
-
Real nice, Steve. I bet it raised some eyebrows when it got trucked down the highway.
-
Awesome! Almost spilled coffee on the keyboard looking at that piece.
-
I've thought about this cast iron forge thing a lot. When I first got my portable forge, a group elder saw me using it bare, and convinced me to clay the bottom. I appreciated his advise, and did so. A couple hammer-ins later, another elder walked by and told me my forge looked to be choked up with clinkers, and he would show me how to clean it. He grabbed my pokey tool, and proceeded to dig out several dinner plate sized clinkers, most of which happened to be my clay forge lining. Okay, there's got to be a happy medium somewhere. At another meet, we were practicing forge welding, and I was having very sporadic success rates, because I had to pile a whole lot of coal up on the flat pan to get a neutral fire. I analyzed all this data, and came up with this steel plate with a CO2 tank top I machined to fit in the pan, atop the air inlet. This gizmo has been in service for 6 or 7 years now, and I don't worry about it anymore.
-
I'm assuming you have a small cast iron forge that says 'clay before using' . If so, It's up to you. I've seen too many people water dowse a gallon of coal with 2 gallons of water, and then dump the whole mess outside a working fire. Broken cast iron forge guaranteed. When I do hammer-ins or demos, I don't let anybody water the coal at my station. I make great stuff with no water added, and the smoke stays down, if it's crowded with humanity. If you introduce green coal at the edges of the fire, and bunch it in as need dictates, you don't need to water it. It will coke up as you bunch it in. Clay, or refractory cement, might last a few forging episodes till it cracks and breaks out when you take your pokey stick and try to clean the fire. Cast iron expands and contracts at a different rate than fired clay does, it's a matter of time till it lumps out and fails. You'll have improved results if it's just you running the forge, and no imbecicles jumping in to show you how incompetent they are at forging.
-
My friend Gina (whom I will introduce you to) has one of those forges. They do work, but those little stamped steel blowers just don't woof out the air like other systems do. I would recommend not spending too much energy on that forge other than what you've done until you work out on Ginas forge. I'll have some forges for sale from an estate I'm helping with, soon. mike
-
I have an old Perfect brand hammer from the 1910's. It has a leafspring design much like the Champion. I feel the leafspring has a more direct whip than the coil, I'm going to irritate dozens more good folks by saying this, I'm sure. Coil spring hammers do a lot of work, and have made many shops much money. Leaf spring hammers have, in my opinion, more tuning options, you can dink around with it and get a by golly thump out of the champion. For the record, I'm in the process of restoring a 100# little giant for a working museum in Weaverville, CA. I'm happy to do it, and the museum is happy to get it. You dance with who brought ya there.
-
Hi Lisa, we talked on the phone the other day. You got a great anvil at a great price. You can make many beautiful projects with it. I'm swamped for a few days, but I will invite you over as soon as I don't feel guilty from spending time with paying projects. There's a half dozen fair hands in the basin. My shop seem to have evolved as the place to share ideas, libations, and smoked pork products. Look forward to meeting you. mike h
-
Very nice piece.
-
Thanks folks! There's always a lesson to be learned. I typed in steampunk to bing images, and got pretty amazed. I remember watching that old tv show 'wild wild west', with, um, Robert Conrad? There was a recurring arch-villain who made all these nifty gadgets, before 3-phase electric power. That's probably where my fascination with rivets, bolt patterns, and layered metal got planted. I guess I'm a grey beard steampunk, and never had a clue...I've got fair smithing skills, this might be a fun avenue to drive down for a bit. mh
-
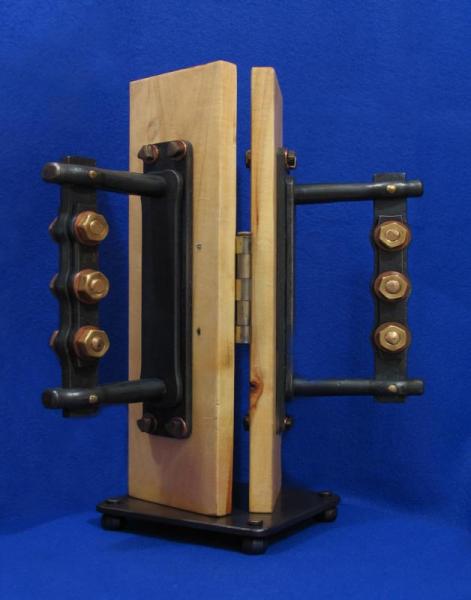
Overall size 2 x 10 x 4.5 inches. I had a windfall of a bunch of used brass nuts and bots, and copper flat washers. I designed this project to help use up some of them. I like the industrial laminate look. It was a good exercise in precise slot punching and drifting. I softened all the edges of the nuts on a flap wheel, the piece feels real good in the hand. My buddy Mark came over for a cold one last week, and we ended up forging a 60 degree bottom swedge to make the custom 3-sided forged heads for the mounting bolts. We modified an old monkey wrench to we could grab the bolt heads for tightening. Wax finish. '>

-
Dave, Charles, et al. My bad. Dave made some good points about what a weldpac can do. I'm sorry for lashing out about it, those things are a sore spot for me. I've actually made a lot of money from them, mostly when some body tried to fix a trailer tongue or weld on spring shackles with a 110v mig, and it comes into my shop in twisted pieces to be sorted out. I'm really not a bad guy, but I have an issue with these machines. The boys at the welding supply aren't much help, they are happy to sell them to whomever for whatever reason. I'll stand down and sit in the corner now mh
-
Short answer, you're screwed. Please don't try to make a trailer from this tool. My family might be on the same road.
-
Thanks for that. I just printed it out, I'm gonna laminate it and tape on my power hammer to look at the next time I feel whiny and tired.
-
Real pretty, Cap'n Rich. I'm going to throw my cards down, Is the antler split down the middle, then re glued back together? The plane of the tang should exit the antler about 2 inches from the end. I've been machining a while, and never once drilled a predictable curved hole. Maybe the end cap is blind glued in? Thanks for spinning my brain, mike
-
I went to a very good tech college to learn welding. The old instructor told us to watch the guy that seems to be wasting time a lot. he knows his ambient heat is approaching the top, and he's just waiting for the piece to cool a bit, before he applies the next pass. Ya got to do something whilst waiting...
-
Jaw dropping pretty.
-
could you drill and tap a hole in the tail end of the thread box, thread in a grease zerk, put penetrant in a small grease gun, and hydraulic it into conformity?
-
After some reflection on the above post, which I posit as true from experience, I feel the need to reflect a conversation I had with a friend who is highly regarded as one of the best instructors in the nation. He was working at one of the places listed above, and giving month long classes for the advanced student. He was pleading with me to sign up, as historically, folks dump off a kid with him, and take a cruise to the Greek Islands, or similar. He often wasted his time babysitting a child who would rather be playing IPod, than generating a blister. Everybody got paid, but nobody came out the smarter. Please don't do that. Join your local group, inch up as knowledge advances. This trade is not an instant gratification candidate.