
Qhforge
-
Posts
63 -
Joined
-
Last visited
-
I found a new mix that works well and is not expensive. I used 20 lbs of white ash urn sand with 2 lbs of bentonite clay. This mix holds together much better than my first mix and captures finer details.
-
Thanks for the advice.
-
Cut the meat well and just had to wash it with soap and water. I am going to hang it from my BBQ tool rack good place for it I think.
-
 Very nice I love the temp labels. I will have to print this out and put it on my shop wall.
 -
I treated it and it works great so far but I am going to try steak tonight so we will see how well it holds its edge.
-
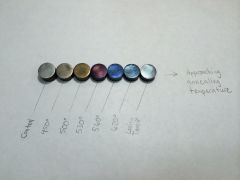
This is my first completed knife. I have made blanks but never made the handle until now. I used a broken Bellotta Farriers rasp, normalized 3 times, and drew down the existing tang. Then I forged the blade from 6" (original broken rasp portion) to 9" and worked on uniform thickness and a straight blade. I then split a piece of oak and burned in the tang on both scales. I drilled the tang and then hardened the blade to a straw/bronze over my stoves burner. I then made 2 pins out of brass brazing rod 1/2" x 1/8". I made the pins pointed on both sides, placed them in the holes in the tang and used my vice to force the pins into the oak scales. Then I drew an out line of my handle profile on the wood and used my belt sander to get the basic handle. Then I switched to 400 grit and finished up the blade and handle. I then used epoxy on the tang and pins to permanently fix the handle in place. Then I used boiled linseed oil on the handle. I buffed the knife and used bees wax on a small buffing wheel to further finish the handle.
-
Yeah I may keep it for that. I was told a new formula to help green sand like mine. Use 1 cup of wax (paraffin, bees, candles already made, whatever). Melt it and then mix in a 1/4 cup of motor oil. Mix into sand and it will help bind the sand together like the clay. I was told to add it to my green sand mix as another additive allong with the clay. It will smoke a little more but it will help keep your molds clean, help hold finer datails such as fingerprints, and keep the mold from falling apart when separating the flasks. I will try this soon and post my results.
-
I had this from my smithing instructor at Pacific Coast Horseshoeing School, Chuck Pressnail. This was the first time most of us had put hot steel to hammer and anvil. "OK, you have 1 hour to make a perfect horseshoe." 1 hour later I had a roughly rounded 90 deg hunk of metal. Chuck then says, "I lied it will take you your whole life to make a perfect shoe and then you wont notice when you did. Save that shoe so you can see how far you have come." I still have that "shoe" Another one from Chuck that I still use is " you can only bend metal up." Meaning that if you want to tweak your heals on a shoe (or any other piece of work) hit the low side to bring it even. (My modification was "Yeah unless you get it hot and use the edge of your anvil.")
-
Norcal and Qhforge have a forge day
Qhforge replied to Qhforge's topic in Blacksmithing, General Discussion
We have a great time and that little anvil may come in handy sometime. Next week we will not be able to have our forge day, but we contacted McLellan Blacksmithing and we may be able to go on a field trip there the next week. -
Norcal and Qhforge have a forge day
Qhforge replied to Qhforge's topic in Blacksmithing, General Discussion
Week 5 in the bag. We started a few projects this week. I made a hoof pick (I try to make one whenever I start my forge to loosen up my shoulders), a bottle opener (correctly tested) with a glass marble inset into it (took it home and buffed it to a near mirror finish), normalized a putter head to make a spear, and started modifications on a useless pair of hoof nippers into a set of useful tongs. I punched the rivet out to make them easier to work on later(no Pic). Norcal worked on a forge hook, getting the bosses on his tongs just right, made a drift for tomahawk eyes, welded up more of his swage block, and drifted his tomahawk eyes. (all of that is cooling in a designated HOT area in the 4th pic) A very productive day even if we didn't finish much. Norcal got his forge so hot that it was molten between 2 firebricks. -
Show me your Bottle Openers!
Qhforge replied to Arbalist's topic in Blacksmithing, General Discussion
I made another bottle opener, but this time I inset the handle with a glass marble. I also tested it and buffed it to a near mirror finish. The glass is still blue but it does not show up well in my pictures. -
I use a 4" od pipe with 1/4" walls and a 3/8" plate oxy/acet welded to the bottom as my crucible. They will slag out after a while but mine has lasted for 200 melts and looks like it can go for at least 50 more. But I am using this forge to do it and I place the aluminum directly under the flame, not the crucible.
-
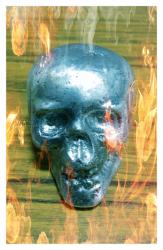
If you melt it down, all they will pay you is dirty scrap prices. I have a bucket full of ingots for my casting and I will never get what they are worth unless I make something like this out of them out of them. Oh and did you notice why the counter kept burning? HINT...... they left the hot crucible on it.
-
Norcal and Qhforge have a forge day
Qhforge replied to Qhforge's topic in Blacksmithing, General Discussion
And then we had some fun with a jewelers anvil I picked up at a second hand store near by. We made it fit my pritchel hole with a carriage bolt and nut, the anvil was already threaded, and just spin the anvil till it is tight. Norcal came up with a surprise set of hammers too. -
Norcal and Qhforge have a forge day
Qhforge replied to Qhforge's topic in Blacksmithing, General Discussion
Yet another forge day is complete for Norcal and Qhforge. We never actually lit the forges today, but we had fun fabricating a tack rack for a client of mine.