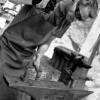
zachsmithjohnson Posted February 25, 2014 Share Posted February 25, 2014 I'd love some feed back on this video i just put out. It's intended to demonstrate how to make the worm of a corkscrew. Quote Link to comment Share on other sites More sharing options...
HWHII Posted February 25, 2014 Share Posted February 25, 2014 Nice video! I am curious about the sugar in the oil? Can you explain this? Thank! Quote Link to comment Share on other sites More sharing options...
Jerry W. Posted February 25, 2014 Share Posted February 25, 2014 Enjoyed the video. I too am wondering about the burnt sugar and oil. I am hoping you will teach me something here, Jerry Quote Link to comment Share on other sites More sharing options...
zachsmithjohnson Posted February 25, 2014 Author Share Posted February 25, 2014 Just my theory but The burnt sugar in the oil, in my mind at least, acts as free carbon and allows the worms made from mild steel to get a light case hardening via carbonized shell. Quote Link to comment Share on other sites More sharing options...
njanvilman Posted February 25, 2014 Share Posted February 25, 2014 Perhaps add a final scene where the corkscrew get used in an actual bottle of wine....to show that it works. Somebody might chime in about grinding the point instead of forging it. And a technical question: is the 1/8 size what it ends up as? Is it small enough diameter to work? Liked the video. Quote Link to comment Share on other sites More sharing options...
divermike Posted February 25, 2014 Share Posted February 25, 2014 We are always saying we love pics, and your video satisfies that craving and then some, next video handles?? Well done. Quote Link to comment Share on other sites More sharing options...
SoCal Dave Posted February 25, 2014 Share Posted February 25, 2014 I like the point of the worm screw to be pointed down so that it can be applied to the center of the cork. Your point looks like it might go round and round and is to shallow so it would damage the cork. I hope I explained that correctly. Like the music and the camera angles. Nice job. Quote Link to comment Share on other sites More sharing options...
Steve Sells Posted February 25, 2014 Share Posted February 25, 2014 Just my theory but The burnt sugar in the oil, in my mind at least, acts as free carbon and allows the worms made from mild steel to get a light case hardening via carbonized shell. case hardening does not work that way. even if it seems to be a popular myth to repeat Quote Link to comment Share on other sites More sharing options...
Frank Turley Posted February 25, 2014 Share Posted February 25, 2014 Good video. Uri Hofi was in my shop a few years ago and made an extra long shanked corkscrew. One of his teachers, Alfred Habermann, used to do the same thing for demos. As I recall, Hofi made the entire worm on the anvil with only hammer and heat. He didn't use any sort of mandrel. I haven't tried it. Quote Link to comment Share on other sites More sharing options...
beammeupscotty Posted February 26, 2014 Share Posted February 26, 2014 Nice corkscrew, not blacksmithing, no problem with grinding the point, lame forge, just use a hot cut with cold material next time to cut, use a smaller hammer, your ideas of case hardening are nonsense. I posted the same in more complete form over on the thread you started at r/blacksmithing. You have some basic skills but calling yourself an artist is presumptuous. Quote Link to comment Share on other sites More sharing options...
zachsmithjohnson Posted February 26, 2014 Author Share Posted February 26, 2014 I like the point of the worm screw to be pointed down so that it can be applied to the center of the cork. Your point looks like it might go round and round and is to shallow so it would damage the cork. I hope I explained that correctly. Like the music and the camera angles. Nice job. agreed when making this video I didn't give the point enough attention but a slight down turn is paramount to an easily opened bottle as is an even helix. Quote Link to comment Share on other sites More sharing options...
VaughnT Posted February 26, 2014 Share Posted February 26, 2014 Quality-wise, I thought the video was pretty good. The music should be a bit quieter, more background music than upfront listen-to-me music. I do like that you chose something neutral, though. Lighting seemed good. I didn't notice anywhere that shadows or glare caused the subject to be obscured, and that's something more budding videographers should pay attention to. Smithing..... nice work. Your use of various tools was fun to watch, though I would have started the forge and had it heating up while I was getting everything else prepared. And I definitely recommend blocking off the rear of the forge unless you need to pass through a longer piece. Otherwise you're just burning fuel. I've not yet been able to get a corkscrew that does more than chew up corks. You can't have a downward pointing tip because the rest of the screw has to follow the channel cut by the tip. You can bevel the tip a bit on the upper face of it, but to actually turn it so it points down? A good place for inspiration is corkscrewonline.com. I never knew there were so many variations of the blasted things. Oh, and I love the apron. I've been looking for something like that for awhile, but haven't found one that I like. I'm almost ready to drop the mula on one from moonshine leather, but.... Quote Link to comment Share on other sites More sharing options...
2Tim215 Posted February 26, 2014 Share Posted February 26, 2014 Nice corkscrew, not blacksmithing, no problem with grinding the point, lame forge, just use a hot cut with cold material next time to cut, use a smaller hammer, your ideas of case hardening are nonsense. I posted the same in more complete form over on the thread you started at r/blacksmithing. You have some basic skills but calling yourself an artist is presumptuous. Sorry, but every one has to start somewhere and this is just plain rude. Constructive crit builds but the above is just worthless drivel. Quote Link to comment Share on other sites More sharing options...
Michael Posted February 26, 2014 Share Posted February 26, 2014 Nice video. I'd edit it down a bit, off cut, pointing etc could be quicker. Your camera placement and blocking are spot on, that wrap around the mandrel is something I've been struggling with while the stock loses heat for a while now. Very clear from your vid. I had early success with the Hofi method, followed by frustrating inconsistancy ever since, but I get lucky sometimes. Love the handles, some slower close ups of those would be nice too. I thought the music intruded, honestly, but I'd definitely shoot for a shorter run time, under 4 minutes if you can. I'd video'd an evolving kenetic sculpure project and the first edits were close to 10 minutes, by the time i'd gotten to the 3rd itteration of the project, the vid was under 3 minutes. edit, edit, edit. Great location, the view out past the anvil is nice. Quote Link to comment Share on other sites More sharing options...
BIGGUNDOCTOR Posted February 27, 2014 Share Posted February 27, 2014 My only beef with the video is when you use the side of the grinding wheel. The wheels are designed to have the face used, not the sides. My question is why use D-2? I would think a spring steel alloy would be a better choice. I would also think that an air hardening alloy such as D-2 would be a lot more difficult to work with successfully,cracking, especially for beginners. Otherwise nice job with the camera, the close ups came out nice. Quote Link to comment Share on other sites More sharing options...
zachsmithjohnson Posted February 27, 2014 Author Share Posted February 27, 2014 My only beef with the video is when you use the side of the grinding wheel. The wheels are designed to have the face used, not the sides. My question is why use D-2? I would think a spring steel alloy would be a better choice. I would also think that an air hardening alloy such as D-2 would be a lot more difficult to work with successfully,cracking, especially for beginners. Otherwise nice job with the camera, the close ups came out nice. The mandrel is D-2 because it is air hardening and it has held up to a few hundred worms being formed on it. The thin cutting wheels on a grinder are for use on edge Quote Link to comment Share on other sites More sharing options...
VaughnT Posted February 27, 2014 Share Posted February 27, 2014 Noted that you say the vise grips were modified but you never show how they were modified or how that modification is applied in the process. I think Biggundoctor was referring to using the side of the stone wheel on your bench grinder, not the edge of your portable angle grinder. Enjoyed watching the video and picked up some good tips. I'll try another screw when I get a chance. Quote Link to comment Share on other sites More sharing options...
David Einhorn Posted February 27, 2014 Share Posted February 27, 2014 My only beef with the video is when you use the side of the grinding wheel. The wheels are designed to have the face used, not the sides....... I agree with biggundoctor...... The Norton web site says that grinding on the side of a grinding wheel is a no-no for safety. Quote Link to comment Share on other sites More sharing options...
zachsmithjohnson Posted February 27, 2014 Author Share Posted February 27, 2014 I agree with biggundoctor...... The Norton web site says that grinding on the side of a grinding wheel is a no-no for safety. interesting I'll keep that in mind and post on my video Quote Link to comment Share on other sites More sharing options...
zachsmithjohnson Posted February 27, 2014 Author Share Posted February 27, 2014 hilarious cut off wheel video Quote Link to comment Share on other sites More sharing options...
BIGGUNDOCTOR Posted February 28, 2014 Share Posted February 28, 2014 Yes, I was referring to the bench grinder, not the right angle grinder. OK, the D2 was for the mandrel, I thought that is what you made the corkscrew out of. Quote Link to comment Share on other sites More sharing options...
John B Posted February 28, 2014 Share Posted February 28, 2014 I agree with biggundoctor...... The Norton web site says that grinding on the side of a grinding wheel is a no-no for safety. Also concerned with no guard on angle grinder, seems to be a common practice these days, but wrong. Guards are there for a reason, grinders can be lethal, any grinders, wheels disintegrate if wrong pressure angles are used, that's the reason for the guard.they bite. There is no right or wrong way top do something, but there usually is a safe way, Adopt it. Quote Link to comment Share on other sites More sharing options...
zachsmithjohnson Posted February 28, 2014 Author Share Posted February 28, 2014 Thanks for all the input guys I've added some safety notes on the video. Quote Link to comment Share on other sites More sharing options...
BIGGUNDOCTOR Posted March 1, 2014 Share Posted March 1, 2014 You wouldn't want to end up like this guy did... Guards on spinning abrasives are a good thing. Quote Link to comment Share on other sites More sharing options...
Crazy Ivan Posted March 1, 2014 Share Posted March 1, 2014 What that guy didn't have any pliers or duct tape around?...at least he had/has his safety glasses on. A guard on the grinder would have helped a bit too. -Crazy Ivan Quote Link to comment Share on other sites More sharing options...
Recommended Posts
Join the conversation
You can post now and register later. If you have an account, sign in now to post with your account.