Alan Evans
Members
-
Joined
-
Last visited
Everything posted by Alan Evans
-
Rosa Kleb style eh? Alan
-
-
Spoiler alert, spoiler alert! Alan
-
Ellis Peters' Brother Cadfael books are just the ticket...the plots are all the same but they are easy page turners. I got through one or two a day when I was last recovering. No brain concentration necessary, but sufficiently distracting to keep your mind off your discomfort! Alan
-
What are the gongs made of? Hardox? Alan
-
My father's operation was done by a locksmith rather than a blacksmith I gather.....well they kept referring to it as keyhole surgery... Alan
-
-
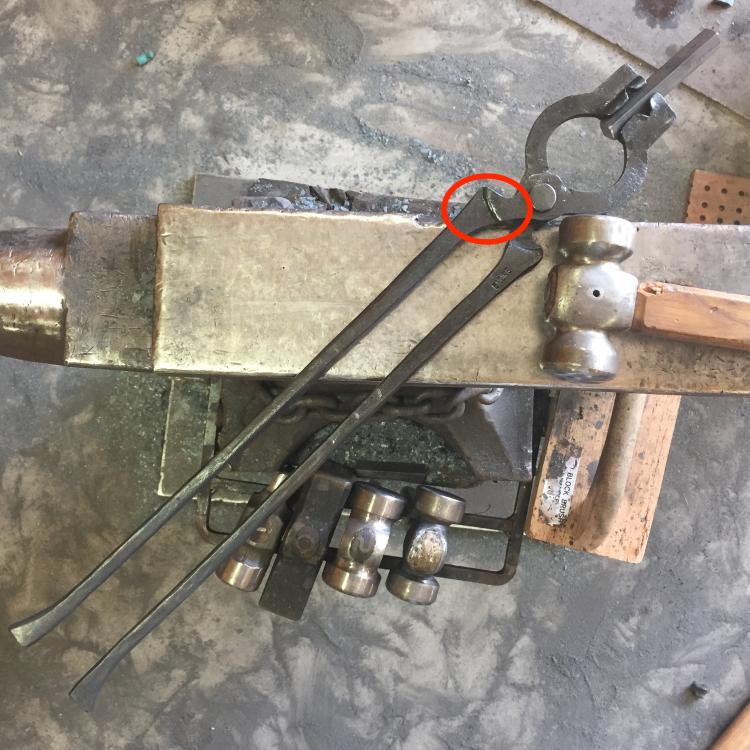
Nice clean metalwork. But I am concerned about the proximity of spikes and sharp edges close to an area where you are are putting some energy into pushing the stakes into the ground...it looks a bit like an accident waiting to happen. It would be much safer if you added another block of wood behind the sharp bits. Take care until you do. Alan
-
Good speed...if it is the same thing my father had he could not believe the relief when it was fixed! Small boys, contests and walls, spring to mind. Alan
-
Don't fee too bad if you find it a pain...I could never get on with a carbon arc torch...though mine was a scissor action rather than straight slide to bring the rods together. I learnt to arc weld on a SIP 140. It is not the kindest of tools to a newbie. Though a good welder will get the best out of it. I would advise going to you local adult education centre/tech college and do an evening class on welding. You will get good instruction on excellent equipment and will save yourself much frustration trying got do it alone. You will also learn to stick your rods in the bottom oven or on a radiator/night store heater so the flux coating is dry. Old rods can be a bit hit and miss. Alan Don't want to be too gloomy, but I would think twice about using your chain hoist anywhere near its rated load. The chain looks pitted in the photo. After you have got the rust off and oiled it you could have it tested, or test it yourself and then use it at half the load you tested it with. Might even be worth replacing the chain if you want to use it seriously. Alan
-
Are you referring to The Specialist by any chance?...there is copy beside the throne in most of my dwellings over the years. Alan
-
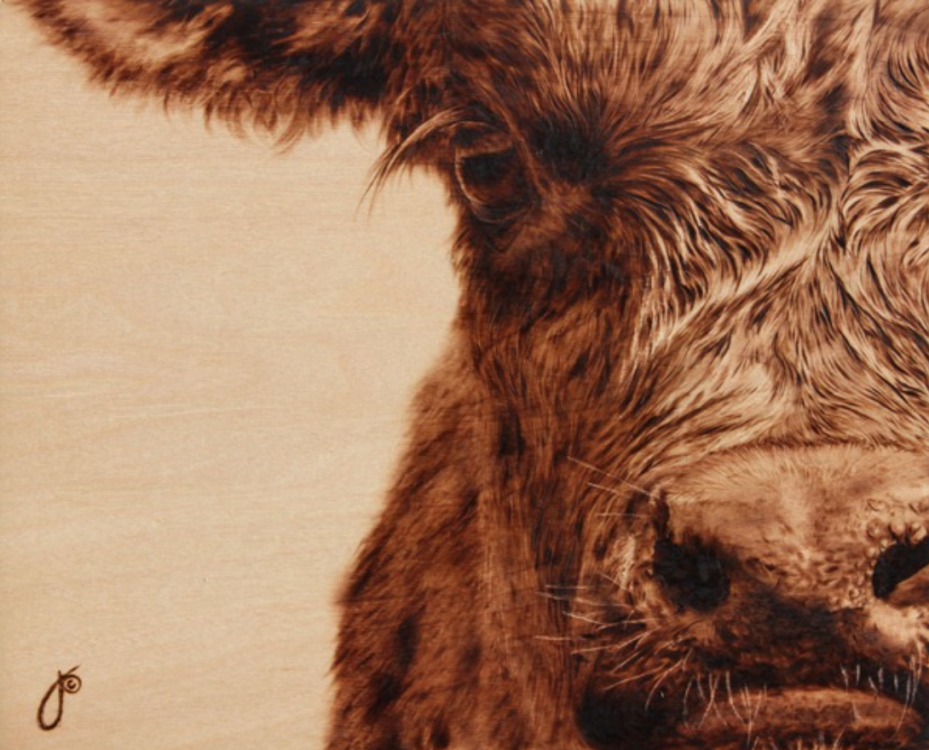
My Grandmother used to do a bit of pyrography...I gather it can be quite addictive, be warned...Alan (not by my Grandmother)
-
It will last a lot longer if you make it from stainless steel. Depends on how you account for your construction time. In terms of percentage of total project budget, the difference in material cost between galvanised and stainless relative to their respective longevity makes it stainless for me every time. My philosophy....If you are saving on labour costs by doing it yourself, do not stint on materials. Double the profit...Make the project better than you could otherwise afford! Alan
-
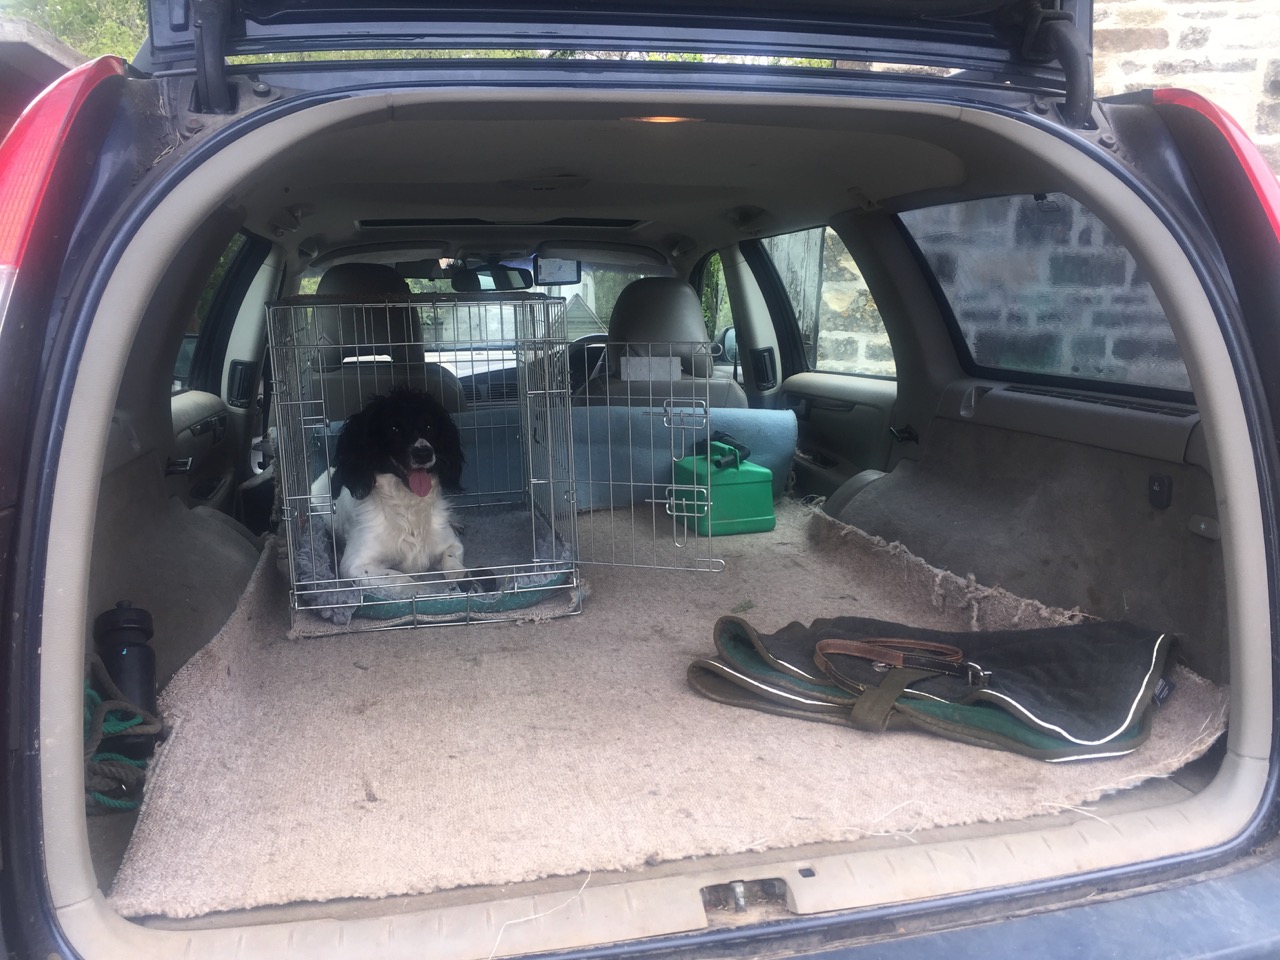
Seeing the juxtaposition of scrappy metal and car interior I am emboldened to offer a useful tip! My Volvo estate cars have always doubled as people carriers, tow and delivery trucks, site cabin, tool store, dog kennel, deer tray carrier and everything in between. They need to be converted between these modes at the drop of a hat. I tried the OEM plastic liners both full and half length and they were okay but not versatile....you could only convert function at home base, when you could either dump the liner in the shed, or pick it up from the shed. The solution....find a slightly over size lump of finest Wool mix Wilton or Axminster carpet being thrown out by someone. Rubber backed, and therefore largely waterproof an advantage. Wall to wall plus is ideal...I have a roll at the front which covers up stuff like rifle slips or levels.. Kind to workpiece finishes. Kind to domestic partner's sense of well being. Kind to itchy dogs paws without fear of vehicle resale value detriment. Robust enough to have horribly dirty lumps of scrap chucked in at a moments notice. Helps to keep load from sliding about. Will fold up to suit whether you have the rear seats up or down, easy to take out and shake/wash/ burn. Can be easily changed on a regular basis to prevent ennui setting in with overly familiar interior decor. I have a mind to market this innovative, nay, revolutionary idea as CAR PET. Hence the promotional image below. Alan

-
Self guiding draw file? If used as a draw file the square pegs on either end could slide along guide rails...the further out the rail on the tapered spike end the lower the cut? The other two handed thing it reminded me of was a pit saw which had a fixed handle end and a Tee handle end which could be detached to allow the saw out mid kerf in order to sharpen it. This file could be passed through a large flywheel axle hole and your mate on the other side tapped on his Tee handle and kept the file true to the keyway... I can't see in the photo but are the two cutting surfaces adjacent to one another, or on opposite sides? Alan
-
All is clear...it is a joggle...the play of light in your other photo puzzled me. Thanks for the illumination! On one of his videos, Clifton Ralph has a tool with a series of profiles as a bottom block on his power hammer which enables him to produce cross-chops / bolt tongs in one heat! Very cunning. Worth a look even for those without a power hammer, to get some insights into efficiency. Thanks again for the new photo. Alan
-
Very good, I like the fresh and clean forging. I have often left "no nip" lumps on the ends of my reins which double as ring retainers, but not quite so elegant as yours. Is there a practical/process function for the shoulder/offset I have ringed, or purely the aesthetic function? Alan p.s. I have just looked at your other tong progression thread, and am now doubting my first interpretation of the image. I am not sure if what I am seeing is a joggle with a scratch or a shoulder! Whether the rein at the ringed point is coming towards me or going away! Could you post a photo of a 3/4 view of the jaws? Are there shoulders on both sides of the jaws...so the jaws come off the reins centrally. Or is the transition a joggle? Alan
-
Not that it means anything (I haven't seen them all, and I am on another continent!) but I do not recognise the make...Do you have a local dealer or online shop for the brand? Order a few of the O ring seals when you order the rose bud...get the largest rose bud of course...it is the only one you will ever use/need even if you have the full set...anybody want a couple of new old stock Victor rosebuds sizes 4 and 6? And see if you can get more cutting nozzles to suit...there are only a few styles and most of the smaller manufacturers sensibly use the spec/style of nozzle of the big boys. I have a USA origin Victor combination set and a couple of old BOC gas axes, plus a Handy Auto Japanese hand held motorised profiler and a Chain drive pipe cutter/beveller. The Handy Auto uses Victor nozzles and the pipe cutter uses BOC style. At that price you only have to use it once to have paid for it, so no bother if the parts aren't around. Good buy. Probably trying to teach Granny to suck eggs but...Safety bit...do check all joints and components carefully for leaks...and not with soapy water...use plain water or the proprietary gas leak products. Alan
-
I trust you will be getting into training already...you will not be able to keep up with Sheila when its done! My thoughts and best wishes with you both. Alan
-
Traditionally those are called rolled snub scrolls over here, and are the type I was referring to in my earlier post that I made on the Davies Brothers' restoration at Erddig. The same shape but forged from solid would be a solid snub, and if the solid snub was hammered flat it would be a penny end...though penny ends are normally made from flat section and twisted 90˚ to align with the taper or the scroll. The trick I was taught to get a rolled snub tight, was after tapering the scroll length, to fishtail the end and cut out a Vee notch about a third of the width. Roll the snub up good and tight and then hammer on the ends to knock the fishtail tip ends in which filled any and all of the gaps in the centre. I am afraid I give up with your OP problem. You had apparently made your mind up that a locking post was the only solution and could not understand why it was not necessary...and I rather think you still don't. And yes, you ignored a number of questions I asked in earlier posts, and yes, you have rejected the quality advantage of starting the scroll on the anvil and using the jig just to complete the less critical part away from the eye/snub, which is how scroll jigs have traditionally been used by others. The locking post will always be a compromise, and is the reason for the kink and/or flat at the heart of so many commercial scrolls. However you have found a solution which enables you to make it to the form and quality that you desire, which is all you need. Good. The candle sconce and drip pan problem that you have now introduced is good from the point of view that it gave Jim a reason for posting his rich piece...But in answer to your question ...and you can add me. I often try and design candle sconces so that not only does the wax run down, albeit onto the base of the fixture, but the candle itself will burn right down until the stub also drops onto the base...effectively self-clearing. I dare say Jim's one will also be self-clearing with the right burning rate candle. Alan
-
Did you drive over them on a flat surface or a concave one? Any handy puddles around? Alan
-
You sound defensive. I am not arguing with you. You posed a problem and I and others have been trying to help. Joel's video clearly shows the viable method with which to prepare the workpiece and secure the flat stock to the jig...my post preceding his video contained descriptions of viable methods which also describe the preparation of the workpiece before taking it to the jig. The key point is that you don't just take a lump of straight bar (or even a lump of straight bar with a hook on the end of it) to a scroll jig, you start the scroll over the anvil so that you do indeed have sufficient clamping area available to hold it to the jig. You do not rely on the jig to form the centre and the initial spring from the centre of the scroll...that is your job. I am certainly not being prescriptive when I describe the properties and characteristics that a conventional scroll contains...but it is well worth knowing them even if only to avoid making them conventional. The flat spot in your OP scroll was caused by lack of preparation of the workpiece prior to putting it onto the jig. But now that you know that, you can choose to produce them with or without the flat spot. You have ignored or rejected our suggestions, and found your own solution...good for you. Alan
-
I am somewhat at a loss. If what you have produced is exactly what you want and desire, then what was the purpose of this thread? Whatever form you use for the centre of the scroll is not at issue. It is none my business. But it is how you then strike off from that centre that makes the scroll look good or awkward. It is not my rules...we are all so accustomed to the form of a spiral that if the constant reduction is interrupted we can spot it a mile off. In your OP example, the half circle hook is your centre point, but instead of the gradually opening form of the spiral springing from it, you have made it with an length of straight, a flat spot, and then it starts to conform to the scroll jig and proceeds as usual. For me, that flat spot was the glaringly obvious problem you were having and what I sought to help solve. If you had formed your hook and the first inch or so of scroll before taking it to the jig, you could have clamped that pre-curved first inch with your needle point tongs (just like in Joel's video) and the centre would have not looked so ungainly. If the awkward appearance with the flat spot wasn't the problem...what was? Alan
-
If you are interested.... I rarely use scrolls but I certainly recognise their strength. And I certainly do not mean as a space filler or method of structural triangulation. As one of the building blocks of wrought iron work, and one of the earliest prehistoric art forms they are well worth studying. Rather than writing out my thoughts regarding the shapes and spaces forming the dynamic of a scroll again...you might like to look up a thread on here from a few months ago. https://www.iforgeiron.com/topic/28811-spirals-scrolls-and-growth-linesmy-understanding/#comment-293986 Alan
-
Did you actually look at the Cosira books that Gerald and I recommended, or the video that Joel OF posted for you? I can not see what problem you think you have solved by cluttering up the interior of your jig. The jig was not at risk of uncoiling, which is what your bracing struts apparently were intended to prevent. The grip effect of the spiral form as shown so clearly in Joel's video obviates the need for a fixed post which relies on your forging the tip to exactly the right thickness...needle nose tongs and scroll wrenches will cope with any thickness. You have now hugely reduced your options as far as holding the workpiece against the jig with tongs or wrenches. The main problem with your OP attempt was that you had not prepared your work piece prior to putting it on to the jig, if you wanted a snub end scroll, or that you were trying to make a scroll form that the jig could not provide. If you do not want to bother with preparing a rolled or penny end snub...make plain end scrolls with it. Have another look at Joel's video. Have a look at lots of scrolls....the key feature of all the best ones that you see, is the crisp precision at the centre. You can't just bang a crude bend on the end as a hook as you did...not if you want make the scroll "sing". Alan