Alan Evans
Members
-
Joined
-
Last visited
Everything posted by Alan Evans
-
When I needed a power tool for a project I always bought new. A straightforward commercial decision. Needed the tool and didn't want the delay of nursing an unknown quantity. Buying second hand I would only consider high quality good brand tools, you can buy cheap new tools for pennies now. I have bought a couple of good quality second hand tools. A 18 volt NmH Makita Combi drill for £50 from eBay which had no scuffs on the sides from any use, and I prefer the handle design to their later Li-ion tools...the 20 year old original is still going strong but cost me near £400 in 2000. The other was an "It followed me home" classic. A few years ago at the big annual steam fair held in Dorset in the UK there was a an acre or two of tailgate sales. As we were meandering up and down the rows I spotted a Ø200mm (Ø8") diamond core drill bit. As I walked towards it asked the vendor how much? He said £30. Having recently paid nearly £200 for a Ø150mm tube I was gobsmacked and didn't say anything else, doubly so because when I got up close I saw it wasn't just a core drill bit, it was mounted on a complete Milwaukee vacuum base drill rig. I had paid over £1500 for my later generation Milwaukee equivalent 10 years before. To cap it all the vendor took my silence for dubious reaction to price and said £25? It definitely followed me home. At home, I found (apart from a cracked area around the cable entry on the motor) it worked perfectly.
-
A tool holder with a socket formed by a flat bottomed drill which would drive the punch through the end rather than the flange would be a fairly simple project...always assuming a lathe or pillar drill... Alan
-
I would say the radius and taper of the fillet is too obtuse to jam like a morse taper, if it did stick just a tap would free it. It would certainly save a lot of grinding if the fillets are identical so you could just heat up a tool holder and drive one punch in to make a perfect fit socket. The punch flange would be a lot stronger if unground. But even simpler and better (as in KISS) maybe you could just make a tool holder which matches the air hammer chuck system and drive the punches on their hardened ends. If they don't mushroom and jam in the chuck under air hammer use, they shouldn't mushroom and jam under fly press use. Alan p.s. As an aside on the power of grubscrews....the punch tools I use in my double acting hydraulic press are held in the chuck by a couple of Ø5/16" grubscrews. The 30 tonne down pressure is taken on the shoulder I have machined into the punch, but the 15 tonne extraction pressure is taken solely by the two grubscrews...which have stalled the press on occasion. I grind tapering flats on the punch for the grub screws to locate which do two things...they act as a dovetail which increases the grip as the punch is pulled out of the chuck by the extraction friction/punch/stripper plate....and secondly any levee thrown up on the sides of the spigot by the grub screw are below the surface of the chuck cylinder and do not foul.
-
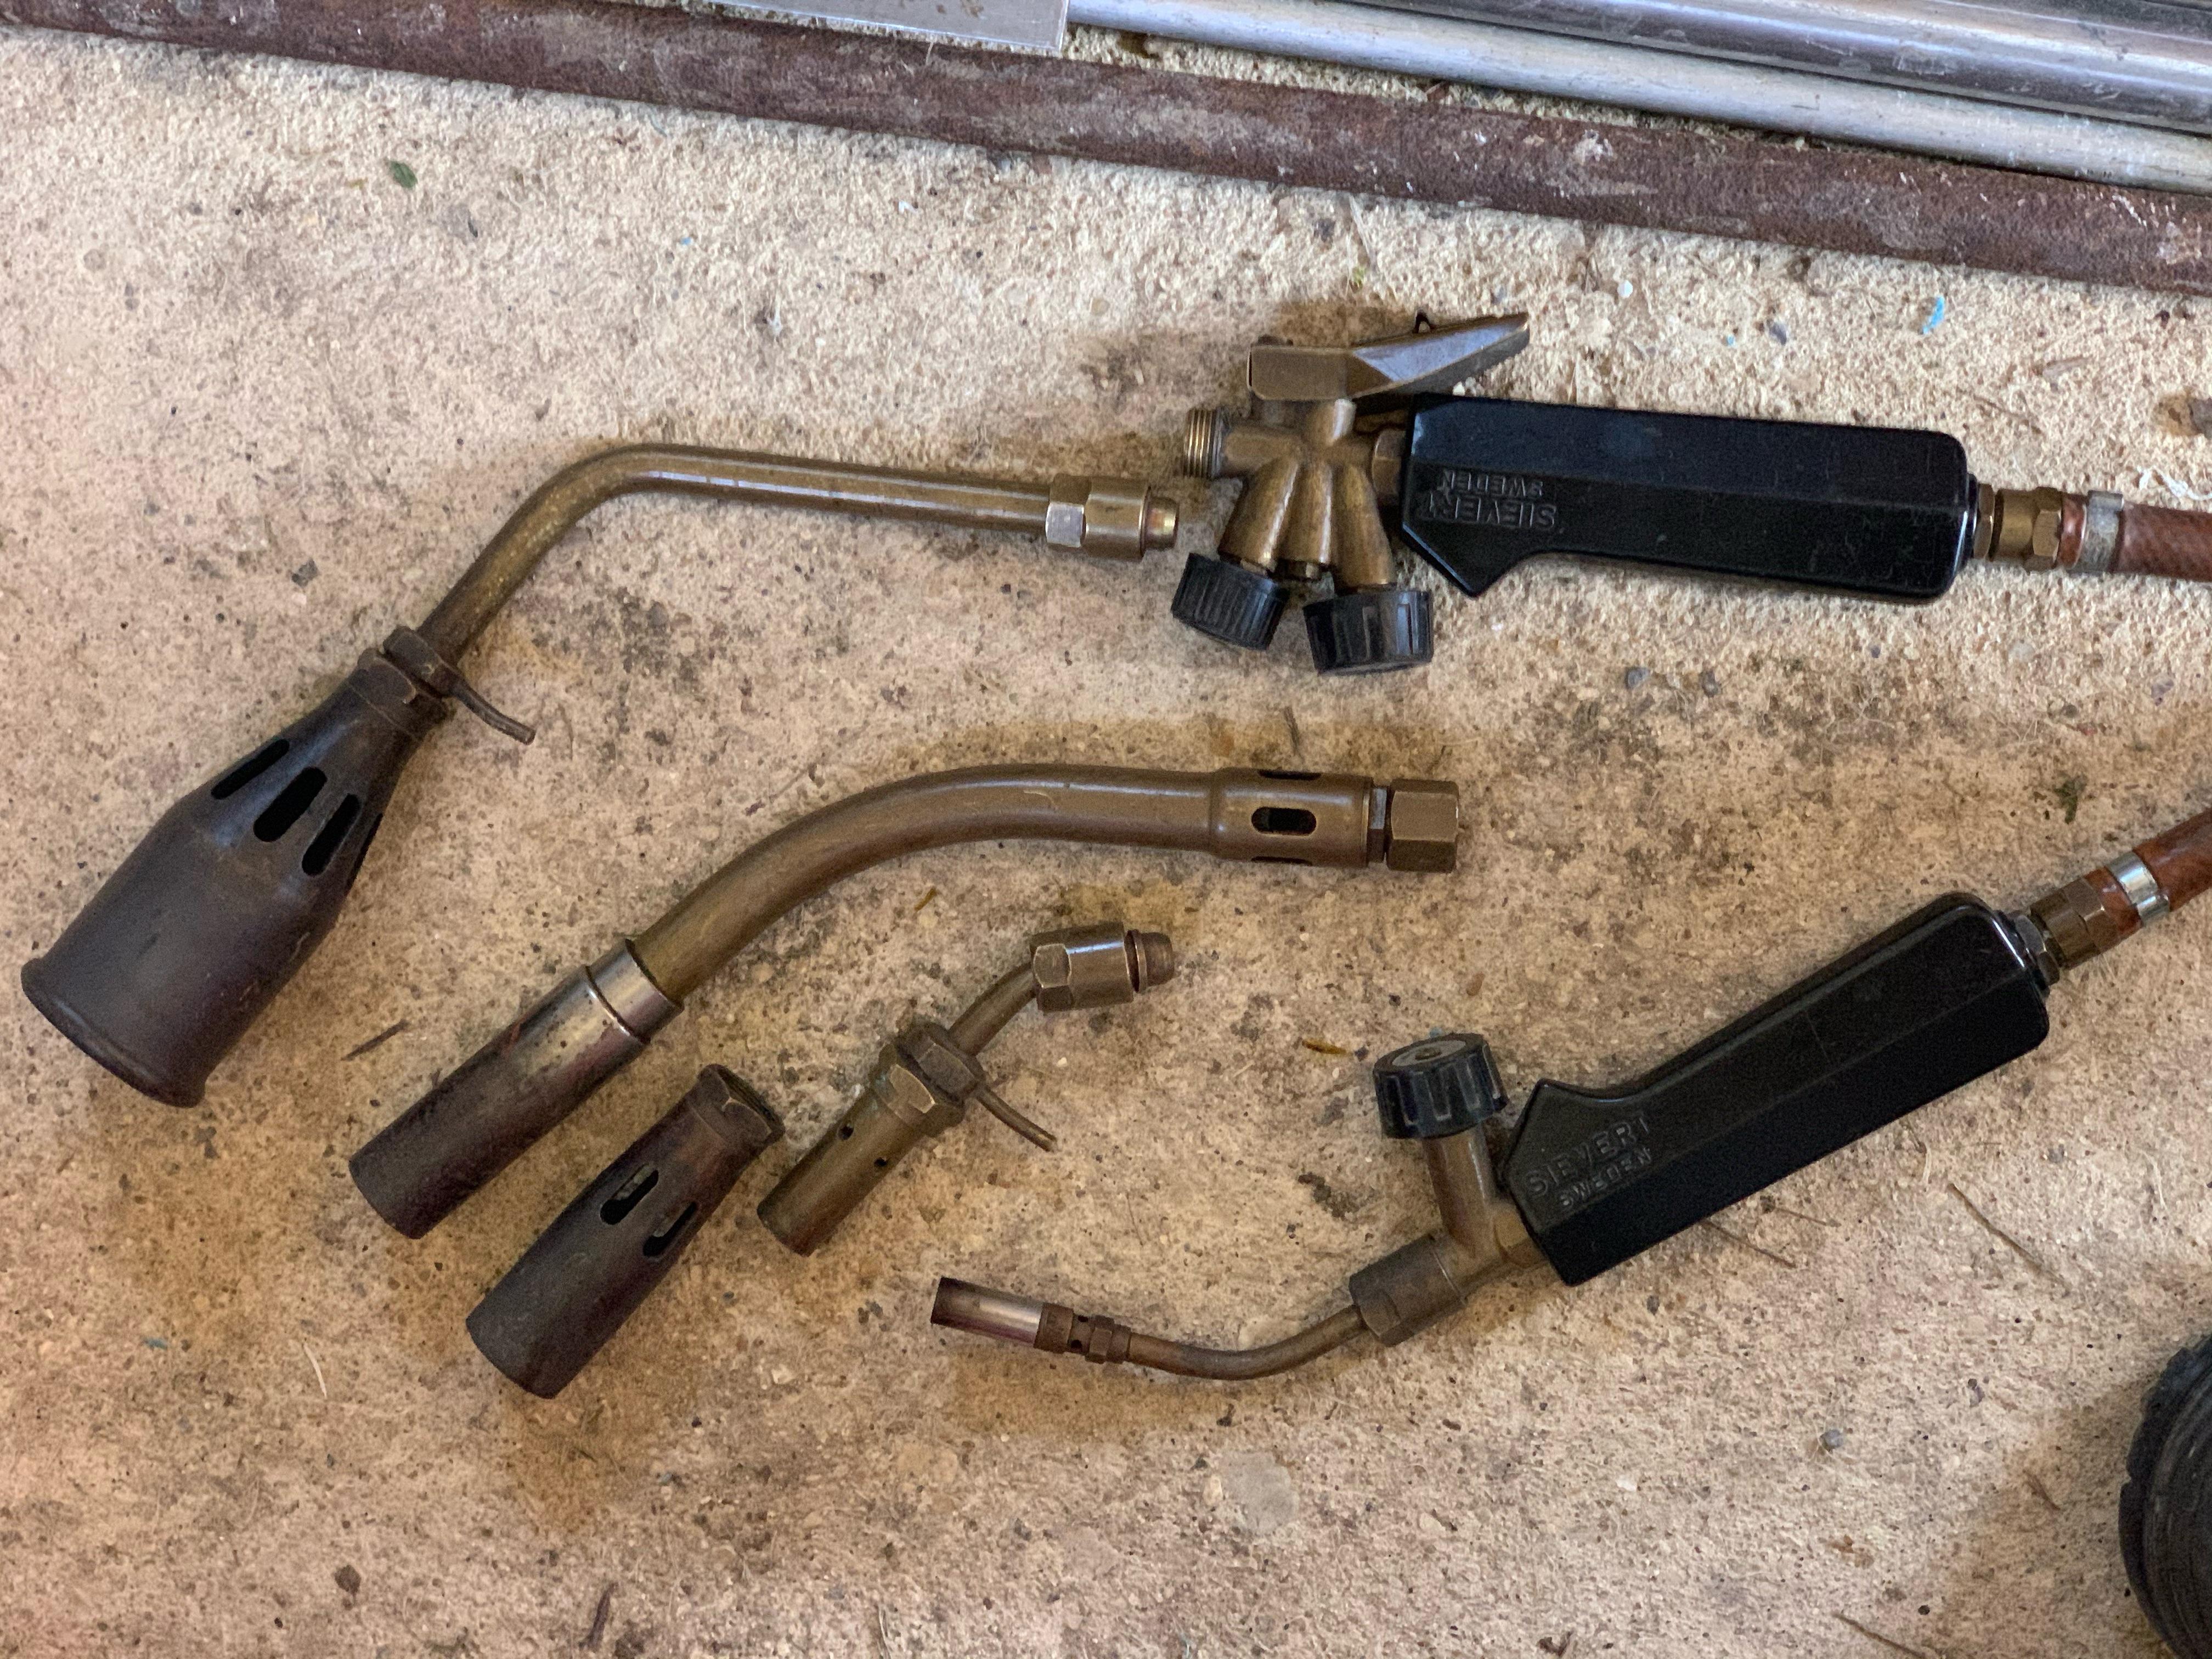
I would advise that you buy a large nozzle for large work and a small nozzle for small work. The oxyacetylene rosebud nozzles are designed to run at an optimum flow rate. If you set them on a softer flame which is burning closer to the tip it can heat up and start igniting within the tip which is quite noisy, and quite terrifying. Goes off like a machine gun. I presume the same would be true of Oxypropane rosebuds although I have not experienced it with mine….I learnt my lesson when I frightened myself stupid with the oxyacetylene ones a few times until I discovered the cause so am now careful not to starve any of the nozzles. For small heating jobs I quite often use the pre heating flame of the cutting nozzles…safe as long as the oxygen pressure is set low on the bottle regulator so that if you inadvertently hit the cutting lever you don’t alter the flame and slice through your workpiece! Alan
-
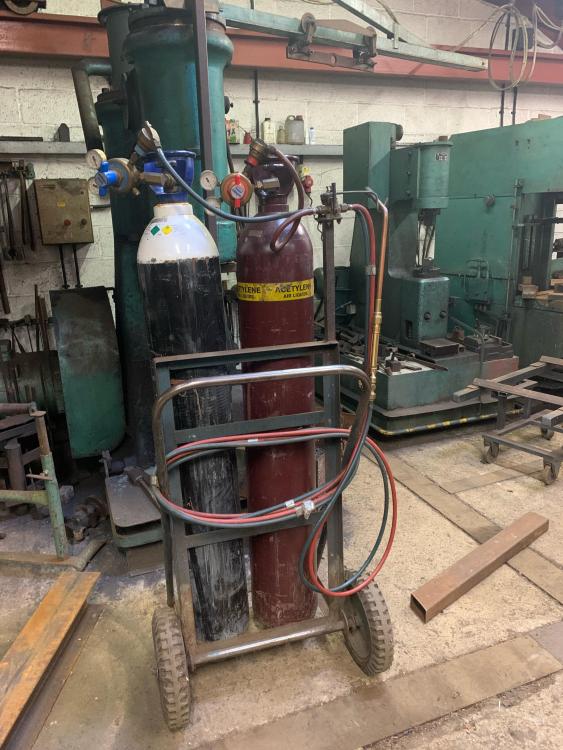
It was actually the Propane cylinder leaks which were more dangerous than acetylene cylinder leaks as opposed to just propane fittings leaking gas. A teaspoon of the liquid propane expands to many cubic metres before it is combustible so when you do get ignition you have a room filling fireball. Alan
-
Not wishing to be gloomy but just as heads up…I went on a industrial gas safety course a decade or two ago and learned two things specifically. 1/ That Propane cylinder leaks were the most dangerous and I had always assumed it was the acetylene ones. 2/ You should never use soap and water to test high pressure gas joints. Apparently the soap hydrocarbons can go bang if they happen to be transferred into the pressurised side of the fitting on a subsequent swap around. This includes high pressure shielding gasses like Argon and CO2 mixes as well as Oxygen. Up until then I had always used soapy water in a squirty bottle. No longer. Plain water, sniff and listen are much the safest if you do not have the commercial gas leak tester/detector product to hand. The commercial detector fluid is very inexpensive compared to a shop rebuild and it is available from any gas supplier. Alan
-
BeaverNZ I am glad it was useful...I envy you having the Rolls Royce of hammers set up. jlpservices I am glad you have managed to download it. Irondragon Thank you for providing a new link to it. Over the years I had a few communications from people having problems downloading the Allday and Onions specification/user manuals from IFI...I re-posted them a few years later which apparently resolved the issue. Puzzling. The Massey one in this OP still downloads okay for me...but it is a bit large at 9.7MB. It was a choice between clarity or low resolution when I scanned and created the .pdf....and I opted for clarity because of the small specification tables. I didn't manage to install my 2cwt Massey Clear Space hammer and so sold it on...It was reconditioned but not installed by the purchaser, who's circumstances then also changed, and he eventually sold it on to John Nicholson. I still have the 5cwt Massey sitting in the yard beside the new studio, but it does look unlikely that I will ever install it now. I still have the 3cwt and 1cwt Alldays and the 50kG Reiter operational in the studio at Mum's...but as she has just celebrated her 98th birthday I think the self contained 1cwt and 50 kg will eventually come here, I don't think future work, or my age, will justify installing the separate anvil 3 or 5cwt hammers in the new studio with their more extensive foundation requirements and need for heavy duty power. I ended up with a lovely 100kVA 415V 3 phase supply at Mum's, but will have to buy a large ex stand-by generator to run them here...or drive them direct off a donkey engine. Alan
-
-
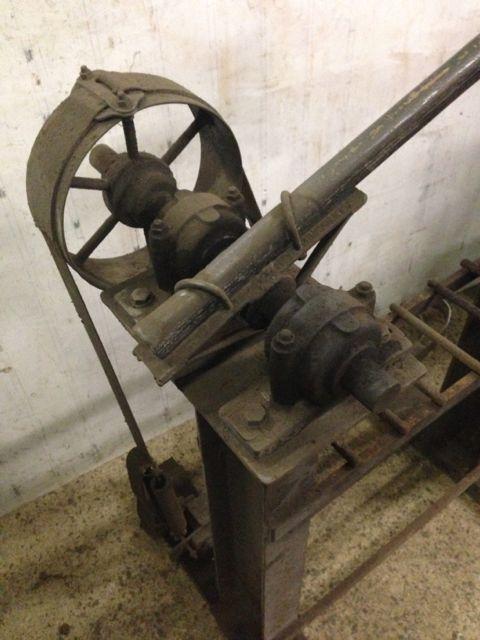
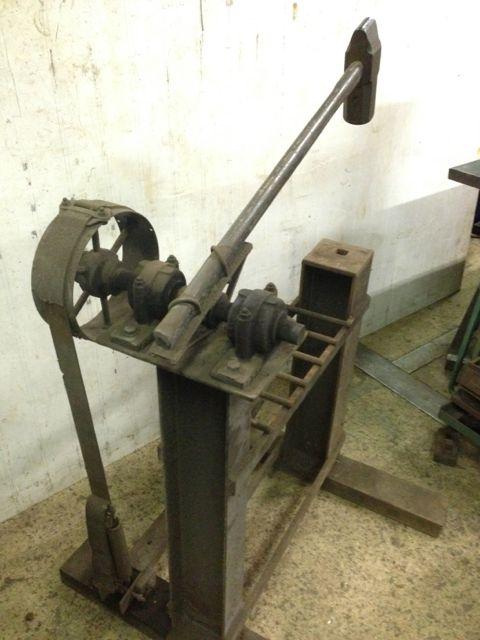
Good find. Very versatile with the fly weights...for light work like bowl sinking it is really handy to be able to remove the weights...for fast light blows it takes as much energy to lift as to bring down with the weights on or with the flywheel type. Alan
-
I posted the Massey books on here some time ago...
-
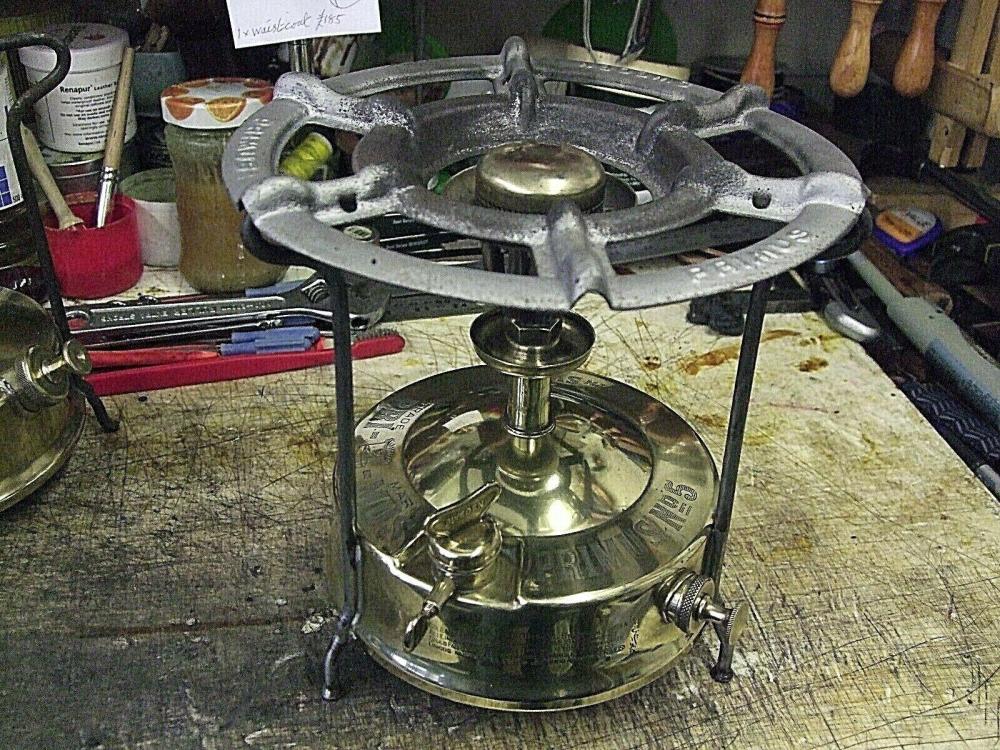
Sorry if it was stating the obvious. I didn't know whether they were exported to the USA. In the UK the pressure lamps were either Tilley or Primus brand. But the paraffin pressure stoves were almost exclusively Primus. Blimey just done a search for an image and see they are worth £50-85 on eBay...we have two or three in the shed I must look out! Alan Knight, the smith I worked with when I left college had a neat folding petrol pressure stove which collapsed into a rectangular box made by Coleman I think, and I had the impression that was ex military USA. We used it every day for tea and coffee brewing Alan

-
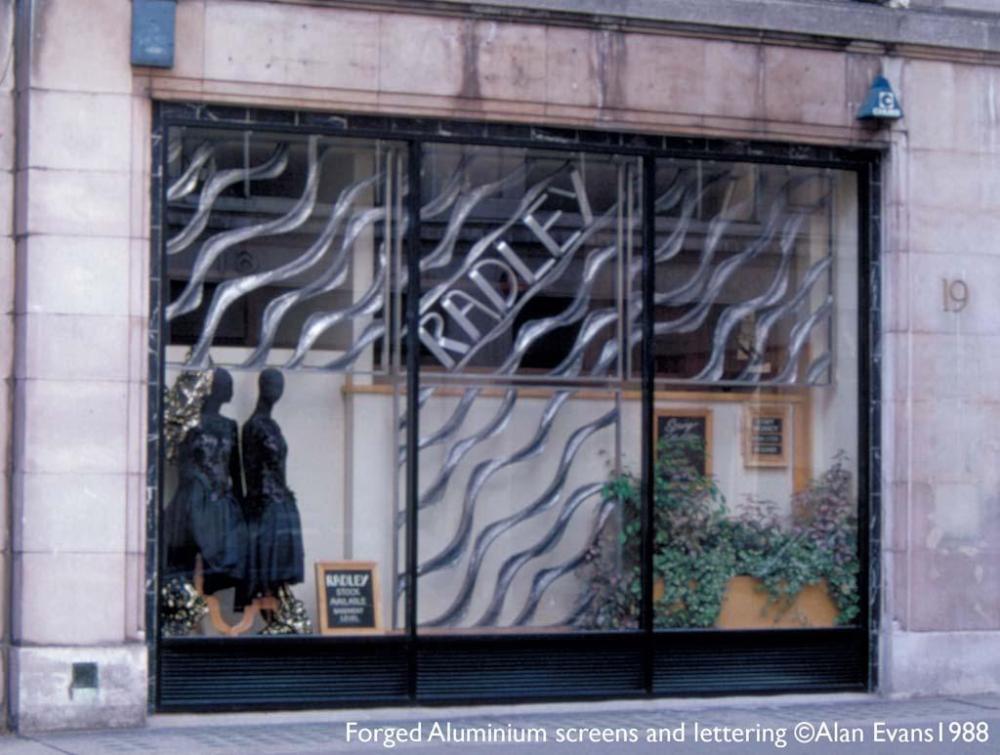
The Sievert propane Torch is top quality. I have a couple of them...bought them back in Mid 1970s when I started out and was earning a living as a jeweller and silversmith. Still in regular use now, last used two days ago to stress relief anneal some cartridge cases. The nozzles are still available. The handpiece is universal and with various necks and nozzles will do fine silver soldering to hot felt roofing. Good website. The large diameter neck in the middle produces a helical flame which licks around the back of copper pipe work for plumbing. I built my first gas furnace from an L shape of fire bricks and an arc made from a third of an oil drum with ceramic fibre bats stacked in...powered by the big sievert nozzle it was enough to give me 650mm (26") heat on lengths of 50mm (2") square aluminium for forging these window grilles. Sievert are one and the same with Primus who made paraffin (kerosene) cookers and lamps...the sort under pressure rather than wick burners. Alan


-
If you are looking for one, the Old English pattern of bar and ball fly weights makes for a more versatile tool than the flywheel type. I discovered this while trying to demonstrate my bowl tools on the flywheel type press in the shop at the National Ornamental Metal Museum in Memphis a couple of years ago. The big advantage being that you can remove the ball weights and have a much more responsive dynamic for multiple light blows even with a larger heavy tonnage press. With the flywheel type you have to put in almost the same amount of energy lifting the ram as dropping it. Removing the weights on the ball weight type and the bounce back does a fair amount of the lift for you. The disadvantage is that sooner or later you get clonked on the side of your head by the bar…only the once but it makes your eyes water! Alan
-
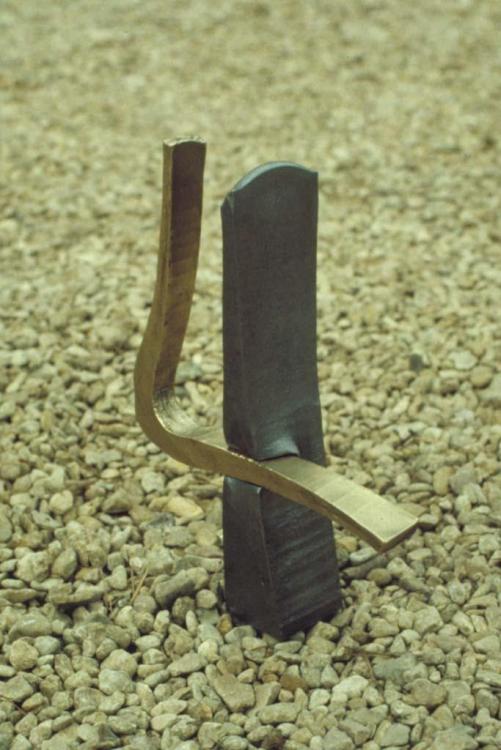
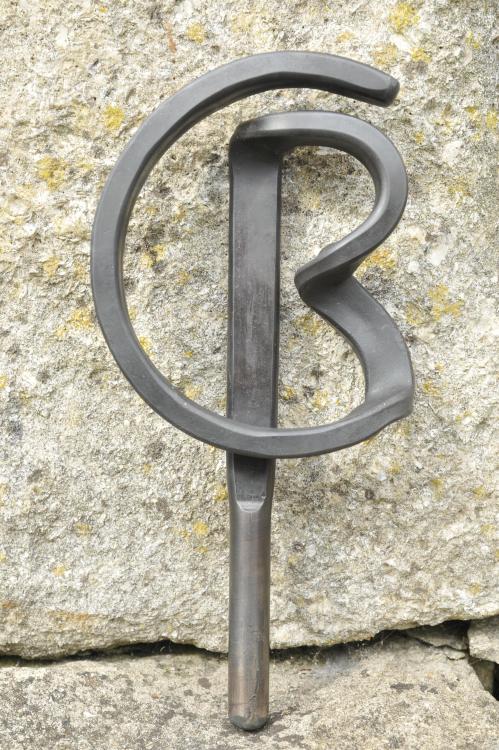
My blacksmith friend was named Rebecca Clark. Knowing her since she was a babe in arms I always think of her as Rebecca. But being a millennial she tends to use Bex and she married Chris so the monogram was a play on these. Alan
-
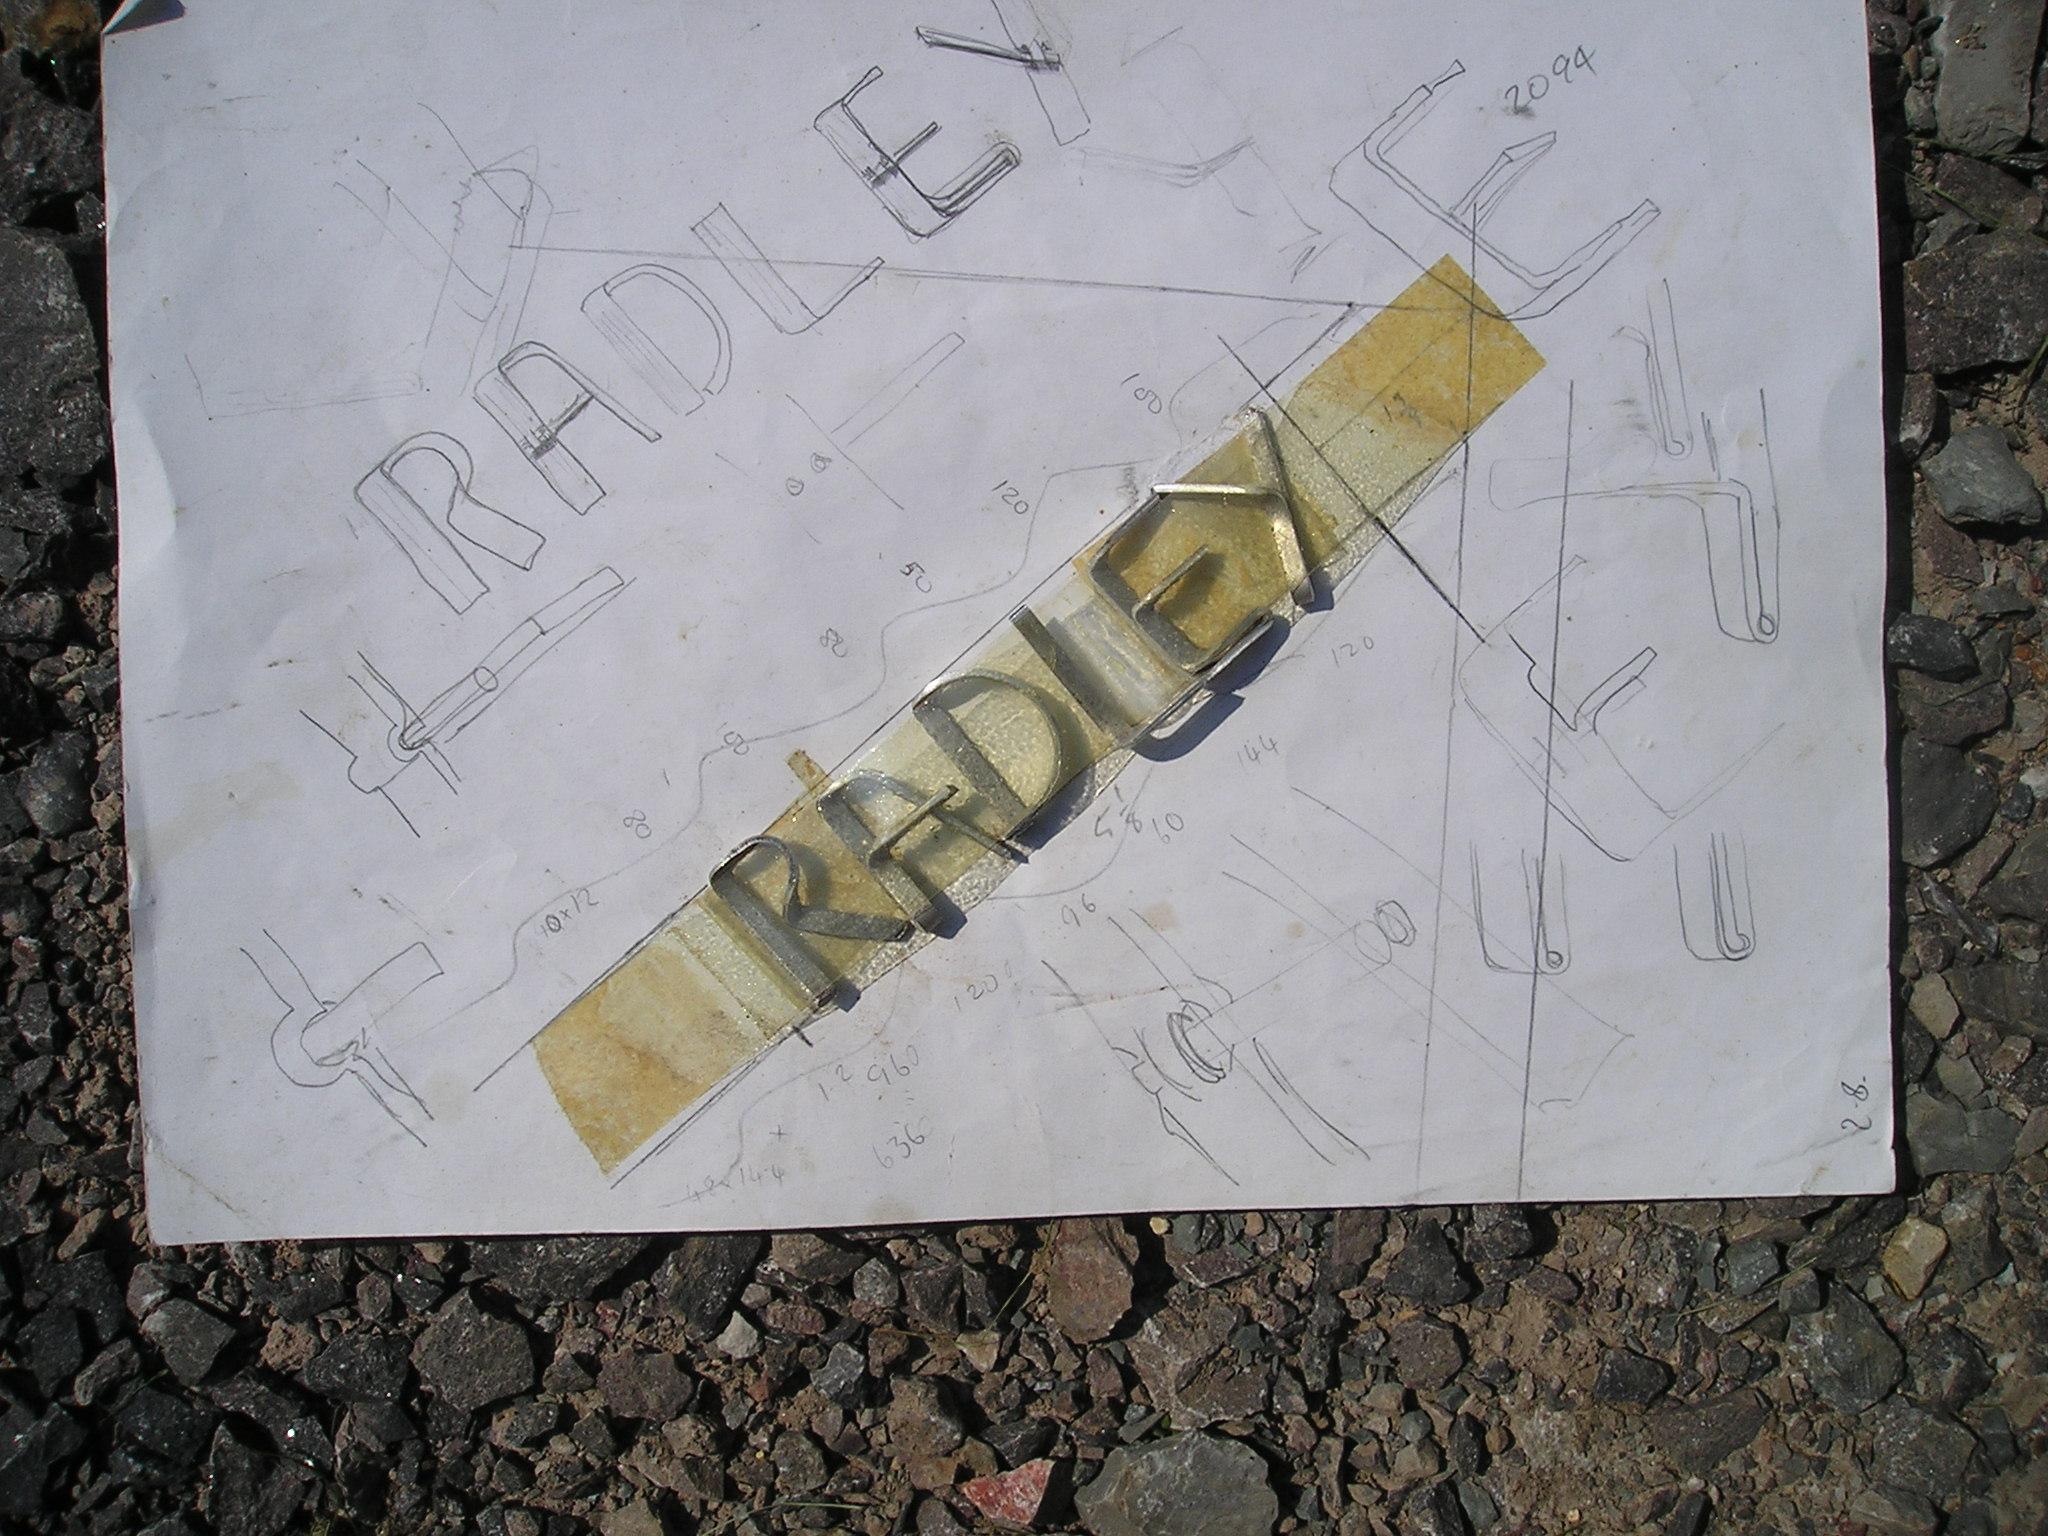
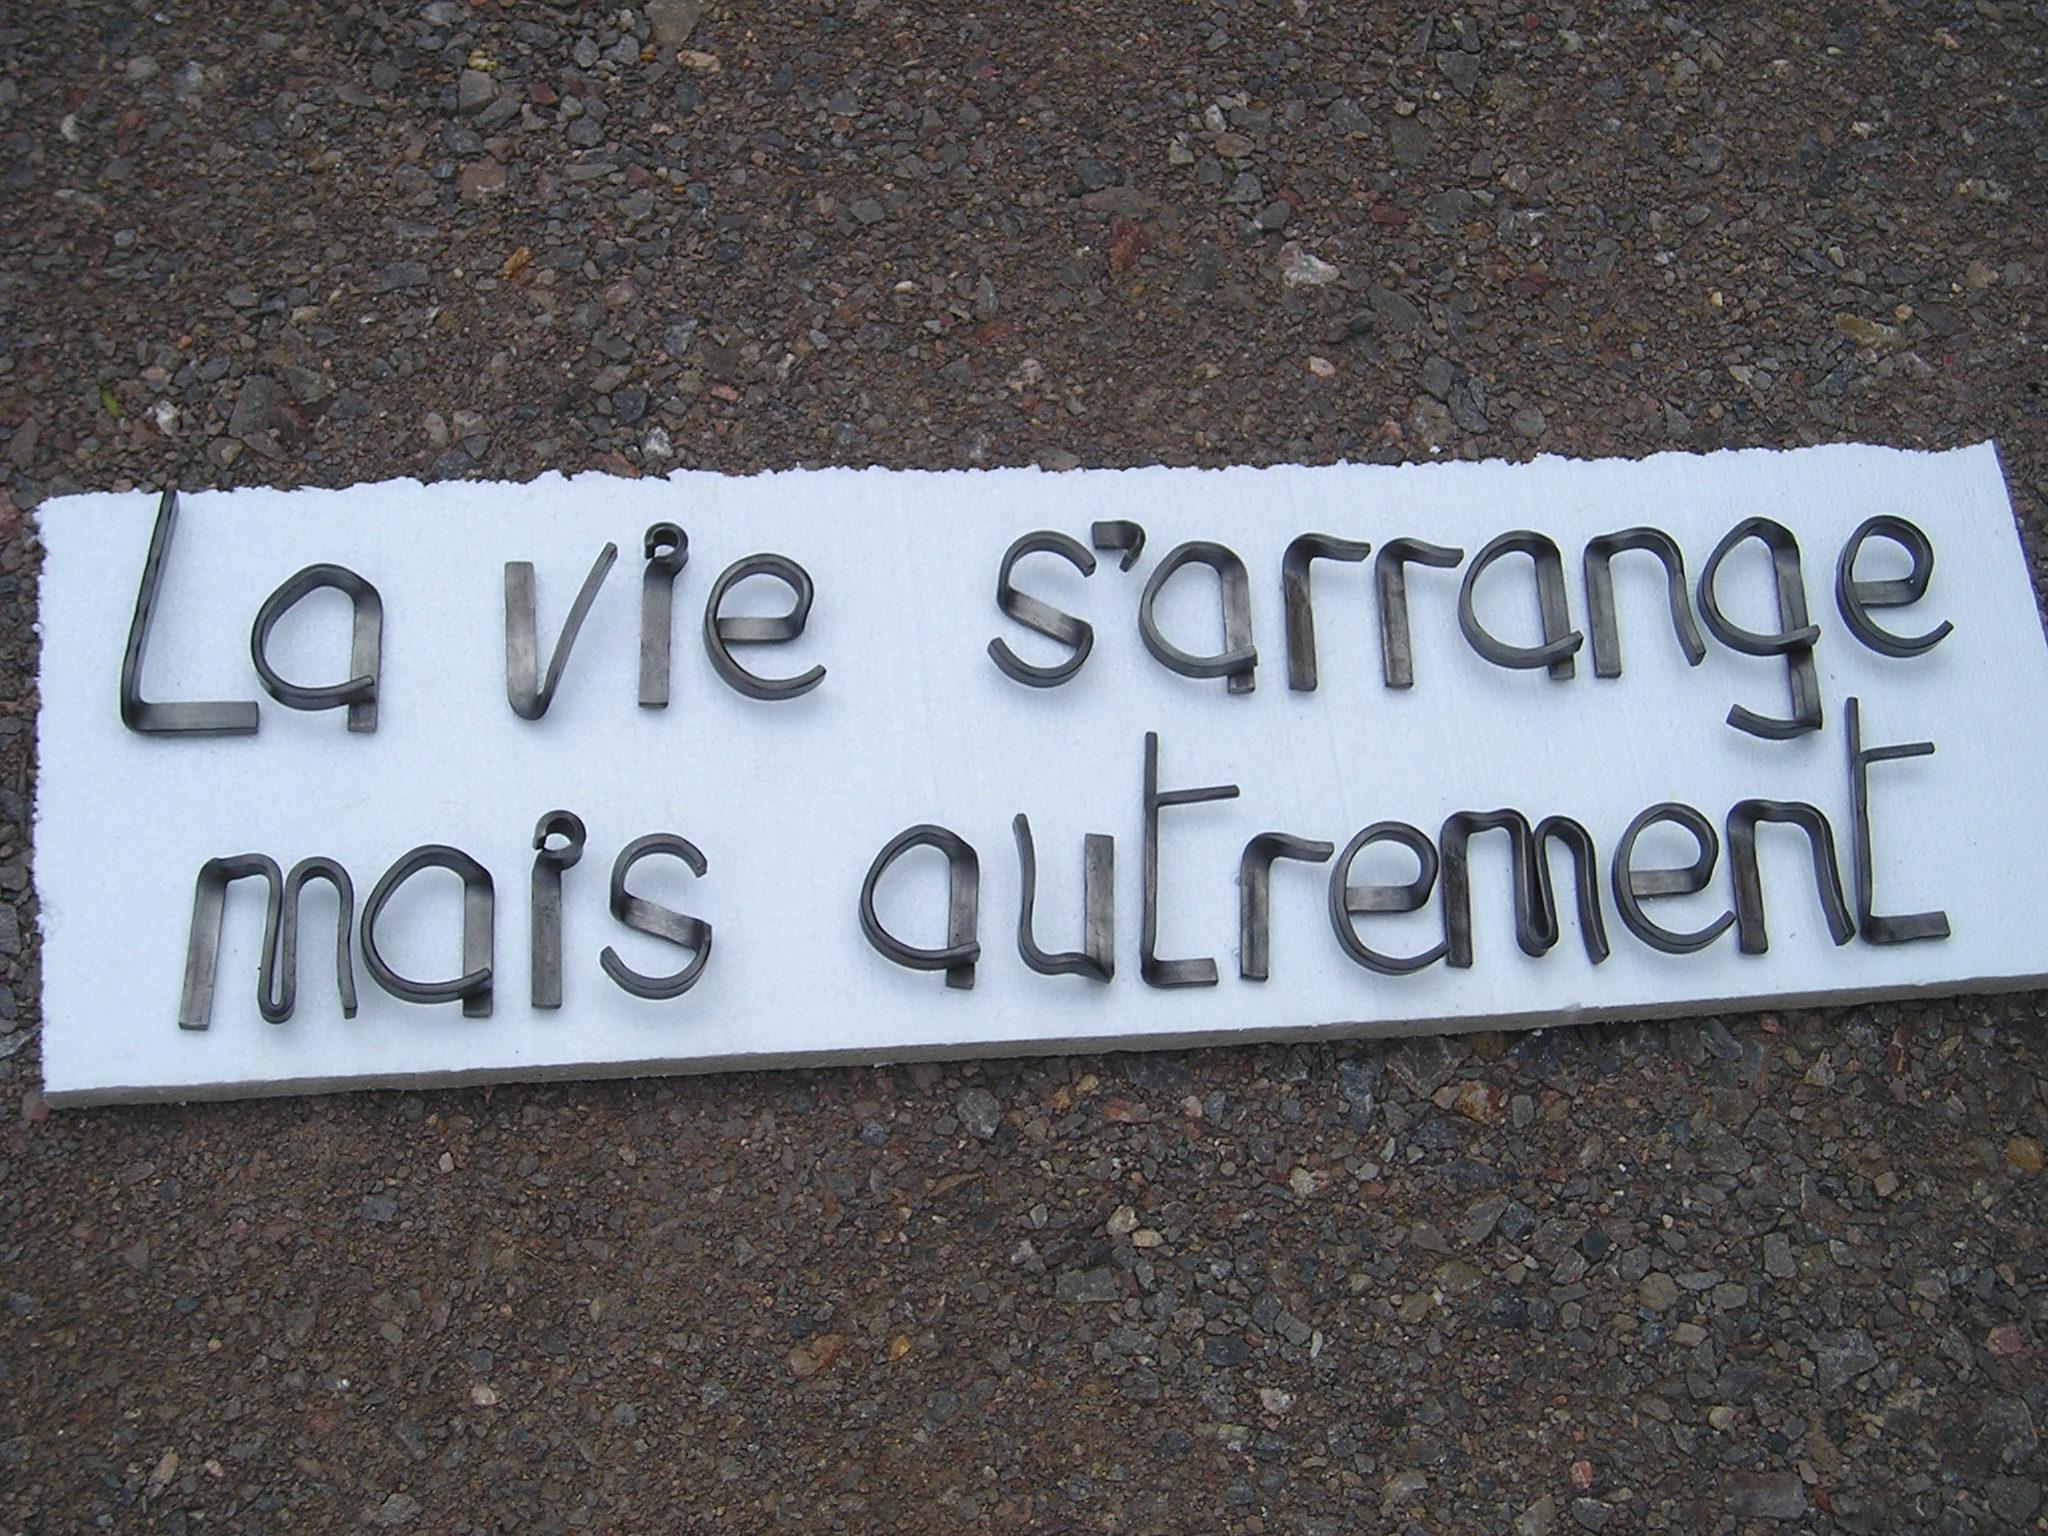
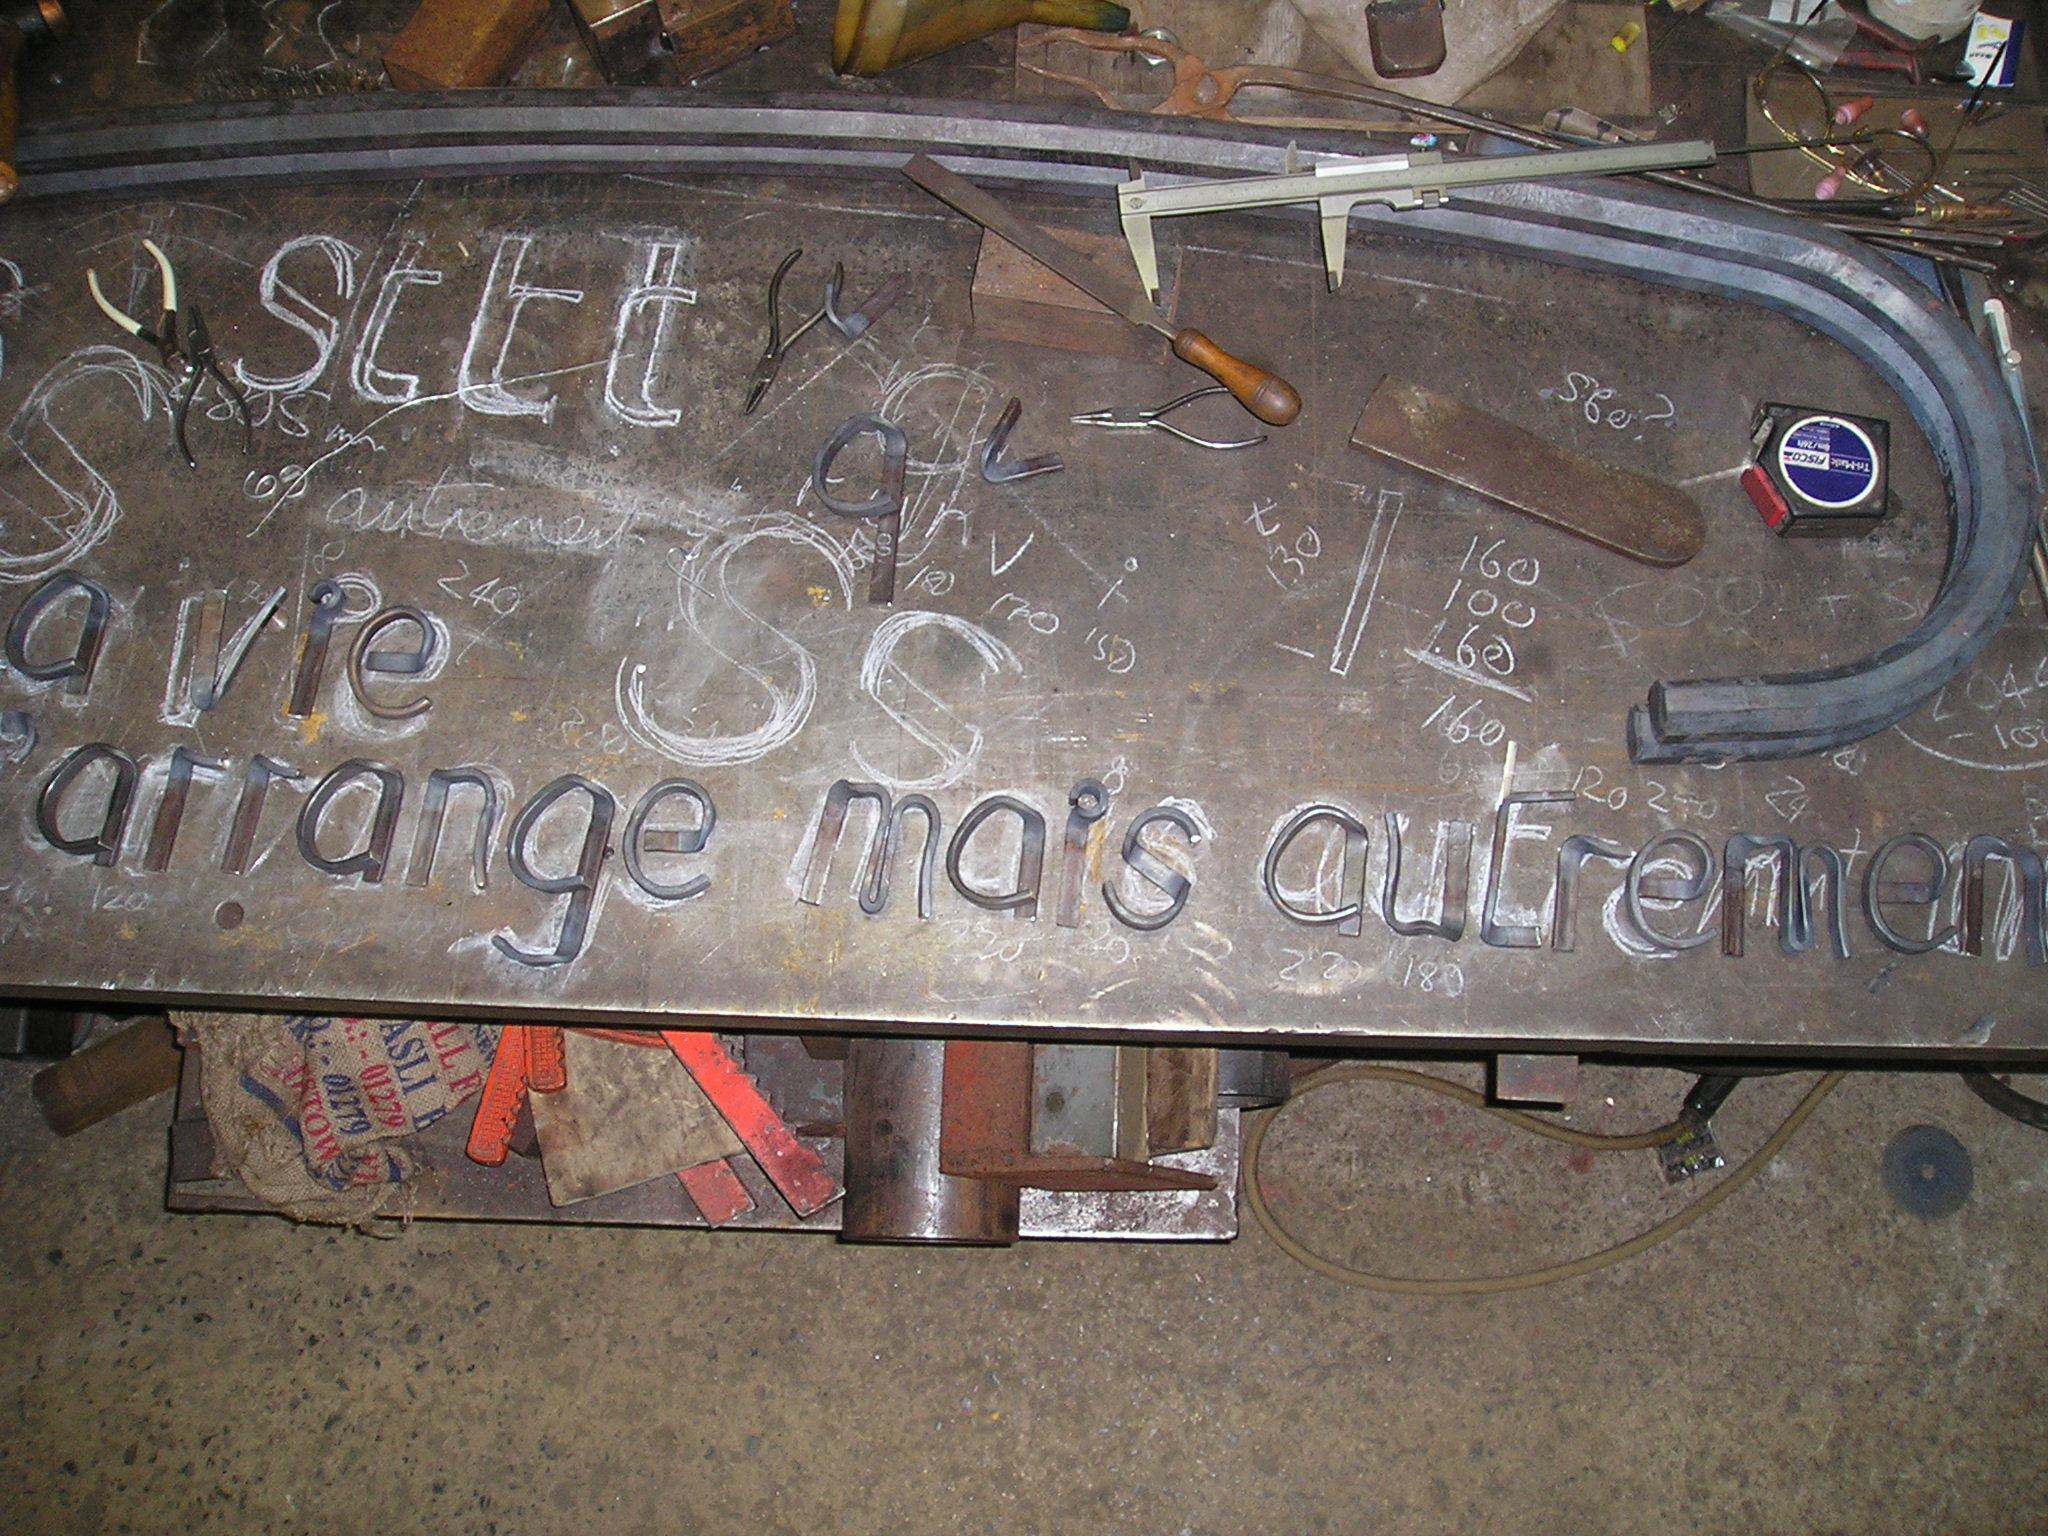
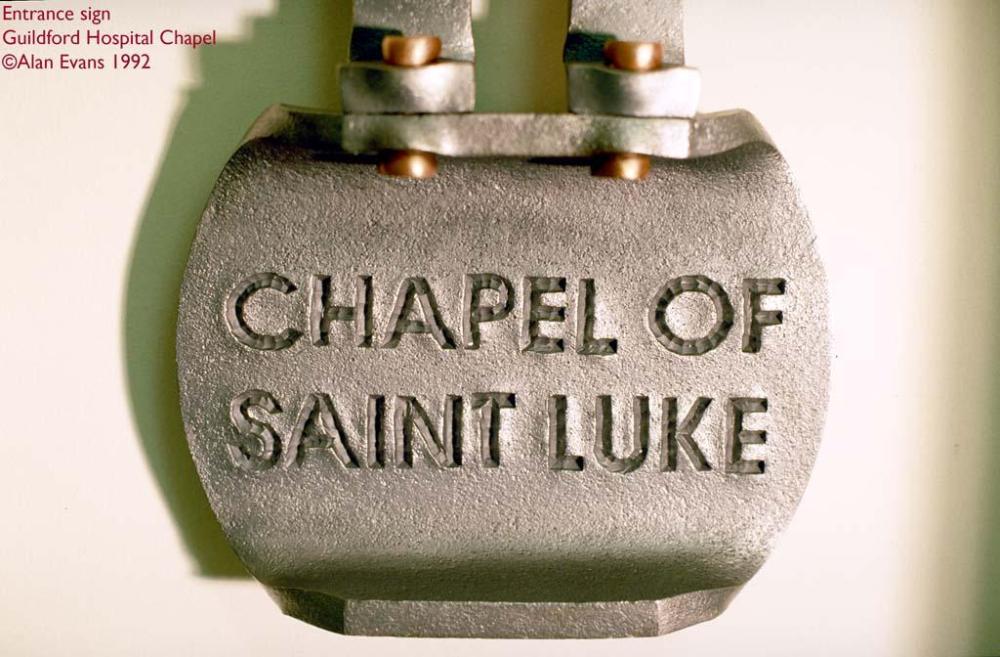
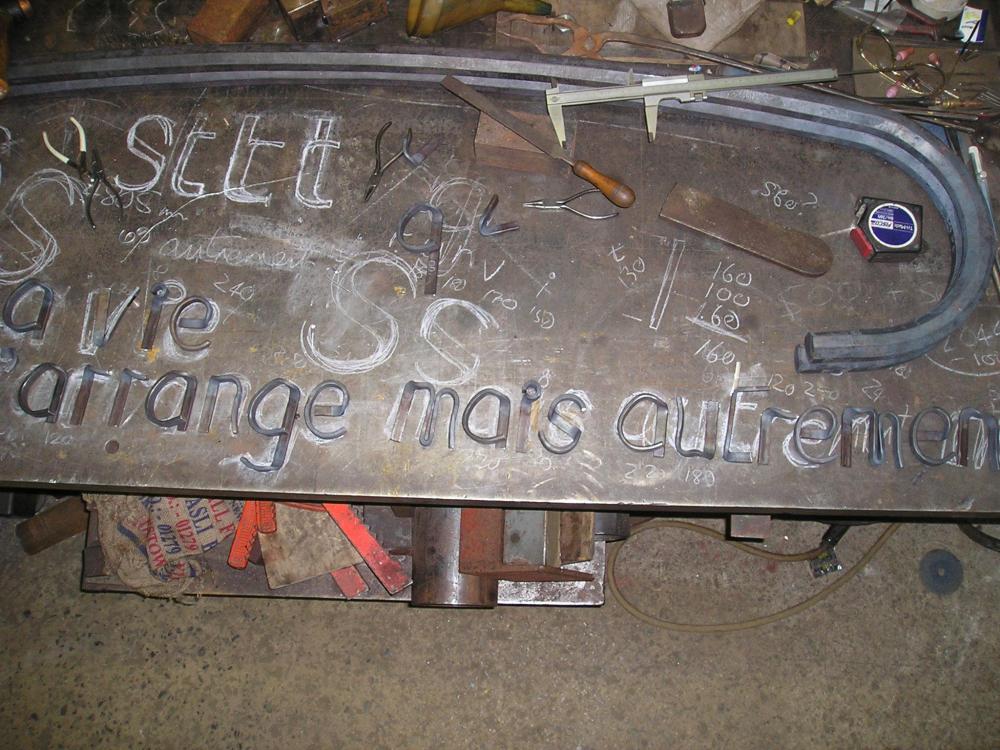
Create your own? Make it your own script like your handwriting? Good fun playing with letter forms. I have had a few projects with lettering and each time made up a script and the tools to make it. The project determined the approach. A grave marker for a friend was chased into a 12mm (1/2") brass plate. It used I think 7 basic straight and arc punch forms to create the letters. Gate Gate and Number 4 for the 1982 Six British Blacksmiths exhibition. The exclamation mark pivots forming the latch. and the left hand gate post revolves around a full height Ø2" pin to form the hinge...hand torch profiled from 10mm (3/8") plate and the edges upset both sides to give a chamfer and shadow line...seemed a good idea when I started but there was over 20 yards of edge to upset! The Number 4 was from 50mm (2") square steel and probably Ø30mm (Ø1 1/4") brass One project was for a fashion house shop window and was formed from 50mmx25mm (2"x 1") Aluminium flat bar... I experimented by shearing off some sheet aluminium to 2:1 section strip and working it with round nose pliers Royal Surrey Royal Surrey County Hospital Chapel sign punched into 12mm (1/2") plate Monogram for Rebecca and Chris as a wedding gift forged from Ø12mm (Ø1/2") 316 stainless An epigram ... "Life works out, but not necessarily as expected"...for a French cottage wall. Forged from Ø10mm or Ø12mm 316 stainless leaving edges radiused and then manipulated with an oxy-acetylene torch. Fixing pins TIG welded on the back


-
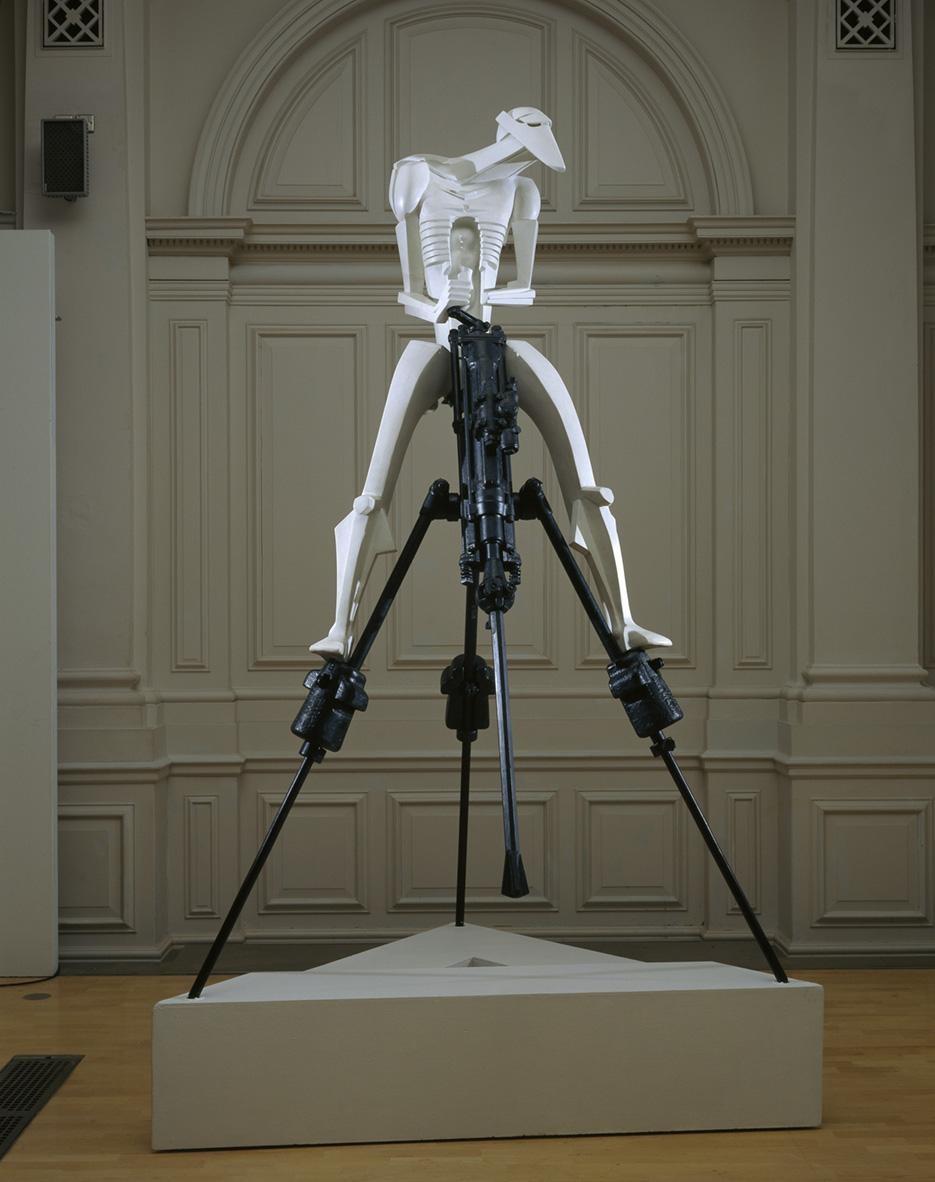
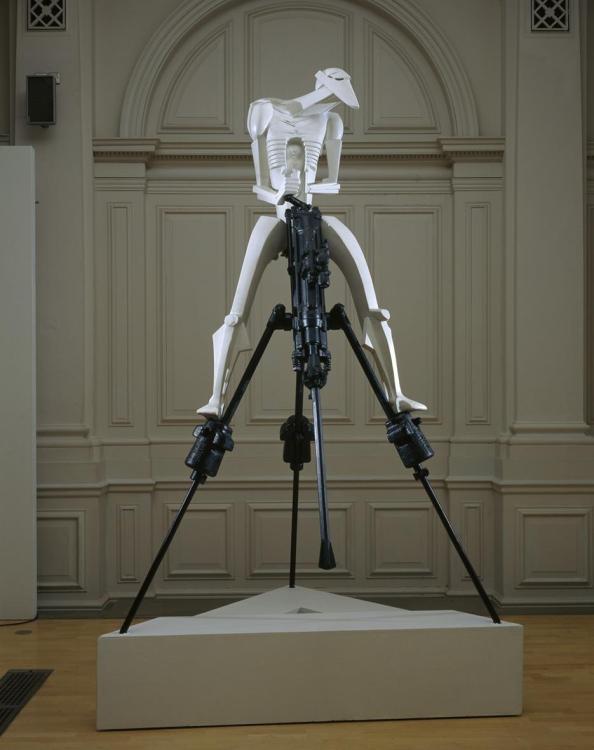
The wonderful rock drill / man drill / Mandril sculpture by Jacob Epstein used hollow hex bits I think. Would that be the sort of machine you mean Thomas?
-
When hot fitting keys I found a few short heats were more effective/controllable than long ones. Start at the thin end and gradually move back a heat at a time. The long heat I found upset the wedge at either end but was hollow in the middle. Alan
-
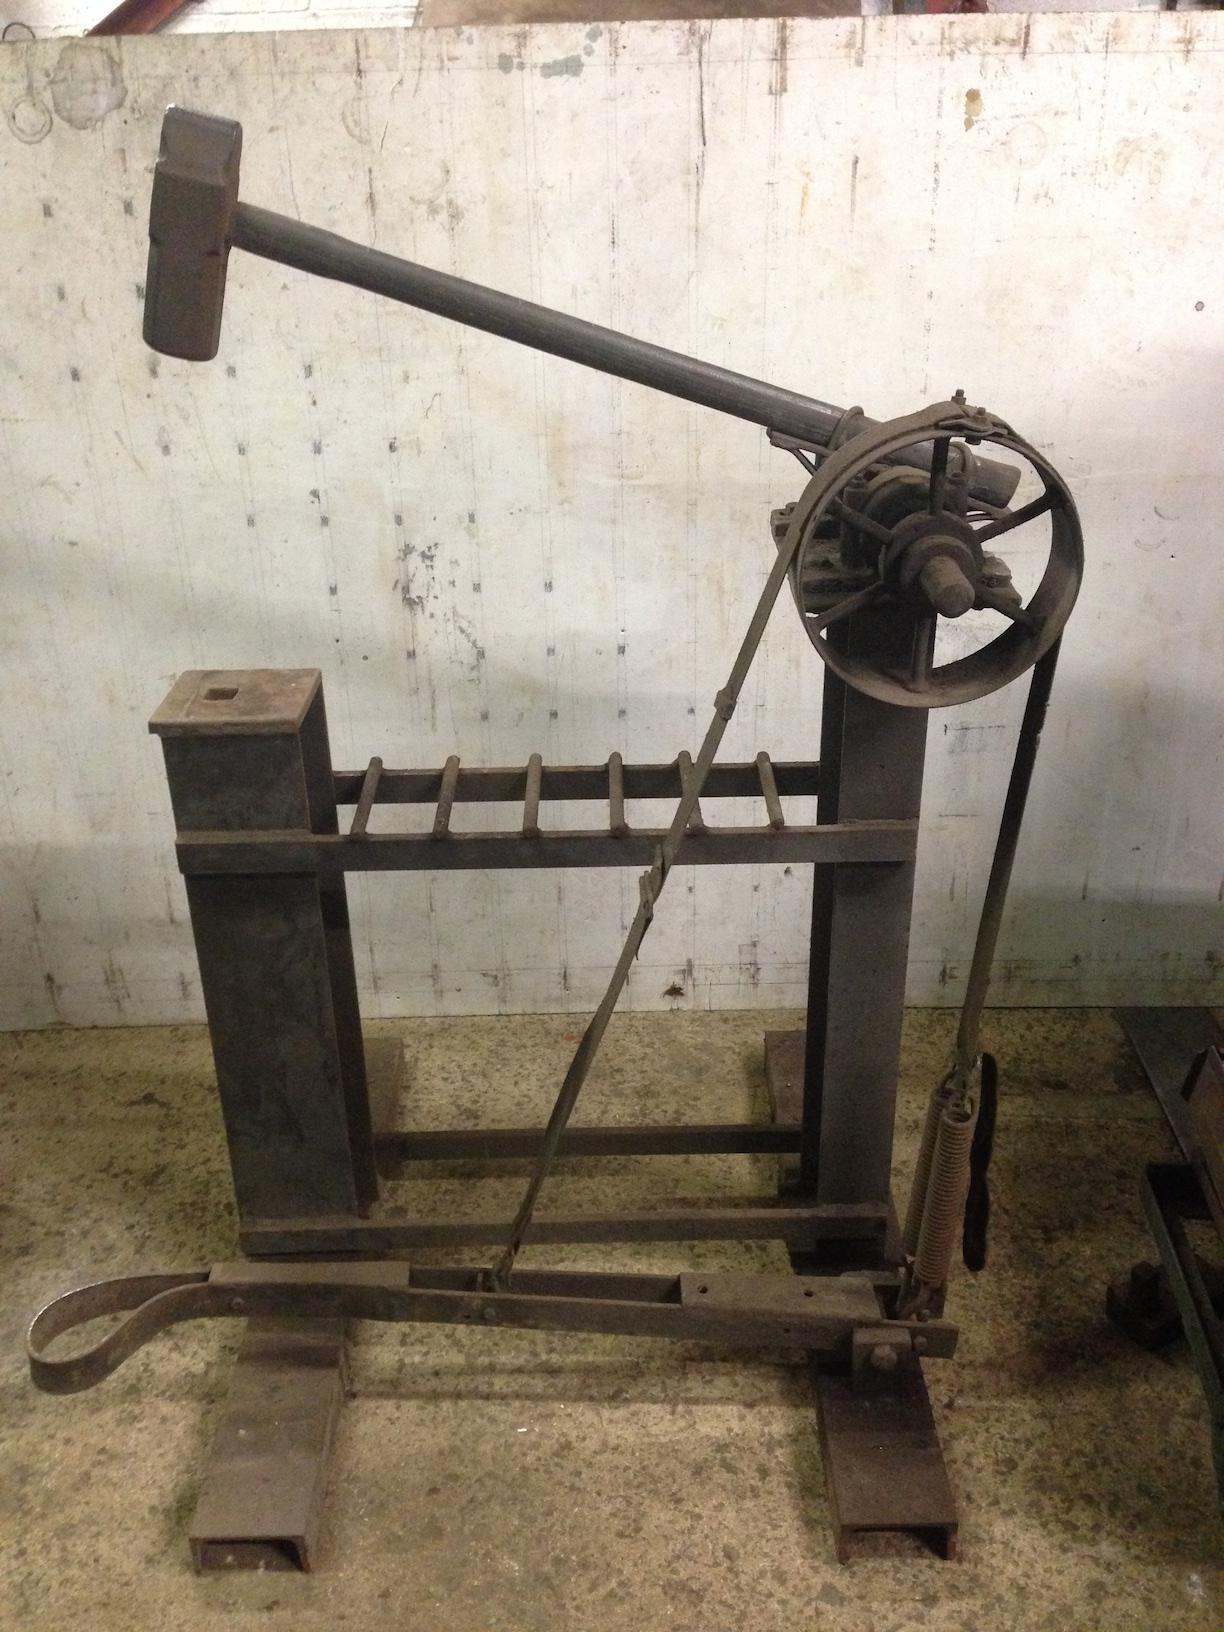
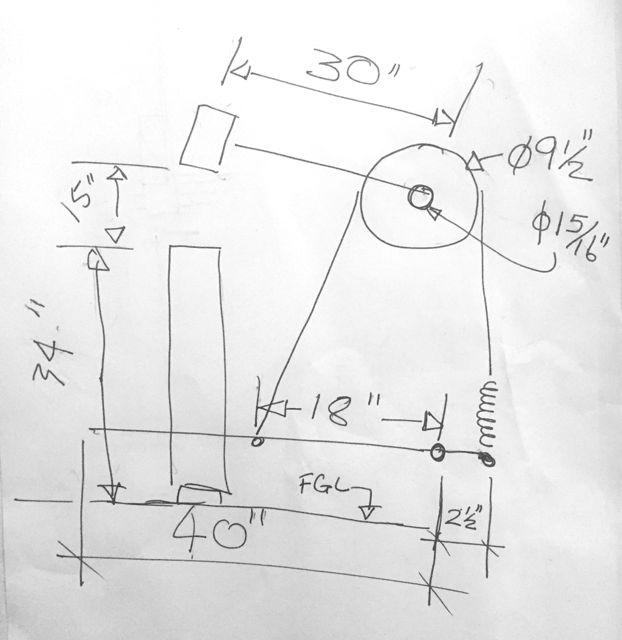
The springs only have to lift the weight of the hammer against gravity and no more, a very light touch required. The hammer does not need to be held at rest at the full height of the stroke. The stroke of my hammer can be well over 20" when cycling but static is 15". With your existing connection points something like a long length of bungee cord may provide that and not fight you so much? It is 50 odd years since I first found the bits of shafting, plummer blocks and old car seat belts at the scrap yard to make my foot hammer, and just looking at it now I see I had forgotten some of the subtleties I had tried to incorporate in the operating and return linkage. I was aware that with most (all?) spring return foot hammers the spring pressure increased as the hammer descends and it reduces your strike energy...you're fighting it all the way down. In the early 1970s I had probably heard of the compound bow invention which accelerated and increased power as the arrow went forward, and although I didn't know how it worked I made an attempt towards that concept in spirit if not mechanically. My contribution was that the bottom spring attachment is on the opposite side of the treadle fulcrum so as the pedal goes down the spring goes up and the tension fighting against you is slightly reduced. Now 50 years later I know how the compound bow cam wheels work, and also the oval Shimano bicycle chain wheels....I think it would be interesting to modify the pulley shape to a cam on my hammer design to further improve the treadle down and return spring dynamics. Something for a younger man to explore! Alan
-
Try moving the spring connection further down the the shaft away from the hammer head...you will have more leverage against the spring... My return springs are off a pulley on the end of the hammer pivot spindle, and from memory is only Ø8-10" so the connection point is effectively 4" or 5" from the fulcrum. I never reckoned you could get the same clout out of a foot hammer as you could from a hand hammer for drawing down etc. Standing on one leg and stamping down with the other is not the most efficient way of delivering energy by the body. What I use it for is the finesse of striking with both hands free to manipulate top tools and workpiece. And that was even before I had a power hammer Just found some photos and a sketch with dimensions if it helps. Alan


-
Good looking building. The best thing I have found to use air for are the tools and processes you can’t do with anything else. I plumbed my compressors in but with the advent of rechargeable drills and impact wrenches they are now only used for the plasma cutter, paint spray and blow gun, tyre inflator, needle descaler (useful for texturing ground and sanded out welds) and the shot blast cabinet. I still use them for die grinders and an angle grinder/drum sander having invested in them, but the advantage brushless motor rechargeables give of freedom from the ‘umbelical’ airline or power cable means I would not be buying any rotary motion air tools now. I can thoroughly recommend the Hydrovane type compressors if you are going to be doing any heavy duty/prolonged work and will be in close proximity to it. Alan
-
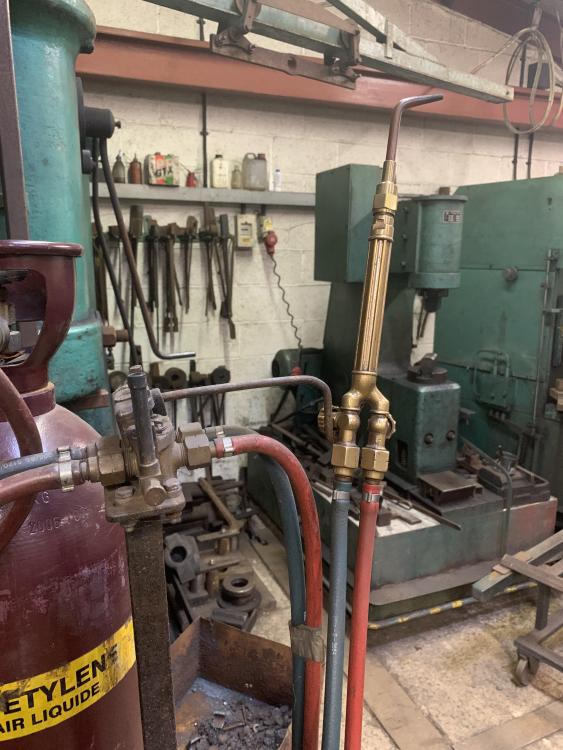
I appreciate what you were trying to do with the static torch system. I make little stainless bottle openers and spoons from 10mm round which might benefit from your foot pedal system but most of the time the workpiece is heavier than the torch and there is much benefit from heating something larger on ceramic fibre blocks or fire bricks which reflect the heat back onto the workpiece. Heating in the open is horribly inefficient. This is my simple economiser set up on a post with the hook arm away from the bottles. hooked on the valve when using a welding nozzle

-
I just hook the torch valve on to the economiser arm if I am using a Victor type one piece welding nozzle. The weight of the pipes keeps the torch body upright with a light nozzle. Alan
-
May I suggest you rotate the economiser around 90˚ so that the actuator arm is way from the bottles? When the torch is alight it may be a bit too easy to direct the flame down onto the gauges and pipes when you hook it on to shut down. On mine I kept it all clear to ensure that when lighting and extinguishing it is easiest to direct the torch nozzle away from any object that might have a gas seep.... Alan
-
HP is HP whatever the power source as far as I know. A 5 hp combustion engine motor would be the same as a 5hp electric motor. 5hp electric motor would be rated at around 3.75kW if that is what you were thinking of. KW rating is around 3/4 of the hp rating number for number. 1kW = 1.341hp 1hp = 0.7457kW FWIW my 30 tonne double acting press has a a two stage pump and is rated at 50mm(2”)/sec up and 75mm(3”) /sec down It uses a 2.25kW (3hp) motor to achieve that. It has a 150mm (6”) diameter piston Alan
-
The speed of the stroke is determined by the volume of oil the pump can deliver at the required pressure, not by the slave cylinder. I am not sure of your 2Way / 4way cylinder description, over here that defines the type of control valve...In the UK the cylinders we call single or double acting? I have a 30 tonne double acting press (hydraulic return) which works well for punching hot metal having a stripper plate which the 15 tonne return power uses to pull the punch and drift back out. It has a two stage pump which gives you a fast approach speed with a 5 tonne push and then kicks over to a slower speed at 30 tonnes when it meets more than the 5 tonne resistance. I have a very slow 100 tonne single acting (spring return) horizontal press and a very fast and sensitive response 12 tonne single acting (spring return) press which cycles as fast as you can push the treadle. The latter being great for straightening hot bars and bowl sinking etc. Hope that helps, Alan