Alan Evans
Members
-
Joined
-
Last visited
Everything posted by Alan Evans
-
Right, so the light coats emphasised the metal flake rather than the dimples. I have 5litre tin of silver metal flake for paint somewhere from when I was experimenting at one time. I assumed it was Aluminium, so apart from making paint and thermite I can't think how to get rid of it! Alan
-
100% agree with trailing edges, but I still find it easier to keep the surface flat with a fresh (trailed) disc! The paint has a more subtle hammer effect that the ones I have seen or used before...must see if it is available over here. We have the Rustoleum brand but not been aware of their hammer finish paints. Be better for smaller objects than the Hammerite brand ones I have had. Alan
-
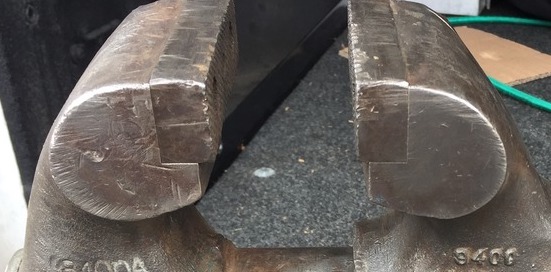
Nice looking vice. What paint did you use? I don't mean this in any negative way because you obviously know exactly what you are doing and what you are aiming for...but your sanding process does illustrate very well what I was trying to say about the difference between the control and the effect of the fresh cut of a new disc and a worn disc under pressure. The "pillowing" or softness around the edges of the frame jaw ends, as indicated by the light reflections on the top edges and shadows below, is typical of the effect of a scotchbrite wheel or a worn sanding disc applied with pressure. The dull disc does not leave a flat surface but "crowns" it because of the pressure which makes it wrap around the job and cut at points of highest pressure...the edges. With a dull disc it is almost impossible to cut evenly and leave flat, the disc (and the physics of pressure with a flexible disc) is in control rather than you. If I was wanting to maintain the flat plane surface of the original jaw end and the crisp joint line with the jaw insert I would have used various grits to remove the marks and a fresh 120 or finer sanding disc (not a flap wheel) as my final process. I would have done this with the inserts in place and the jaws together. If I wanted to lose the resulting arced disc marks, then wet-and-dry wrapped around a baton to leave straight lines. However I would likely use the 120 grit arcs as decoration to mirror or contrast with the curve of the vice frame. Alan
-
I have no idea what the rectangular holed centre tool was for...well it looks like it has a swage top so perhaps for rounding up a journal in a crank shaft shaped piece? Underneath the rust the other one looks like a standard swage. It will have been forged to that shape so as you now have a heat source I would make like a blacksmith and forge the bottom half of the pin to fit your hardy hole. Don't forget that a minute at the anvil with hot metal can save 20 minutes with a file....and of course you can always file hot metal provided you are careful, but it is still much slower than forging. I say the bottom half of the pin...if you do it neatly and leave a shoulder it will still have the top part of the pin full size for when you acquire your next and larger anvil. You can always do the final squaring up of the shoulders by heating the pin and driving it into the hardy hole. Alan
-
I 100% agree with the note of caution about tidying up an anvil...and yes it took me many years to get to know some of the uses for the blemishes on mine. And hopefully I will find more in the future. What I 100% disagree with is the premise of using worn cutting tools as some form of safety measure. Especially for beginners. Old hands can make allowances and get away with it but it is not something I would ever advise beginners to do. If your flap disc is too aggressive...use one with a finer grit. A soft edge / broken in flap disc can help blend the ends of the ground area but an overly worn/bevelled/rounded one is very difficult to sense where it is contacting and cutting, again especially for a beginner. I think you have far less control with a worn or dull tool and much more control if you are using a sharp tool/fresh disc because you are not having to push hard to make it work. You can concentrate fully on what effect the tool is doing rather than putting energy into the process. The tool is not under stress nor is the wielder. You are far more likely to make a mistake through over pressure with a worn disc, than a fresh disc used lightly. Alan
-
Glen's phrase about pointing anvils to the North is a metaphor...and not a Metaforge...not even a Betterforge. Alan
-
The branch welds on that I would fireweld, you will always see where the arc starts otherwise, even if you chisel or file a vee. The firewelded branching elements just flow together. Obviously an actual flower or shrub does not look like a fire welded branch weld, but this is an interpretation of a natural form using the properties of the material...the chosen media. I would suggest you tie the leaves and petal elements together with soft iron wire and weld in one go. The butt weld between flower head and stem you could arc weld and blend/lose it...but just as difficult with a stick as with a fire weld which requires no further blending or hiding. TIG or gas might be a bit easier for that butt weld...but the over all time taken would not save money. If you want to produce a fire welded form why not fireweld it? Nothing wrong with an arc weld, but it has different characteristics and visual properties. Learning to produce a fire welded form by fire welding is a skill that is worth having...it really is win win. It is obscured by the dish but the base of the stem in the image appears to show a couple of blobs of weld which look awkward and interrupt the otherwise graceful flow of the stems. Alan
-
Without seeing the actual project it is difficult to advise, but in general terms... It will depend on the final finish of the piece. If pickled and armour bright you may see a colour change, if hot waxed you may not. If painted you won't see the colour change of the metal, but by removing one visual reference your eyes focus on the form below the paint surface and you will see the slightest hollow or waisting if you are not meticulous about maintaining the section when grinding out the weld. If the rest of the surface is hot forged texture obviously the ground or filed section of the weld will show. You can put it back in the fire and planish the joint to blend the texture. Depending on the project you might be able to use a needle descaler to texture the ground surface and blend it into the forged one. On finer work I have hammered a piece of abrasive sanding disc onto the smooth ground surface which acts as a matting punch and helps blend the textures. Welding in any form is not an unskilled option. If your piece is designed to look like it was fire welded, that is probably your best option to achieve that look. You see so many awkward looking branch welds that have been arc welded, and they still look "stuck on". The time taken to prepare, weld, and grind up will probably not save much time, if any, over fire welding and it is a poor end result visually. If you have a number to do, your fire welding skills will be greatly improved by the time you have finished! Zanni the great CoSiRA flower forging instructor over here 60 years ago used to have an anvil set in the side of the hearth for welding up his flowers...I have seen Carnations, and Roses of his that were exquisite. Alan
-
I never understand why some blacksmiths seem want to make a rule about bick direction...we have enough rules, don't need pointless self-imposed ones. Strike while the iron is hot is the only rule / guide we need to determine hearth and anvil relationship. Keep it close. For instant use I would lean back to the hearth, hammer in hand, to take out the workpiece and just swing around to the anvil, without even taking the standard "one step". The ultimate is to have an anvil block sitting in the hearth for fine flower welding. Larger workpiece, larger fire, larger distance to get the smith away from the fire's heat. Larger piece will not lose too much heat in a few steps. I keep my big furnace outside for this reason. The only reason to have the horn pointing either way is so that for the operation in hand you don't have to walk around the anvil to present the workpiece. If it is only for one heat it is probably worth walking around the anvil, most blacksmiths will have a regular bruise on their thigh at bick height! If I were going to do a lot of leaf or other spreading with the workpiece lying along the axis of the bick I would have the bick pointed to the left, and if I was using the bick as a fuller for drawing out or wrapping something around it I would tend to work with the bick to the right. Just swing it around to suit the work in hand. My anvil also happens to have larger radii on one edge so that also determines which side I stand, in order to achieve a particular profile. My shop, my anvil, my job, my reasons, my rules....same for everyone. Alan
-
It looks in great shape. If its anything like the one in my brother in law's garage, the mechanics only use it for clonking cold metal and rounding/flaring exhaust pipes by pushing them onto the end of the bick and tapping around. Great work for mushrooming and bruising. Ranchmanben and Marc1, I don't understand your "worn" flap disk description. Unless you mean "broken in"? Either way I don't see the advantage over a new one, they are designed to have a consistent cutting rate until worn out... please explain. Alan
-
And so ad infinitum. (Until proportionally they become tubes.) Alan
-
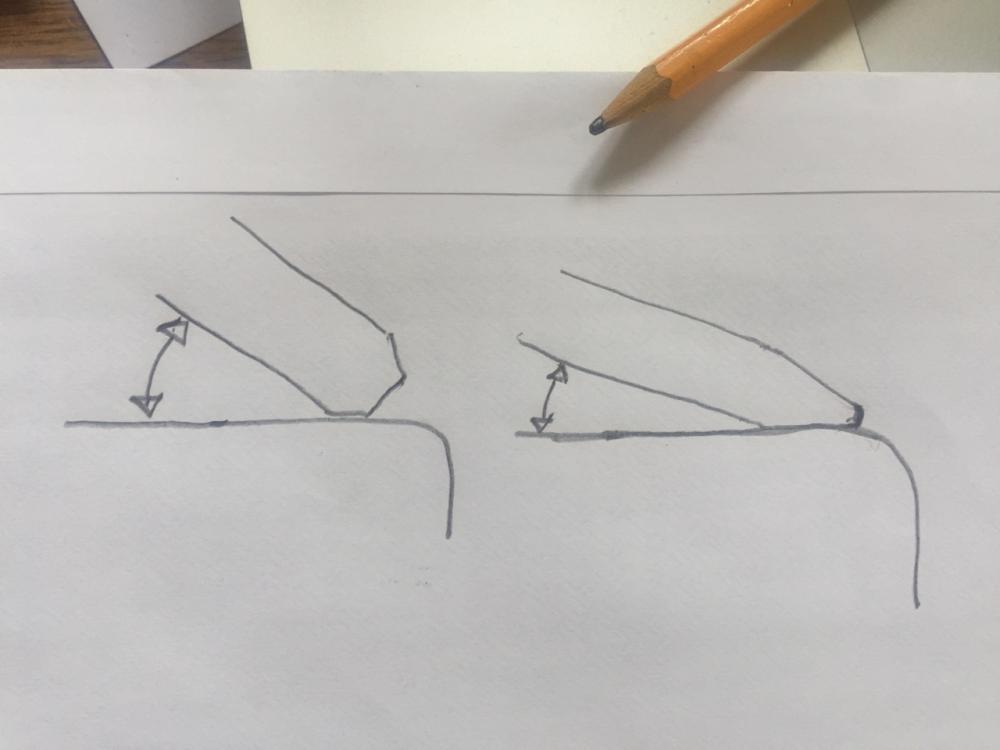
If you set up a punch you could take out the centres and make washers from them. AlanWe all end up doing that some times. And some times it is the most efficient and economic way of achieving the form we need. But in this instance the question was how to avoid fish mouthing...rather than how to correct, repair or remove it. Sometimes prevention is better than a cure. It is useful to know how to avoid it even if the required end result of a given project is best achieved by creating a fish mouth and cutting it off. AlanLike Frosty said but in slightly different words...and pictures Look at any basic blacksmith book and it will show you that when you want to form a taper/avoid fishmouthing you must first drive the corners in to form a blunt point and then lower the angle of the workpiece to the anvil to form the required taper. There are no fixed rules, and there are some variations to the above process depending on the size of stock relative to hammer power, but it is a good concept to be aware of. Essential when working wrought iron of course, the first few blows of any process with that material is to consolidate the welds of the bar and prevent not only fish mouth but fraying/delaminating. Alan
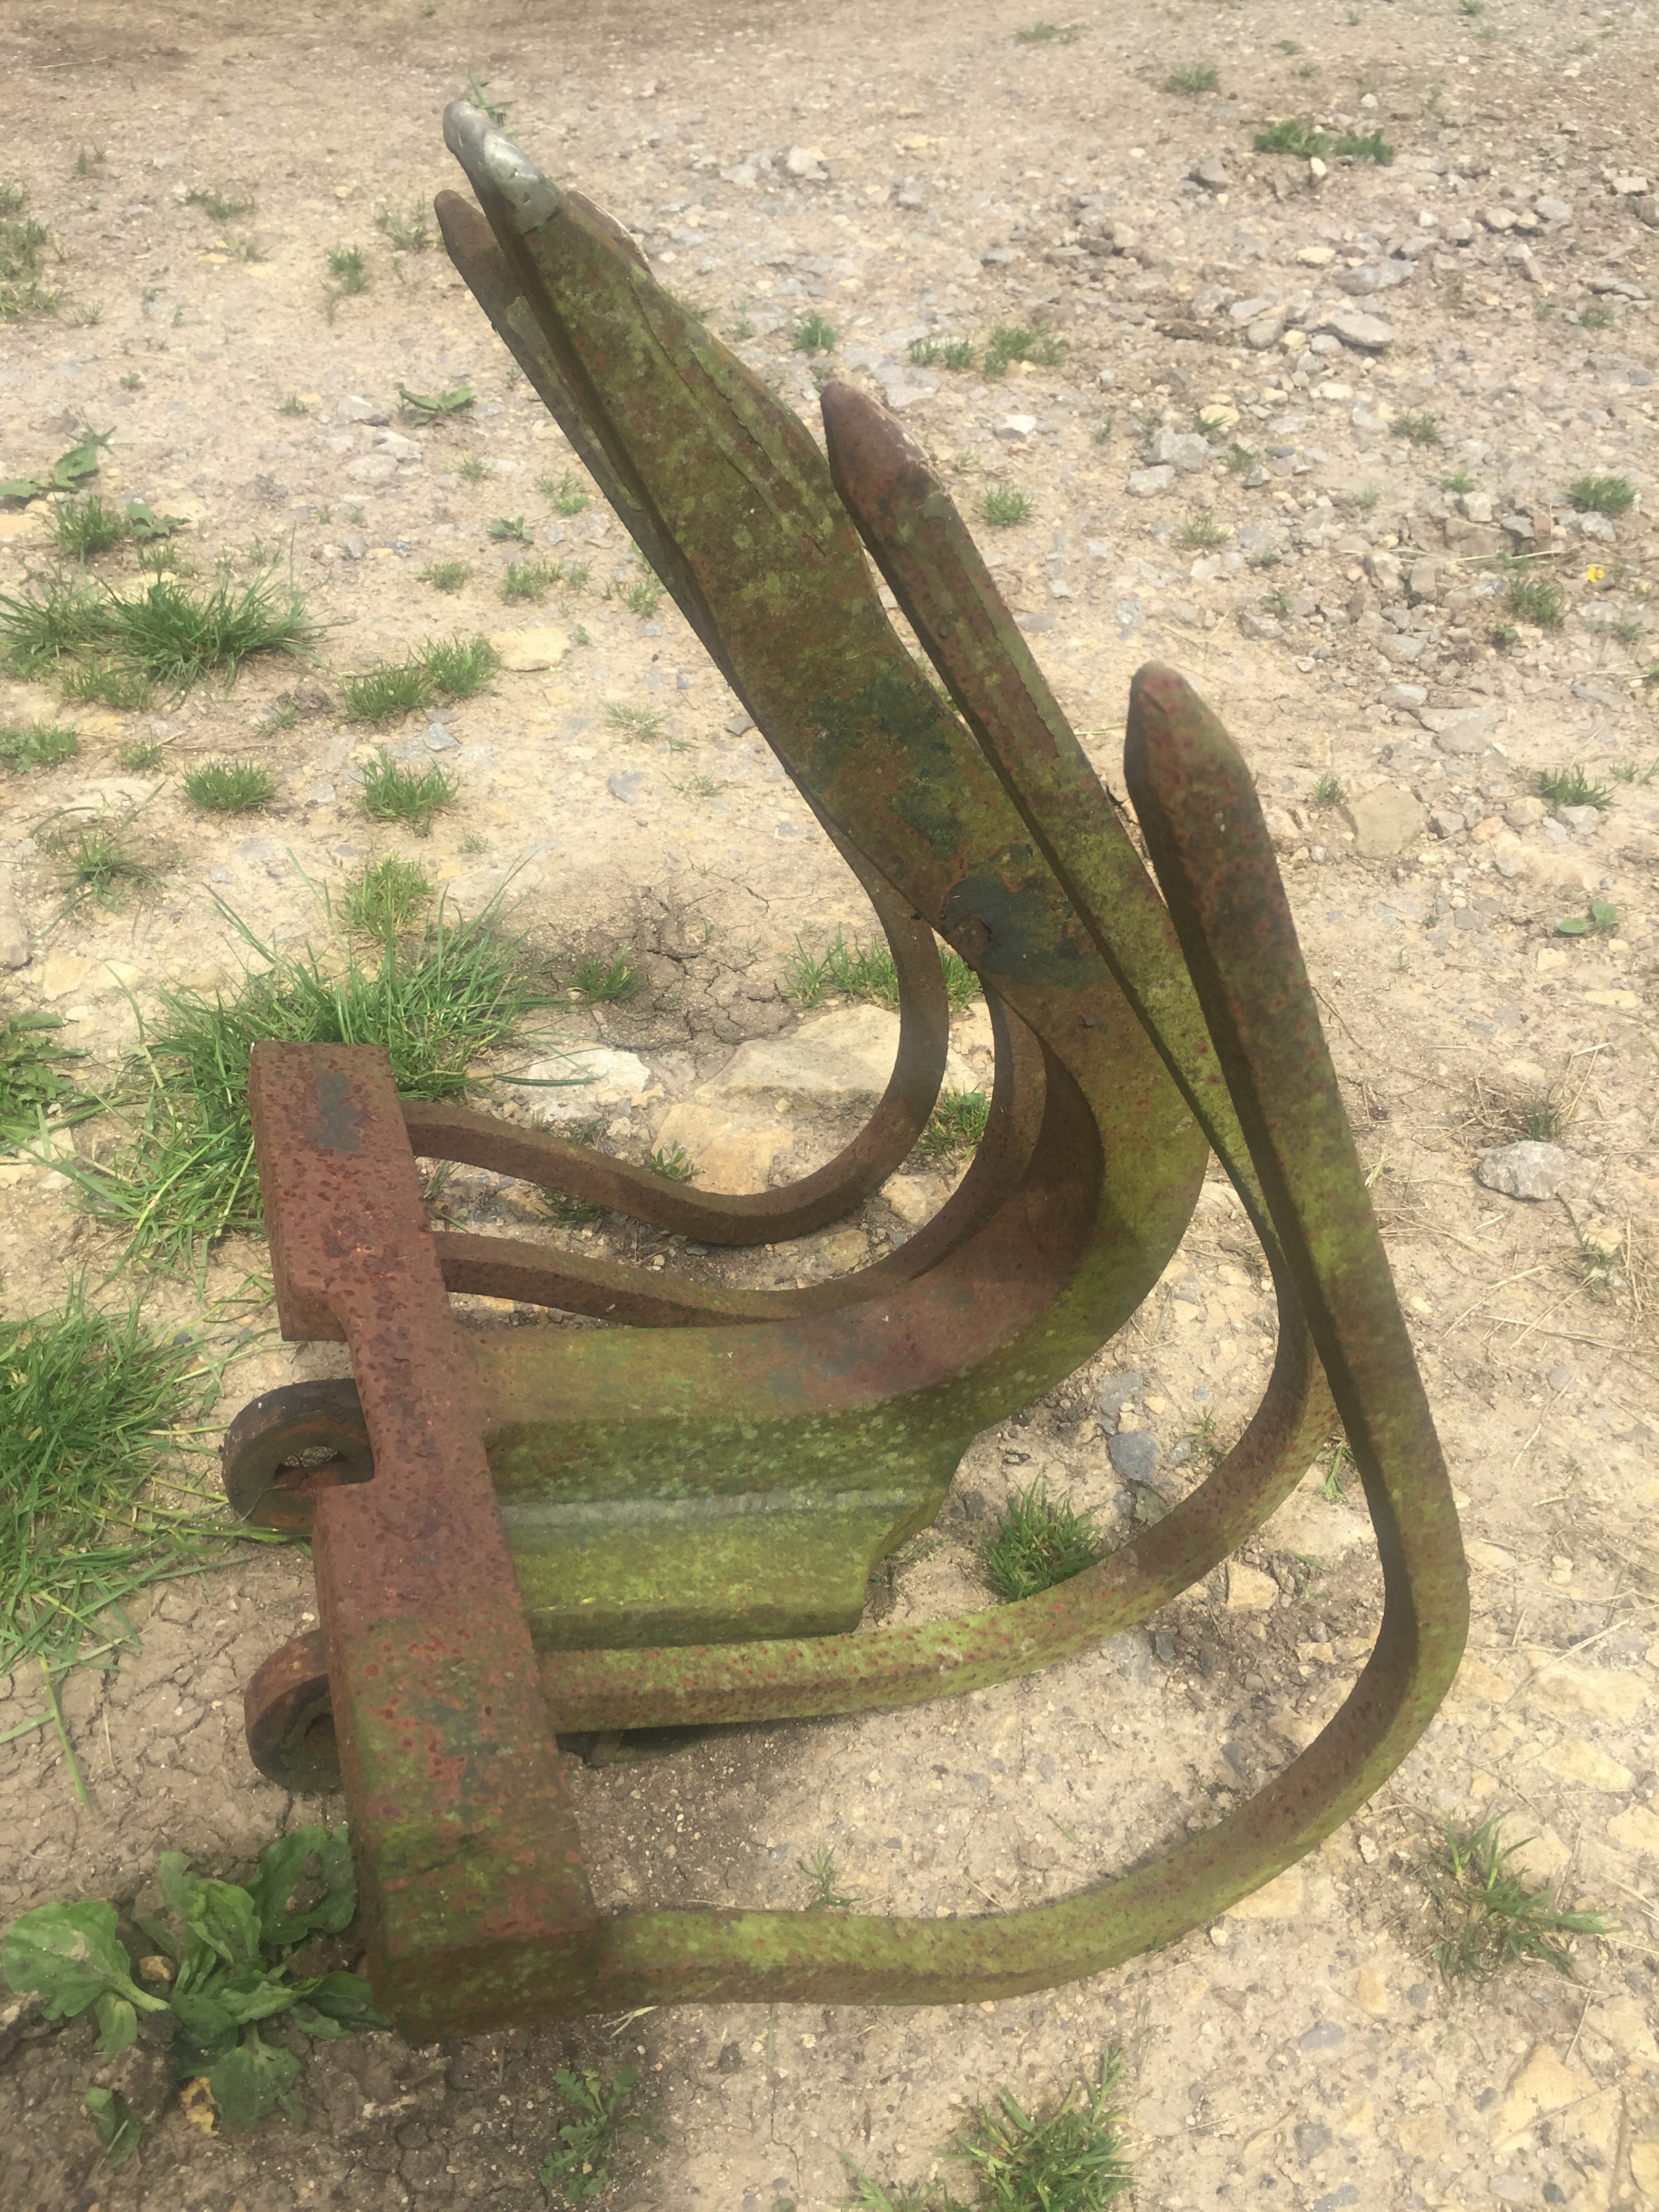
 When I was doing semi production hand forged stuff with a coke fire I always preferred a standard wire brush than a butcher style. I reckoned they were definitely a consumable item. A few pounds a month in order to get the finish I wanted was peanuts. I did find a combination of scraper and brush quite effective depending on the piece, and that prolonged the working life of the brush. I had a couple of instances of the butcher style brush digging its nose in and my hand rolling over the top which I didn't like. I did not find them as efficient to clean, especially once the piece had any form to it. The standard brushes can get into much smaller spaces and follow the contours better. AlanI have just dug this out from the long term storage nettle patch as I happened to be passing by with a strimmer. The main piece is forged from 50mm (2") square mild steel welded to 12mm (1/2") plate. You can see the 312 on the tip has survived unscathed. The little Bobcat X320 is a 1.5 tonne machine with a 3,408lbs bucket crowd and it could not bend the 50mm. As far as I can see your Kubota model has the same size motor but double the kW and has 50% more digging power...but I would still have every confidence in the 50mm square. You could always make a sharks fin shaped blade...In fact I might just put in a hard edged gusset plate in mine for tree roots...and it could double as a mobile log splitter. I already attach my log splitter ram to the dipper auxiliary pipes for firewooding. After use as a trench bottom ripper tooth I added the cross bar and some 20mm (3/4") square mild steel fork tines so I could weed an overgrown chippings heap. At one stage I added some bits of 6mm(1/4") stainless flats to link all the tips together for stone sorting and digging out clay for a pond. Cut them off to revert to weeding again. Every now and then the 20mm tines get snagged and bend but I just use the hydraulics to bend them back. The time consuming part is making the pin plates. Once that is done you can weld any configuration of implement to it and keep modifying it to suit the project... Alan
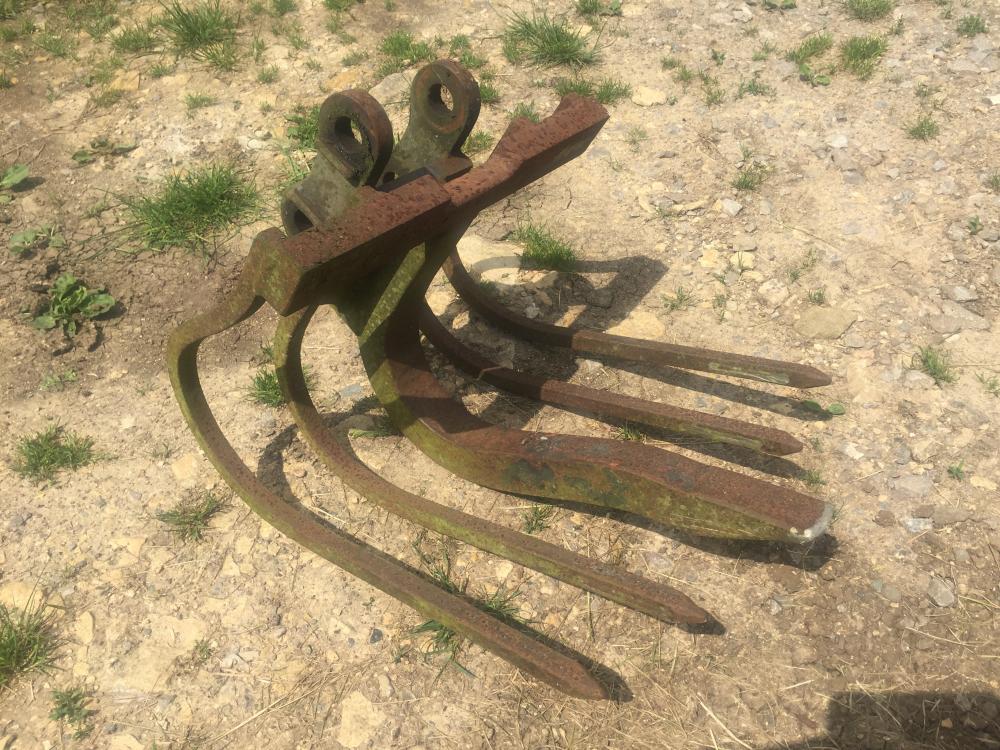
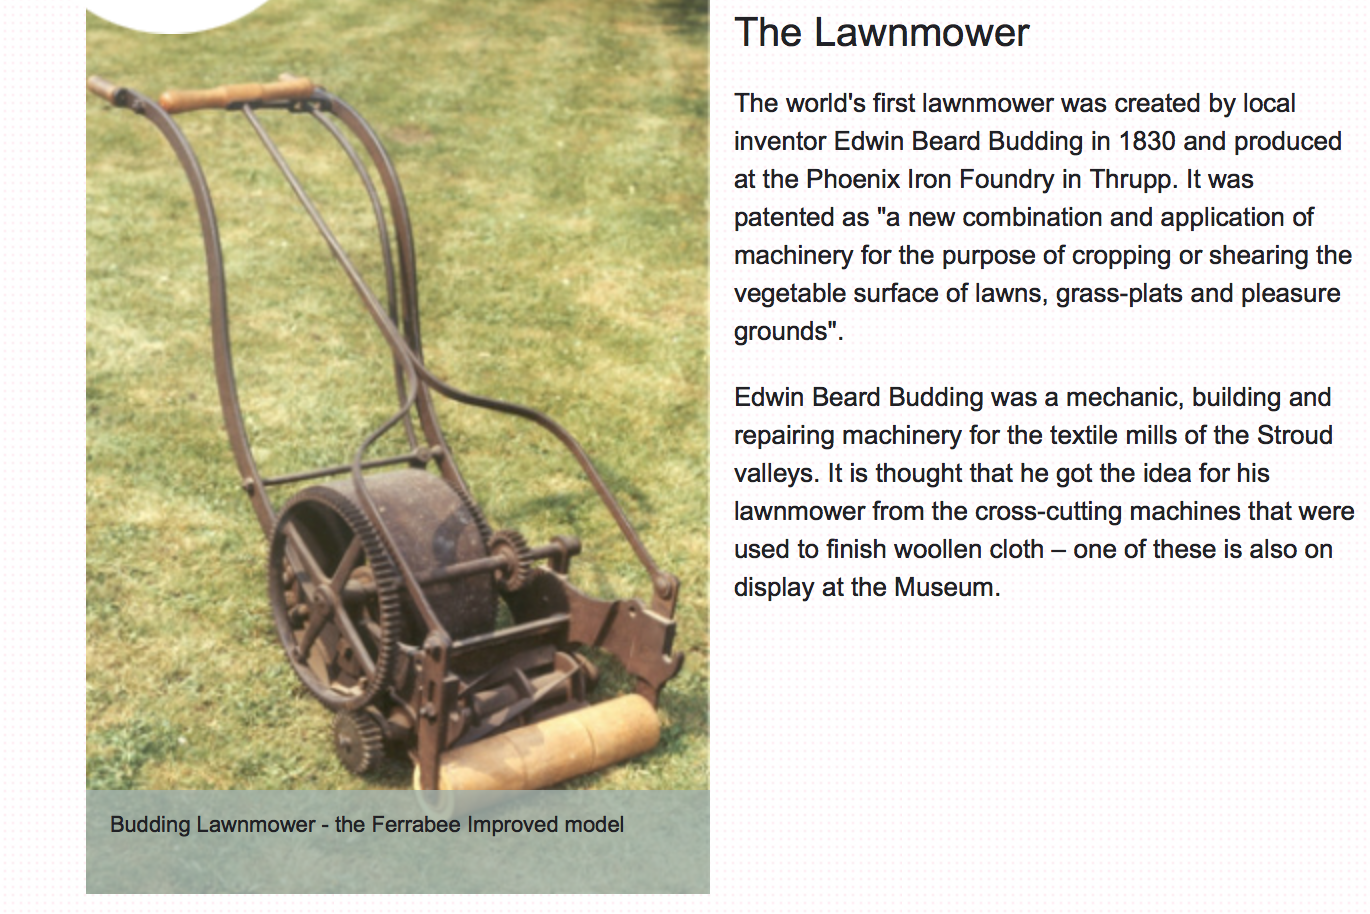
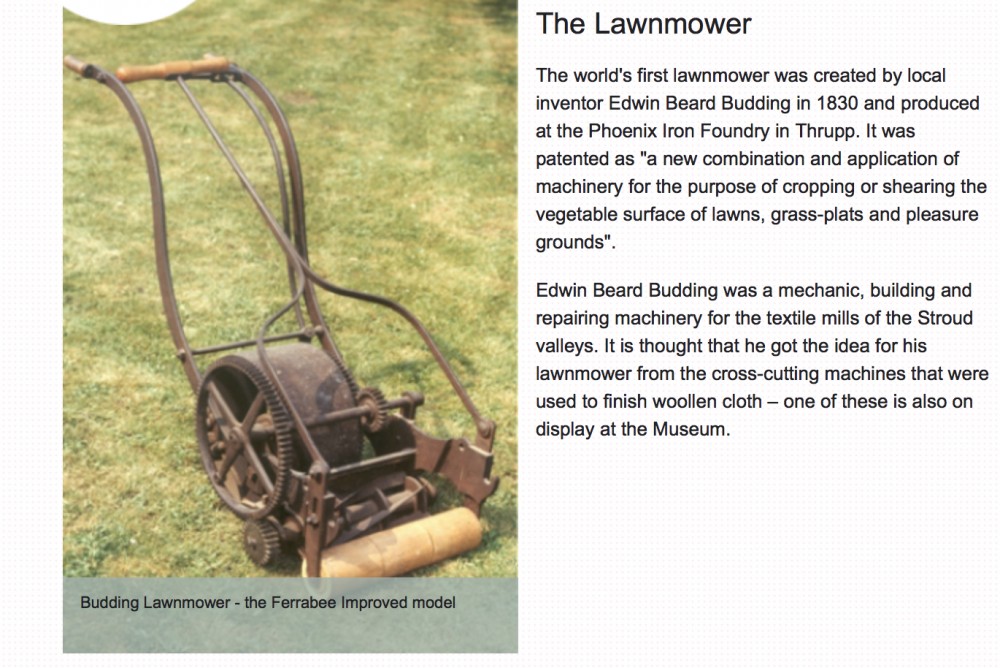
 I was going to do a "all dogs should be seen and not heard" but I decided not to make a scene. AlanI thought sheep always followed? AlanIt looks like the tee handle bar flips forward so you can have a stoker pull you up the hill. I guess you would need something like snow shoes on a horse to prevent the hooves digging in to fine turf! AlanThat venerable beast may well be the pinnacle, but apart from the BS that powers it they haven't come far from the original! Alan ps Daswulf, this one is in the Stroud Museum! http://www.museuminthepark.org.uk/featured-objects-the-lawnmower/
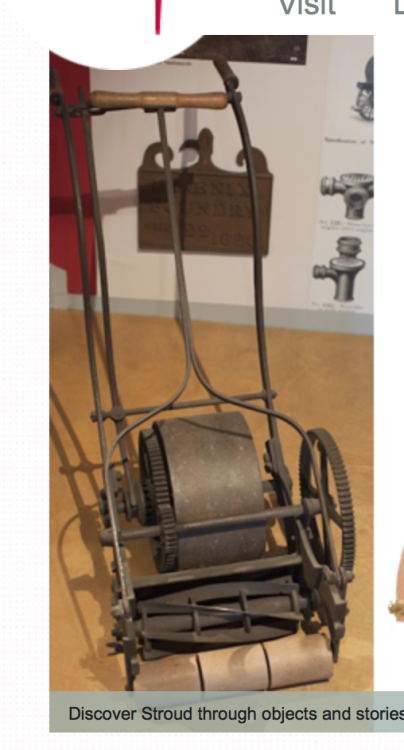
 Springers who spring to see over verdant pasture. Well I think they are springing...can't see for the grass. Fortunately for me it is several thousand square yards rather than miles, and I leave most of it to cut and make hay after the orchids have set their seeds. Alan ps If I had said Great Danes, people might have thought I was exaggerating...We went away last week and came back to grass so high the dogs could not see over it! I am strimming and mowing in-between coming in for a drink at looking on here. AlanI have an idea the American tourist in question may have been a certain Mr. Monsanto...he certainly speeded up the process for those lucky enough not to garden organically! AlanTo be fair cylinder mowers were not designed for rough work, that was their point. You had sheep and/or minions with scythes for that. Triple and more gang cylinder mowers are still used for town parks, sports fields, football and cricket pitches over here. Walk behind cylinder's for the actual cricket wicket, tennis courts and bowling greens of course...and for many domestic lawns too. Though most people settle for a rotary mower finish for their gardens now it is true...the old tale about the American tourist and the 400 years to achieve and maintain a decent lawn has gone by the wayside! Alan