

Hefty
-
Posts
288 -
Joined
-
Last visited
Content Type
Profiles
Forums
Articles
Gallery
Downloads
Events
Everything posted by Hefty
-
What did you do in the shop today?
Hefty replied to Mark Ling's topic in Blacksmithing, General Discussion
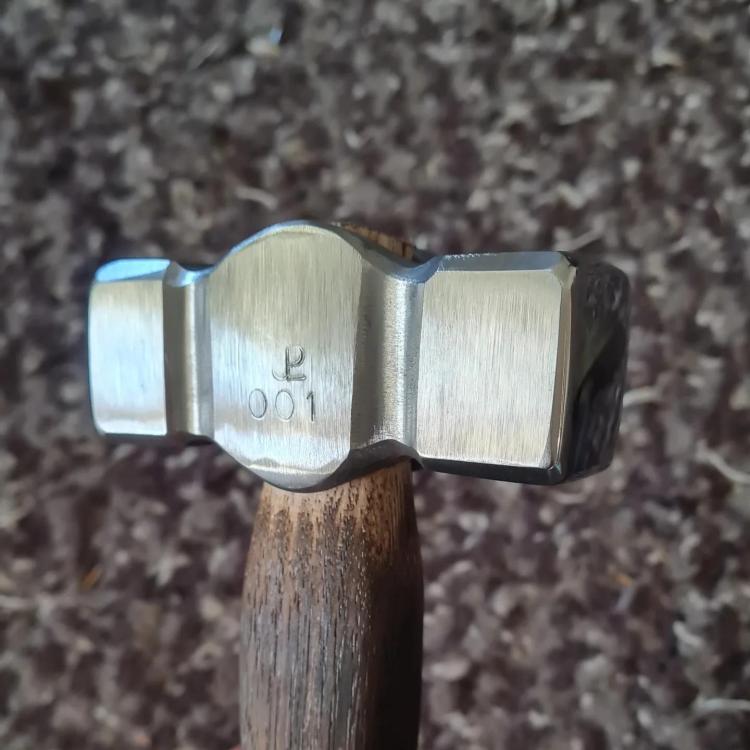
I like that Billy. If you needed to hang two off adjacent sides of one corner, it would lend itself to a stag's head kind of look. Not today, but I finally finished off my first rounding hammer over the weekend. It's been an on-again-off-again project, but I finally got some good consecutive hours in the shed to finish forging it and got it heat treated, sanded/filed/polished, and handled. I also experimented with what will be the basis of my future touchmark, with my initials overlapped. Man, it's hard to line up letter punches over the top of each other! I hope it's easier when I remember to do it hot so they can be a little deeper. By a happy coincidence it is only 20 grams lighter than my first, store-bought cross-peen hammer! Cheers, Jono.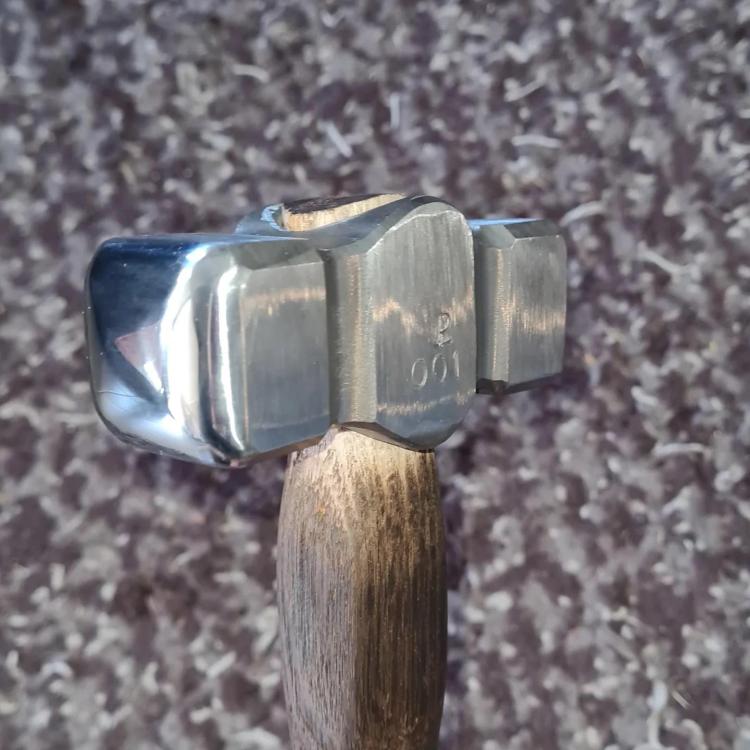
-
Sorry if this seems like a stupid question, but am I correct in thinking the towels don't have to be in contact with the kastolite, just generating the humidity in the bag?
-
Yes, and would be my eventual goal. I'm still at the point where I understand the basics and have the skills to recreate burners from known designs but I don't have the experience yet to recognise on my own, for example, that a vortex burner and a NARB plenum may not mix, but I understand why when someone more experienced, such as yourself, explains it to me. I'm not at the point where I have the time to experiment with modifying designs. The closest I come at the moment is combining parts of known designs and, as in this case, even that isn't always appropriate/advisable. Not a complaint, just acknowledging that these things take time. I can't be forging things, building a second forge, and designing a burner all at the same time.
-
That's a fair enough explanation. I was mainly hoping to do it because I had the 3d printed burner already. I can put together a linear or another T burner for a NARB easily enough. At this stage, it's still a round tuit job anyway.
-
Oh, I didn't realise they don't mix. I was actually thinking about basing a NARB on AFBs 3d printed vortex burner. So, would the further braking force of the plenum chamber cause the already comparatively slower vortex flow of FAM to burn back in the mixing tube? I guess I could just 3d print a linear assembly, without the vortex vanes.
-
Yep, no worries Frosty. I'm thinking maybe I should put the text of the first post into a PDF attachment so I can update it as these clarifications come up. Anything that makes this information easier to access and understand is good. I forgot that there's only a short window for editing a post. Also, any advice on terminology for main run and drop, or their equivalents, for the Y fitting on a Z burner. Is it just called an angled branch/drop? (P, D, F, Y, Z?!, it's alphabet soup around here!)
-
I had heard of the Anvilfire site before but only looked at it in any depth recently when researching power hammer build designs. I only learned who Jock was and that he had passed away after that and still I can tell it was quite a loss to the blacksmithing community.
-
This thread is intended as a starting point for people wanting to know about what different kinds of naturally aspirated burners available to build or buy. When I first started looking around, it all seemed like too much information in too many different places and I wished I could find some kind of overview of the types of NA burners available. I’ve built a few of these burners myself now, but I’m still fairly new to it. I love to build things myself, either to save money (never really works out that way) or to learn more about things and better understand how and why they work. I’m starting to get my head around the how and why, but THIS IS NOT BURNERS 101. I’m not in any way experienced or qualified to give detailed information about HOW to build each of these burners. Different dimensions, and ratios of dimensions, and tuning methods apply differently to each of them and there are many members on the forum (Mikey, Frosty, AnotherFrankenBurner to name just a few) with far more experience and knowledge specific to their construction. (I know, because I’ve already asked the three I just listed many questions myself!!). Also, note that I haven't included information about NARBs as I'm mainly focused here on the NA aspect at the input end of the burner and I see ribbon, or multi-orifice, burners as being part of the flame side of the burner, similar to, or in replacement of, a flame retention nozzle. (And yes, I know that these all have very different tuning requirements and effects on the actual burner flame, too!) So, without further ado, here is a basic list of common types of NA burners and an entry level description of how they work: Frosty T burner: NA jet ejector burner where air is induced by gas from a mig tip drilled through the back of a 2 to 1 reducing T pipe fitting into the mixing tube. The two larger sides of the T allow maximum air to be induced and the “stem/upright” of the T is the connection to the mixing tube. Originally designed/discovered by Jerry Frost (Frosty) with detailed instructions in its own thread in the gas forges section of this forum. (I know this one - I've built two) Side-arm burner: NA jet ejector burner where air is induced by gas from a mig tip installed in a plug (or similar) through one side of a 2 to 1 T pipe fitting, with the mixing tube attached to the other side. Air is induced through the “stem/upright” of the Tee. The original version was a misinterpretation of Frosty’s instructions to make a Frosty T burner, by Robert Groman. A modified version was developed by Larry Zoeller using tapered reducing fittings. Z burner: A further development of the side arm burner, this is an NA jet ejector burner where air is induced by gas from a mig tip installed in a plug (or similar) through one side of a “Y” pipe fitting. I have no experience with these burners myself but my understanding from what I have read about them is that the air induced through the angled “stem” of the fitting tends to be more streamlined than from the side-arm and mixes better with the gas stream. Mikey burner: NA jet ejector burner where air is induced by gas from a mig tip through 3 (ideally - beveled edged) slots into the mixing tube. Designed by Mike Porter (Mikey) and presented with detailed instructions in his book. Linear burner: NA burner where air is induced by gas from a gas orifice, through a reducing funnel into the mixing tube with the direction of induction parallel/linear to the gas jet direction. There are many variations on this design. One well-known example is the design by Ron Reil. The original of the Ron Reil design used a hole drilled in a brass pipe mounted across the intake funnel. Other common variations replace this with an orifice in the end of a pipe centred on the same axis as the mixing tube. Vortex burner: NA burner, similar in concept to the linear burner, where air is induced by gas from a gas orifice (usually a mig tip or 3d printer nozzle) through a trumpet bell shaped funnel into the mixing tube. An "Aerospike" and vanes encourage vortex flow in the induced air as it enters the funnel, causing better mixing of the gas and air in the mixing tube. Currently well-represented by designs from AnotherFrankenBurner in the “3D printed plastic burner experiments” thread in the gas forges section in this forum. (I’ve made one of these so far but intend on making a few more) Fan-induced vortex burner: NA burner where air is induced by gas from a gas orifice, through a reducing funnel into the mixing tube with the direction of induction parallel/linear to the gas jet direction. A computer-style fan is used, not to force air, but to encourage vortex flow in the induced air as it moves through the funnel into the mixing tube. Designed by Mike Porter (Mikey) with pictures forthcoming when available. I'm sure there are more, and as I mentioned in the burners 101 thread where this idea started for me, some of this may need correction from those in the know, so please if you have more to add, post it below! Thanks, Jono.
-
Jet ejectors, that's right!! I knew it was "jet something" and I knew they induce air so I cobbled the wrong words together! You're right, I forgot about side arm burners, and I've heard of z burners but don't think I've seen one (or if I did, I didn't realise what it was). I'll do some more research and see if I can write up some more descriptions and add some photos (with credit where it's due) and maybe I'll start a new thread so it's easy for newbies like me to find. Cheers, Jono.
-
May I slightly hijack to ask a relevant burner question, please? I've searched the site (using site:iforgeiron.com) to find some threads and images to clarify, but I'm trying to find clear examples of each type of NA burner by their most common names. Can all of you people-in-the-know please tell me if I have all of these correct? (I've underlined where I'm not sure, or don't know) Frosty T burner: NA jet induction burner where air is induced by gas from (usually) a mig tip through a 2 to 1 reducing T pipe fitting into the mixing tube, originally designed/discovered by Frosty with detailed instructions in its own thread in the gas forges section of this forum. (I know this one - I've built two) Mikey burner: NA jet induction burner where air is induced by gas from (usually) a mig tip through 3 (ideally - beveled edged) slots into the mixing tube. Designed by Mikey and presented with detailed instructions in his book. Linear burner: NA jet induction burner where air is induced by gas from a gas orifice, through a reducing funnel into the mixing tube with the direction of induction parallel/linear to the gas jet direction. (Does a Ron Reil burner fit this description even though the original design has the gas delivered by a pipe at right angles to the orifice itself, or am I just splitting hairs?) Vortex burner: Is this the name used for AnotherFrankenburner's design that he has been experimenting with in the 3D printed burner design thread? NA jet induction burner, similar in concept to the linear burner, where air is induced by gas from a gas orifice (mig tip or 3d printer nozzle) through a trumpet bell shaped funnel into the mixing tube. An "Aerospike" and vanes encourage vortical ??? (is it "spin" or "flow" here) in the induced air as it enters the funnel, causing better mixing of the gas and air in the mixing tube. Fan-induced vortex burner: I haven't seen one of these but have seen Mikey reference the concept often in this thread. Mikey, have you (or anyone) made one of these, or is it currently a thought-experiment yet to be carried out? NA jet induction burner where air is induced by gas from a gas orifice, through a reducing funnel into the mixing tube with the direction of induction parallel/linear to the gas jet direction. A computer-style fan is used, not to force air, but to encourage vortical ??? (again, not sure if it's "spin" or "flow" here) in the induced air as it moves through the funnel into the mixing tube. What other types of NA burners have I forgotten? I haven't included NARBs because I was mainly focussing on the NA aspect of the burner, not the flame itself. With any necessary corrections, and maybe some pictures, I thought this might make a good starting point/reference for people learning about the different types of NA burners to find the info all in one place. Let me know how I did. Cheers, Jono.
-
I think it might be to raise the vise higher because the leg/post is too short for where it is mounted, compared to his working height?
-
"It's great therapy just to heat, beat and repeat." and "My forge is my fidget spinner" - Jason L (they'd both make good t-shirt slogans!)
-
Templehound, for such a BIG knife, it still has such good fit up and finish! Those fullers are a thing of beauty! Cheers, Jono.
-
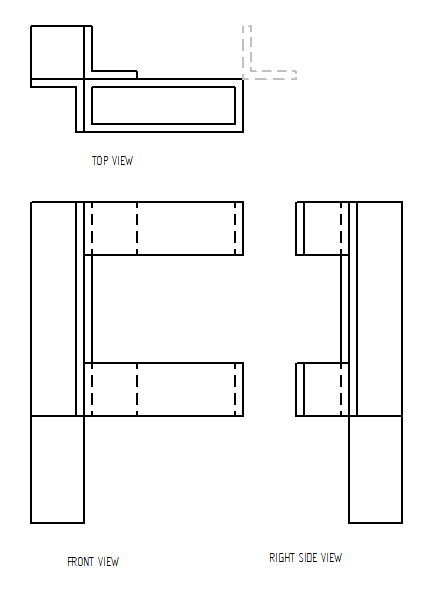
I saw and appreciated this video and it got me thinking about guillotine tools, too. I'm still only beginning my blacksmitherly journey and I'm planning to do bladesmithing and blacksmithing along the way, so I am planning an offset guillotine tool that will double as a blade fullering tool in future. Where Mark's has two pieces of square tube welded to some angle iron for the hardy hole, I'm going to make some form of hardy shank (tube/angle iron/etc) and then weld two opposing pieces of angle iron to it, upright, to make an "X" cross-section, then I'll weld two pieces of rectangular RHS into the opposite opening of the upright "X" to take dies made from some large leaf spring that I have. I'll have to either weld the top and bottom die guides on with separate pieces of angle iron "X", or cut the webs in between to allow the tool to be used from both sides. Depending on how sturdy I need it to be, I may weld another pieces of angle iron, offset to the outside of the tool, as another support on the far side. Here's a working drawing of what I'm thinking of. The possible offset support is in grey in the top view. Now that I look at it again, I might need to extend the offset on the right side view to allow a blade to fit past the hardy shank/upright. Whadya think?
-
Hehe, my mother said that time and again to my older brother and he had to suffer the same as her! I've also found myself, in multiple different contexts just this week, noticing how fitting Hanlon's razor (mentioned above) is.
-
3D printed plastic burner experiments (photo heavy)
Hefty replied to Another FrankenBurner's topic in Gas Forges
Jake, not sure if you have some knowledge and experience of CAD software but if you do, AFB's pictures of his different numbered versions will be enough to give you an initial design to tweak. That's what I did! Some things will depend on what software (if any) you have experience with. What I did was to insert one of AFB's images into a sketch, scale it to match the size of the pipe I had and trace it. Then I created a revolved 3d profile from that to get the "trumpet bell" funnel shape and the "aerospike" shape (as Frosty calls it). I then used the same method with one of his section views of the vanes onto the top view of the funnel and did a helical revolve to get the spiral shape (tools and terminologies may vary between software). I hope that makes sense. Cheers, Jono. -
I just did a quick search and found a few. I won't list them all. Hopefully, others will be encouraged to look some up, too. I found it surprisingly interesting. Turns out the "duck test" is a razor. As in, "if it walks like a duck and quacks like a duck, it's probably a duck."
-
Coming up With a Touchmark Design
Hefty replied to NoGoodWithUsernames's topic in Tools, general discussion
I like it. Simple yet elegant. And there's plenty of room for tweaking the dimensions and proportions of the different letters, and the different "legs" of each letter. -
Not to hijack the thread, but would knee tongs like this work well for gripping pots/pans for campfire cooking? I've been thinking about making some as a replacement handle, kinda like a camp oven/dutch oven lifter but for a skillet, so I can nest pots and pans when travelling.
-
Judging by the shades of paint on the grass, it's freshly painted sheep fencing (Sorry, couldn't help but notice)
-
Mikey and Frosty, do you think notched "cut and shut" pipe methods could be used to make decent burners with tapered intakes and mixing tubes? I've seen youtube videos on this sort of method on a larger scale in the past (when I knew a lot less about burners) but I wondered if the inside would be too "chunky" to get good vortex mixing on smaller burners?
-
Nice!
-
Nice, thanks! Yeah, I just got a TIG welder myself and it's a STEEEEP learning curve!
-
What did you do in the shop today?
Hefty replied to Mark Ling's topic in Blacksmithing, General Discussion
Brings a whole new meaning to a "hot date"! -
Das, are your steel sculptures and ornaments MIG, TIG or stick welded? And, if TIG, autogenous or with filler rod? Cheers, Jono.

