Hefty
-
Posts
288 -
Joined
-
Last visited
Content Type
Profiles
Forums
Articles
Gallery
Downloads
Events
Everything posted by Hefty
-
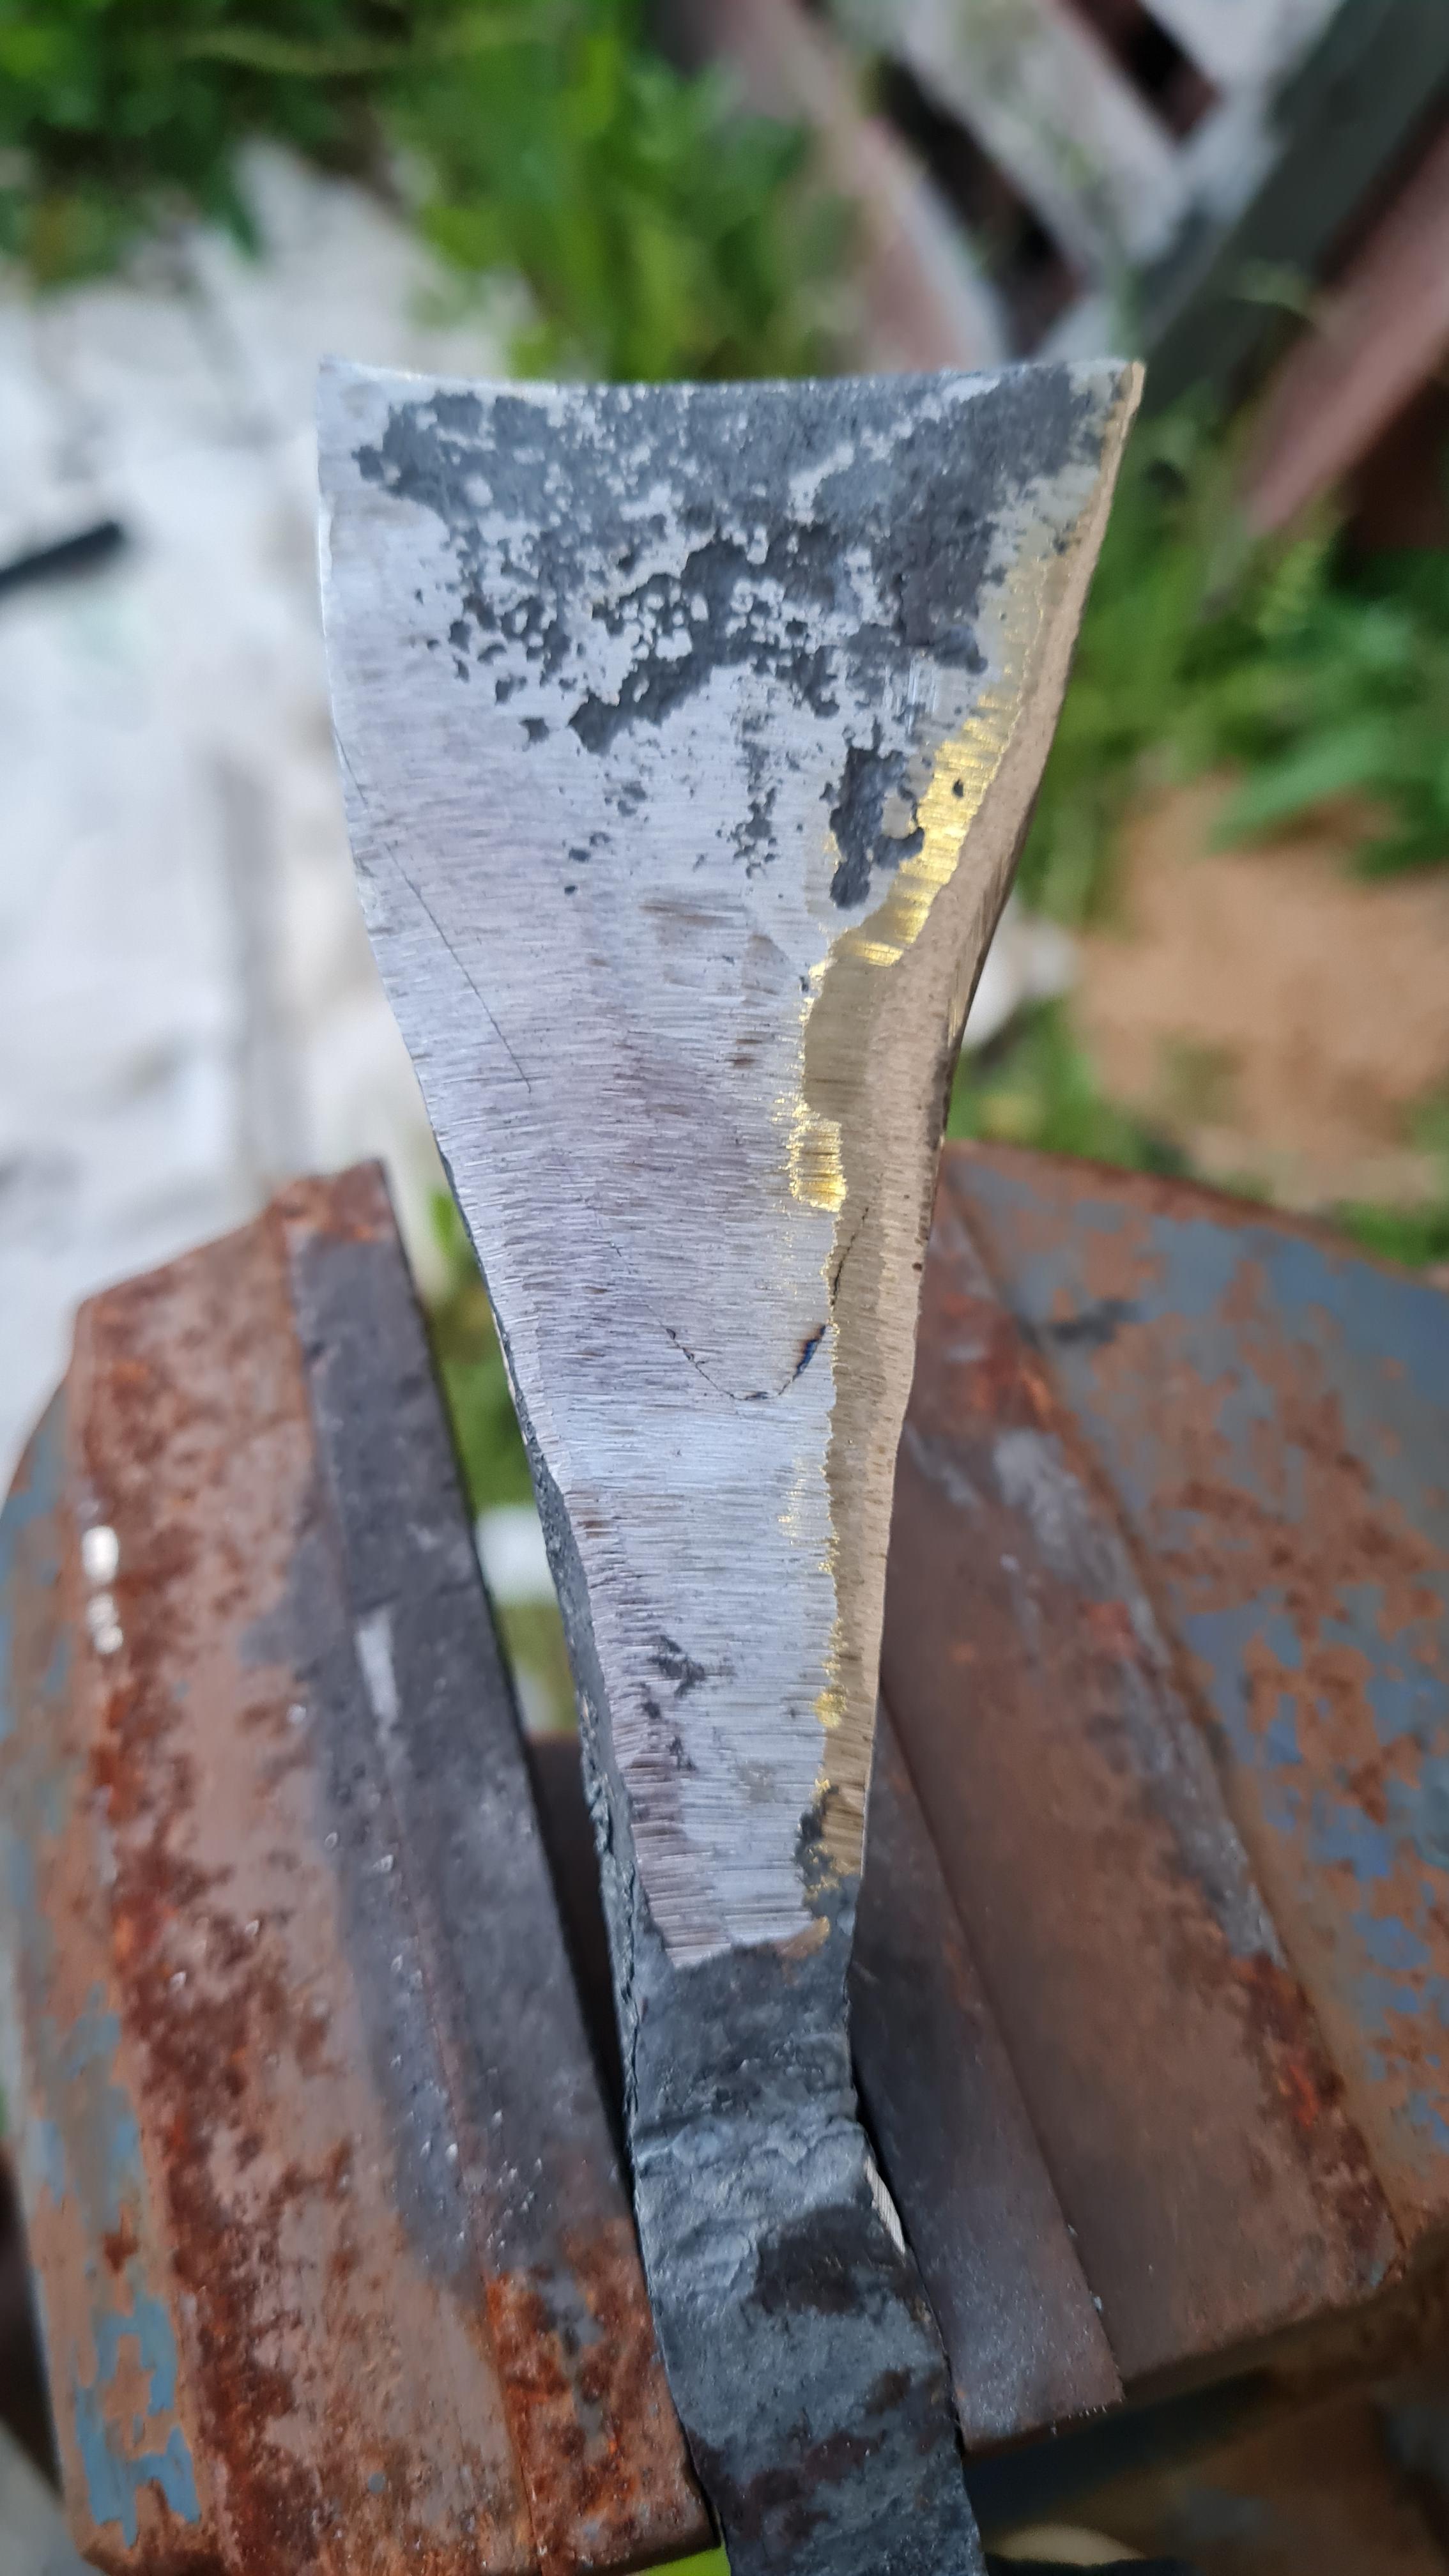
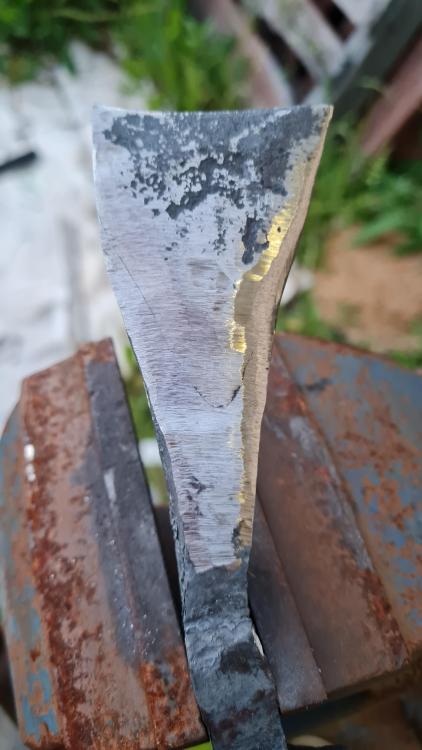
Hmmmm, I may have some sections that haven't taken properly then. The are a few little blued spots at the edge. I went with the lap weld because I had drawn out the parent material too thin in trying to get some depth in the blade section. My original intent was to split the end and insert the bit but I had seen this method in a video somewhere (I think it was one of John switzer's videos) and thought it would be a less fiddly solution to my problem.
-
Yep, both of those explanations make sense. Thanks to you both! Going back to the forge weld above: Is it normal to still have such a clear delineation between the two steels after grinding back, or does this suggest the weld has not taken properly? I know damascus shows delineation but that is more from the difference in brightness of the etched steels. I've only done two other successful forge welds and they were in a charcoal JABOD.
-
Also, towards the end of the session, my burners started to sputter/backburn so I shut them down and checked the tank. It was icing up and getting low. I know this is common, but I want to make sure I'm understanding this correctly. Is it the low volume left that would have caused the sputtering? or, the icing up? Or are they one and the same in terms of symptom/cause?
-
If you ever cross the ditch, in some areas over here people sell them for a dollar each or $50 a bucket load!
-
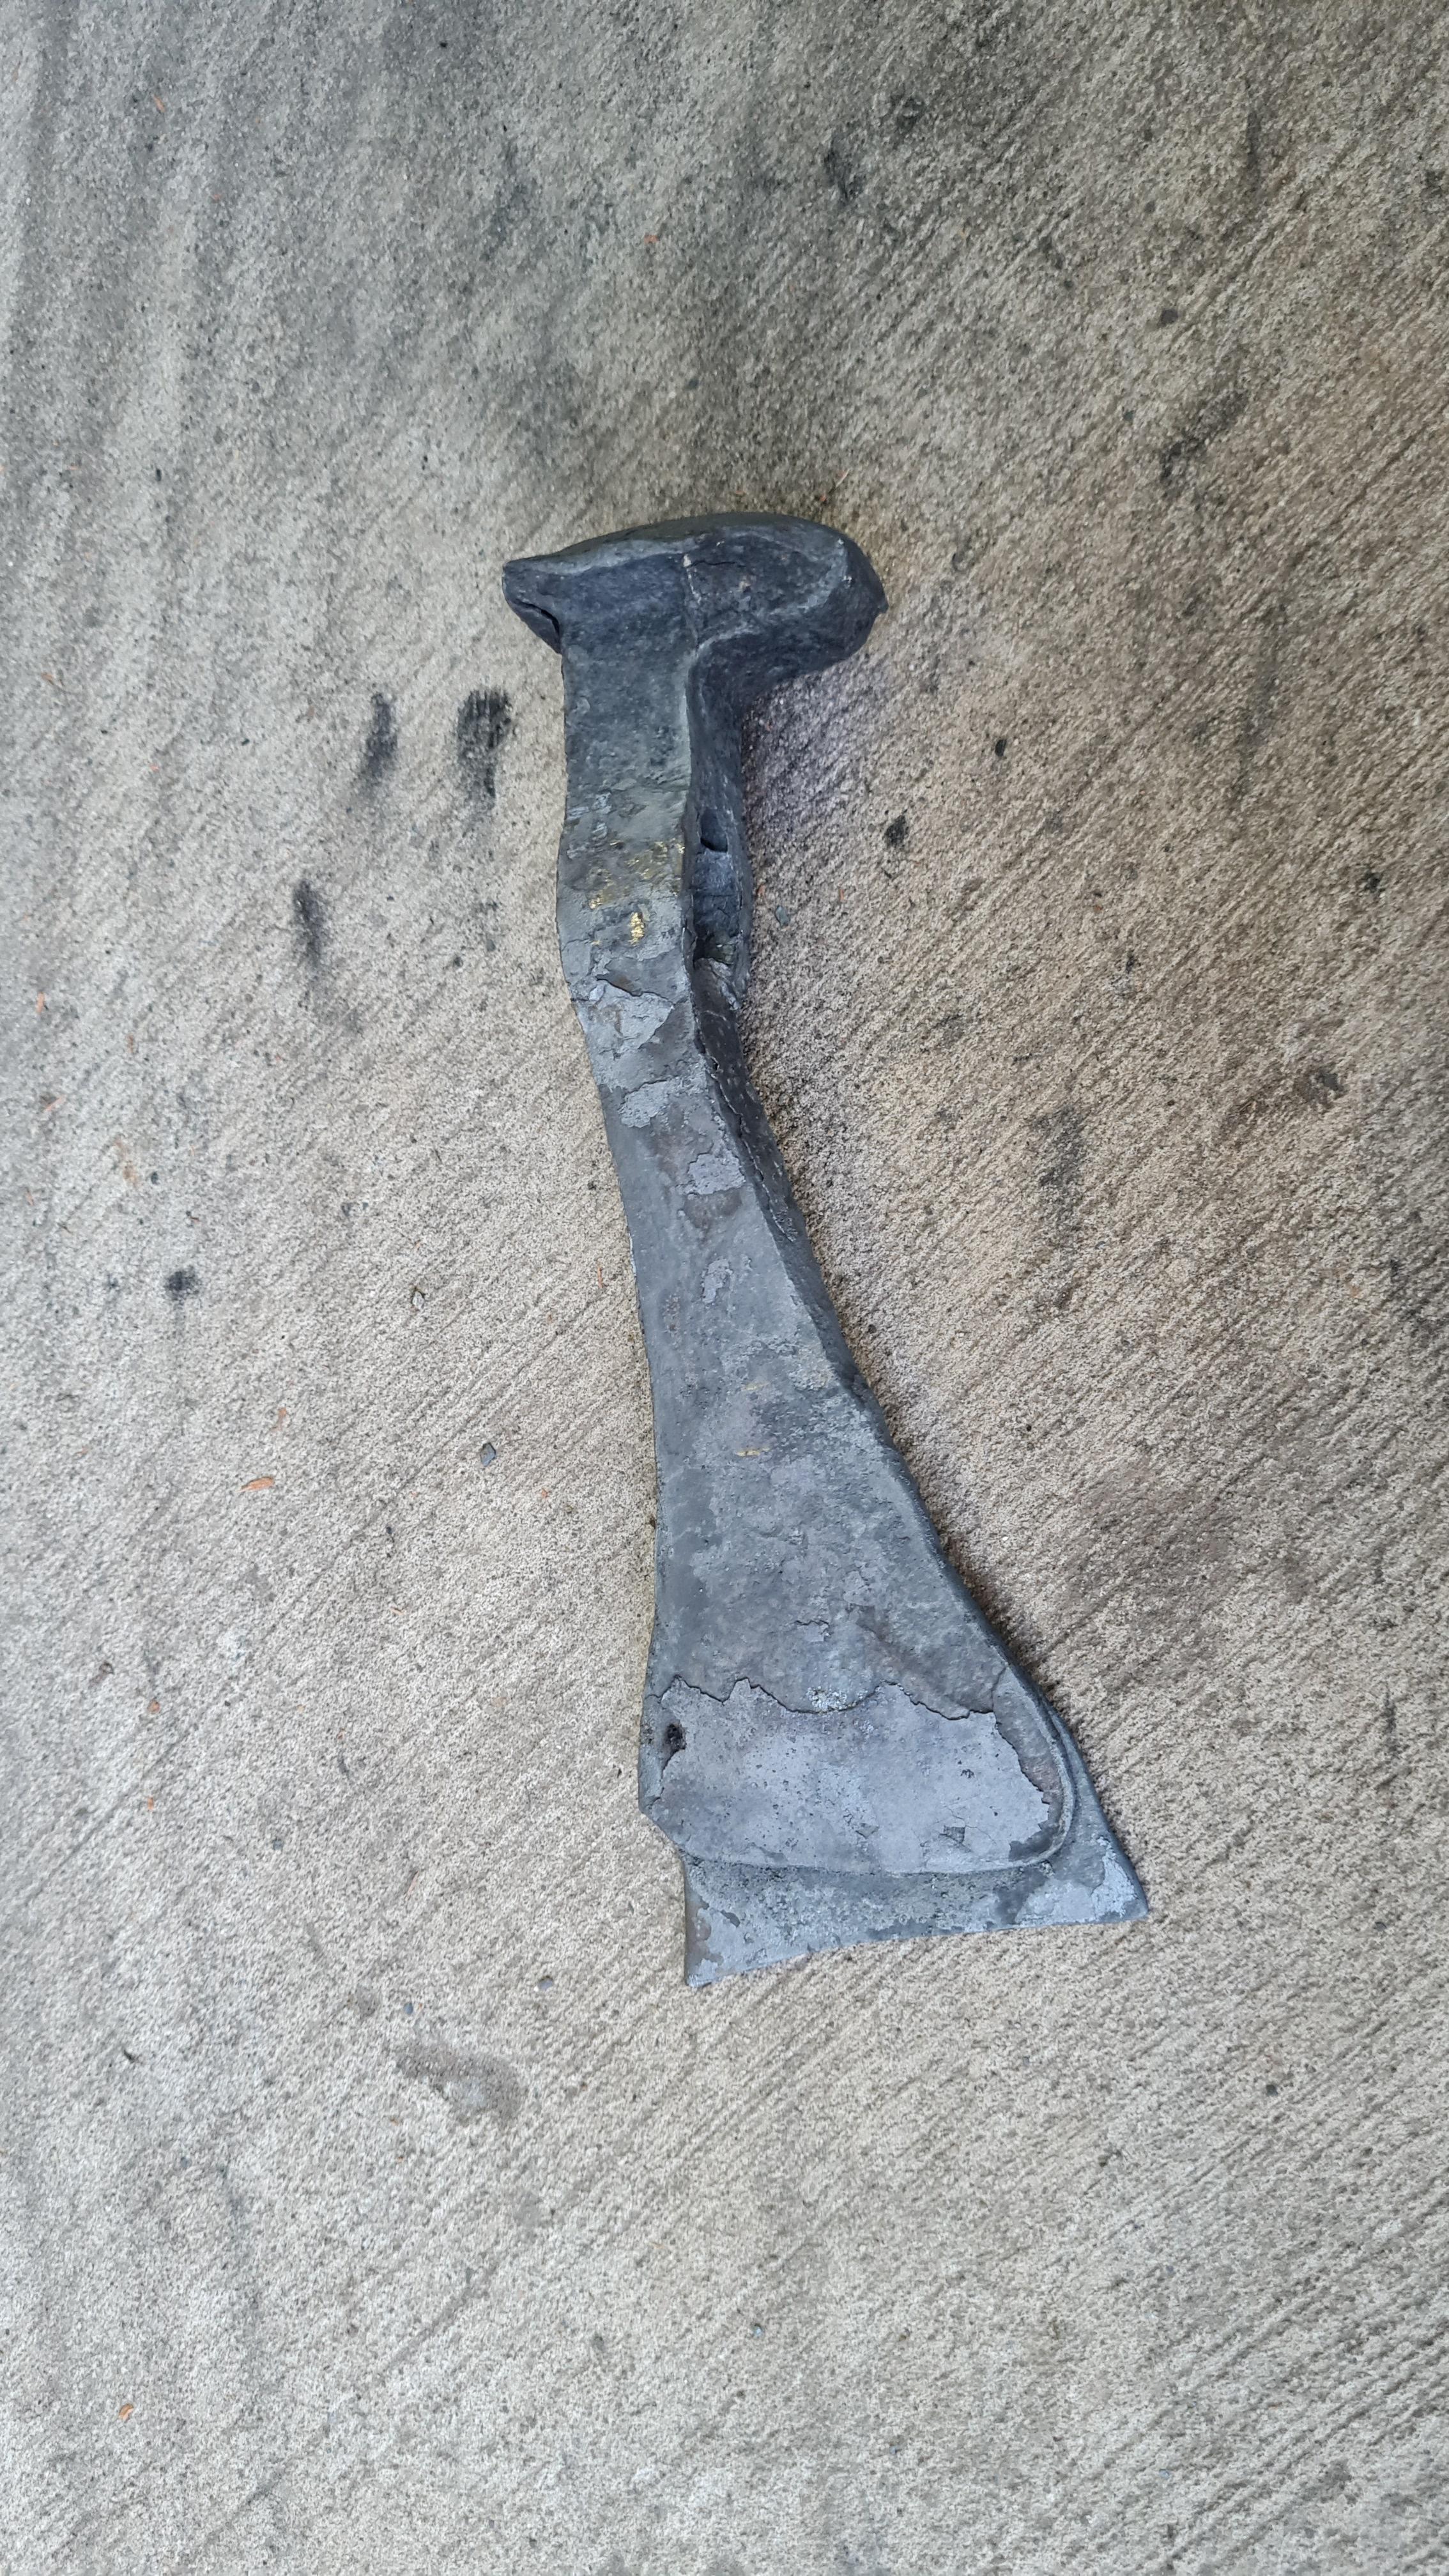
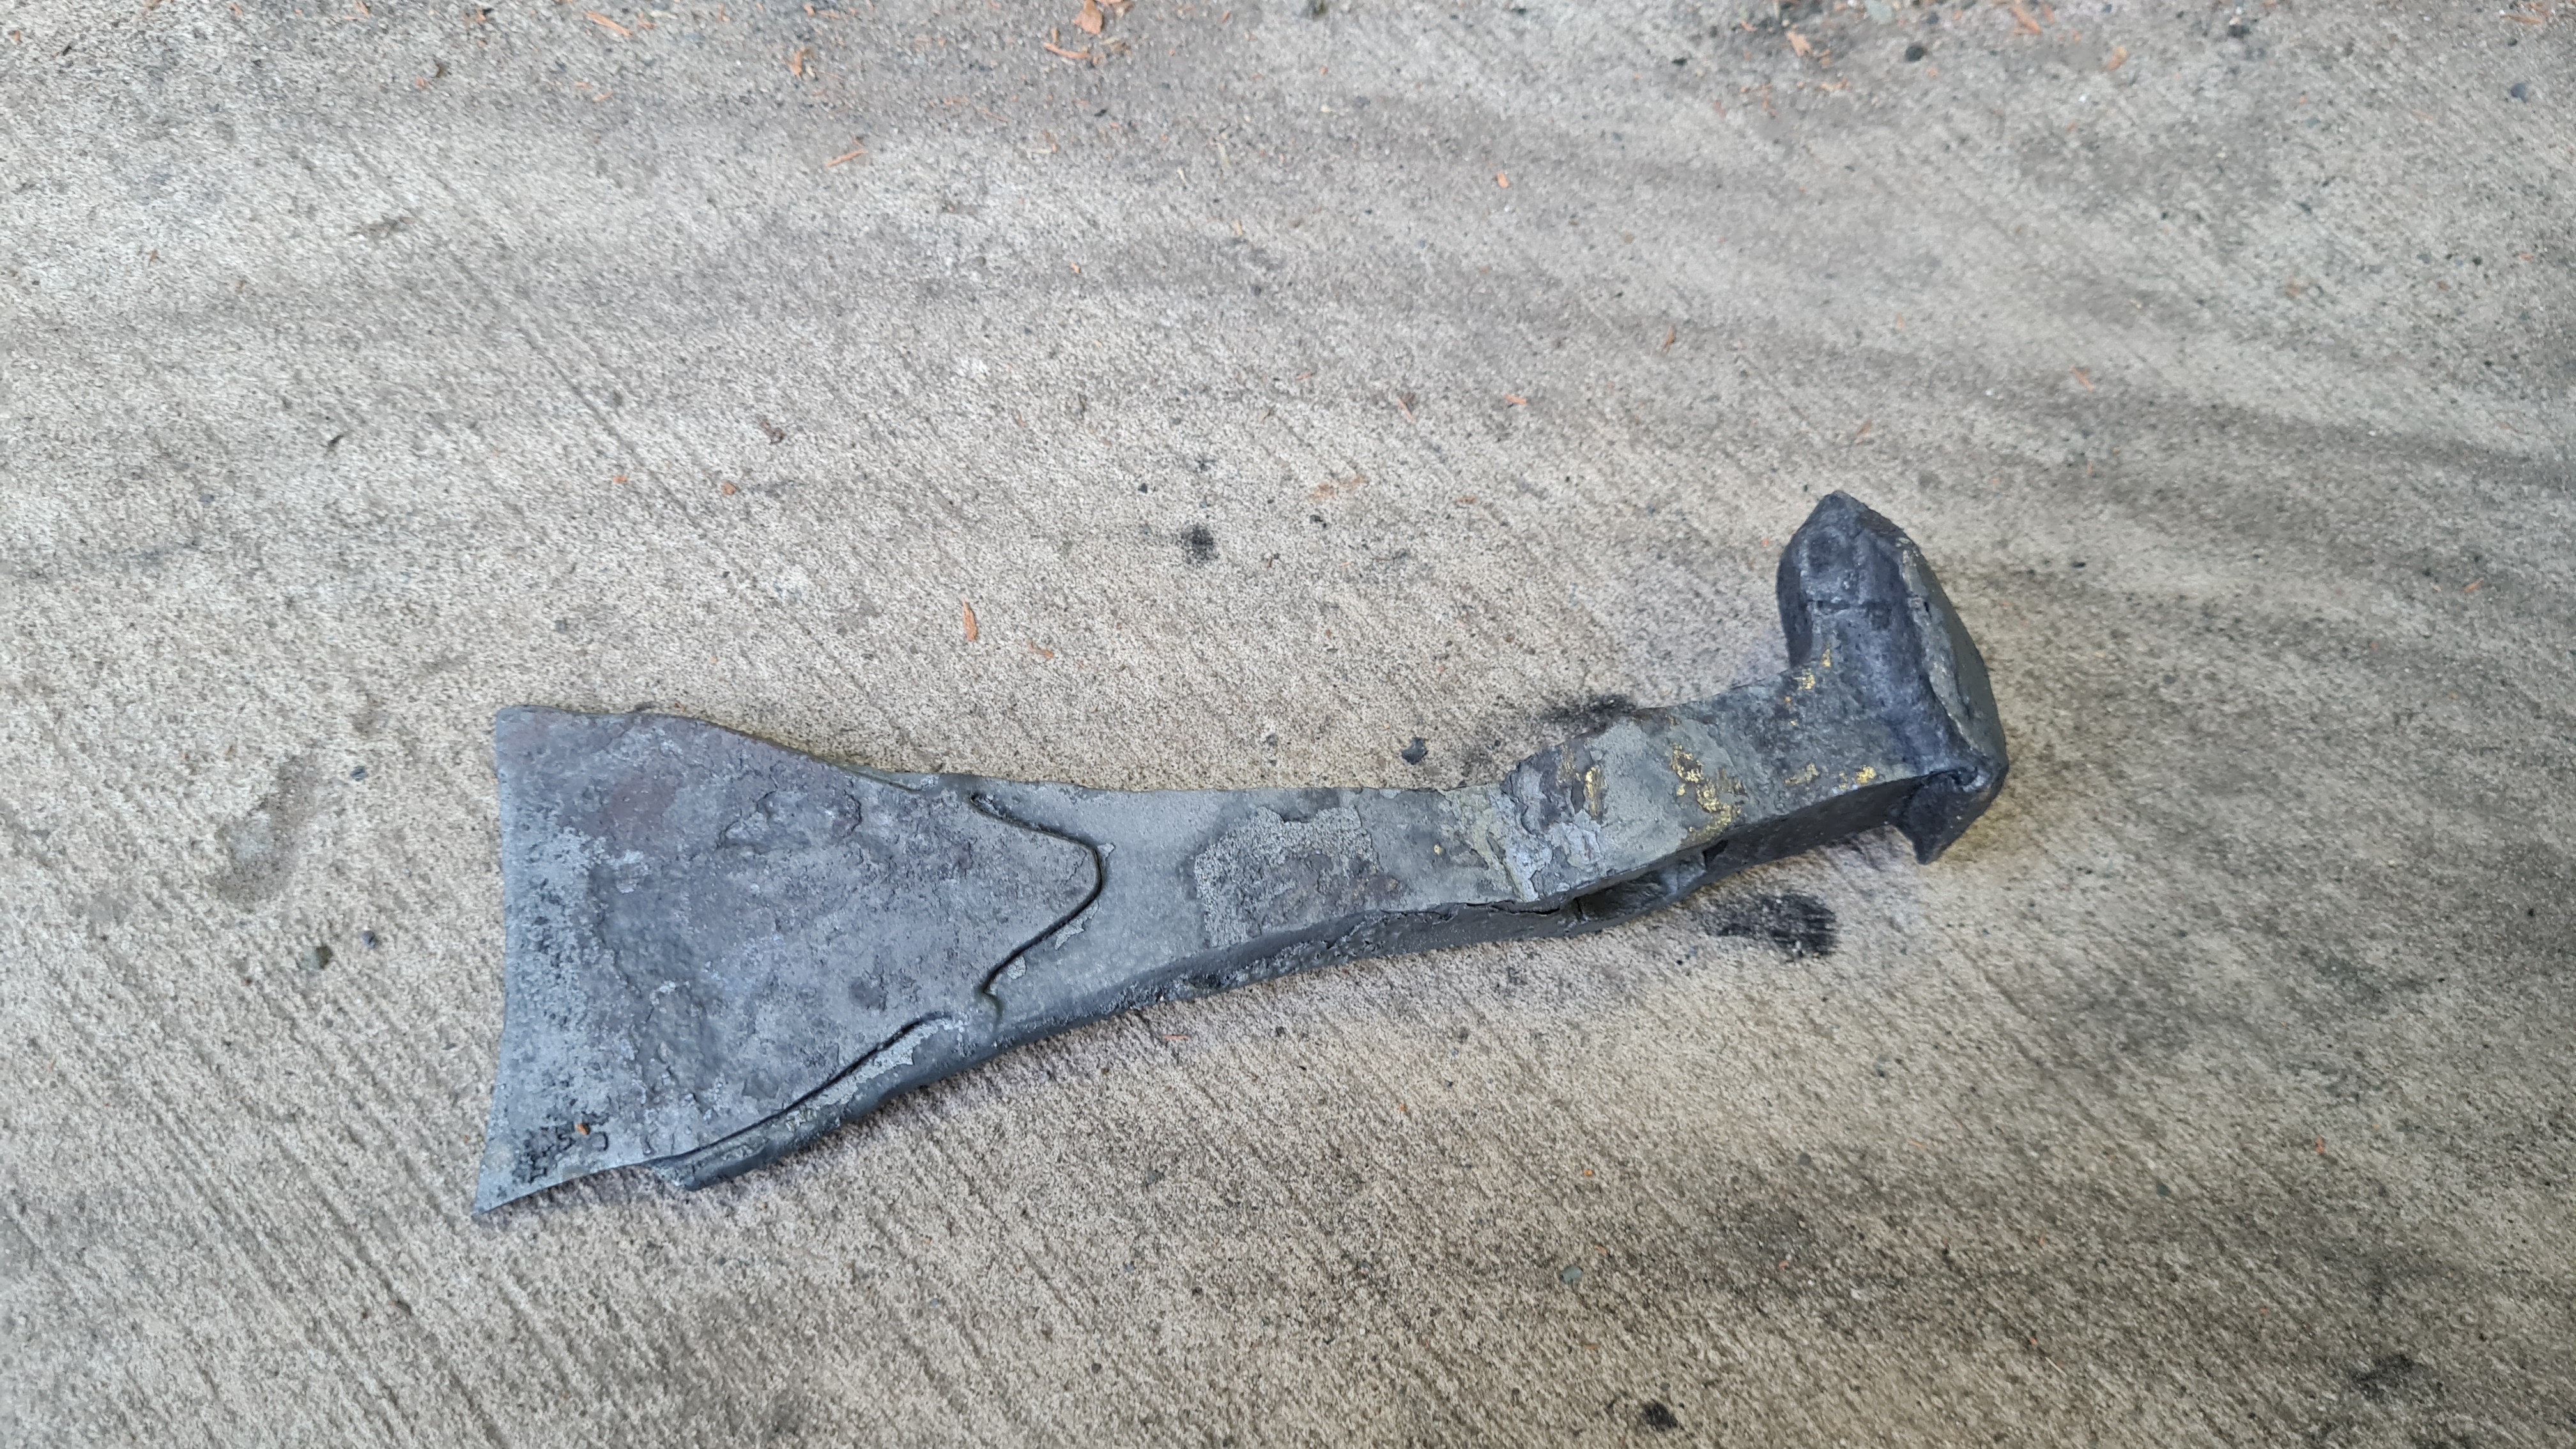
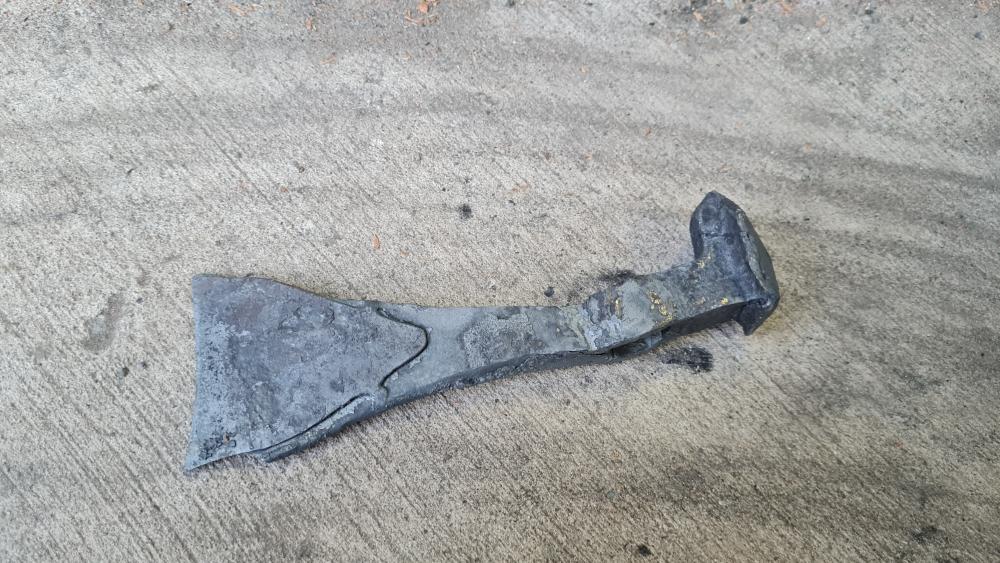
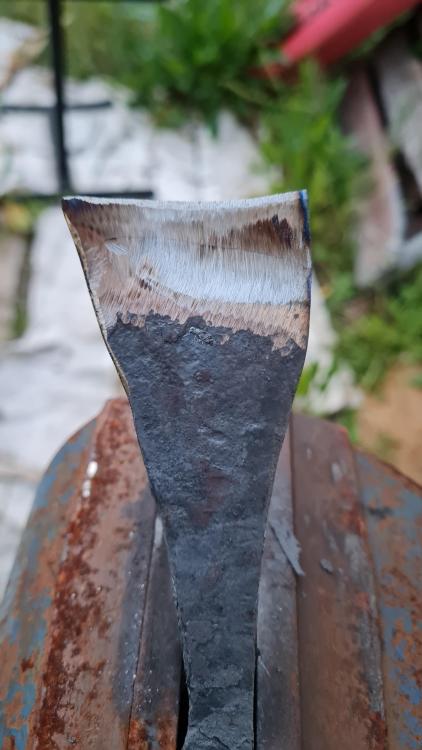
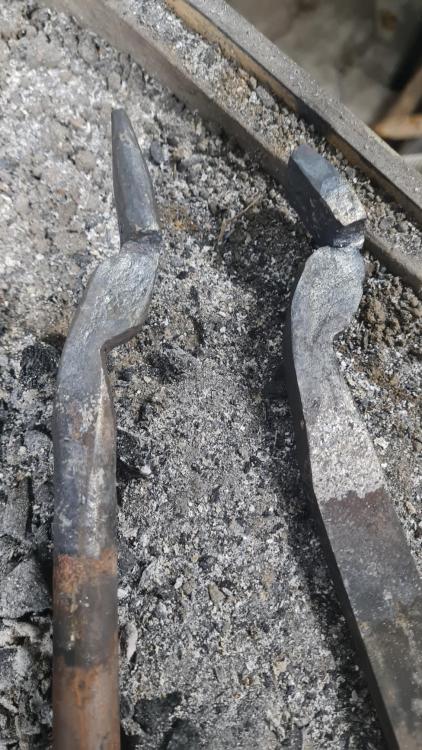
Yep, lesson learned. I have some adjustable, sleeved supports under the front of the forge that I was able to use to support the porch for now but I will weld some RHS between them and put an old, broken piece of pizza stone on top instead. In the meantime, I did my first successful gas forge-forge weld on my rail spike tomahawk today to add a steel bit to the blade! (Well, at least I THINK it was successful!) You can see where I tacked it with my stick welder first. I ground the surfaces clean but didn't grind a scarf/taper around the edge. The back side: and the edges of the weld after grinding Again, the back side (*not the final blade shape, just grinding back to inspect the weld ) Does this look like an ok weld? Cheers, Jono.

-
The video at the end of the OP shows him holding them. Pretty impressive scale!
-
I know a lot of insect larval stages can take more than one year so you'd have to think about conditions a year, or more, ago to figure out why so many of that particular bug are coming out now.
-
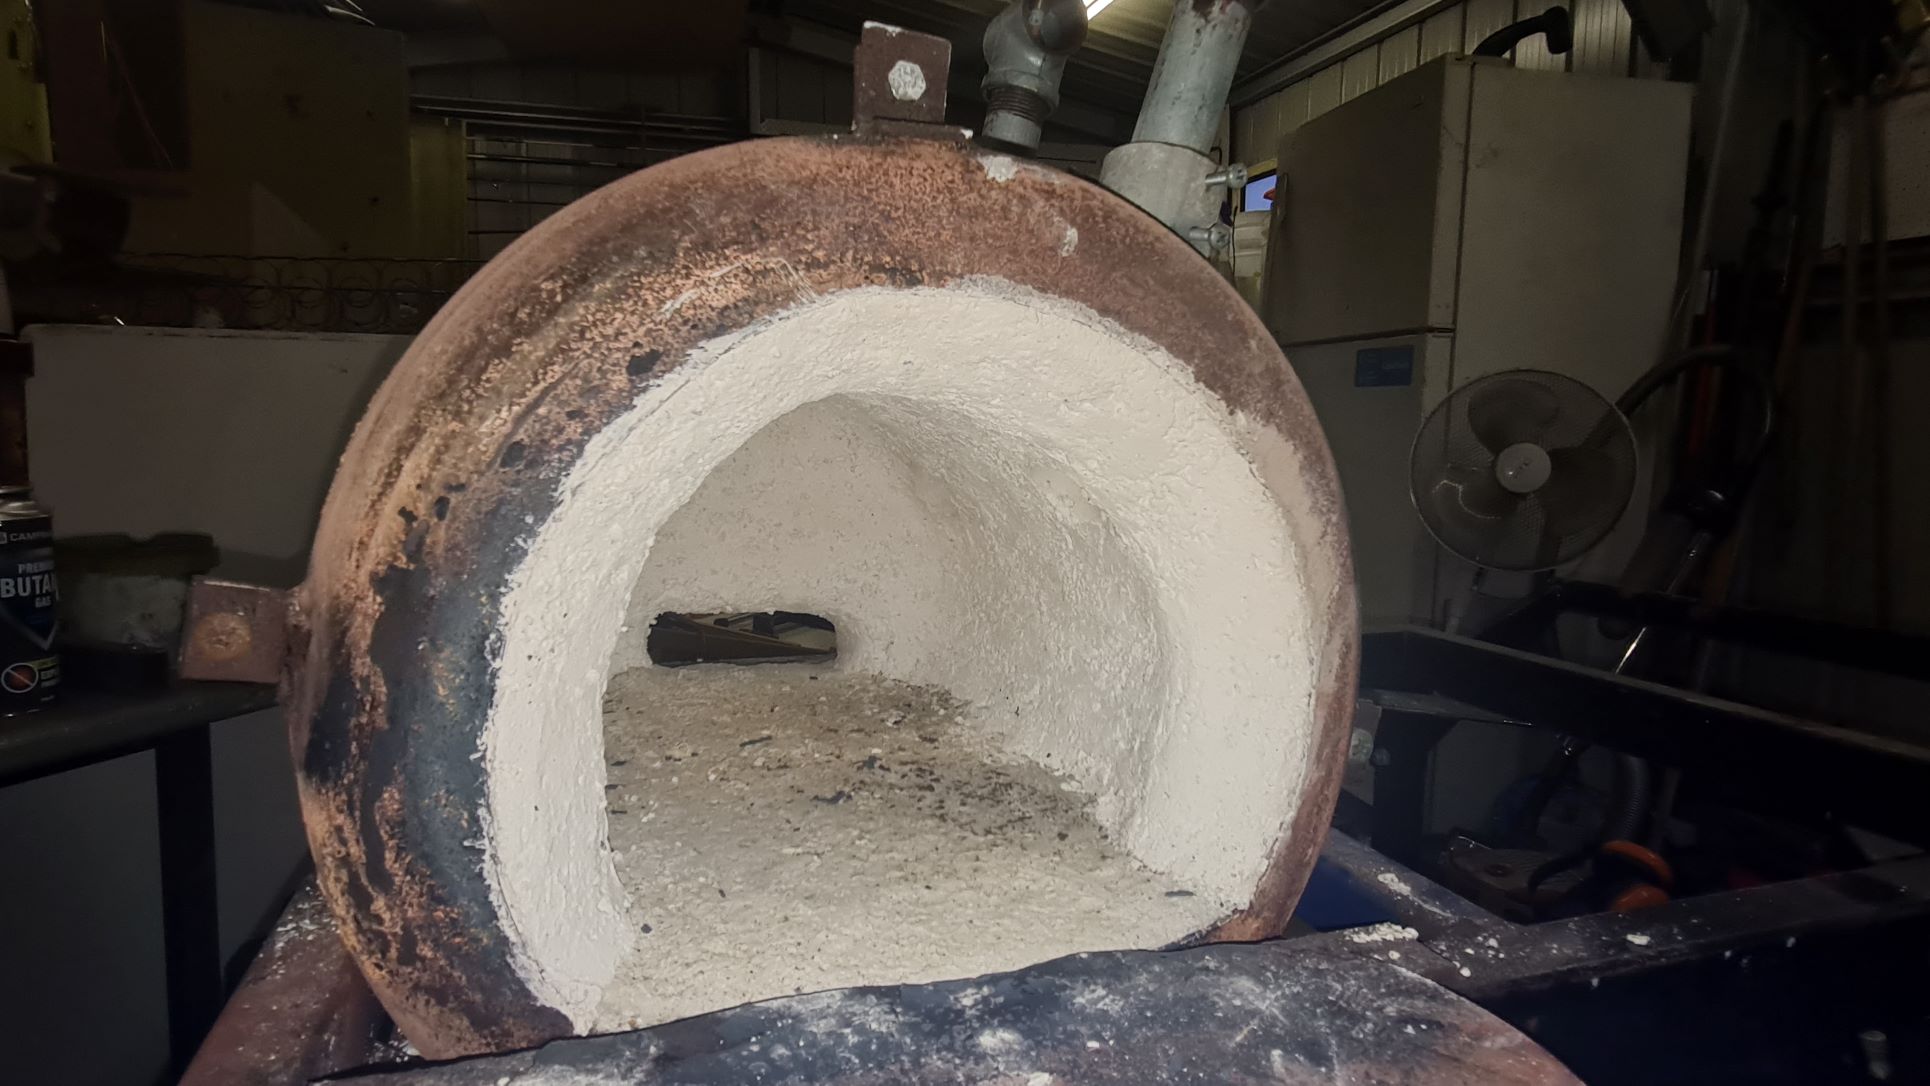
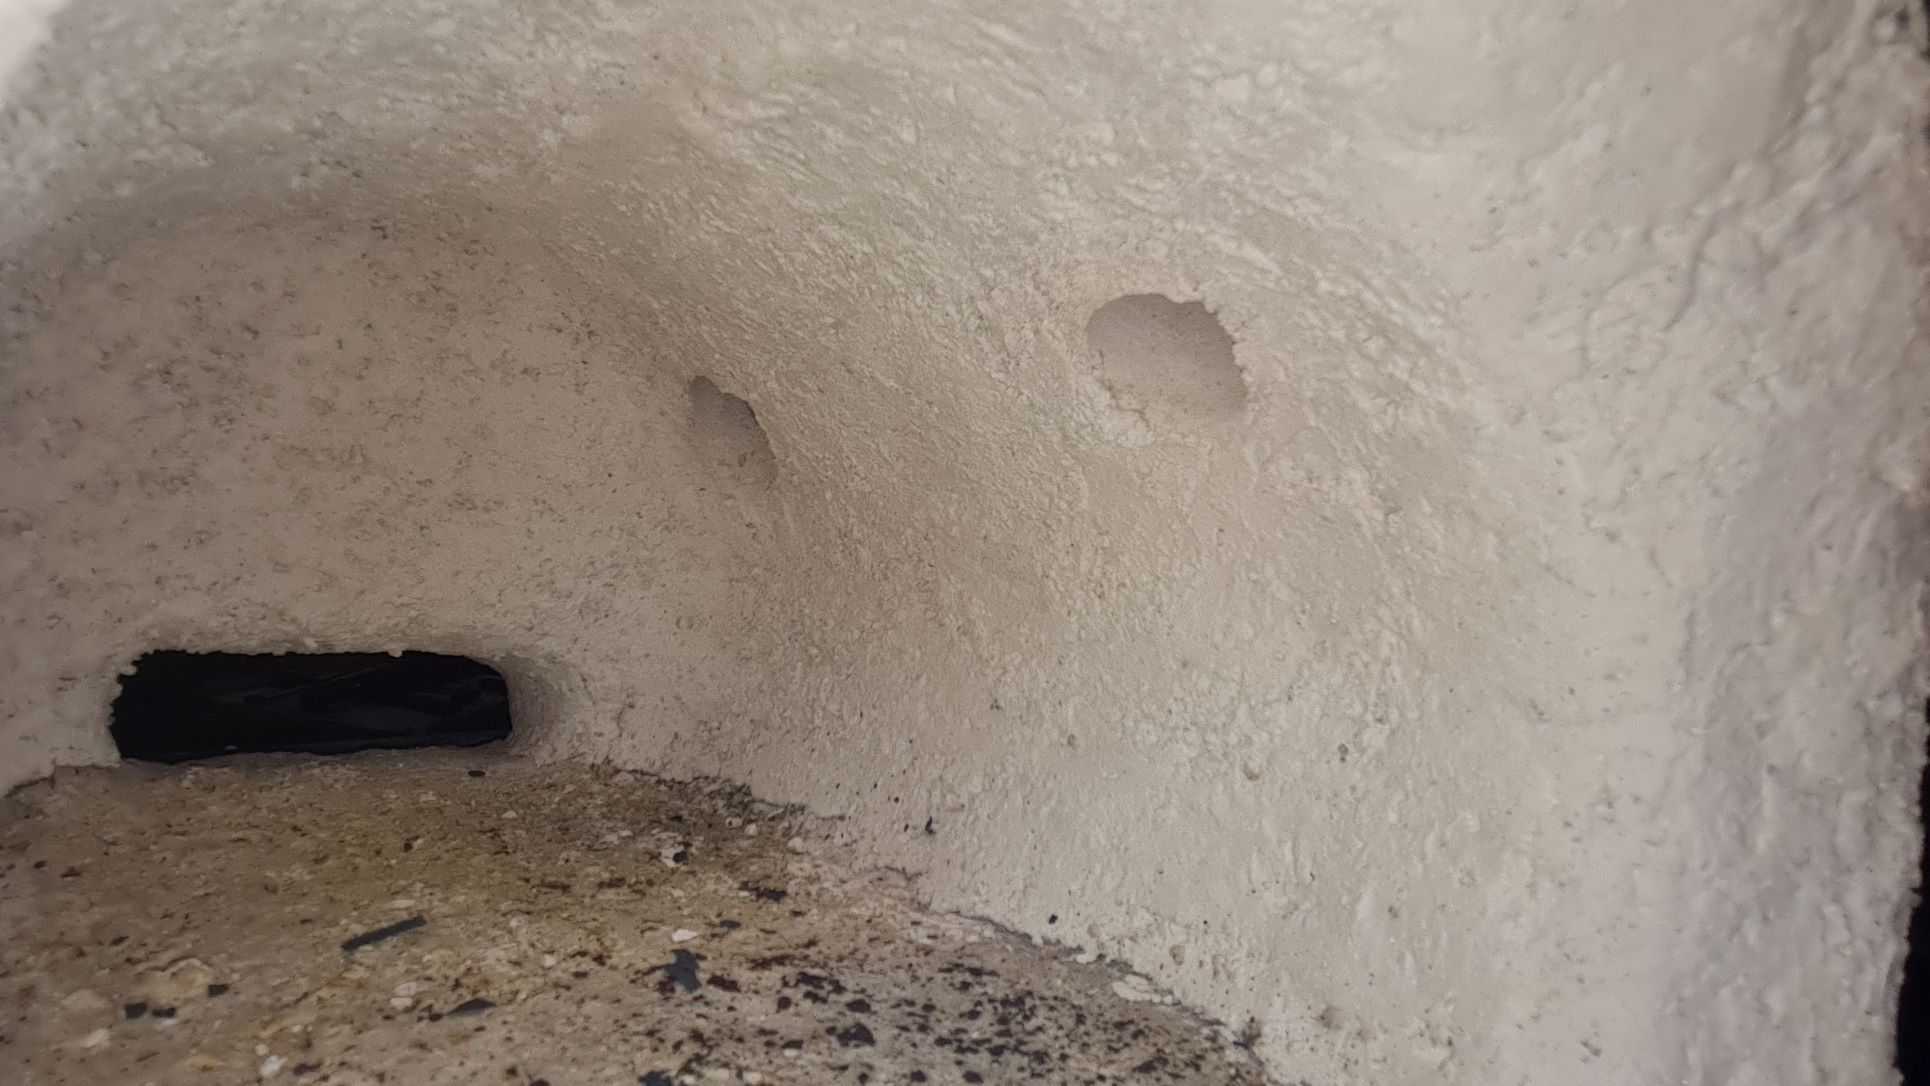
Can do. In the first photos I was using a soft firebrick which is easy to pull back from the opening. In the later photo I was using a door I made from the circular cutout of the ceramic wool, coated in castable. Unfortunately, I didn't make its base wide enough, so I have been having to lean it on the shell for stability. Not really safe for something getting to that temperature so I've decided I will bench it until I can make the base a bit sturdier and instead I'll put a thin layer of the castable over the brick. I also need to put a gusset under my front door shelf because it is made from the door cutout from the tank and is not holding up under the heat coming out of the door.
-
I'm loving it so far! I haven't used it much yet but I've been working on a railroad spike tomahawk and I'm taking much better heats than I was out of my JABOD because I'm usually too stingy with my charcoal. Haven't tried a forge weld yet. I'm keen to try but it's sooo loud at those higher pressures! I'm working my way up to it because I think my neighbour might get a bit sick of the noise. I'm also keen to try making some hammers now that I have the ability to heat a larger billet more easily. Thanks Frosty and Mikey and anyone else who helped with advice to get this one fixed and back up and running! Cheers, Jono.
-
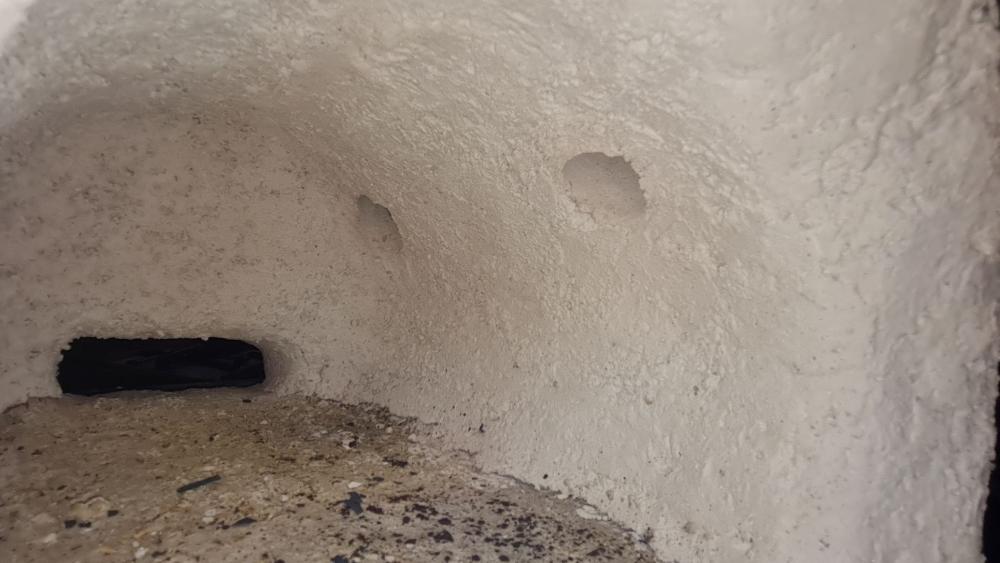
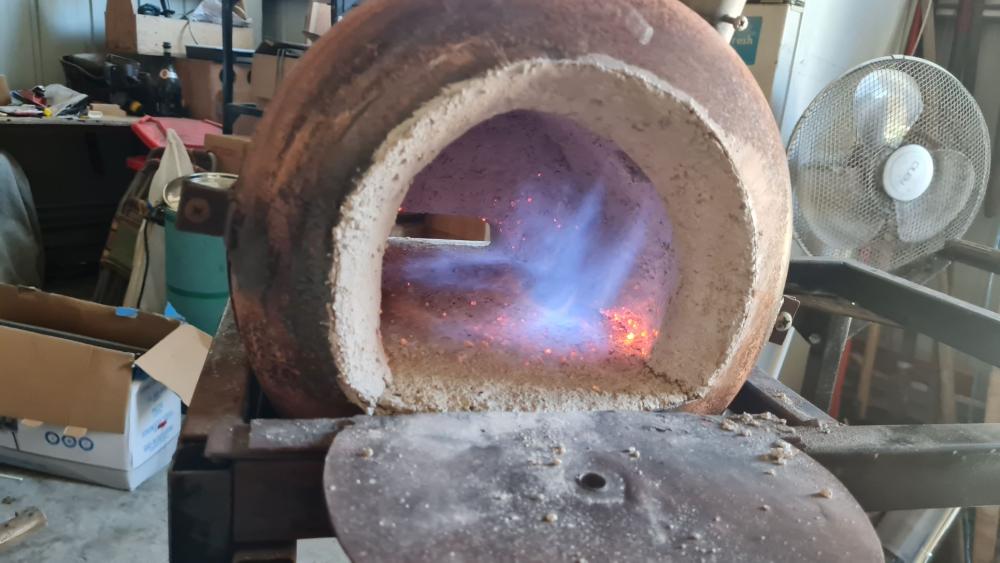
Well, I finally found a local supplier of castable refractory so I could fix the issue. I went in to pick up the bag of castable and when I explained what I was doing he threw in a litre of rigidizer for free! I'll be going back there for sure! I got the castable in place in two sections (in addition to the floor that was already there) and used rigid PVC electrical conduit the same diameter as my burner tubes to make stepped flame nozzles in the wall of the forge. It's been so long since I came back to this post that I forgot the plastic funnel suggestion! In terms of casting and removing them, I just kept going back to the forge every half hour or so as the castable was setting up and just rotated the PVC so it the castable didn't stick to it. Once it was fully dry/set/cured (not sure what the right term is for this particular castable) they just slid straight out and I could put the burners straight back in and tighten the set screws on the mounts. But now I'm a little unsure of my tuning. It gets steel hot and I got the forge up to a bright orange, maybe a little into the yellow, after about 10-15 minutes at 30 psi, but my flames still sit quite a way off the nozzles in the forge and I think it may be a little oxidizing. I shined up some steel and put it in there soon after lighting and at 10PSI it came out again red hot but still shiny. Later I put steel in there at 20-30PSI when the forge was hot and my results were inconclusive to my limited experience. My combinations of photos are not very consistent but this is what I have: Here it is straight after lighting, at about 10PSI: In ambient lighting I couldn't perceive any dragon's breath out the front door. Here it is at about 20 or 30 PSI while still warming up: and here it is a few days later at 30 PSI: (I forgot to take one looking into the forge) The yellow of the interior or the forge and door in the photo was more of a bright orange to my eye at the time. The dragon's breath is about as it appeared to my eye. Any recommendations for tuning or is this looking ok? Cheers, Jono.


-
I have heard a lot of the points in this thread before and I have not previously been a "tapper" but I read through the thread yesterday and then had to straighten out some strainer wire on my puny, little ASO for a birthday decoration I've been working on. I consciously/intentionally tried it as I was moving the wire to where I needed to hit it. I think I might start doing it more often! Even for only light taps between light blows to straighten wire, I found the extra split second for moving the wire and the extra rebound to return the hammer to the top of the swing really made a difference. I'm not gonna start tapping out rhythms or tapping every second swing, but I want to develop a feel for how and when it will be of most benefit to me. I also acknowledge that it's very much a personal preference thing, YMMV, etc, but I "get it" more, now that I have felt the difference, not just discussed it. cheers, Jono.
-
So, even though it is only very very short, the last little bit of a printer nozzle is the "through hole" and is still suitable for smaller scale burners. And the larger diameter before the end is still of some use for promoting good flow, similar to what you are saying about mig tips?
-
When you say through-hole or orifice tunnel, does that mean the length of the section that is at final orifice diameter? That was what prompted my first post. Then I thought I had it, now I'm confused again The tunnel diameter for most of the inside of the printer nozzle is 2mm diameter and only the tip (I'd estimate less than 1mm) is at the true orifice diameter. If I understand your description of the mig tips, the final section/through-hole is all at the final diameter. I get what you're saying for smaller burners: at very small orifice diameters, it doesn't matter that only a tiny section at the end of the jet is at final diameter. But I wanted to clarify because above you suggest the printer nozzle has a 1/2" long orifice tunnel, but if we are talking final orifice diameter then that orifice tunnel is less than 1mm (.040")long. Sorry, I'm not meaning to be a pedant, I'm just trying to clarify my understanding because if I am understanding you correctly, this will greatly increase my ease of burner construction. Cheers, Jono.
-
What did you do in the shop today?
Hefty replied to Mark Ling's topic in Blacksmithing, General Discussion
Hi Johnnywick, welcome to IForgeIron! Don't forget to put your location in your profile so we can see it when you post. I'm confused, though: you quoted me and said thanks for the question and then copied the rest of my post into yours but there's no question? Frosty, I'm only just discovering my interest in fossicking. There are a number of places to fossick in Queensland, but the ones I've travelled to with my family are for agate (a property literally called Agate Creek) and one for sapphires (a town literally called Sapphire. No, I'm not kidding) We came back from Agate creek with 9kg of agate nodules, cracked pieces, geodes and quartz crystal pieces! We came back from Sapphire with a tiny baggy of low quality sapphires Cheers, Jono. -
Mikey, I've been looking at using 3d printer nozzles for my burners as they are more readily available to me so the above info is great, thank you. Do you know if there are any issues caused in terms of jet stream, turbulence, etc by their very short section of final diameter, compared to the 1/2" long "through hole" in the mig tips? If I have to include putting a capillary tube in the 3d printer nozzle, then I'm back to mig tips being the most readily available "off the shelf" option so any clarification would be great. EDIT: nevermind, I just re-read the start of your post and it answered my question!

-
Stunning form in the hammer head and stunning figure in the wrought iron!! There's so much to love in that hammer. Beautiful work, Jennifer! Cheers, Jono.
-
Double kaowool and refractory in a furnace?
Hefty replied to WALLC's topic in Smelting, Melting, Foundry, and Casting
I'm sure some of the more knowledgeable IFI members will be along shortly but a few things that pop into my head to check: 1. Did any of this re-lining process allow crud to get into the mix tube or even into the jet orifice? 2. Does everything you installed make a layer that is the same thickness, or thicker, or thinner than the original and: a)have you adjusted where the mix tube/nozzle sits accordingly in the new lining? b)does this significantly change the volume you are trying to heat up? 3. How thick is the refractory cement layer you've installed? This will take more to heat up than just kaowool alone. All of this long with: what was the original forge? what volume? What burner size and type? We need info to help you figure this out! Cheers, Jono. Also, the obligatory: Welcome to IForgeIron! We won't remember where you're from after one post so be sure to add your location to your account profile so it shows up under your name when you post. -
What did you do in the shop today?
Hefty replied to Mark Ling's topic in Blacksmithing, General Discussion
Looks great Les! Is that forged copper or steel with a fire-scale finish? I can't quite tell in the photo. Cheers, Jono. -
What did you do in the shop today?
Hefty replied to Mark Ling's topic in Blacksmithing, General Discussion
Yep, I've chatted back and forth with a few and met one in person, but he lived over 1000kms away: I met Daryl (Ausfire) when I took my family to the historical village he curates and blacksmiths at while we were on holidays up north. I love all the info I pick up on IFI (too much sometimes, there's so much I want to try!) I just need to pull my finger out and make the time to get across to the club or find a closer one for some direct, at the forge instruction. Cheers, Jono. -
I feel like we need a map we can all pin our approximate location on so we can see who is close by who might want to get together for a hammer-in! Not really sure of the easiest way to do it, though. Could we make a public Google map we could drop a pin on?
-
What did you do in the shop today?
Hefty replied to Mark Ling's topic in Blacksmithing, General Discussion
Thanks JHCC, that's two useful tips in one day! It's these little things that seem so obvious when you hear/read them afterwards that just don't occur to me at the time. Man, I really need to find some more smiths who live close by so I can pick up these sort of tips in person while I'm forging! My nearest club is an hour away. Cheers, Jono. -
What did you do in the shop today?
Hefty replied to Mark Ling's topic in Blacksmithing, General Discussion
JHCC, yes, the starting stock for the flat jaws was rectangular - about 19mm x 9mm (3/4 x 3/8")- so I used the butcher and twist method. I often get the hint of a cold shut where the flat surfaces fold in on themselves between the edges of the bar as it twists in such a tight space. I've got a chainsaw file that should smooth them out nicely. Dividers! Why didn't I think of that?! Good idea. Les, I've got vinegar and we use hydrochloric/muriatic acid for the pool that I can dilute, so I'll give one of those a go. Cheers, Jono. -
What did you do in the shop today?
Hefty replied to Mark Ling's topic in Blacksmithing, General Discussion
OK, I managed to get some photos this afternoon: Here's one end of each set of tong blanks. Each half of a set is on either end of a holding length bar so I couldn't fit both ends in a photo that would show much detail. The flat jaw blanks both look surprisingly similar which is definitely an improvement for me. The other scroll tong blank isn't finished yet and looks more like a stubby flat jaw blank. I did a tiny bit more copper work this afternoon with some lighter gauge wire and found that I could do a round four braid with round wire that looked OK but I still prefer the "ribbon" version I did on the weekend. The two ring shaped sections are the ones I did on the weekend. I need to do some research on removing oxides from copper after annealing. Cheers, Jono.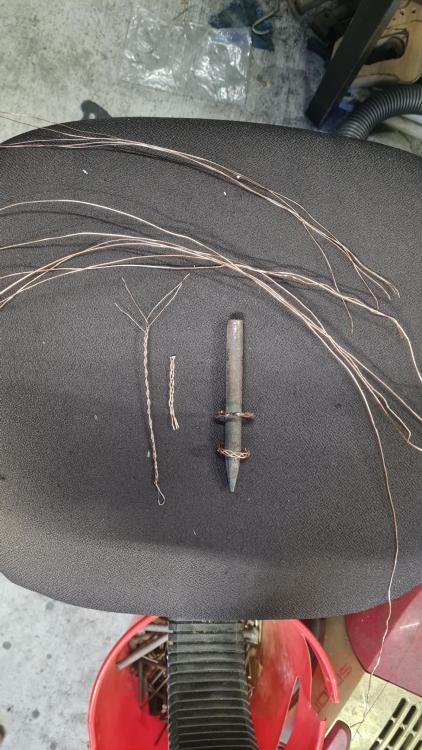
-
What did you do in the shop today?
Hefty replied to Mark Ling's topic in Blacksmithing, General Discussion
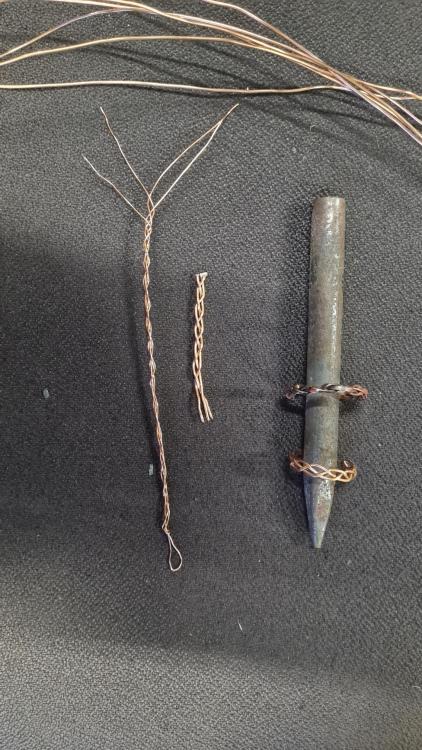
They look great, Goods! I got some time in the shed over the weekend and forged tong blanks for a set of flat jaws and nearly finished a set for my first ever scroll tongs. I'm going to stick weld some reins on these two sets to save my elbow (My son isn't as keen on striking as he used to be). I also started experimenting with copper jewelry making from 1mm strands of copper from earth cable. I tried one with a 3 strand plait which looked great and very uniform, and one using a 4 strand round braid. My initial attempt on this one was ugly so i hammered the strands into flat "straps" about 0.5mm x 2.5mm and then, with frequent annealing and some fiddly twisting with needle nose pliers, I got something I was happy with. Next I need to try some jewelry soldering and then I might try my hand with sterling or fine silver. I recently did some agate fossicking and I'm keen to mount some in some jewelry myself. Pictures! I keep forgetting to take pictures. I'll try to get some next time I'm back in the shed. Cheers, Jono. -
As a teacher, I've often used this quote but just replaced "person" with "student"