Hefty
-
Posts
282 -
Joined
-
Last visited
Content Type
Profiles
Forums
Articles
Gallery
Downloads
Events
Everything posted by Hefty
-
A thing of beauty!
-
What did you do in the shop today?
Hefty replied to Mark Ling's topic in Blacksmithing, General Discussion
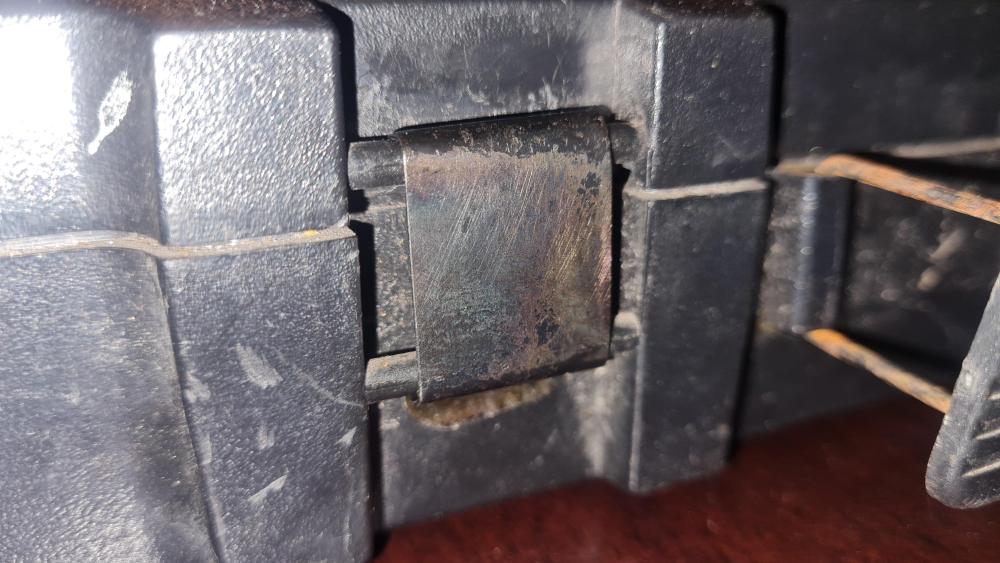
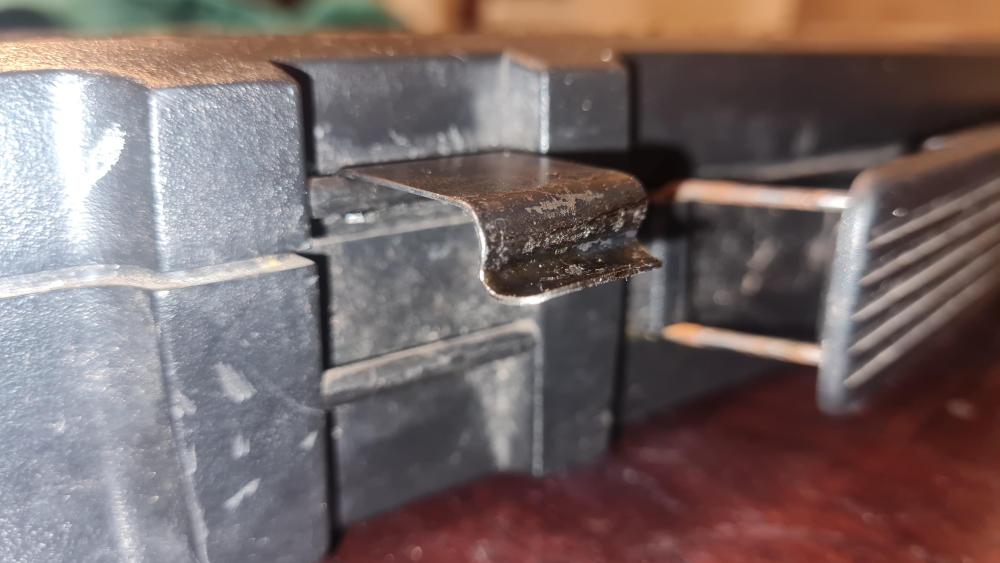
I've had a socket set for a few years now that originally had plastic clips to hold it shut. They broke within the first few months after purchase. Since then, I've had to ignore the handle on the case and carry it flat so the lid wouldn't fall open and spill all of the sockets onto the floor. Well, today I took some pallet strap steel and made some replacement clips. I took some thick wire, about the same size as the section the clips used to sit on, to use as a mandrel to form the clips around and then I heated the new clips with a little butane torch, quenched them in canola oil and drew a spring temper. I'm pleasantly surprised at how well they work! I'm still nervous enough to keep my index finger down the lid side of the box when holding the handle, but at this point it looks like they'll hold securely enough for me to start trusting them not to pop open. Cheers, Jono.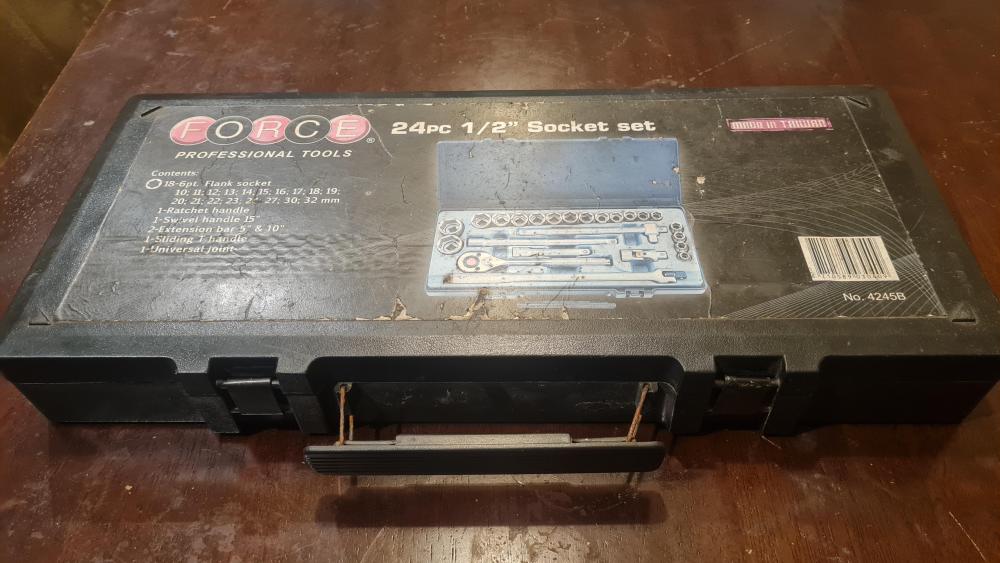
-
Thanks PB!
-
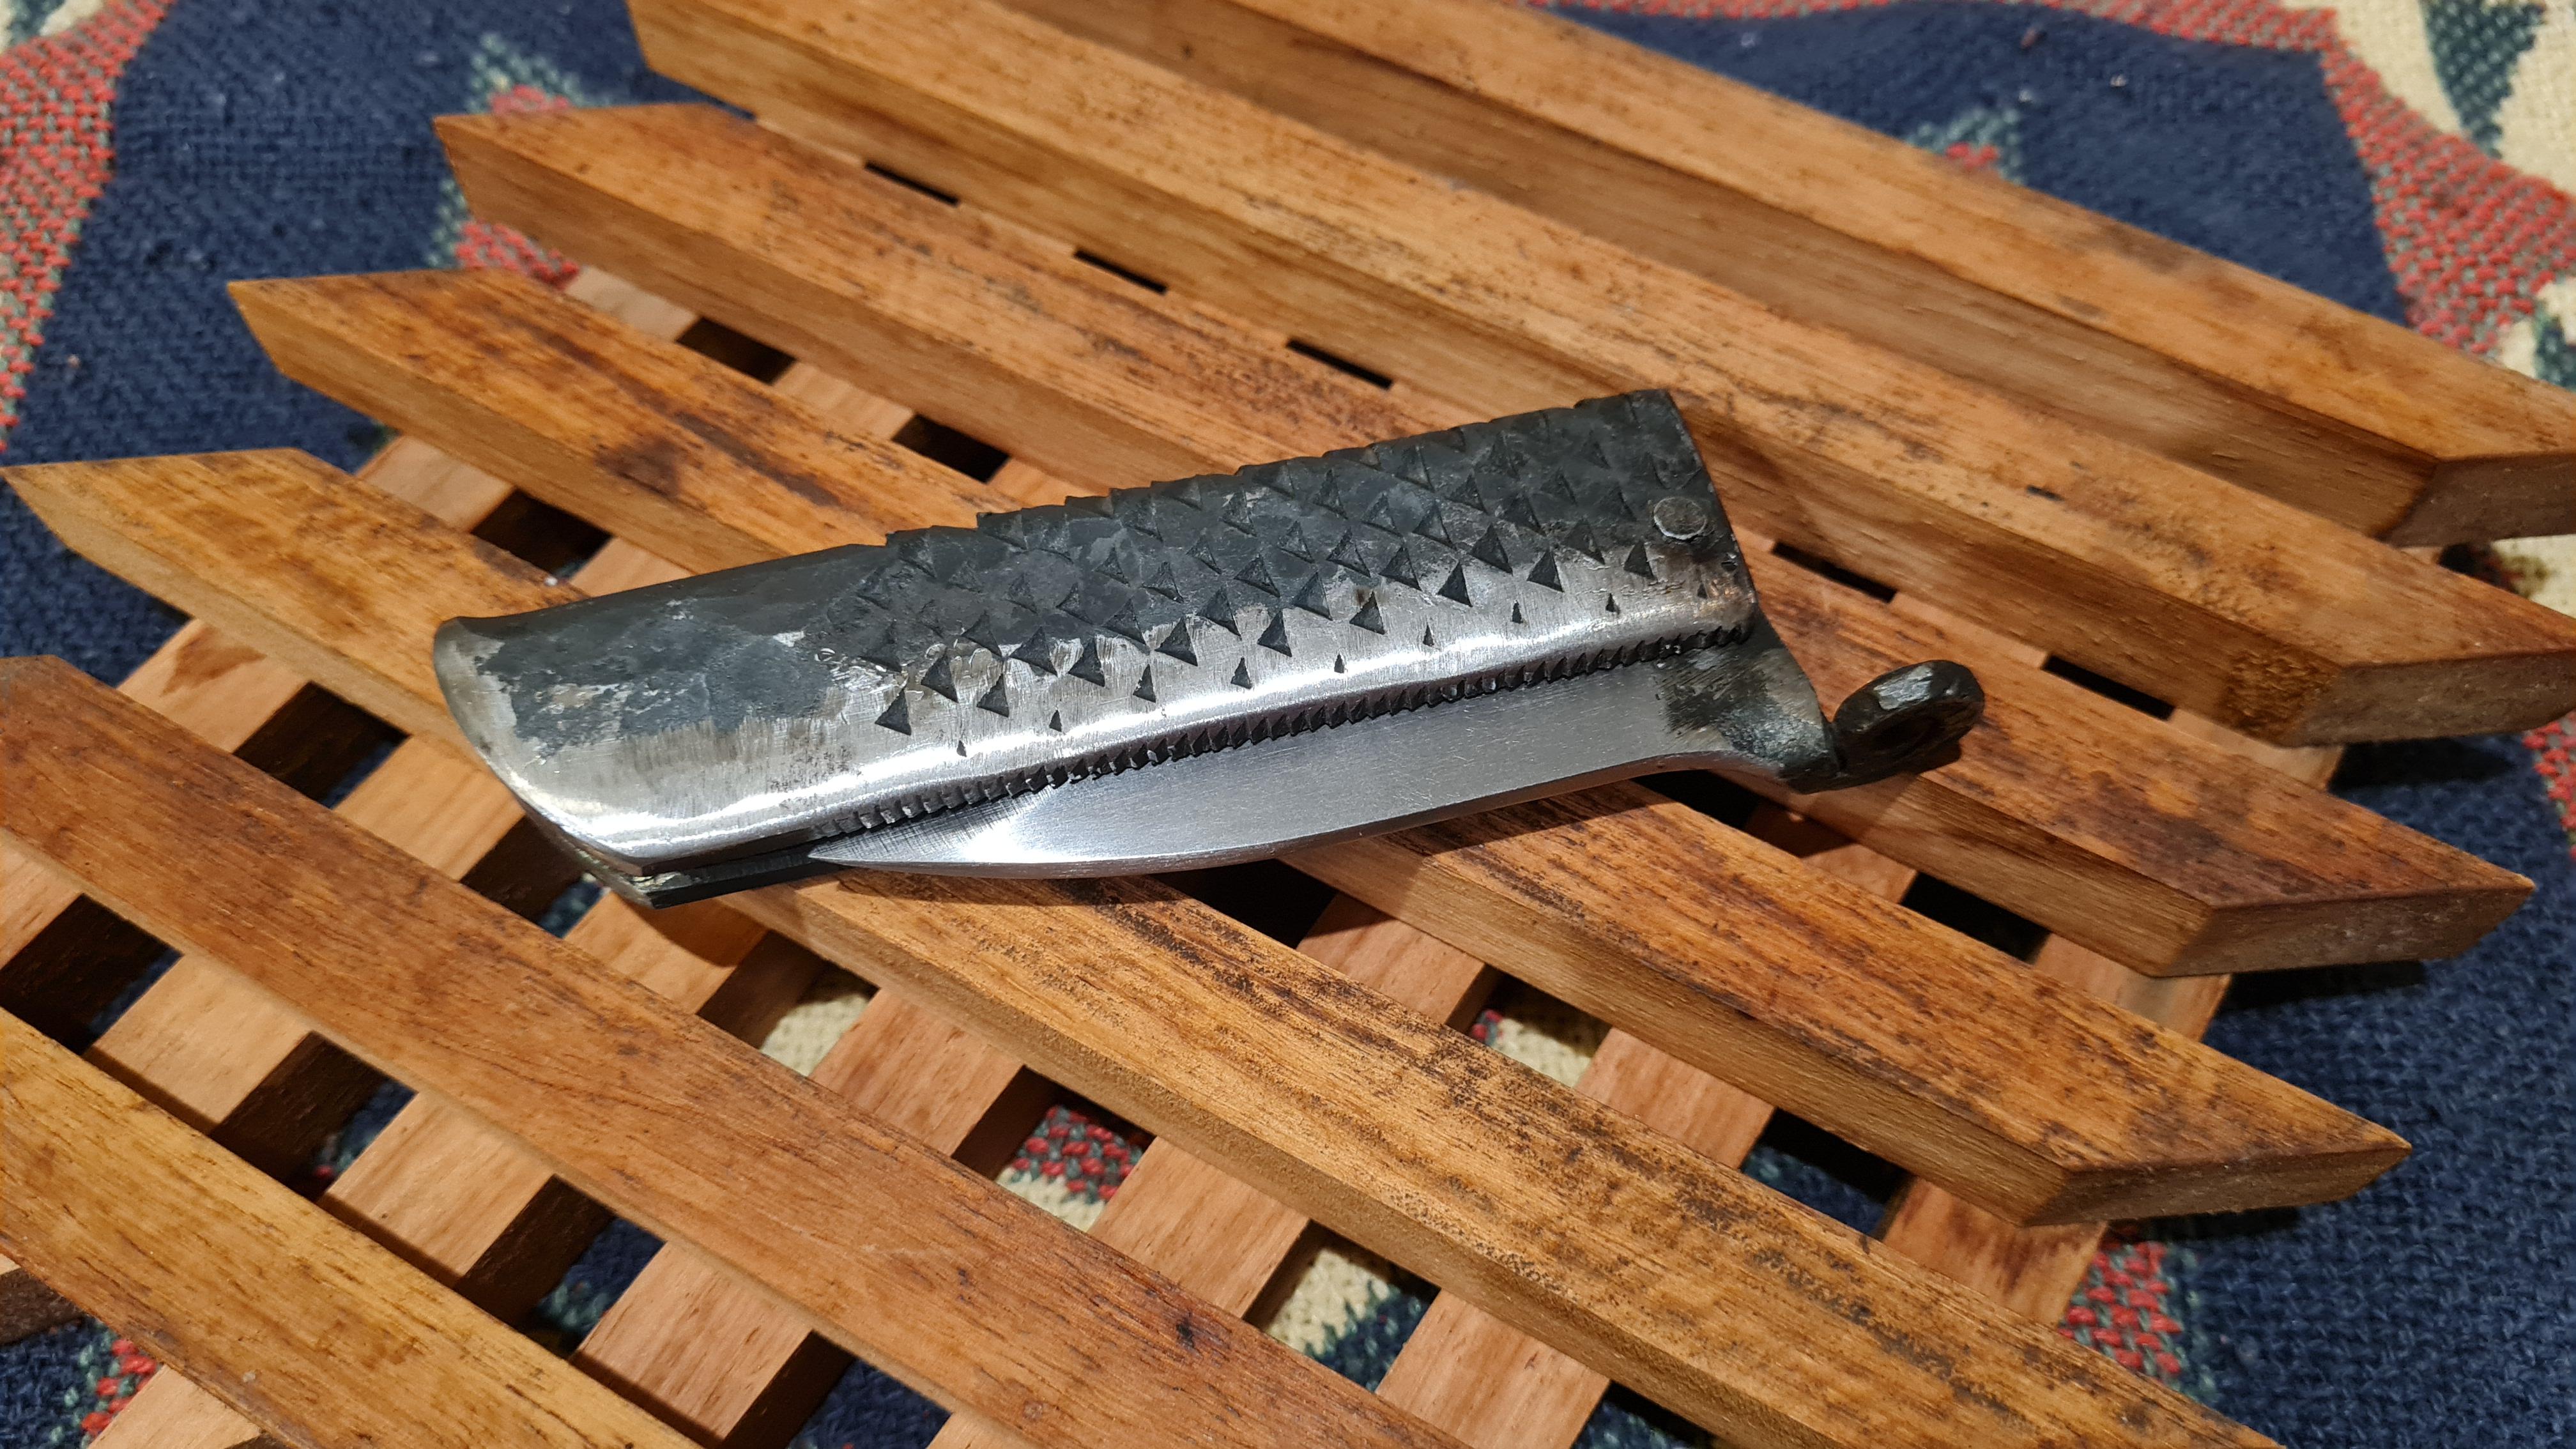
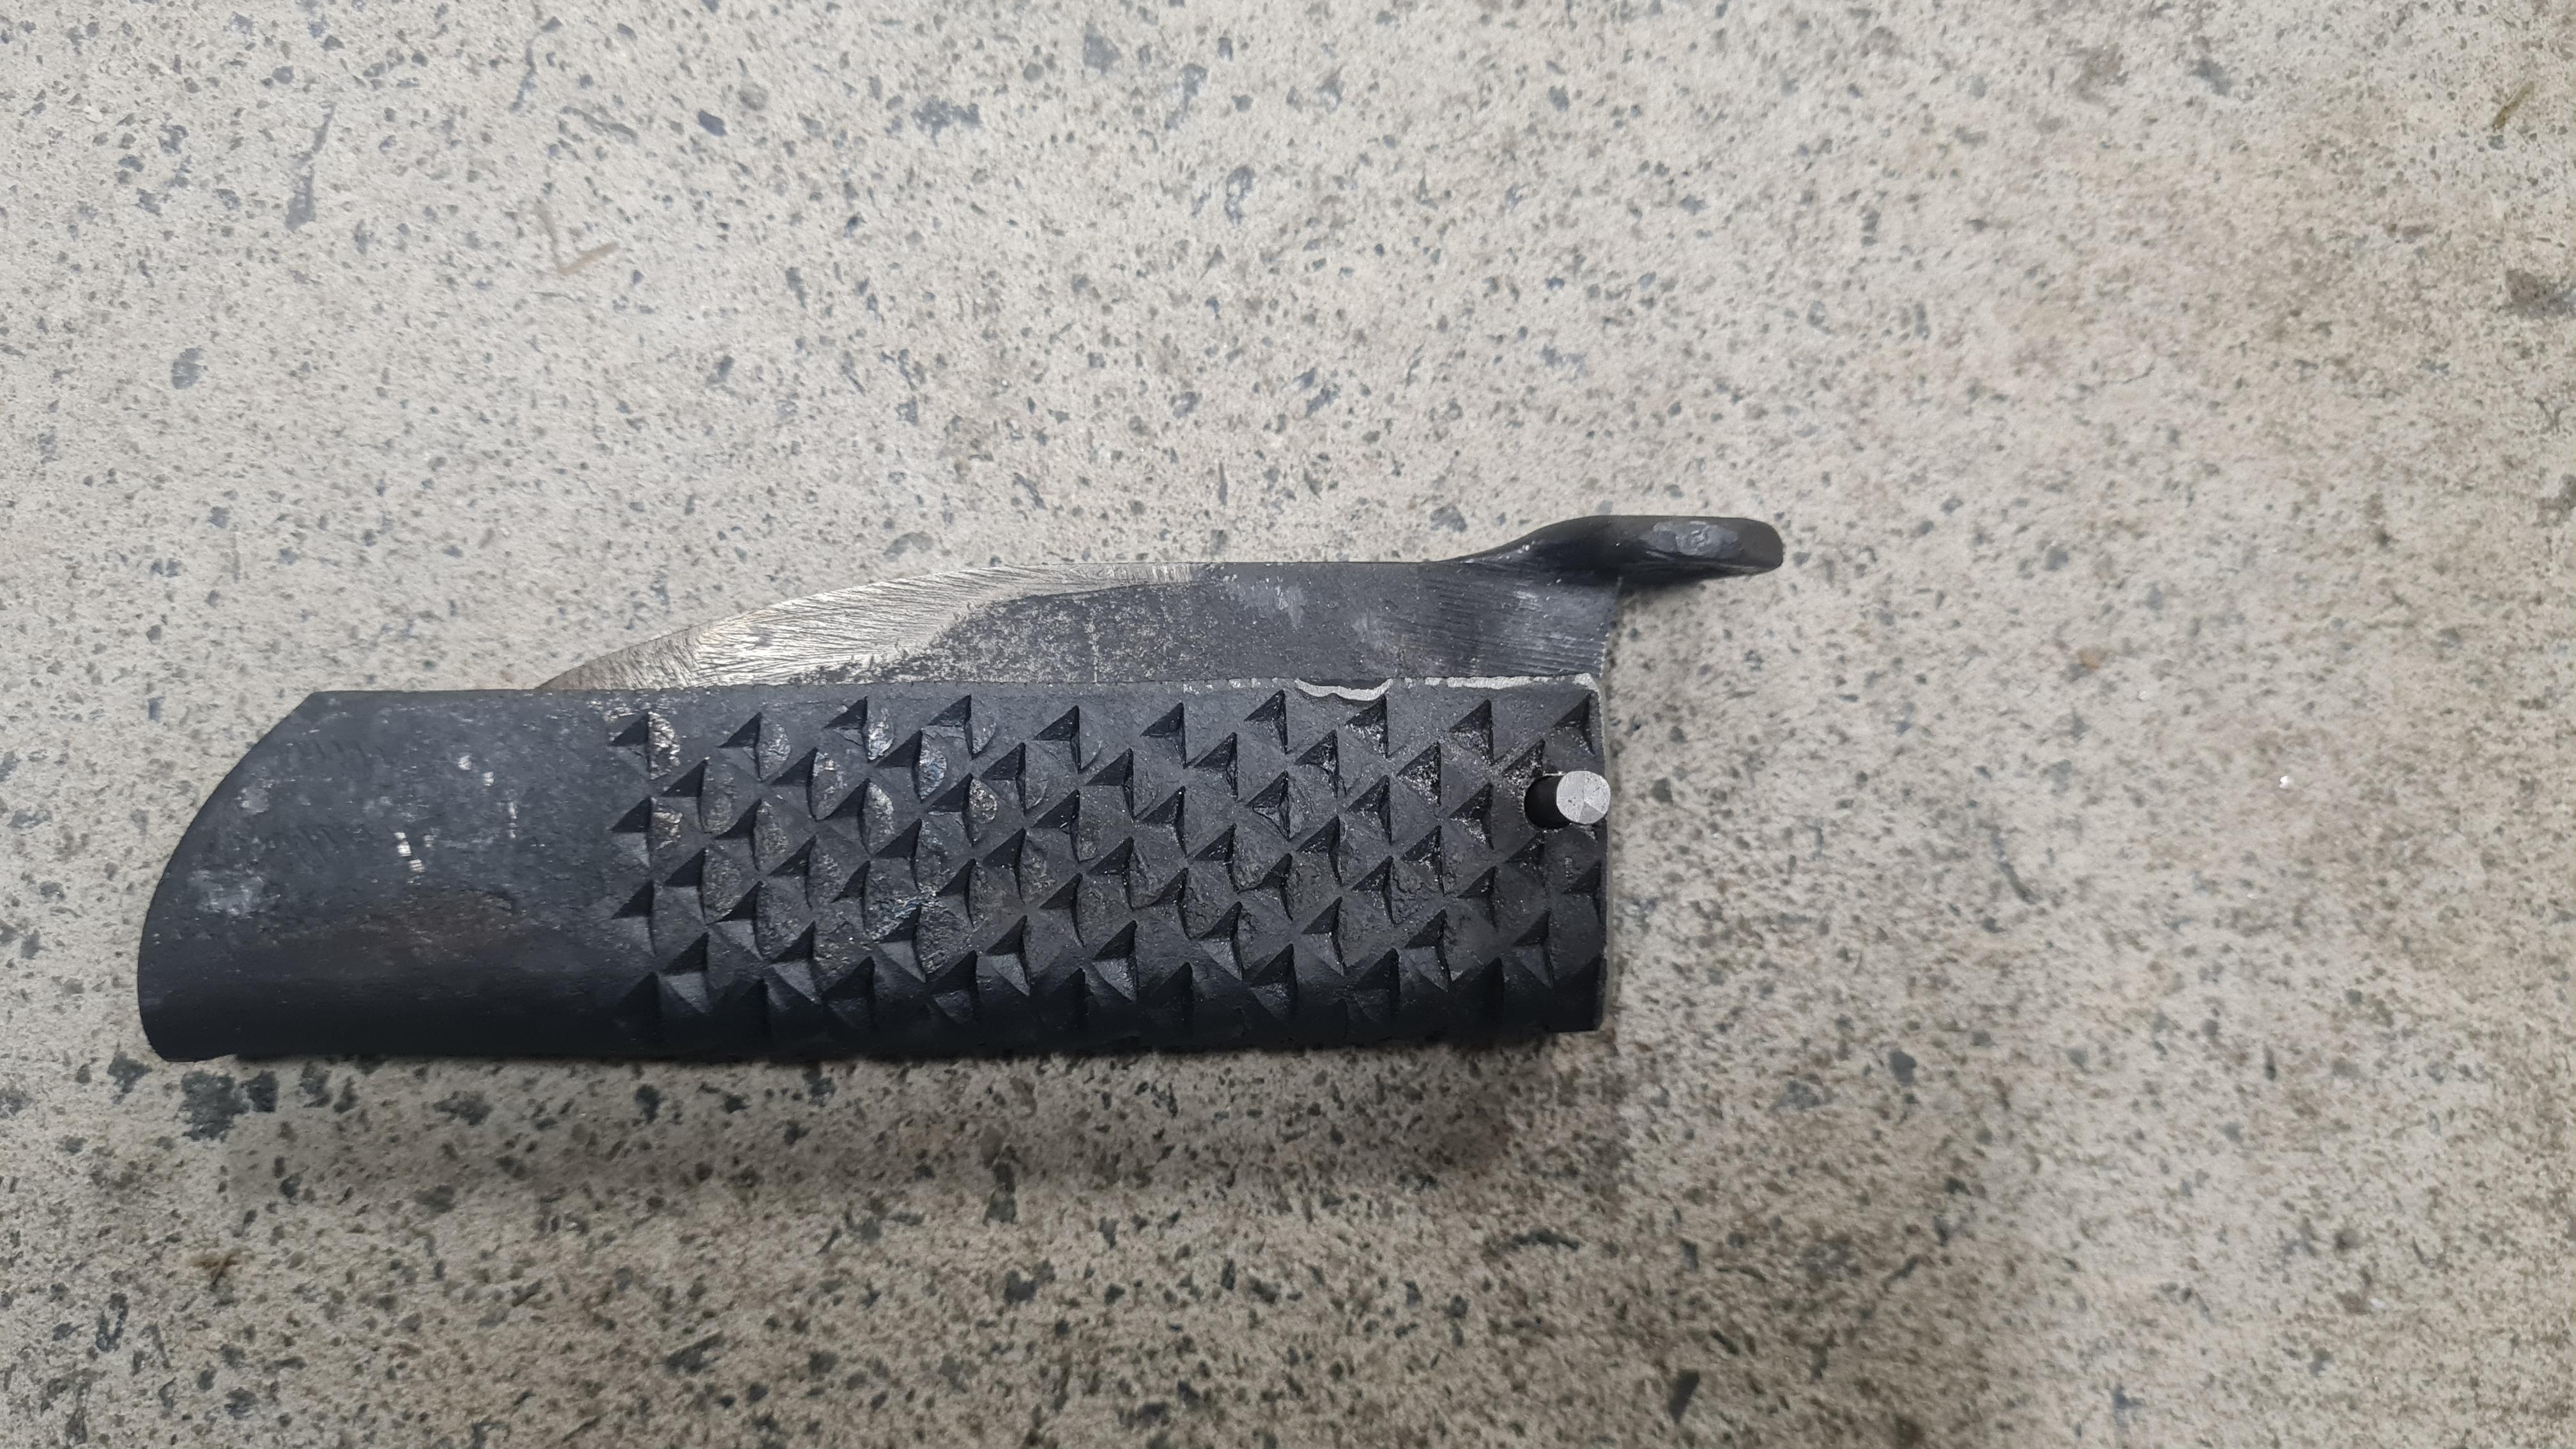
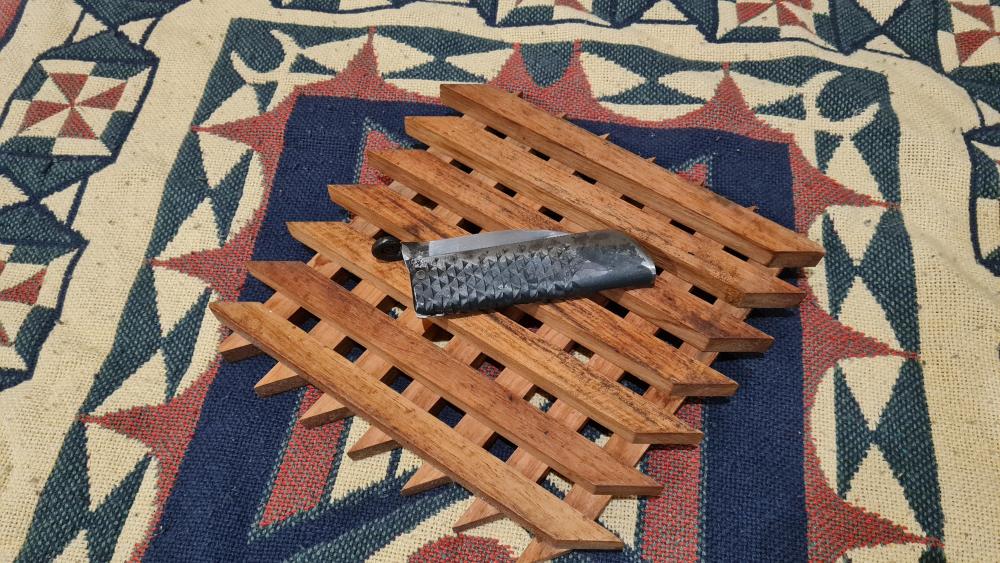
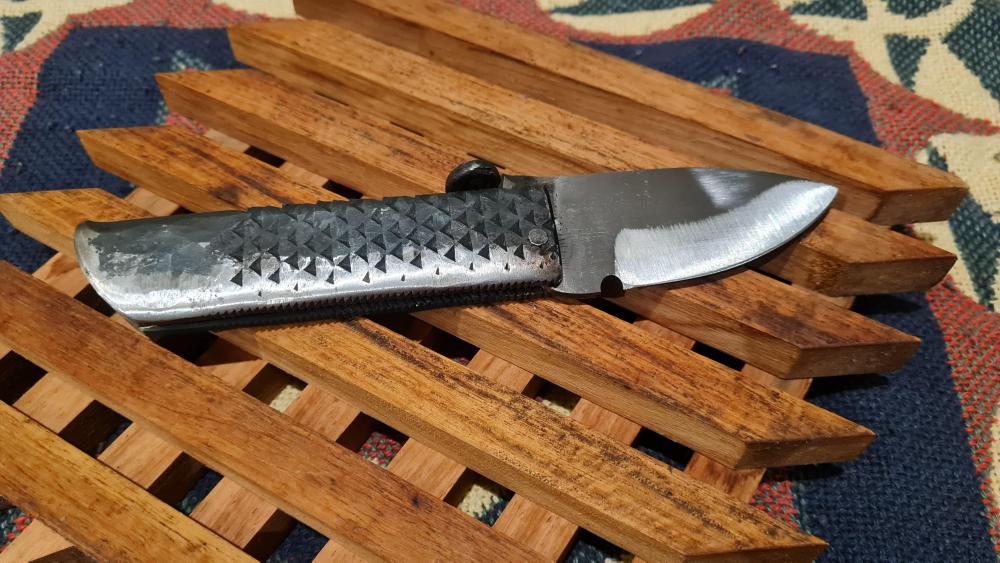
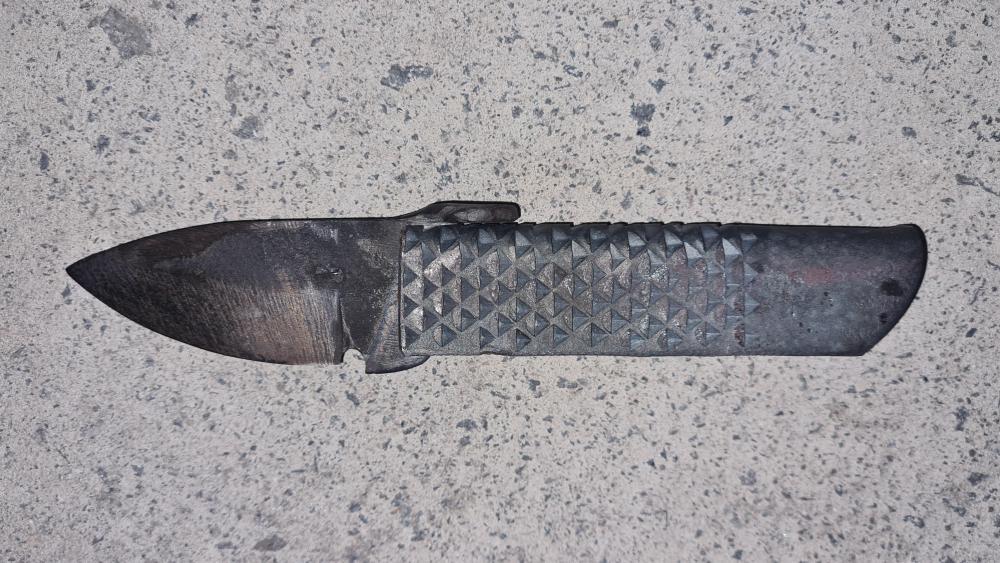
Finally got this one finished. The action is almost too tight but I figure it will wear in a little on the rivet over time. Did some grinding on the handle to make it a little more comfy in the hand. I've left the bevels at a worn 120 grit finish because I've given the knife to my son as his utility knife for the carpentry apprenticeship he's just started and I figure it'll get scratched up pretty quick.

-
What did you do in the shop today?
Hefty replied to Mark Ling's topic in Blacksmithing, General Discussion
Rojo Pedro, that's some nice raising! I did couple of pieces recently, one of which was very similar in dimensions/proportions but I really struggled to get the walls as steep as yours. -
Determining starting blank size for beaten copper alembic dome?
Hefty replied to Hefty's topic in Copper Alloys
Thanks JHCC. That looks like a larger scale version of what I did with the U shape in the vise and the smaller fuller. Especially flipping the piece to define the tuck from both sides. I've finally found some good information and videos on proper methods for raising, too. I didn't have the full/correct idea initially, but I do now and it's a little harder, and slower, than I thought to do it right. I'm getting there, but I'm still only practising on small pieces before I bite the bullet and go full size. -
Blue Rooster, did you ever get around to making another vise?
-
G'day and welcome, Jim! It's good to see another Aussie on here. We never seem to post enough! Cheers, Jono.
-
If the material is axle, there's a good possibility that it's some form of medium carbon alloy which means it will still quench harden to a degree. That makes it pretty good as hardy material because it will be a little harder wearing but will mean you were right not to quench to isolate heat. To be sure, cut off a few coupons to test quenching in canola oil and water and compare hardness by seeing if a file will skate over the surface or remove steel from either. A file might still remove a little material from medium carbon steel that's been quenched but it will feel different than a file really cutting into mild steel. You're right, quenching and tempering is not really necessary for a hardy because, even in mild steel, it would still be harder than the hot steel you are cutting with it, and too long in contact with said hot steel and a quenched and tempered tool may lose temper over time anyway. Cheers, Jono.
-
Determining starting blank size for beaten copper alembic dome?
Hefty replied to Hefty's topic in Copper Alloys
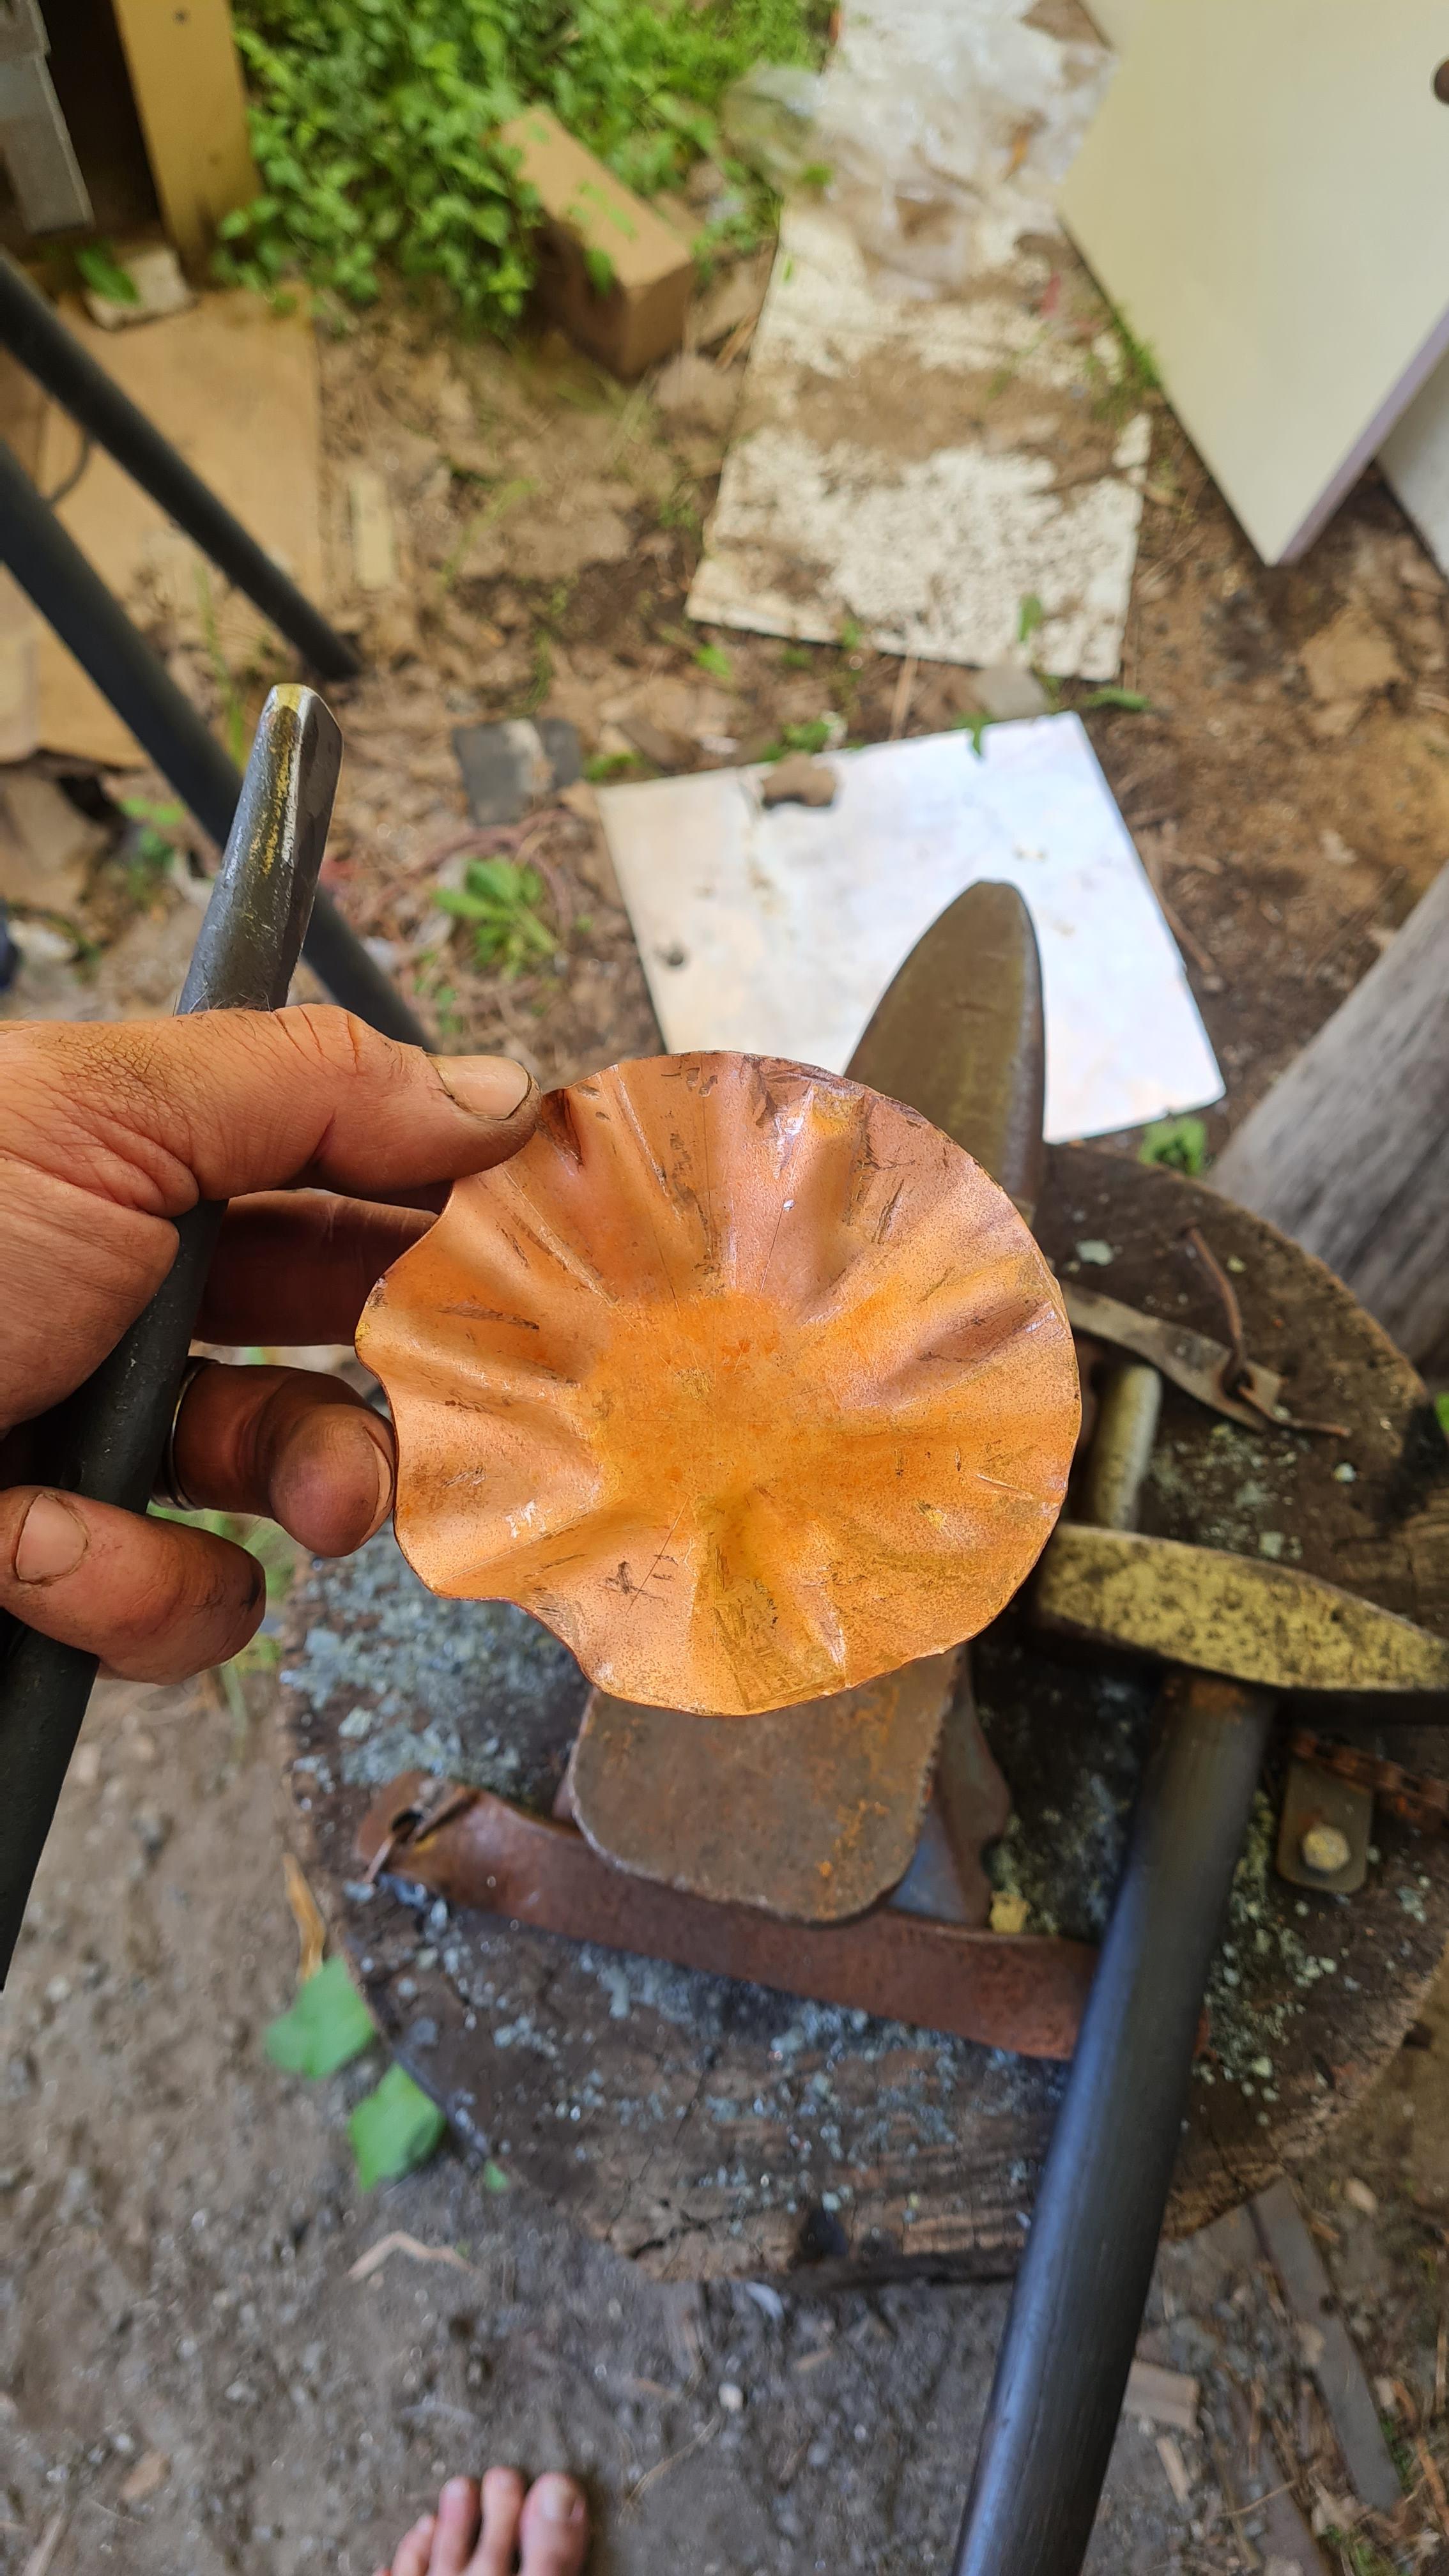
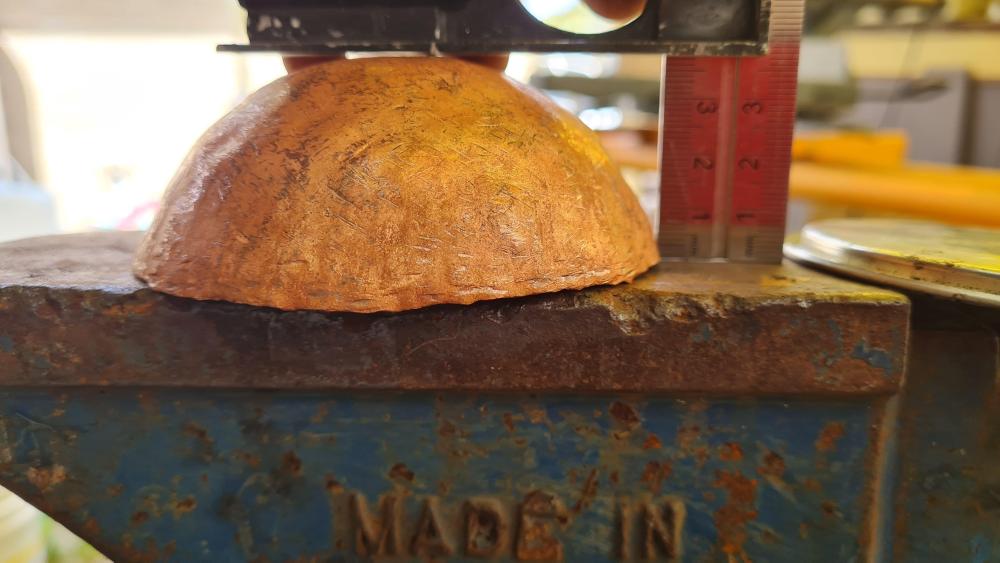
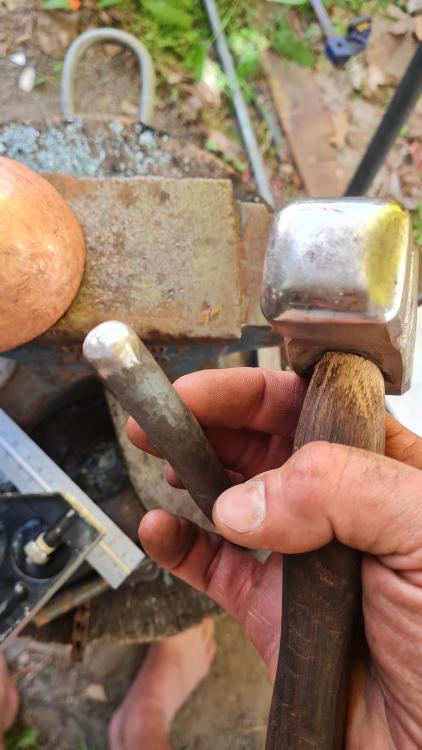
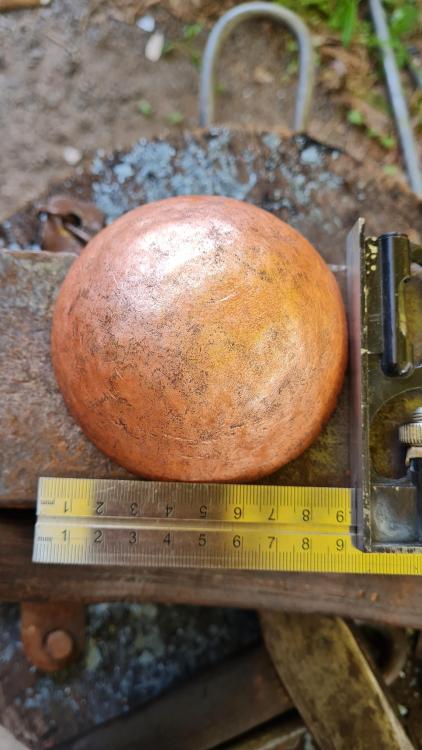
Ok, I had a U shaped piece already made that I could use to start some tucks with a small coil spring top fuller. (I made a smaller U out of garage door spring too, but I forgot to take a photo) Then I hammered these in with my rounding hammer on the anvil. I alternated this with hammering into the axle side of a small trailer wheel hub that I smoothed with a flap disc. I had forgotten just how soft fully annealed copper sheet is! After a few rounds of tuck shrinking, I started focussing more on just sinking into the round form. I got to a point where I was stalling a little and not getting any deeper, so I made something like a ball-end punch out of a piece of coil but used it more like mini rounding hammer so I could focus more in the centre of the round form from dead-soft to go deeper a little faster (still regularly annealing, though). This first attempt in copper was 115mm diameter (~4 1/2") flat and I got it to 93mm diameter (3 5/8") and 42mm (1 11/16") deep. Including messing around experimenting with it and thinking it through, it probably took me 45 minutes or so. This next photo shows the tin lid I traced to start with for comparison. The second photo shows the depth I was getting, but this was just before I switched to the ball end punch/hammer for more depth/height in the middle. It's fun and really satisfying to see the shape transform. Yet another rabbit hole to get lost in! Cheers, Jono.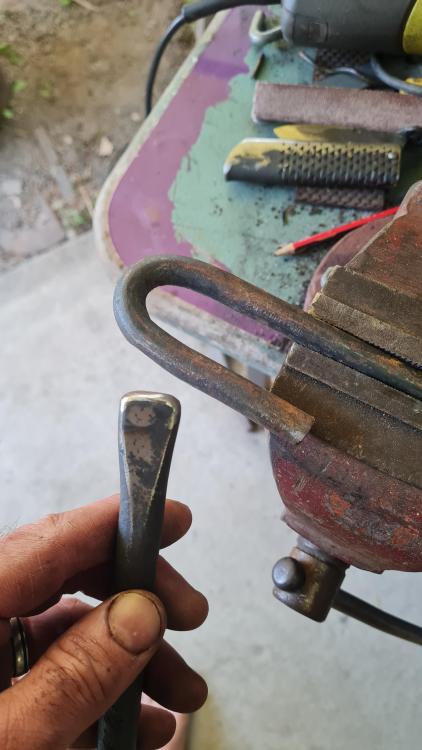


-
Determining starting blank size for beaten copper alembic dome?
Hefty replied to Hefty's topic in Copper Alloys
This is all great info! Thanks all! Hopefully I'll get a little time to make some tools and practise today. I'll report back how I do. -
Determining starting blank size for beaten copper alembic dome?
Hefty replied to Hefty's topic in Copper Alloys
My practise has been with sinking the edge of the of the blank into the pipe end to form a tuck and then shrinking the tuck, but I have only worked with small, sheet metal blanks. Do people normally form tucks over stakes, or into forms? Frosty, I've seen some videos you have suggested in the past involving using a tucking fork so I guess I could try that sort of thing too. I also have tried anything too deep yet. i guess that will be my next challenge. -
Determining starting blank size for beaten copper alembic dome?
Hefty replied to Hefty's topic in Copper Alloys
Yes, I am still deciding on what sort of form to sink into or work down over. I've done some practise sinking and shrinking using the end of a pipe that has been filed to a rounded edge. I saw Roy from Christ Centred Ironworks do this in a short on Youtube. My practise piece has some marring from the edge of the pipe, but for a still, while a perfectly smooth would look really nice, it's not critical for the function. I'm also thinking about getting an old trailer hitch (or something larger if I can find it) and trying working down over that. -
Determining starting blank size for beaten copper alembic dome?
Hefty replied to Hefty's topic in Copper Alloys
That would be cool and I'd love to get into metal spinning but I need to be honest with myself and show some restraint. It's a whole other rabbit hole I could follow forever and chasing my current hobbies keeps me poor enough as it is, in money and in time! George, yes, I think I'm going to practise different forming methods in sheet steel to see the different effects on the thickness in different areas. Then I'll have to also, sparingly, do some practise in copper to compare the work hardening as Frosty mentioned. Scott, yes, I'm going to have to figure out just how tall/deep I can form by hammering. Thanks for the info so far, gents! Any other tips for the forming? I haven't done much sheet metal work in my time. Mostly little bits and pieces in high school. -
I've done a search here on IFI and elsewhere and I've got nothing: How can I determine (at least roughly) how big to make a circular blank to create a dome to fit on a boiler of a specific diameter? And, because I will be using a combination of sinking and tuck shrinking, do I need to adjust further to allow for stretching and/or shrinking of the overall blank to final? Any help or advice would be greatly appreciated! Cheers, Jono.
-
What a score! Is that the wrought in the vise? It looks crusty but solid!
-
Never met or spoke to Glenn in person but I'm still rocked to hear this, as I was about Thomas. Glenn was always generous and, as mentioned above, patient with his sharing of knowledge but also his wisdom in terms of safety, and its promotion here. This place is a testament to that and to him. My condolences to Foo and the rest of the family. My anvil is pretty average so it doesn't ring , but I'll hit it for him anyway!
-
What did you do in the shop today?
Hefty replied to Mark Ling's topic in Blacksmithing, General Discussion
That means it's a great weld! The "barb" shaped keeper on the hook has been formed by folding the stock over and welding it back onto itself. He's made a really clean weld so there is no visible weld line. -
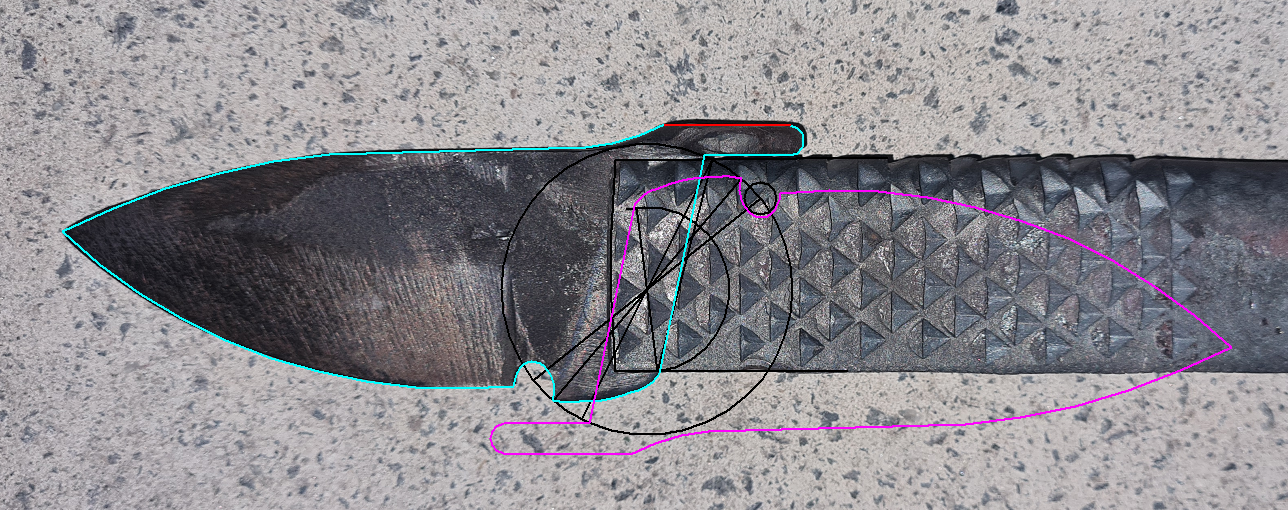
I got the pivot hole drilled! I had to re-sharpen my drill bit but the wet rag and torch got the steel soft enough to drill. I've got a pin loosely inserted for checking the position of the blade and it's looking good so far. I've done some grinding on the ricasso and the inside of the handle slot where the ricasso was contacting too early and I've got the tip of the blade level with edge of the handle when closed. I'll take a little more off so it is definitely confined when closed and then focus on final grinding and hand sanding the blade and any uncomfortable spots on the handle, then I'll peen the pivot rivet and set the friction to a level I'm happy with. Really stoked with the progress so far: Cheers, Jono.

-
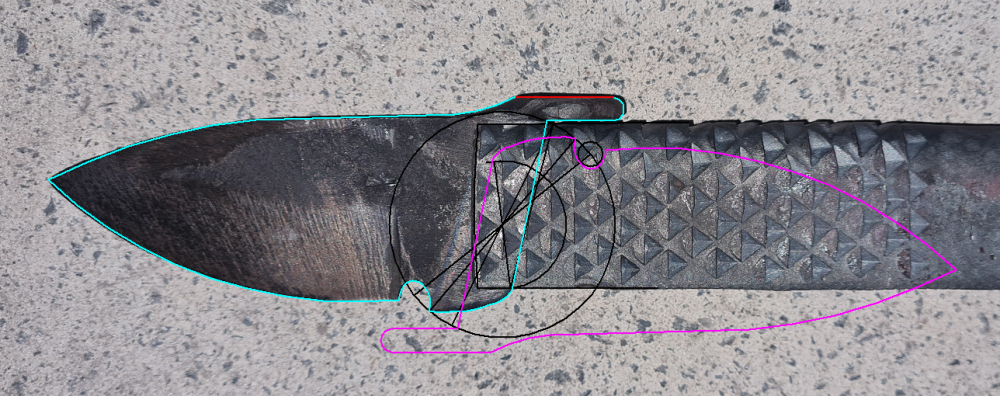
Welp, I tried spot drilling with a piece of rod but my itty, bitty drill press couldn't get the speed or resist enough pressure to get it hot so I went with the wet rag and torch. I haven't drilled yet though because I'm still checking and double checking where I want to put my pivot point. Anyway, here are some photos of how it's looking now: The choil and ricasso area currently look like a can opener because I was hoping to get that point to contact inside and prevent blunting the blade, but I'm not sure if I'm going to be able to actually achieve that, yet, so it may get ground back. I've even played around with this image in a 2D CAD file to see if I can figure out my pivot point that way. I think I'm almost there. Absolute-worst-case-scenario will be that I have to cut back the handle, re-cut the notch at the top and drill a new pivot point, but don't actually think it will come to that. Oh, and here's the 2D CAD work I've been toying with for the pivot, in case anyone's interested: Judging by this I will have to grind down the "can opener"/ricasso area, but I could put a stop pin in to sit nicely in the choil.

-
That's right! I read that same trick on here somewhere recently but I had forgotten it.
-
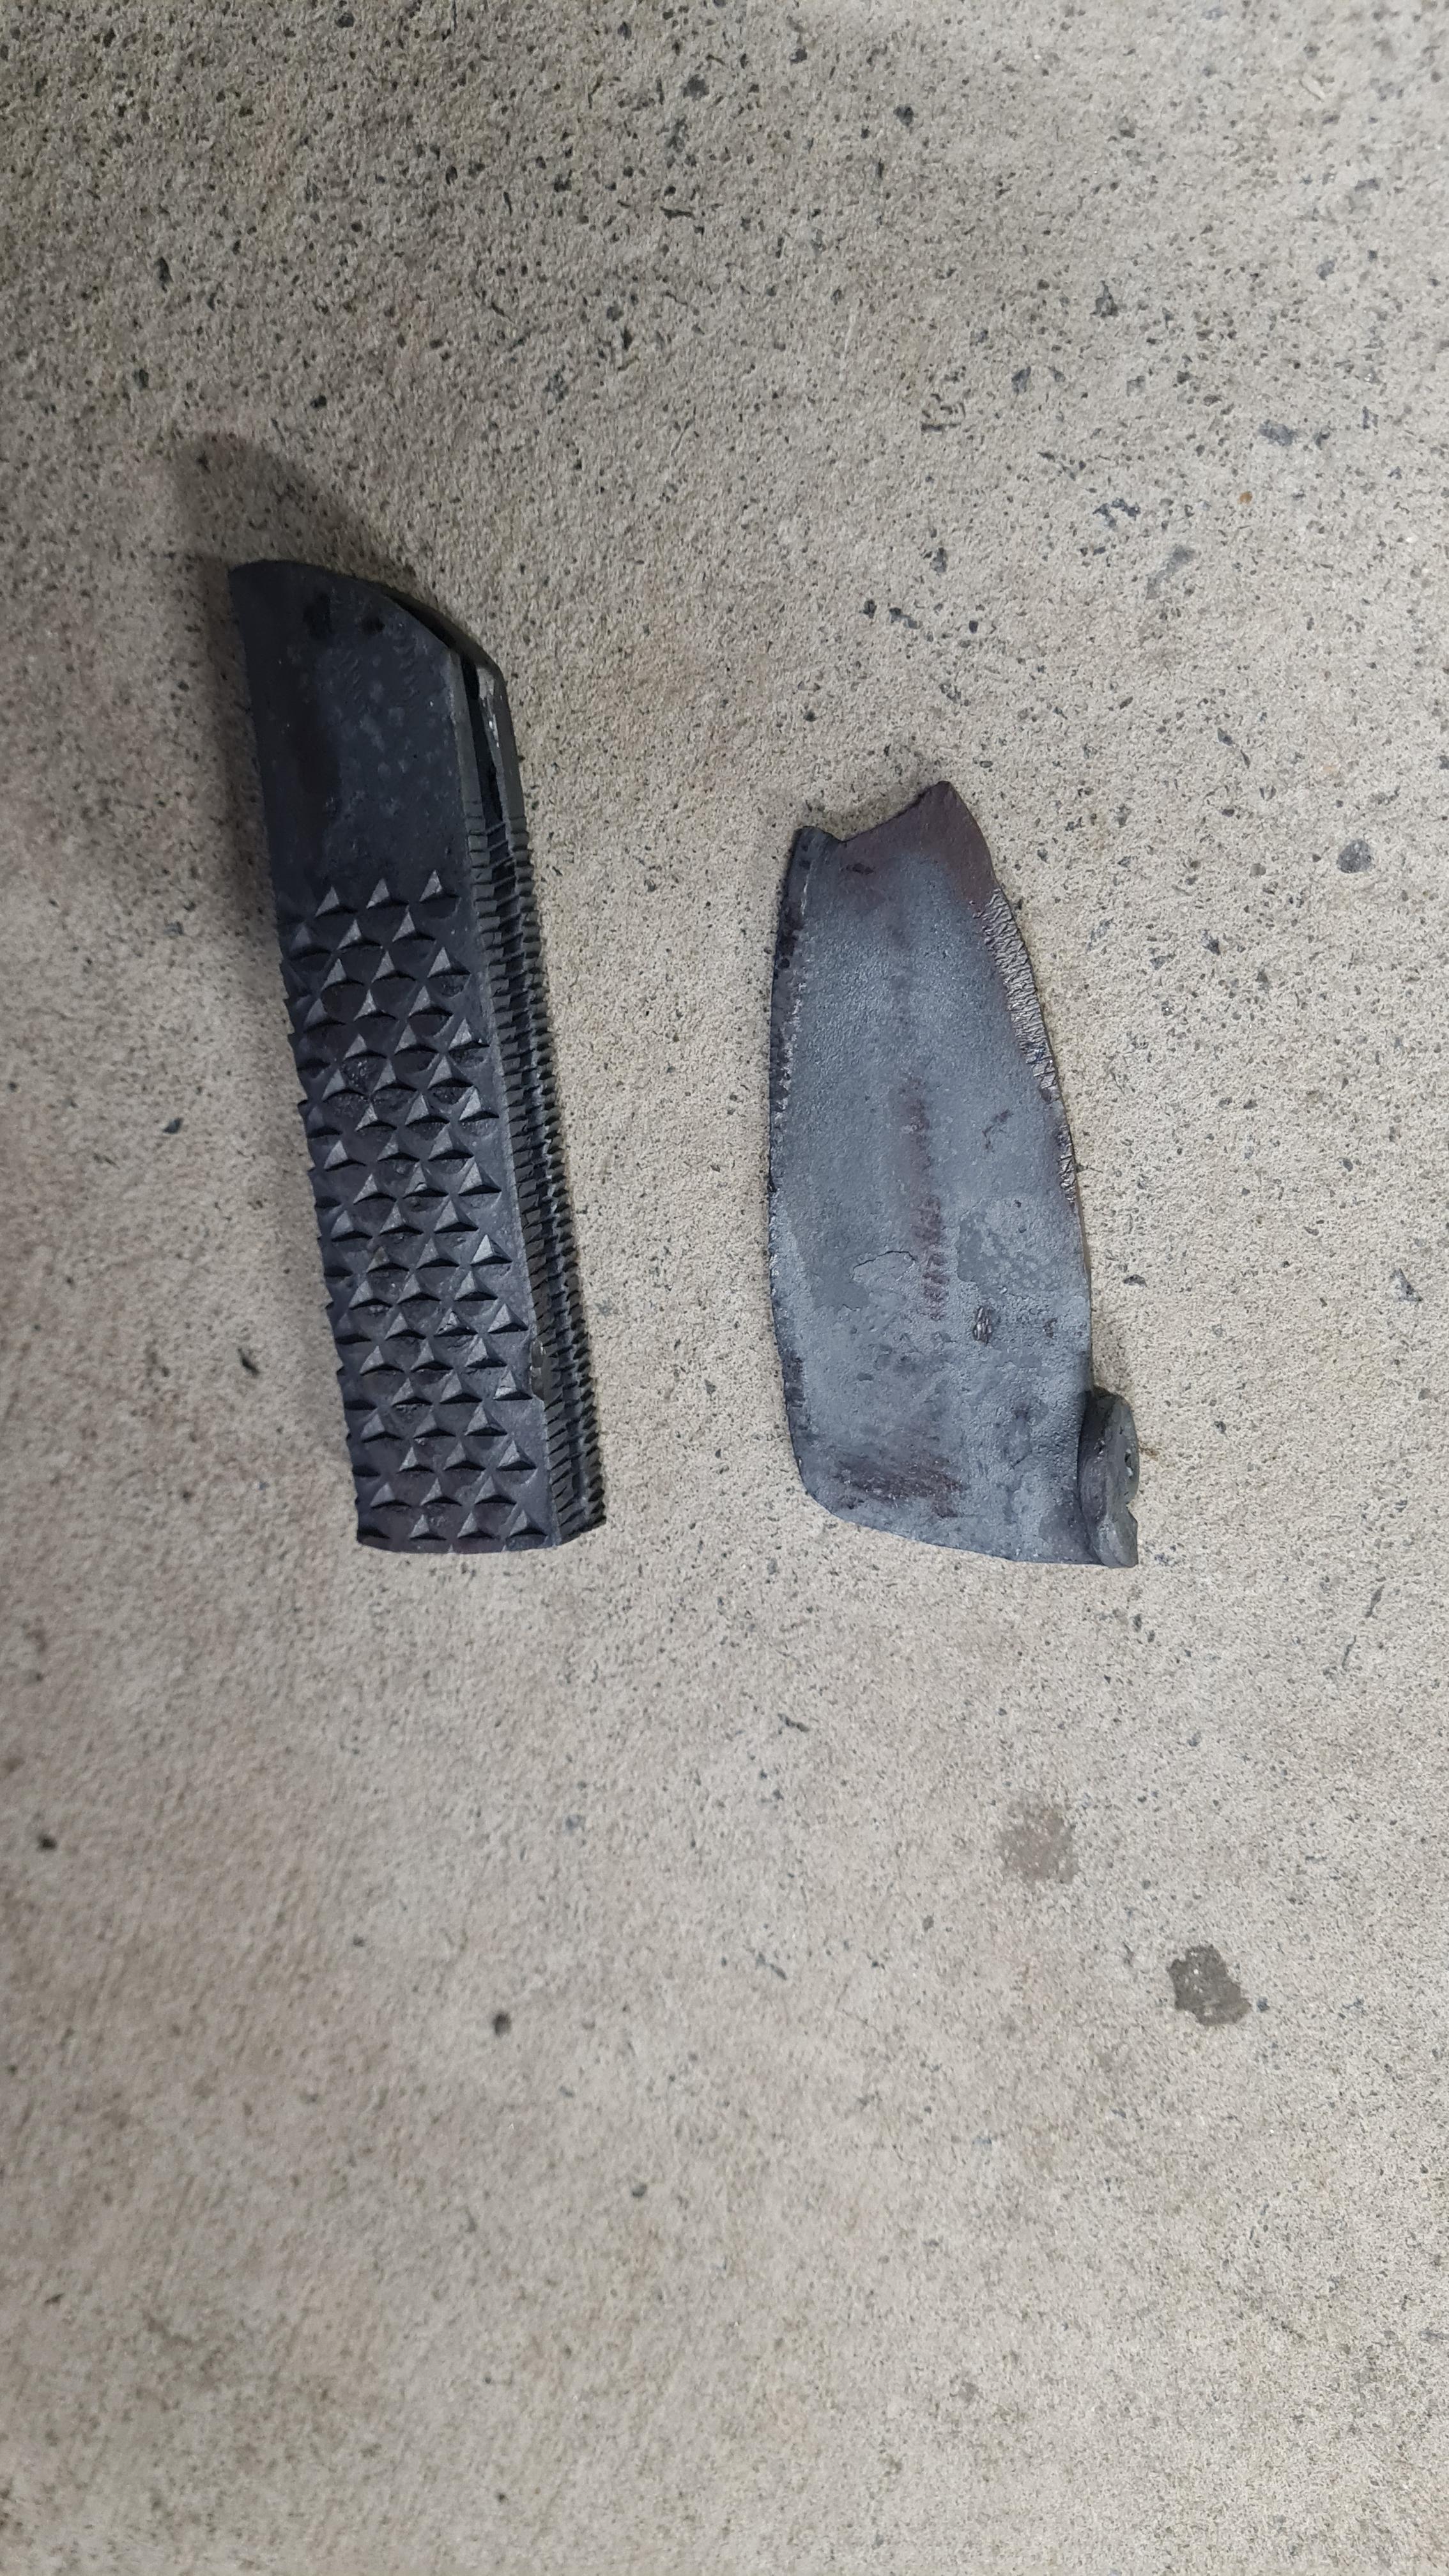
I made some progress over the weekend but forgot to take photos. I've got the blade pre-ground and heat treated, but I forgot to drill the pivot hole before heat treating (rookie mistake) so I'll have to do the "wet rag and focused heat" trick to anneal the spot for drilling. Then I'll sneak up on the finished bevels on my cheapie belt sander. I'd been meaning to buy some needle files for a while now, so I bought some and got the handle spacing right, especially around the pivot area and the short slot in the back. So, the blade fits in place and now the most important thing is getting the position of the pivot just right. I was surprised by how close to the opening side the pivot was in that video. Photos to come! Cheers, Jono.
-
Yep, I've still got plenty of profile grinding and filing to do but hopefully it shouldn't take too much sanding/filing to get a nice sliding fit on the blade thickness. There's still some file texture on the inside of the handle but I ground most of it off. The gap should also be just wide enough that I can file the inside surface down a little as well, if I need it.
-
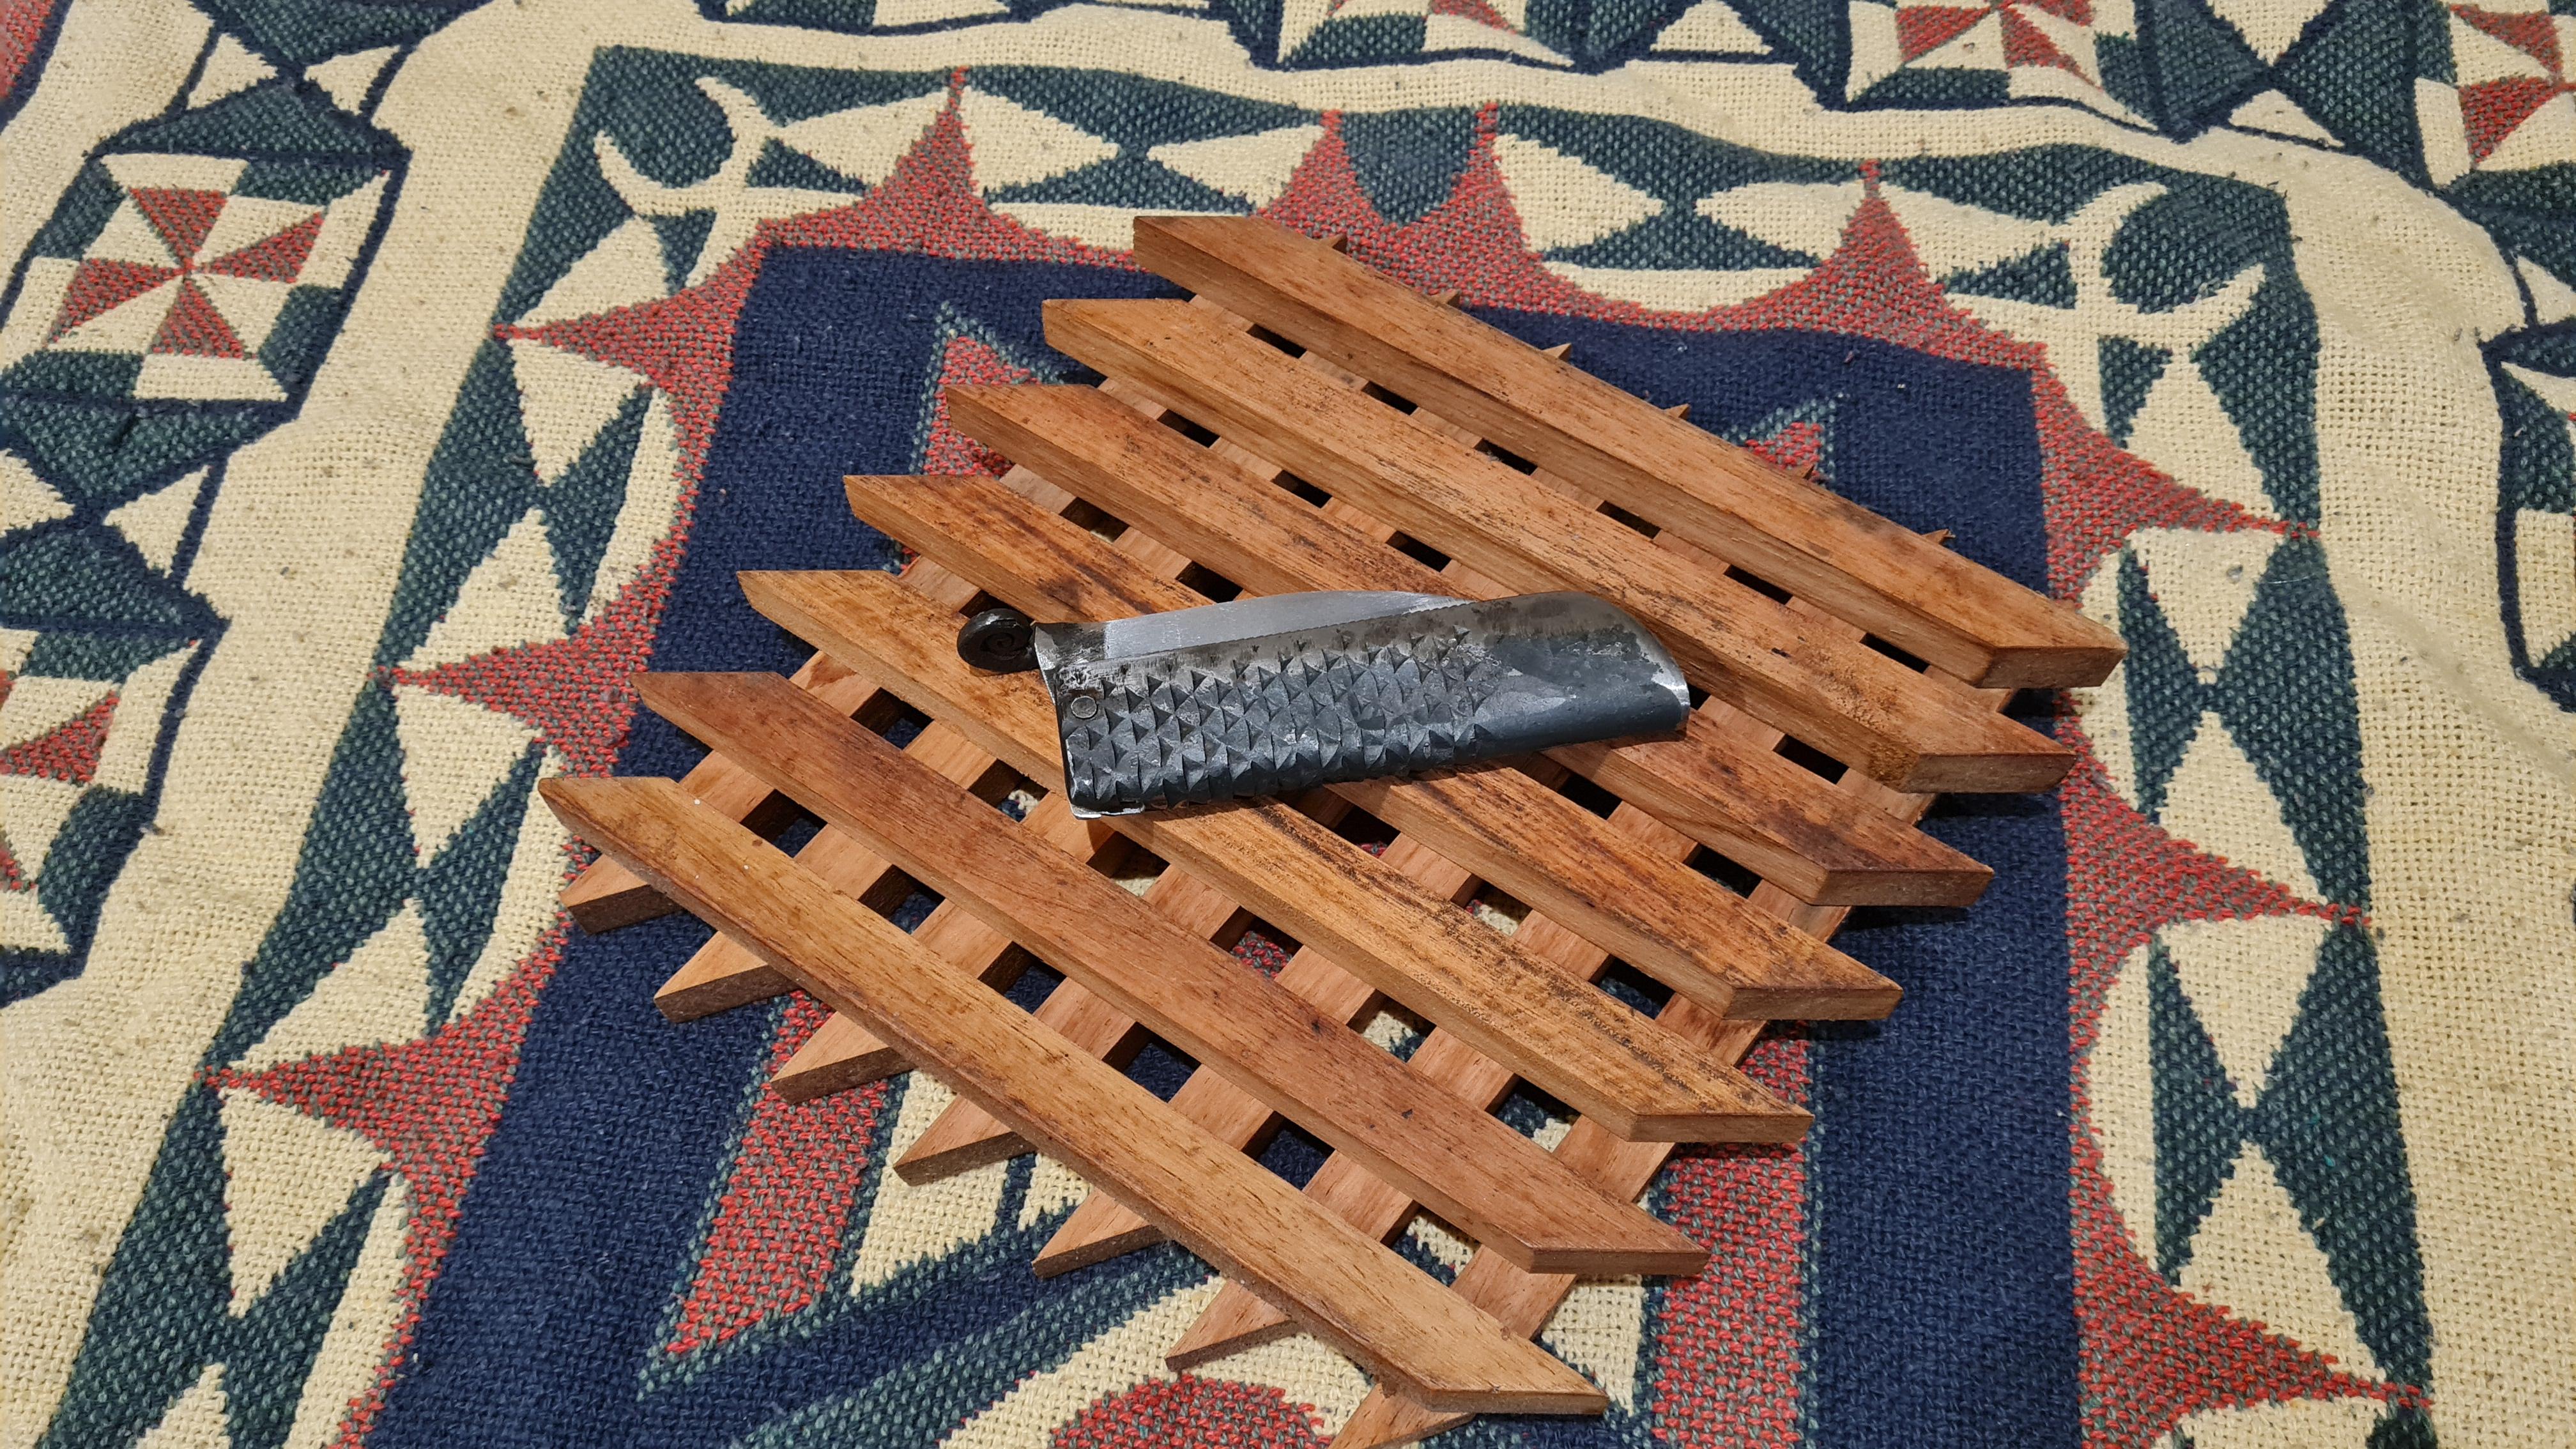
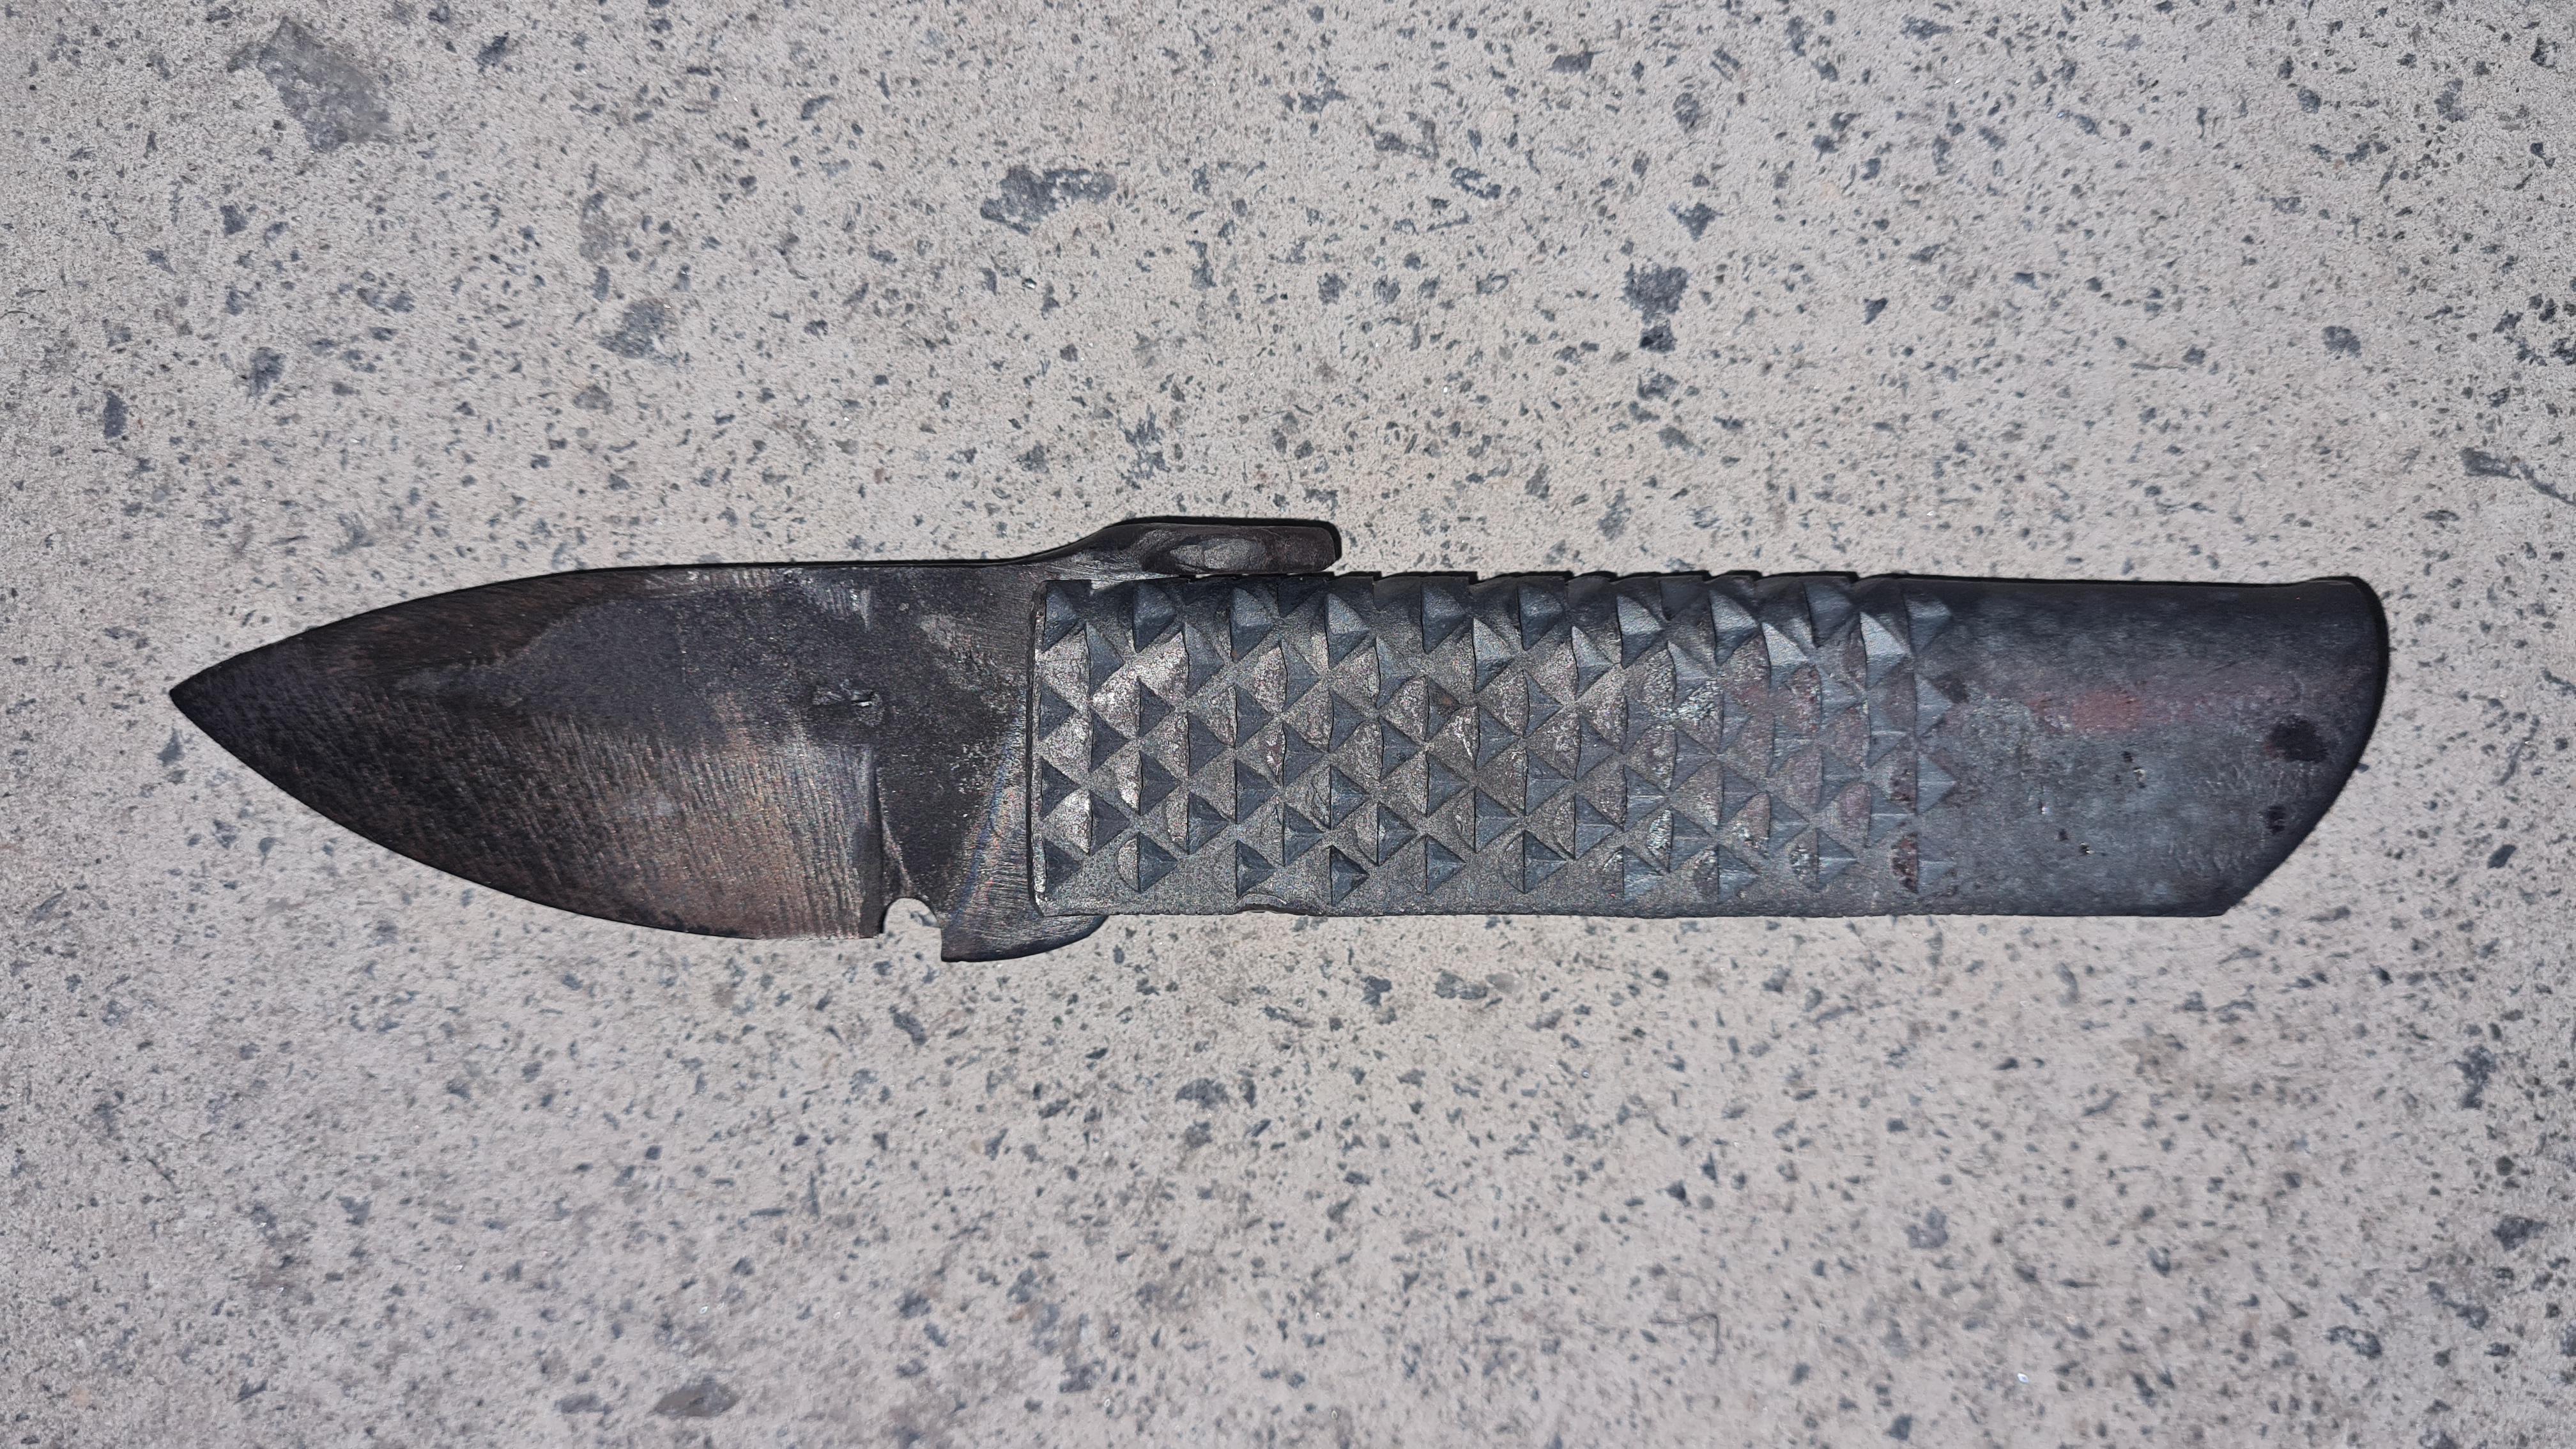
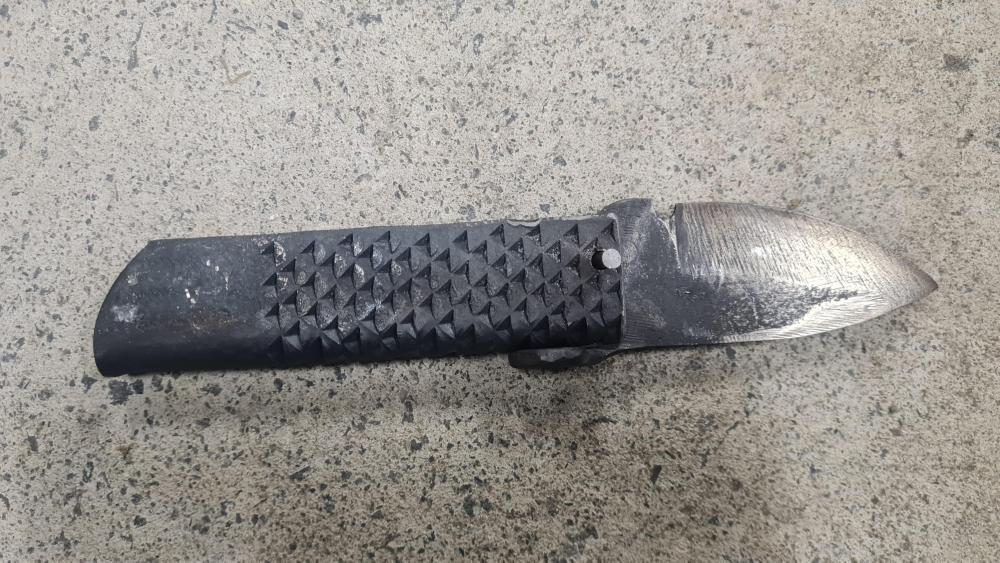
Ok, I got some time in the shed this afternoon so I forged out the (very) rough blade shape and ground down the teeth on a piece of farriers rasp and forged it into a handle. I forged it around the blade so tight that I had to drive it off with a punch. Oops! I love the teeth along the edge of the handle steel. Ready made checkering!

-
Templehound, I think you're right: a friction folder won't fully scratch the itch, but after seeing the video JHCC posted above, I think I'm going to try one friction folder with farrier rasp steel for the outside/liner/handle piece. I've already been watching several videos from the InMyShed channel, but I hadn't seen that one yet. I like it! But yes, Frosty, I noticed the issue with his drill press in one of his other videos, too. I think a liner lock will be my next after the friction folder. I've just recently made my first micarta, so I've got some scale material ready to go. Now I just need a round tuit, so I can get them done! Cheers, Jono.