

JME1149
-
Posts
381 -
Joined
-
Last visited
Content Type
Profiles
Forums
Articles
Gallery
Downloads
Events
Everything posted by JME1149
-
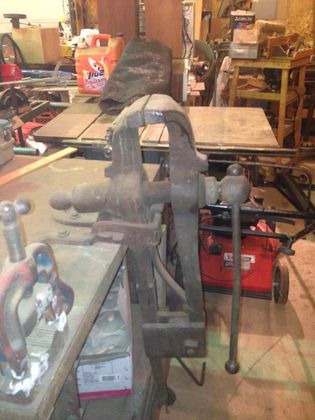
Brought home a nice 6" post vise from a local auction for $60. Good overall condition and the screw / screw box is perfect. Only issue is that the leg had been cut short. No visible markings I could find.
-
Das, Thoughts and prayers headed your way. I've always found hammering at the forge to be therapeutic and calming and hope the young ones do as well. John
-
Fixing (or trying to) a really sad Hay Budden
JME1149 replied to haddockkl's topic in Anvils, Swage Blocks, and Mandrels
I'm curious about the next step. Are you planning to cut a mating groove in the underside of the forklift tine, then weld the seam around the outside, or are you going to set the tine on top of that rib and weld/fill the 1/2" groove? Have you thought about heat treating after weld? Hope it all works out for you and you can bring that old girl back to life. -
You Think It Is Like Tying Your Shoe
JME1149 replied to fat pete's topic in Blacksmithing, General Discussion
I can't think of a much nicer compliment from a student. -
Yet another railroad spike tomahawk
JME1149 replied to rifleshooter2's topic in Axes, Hatchets, Hawks, Choppers, etc
Very nice, I really like the bearded axe take on that. Did you fold the point at a 90 degree bend before shaping/thinning? -
A truly rare portable forge...? (Link inside.)
JME1149 replied to ledhed's topic in Solid Fuel Forges
I would speculate that this is indeed rare. I mean, how many other people would have cobbled together that exact mix of different components into one Frankenstein unit? The wheels are definitely add-ons, I doubt the Centaur firepot is original to the cast Iron table, and I'm pretty confident the blower didn't start out with that forge (hence the duct tape connection). That's not to say it isn't perfectly usable. Value is entirely up to how badly you want it and what other similar units are going for in your area. -
So compromise and make a half round, flat on the inside edge where it wraps around the bar, but keep the round shape where you see it. Best of both worlds.
-
Trying to find out about a strange anvil
JME1149 replied to Benh67's topic in Anvils, Swage Blocks, and Mandrels
First, welcome to Iforgeiron. Please put your location in your header, you might be surprised how many blacksmiths may be close by. Second, show us the photo of the other side, my guess is that what you have is half of a vise, not really an anvil. If so, it's more of a light duty cast iron block than something that can withstand any type of heavy hammering. -
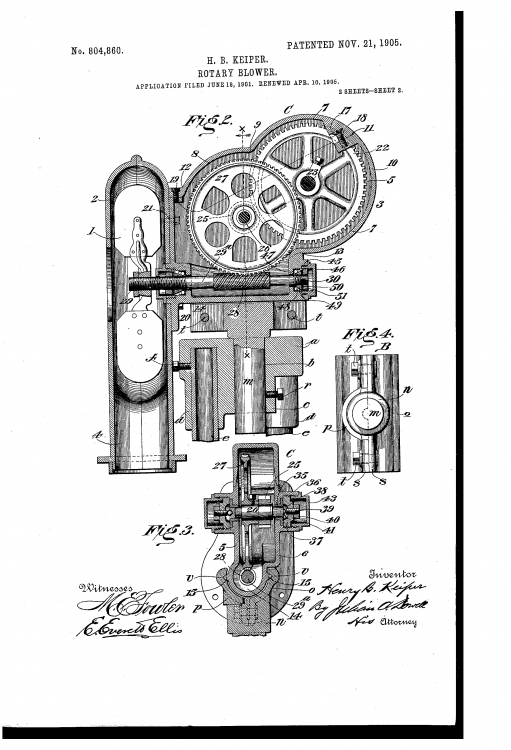
Yes, you are missing the cone nut on the fan side. Note that the washers should have an internal tooth to fit in the groove in the shaft. Look through the bellows section or just search for champion 400, you should get loads of information for the rebuild. Here's a copy of a diagram for the internals. Hope it helps.
-
Drift Dimensions - Hammer Eye - Top Tools, etc.
JME1149 replied to Mark Thomas's topic in Slitters, Punches, Drifts, etc
This is the info I had previously saved, hope it helps. Hammer Eye Dimensions: For punches and handle drifts Hammer Eye Dimensions: I found a hammer handle manufacturer's list of dimensions and will extract a chart (eventually). A 1.5 to 2.5 pound hammer has a 7/8 x 5/8" oval eye. A 3 to 4 pound is 1" x 3/4". U.S. Department of Commerce, Forged Tools Simplified Practice Recommendation. For oval handles. Handle eye width = 40% of hammer width Handle eye length = 125% of eye width. Tolerances +1/16" - 1/32" max. Tapered sledge eyes taper to center 4° on long axis and 3° on short axis. This is for punches and finished holes. Note that the above is for a true oval. Check your drafting book or Machinery's Handbook for how to lay one out. There are also straight sided handle holes with round ends (milled). Thess are US standards I am sure European standards are different. - guru - Tuesday, 11/14/06 01:04:50 EST Hammer Eye: My information is not as exact as that in the Guru's response. But anyway, here goes based on my experience. We have talked about this. If I buy a hammer handle, I get the "16 inch machinist's handle". The eye-end will give you an idea as to dimension. Harcourt's "Elementary Forge Practice" shows the initial punched OVAL hole measures 5/8" x 7/8". After drifting the hole has a 1" length by an 11/16" width. Nothing is written in stone. 5/8" x 1 1/16" is not unusual. An old rule of thumb for hand forged hammers is the eye length is twice its width. Many a hand forged hammer in the U.S. had an oblong eye; ie., the eye had two parallel sides in length. The ends were half round. It is easier to forge and cold finish such an eye when compared with forging an oval eye. It is easier, because you forge a tapered rectangular section and then swage and cold finish the ends. The initial punched eye I judge to be about 2/3 the size of the finished eye. My drifts are about 8" to 9" long for a 2.5 pound cross peen. The small end should just enter the eye when drifting. I drive the drift in about three quarters of its length, and I drift from both sides. While the drift is in, flatter the side bulges. If the drift is 8" long and the small end is about 2/3 the finished eye, then 6" up from the bottom will be the finished eye size. The drift has a full taper top to bottom. It is not driven all the way through from one side. Drifting from both sides is advantageous. It will give the eye a slight hourglass shape, the latter being desirable for the insertion and wedging of a wooden haft. Frank Turley - Tuesday, 11/14/06 01:28:11 EST -
I checked out your website and thought it looked good. You've got a nice mix of basic tooling to the artistic creations. Layout and photography looks professional. If you want to get into the tool market, I'd suggest using this slow period to build up some inventory and schedule a trip out to SOFA this year. Could be a good venue to get your name out there and make a few sales, as well as a chance to get some ideas from others trying to do the same thing.
-
" I just like to play with fire and hit things with hammers. " -- Frosty
-
Battery operated, or a very long extension cord.
-
Nice design and execution. I look forward to seeing the finished product. My other thought was that's a lot of rivets.
-
Highly unlikely that old of an anvil will have such pristine corners. Coloration also screams weld repair, possibly even a new top plate. As much as I prefer the Fisher for the quiet thump instead of the ring, I think I would choose the Trenton. Seen too many Fishers with edge damage more severe than what you see, makes me think it's too likely to loose another chunk. I have no experience with the Soderfors and would use rebound and face condition as the deciding factor. Or just buy them all and flip them one at a time.
-
Sorry to hear of your latest challenge and hoping for a speedy and complete recovery. You both will be in my thoughts and prayers. John
-
That's genius! The first two I tried the bandsaw down the middle route both developed a crack on one side near the bottom of the saw cut. Definitely have to give your method a try. Thanks for sharing.
-
The shape of the anvil, serial number on the left side of the front foot, and that hourglass depression in the base all lead me to strongly believe it is a Hay Budden. The serial number is putting it in the very early 1900's range (don't have AIA handy so can't be more specific. All this points to the anvil being cast steel rather than wrought iron. This is important because it will make a difference how it welds up for you. From my very limited experience, this should be much easier to weld than dealing with wrought iron. I can't tell from the photos what the face looks like, but it appears to be straight and flat. Once you weld the bottom back on, if you need to true up the face to the bottom, set it on the face and cut the bottom of the feet. Personally, I'd grind off that Mesaba Auto so the poor old girl can forget about her abusive past. Good luck with the repair and thanks for saving a good anvil.
-
Teaching Class; With Disruptive Student
JME1149 replied to SReynolds's topic in The Business Side of Blacksmithing
As you alluded to, it's not so much about the age as it is the maturity of the kid. Too many variables to give you a right or wrong answer as to what you should have done, the bigger question is what can you do going forward? Can you blackball this kid for a couple years until he grows up? If not, grandma may bring him back for another class. As long as he doesn't get injured, isn't jeopardizing anyone else's safety, and doesn't damage the tools, it sounds like you are being paid to be there to try to impart your knowledge whether they are receptive or not. If his actions pose a threat to safety, by all means shut him down and send him packing along with a very detailed explanation to grandma why. I've experienced that frustration first hand, but when you get that one kid that really shows and interest and you actually make an impact on their life, it's all worth it. -
Over the years I've enjoyed looking at your tooling and fixtures almost as much as seeing the finished product. You've impressed me yet again.
-
Subcontracted for scrolls
JME1149 replied to nictaylor0's topic in The Business Side of Blacksmithing
Too many unknowns to give a solid answer, maybe if you ask yourself some of the following questions, it might lead you down the appropriate path. You probably know all this already, but seeing it in front of you might help. Is this a one time deal or can if lead to repeat orders? Any chance he will need to order just a few more to finish the project after you have completed your batch? If so, you should be upfront with pricing for extras. Is the material something you buy in bulk and always have in stock, or do you need to special order it? Do you get a price break from the supplier if you buy it in bulk rather than one bar at a time? Assuming you are going to make 100 pieces of each item, how many will be in the individual batches for you to process in a cost effective manner? Will you make 10 at a time, 20, 50 or all 100 parts together? Setting up to run one at a time is not as efficient and will ultimately cost you more per piece than if you run them as a batch. Do you already have the tooling you will need to make multiple, identical pieces or will you have to build that? Will the cost of the tooling get amortized over the whole lot or just absorbed as an operating expense? I would approach it as estimating how long it takes to run a "batch", multiplied by your hourly rate, and add in tooling costs amortized over the total quantity, plus material costs and finishing/coating if required. Give him pricing based on your production batch lot (10 pieces for $$$). That way, he can buy the multiples he wants, and if he comes back for some spares or replacements, you are covered to make it worth your while to setup and run a small batch. -
PM sent with some info. Welcome aboard.
-
Looks nice from both sides, I'm looking forward to seeing the completed product.
-
Very nice job, and having two definitely balances it out. I like the fishtail detail, adds a nice touch.
-
anvil Does this look cast?
JME1149 replied to kiddcaprix's topic in Anvils, Swage Blocks, and Mandrels
The shape of the waist and thickness of the heel make me think Hay Budden, Trenton's typically show a thinner heel. Either way, it looks like a bigger one, maybe in the #200 range?? Doesn't look like a farriers anvil to me, that's just the way the HB's horns look.
