JME1149
-
Posts
381 -
Joined
-
Last visited
Content Type
Profiles
Forums
Articles
Gallery
Downloads
Events
Everything posted by JME1149
-
Das, I know that guy in Monroeville. Actually bought a couple things from him. Welcome aboard, hope you've had a chance to connect with PAABA, great organization in your backyard.
-
Of all your doodles, the one that jumps out at me is the bottom right corner. It looks simple yet elegant. Maybe if you go with an octagonal shape rather than square, the twists might look a little more finished or refined. Maybe try a mockup in a piece of mild steel before you commit to changing what you have. Just the humble opinion of a non-bladesmith
-
professionally repaired?
JME1149 replied to MarkDobson's topic in Repairing and Modification to Anvils
Professionally repaired means you paid someone to weld it, not an assurance that it was done without destroying the temper. -
Instead of a bench, why not make a new, longer top mounting bracket that would drop down into the hardie hole of your traveling anvil?
-
How can I tell how much my anvil is worth
JME1149 replied to Karie's topic in Anvils, Swage Blocks, and Mandrels
Karie, As Glenn indicated, Hay Budden has a good reputation, but the there are many other factors that could detract from being a good anvil. If the top surface has been improperly repaired and the hardness reduced, that would be bad. Evidence of cracks or delaminations would be bad. The picture of the side where you are pointing to the "60" looks a little odd along the top surface. Really tough to say without checking the rebound all over the top surface. As to some basic information, the "146" stamped below the Hay Budden is the weight of the anvil in pounds. It could be a little less because of wear, but should be right around that. The serial number is on the front foot on the left side. Look at your photo where you are pointing at the upside-down #5, you can just barely see the stamped S/N just above the screw head. I would suggest contacting a local blacksmith who has some knowledge in evaluating the condition. You can start with the California Blacksmith Association leadership, and they can direct you to someone in your area. Whether you should sell or keep it is your call. Is anyone in the family even vaguely interested in taking up the hobby? It will be hard to replace the anvil down the road and the family history won't be there with another one. Good luck with your search and decision. -
The oil sloshing around inside the housing is what keeps all the gears and bearings lubricated. Think of it this way, oil dripping from the front/fan bearing is keeping the balls lubricated and flushing all the soot and dust from them. This model does not need to be oil filled, and isn't sealed to be so. A small pool of oil laying in the bottom around the worm shaft is sufficient, with a few squirts being added every now and then while in use. I'm still not convinced that grease is required and tend to think the grease actually slows down the turning of the handle. Also, just to clarify something Jim mentioned above, the bearings ride on cone nuts attached to the shafts, if the conical surface is excessively worn you may want to consider replacing the nut. One other trick I've used to remove the fan nut is to use the blower handle to turn the shaft while holding the nut with a wrench. This maximizes the mechanical advantage of the machine itself. Caution: If you apply too much pressure, you could break something and replacement parts are hard to come by.
-
I saw a demo recently where the bladesmith had taken a pair of standard tongs and welded on a section of half-pipe (take a 1-2" long piece of 1/2" pipe or tubing and slit it lengthwise) to the top and bottom jaws. Very quick and easy solution that also appeared to hold well.
-
Realistically, trial and error until it feels right. Remember that you are dealing with side-to-side alignment as well as front-to-back if you tear it down all the way (remove the bronze worm from it's shaft). And you have to leave enough end play in the shafts so they turn easily. Meaning, if you tighten the cone nut too much, the bearings will put a bind on the shaft and it will be hard to turn the crank. Either way, it's your equipment, you do what you feel is best.
-
Looks like that bronze worm gear is really worn. I still recommend not futzing around with it. Any misalignment between that and the shaft when you reassemble will accelerate the wear and shorten the life span. Use some degreaser or kerosene to clean/flush out the inside well then recoat it with motor oil. A few grains of sand isn't going to hurt anything. As for the bearings, the rear shaft is just loose ball bearings. The other three sets can be replaced with bicycle race ball bearings. I don't recall the size but I'm pretty sure all three are the same size. When you pull the handle off, is there a lot of wear between the shaft and dust cover, or is it a nice fit? Oblong/oversized hole would indicate a worn cone nut. If you insist on removing the fan, try a large channel lock grabbing the hex between the fan blade arms while you break the nut loose with a socket. Worked for me, just be careful not to break the fan arms (grip it tightly).
-
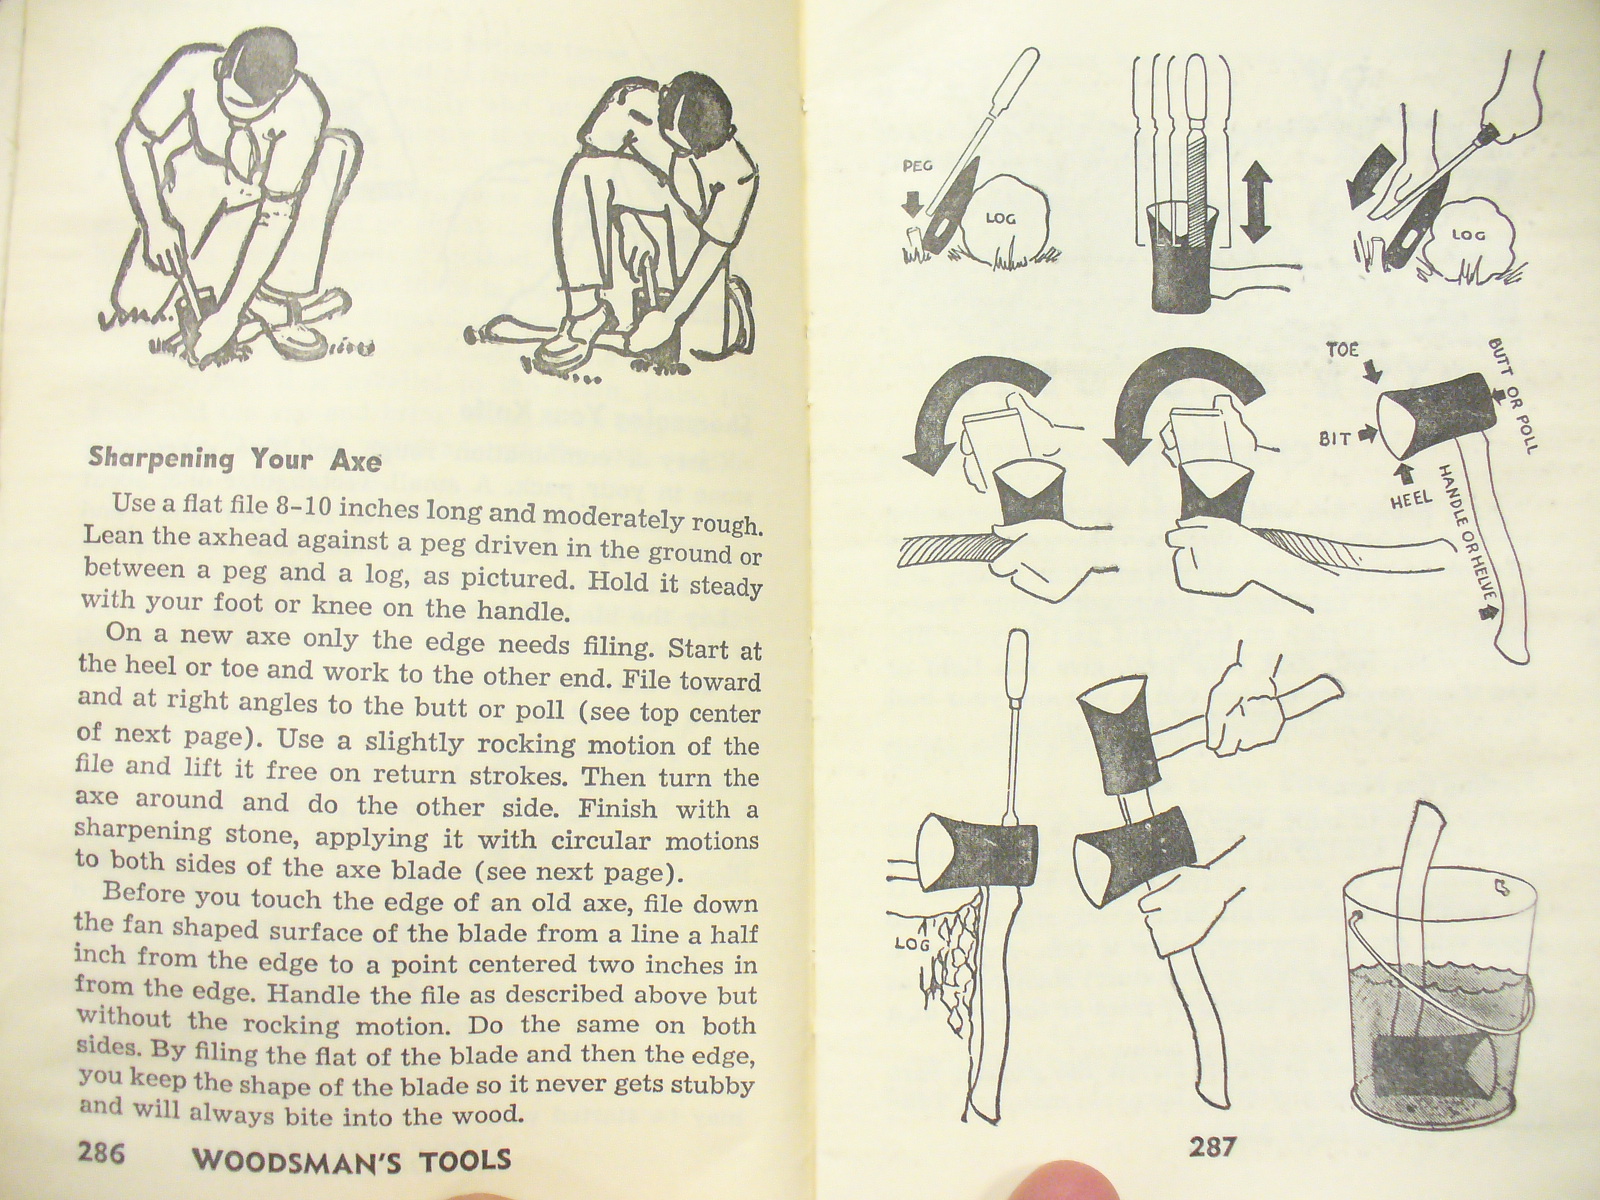
Vintage Collins Boy Scout axe blade angle
JME1149 replied to Jacob Nothstine's topic in Axes, Hatchets, Hawks, Choppers, etc
Handbook For Boys, 1958 edition (that should qualify as Old), no angle listed.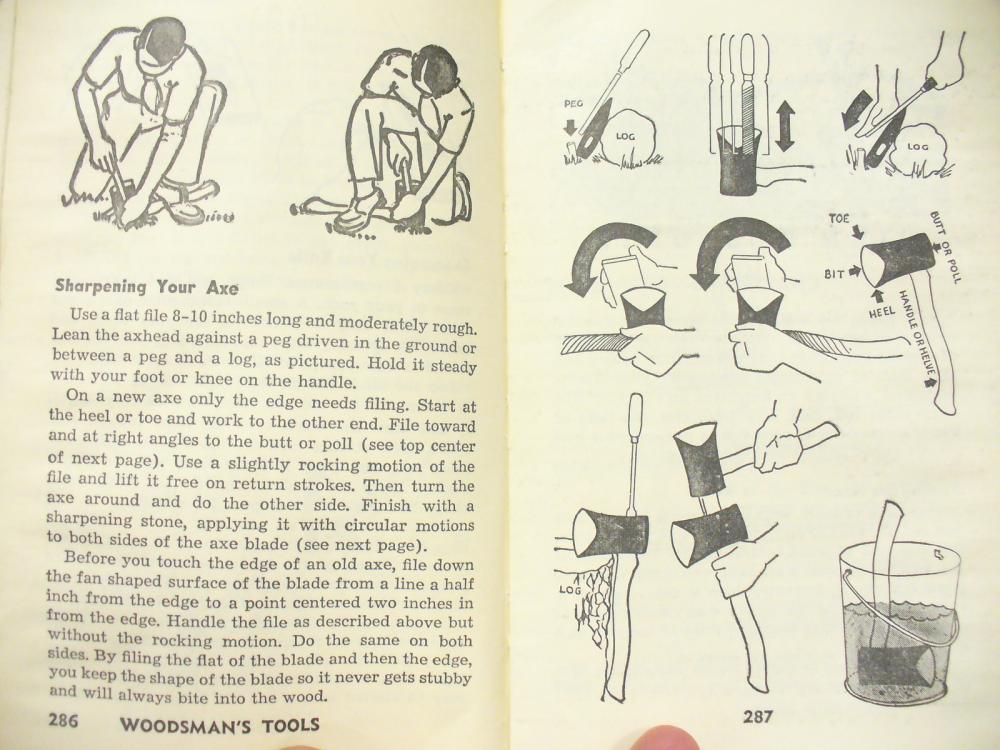
-
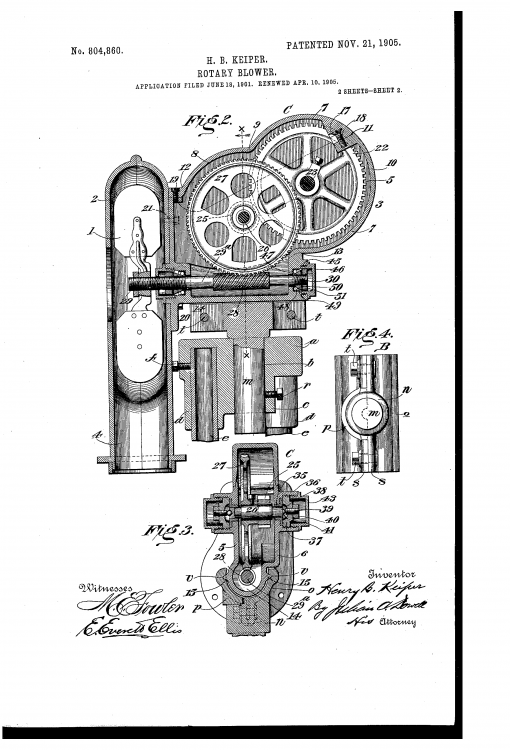
Here's something I picked up a while ago, I think it was from the patent office. Hope it helps.
-
Sounds like a new T-shirt slogan Glenn
-
Did you take the top cover off and look at the internals? See any damage, burrs, excessive wear, crud buildup? Have you tried putting some lubrication inside? With the cover off, turn the handle and watch the edge of the big bronze gear, does it run straight or wobble as it turns? Does it operate the same in both directions? Can you isolate where the grinding noise is coming from? Did you unscrew the three dust covers and look at the condition of the ball bearings? There are four sets of bearings that could be the culprit. Three of them are fairly easy to access for a visual inspection. If it's turning freely and pushing air you might make it worse by taking it apart. It has had 100 years for the gears to wear-in to each other. Pictures will help get you a better answer, as would a video.
-
On the rear of the worm shaft, you have the cone nut riding on the bearing balls and the rear hex nut. Between them is a washer with an ID tab that rides in the shaft slot. The purpose is to adjust the cone for fit then put the tab washer on and tighten the lock nut. The tab washer would keep the lock nut from changing the setting of the cone. You should notice that on the cone nut, there are two wrench flats near the large end. If you can fit a thin wrench to go over these flats and hold it, you would be able to turn off the front fan nut. One piece of advice I have from personal experience, if you don’t absolutely have to remove the worm shaft, don’t touch it. Trying to adjust the end play to get the worm gears properly aligned so the handle turns smoothly in both directions is a pain. Good luck and keep us posted on your progress.
-
There used to be a Hay Budden catalog in the Anvils by Brand forum, but it disappeared with the site upgrade. I seem to recall seeing anvils with double pritchels but don't think I ever saw that half cut table version. Hay would custom make anvils, so this could be a special. It also looks like the hardie hole is not centered which seems odd as well. In any case, she's a beauty and will last many generations to come.
-
Just as a slight clarification, PABA (http://www.pabasite.org/home.html) is more to the eastern side of the state whereas PAABA (http://www.paaba.net/) is on the western end.
-
I keep looking at the pics but don't see a scrap pile. I see the beginnings of a nice little resource pile, but no scrap. That is a nice setup you have, I'm sure you'll have many enjoyable hours forging there.
-
Welcome neighbor, this is indeed the go-to place for information and ideas. As Glenn said, check into PABA for local affiliates and feel free to shoot me a message if I can be of any help. John
-
6" flue for outdoor coal forge?
JME1149 replied to falsevacuum's topic in Chimneys, Hoods, and Stacks
A picture or two of your particular setup would help get more informed answers. An outdoor setup is going to be subject to wind which will alter the flow. Just getting 1/2 the smoke up and away is good. Adding another 10 feet may be enough to topple your forge. Personally, I'd try adding another 2 feet and see if it helps significantly, my guess is that what you have may be about the best you're going to get. -
How I calculate knife prices
JME1149 replied to j.w.s.'s topic in The Business Side of Blacksmithing
That is a very thorough and insightful summary and contains a lot of good information for beginners to consider what the cost to produce actually is. I do have one question though. You're showing 5.5 hours for heat treating. To me, heat treat would be considered unmanned hours rather than fully billable. If you put the piece in the oven to bake for an hour, you are not going to stand there watching it heat up for the entire time. I would think the actual hands-on time where you are actively participating in the heat treat process would be significantly less than the 5.5 hrs, but you may need to factor in the cost of the gas/electric to run the furnaces as part of your overhead. -
Looks like you could use either end for lifting, hook the handle under the jaw and the horns could help stabilize the lid. Very nice design.
-
I think the lines were made by Wile E. Coyote trying to handle the anvil. It is an Acme after all.
-
Meet James Hay, of Hay-Budden
JME1149 replied to Black Frog's topic in Anvils, Swage Blocks, and Mandrels
Thank you for sharing this, it's always nice to know the history of some of my tools. -
Looks like a Peter Wright, can't tell what the weight is but it looks like a good size. Pictures show it to be in what I'd consider to be very good condition. As for the cleanup, power wire brush on an angle grinder would work wonders, followed by a couple coats of boiled linseed oil. Whatever you do, no grinding! Using the top face to beat hot metal will improve the condition. I think you made a good deal, I'd be happy to hand over $200 any day of the week for that one. Congrats.
-
I was thinking about something this morning and can't convince myself which answer is correct, so I'm turning to the experts for opinions. When making a billet, let's say I start with a simple 5 layer stack; low carbon / nickel / high carbon / nickel / low carbon. When you cut and stack, or fold, or whatever, for the next step, does it make a ten layer billet? Or is it a nine layer because the two stacked surfaces being the same material would essentially be one thicker layer of the same material? To clarify, is it LC/NI/HC/NI/LC/NI/HC/NI/LC, or is that center LC layer considered two LC's?