
Dan C
-
Posts
810 -
Joined
-
Last visited
Content Type
Profiles
Forums
Articles
Gallery
Downloads
Events
Everything posted by Dan C
-
Looks like a very nice knife Eseeman (could use a better picture though). I like how the blade transitions from the handle to the blade. I'm going to save this picture & hopefully any others you post to remind myself of what I should do on the next one. Good job!
-
Protection from anvil surface
Dan C replied to David Gaddis's topic in Anvils, Swage Blocks, and Mandrels
DanielC, it's a good thread to resurrect, I like your solution. I have large eyebolts on my anvil mount and could do as David suggests with springs & S hooks. -
hmmm...where's the disclaimer, kid's don't try this at home. Reminds me of this one, another stupid (but cool) way to seriously mess yourself up. Among other things notice the lack of safety goggles, not to mention what happens if it misfires. And here I was thinking that they'd be shooting junk anvils, but those looked like ones that should be put to work by someone. At least the bottom one looked like a nice Peter Wright with good edges. I'm in the sad camp on this one.
-
I used refractory clay on mine to taper the edges for the fuel efficiency.
-
If you could drop it in my backyard and not on the house I wouldn't mind digging it up. Hey, maybe someone finally found a good use for ASOs?
-
This forum is truly an astounding wealth of information if you just take the time to look. I stumbled on this one while trying to understand why I've been accidentally burning up more pieces I'm working on. '?do=embed' frameborder='0' data-embedContent>>
-
I almost always have my grinder with a sanding disc within reach when welding. Easy enough to clean a spot for the ground clamp. In addition to checking the ground clamp connection, check the insulation for the terminals. The stick welder I picked up on CL for next to nothing supposedly didn't work. A quick glance at the cables showed bare wire, a real safety hazard. Since I cut back to good wire it welds beautifully. I can't say how it welded before that and inspecting the insides, checking & cleaning contacts because I wasn't going to risk turning it on beforehand. Maybe this article would be of some use to you. Don't know what type of welder you have. This is the type that I got. Be careful. http://www.instructables.com/id/Refreshing-your-Lincoln-AC-225-220V-tombstone-weld/?ALLSTEPS
-
Ugh! Excuse me while I turn green with envy!!! Where were all these fantastic deals when I was anvil hunting? Don't get me wrong, I love my anvil, but really $50? Mine is a 190 lb PW that I paid $250 for that's no where near as good as shape as that one. Nice score...very nice score!
-
Tips from me...take them with a grain of salt, this is only the first time of done this, but here's what I learned and what to improve on. Head bolt tongs sure would've sure made the forging go better. I need to revisit the dimensions of the slit punch that I made. Is it correct to say the width of the slot made should be 1/2 the distance of the circumference, ie. 1 1/4" circumference needs a slot 3/4" wide? I read that in some postings which seems right, but then in this one, '?do=embed' frameborder='0' data-embedContent>> It says the width should be the same as the circumference. As said, first time slitting & drifting but that would seem to be too much. Maybe I'm reading it wrong. I saw where it was suggested to pre-drill a center hole for the slit punch which helps centering the slot. Don't know if that's necessary, but I was going to try it. Mine turned out okay, but could've used some improvement.
-
Good point on the pre-heating. I was thinking of welding a rack of sorts out of scrap steel that would hold the blade horizontally by the tang. Would that sort of contact if minimalized be a concern?
-
My "too fancy for a brake drum forge" thread
Dan C replied to tantofolder's topic in Solid Fuel Forges
Can't wait to see the next set of pictures. Who knows maybe after seeing how nice yours is I'm be prompted to do something similar, but not anytime in the near future. -
Teebs, I did buy the hawk drift & some handles from Kayne & Sons. I had someone asking to buy and since I'm new to smithing didn't want to take the time & frustration to forge my own.
-
Thanks Chinobi, I realize now I need to change how I was approaching the question. Instead of hanging up and down it could be suspended horizontally so just the blade isn't making contact.
-
The OFF/ON switch can be as simple as a Christmas tree switch that you step on, that's what I did for mine. Then instead of an air gate I used a hinge to attach it to a pipe flange and change the angle that it blows. Doing that also changes the resistance which either increases or decreases the intensity that the fan blows. See the link above for pictures, if you still have questions on my setup PM me.
-
Wow, very impressive work! What type of grind did you do? I had someone asking me to make them a razor from an old file and I've been holding off until I could get more experience making small knives from the files. Any differences in the heat treatment and how thin do you rough grind the blade before you HT?
-
When tempering in an oven I've saw where it was recommended suspending the knife via wire so it's not resting on metal. I don't have this option due to space, but wondered about setting the knife instead on a firebrick in the oven vs. a metal rack. Any preferences?
-
$8-12 at HF. Worst case, you don't have a good ground connection you could become the ground. Better case, it affects your ability to weld and strike an arc
-
That looks nice! Here is one I just did from an HC rr spike. I need to snug up the eye on the handle. Have you seen Mark Asprey's video or the one Autine uploaded? You will likely get some ideas there. One common thing in both of these videos is the head of the axe is not high carbon, but a bit for the blade is forge welded in later. This makes sense for forging, functionality and safety reasons as an axe head is going to flex and need to be tough. If it doesn't it could shatter and become a hazard. '?do=embed' frameborder='0' data-embedContent>>
-
requesting help troubleshooting a welder
Dan C replied to billyO's topic in Welding/Fab General Discussion
I would suggest taking a class in welding depending on your experience. You didn't provide much information on your experience level, but there are a lot of ways to kill yourself from electric shock, breathing toxic fumes, igniting something combustible or just burning down your house. A class would go a long way to teaching you how to weld properly and you'll learn faster there than on your own. Depending on what you are welding someone's life could depend on that weld holding. The instructor in your class would likely give you a hand in checking out the new machine and making sure it's safe. What sort of condition are the cables or terminals? I have a Lincoln tombstone, got it for $30 from a guy who said it didn't weld worth a hoot. Looking at the terminals I was thinking to myself he was lucky he didn't fry himself. The terminals which had been spliced and extended looked like someone had dragged them over hot steel and burned off the insulation the last 10'. I cut off the damaged ends out of safety concerns as well as functionality which still left 15', went inside the box cleaned all the contacts and now it welds beautifully! -
Newly aquired anvil - need help identifying
Dan C replied to Rockface's topic in Anvils, Swage Blocks, and Mandrels
Dang, why don't we have antique dealers like that down in Texas! For what you paid it's practically grand theft. That is one SWEET anvil, just put it to work right away and post what you make. -
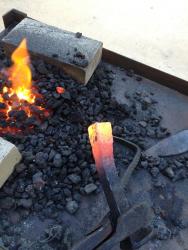
During the Winter months when forging at night, my kids and a few of their friends have enjoyed roasting marshmellows over the forge. They get a kick out of seeing a glowing RR spike twisted. Both of my older kids, daughter 16 & son 13 can arc weld, and when teaching the welding merit badge to boy scouts my son could pretty much present the safety demo.
-
My "too fancy for a brake drum forge" thread
Dan C replied to tantofolder's topic in Solid Fuel Forges
When you are finished I swear it's going to be so nice you're not going to want to get it dirty! -
Iklwa, the Zulu fighting spear.
Dan C replied to Kwisatz's topic in Spears, Arrows, Pole arms, Mace/hammer etc.
I trust there will be videos of your beta testing! -
First Try at a Hatchet
Dan C replied to scjohnson243's topic in Axes, Hatchets, Hawks, Choppers, etc
An old post, sure he figured it out by now but there are also steps on anvilfire #12 that details how to make one as was wanted. Here's the one I made using those steps. I haven't cleaned it up or sharpened it at all. -
Question on steel anvil stand
Dan C replied to 78sharpshooter's topic in Stands for Anvils, Swage Blocks, etc
Good looking anvils! I went with a tripod stand built from drops which I welded. I typically stand behind the anvil so I decided to mount it with the two legs forward. The legs are filled with sand and oil to quiet noise & prevent rust. The anvil is sits on a layer of caulk, then wood in a steel tray, which then has more sand. I welded some steel mesh under the leg supports and put some of my hardy tools underneath. I've been pleased with the setup.