
Dan C
-
Posts
810 -
Joined
-
Last visited
Content Type
Profiles
Forums
Articles
Gallery
Downloads
Events
Everything posted by Dan C
-
Cleaning a rusty anvil
Dan C replied to Reverend Boxcar's topic in Anvils, Swage Blocks, and Mandrels
Yes, that will make a big difference. I did use a wire brush to clean the wording on the sides while trying to figure out the type and some tarlike substance on the sides. The rest of mine was just rubbing boiled linseed oil and using it. On occasion I still wipe the face down. -
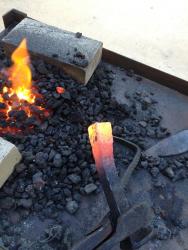
My forge is very similar, though I gave up on using kitty litter and just went with the refractory cement and firebrick to make grog. It's easy to add a dump gate at the pipe bottom. What are your plans for a blower? Here's a link to my setup. '?do=embed' frameborder='0' data-embedContent>>
-
Cleaning a rusty anvil
Dan C replied to Reverend Boxcar's topic in Anvils, Swage Blocks, and Mandrels
Rub it down with linseed oil, put it to use and no more! If you put a torch to it to burn off the rust you will without a doubt soften the face and ruin the rebound. Spend some time reading the suggestions given in this forum before possibly doing irrepairable damage. Could be a Trenton. -
Sweet, thanks Cody much appreciated! Those knives are amazing!!!
-
top right hand corner, select your id that has the upside down arrow, select myprofile -> edit profile -> then scroll down to the profile information section
-
Welcome to IFI. There is a ton of information here, so much you may end up on a different road that you started on. For bladesmithing and heat treating I would recommend you start here. http://www.iforgeiron.com/forum/151-knife-class-reference-material/ If I can learn to do it you certainly can with your prior experience, heat treating isn't magic or voodoo. Read what's on this site and then give it a try once you get your forge setup. You don't even need an anvil, though it helps as it'll save you some time tapering and beveling the edges or point. This thread may help while searching for an anvil. '?do=embed' frameborder='0' data-embedContent>> Experiment making screwdrivers or sharpening a point and knife like edge onto an old file, harden & temper and then see if you can hammer it into a piece of wood and twist it out without breaking. It snaps, temper the remaining end to the next color and try again. It'll all start making sense. Also better to first learn on things like these though than trying to learn on a tool like a punch or hammer which could fragment and become a projectile if not tempered enough.
-
Congratulations on your anvil and first posting! I don't know what type of anvil that is, but looks like you should be able to do good work on it. I would guess that the 100 under the heel is for 100 kgs or 220 lbs.
-
Getting to pass the experience onto to others certainly enhances the experience. I had a HS friend I hadn't seen in 20 years come over, kinda lost track of what the final result was supposed to be, ended up with a RR spike drawn out over a foot. Made an interesting bottle opener for his wife. I love having my kids or friends join in, though each time reminding them of safety concerns. Often times when someone comes back over they will bring some sort of metal asking what can be done with it. That's also how I got my squirrel cage blower. For me the anvil & forge is just the beginning. Putting to use a tool that you forged from what was considered junk is very satisfying. I showed a co-worker the knife I made out of a file and she was astonished that a knife that was beautiful and functional could be made in someone's garage. We're so accustomed nowadays to things being mass produced. Helping preserve what our ancestor's did is much of what we are doing, from the old salt's on this forum to the beginner's asking about how to forge swords it keeps the knowledge alive. While many beginners may loose interest, many will forget what first drew them to smithing and see the beauty in a well forged tool, or the elegance of a candle holder. Then there's the satisfaction you get from the routine problem solving that accompanies our craft. Each time you overcome a problem you have one more bit of knowledge to add to your tool belt and have a little bit more confidence to overcome the next challenge.
-
Absolutely. I doubt I'll ever be able to retire from my day job which puts me at a desk and computer, but in the evenings or weekends my refuge is working on little projects. One of the reasons I like forging knives is in the evening when I need to keep things quiet because of neighbors or the kids are in bed I can still grind, polish or make sheaths and feel productive. Last night was sitting on my anvil, working on a blade watching the sunset. Is it weird to feel a certain bond to your tools? It's like spending time with good friends and good for the soul. Yes, my anvil doubles as a chair sometimes. Quite comfortable.
-
I don't have an OA cutting torch, and have only used the chopsaw as mentioned above. I was cutting larger sections to use as an anvil for either myself, or for friends. I did have intentions on cutting smaller pieces to use as hardy tools until I found that jack hammer bits are readily available at tool rental places for next to nothing and easier to work with considering the tools that I have. Besides the piece of track mounted vertically, I only have one 2 foot section of track remaining which is useful for other things, ie. straightening large pieces of steel by heating them, setting it on the ground and then pressing the track on top of it, so I decided against cutting it up.
-
Your daughters are beautiful Neil! Thank you for the pictures. Don't blink, it won't be long before they are asking to borrow the car and you'll be forging axes to scare away all those teenage boys. Call me evil, but I literally had one young man shaking when he returned my daughter 15 minutes late with a piercing glance and asking if his watch was broke. How are they doing?
-
I've used a 14" chopsaw, cut from the bottom, when there's very little left pick it up and drop it on another piece of rail. You should get a clean break.
-
I'm all for the post anvil style. When I started not that long ago, I was planning on making a horizontal RR anvil but after using it flat and doing research realized that it was too springy. Going vertical worked much better for me, and I really didn't want to spend days making something I wasn't sure how would turn out. A better use of time IMO was to get as clean a cut as possible w/ a 14" cutoff saw, mount it vertical and grind the surface flat. If you went to the link above you saw how I welded a RR tie plate to the top which mounts it to a 4x4 post. Anchored to the concrete this things solid and I still use it for the many edges it has. I'm thankful for this site and posts like Frosty's that promote safety, which I as a beginner didn't give enough consideration. I use mostly unknown high carbon steel for tools which I don't HT. As I get more experience and the desire for my tools to last longer perhaps this will change. At first the thinking was something like a hot cut or punch was most likely going to loose hardness as you used it w/ hot steel so why do the extra steps to HT. Forge it, normalize and put it to use. They seem to hold up well enough and I don't have much time invested in them. Now I'm realizing that working w/ unknown steel and not having more experience, HT'ing could put myself or others at risk. I'd much rather gain experience HT'ing a tool such as a screwdriver or paring knife and find out it wasn't tempered enough vs. a hot punch.
-
Which files to shapen / finish
Dan C replied to Eddie Mullins's topic in Finish and Polish for Knives
I'll be interested to see the responses on this one. I'd like to be able to buy quality tools and steel, but at this point anything I earn from smithing goes into the 55 Chevy truck I'm restoring or paying bills. What I've done is pickup old files from garage sales, craig's list or flea markets. Many of them are still useable, and those that are not I've started turning into knives to sell. I am starting to gather materials to build my own 2x72 http://www.dfoggknives.com/PDF/GrinderPlans.pdf but until that happens I've been using a cheap HF 1x30 belt grinder and promoting the "primitive" look on my blades. These two file knives are the first ones that I've spent anytime trying to polish, which was done by hand. The top blade is for my Dad on Father's day, the bottom one is sold. Future knives I'm going to try to follow these steps using the tools I have. '?do=embed' frameborder='0' data-embedContent>> -
That is awesome and amazing craftsmanship! This year I'm giving my dad my first file knife that I forged. Not pretty but very functional. I've been putting it to this test all week as I know he will.
-
In the apocalypse if I come back as a zombie keep him away from me! That was freakin awesome!!! And just when you think as a beginning blacksmith you're over the I wanna sword bug...
-
Great article on finishing a blade, thank you for putting it out there and suggesting it. Beautiful photos of your finished work! '?do=embed' frameborder='0' data-embedContent>>
-
Works best when you turn it on end and mount it vertically. Here is what I did w/ mine until I got an actual anvil. '?do=embed' frameborder='0' data-embedContent>> Quenching is done for hardening after you heat to critical temp, tempering is then done to take away some of the hardness. There is info out there on making RR anvils, though the more mass under your hammer the better it will work. Search here or anvilfire for RR anvil info.
-
For tools like a hot cut or slit punch made from scrapyard steel, is it necessary to heat treat & temper considering the usage is putting it in contact with hot steel which could ruin the temper? This weekend I made a slit punch from some scrap that spark tested as high carbon. I normalized it, but I didn't HT and immediately put it to work. It seemed to work fine and I was cooling it in water every 3-4 hit. When finished slitting a RR spike for a hawk the punch didn't seem any worse for the wear. As the steel's unknown my concern would be improperly HT something and potentially making something that could send shrapnel when struck. I guess that's still a possibility if it was something that air hardened.
-
This is my 2nd file knife and the first time I've done a full tang w/ scales. The previous one was a partial tang & antler handle. Same tempering as above and passed the wood test with the point of the blade. Question I have is what sort of price tag to put on the knife. The blade is 2 3/4" long, knife overall 6" and was requested by a customer who's also buying a RR spike kso. Typically I sell the stuff I make so I'm getting $25-30 an hour. On something like this I don't feel like I can do that as there's time spent for the learning curve, and after 120 grit sanding I had to polish or sand everything by hand as I don't have a decent belt grinder yet (in the works). I'd make a better sheath to go w/ it, this was just one I had onhand. I know what I want for it, and if the customer doesn't want to pay that much I'm okay keeping it for myself or giving it to my dad for Father's Day.
-
May God bless you & your family, and watch over your twin daughters. Our thoughts and prayers are with you.
-
Maybe to add to what tantofolder already said, get some medical gloves to wear when applying the dye. That's the only way I don't end up with it all over my hands. I usually have to apply it twice, rubbing off each time to get rid of streaks and even then it's not perfect. Nice job on the knife. How did you heat treat the blade? I quenched the two knife files I did in motor oil and tempered to bronze except the spine & point which I tempered purple. On a sharpened test piece a point at straw or bronze would break when hammered into wood and twisted out.
-
New video about an axe making
Dan C replied to AUTINE by John Neeman's topic in Axes, Hatchets, Hawks, Choppers, etc
Very informative & high quality video, especially for someone relatively new wanting information from beginning to end for making a fine edged tool! Thank you for posting it and welcome to IFI! Dan -
Now I'm curious Ian, you don't have a video of you doing this do you? I'd rather learn from others mistakes.
-
Thanks Frosty & Fra, I'll keep some water nearby and keep them from getting overheated. First thing will be to make the touchmark.