

Buzzkill
-
Posts
2,049 -
Joined
-
Last visited
Content Type
Profiles
Forums
Articles
Gallery
Downloads
Events
Everything posted by Buzzkill
-
You didn't mention the material of your mold form. In my experience anything that can wick moisture away from the kastolite when you apply it can result in a "crumbly" casting. Any surface in direct contact with the kastolite should be damp/wet first.
-
If you're fairly certain you have the alignment correct then you can solder the mig tip to the brass fitting.
-
She's a bit stiff when she turns (champion eureka #140 gearbox)
Buzzkill replied to Dewnmoutain's topic in Bellows, Blowers
I think you are on the right track with the bushings/shafts. You're describing something similar to what I experienced a few years ago. I ended up taking mine apart, polishing the shafts, cleaning out the bushing holes well, and applying some grease. That stopped the "grinding" noise for a while. I think what was happening in my case is that the bushings were worn enough to allow the shaft(s) to move back and forth inside the bushing just a little, but rapidly. I don't believe it was grinding in the sense of the teeth wearing on another surface, just slop that translated to a noise and resistance. Your situation may be different. -
Scavenge nickel steel or other contrast steels for Damascus.
Buzzkill replied to Northerncraftsman's topic in Knife Making
I believe that Thomas Powers has reported good contrast between bandsaw blades and pallet strapping. I'm not sure which is the light and which is the dark. Maybe he'll chime in here. -
I'm still not sure how that gets you more than 24 hours in a day. I lived in Fairbanks, AK for a couple years and we did have 23 hours of daylight in the middle of summer without ever going completely dark before the sun came up again, but our days were still 24 hours long if I recall correctly.
-
Looking for recommendations on die dimensions
Buzzkill replied to Buzzkill's topic in Power Hammers, Treadle Hammers, Olivers
More than half, but yes. I got it from someone who was using it as a yard decoration. It's a HB, and appears to have broken at the waist. It's a clean break though, so it's always made me wonder if someone did machine work on it or if it was made that way intentionally. It has 2 3/8" holes bored completely through the body. The spacing, placement, and precision of the holes makes me think it could have been manufactured that way, but it could also be the result of a skilled machinist with the right tools later on. -
Are you sure you live on the same planet as the rest of us?
-
Looking for recommendations on die dimensions
Buzzkill replied to Buzzkill's topic in Power Hammers, Treadle Hammers, Olivers
Here's a pic of it. I have about half the material cut for the new anvil, but I doubt I'll be able to work on it much more for a few months now.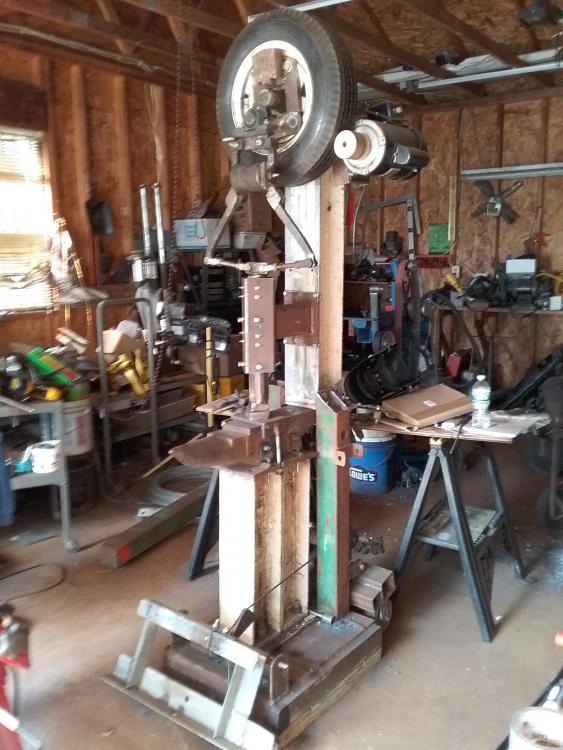
-
Sounds like you have the right idea. If you make believers out of them when they are young it will significantly decrease the frequency and severity of the discipline you have to administer as they get older.
-
They can be a little vindictive too. My sister saved a baby crow when I was a teenager. Consequently it had no fear of humans whatsoever. It would open mailboxes and "distribute" the contents. One time it followed my mom's car into town a couple miles away and when she stopped at the bank it landed on the edge of the drawer at the window. The lady inside the bank asked, "Do you know this bird?" We still get a chuckle out of that one. They do love shiny things though. My dad was teasing it with a keyring one time and it snatched the keys from his hand and then deposited them in a woodpile a couple hundred yards away. It could also be a bit annoying. One time when it was making a racket I chucked a rock at it. I didn't hit it, but apparently it was close enough. A few moments later it flew in from behind me and knocked the hat off my head. Sometimes fear of humans is a good thing
-
Looking for recommendations on die dimensions
Buzzkill replied to Buzzkill's topic in Power Hammers, Treadle Hammers, Olivers
Thanks for the reply and info. Right now I'm planning on making the dies 3.5 inches long and 1.75 to 2 inches wide. Unfortunately it may be months before I can make that modification. I have rotator cuff surgery next week and I don't think I'll get that far this coming weekend. It gives me more time to think about how I want to do it I guess. -
Then that's too low pressure and/or an alignment problem with the mig tip in relation to the mixing tube. What really matters is where the fuel stream is aimed inside the tube. It's possible to have the mig tip itself perfectly centered, but a burr or piece of debris deflect the gas stream off center. Whenever you modify the mig tip you should always use a torch tip file or something similar to ensure the hole is not obstructed - if you haven't already done that.
-
When these burners are constructed correctly it is normal to be unable to keep them lit in open air without a flare on the end. You have a minor flare of sorts which should make it slightly easier to keep the flame on the end of the burner, but the back pressure in the forge is what really helps keep the flame where we want it. Even in the forge it is sometimes necessary to run the burner at low pressure until the forge interior begins to glow before the pressure can be raised without blowing the flame off the end. The bell shaped reducer fitting you had to begin with is probably more likely to allow you to get a flame to stay on the burner in open air. Once you get the zinc off those parts and reassemble everything let's see if you can get a low pressure stable flame on the end of your burner. Mikey said he doesn't think your mig tip is centered in the mixing tube. If true that will definitely affect the burner performance. Personally I find that pictures can sometimes be a bit deceiving due to the angle of the camera. However, as Mikey suggested, you can hook a water source that has a little pressure to the burner and shoot it through the mig tip to see how well the water stream is centered in the mixing tube. If your regulator does indeed have a flow limiter built into that is likely to keep your burner from functioning properly. We should be able to zero in on some of these issues soon if you bear with us though.
-
Ok, a couple things. I see your ball valve is most of the way closed. If your regulator can go to 0 psi on the low end then open the ball valve all the way and control the pressure/flow with the regulator. Without covering the air intakes, when you try to light it, does the flame just blow off the end of the burner as if there is too much pressure? If it does then again turn the pressure down at the regulator and see if you can get it to stay lit with low pressure. If you can get it to stay lit then post a picture of that flame. If not then describe how it behaves when you try to light it.
-
Can you post a picture of whatever flame you are getting on the burner? That will go a long way towards pointing us in a direction regarding what you should do next. Oh, and if your mixing tube and the coupler on the end of the burner are galvanized you should replace those with black iron fittings or strip the zinc off in a vinegar (or other acid) bath.
-
Newbie looking to buy my first Real Grinder
Buzzkill replied to Dangerruss's topic in Grinders, Sanders, etc
You'll want 220v or more to power the machine. Using 110v limits the horsepower of the motor you can use on a traditional circuit. It's best to have 1.5 hp or greater for a 2x72 grinder. If your budget will allow for a VFD then I do recommend going the variable speed route. The cheap Chinese VFD's are not NEMA rated and will need an enclosure to keep the dust and debris out of the system or they will fail fairly quickly. A 220v 2 to 3 hp TEFC 3 phase motor (and a VFD rated for the same or greater hp) works well for this application. If you start off with a flat platen attachment, that will get you started. You can build or purchase additional attachments as your skill and budget allow. I'm far from a master bladesmith, but the things I use the most are the flat platen, an 8 inch contact wheel and slack belt grinding. Others probably have different preferences, but those are mine. It's worth the money to purchase quality belts and only use them until they stop cutting well. The way I've heard it put best is "use the belts like they were free." Trying to use a belt once it no longer cuts well makes you push harder, which builds up more heat and makes it more likely that you will slip and injure yourself or make grinding mistakes that are difficult to correct. I have some personal experience in that area. There's my 2 cents. -
If the ceramic fiber blanket is completely coated with anything that can withstand the heat of a forge to the point where no flames are in contact with the blanket and there are no gaps where the particles can escape then it should be fine. If you are applying the material yourself you will still want to wet the blanket surface before applying the refractory material. If you want extra peace of mind then go ahead and spray rigidizer on it first. All we are trying to accomplish is preventing tiny particles from becoming airborne, whether that be with rigidizer or other means.
-
What did you do in the shop today?
Buzzkill replied to Mark Ling's topic in Blacksmithing, General Discussion
"...regulations on flying animals..." I thought you said they were dogs, or is this some new airborne breed? -
Just another observation here. I can't tell for sure from the first pic, but that regulator on your propane tank may not be suitable for this application. The preferred regulators are adjustable from 0 to at least 20 psi (0 to 30 psi is better) and if either the regulator or the propane tank has a flow limiter built in to it you will not be able to get the combination of pressure and volume needed for one of these burners to function correctly. Having said that, start with a properly built burner and then we can troubleshoot other issues afterwards.
-
Looking for recommendations on die dimensions
Buzzkill replied to Buzzkill's topic in Power Hammers, Treadle Hammers, Olivers
Strangely enough I haven't taken any pictures of it yet. Currently it's using a broken waist Hay Budden anvil mounted on I beam. I made it mobile since it lives in my detached garage and I do actually like to park my truck in there during the winter months. I'm hoping that the new modifications I have planned will eliminate or reduce the tendency it has to slowly walk across the floor in heavy use. I also don't use any springs of a traditional nature. I have an air bag from the cab suspension of a Peterbilt truck providing the tension between the linkage arms. I'll try to remember to grab a picture or two before I start tearing it apart again to make more modifications. The funny thing is I originally planned on making a light anvil mounted power hammer, but the more I got into the build the more I "upgraded" it. The idea was to use materials I already had or could get cheap/free. So far I've only put a couple hundred dollars into it, but I have spent a fair amount of time building and modifying it over the past year and a half or so. Thanks for that info. That sounds more reasonable than what I've been using. -
I've built a junkyard tire hammer, and I'm getting ready to modify it again. I've procured some steel that should allow me to end up with a 6x6 inch cross section anvil which should weigh in around 300 lbs. The base plate weighs over 500 lbs. Right now I'm planning on keeping the ram around 30 lbs, give or take a little. It's powered by a 1 hp motor and has a maximum bpm around 250. This is the only power hammer I've ever used, so I have no frame of reference for what works better/best. Since I'm planning to replace the anvil I'll most likely use a different die system. So far I've used the top portion of a RR track (or maybe mining track) welded to a plate for the lower die and I welded another piece of rail directly to the ram for the upper die. The surface where the dies meet is a little over 2 inches square, but that seems a bit small to me. Anyone have good recommendations for die dimensions based on using a hammer with similar characteristics?
-
This has not been my experience. I did have a couple crumbly castings, but I'm fairly sure why now. On one of the failed castings I used half a dry sonotube without buttering the surface before casting and I just let it cure/dry in open air. It was a bit crumbly especially around the edges. The last one I cast using half a sonotube is still in use in a D shaped forge after a couple years. It has some cracks across from the burner, but it has not crumbled or shown other signs of imminent failure. On this one I wet the surface of the sonotube before applying the kastolite mix, and when done I covered it with a wet towel. I added water to the wet towel several times over the next couple days before letting the surface air dry. I removed the tube by burning it out. After firing briefly several times in gradually increasing duration and temperature I coated the flame face with Matrikote. I can't say this is the perfect way to handle the material, but it has worked fairly well for me. Nothing else in my forge supports this inner shell of kastolite. The two straight edges rest on the forge floor, and the casting supports itself, the two layers of superwool, and the sheet metal "wrap" over the top of the whole thing. In addition it gets bumped and scraped occasionally as stock is being placed in or removed from the forge. Of course there could be some variance from one batch of the material to another, but in my experience it has good structural strength the way I cast it last. YMMV
-
Oliver, The fact that you asked that question that way tells us that you do not have the knowledge needed to safely construct this device. If you did have the appropriate knowledge you would never have asked that question. That's what people have been trying to tell you. A couple people have tried to explain some very basic issues that you have completely ignored in the "only thing" you aren't sure about. Regardless of the reasons, after asking for assistance you have been resistant to nearly every piece of advice offered to you. Why ask anyone for help if you are going to ignore their answers anyway? What you see is your first experience with this forum asking what seems like a very simple question to you. No one has given you the answer you think you need, so you interpret that as people attacking you or at least being hard to get along with. On our side we see this pattern in a person about once a week. Some of us have been that person in the past. All I can tell you at this point is that if you honestly do the proper research to allow you to understand the device you want to build, you should come to see why you have gotten the responses given here. We want people to succeed. What we do is inherently dangerous. We are trying to help you minimize the risks with the advice we have given. If you choose to ignore that advice I wish you the best and hope you can accomplish your goals safely.
-
Building an electric foundry, furnace, or oven that works well is a little more involved than grabbing a coil of nichrome, kanthal, etc. wire and a couple switches. I strongly recommend you do some research before you dive in head first. If you want to maintain a specific temperature, you will want a PID controller. You'll need insulating material, such as ceramic fiber blanket or insulating fire bricks. I recommend the bricks for use with heating coils. You'll also need to find some plans from someone who has built something similar that works well (they will have done all the math) or you will need to be able to calculate how much current you will pull to get the heat you need for the size of your furnace. If you don't get the volume of the furnace, the current draw, and the coils matched well, you will either not achieve the heat you want in a reasonable amount of time (if at all) or your heating coil will fail quickly. Just for reference sake, I built an electric oven for heat treating and I spent about half what it would have cost me to buy a commercial product of similar size and capability. It also took me a couple weekends to put it all together and get it working properly. I did not work off of anyone else's plans, so I had to do all the math and determine all the materials needed myself. I recommend using good plans after that experience.
-
