Buzzkill
-
Posts
2,049 -
Joined
-
Last visited
Content Type
Profiles
Forums
Articles
Gallery
Downloads
Events
Everything posted by Buzzkill
-
Bjorn makes sharp things. My beginners log book
Buzzkill replied to Bonnskij's topic in Member Projects
You'll need to do some type of annealing to soften up the O1 core. I suggest heating it up until it's barely glowing but still magnetic and then letting it cool slowly. This is sometimes referred to as a "sub-critical annealing" process. It won't be as machinable as the annealing process on an O1 spec sheet would provide, but it should allow you to do your file work and/or drilling. As for carbon migration, you'd probably have to fold and forge weld 3 or more times before the carbon content is dispersed more or less evenly throughout the billet, but with mild steel being one of the alloys you'd probably end up with a billet unsuitable for keeping a decent edge. -
You can still do it in 2 sessions if you turn it one way and cover what gravity will allow then turn the other way and meet in the middle so to speak - or you can do it in 3 separate applications. Either method will work. The surface of the blanket should be quite damp, but not have standing water on it or anything. The bottom line is you don't want the blanket wicking water away from the Kastolite. The water in it is needed for it to cure properly. I mix Kastolite by eye/feel. There is a fairly narrow range of water between too dry and too wet. I usually get it a little too wet intentionally to begin with so that it mixes well and then I sprinkle on a little dry product, mix, and then add more and repeat as needed until I get the consistency I'm looking for. You don't really need the additional bubble alumina on top of the Kastolite, but it shouldn't hurt anything. It might make your heat up time slightly longer is all. If you have a properly sized, built, and tuned burner for the forge it should be a nice change for you. If nothing else you should have a little more space to work with.
-
Bjorn makes sharp things. My beginners log book
Buzzkill replied to Bonnskij's topic in Member Projects
Sure, it's always a risk with multiple layers. Keeping the core centered in the billet can be a challenge and takes some practice. Also, if you grind your bevels rather than forging them you are even more likely to remove a lot of the outer layers. In general it's easier to get good forge welds on small surface areas and then draw out the billet rather than trying to forge weld a billet close to your final dimensions. I prefer billets to start out around 1.5 inches wide and 4 inches long personally. The size of the finished product, or the number of layers desired in pattern welded billets, determines how thick it needs to be at the start. Are you doing this technique just for practice, or are you trying for a soft outer shell for toughness purposes? -
I'm not sure what the "official" recommendation is, but here's what I do: I set the shell so that I can cover the largest area possible without moving it. Then I apply that largest section in one session. Kastolite starts "firming up" as it sets fairly rapidly. You need to be comfortable that the first part you cast won't fall off when you rearrange the shell for the next section. That can be even less than an hour sometimes. Remember to wet (butter) the rigidized blanket before applying the Kastolite layer. You don't necessarily need to turn it completely upside down. You may be able to turn it halfway one direction, then halfway the other direction so you can apply to the blank spots without gravity pulling the previous section straight down. I usually wait a couple hours or resume the next day. I don't know with absolute certainty, but my impression is that subsequent applications of Kastolite will bond better to previous applications if they are still damp, but solid. As others have mentioned elsewhere, I find I get the best results by "patting" Kastolite with a trowel, putty knife, or even rubber gloved hand. That tends to pack it into place better and pushes the rough edges down past the surface. I do not recommend firing until all the Kastolite has been applied.
-
Bjorn makes sharp things. My beginners log book
Buzzkill replied to Bonnskij's topic in Member Projects
You can always double up the high carbon steel in the middle. It's another forge weld seam and another potential failure point, but when properly forge welded, two pieces of the same alloy become one solid piece of that alloy. -
There is no one size fits all answer here. The short version is you really want complete combustion to occur before the flames reach the work piece. However, the number and diameter of holes in the burner face will have a big impact on the distance required for complete combustion, as will the pressure of the fuel and air mixture in the burner. Four to six inches should be more than sufficient for most ribbon burners, but yours could be different.
-
Castable Refractory Cement
Buzzkill replied to 11xray's topic in Smelting, Melting, Foundry, and Casting
This is probably an over-simplification, but Kastolite has 2 schedules for all practical purposes. The first is the curing stage. This has nothing to do with drying per se. In fact it's best done in high humidity, but will happen faster with the temperatures you listed. However, most of the time if you apply heat you're also reducing the moisture in the area heated, which will make Kastolite weaker. After the curing stage is complete (at least 24 hours, but up to a week) then you can start stage 2. That's when you drive off the excess moisture slowly. You don't want any remaining water to flash to steam, which could cause mini-explosions in the material. Then it's just continuing to raise the heat and duration of heats until you get to operating temperatures. According to the spec sheet for the material it's somewhat weaker in the mid range of its operating temperature than it is after being fired at high heat for a while. Satanite is different. It is a clay based material that does indeed dry out rather than "cure" or "set." That one you paint on in thin layers, dry, repeat until you get the thickness you want. -
Bjorn makes sharp things. My beginners log book
Buzzkill replied to Bonnskij's topic in Member Projects
A couple things: First off O1 can air harden in thin cross sections. I've had this happen a few times. It becomes quite evident when you attempt to drill holes for scale pins and the drill bits just scream at you. Secondly, the rate of thermal expansion/shrinkage for O1 and mild steel are not the same. When doing a san mai technique with mild steel on the outside, you really want that central core to be twice the thickness (or more) compared to one of the jacket layers. The mild steel can literally pull the hardenable steel apart. I've seen it a couple times where the layers welded together fine, but the hardenable steel core cracked right in the middle rather than at the weld seams. So again, the way to reduce the likelihood of that happening is using a thicker core and thinner outer layers. Hope that helps. Gouda luck! -
This was just for the 2 places where the half cylinder meets the flat floor. There's no shortage of space for exhaust gases to escape because of the front opening and the rear pass-through.
-
I found the article and the comment. Here's a portion of the comment: "I can add a little to the Richtig story. As a young boy for a number of years during world war two he was in need of aluminum to make his knives. My dad had quite a few pistons from doing overhaul jobs on cars and tractors and when my Red Ryder wagon got full I would take them to Frank. Many times when I took them there he was tempering blades. In the process he took them off the forge and dipped the blade in a solution in a bucket, I don’t know what the solution was or how long he kept them in it, but after they cooled he would hit the blade on an anvil with one hand and with other he would hit a tuning fork. If the tone was the same the blade went into the good blade bucket, if not it went to the forge later." And here's the article: https://clarksonhistory.wordpress.com/2013/05/06/secrets-of-the-dead-the-richtig-knife/
-
I read an article about him a few years ago which contained less technical information, but more or less the same story. What was interesting is one of the commenters on the article claimed to have been a child in the town where and when Richtig was making his knives. According to this person one of the things Richtig did was tap each blade against something and listen to the resulting sound. If he didn't like the sound he tossed it in the scrap pile, and if he did like it he would finish the knife. Of course I have no way of knowing if any of that is true, but it is entirely possible that he did have quite inconsistent heat treating but also used sound to weed out those that would not perform well.
-
What I did where the "dome" meets the floor on my D shaped forge is use a couple strips of fiber blanket which were sprayed with rigidizer to make a gasket of sorts. This makes removal of the top portion easy when needed but also provides a "flame tight" connection between the two slightly irregular surfaces.
-
What did you do in the shop today?
Buzzkill replied to Mark Ling's topic in Blacksmithing, General Discussion
This is what makes it tough. The result of infection with the virus ranges from no symptoms at all to death. That's pretty much the maximum range possible. It's like viral Russian roulette. I tested positive and had relatively mild symptoms last December. Others my age in my area have perished from the virus. For me this is no different than any number of other safety related issues. Each person should assess their personal risk based on the information available and protect themselves and those around them accordingly. However, you cannot use logic to help someone out of a position they didn't use logic to get into in the first place. -
If you have any kind of grinder (bench, angle, belt, etc) and a reasonably steady hand I'd recommend grinding 3/4 or more of the cutting edge in and then finish with the stones. You'll wear out your arms and your stones removing that much metal that way. If you have no grinder then you may want to try some low grit sandpaper with a backing board and your jig to get the cutting edge close to where you want it to be. And BTW, I agree with your kids. Looks good.
-
Blacksmithing gems and pearls
Buzzkill replied to Glenn's topic in Blacksmithing, General Discussion
https://youtu.be/qzucWnQpfZY -
Insboard Forge Top - How Thick?
Buzzkill replied to Steven Bronstein's topic in Insulation and Refractories
TP - Granted, but the question was really whether a single 1 inch layer of insboard would suffice. -
Insboard Forge Top - How Thick?
Buzzkill replied to Steven Bronstein's topic in Insulation and Refractories
Not sure that helps with his situation. I've only used fiber board on a very limited basis. However, it did seem to me that the insulating properties are impressive. I had a piece glowing on one side with my hand comfortably on the other side from where it was glowing. That was an inch thick piece, so you are probably ok with a single 1 inch piece. If you want extra peace of mind you could add a second layer, but I doubt it's necessary. -
I rarely do false edges on the spine, but when I do they are less than half the length of the spine and I grind them after the bevel for the cutting edge. I have no particular reason why. It's just the way I do it and any way that safely gives you the result you want is the right way. Your bevel in the picture above looks pretty darn good to me. I like that you gave yourself a lot of options for changing the bevel angle slightly in your jig. Well done IMHO.
-
Oh there are some definite benefits. I like it hanging on the wall rather than taking up space next to the furnace and water softener. It's also really quiet. I had my doubts about the claim of 93% efficiency, but the exhaust coming out of the system is barely warmer than ambient and exits the house via PVC pipe. I'm not sorry I did it. I just really didn't know what I was getting into as far as the extra expense and labor goes. If I was building a new house I'd probably spec it out with a tankless water heater to begin with. In the negative column it does take about 15 to 30 seconds longer for hot water to get to the top floor of the house, and of course if the power goes out there is no stored hot water unlike the tank. However, not having to be concerned with 3 people taking a shower before you using all the hot water is a definite benefit.
-
Yeah, but in extreme cold temperatures hot water freezes faster than cold water, although that's not really relevant. FWIW, I installed a propane tankless water heater in the house a couple months ago. It probably uses a little less than the previous tank version, but the up front cost is a lot more and I had to make modifications to the gas, electric, and water lines in the house. Knowing what I know now I probably would have gone with another tank version, but on the bright side the tankless unit should last about twice as long.
-
Preparing a white-tailed deer antler to be used as a knife handle
Buzzkill replied to Donal Harris's topic in Knife Making
I believe it was a typo that was intended to be "plotting." -
As everyone else has indicated, handle size and shape is influenced heavily by the intended use and the person who will be using the tool/weapon. When in doubt, always start bigger/thicker. You can remove material much easier than adding it. For me the two biggest questions in handle shape are 1) Does it feel comfortable and secure in my hand when holding it how I would use it?, and 2) with my eyes closed can I tell where the cutting edge is just by holding the handle? Generally speaking, handles that feature swells both in width and on the cutting edge side of the handle make a big difference in the comfort and secure grip on a handle. Of course those have to be placed and spaced correctly on the handle, but it doesn't take much trial and error to get a feel for that.
-
Preparing a white-tailed deer antler to be used as a knife handle
Buzzkill replied to Donal Harris's topic in Knife Making
For a hollow grind you'll want a much bigger wheel than you've been trying to use. Something 2" in diameter or smaller is more suited to grinding in fullers than hollow grinding the bevel on a blade. I use an 8 inch wheel for that frequently, but I think 10 to 14 inch would be better for blades 1.5" or more from spine to cutting edge. -
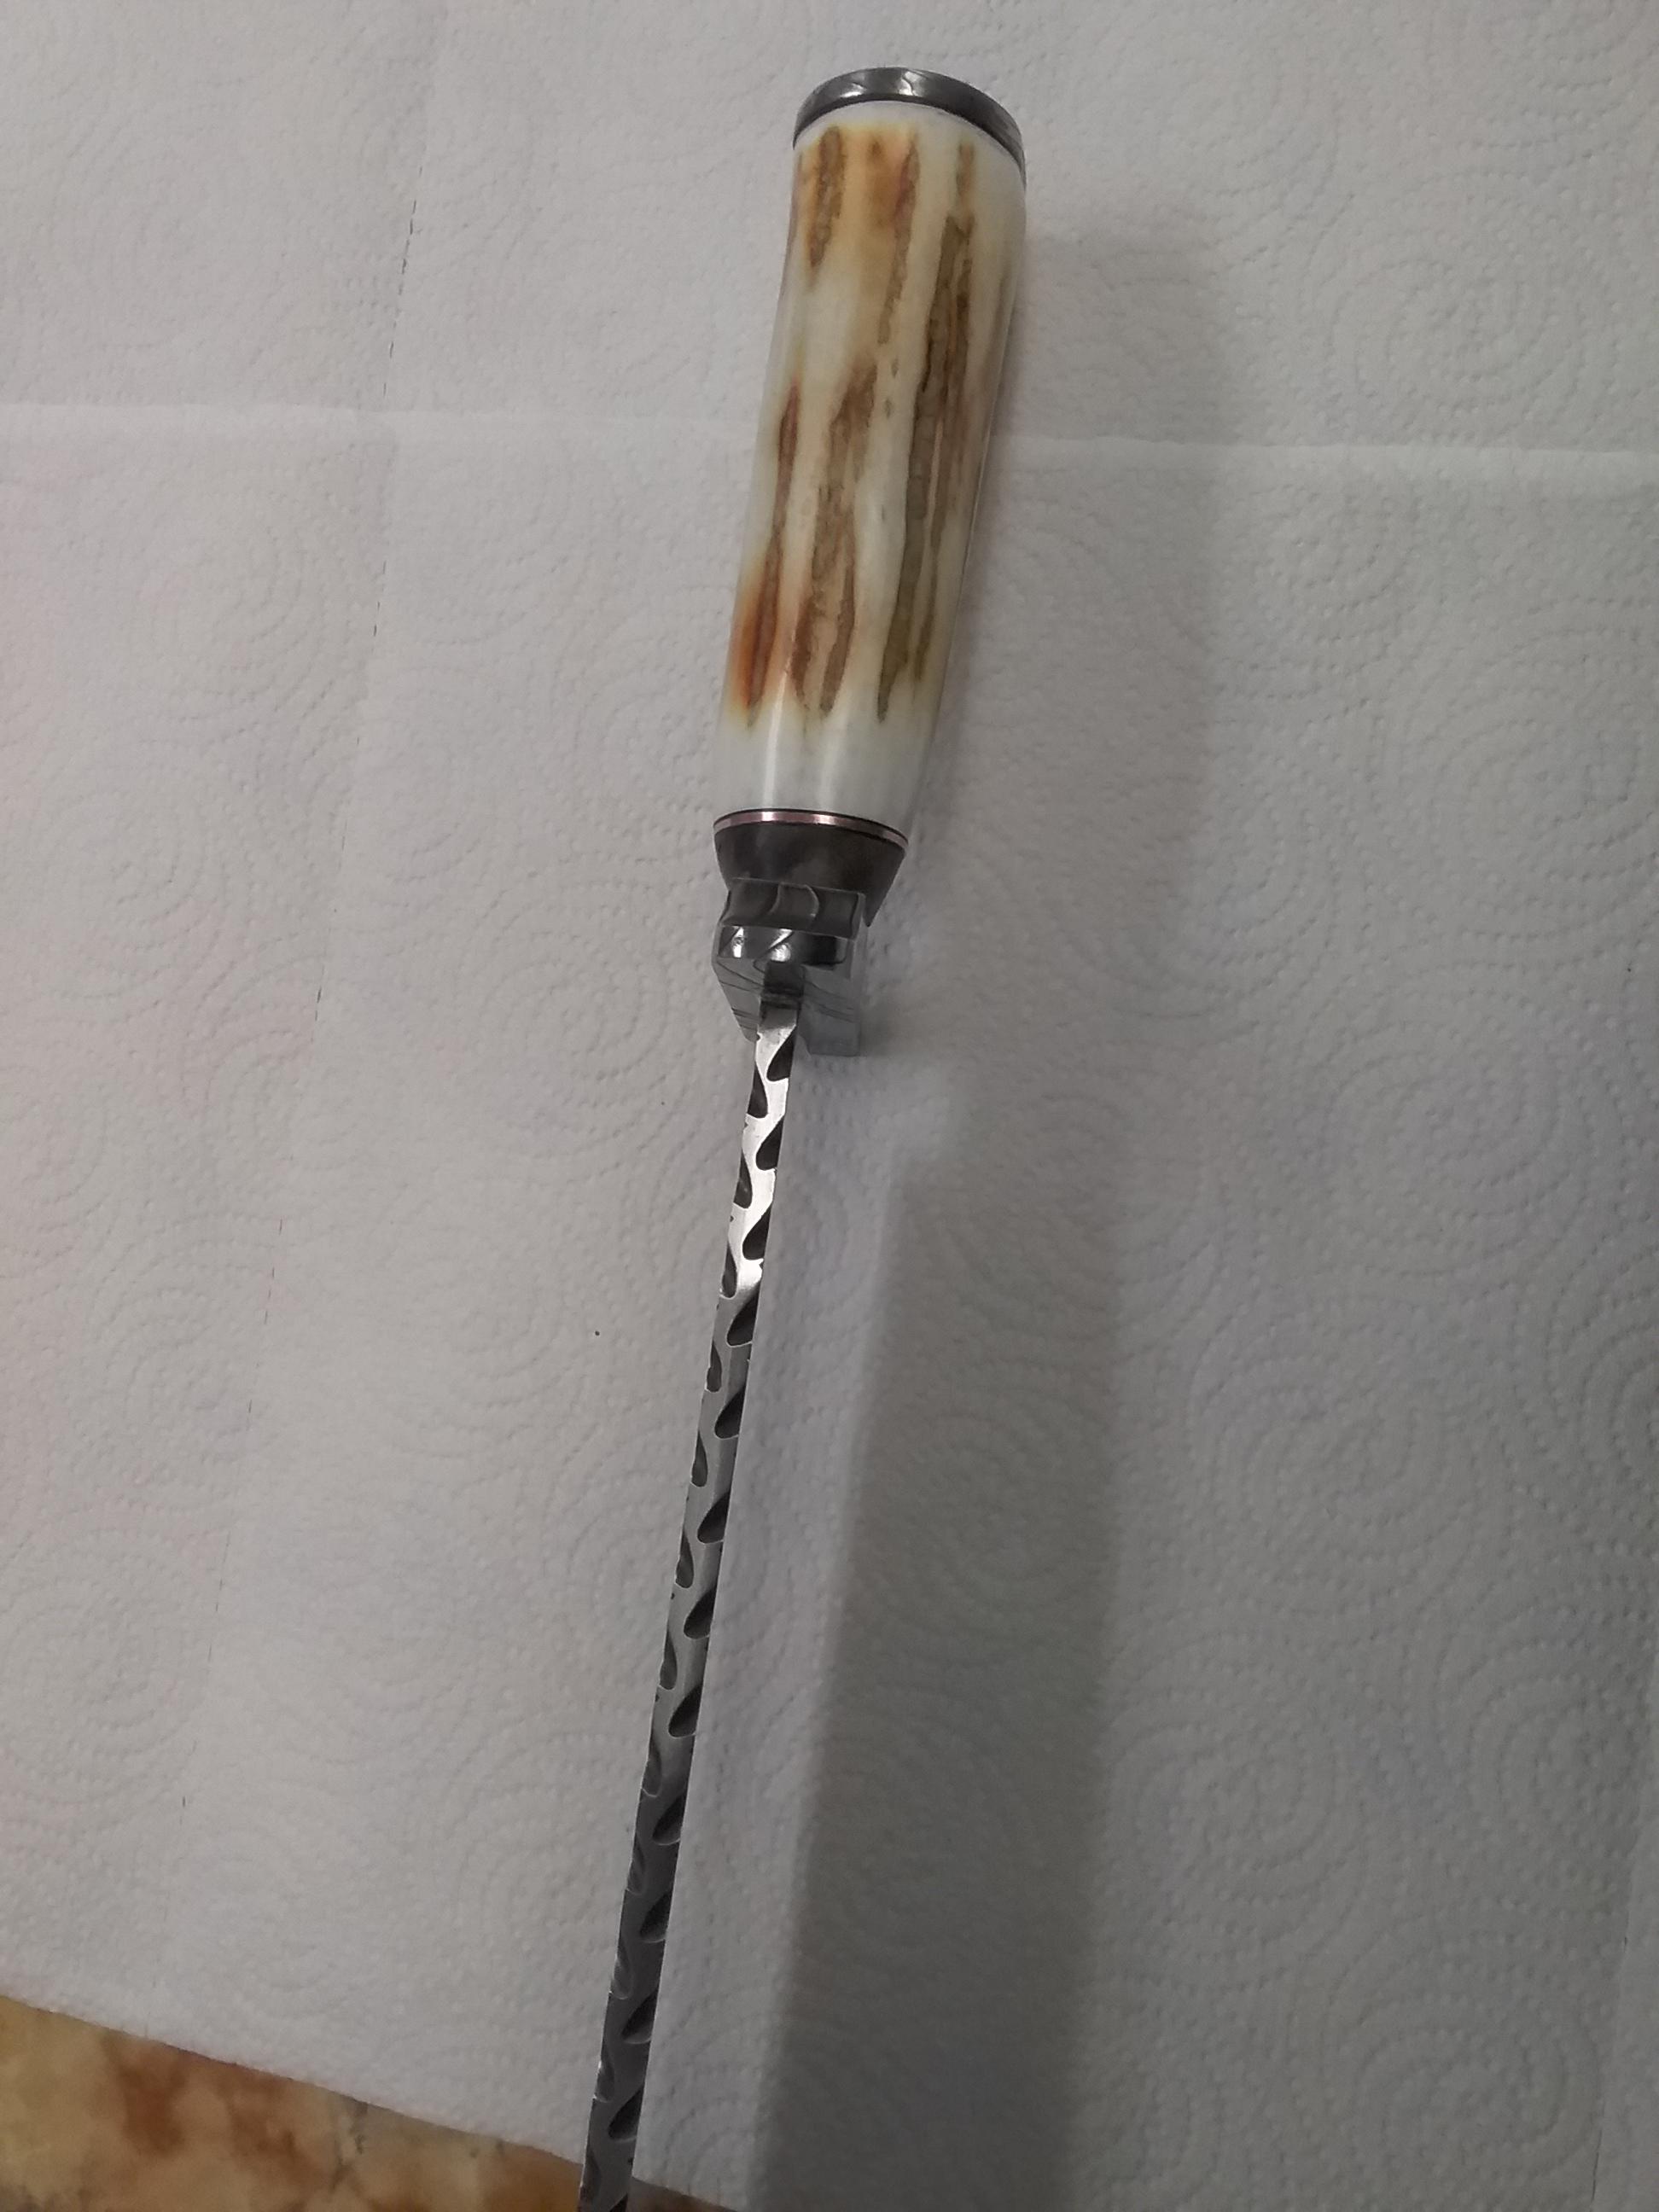
Preparing a white-tailed deer antler to be used as a knife handle
Buzzkill replied to Donal Harris's topic in Knife Making
Here's a pic of elk antler I used on a knife. It was bleached white, so I used the pen torch method to add some color, and it was stabilized using Cactus Juice and a vacuum chamber.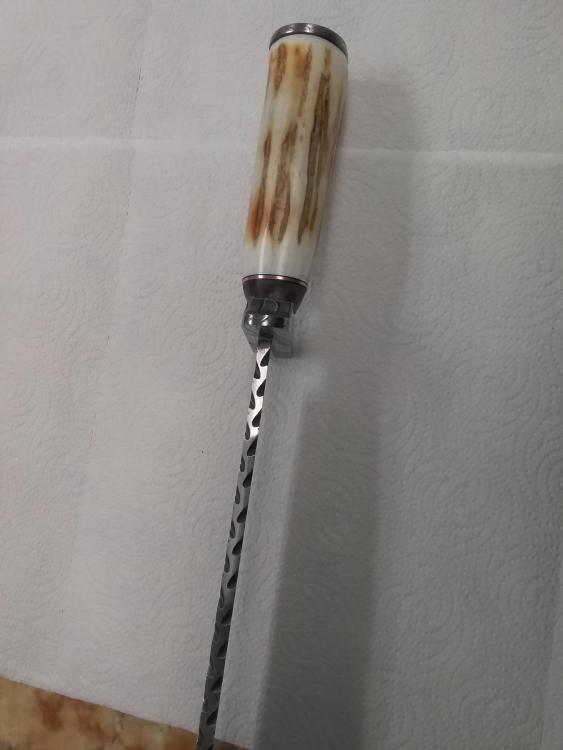
-
Right. The point is you don't want moisture pulled away from the kastolite.